Transcripted Summary
# What Are TestNG Annotations
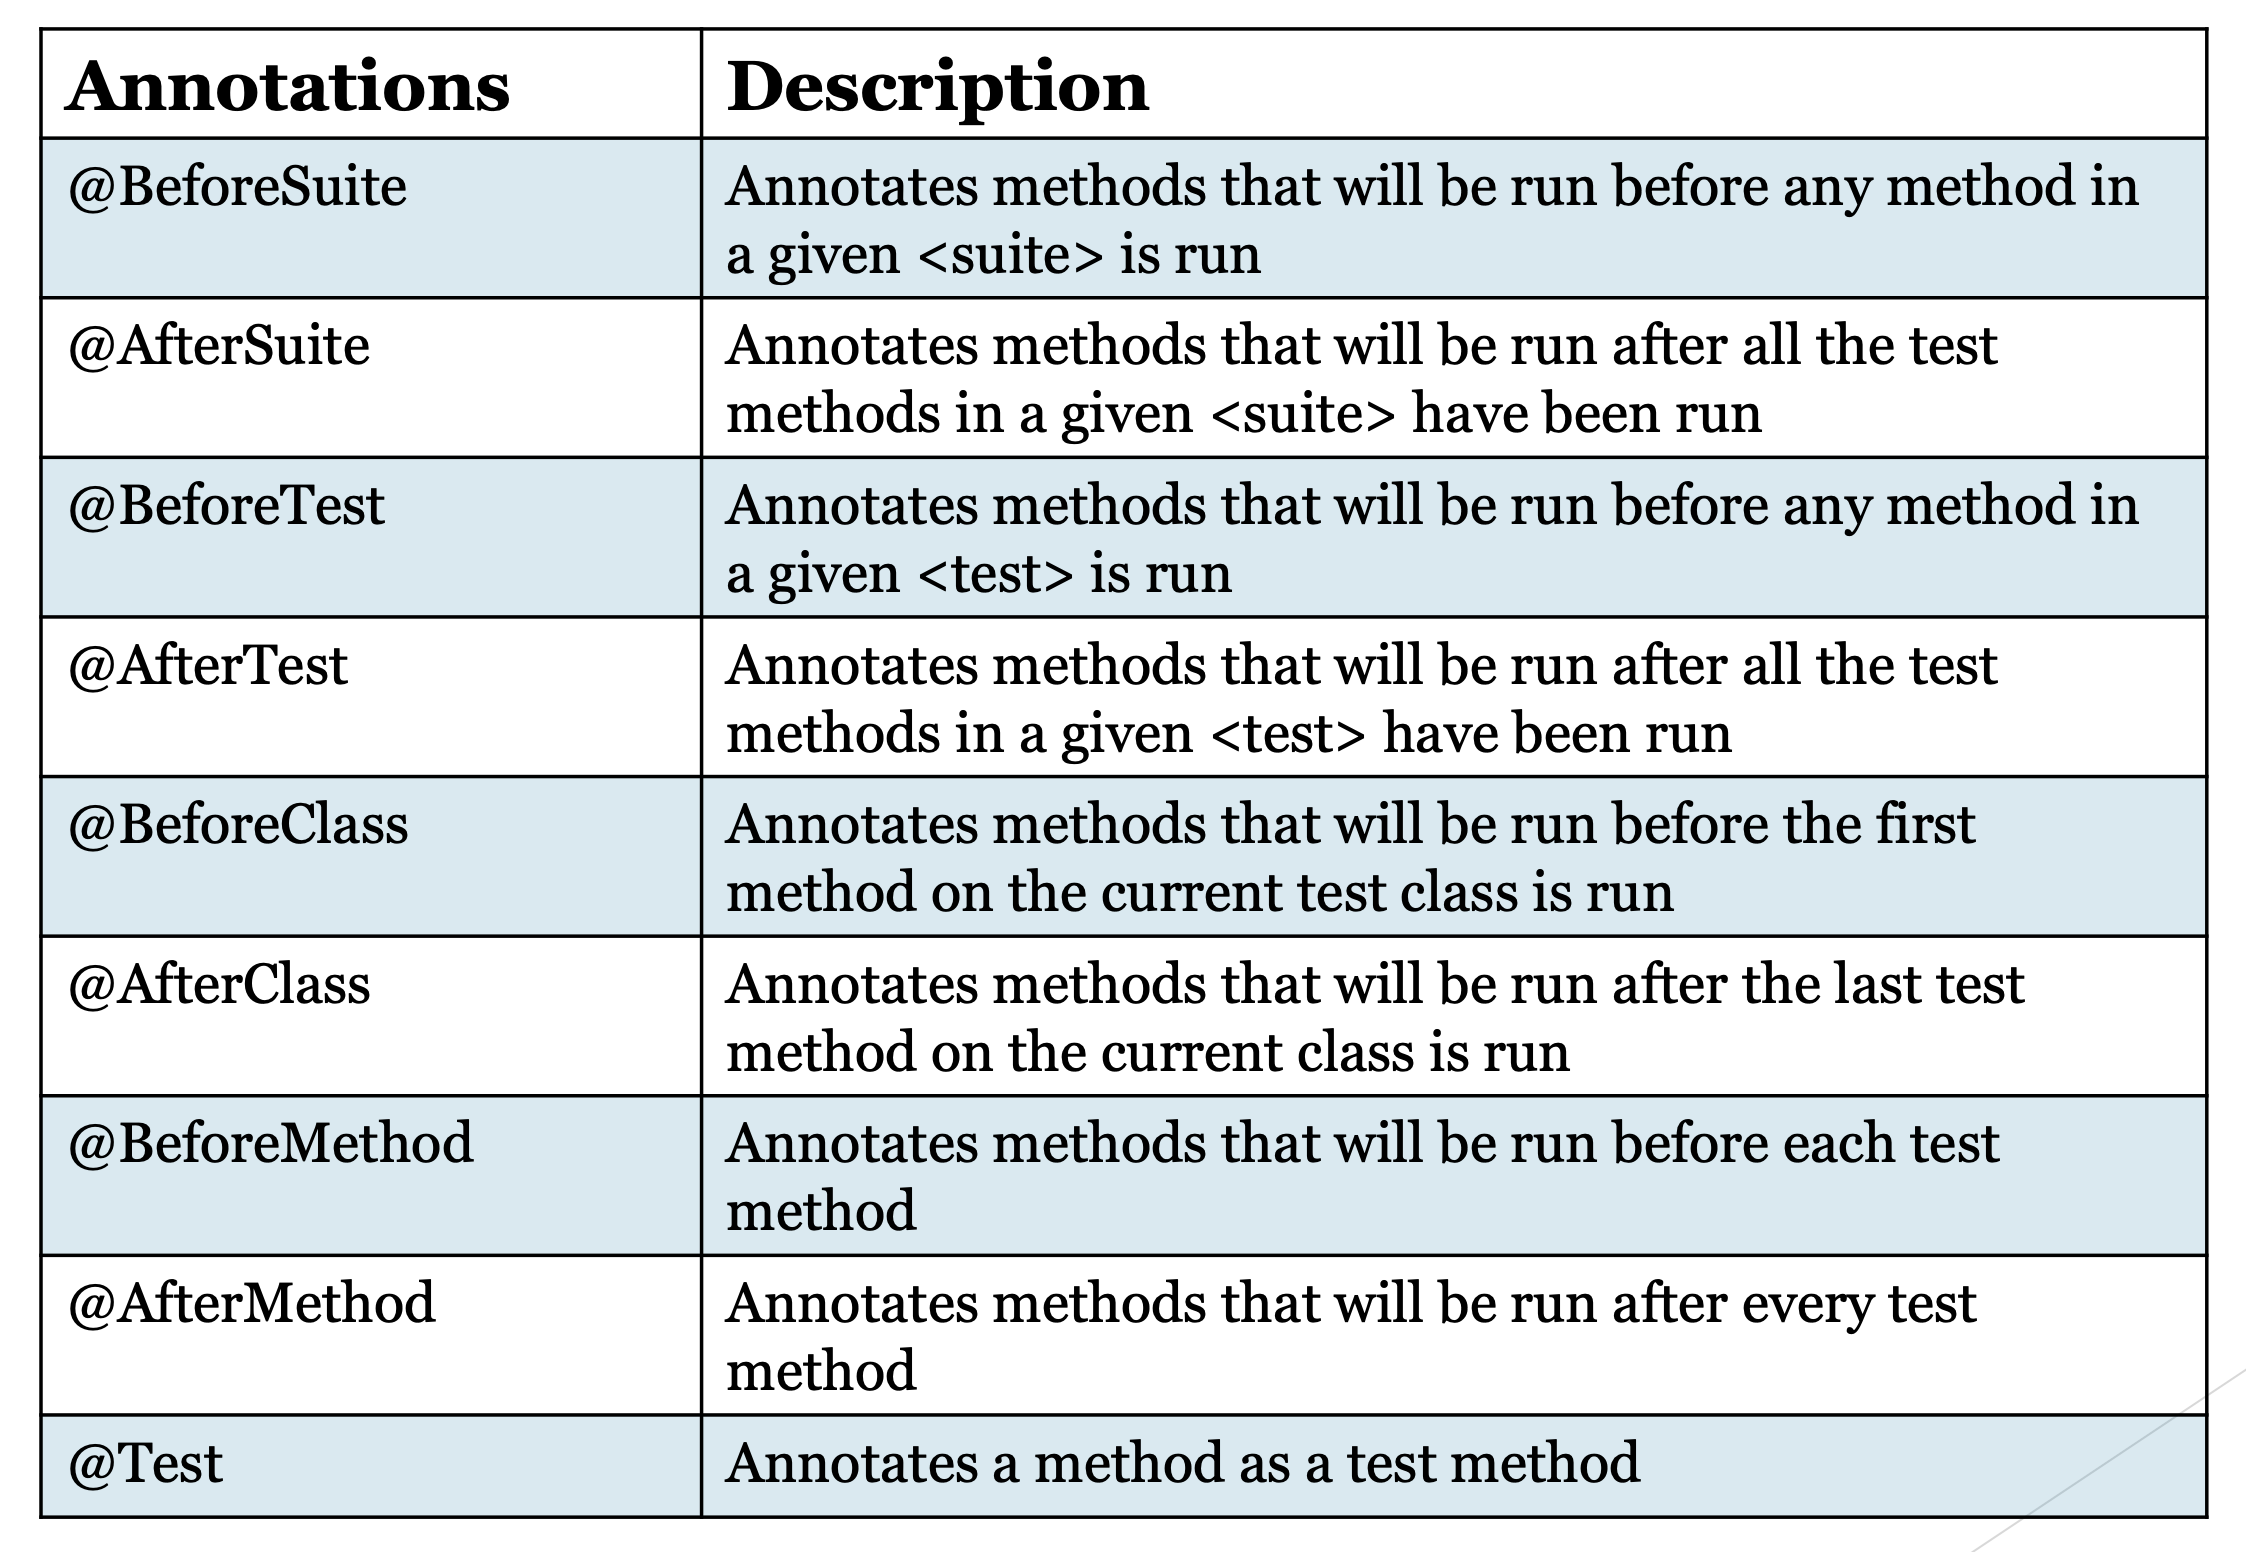
A TestNG annotation is data that has a special meaning for a Java method. It provides information about how the annotation will control the execution order.
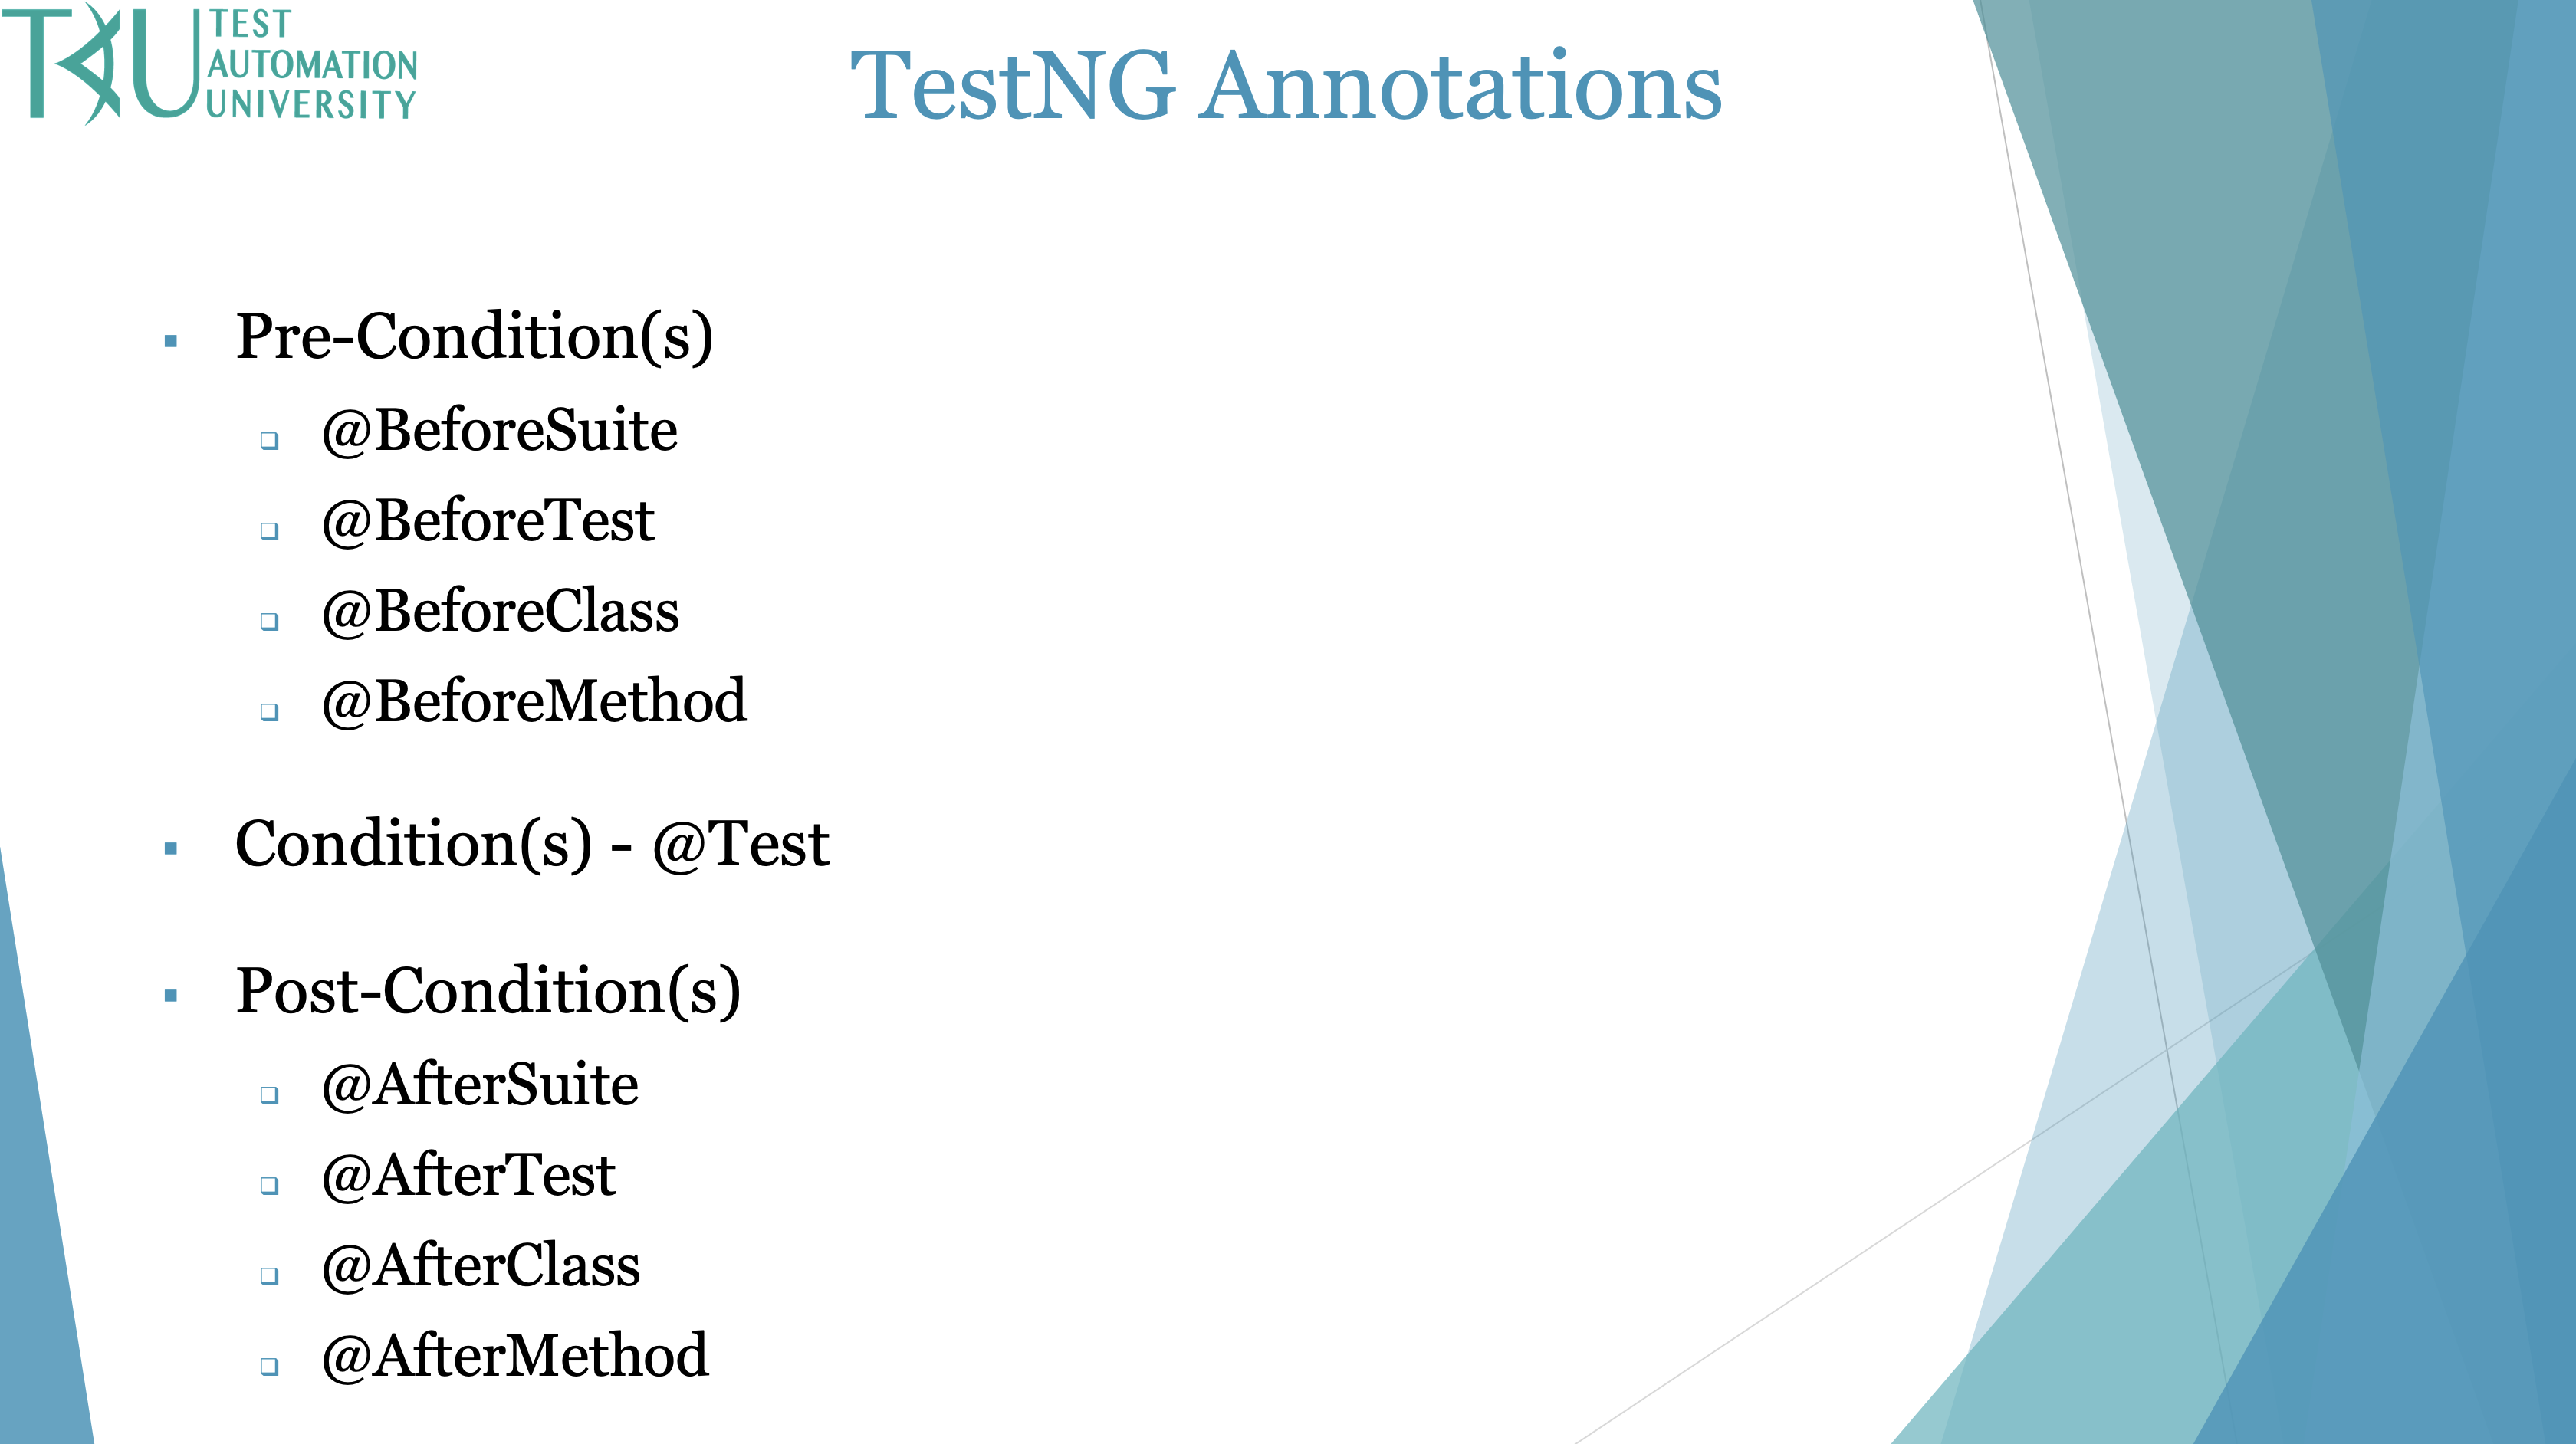
I view TestNG annotations as pre-conditions, conditions, and post-conditions. Our test automation scripts are very similar to manual test cases. Sometimes with manual test cases, there are pre-conditions that must be set up before we start our test. Our test is the condition, and after our test is the post- condition.
It’s the same with automation, we have pre-conditions that must be set up before we test; then we have our test which is the condition; next is the post-condition that is performed after we complete our testing.
Notice the @ symbol (or @ sign). This is short for at a rate which is an accounting term. This symbol is placed in front of every TestNG annotation.
- All of the pre-conditions begin with
@Before. @Testis a key annotation because it performs our test.- Last, we have the post-conditions that all start with
@After.
# How To Add TestNG Annotations
Let’s go to Eclipse.
There is more than one way to add an annotation. The most straightforward way to add an annotation is just to type it on the line above the method you'd like to associate it with.
@BeforeMethod
public void setUp ()
{

}
After typing it, you'll need to import the annotation if it's the first time you're using it in this class. A short cut for importing and organizing our imports is CTRL + SHIFT + O. (If you want to see a list of Eclipse shortcuts select CTRL + SHIFT + L and we see a lot of shortcuts including Organize Imports.)
Another way to add TestNG annotations is to:
- Right click on the package in which the class resides
- Select New
- Select Other
- Type TestNG
- Select TestNG class
- Click Next
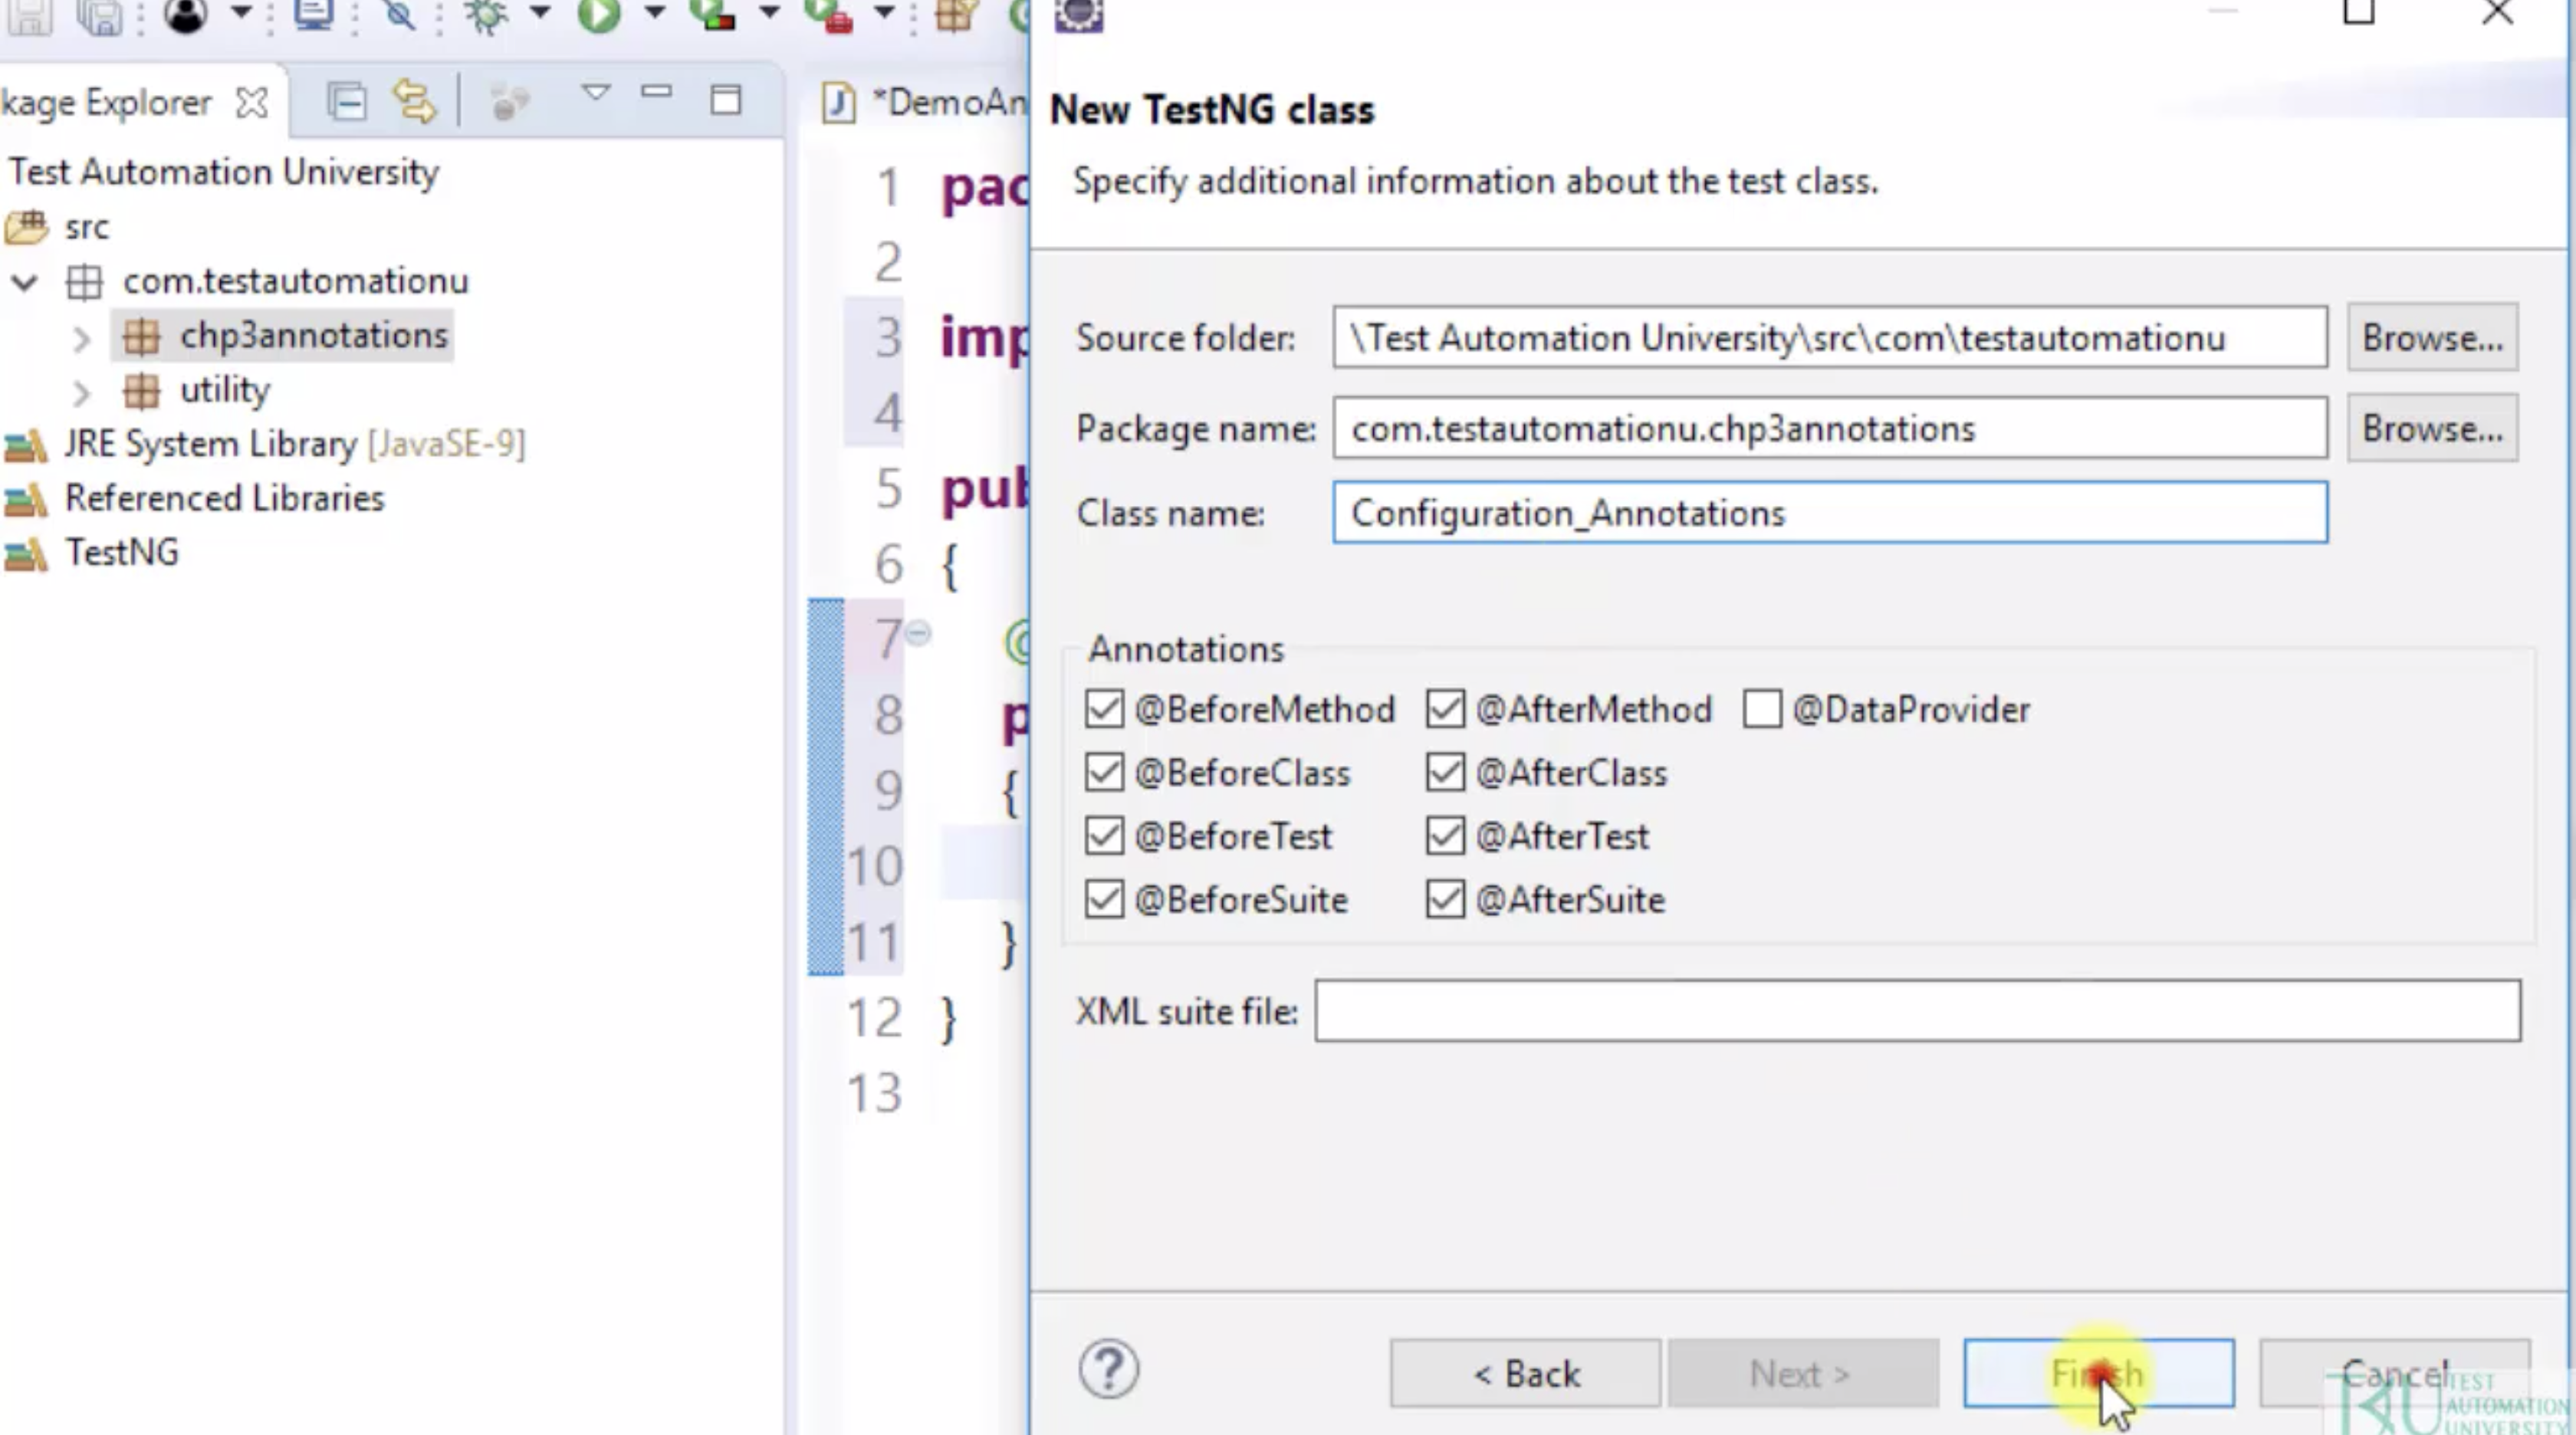
- Select all of the annotations except for DataProvider (we are going to cover DataProvider in a subsequent chapter called Data Driven Testing)
- Change the Class Name to Configuration_Annotations
- Click Finish
# Configuration Annotations
A configuration annotation is an annotation that begins with Before or After. They are called configuration annotations because the Before annotations help us set up variables and configurations before starting test execution, while the After annotations help us clean up everything after executing our test.
If we take a look at the TestNG annotations package, we will see all of the annotations. The configuration annotations start at AfterClass and stop at BeforeTest.
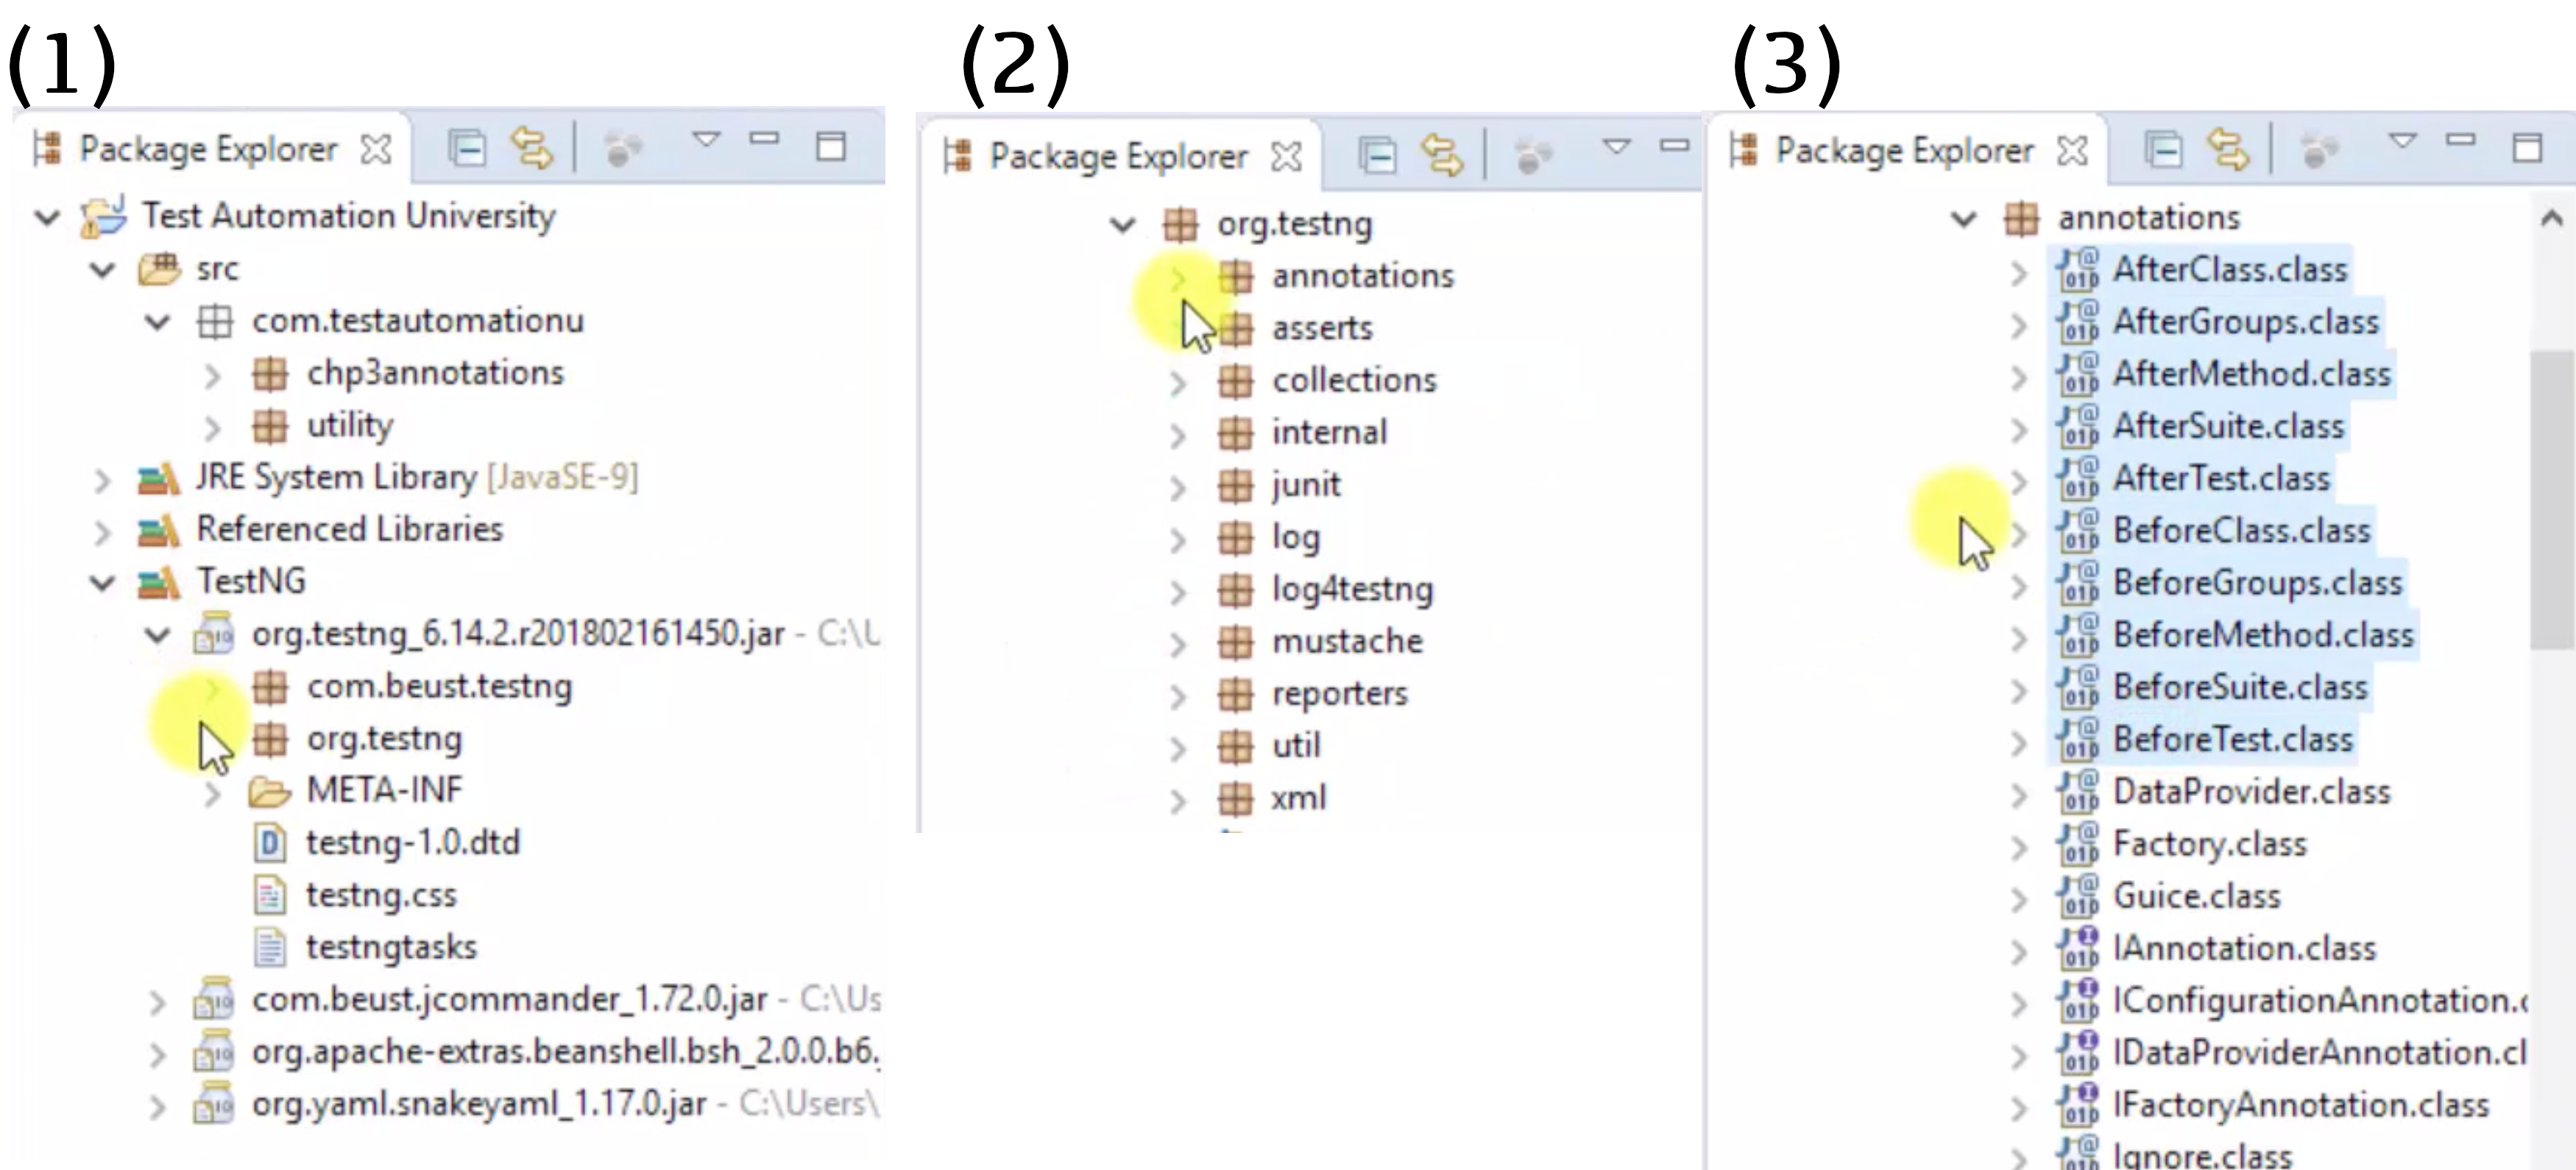
In our editor, the annotations are displayed in order from lowest to highest. Let’s start with the highest level and add some print statements to demonstrate how the annotations can be used.
package com.testautomationu.chp3annotations;

import org.testng.annotations.Test;
import org.testng.annotations.BeforeMethod;
import org.testng.annotations.AfterMethod;
import org.testng.annotations.BeforeClass;
import org.testng.annotations.AfterClass;
import org.testng.annotations.BeforeTest;
import org.testng.annotations.AfterTest;
import org.testng.annotations.BeforeSuite;
import org.testng.annotations.AfterSuite;

public class Configuration_Annotations {

  @BeforeSuite
  public void beforeSuite() {}

  @BeforeTest
  public void beforeTest() {}

  @BeforeClass
  public void beforeClass() {}

  @BeforeMethod
  public void beforeMethod() {}

  @Test
  public void searchCustomer() {}

  @Test
  public void searchProduct() {}

  @AfterMethod
  public void afterMethod() {}

  @AfterClass
  public void afterClass() {}

  @AfterTest
  public void afterTest() {}

  @AfterSuite
  public void afterSuite() {}
}
@BeforeSuite runs before a suite starts. So, let’s use the @BeforeSuite annotated method to set up our system property for the browser.
  @BeforeSuite
  public void beforeSuite()
  {
	System.out.println("Chrome - Set Up System Property");
  }
@AfterSuite runs after all @Test methods within the suite have completed running. So, we'll use the @AfterSuite annotated method to clean up cookies.
  @AfterSuite
  public void afterSuite()
  {
	System.out.println("Chrome - Clean Up All Cookies");
  }
@BeforeTest runs before all tests. We can demonstrate this by using @BeforeTest to open the browser before any tests begin.
  @BeforeTest
  public void beforeTest()
  {
	System.out.println("Open Chrome");
  }
@AfterTest runs after all @Test methods. We can use our @AfterTest method to close the browser after all @Test methods have completed.
  @AfterTest
  public void afterTest()
  {
	System.out.println("Close Chrome");
  }
@BeforeClass runs before a test class starts, so let's use that method to open the test application.
  @BeforeClass
  public void beforeClass()
  {
	System.out.println("Open Test Application");
  }
@AfterClass runs after all @Test methods, so we will use that method to close the test application.
  @AfterClass
  public void afterClass()
  {
	System.out.println("Close Test Application");
  }
Next, we have @BeforeMethod which runs before each @Test method. Let's demonstrate this by having our @BeforeMethod sign into the application before each test runs.
  @BeforeMethod
  public void beforeMethod()
  {
	System.out.println("Sign In");
  }
@AfterMethod runs after each @Test method. We can use this to sign out of our application after each test finishes.
  @AfterMethod
  public void afterMethod()
  {
	System.out.println("Sign Out");
  }
Next is the @Test annotation. After all Before methods have executed, the @Test methods will run. We can have as many @Test annotations as we want. Let's add a few here.
  @Test
  public void searchCustomer()
  {
	  System.out.println("Search For Customer");
  }

  @Test
  public void searchProduct()
  {
	  System.out.println("Search For Product");
  }
The annotations can be placed in any order in the editor because TestNG identifies the methods by looking up the annotation. For example, we can place the @BeforeSuite method anywhere in this editor and it will always execute first.
# TestNG Annotations Execution Flow
The execution flow depends on our annotations. Therefore, the methods execute according to the rank of each annotation. Let’s run!
package com.testautomationu.chp3annotations;

import org.testng.annotations.Test;
import org.testng.annotations.BeforeMethod;
import org.testng.annotations.AfterMethod;
import org.testng.annotations.BeforeClass;
import org.testng.annotations.AfterClass;
import org.testng.annotations.BeforeTest;
import org.testng.annotations.AfterTest;
import org.testng.annotations.BeforeSuite;
import org.testng.annotations.AfterSuite;

public class Configuration_Annotations {

  @BeforeSuite
  public void beforeSuite()
  {
	System.out.println("Chrome - Set Up System Property");
  }

  @BeforeTest
  public void beforeTest()
  {
	System.out.println("Open Chrome");
  }

  @BeforeClass
  public void beforeClass()
  {
	System.out.println("Open Test Application");
  }

  @BeforeMethod
  public void beforeMethod()
  {
	System.out.println("Sign In");
  }

  @Test
  public void searchCustomer()
  {
	System.out.println("Search For Customer");
  }

  @Test
  public void searchProduct()
  {
	System.out.println("Search For Product");
  }

  @AfterMethod
  public void afterMethod()
  {
	System.out.println("Sign Out");
  }

  @AfterClass
  public void afterClass()
  {
	System.out.println("Close Test Application");
  }

  @AfterTest
  public void afterTest()
  {
	System.out.println("Close Chrome");
  }

  @AfterSuite
  public void afterSuite()
  {
	System.out.println("Chrome - Clean Up All Cookies");
  }
}
On the console, we see the first few print statements in the following order:
Chrome – Set Up System Property

Open Chrome

Open Test Application

Sign In

Search For Customer

Sign Out
This shows that the annotations have been executed in the following order:
@BeforeSuite@BeforeTest@BeforeClass@BeforeMethod@Test@AfterMethod
Here’s the interesting part, the @BeforeMethod always runs before the @Test method. In this case, the first @Test method prints "Search For Customer" which has a @Test annotation. And the @AfterMethod always runs after the @Test method. In this demo, the @AfterMethod prints "Sign Out".
At this point, we have finished searching for a customer, however, Chrome is still set up, Chrome is still open, and the application remains open but we are not signed into the application. Now we start over with the @BeforeMethod, which is a pre-condition to allow us to sign in before moving on to the next @Test to search for a product.
Here's an update on the print statements:
Chrome – Set Up System Property

Open Chrome

Open Test Application

Sign In

Search For Customer

Sign Out

Sign In

Search For Product

Sign Out
This shows that the annotations have been executed in the following order:
@BeforeSuite@BeforeTest@BeforeClass@BeforeMethod@TestsearchCustomer@AfterMethod@BeforeMethod@TestsearchProduct@AfterMethod
This shows us how TestNG executes the pre-condition, the condition, and the post-condition based on our annotations.
Next we see that the @AfterClass, @AfterTest, and @AfterSuite annotations are executed.
Chrome – Set Up System Property

Open Chrome

Open Test Application

Sign In

Search For Customer

Sign Out

Sign In

Search For Product

Sign Out

Close Test Application

Close Chrome

Clean Up All Cookies
@BeforeSuite@BeforeTest@BeforeClass@BeforeMethod@TestsearchCustomer@AfterMethod@BeforeMethod@TestsearchProduct@AfterMethod@AfterClass@AfterTest@AfterSuite
# Which Annotation(s) Do We Choose For Testing
The annotations we choose for testing depends on our test requirements. Do we need our test to set up a pre-condition before every test method and clean up with a post-condition after every test method? Or do we need one pre-condition before all of the test methods and one post-condition after all test methods?
Let’s walk through our test application then I will show you the difference using two pairs of configuration annotations and three test methods.
The test requirement is to sign in with username:Admin and password:admin123 then click the login button. After signing in, we click the Admin tab then search for a user. Finally, we sign out.
Our code uses a @BeforeMethod annotation and @AfterMethod annotation. First, we setup the test, then sign into the application, after signing into the application, we search for a user and sign out. After signing out we teardown our test which is close the browser.
package com.testautomationu.chp3annotations;
import org.openqa.selenium.By;
import org.openqa.selenium.WebDriver;
import org.openqa.selenium.WebElement;
import org.openqa.selenium.chrome.ChromeDriver;
import org.testng.annotations.AfterMethod;
import org.testng.annotations.BeforeMethod;
import org.testng.annotations.Test;

import com.testautomationu.utility.Highlighter;

public class BM_AM_OrangeHRM
{
	WebDriver driver;

	@BeforeMethod
	public void setUp ()
	{
		System.setProperty("webdriver.chrome.driver", "C:\\Users\\Rex Allen Jones II\\Downloads\\Drivers\\chromedriver.exe");
		driver = new ChromeDriver ();
		driver.manage().window().maximize();

		driver.get("https://opensource-demo.orangehrmlive.com/");
		System.out.println("1. Open Chrome & Application");
	}

	@Test
	public void signIn ()
	{
		WebElement textUsername = driver.findElement(By.id("txtUsername"));
		Highlighter.highlightElement(driver, textUsername);
		textUsername.sendKeys("Admin");

		WebElement textPassword = driver.findElement(By.id("txtPassword"));
		Highlighter.highlightElement(driver, textPassword);
		textPassword.sendKeys("admin123");

		WebElement buttonLogin = driver.findElement(By.id("btnLogin"));
		Highlighter.highlightElement(driver, buttonLogin);
		buttonLogin.click();

		System.out.println("2. Sign In");
	}

	@Test
	public void userSearch ()
	{
        WebElement menuAdmin = driver.findElement(By.id("menu_admin_viewAdminModule"));
        Highlighter.highlightElement(driver, menuAdmin);
        menuAdmin.click();

        WebElement textUserName = driver.findElement(By.id("searchSystemUser_userName"));
        Highlighter.highlightElement(driver, textUserName);
        textUserName.sendKeys("Admin");

        WebElement buttonSearch = driver.findElement(By.id("searchBtn"));
        Highlighter.highlightElement(driver, buttonSearch);
        buttonSearch.click();

        System.out.println("3. Search For User");
	}

	@Test
	public void userSignOut ()
	{
        WebElement linkWelcome = driver.findElement(By.id("welcome"));
        Highlighter.highlightElement(driver, linkWelcome);
        linkWelcome.click();

        WebElement linkLogout = driver.findElement(By.xpath("//div[@id='welcome-menu']/descendant::a[contains(@href,'logout')]"));
        Highlighter.highlightElement(driver, linkLogout);
        linkLogout.click();

        System.out.println("4. Sign Out");
	}

	@AfterMethod
	public void tearDown ()
	{
		System.out.println("5. Close Chrome & Application");
		driver.quit();
	}
}
When we run this, we see two failures: userSearch and userSignOut.
If we look at the output of the first test, signIn, we have:
1. Open Chrome & Application
2. Sign In
5. Close Chrome & Application
- Step 1 shows we opened Chrome and the application
- Step 2 shows we signed into the application
- Step 3 is missing
- Step 4 is missing
- Step 5 shows we close Chrome and the application
Let’s look at the output for the next test userSearch.
1. Open Chrome & Application
5. Close Chrome & Application
- Step 1 shows we opened Chrome and the application
- Step 2 is missing
- Step 3 is missing
- Step 4 is missing
- Step 5 shows we close Chrome and the application
Why were steps 2 through 4 skipped? The test script skipped those steps because we cannot open Chrome and the application then search for a user because we have not signed into the application yet. The console shows:
Failed: userSearch. Unable to locate element. It could not locate the Admin tab to begin searching for a user.
Same with the userSignOut. Our test script could not sign out of the application because it never signed into the application. Steps 2, 3, and 4 are missing. The console shows:
FAILED: userSignOut
With this test requirement, we must use @BeforeClass/@AfterClass or @BeforeTest/@AfterTest so that our code does not open the application before every test method and close the application after every test method.
Now, watch what happens when we use the same code but change the configuration annotations to @BeforeClass and @AfterClass.
	@BeforeClass
	public void setUp ()
	{
		System.setProperty("webdriver.chrome.driver", "C:\\Users\\Rex Allen Jones II\\Downloads\\Drivers\\chromedriver.exe");
		driver = new ChromeDriver ();
		driver.manage().window().maximize();

		driver.get("https://opensource-demo.orangehrmlive.com/");
		System.out.println("1. Open Chrome & Application");
	}
	@AfterClass
	public void tearDown ()
	{
		System.out.println("5. Close Chrome & Application");
		driver.quit();
	}
Now if we run this, we see that all tests pass and the console shows all 5 steps.
TestNG provides a lot of annotations for our test requirements. This is a list of the annotations.