

Transcripted Summary
In this chapter, we will publish the contract and check the matches that are possible.
Pact Broker
To set up a local pact broker, navigate to the pact-foundation github:
https://github.com/pact-foundation/pact_broker#to-have-a-play-around-on-your-local-machine
Let's follow the instructions. I already have packages ruby and bundle installed on my laptop. Now I just need to clone the repository into a new directory with git-clone and open the “pact_broker” example folder.
git clone git@github.com:pact-foundation/pact_broker.git && cd pact_broker/example
Now run bundle install and execute a bundle command to start the Ruby webserver interface on port 8080.
bundle install
bundle exec rackup -p 8080
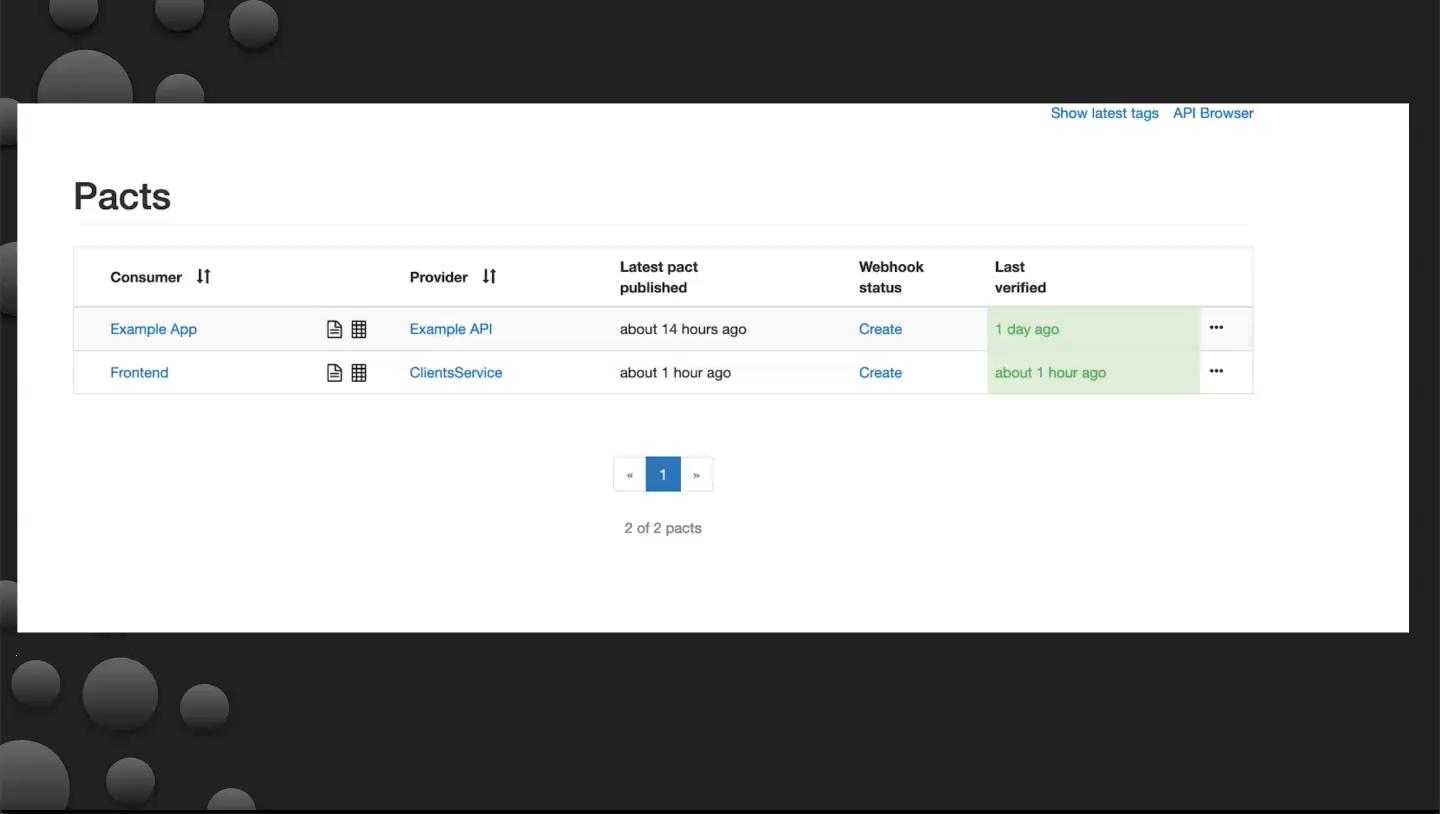
The pact broker can now be viewed locally at localhost:8080/groups/Example App/.
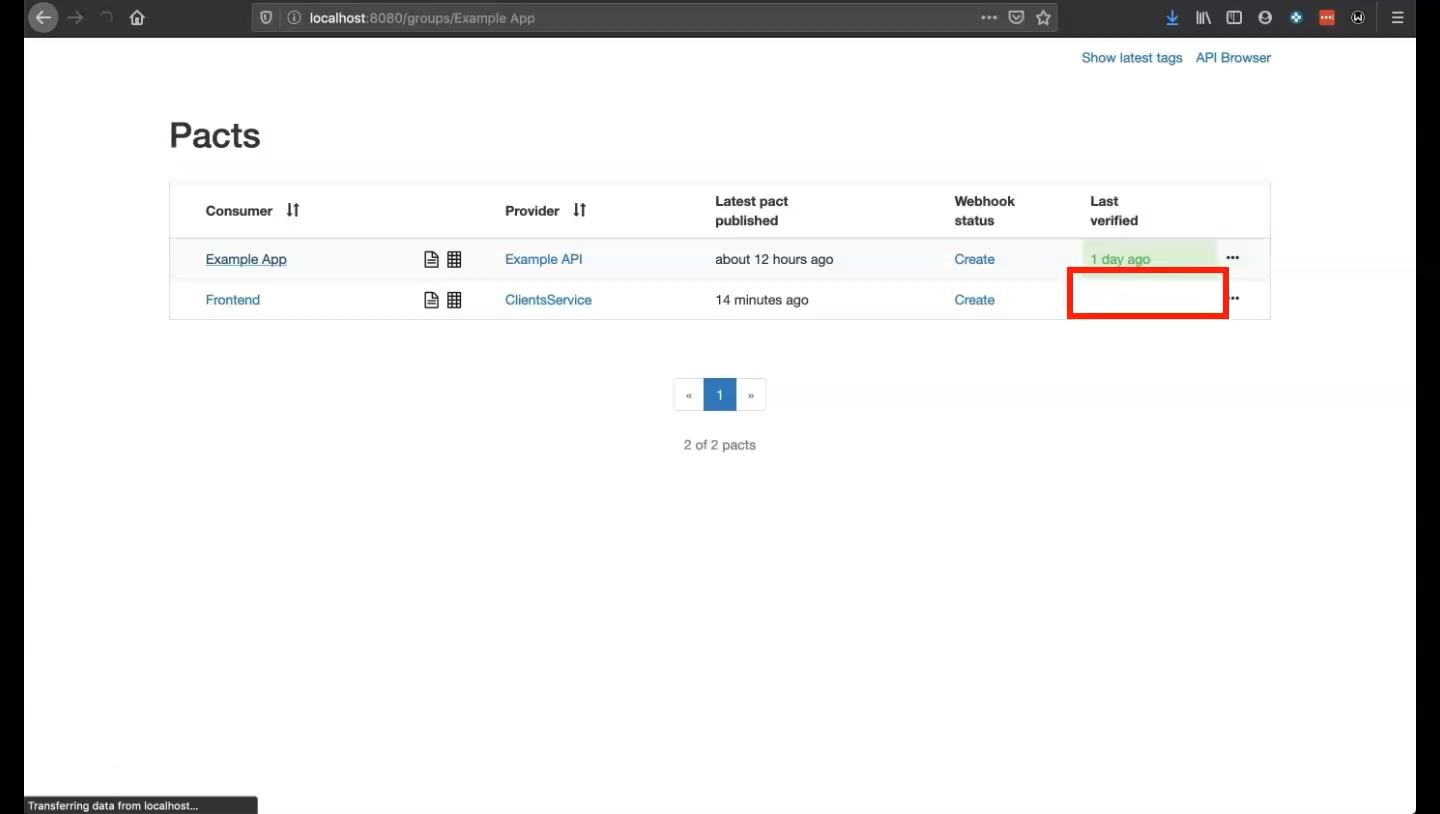
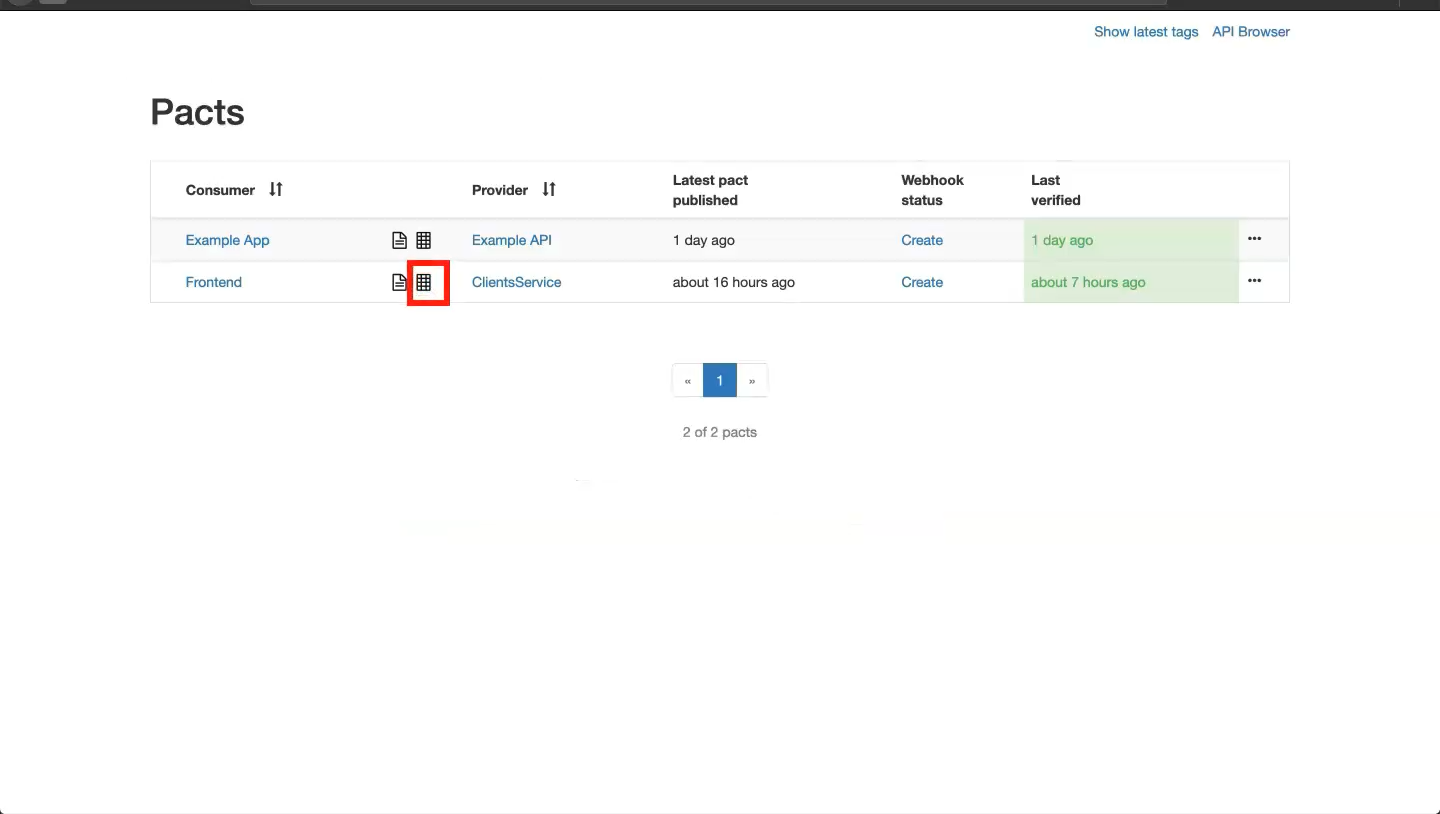
Here we see that all of our Pacts have been published ahead of the front-end and client service contracts. Through this Pact flow we see that the contract has been published. Note that the status of our contracts is currently empty. This is because the provider verification still needs to be run and results need to be published. To view the contract, click on the icon that is highlighted:
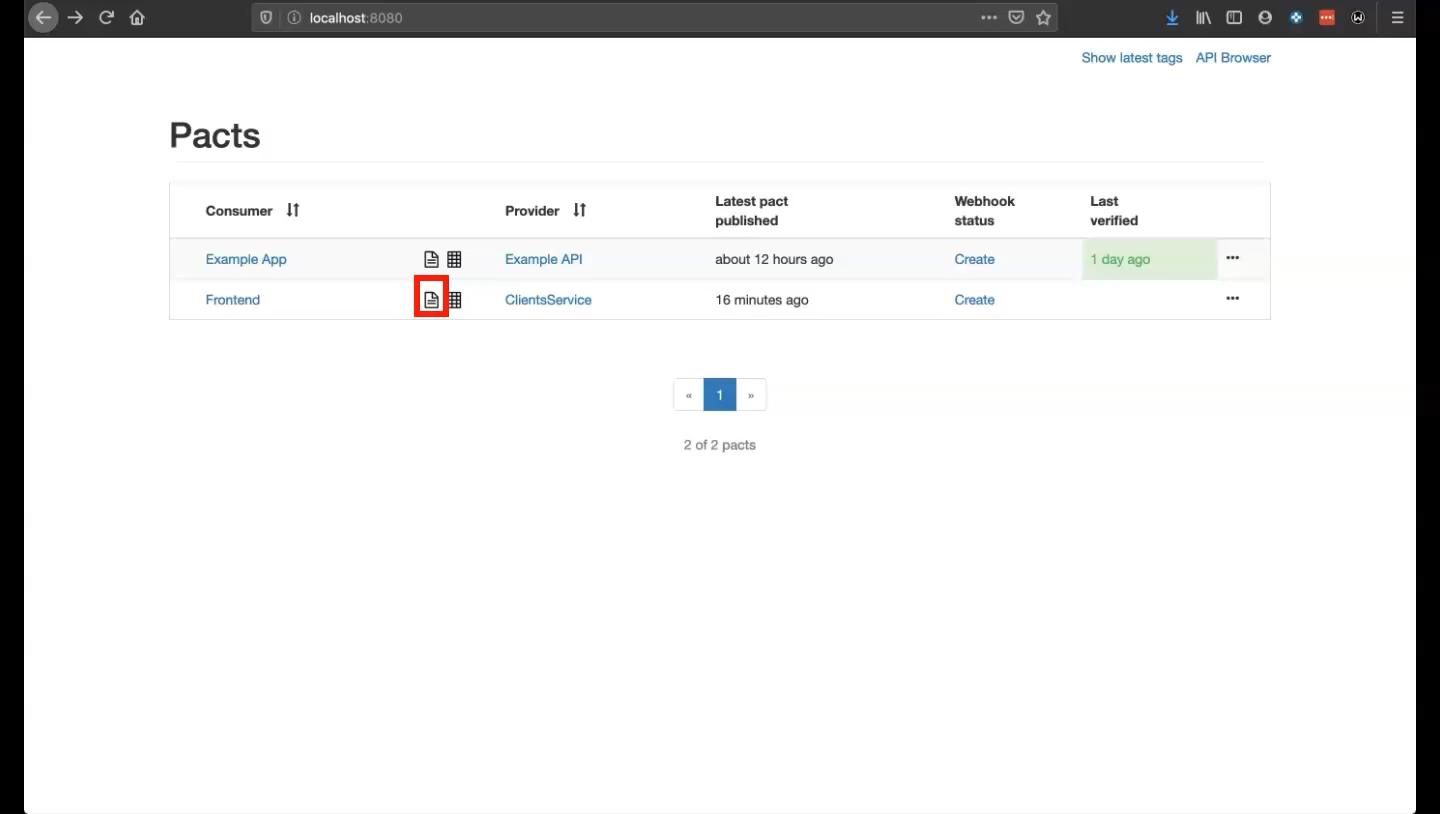
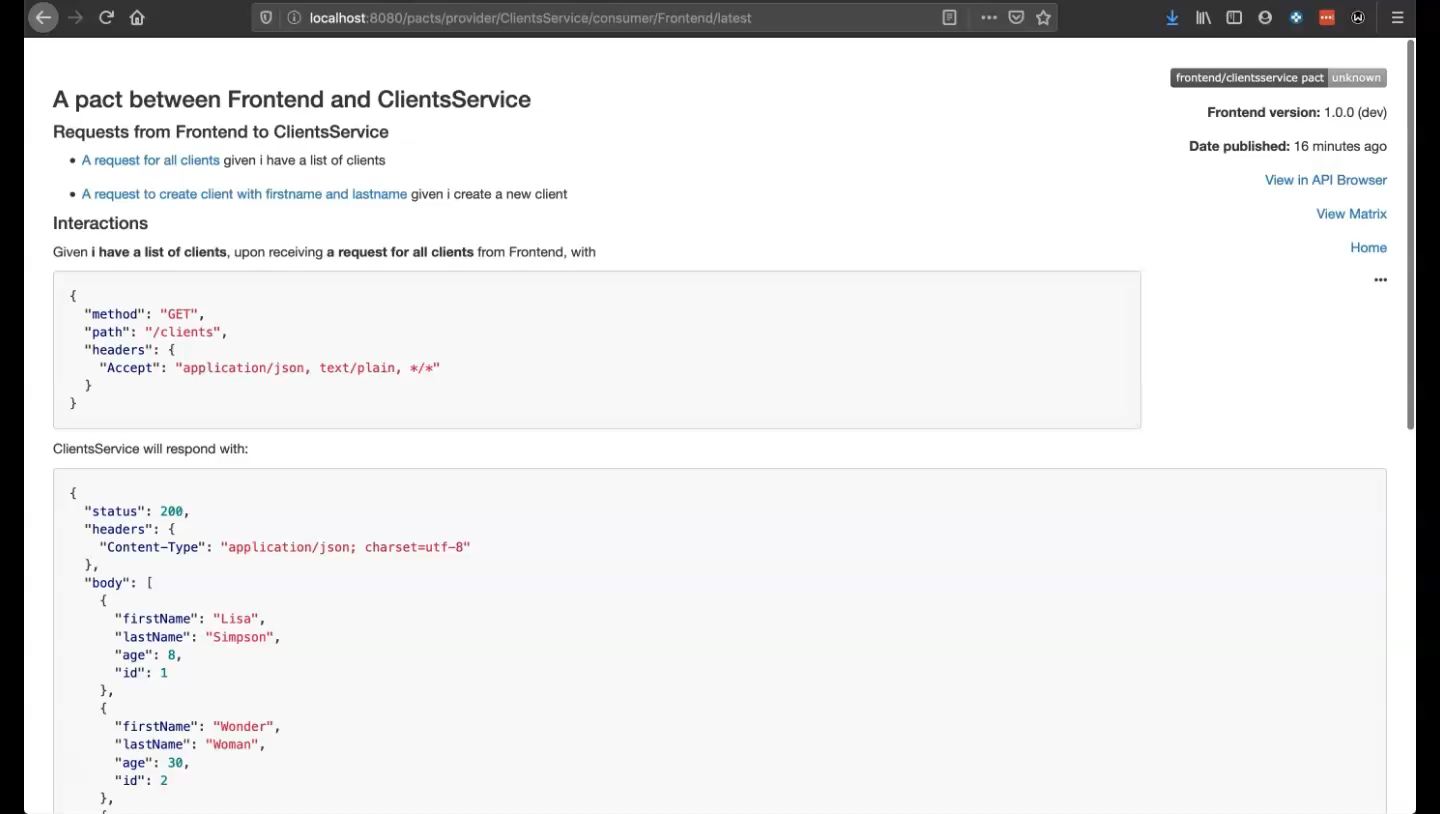
This will display the Pact that was created between the front-end and the client service.
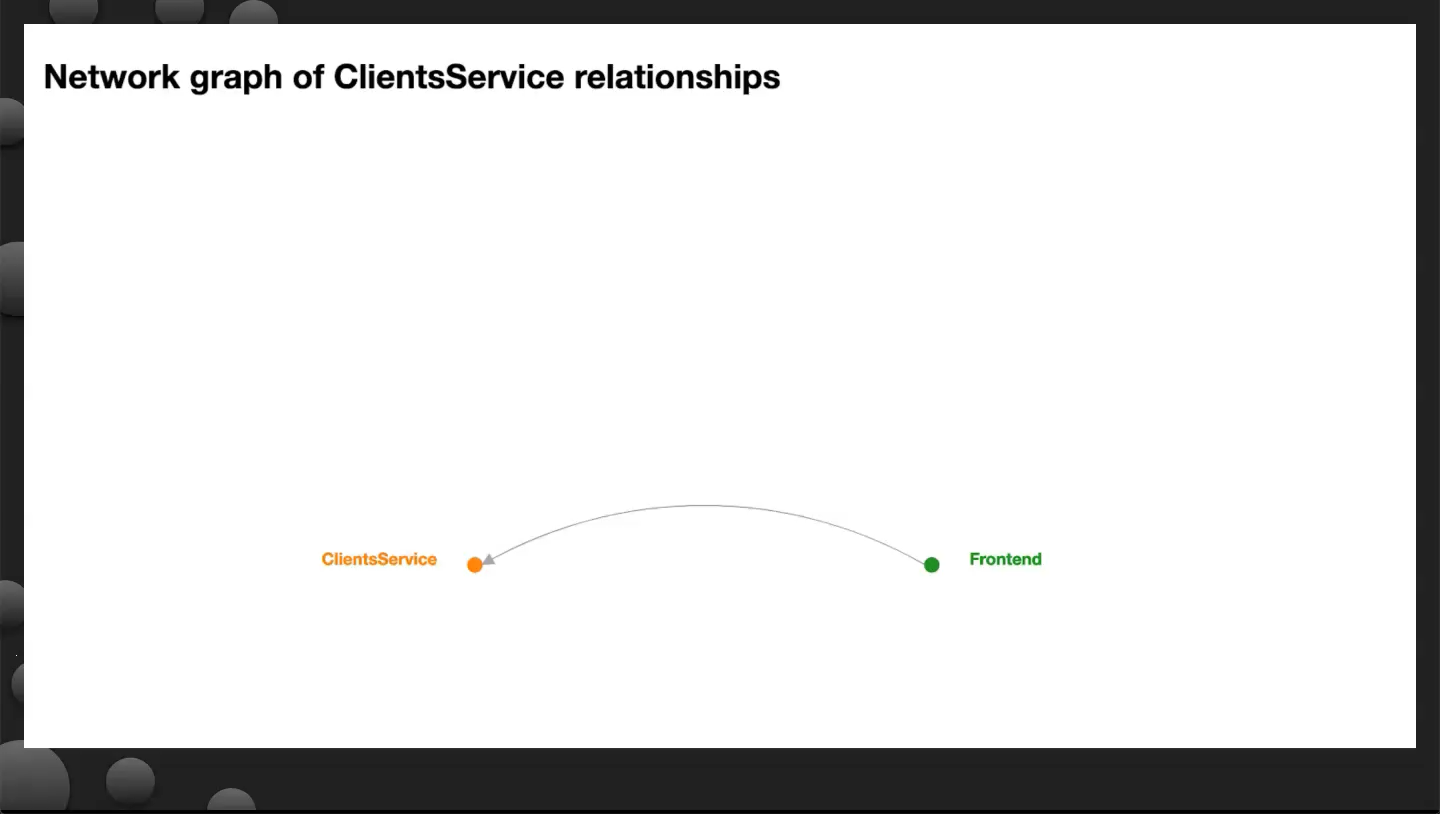
To view the services network graph, click on the highlighted icon(s) to display the network between services:
In this case the services network is simply between ClientService and Frontend.

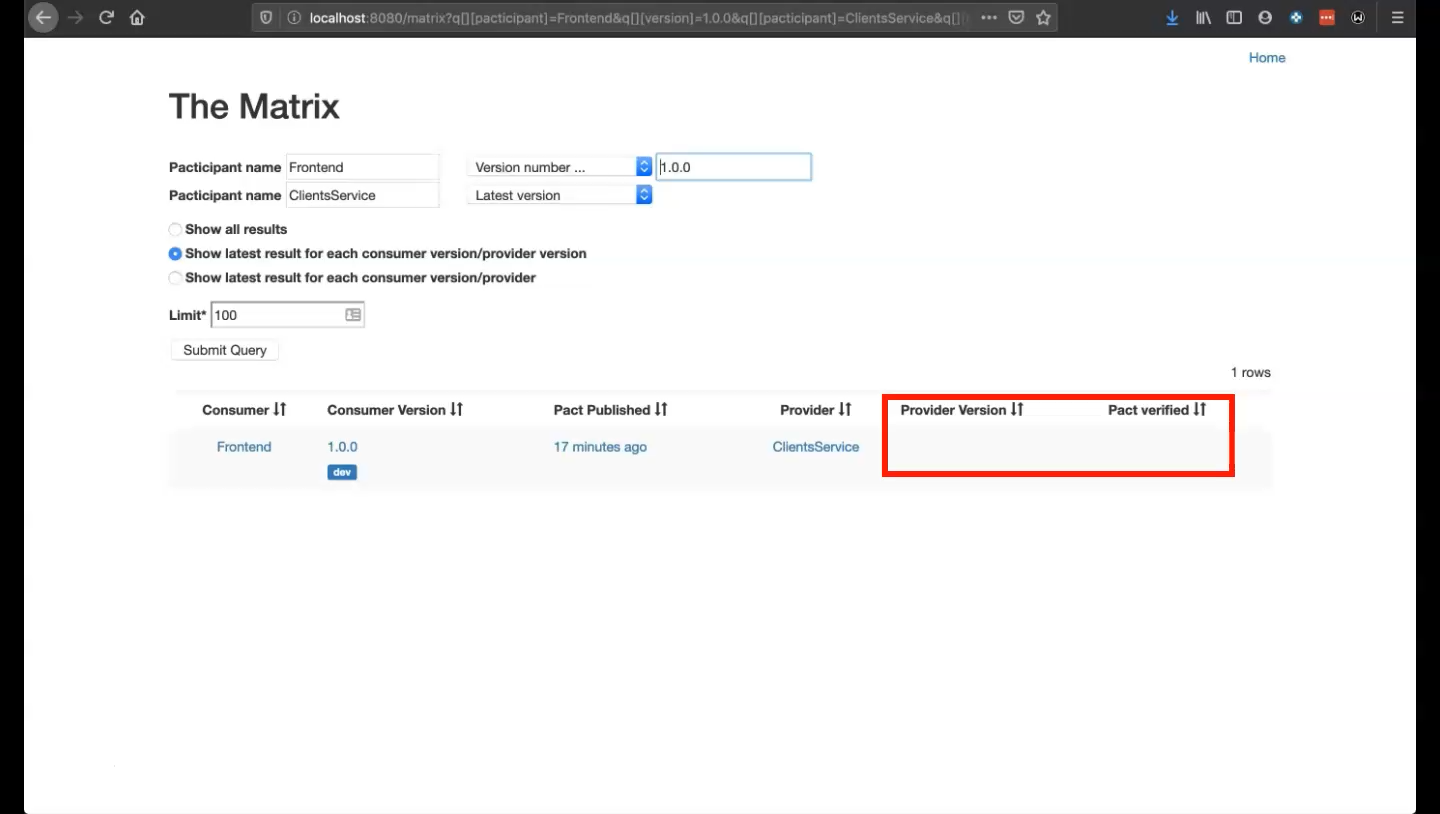
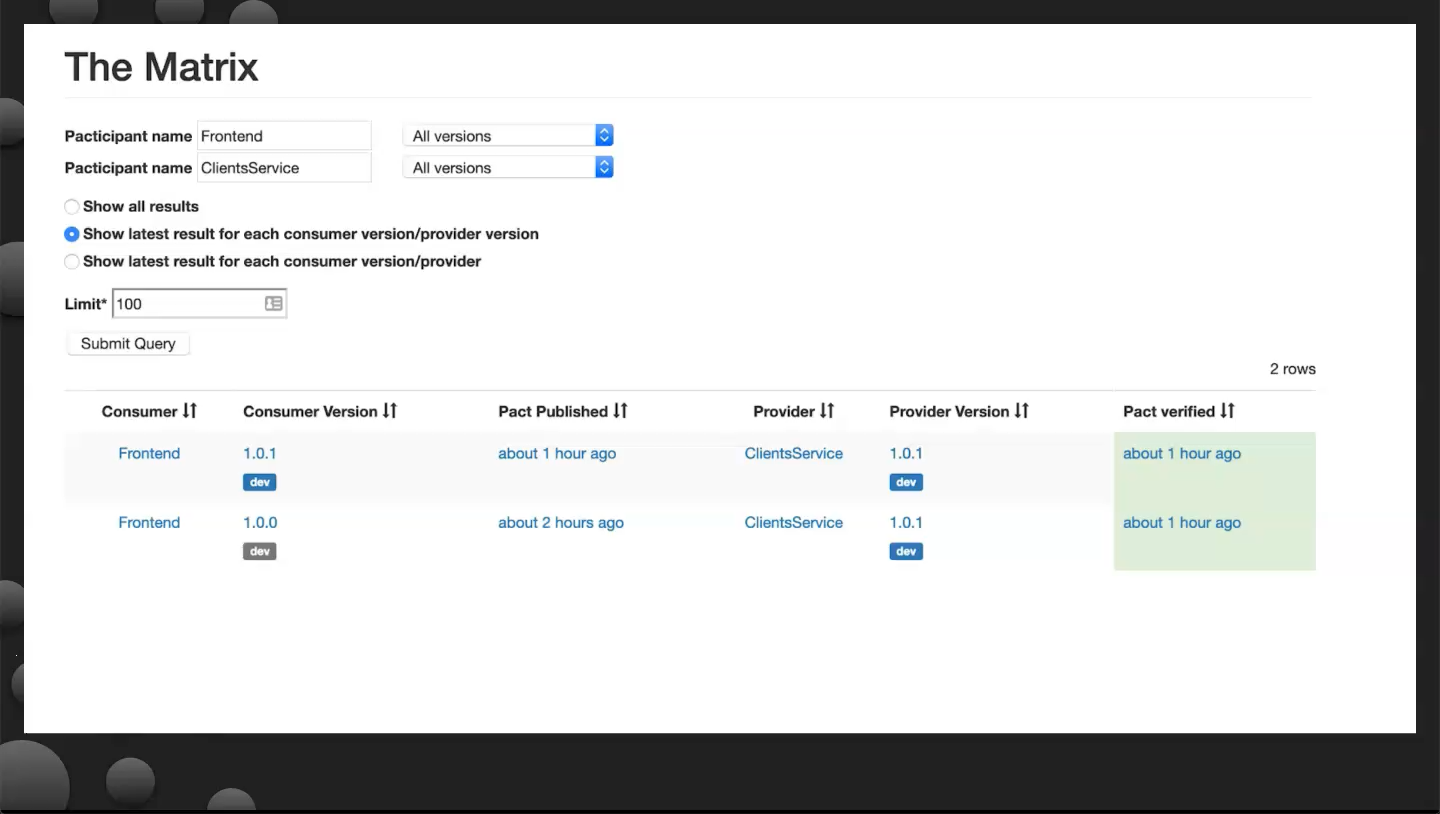
To view the matrix, click on the highlighted icon:
This view shows the consumer, consumer version, Pact publishing date, provider, and provider version. Right now the Pact verification date is empty because we haven't published it yet.
Scripts, Contract Publishing and Verification
Now let’s explore script creation, how contracts are published from the consumer, and how provider verification runs.
Return to the project and create a new file inside of the helpers folder called publish.js. This will become the script to publish the contract in our Pact broker.

NOTE
Docker can be used to create the Pact broker as well. For the purposes of this course we will use the local Pact broker only.
let publisher = require("@pact-foundation/pact-node")
let path = require("path")

let opts = {
   pactFilesOrDirs: [path.resolve(process.cwd(), "__tests__/contract/pacts")],
   pactBroker: "http://localhost:8080",
   consumerVersion: "1.0.1",
   providerVersion: "1.0.1",
   tags: "dev"
}

publisher.publishPacts(opts)
Once again, define Pact as our publisher and set path parameters. Options opts created here will include all of the configuration information needed to publish the contracts. Next, specify where the Pacts are saved. On the consumer side contracts are saved to the folder “tests/contract/pacts”. We need to specify the URL of our Pact broker with pactBroker as well as the consumerVersion and providerVersion of the Pact that is published on our Pact broker. The provider will use this version information to find the contract to be verified. Finally, specify the tags that the provider will use to find contracts. Tags are typically used to specify the environment that a contract is applicable to. Finally, invoke publishPacts from publisher passing the options in opt.
NOTE
A Pact broker is not required. Contracts can be saved to your own repo and the provider will be able to reference them from there.
Now contracts can be published after being generated from the consumer side. Open package.json and create the following script:
{
 "name": "tau-pact-nodejs-course",
 "version": "1.0.0",
 "description": "A simple Nodejs + jest project configuring contract tests with PactJS",
 "main": "src/index.js",
 "scripts": {
   "consumer": "node src/consumerService.js",
   "provider": "node src/providerService.js",
   "test:consumer": "jest __tests__/contract/consumer --runInBand --setupFiles ./__tests__/helpers/pactSetup.js --setupTestFrameworkScriptFile=./__tests__/helpers/pactTestWrapper.js",
   "test:provider": "jest __tests__/contract/provider --runInBand --force-exit",
   "publish:contract": "node ./__tests__/helpers/publish.js"
 },
 "repository": {
   "type": "git",
   "url": "https://github.com/rafaelaazevedo/tau-pact-nodejs-course.git"
 },
 "keywords": [
   "nodejs",
   "contract-tests",
   "pactjs",
   "pact",
   "tutorial",
   "course",
   "tau"
 ],
 "author": "Rafaela Azevedo",
 "license": "MIT",
 "bugs": {
   "url": "https://github.com/rafaelaazevedo/tau-pact-nodejs-course/issues"
 },
 "homepage": "https://github.com/rafaelaazevedo/tau-pact-nodejs-course#readme",
 "devDependencies": {
   "axios": "^0.19.0",
   "body-parser": "^1.19.0",
   "cors": "^2.8.5",
   "eslint": "^6.8.0",
   "express": "^4.17.1",
   "jest": "^25.1.0"
 },
 "jest": {
   "testEnvironment": "node"
 }
}
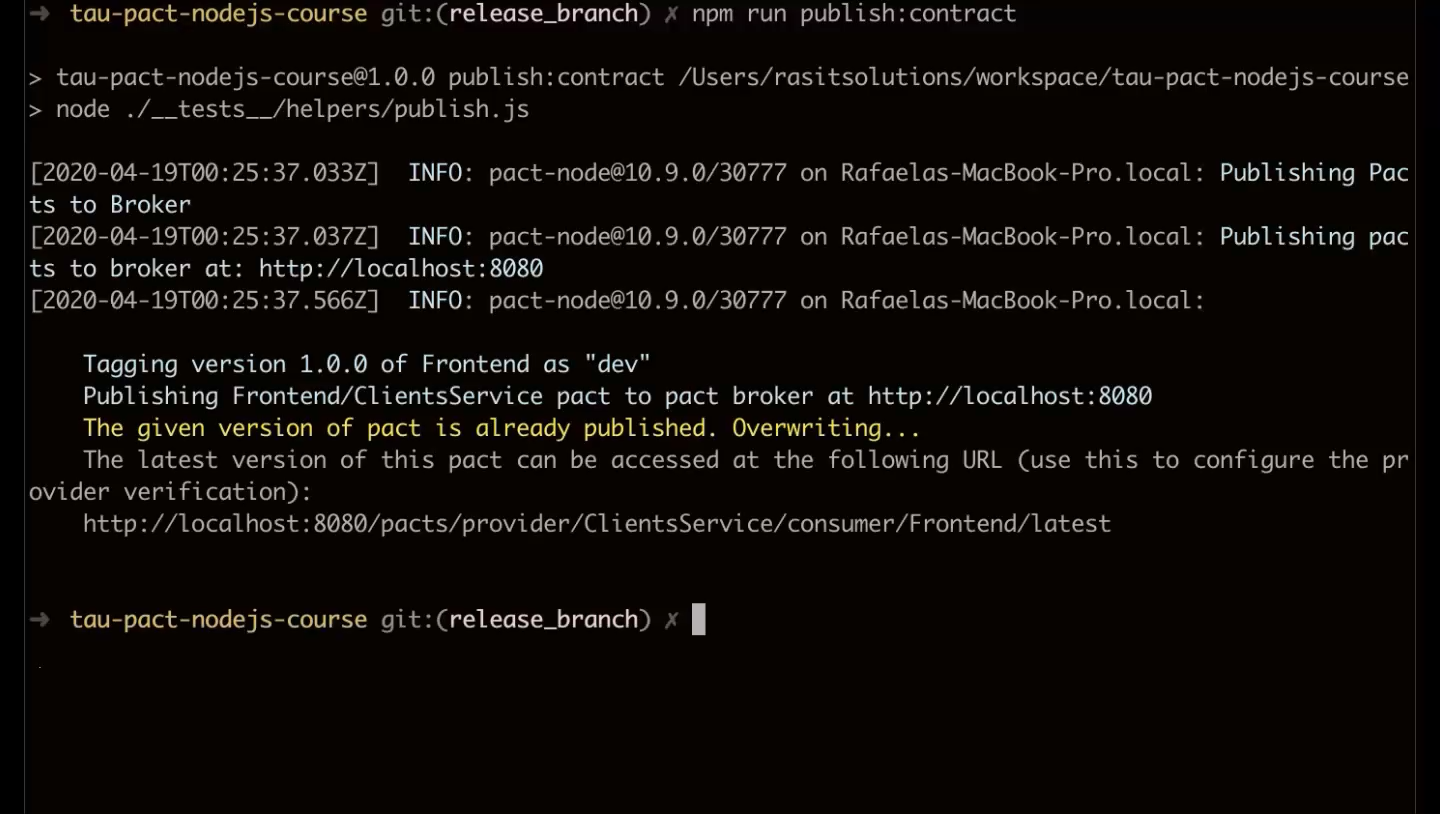
Back in the terminal, run the following command:
npm run publish:contract
Some modifications to ClientsProvider.spec.js are necessary:
const path = require("path")
const { Verifier } = require("@pact-foundation/pact")
const { server, importData } = require("../../../src/provider")
const SERVER_URL = "http://localhost:8081"

server.listen(8081, () => {
   importData()
   console.log(`Clients Service listening on ${SERVER_URL}`)
 })

  describe("Clients Service Verification", () => {
   it("validates the expectations of Client Service", () => {
 	let opts = {
       	provider: "Clients Service",
       	logLevel: "DEBUG",
       	providerBaseUrl: SERVER_URL,
       	pactUrls: ['http://localhost:8080/pacts/provider/ClientsService/consumer/Frontend/latest'],
       	consumerVersionTags: ["dev"],
       	providerVersionTags: ["dev"],
       	publishVerificationResult: true,
       	providerVersion: "1.0.1"
         }

   	return new Verifier(opts).verifyProvider().then(output => {
       	console.log("Pact Verification Complete!")
       	console.log(output)
   	})
   })
})
The first time this was tested, the Pacts were stored in a local folder and the verification results were not published. Now we wish to publish the results following the test as well as to retrieve Pacts from our Pacts broker.
Update the value of providerVersion and change publishVerificationResult to “true”. Also update pactUrls to point to our Pact broker instead of the local directory:
pactUrls: ['http://localhost:8080/pacts/provider/ClientsService/consumer/Frontend/latest']
From the terminal, execute the following command to run provider verifier and publish results to the Pact broker:
npm run test:provider
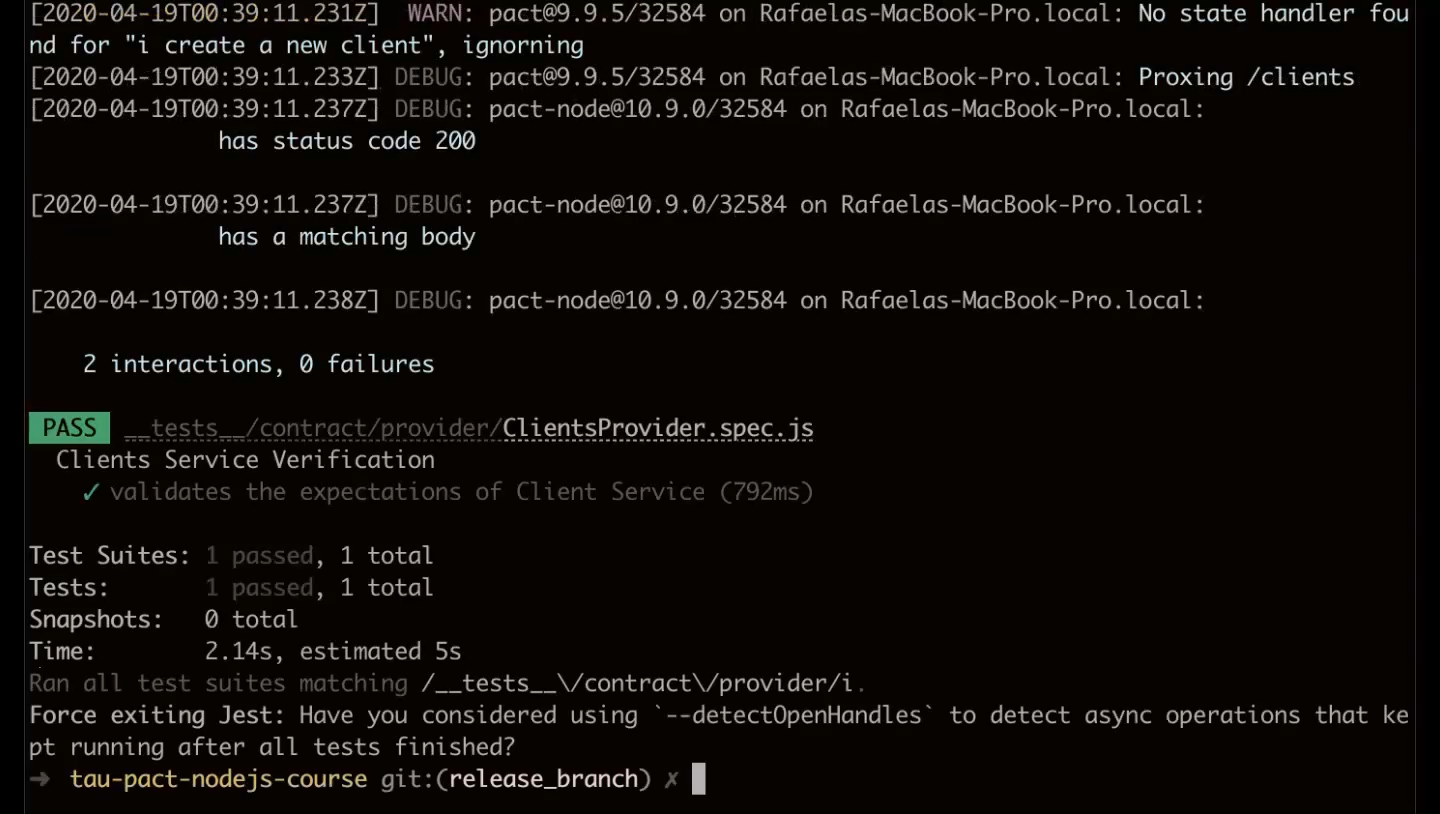
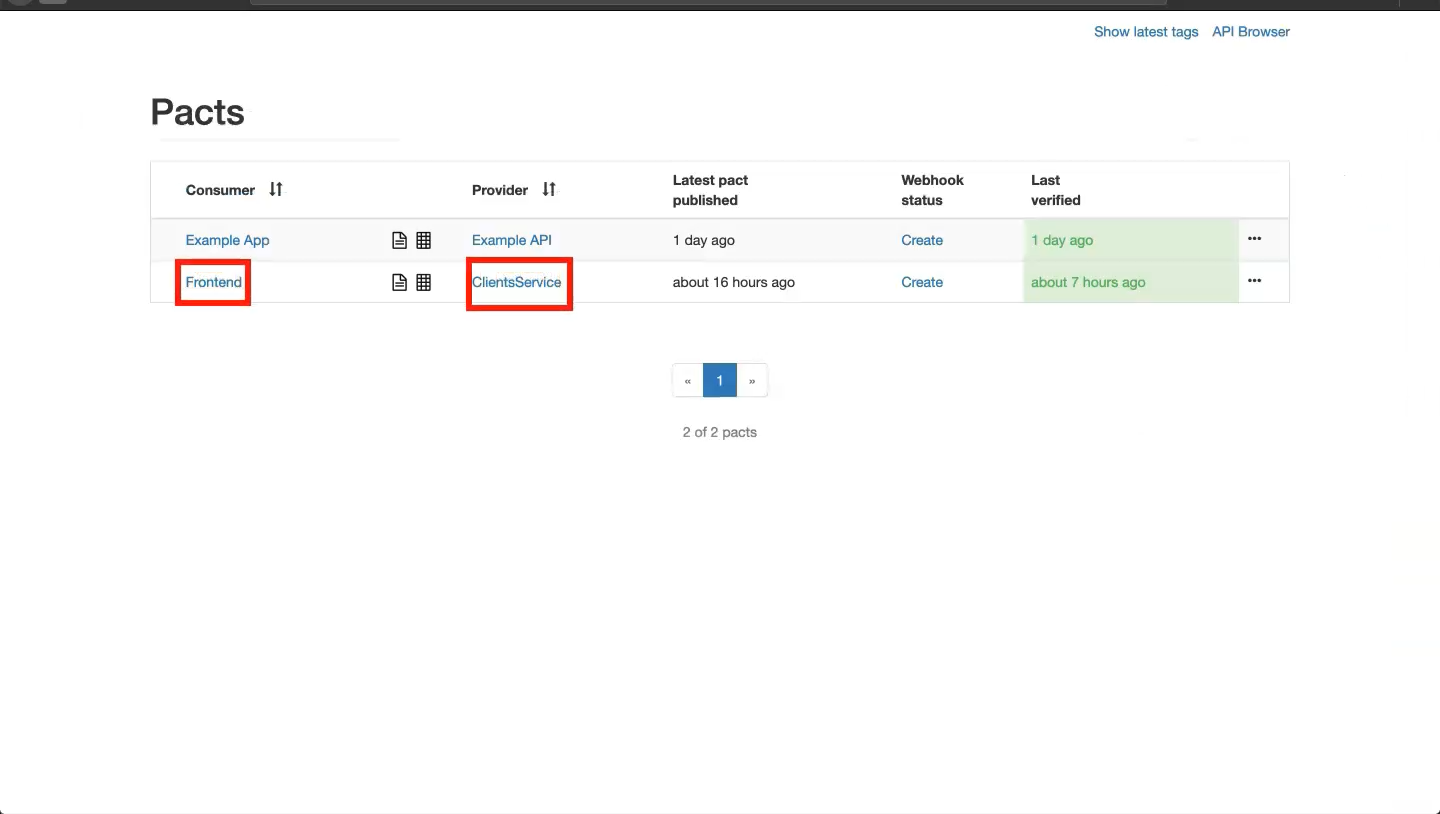
Now we can check on localhost:8080 to see if it was published. Observe that the verification column now is green, indicating that the contract was successfully published to our Pact broker.
Inspect your results. Verify that provider versions and tags are correct and that the Pact verification dates have been populated.
The services network graph should be similar to the one generated for the Frontend:
Usage Guidelines for Matchers
Let’s briefly discuss matchers. Try to avoid hard-coding literal values into the contract. Instead, attempt to match values based on their type, structure, or through the use of regular expressions. In the following example a regex is used to match a specific date format:
body: {
  name: "Mary",
  dateOfBirthday: Matchers.term(
  generate: "02/11/2013",
  matcher:/\d{2}\/\d{2}\/\d{4}/)
}
Hard-coded values represent unnecessary constraints during provider testing when contracts are replayed using the Pacts runner. Use of expected types and regular expression patterns enable more freedom in data and state management on the provider contract testing side.
NOTE
Regular expressions can only be used on strings.
Remember that exact values returned by the provider during verification are of less concern so long as the types match.
Avoid the use of random data when composing expectations so that tags are consistent and reproducible. The Pacts broker calculates a hash on the contract and when the hash is the same, it indicates that no change was made to the contract. Even if re-published, no additional provider verification results are required. However, if the hash has changed it indicates that the contract has changed and is subsequently treated as a new contract. Using random data forfeits this optimization that the Pact broker performs for you.
Contracts can be matched by type. With this type of matching, the only consideration is whether or not types match regardless of value. In the following response matching example, the name must equal the value of “Mary” exactly but the age simply needs to share the same value type regardless of the value itself. When used, Matchers.like() statements should reside at the top of the statement body.
body: {
  name: "Mary",
  age: Matchers.like(73)
}
Queries can also be used. Queries are specified as strings but query pairings must be URL encoded in the expectation.
query: {
  name: 'Mary Jame',
  age: '8',
  children: ['Betty', 'Sue']
}
NOTE
If the order of the query pairings does not matter, the query can be expressed as a hash. Hashes can embed Pact terms such as somethingLike but be aware that all query pairings will be parsed to strings so avoid using somethingLike with a number.
This next example is similar to the previous one except that somethingLike is used to match multiple fields instead of just “age”. The provider will respond with two fields, “name” and “age”. Field “name” will be a string while “age” will be a fixed number.
willRespondWith: {
  status: 200,
  body: Matchers.somethingLike(name: "Mary", age: 20)
}
There are many options at your disposal. You can match a boolean, string, integer, and many more:
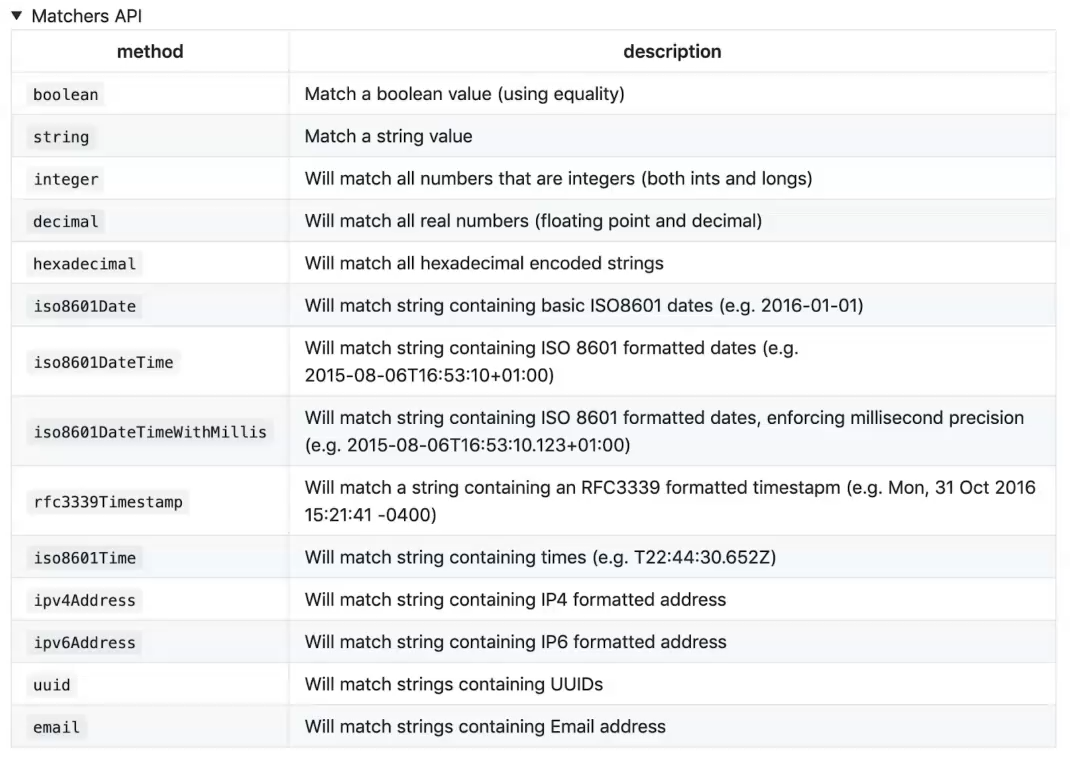
This concludes our discussion on matchers.
