

Transcripted Summary
Now that we know all about Web pages and the DOM, let’s learn how to find live web elements ourselves and then write some basic locators.
Finding elements manually is an important step when automating Web UI tests. Developers won’t always give locators to every element - we, as testers, often need to find them ourselves.
For this activity, I will use Google Chrome Developer Tools. Why use Chrome? Chrome is an excellent, free browser with high market share. Plus, its DevTools make it easy for anyone to peek under the hood at the source code, the console, the network activity, and more. It’s great for finding elements manually - I almost always have an instance of DevTools running side-by-side with my IDE when developing test automation.
# Into the HTML
To get started, open Chrome and navigate to a web page. Let's go to DuckDuckGo.
To open DevTools, simply right click anywhere on the page and select “inspect”.
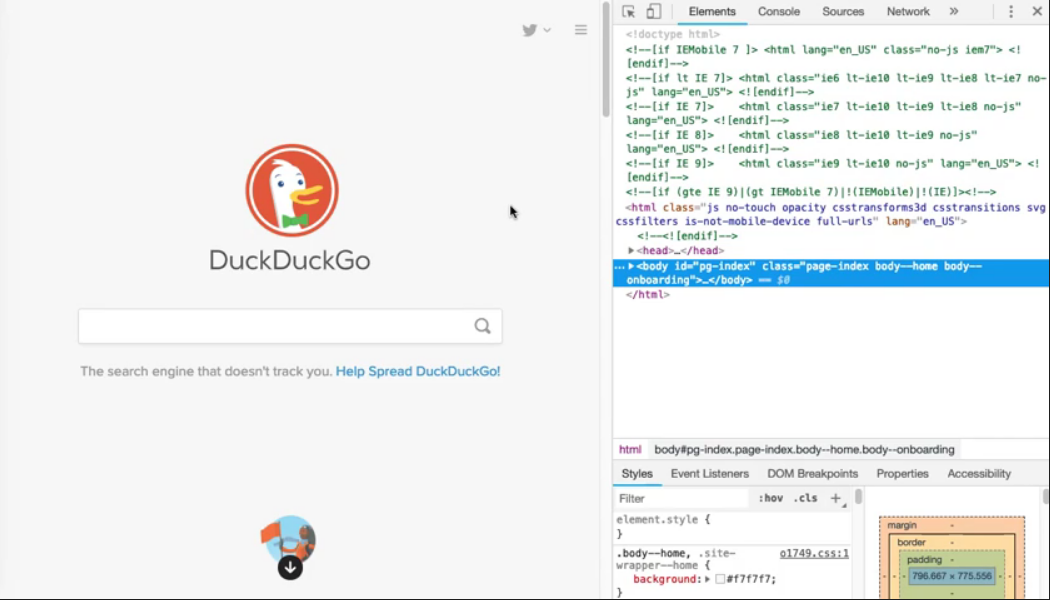
And, voila! DevTools will open on the side of the page. Feel free to expand it, or even drag it to its own window.
You can also access DevTools via the 3-dot menu in the upper right corner of the browser and navigating to “More Tools” > “Developer Tools”.
To visually pinpoint an element, click the “select” tool in the upper left corner of the DevTools pane.
It should look like a square with a cursor on it. When you click it the icon should turn blue.
Then, move the cursor to the desired element on the page. You will see each element highlighted in different colors as the mouse moves over.
The corresponding HTML source code in the elements tab will also be highlighted. Nice!
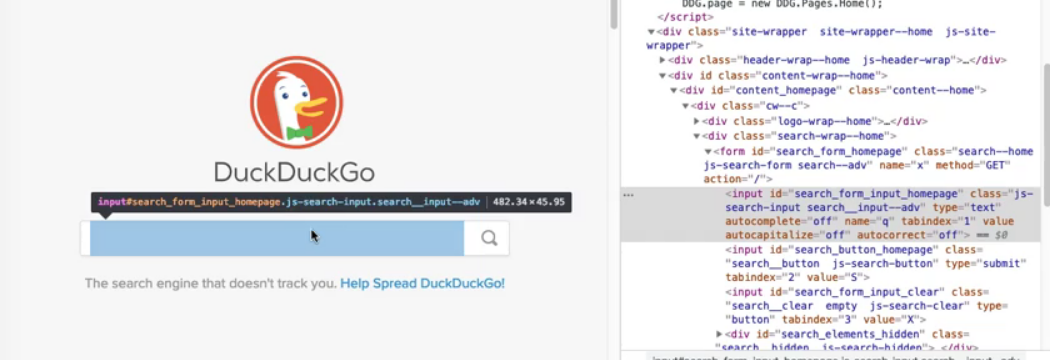
Click on the desired element to set the highlighting. When you move the mouse, the element will still be highlighted in the DevTools source.
With the desired element located in the source, we can now use our knowledge of HTML and CSS to come up with some basic locators.
Writing good locators can be challenging. Remember, a locator will return all elements that match its query.
- If a locator is too broad, then it could return false positives.
- However, if a locator is too specific, then it could break whenever the DOM changes and it could also be difficult for others to read.
The best philosophy is to write the simplest locator query that uniquely identifies the target element or elements.
Some web pages are easier for locators than others. Take a look at DuckDuckGo's HTML source code. Quite a few elements on the home page have an ID. For example, the search bar has the ID “search_form_input_homepage”.
IDs are the best types of locators.
By HTML standards, the id attribute must have a unique value on a given page. Thus, a locator that uses an idwill uniquely identify a single target element.
Whenever I need to write a locator, the first thing I look for is an id attribute. If the element has one, then my locator is super simple. Just make sure that the id is, in fact, used uniquely on the page. A simple DevTools source search can validate that.
document.getElementById(“search_form_input_homepage”)
driver.FindElement(By.id(“search_form_input_homepage”))
Another good locator is the name attributes.
Name attributes are used for input related elements like input, button, and text area. Each input element within a form should have a unique name and oftentimes, the names are unique for the whole page as well.
Take another look at the search bar element. You can see that it has the name, "q" (name = “q”), and the name is unique on the page. This means that we can use either an id or a name locator to find the search bar elements.
document.getElementByName(“q”)
driver.FindElement(By.name(“q”))
A third basic locator is CSS class name.
Class names attach CSS styling to HTML elements. However, they can also double as defacto identifiers. An element may have one class name, many class names, or none at all.
Furthermore, class names do not need to be unique per element. One class name could be shared by multiple elements. This is useful when locating a set of elements, such as a list of search results.
For example, let's do a DuckDuckGo search. I'll search for Giant Panda. The search result page will show a lot of results. Let's look at the main result.
Use the selector tool, and I can see this div here contains all of it.
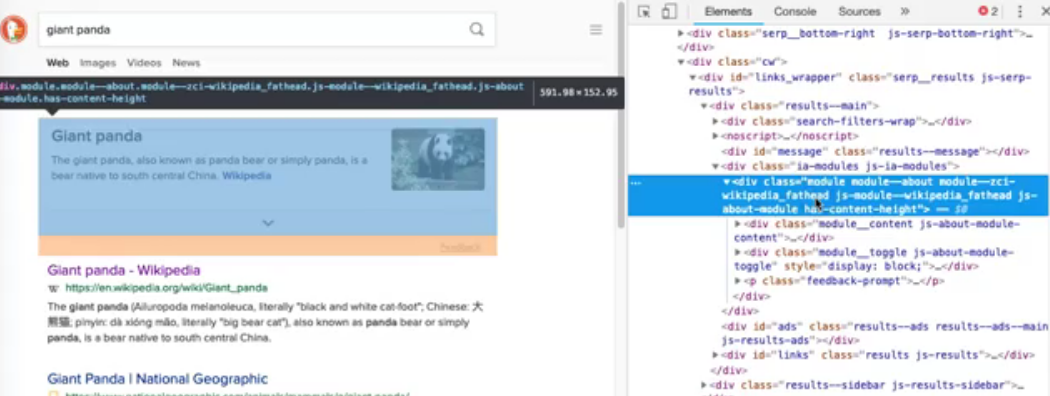
The main search result doesn't seem to have an id and it's not an input, but it does have a unique class name: “module—about”. I can verify that with a quick search. There's only one appearance of it. That would be a great locator to use to get that div.
The other results also have a class name in common. If I pick one of these, I can see every single one of the results has a “result” class. So, if we wanted to get all results, we could use that class name to get them.
However, be warned —there are a couple hidden ones.
If I go down the list, it looks like there are 11 total results on the page.
But if I go all the way down, you can see that some of them, or one of them, is going to be this more results button (“result—more”), which may not necessarily be what I want.
document.getElementByClassName(“result”)
driver.FindElement(By.className(“result”))
We'll learn how to handle that case with more advanced locators in the next chapter.
IDs, input names and class names are the easiest locators to use.
I always try to find these types of locators first, before moving onto more complicated ones. They are quick to find on a page, if they exist, and they require no extra thought to write the locator.
When they don't appear as a tester, I'll often ask developers to add them.
If I'm familiar with the code base and I have time, then I might even go add them myself. In the worst case, I'll use a more advanced locator, like a CSS selector or an XPath.
# Conclusion
Finding elements manually isn’t tough with the right tools. It just takes a little bit of time and common sense. The difficulty is deciding the right kind of locators to use. Let’s learn those strategies in the next chapters.
Resources
HTML Document for Quiz Questions 6-9
<html>
<body>
	<div class=”article opinion” id=”main-article”>
	    <div class=”section”>
			<h2 class=”topic-header”>Main Argument</h2>
			<p>...</p>
		</div>
		<div class=”section”>
			<h2 class=”topic-header”>Rebuttal</h2>
			<p>...</p>
		</div>
		<div class=”section”>
			<button class=”response-button” name=”agree”>Agree with Argument</button>
			<button class=”response-button” name=”disagree”>Agree with Rebuttal</button>
		</div>
	</div>
</body>
</html>
