

Transcripted Summary
We have to cover one more topic before we start coding. I know, I know, be patient. We're going to get to write and run our first automated Selenium test. But first, we have to lay the foundation. We have to talk about, what exactly is Selenium?
So, in this specific chapter, you're going to learn a little of the history about Selenium. Then, you're going to understand the the Selenium WebDriver protocol and how it works. Then I'm going to teach you about the Selenium script. And then, finally, we're going to talk about all the common Selenium commands that you can use.
Now, this isn't meant to be a very comprehensive course in Selenium. This is a "Getting Started" introduction to Selenium WebDriver course. And so, the goal is to get you up and running as soon as possible.
People, such as myself, actually make careers doing test automation and using Selenium every single day. And so, there's actually a Complete Selenium WebDriver with C# Course that I offer which is that covers this topic in the span of several hours. That will not be the case here, but I promise I'll give you enough information so that you can proceed comfortably and then I'll leave you with a bunch of resources to further expand your knowledge.
Selenium was actually started back in 2004 nby Jason Huggins at ThoughtWorks. The idea behind Selenium was that we needed a way to simulate user actions in our browser so that we can test. We had unit tests, we had API tests, but we had no way of simulating browser rendering and browser interactions with our web applications. And so, Selenium was born.
Selenium has actually gone through many versions already.
Version 1 was the original one that was created. And that was basically interacting with the browser using JavaScript. It had lots of problems because JavaScript is asynchronous and so it's really hard to sync the browser with random JavaScript commands.
In Version 2, Selenium introduced more object-oriented programming concepts. So, now you could create stuff like Page Objects and write classes, and have elements that contain a bunch of different locators. And it made the use of Selenium much easier. Also, they introduced the JSON (JavaScript Object Notation) Wire Protocol. Instead of talking through JavaScript, it was using HTTP requests, and I'll cover that in a little bit.
Version 3 basically removed Selenium RC (Selenium Remote Control) and there are some API changes that improved the functionality of Selenium. And, this is the version that we're going to be using this course.
However, in hopefully a not too distant future, Selenium 4 is coming.
Selenium 4 is going to bring with it the W3C protocol. What the means is that Selenium is going to be a W3C standard and every browser now should support the Selenium API out of the box. The problem with Selenium currently up to Version 3, is that the Selenium community works on implementing their API on browsers. However they don't have a full internal knowledge of how the browsers operate, and so there are always a lot of problems that arise from that. And so, the beauty of integrating Selenium with the W3C protocol, is now the browser vendor such as Safari, Chrome, Firefox, will need to implement the Selenium API.
So, for example, if you want to do a browser click or we want to refresh your browser and we want to wait for a page to be loaded, the browser vendor will be responsible for making that implementation. It will be a W3C recommendation, so it'll kind of be a standard that every browser should follow. That's beautiful because now our Selenium code is going to be much faster, it's going to be much more stable and it will allow browser automation to evolve.
The Selenium Project actually has many different tools such as Selenium RC, which I already mentioned. There was also Selenium IDE (Integrated Development Environment) which actually used to exist but then it died. It was a record and replay tool. We all know how record and replay tools are not the best. And so, now actually Selenium IDE is being brought back by Applitools and Dave Hefner, they're trying to make Selenium IDE awesome and more user friendly.
But the ultimate Selenium tool is Selenium WebDriver. And, that's exactly what we're going to be using in this course and that's exactly what's used by most of the world in order to be able to interact with the browsers.
Selenium WebDriver is a language-specific API that allows us to use a programming language to communicate to a Selenium server that will talk to the browser and allow us to go back and forth.
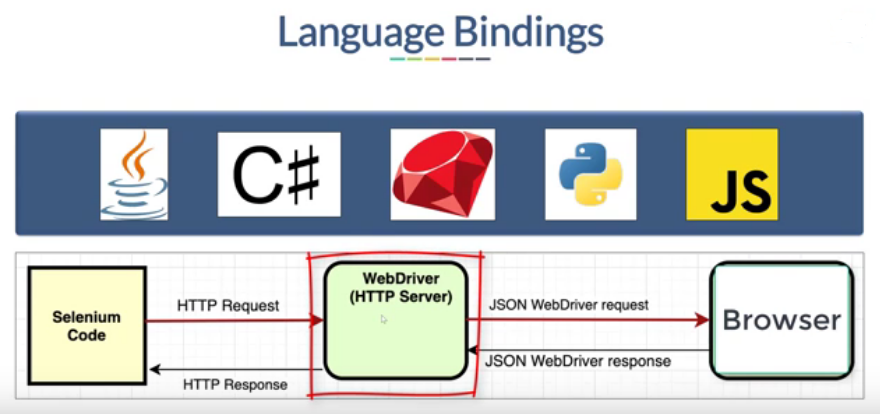
Selenium WebDriver actually supports multiple language bindings, such as Java, C#, Ruby, Python and JavaScript. Those are the ones officially supported. There are a bunch of other ones that exist out in the web, but I don't recommend you use them. But, the beauty of all these languages being supported is that if you're comfortable coding in any of these programming languages you simply have to learn the Selenium WebDriver API, which is not so complicated, and once you learn the Selenium WebDriver API, you can start writing automated functional tests, which is really beautiful.
The way the Selenium WebDriver Protocol actually works is you start with your Selenium code. The Selenium code makes an HTTP request to Selenium sever, which is the Selenium WebDriver. And, that will then send a JSON WebDriver request to the browser. The browser will respond back with a WebDriver response, and then that will go all the way back to the code, and they talk back and forth. It's basically just a little HTTP server that allows communication between our code written in one of those five language bindings and the browser.
The Selenium Project is an open source project, so it's supported by members that don't get paid. So, they're always looking for support. If you want to contribute, there are multiple different ways to contribute.
And also, you can go to the Slack channel or the IRC channel to ask questions and the maintainers of Selenium are there and can help you to answer questions.
# The Seven Actions of a Selenium Script
A Selenium script really boils down to seven actions.
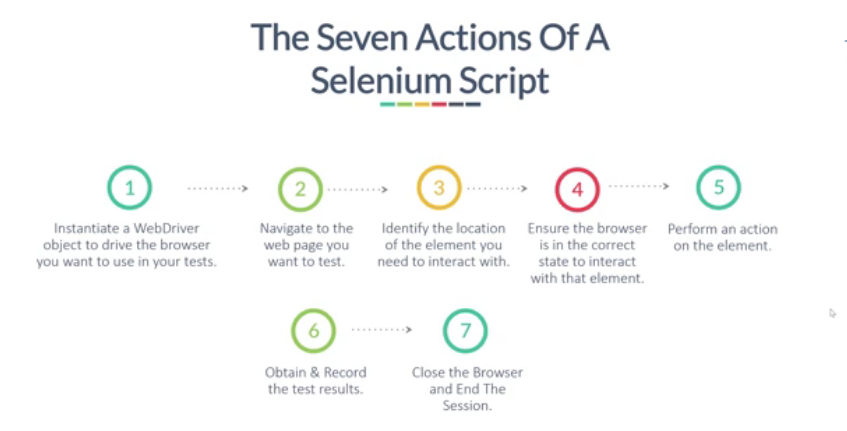
1. Start the session The very first action is creating an object that allows you to interact a browser. There are multiple different drivers, you can have a Chrome driver, a Safari driver, an Edge driver, and each of those allow you to communicate with the appropriate browser. And so, the very step is you instantiate that object that will allow you to talk to that specific browser.
//Start session (opens browser)
WebDriver driver = new ChromeDriver();
2. Navigate to a page After you instantiated that object, the second step is to navigate to some specific URL.
//Navigate
driver.get("http://a.testaddressbook.com");
3. Locate the element
After you open up a webpage, you want to identify an element that you want to interact with. So, in this case we are using the Selenium By class and we're locating an element using an ID.
//Identify location of element
By signInLocator = By.id("sign-in");
4. Ensure the browser is in the correct state
After we've located our element, we actually want to make sure that element is in a correct state before interacting with it. In this case, we're using the Selenium WebDriverWait, to wait until a specific condition. So, in this case the expected condition that we're waiting for is that the element is present on the page, and once we've figured out that it is, at that point we can proceed with the rest of our actions and interact with that element.
//Ensure browser in correct state before acting
WebDriverWait wait = new WebDriverWait(driver, 10);
WebElement signIn = wait.until(ExpectedConditions.presenceOfElementeLocated(signInLocator));
5. Perform action Once you know an element is in the right state, then you perform an action on that element, such as a click.
//Take action on element
signIn.click();
6. Obtain and record result After we've interacted with some elements, at the end of the day, this is an automated test that's meant to represent some kind of end user scenario, and we want to assert that some condition is true or false. Here is where you perform your assertion using that Assert class from MSTest. And so, we can retrieve some results whether it's checking that an element is present, or checking that some text exists on some page, or checking that some page as loaded. At some point we obtain and record that result.
//Record result
Boolean result = ("Address Book – Sign In").equals(driver.getTitle());
String status = result ? "passed" : "failed";
System.out.println(status);
7. Terminate session And finally, we just quit the driver session, that will close the browser, shut down Selenium WebDriver, and clean everything up.
// Quit session (closes browser)
driver.quit();
I know I flew through all of that so let's dive a little bit into a little more detail.
# Locating Elements to Test
There are multiple types of locators that Selenium provides us. You can use an ID, a name, CSS, a class name, tag name, link text, and so on. You can use all of these to find an element on a page.
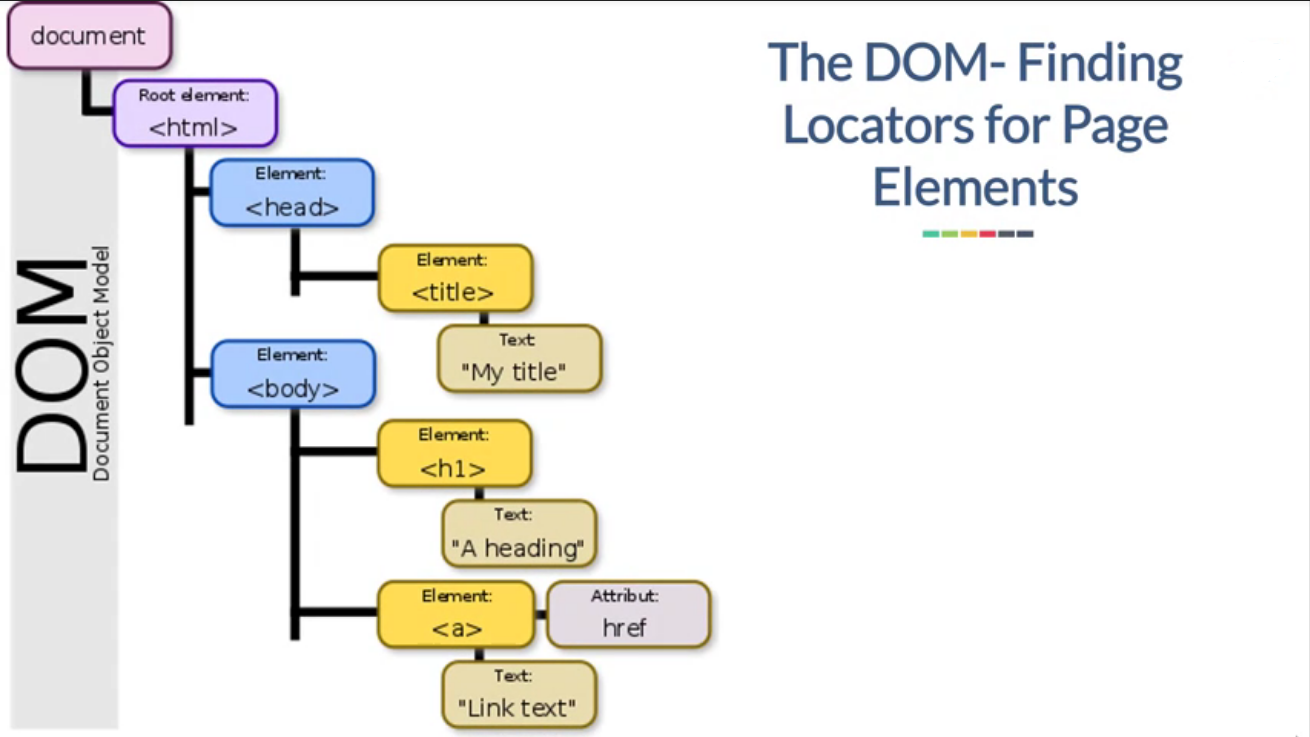
To find an element on a page, basically you have to analyze the DOM. And, based on the DOM you will find an element in some location and you will want to interact with that specific element.
Normally, you find an element using your browser's Developer Tools. So, all you have to do is right click in your browser, open Developer Tools and find that element that you want to interact with. You need to find a unique element. You want to make sure that the element is the only element on a page that you want to interact with.
So, here are some examples in Java of how we can locate elements.
// ID
driver.findElement(By.id("sign-in"));

// CSS Selector
driver.findElement(By.cssSelector("a[data-test=sign-in]"));

// Link Text
driver.findElement(By.linkText("Sign in"));

// Partial Link Text
driver.findElement(By.partialLinkText("Sign"));

// XPath
driver.findElement(By.xpath("//a[@data-test='sign-in']));
You can also use the findElements method, instead of the findElement to identify multiple elements. This will allow us to get back a collection of elements.
// Class Name
driver.findElements(By.className("nav-item")).get(1);

// Tag Name
driver.findElements(By.tagName("a")).get(1);
So, once we've found an element using the findElement command or findElements (if you want to find multiple), at that point, you want to start interacting with elements.
# Interacting with Elements
There are some basic actions to interact with elements:
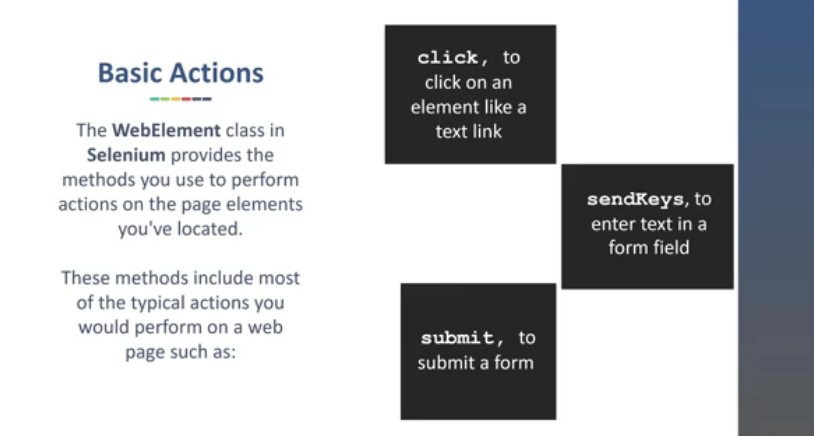
There are actually many more than this, but I'm just going to show you a couple. You can click on an element, you can sendKeys, or you can do something like a submit.
For example, in here, you can see we are finding an element and then we are clicking on it. And, there are two ways to do that, you can find an element and store it in a variable, or you can find an element and interact with it directly.
// Find and Act
driver.findElement(By.id("sign-in")).click();

//Find, Store, and Act
WebElement signIn = driver.findElement(By.id("sign-in"));
signIn.click();
Here you can see we're taking actions on several elements such as clicking, clearing these elements, sending keys (sendKeys will type text into some kind of a field), and we're submitting a form.
driver.findElement(By.id("sign-in")).click();

driver.findElement(By.id("session_email")).clear();

WebElement email = driver.findElement(By.id("session_email"));
email.sendKeys("sauce@example.com");

WebElement password = driver.findElement(By.id("session_password"));
password.sendKeys("password");

driver.findElement(By.tagName("form")).submit();
And, with that, let's go and dive into the code, start writing out first test, and you'll understand everything as we do that.
