

Transcripted Summary
Let’s look at an example to understand the drawbacks of the legacy (or the DOM-based) functional testing.
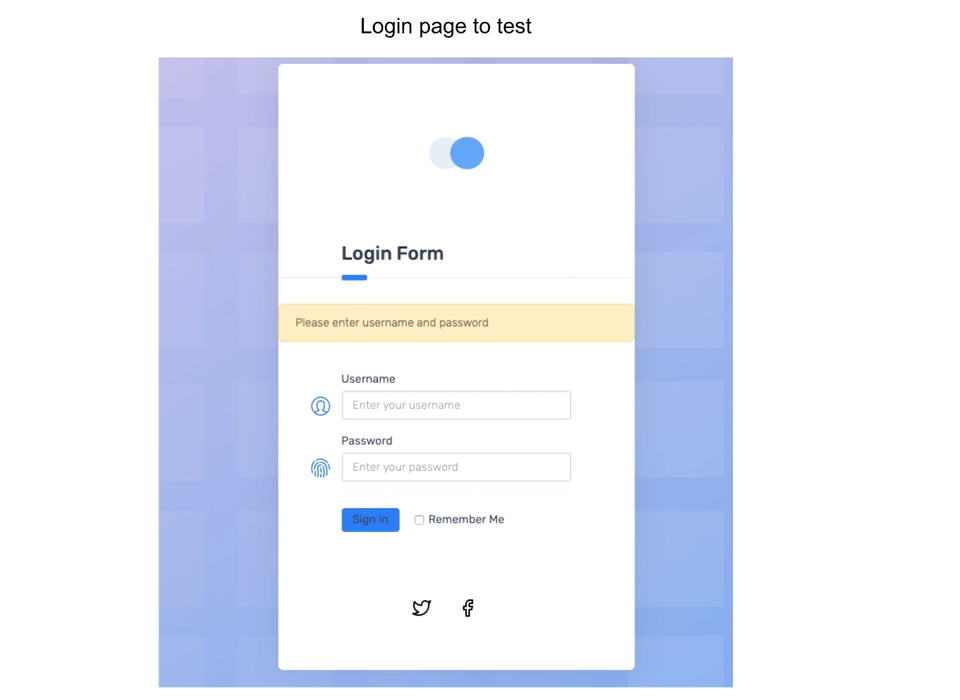
Let's say the test case is that you don't enter the username or password and simply click on the login button.
And then verify if the error message shows up and all these fields show up.
Now, typically, you’ll test them as part of multiple different tests, but let’s combine them into a single test for illustration purposes.
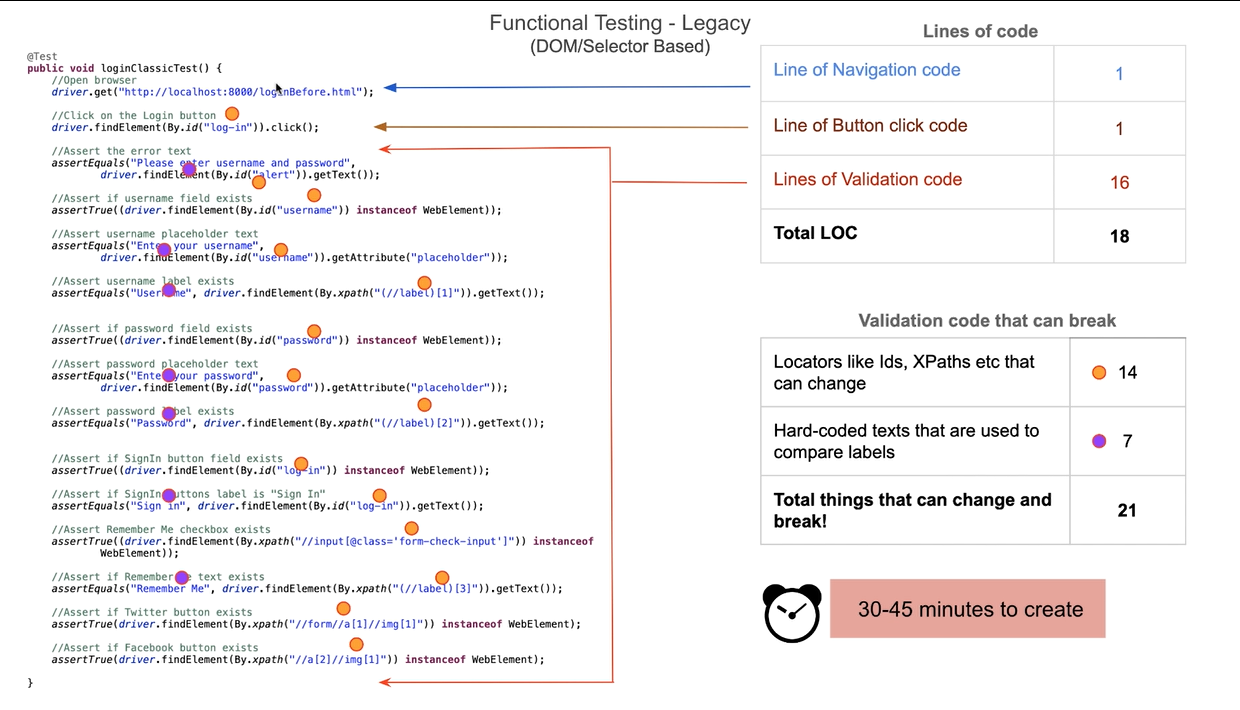
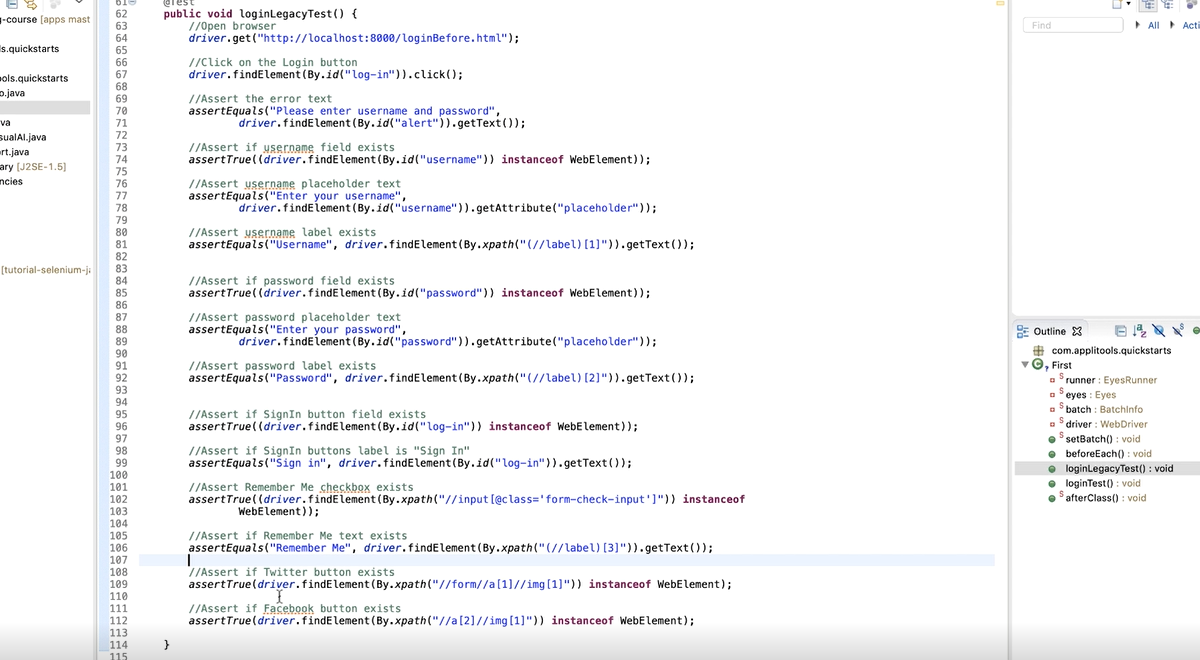
What you see on the left is the amount of Selenium-Java code you need to write to do a decent amount of validations of this simple login form. This is going to be the same irrespective of language or test framework.
As you’ll see soon, even this is not enough!
# Let’s analyze this line-by-line.
The first line is the navigation code that opens up the app’s login page.
The next clicks on the login button without entering the username and password
And all the remaining 16 lines of code are all for validation purposes!
The worst part is not just the amount of validation code, but what’s hidden inside it.
- There are 14 locators like ids, XPaths etc. that are denoted by the orange dots
- And then about 7 hard-coded texts that are used to compare labels.
And all these 21 items can change, and do change from time-to-time, and break your tests!
This is because in order to fully and automatically test your application, you need a tool that does both browser automation and app validation.
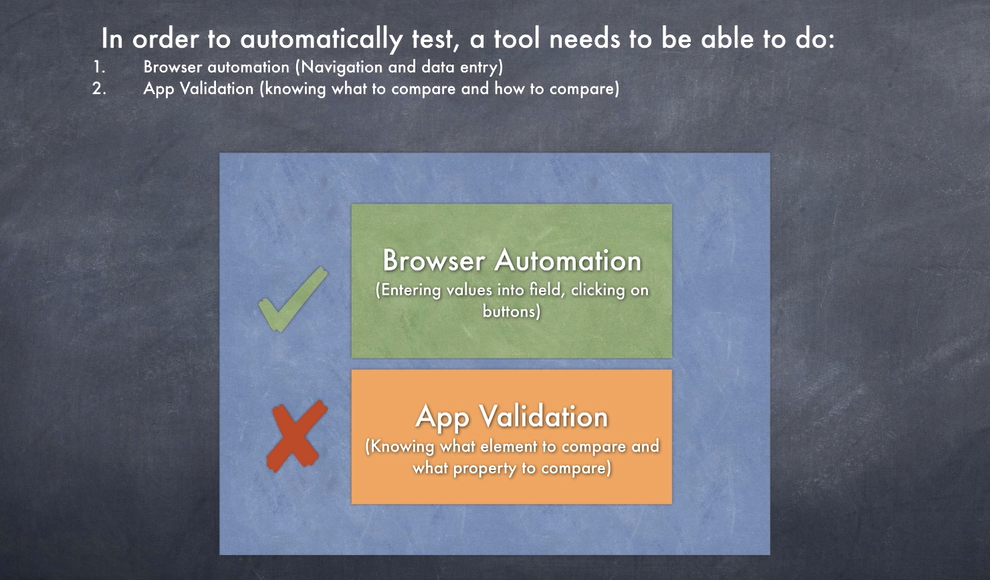
Browser automation means, clicking on buttons, entering values into fields and so on.
App Validation means knowing what all elements in the app to check, and what all properties to check.
As you can imagine tools like Selenium, Appium, Cypress, etc. can do the browser automation, but they don’t do any app validation.
In fact, if you look at the Selenium’s own website, the first line itself says, “Selenium automates browsers. That's it!” — meaning it’s a browser automation tool.
So, in order to do any validation, you need to manually write a lot of code.
The challenging part is you can’t just check the whole page, because these tools use locators that work at the DOM-level or the Source Tree-level in mobile apps.
So, you are forced to individually check different elements and you end up with a lot of code.
Now, from the company or business perspective, you and your automation team are going in the opposite direction of their business objectives.

Because your Sales team, your Marketing team, your Development team and everyone else in your company want your app to quickly change and meet the business needs.
But because of the tool’s limitations you want the app to not change at all! So, you are boxing yourself in.
If you look across your company, every other team in your company is using modern tools to be more productive.
If you look back at this picture, what you need is another tool that complements Selenium, Cypress etc. and does the app validation to a great extent.
# This is really where Applitools comes in — thanks to the technology evolution, you can use AI.
In Applitools case, all you need to do is to use the SDK that simply takes screenshots and delegate the validation work to the AI and makes test creation and maintenance dramatically simpler.
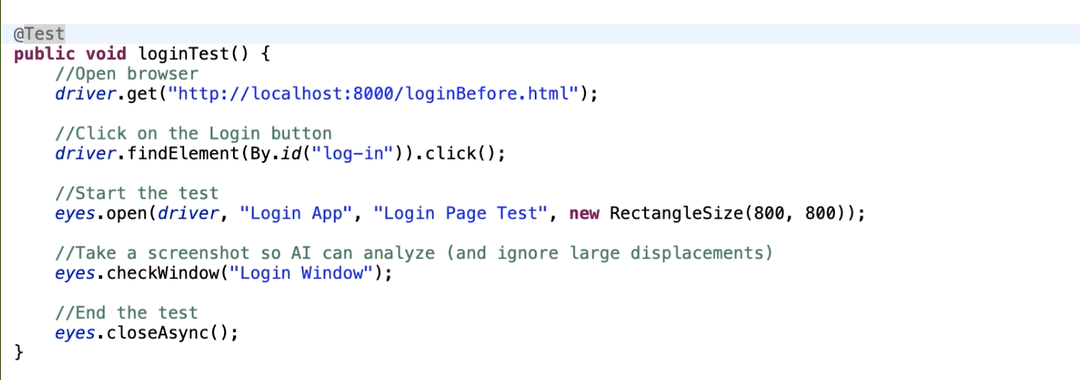
Now let’s see how the same code looks if you use the modern way.
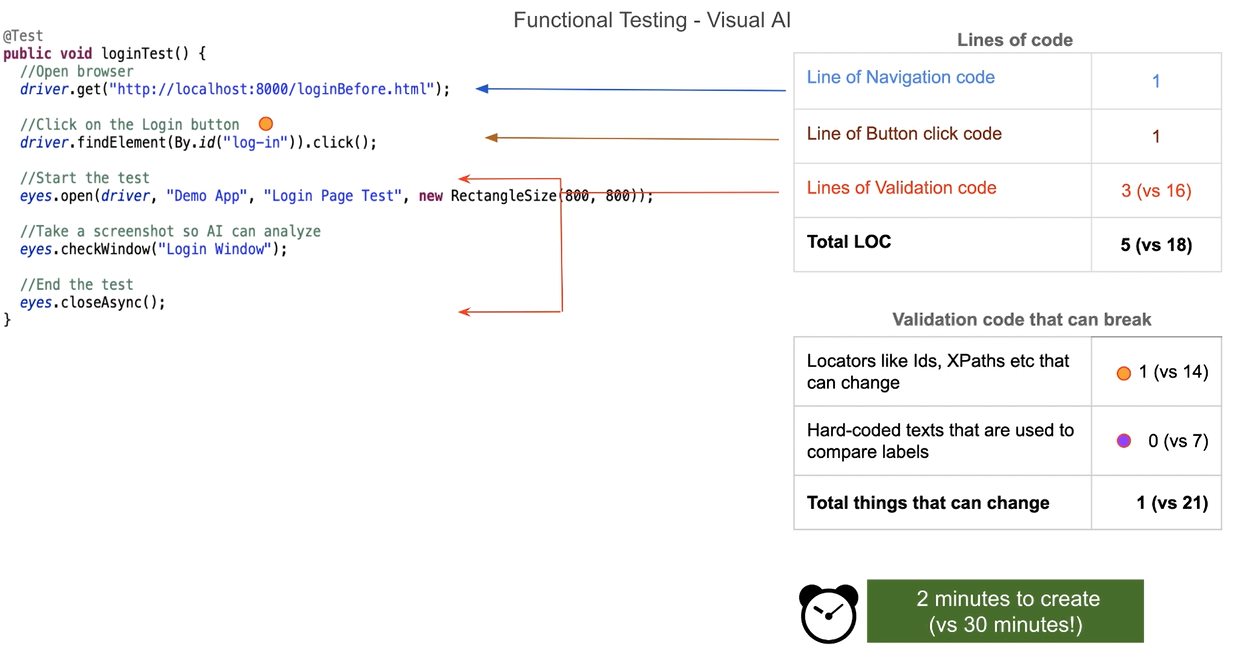
You are still using Selenium for browser navigation, that is, for opening the browser and clicking on the sign-in button.
But then you are delegating the validation to Applitools.
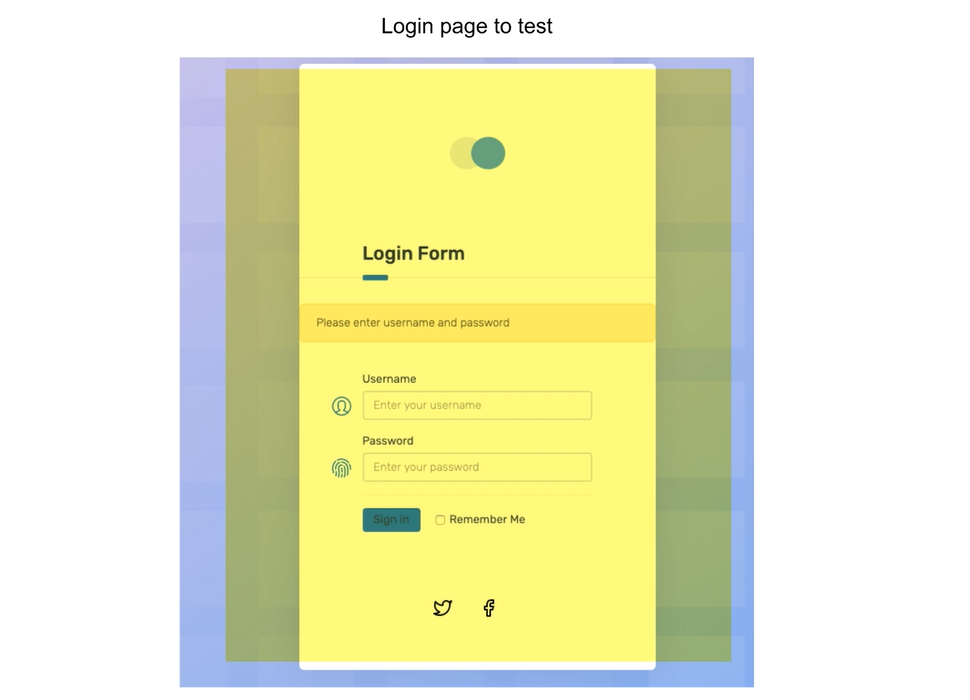
Applitools takes a screenshot of the entire page and uploads it to the AI server.
Then, every time you run this same test, it keeps taking screenshots and compares that with the original one. And it uses AI to do comparison instead of doing pixel-by-pixel comparison.
Now, if there is any difference, then the AI will let us know. And because of using AI that’s been trained with millions of screenshots, you can confidently test the entire page holistically, instead of the legacy way where you take a piece-meal approach of testing individual elements.
Now, you can also take screenshots of individual elements and small regions when needed but it’s not forced up on you.
The best practice is to try to avoid or limit depending on locators as much as possible.
You’ll learn more about this in a future chapter. But the gist of it is, start with the whole page or small regions of the page where you don't need to depend on the locators.
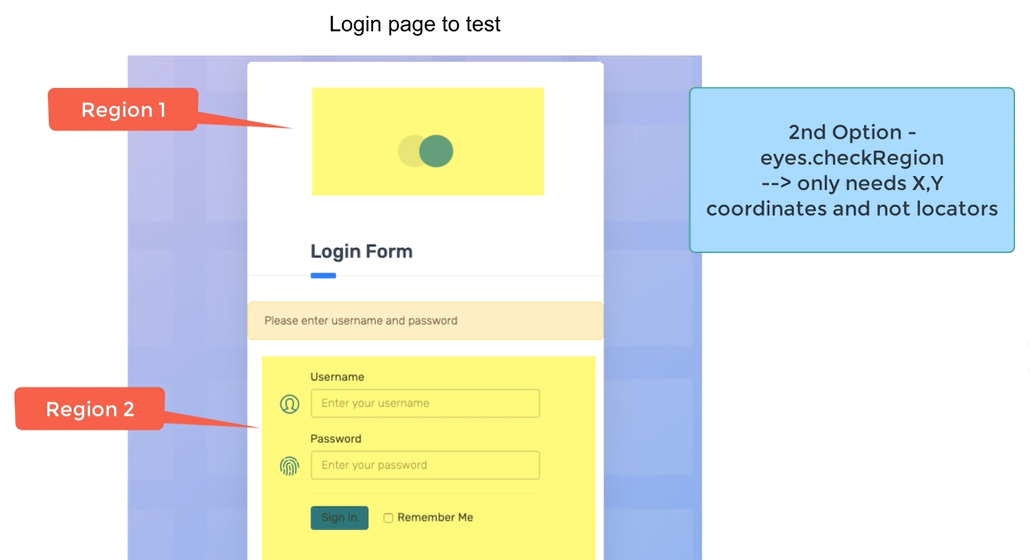
And if you really need it, then go to the element level and take screenshots of the elements.
And as you can see, there is a pretty dramatic difference.
You only need 5 lines of code instead of 18. You are only depending on 1 locator/label instead of 21.
Obviously, depending on the test and the amount of browser automation you need, these numbers will vary.
But most importantly, let’s see how it actually works.
Let’s see how it’s superior.
Here I have a legacy code that’s working but is a lot of code.
Now I’m going to show you how can add Applitools to this existing test.. If you have similar code, pause this video and open that code to follow along the instructions to add Applitools. Now, It doesn’t have to be an exact test like this one, just any simple test is enough for you to see the value and see how it works. And even if you don’t have Selenium Java code, the steps to add Applitools are going to be very similar irrespective of the programming language and test framework. If you open up the Applitools tutorials page at applitools.com/tutorials, you can find the steps for most programming languages and test framework combinations.
Note that most tutorials also provide you with a pre-built app that you can simply download and try out applitools. So if you don’t want to add Applitools to your existing code base, this is a very good option for you to try out Applitools and follow along the course.
OK, I’m going to comment this legacy code out so I can recreate the same test using Applitools. In order to add Applitools there are 3 main steps: The first step is to create a free Applitools account. If you don’t have, please pause the video and go ahead and create an Applitools account now. Note that you can use this free account for as long as you want and there is no time limit. This account should be enough to try out all the features I mention in this course. And once you register and login to Applitools, you need to click on this person icon in the toolbar and select “My API key” menu. Here you’ll find the API key that’s required to run Applitools tests. Make a note of that. Applitools SDK is called as the Eyes SDK. This SDK makes it simple to take screenshot and upload it to the Applitools server. It can even scroll long pages and take multiple screenshots and stitch them. Again you don’t need to do anything but simply call a method on the SDK. So Next step is to add Applitools SDK into your Maven like so. If you use Selenium JavaScript, Cypress, etc the steps are very similar where you may need to do npm install Eyes SDK instead of using Maven.
Now once you have the dependency, if you are using Eclipse, you may need to rebuild the project to download all those dependencies. Next, once you have that, you need to import the Eyes SDK. Next step is to set up a batch, this is optional but recommended. This simply groups all your Applitools tests into a single group. Then you initialize the Applitools like so. I won’t go into the details but the classic runner simply takes screenshots on local machine where the test is currently running. Applitools also provide another runner called VisualGrid runner that takes screenshot in the cloud but for our purpose we just need the Classic Runner. Then you setup the API key and set up the batch if you have one. And that’s pretty much the setup even if you have 1000s of tests. BTW, you can directly set the API key directly into the setApiKey method or store it in the APPLITOOLS_API_KEY environment variable and load it into Eclipse or Jira.
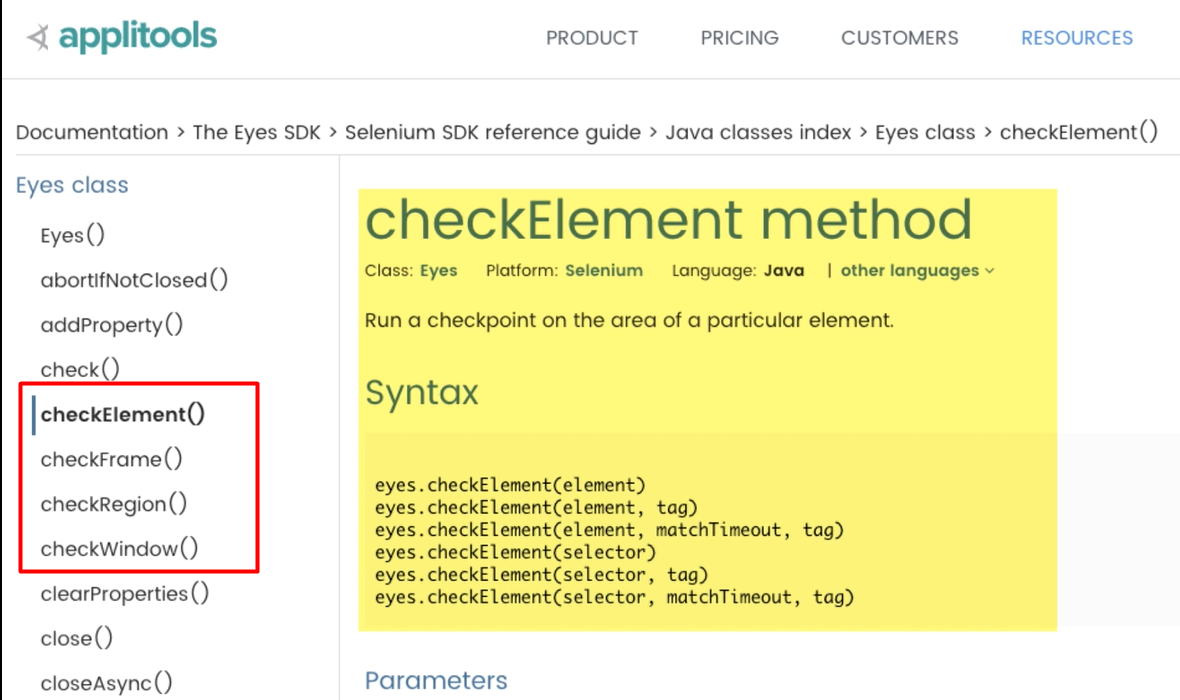
Next, in order to create tests within Applitools you need to do the following.
First call the eyes.open method. This basically creates a test inside Applitools.
And after eyes.open, you can call eyes.checkwindow to take a screenshot and then call eye.closeAsync to end the test. Now, you can call eyes.checkWindow multiple times if you have a test with multiple test steps. And if you call it multiple times, you’ll have multiple baseline images for that test.
But in our test, all we need to do is to simply use Selenium to open the login page, and then click on the login button to see if the error shows up. And after we click the button, we take a screenshot using Applitools. You’ll need to do the same thing for your tests. And notice that this is kind of a boiler-plate code that you’ll write for almost all your tests. There is not much going on here, no dependency on locators or labels and is pretty simple. And since you can take full page screenshots and deletage the validation to applitools, firstly you are not writing a lot of validation code, but secondly, you can remove a lot of smaller tests that may just check a small piece of the page and thus reducing the code much further.
OK, let’s run this test.
Now the test is run and I’m switching to Applitools dashboard.
And what you see here is the screenshot, also known as the baseline.

And when you run this test again, the AI compares this screenshot with the new screenshot and then tells us if there is any difference.
Further Applitools provides us with lots of advanced features to easily ensure there are no false positives.
You’ll see them in action in a bit.
Now let’s say a new version of the login page got deployed and it has all these differences/bugs.
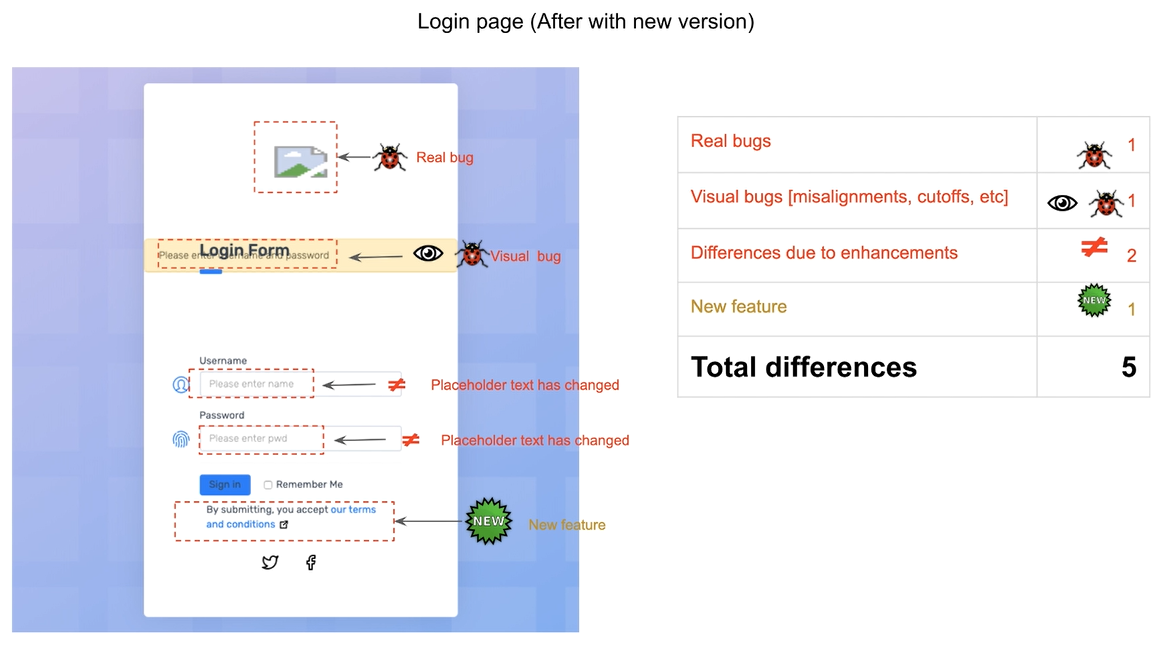
The logo is missing,
The error message, although is displayed, has a visual bug and is not at the proper location.
The placeholder texts are different.
And the new terms and conditions feature has been added.
Now, if you run the old code, despite having all those validations, it doesn’t catch the missing logo.
It also doesn’t catch the visual bug.
It catches the differences in the placeholder.
But it doesn’t catch the terms and conditions feature because there is no visual validation for that.
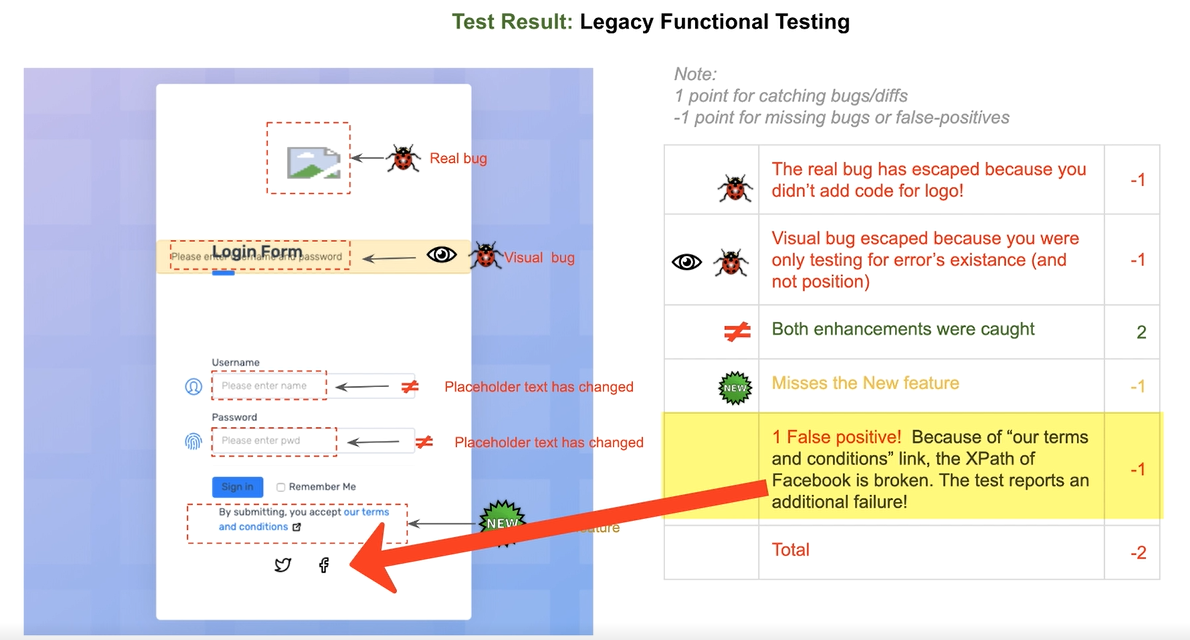
Further, because of the new link in terms and conditions, it actually breaks the XPath of Facebook button and so it reports an additional failure.
If you are an experienced QA engineer, I’m sure you hit this situation all the time.
And of course, this is a demo, but the point is that it’s very easy to miss things and you can’t validate everything.
Let me change the URL to a new login page that has the issues to simulate the scenario and run the same test again.
//Open browser
driver.get("http://localhost:8000/loginAfter.html");
Now let me switch back to Applitools and here is what you’d see….
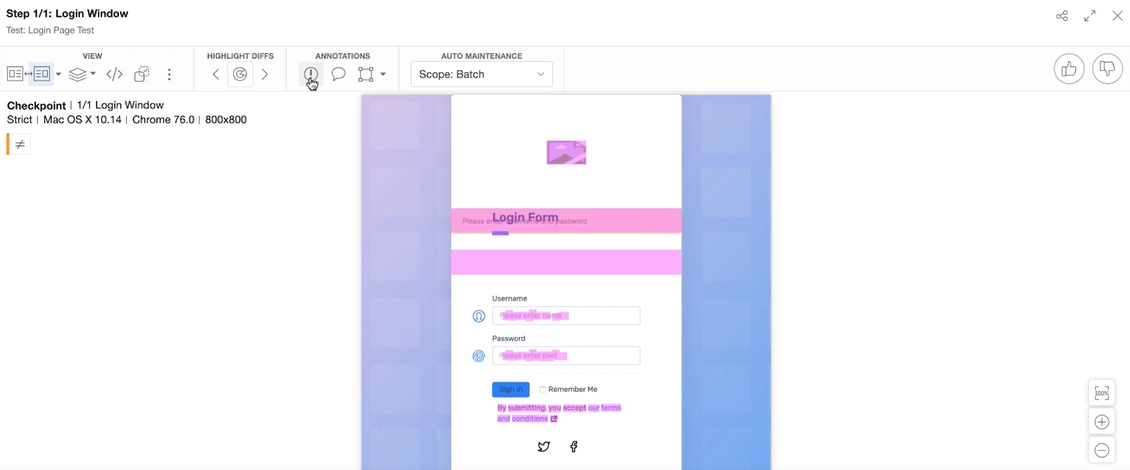
As you can see it is showing all the differences.
From here you can mark this as a bug and fail this test.
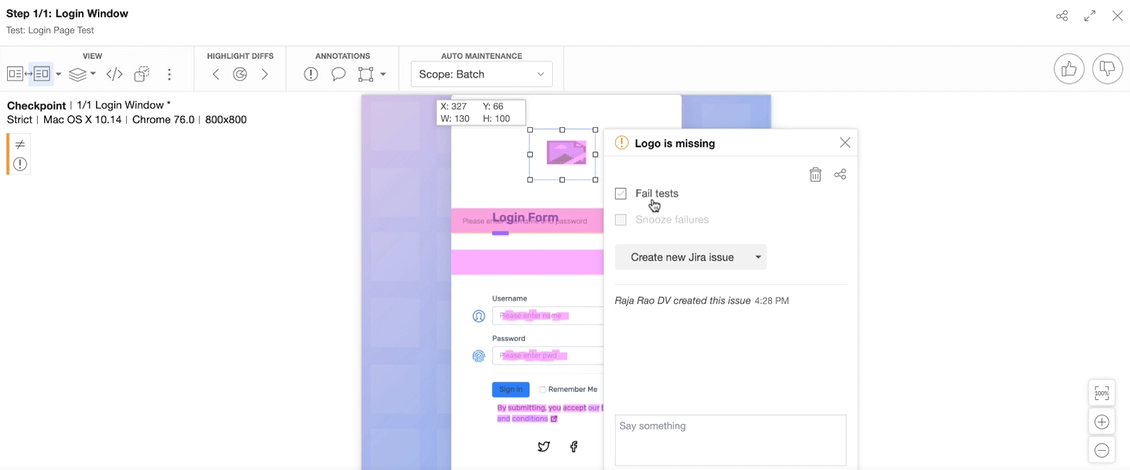
Once this logo is fixed, you can simply do thumbs up to mark this as a new baseline image,
And from that point on, Applitools will use this new baseline to compare future screenshots of this test.
Let’s get back to the slides.
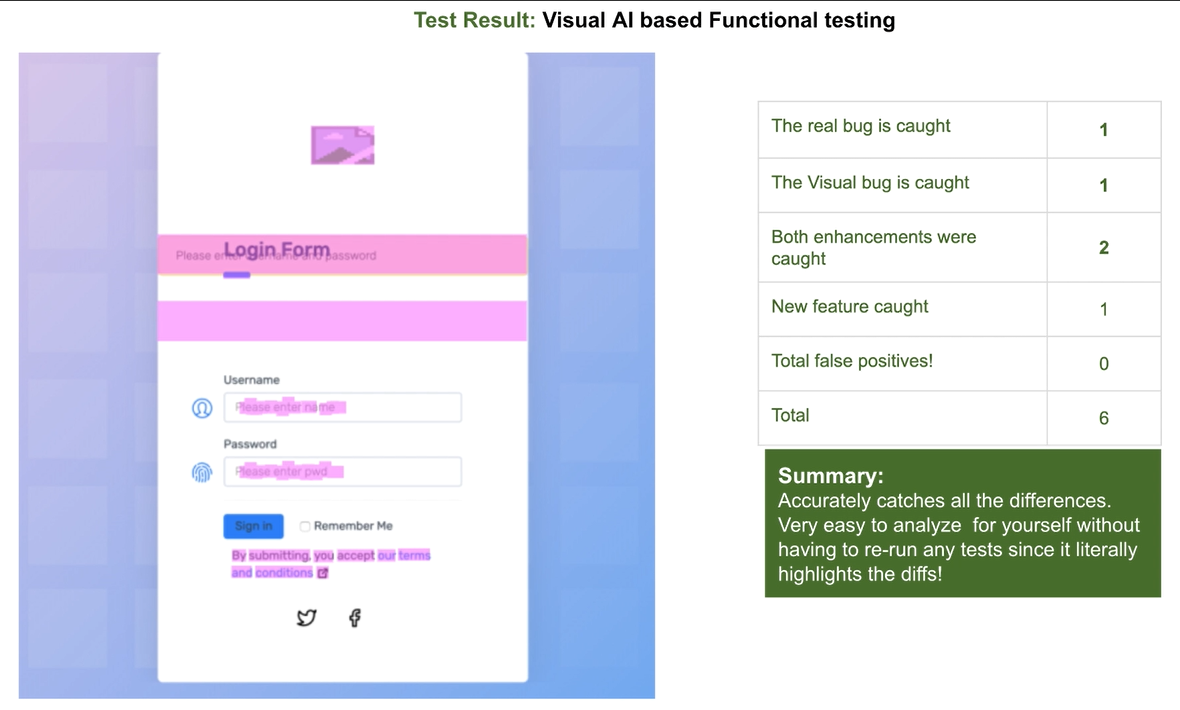
As you just saw Applitools accurately found all these different issues in the page.
Now if you compare both the legacy DOM-based approach with the modern approach in terms of time taken, it’s easily 8x better.
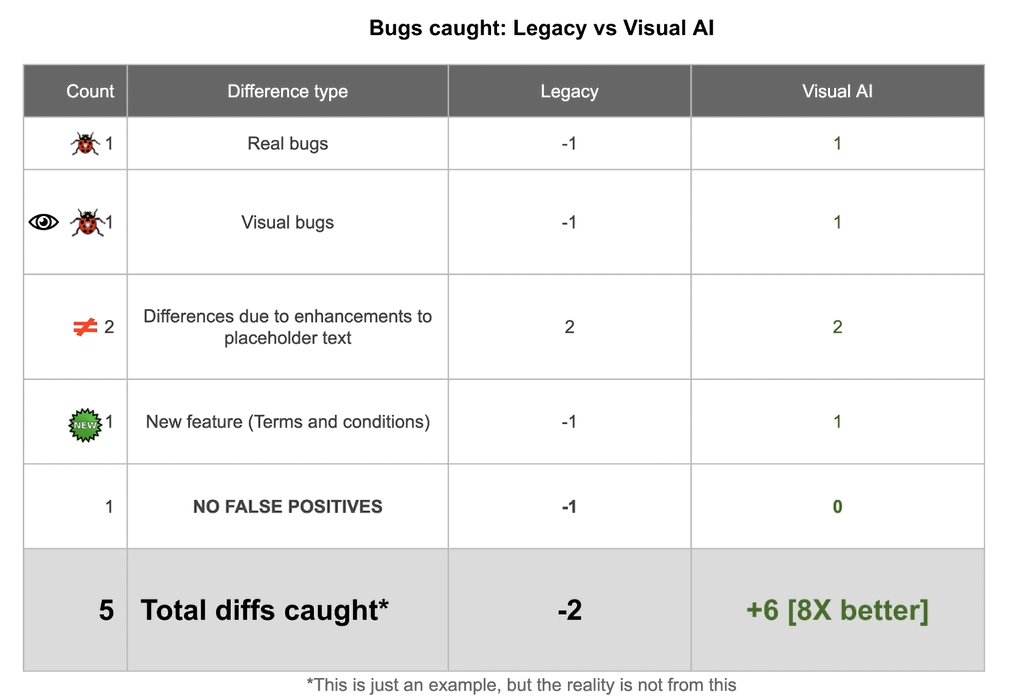
Of course, depending on the page you are testing, it could be much higher or much lower.
Now, let’s take a step further and analyze the cost of maintenance.
In the legacy case because there were errors, you need to spend time manually checking everything and updating your tests.
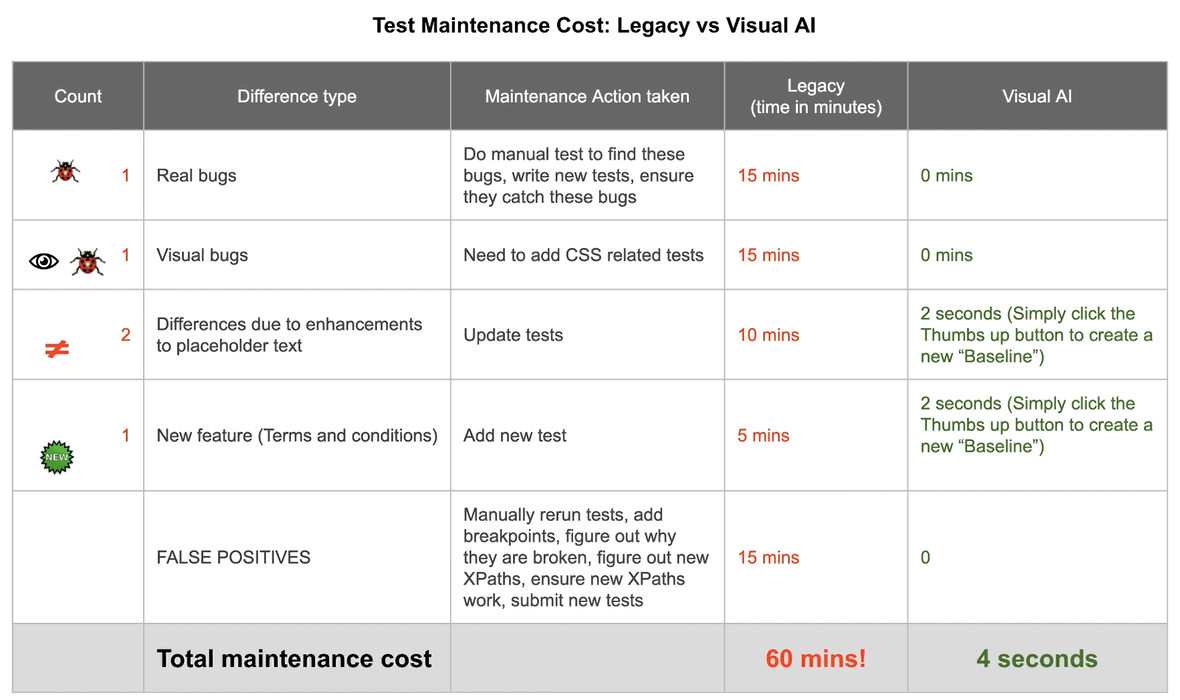
So approximately here is how much it’ll cost you in time for each item.
Adding tests to catch the logo issue, 15 minutes
Adding CSS tests for the visual bug 15 minutes
Updating the labels in placeholders, another 10 minutes
Adding a new test for the terms and conditions feature, another 5 minutes
Figuring out the false positive, updating the test with new XPath and ensuring it actually works, another 15 minutes
Total 60 minutes instead of about 4 seconds in the Applitools case. In Applitools case, you simply do thumb up or thumbs down to update baseline images.
It’s so much simpler, isn’t it?
Now, let’s look at the overall benefits of doing functional testing in a modern way.
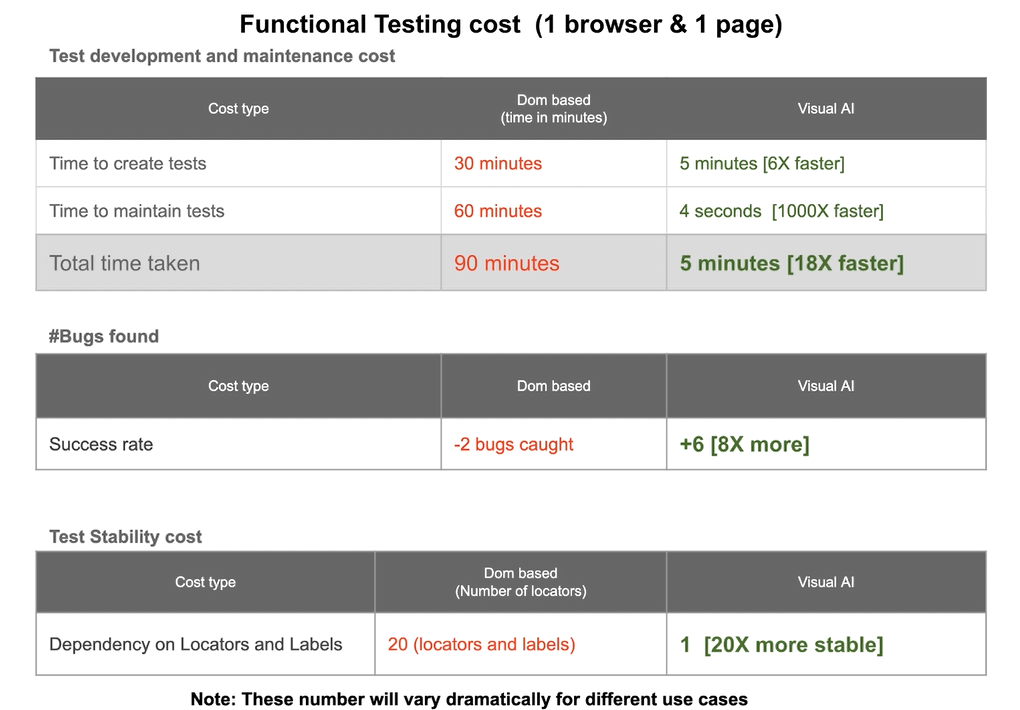
You can read the details yourself but here are the highlights.
Test development and maintenance cost became 18x faster
The number of bugs found, about 8x more bugs
Test stability costs, about 20x more stable.
The reason these are so dramatic is not because of some magic.
It's simply because you, the QA engineer, is no longer doing a lot of work and instead delegating the work to an AI.
And secondly, you are no longer depending on DOM or source tree and the flaky locators.
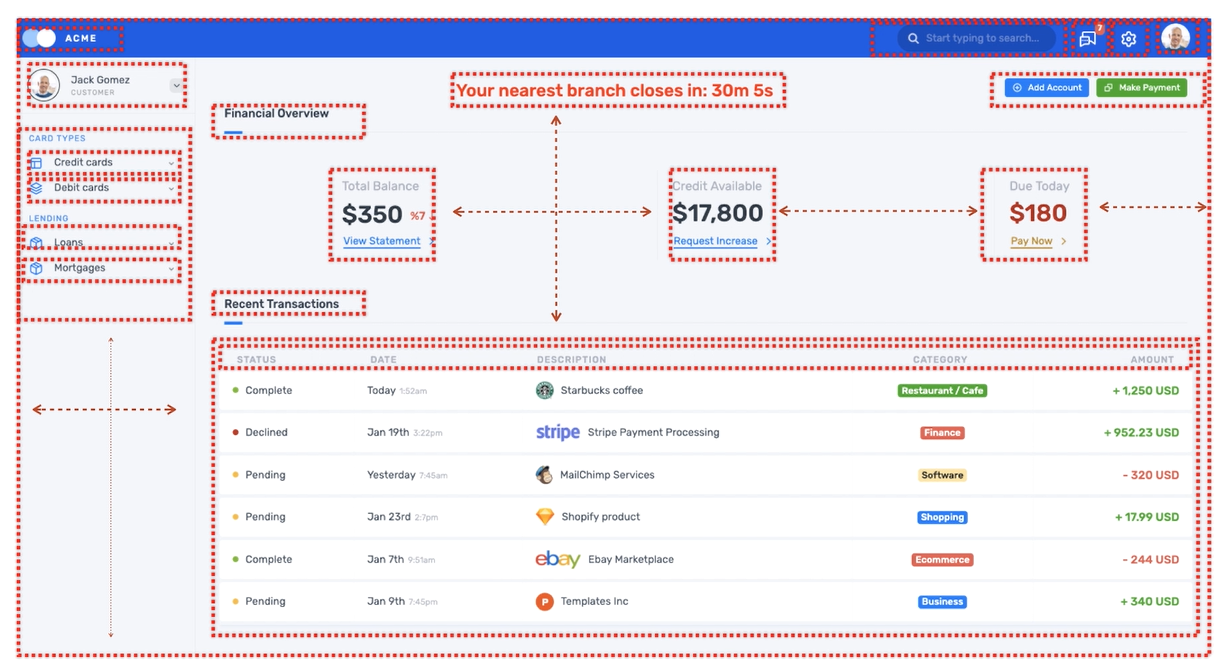
Now remember we are dealing with a simple login page.
Imagine the benefits when you deal with application pages where the vast majority of them look like this?
NOTE
The main reason for these crazy looking numbers is that you are now delegating the majority of the validation work to an AI where you can holistically check the entire page, instead of you manually writing and maintain code and unnecessarily spending time at the DOM level.
Now if you think about it, the reason this actually works is that functional testing with visual AI is a superset of the legacy DOM-based functional testing.
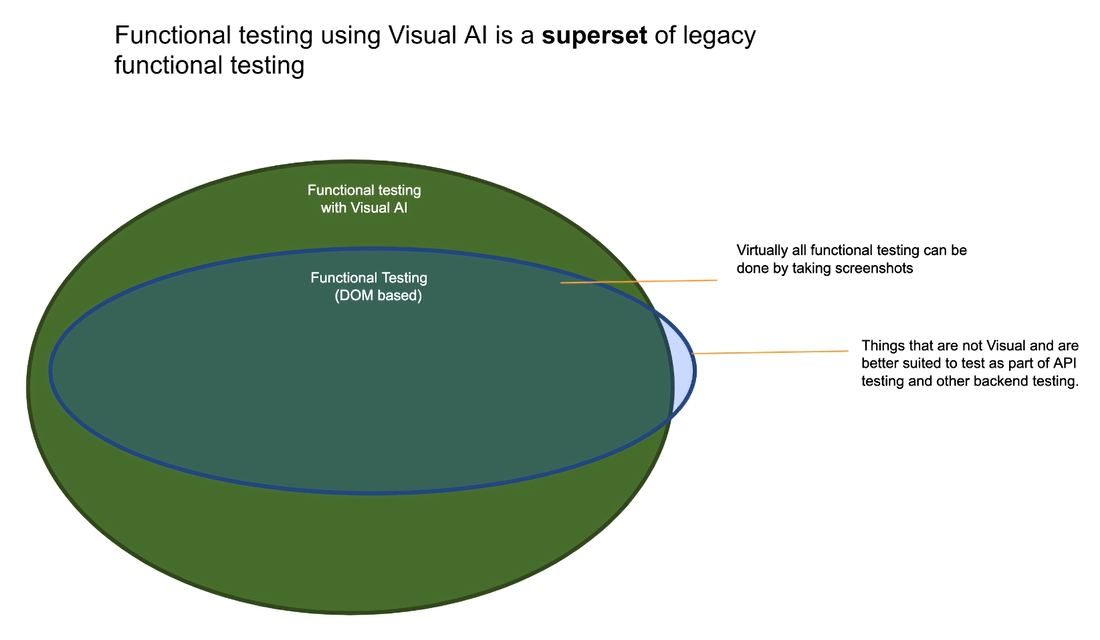
This is because virtually every functionality has a corresponding UI associated with it.
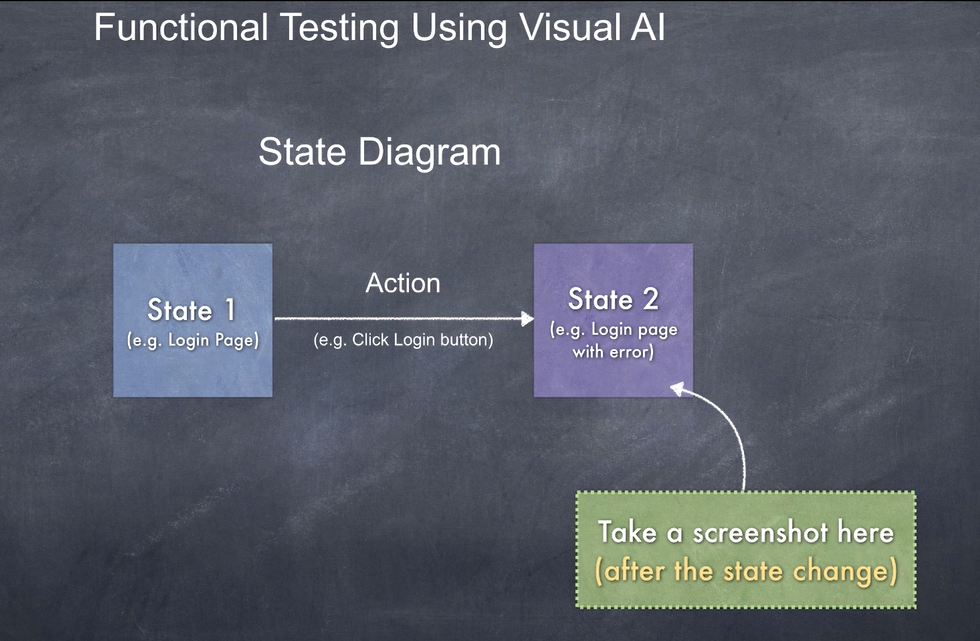
And so, all you need to do to validate the functionality is to simply take a screenshot after that functionality and then delegate that to an AI so that an AI can decide if there are any issues.
So hopefully you got a good idea about how the modern way works.
In the future chapters I’ll go over various functional testing use cases and on various demo apps, including enterprise apps that are built on frameworks such as Salesforce Lightning, SAP Hana etc.
This way, you’ll know how to use this approach on all sorts of apps and all sorts of use cases.
