

Transcripted Summary
In this chapter we’ll look at how to do data driven testing the modern way.
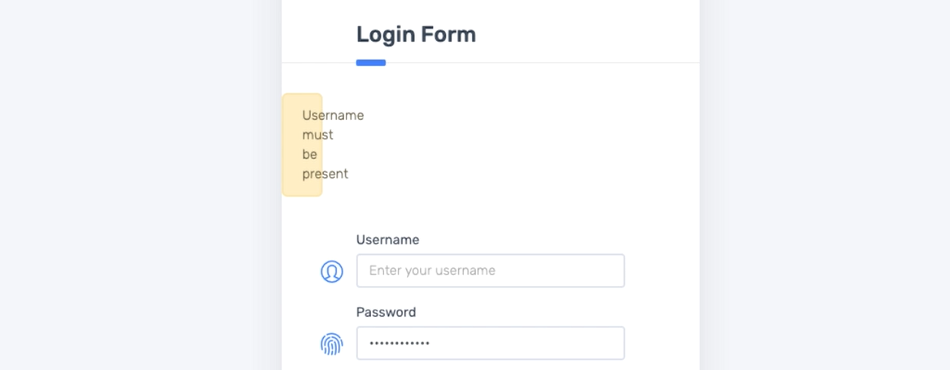
Here is an example login page that behaves differently depending on the input.

So, this is perfect for data-driven-testing.
If we don’t enter username and password, it says, “Both username and password must be present”
If we only enter username, it says, “Password must be present”
If we only enter the password, it says, “Username must be present”
And if we enter any username and password, it logs us into the app
# Here is how the legacy code would look like — there are 4 tests here.
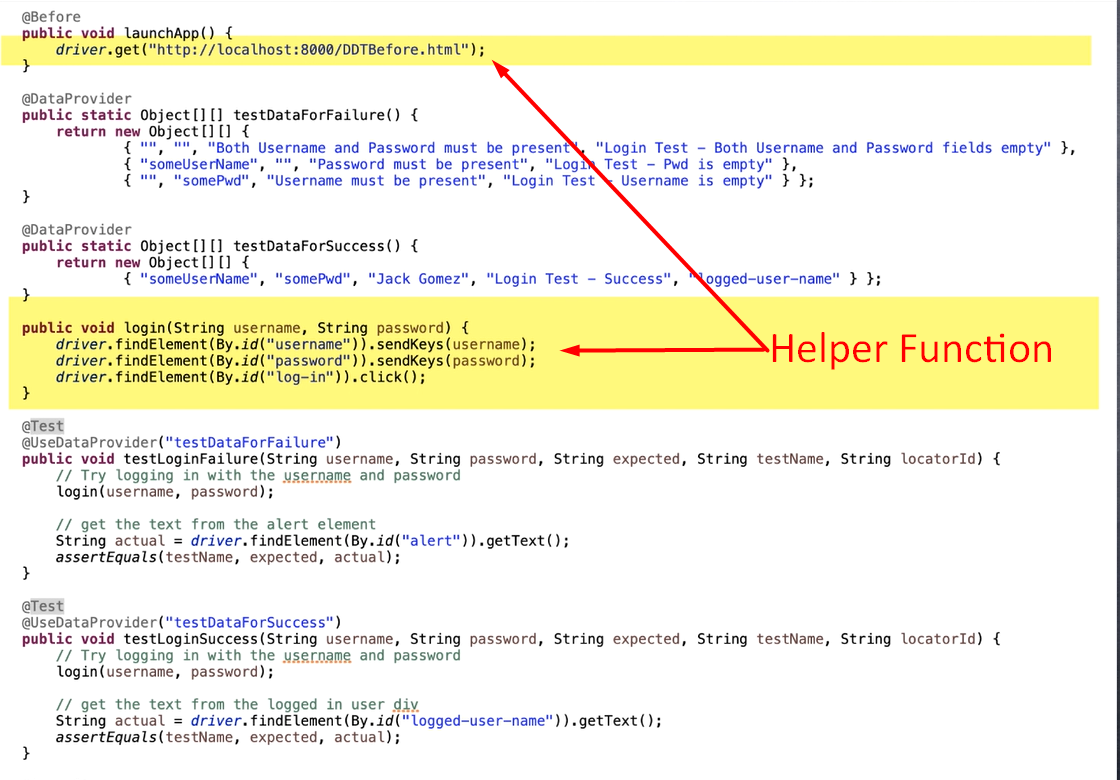
In the first test, you are passing empty Strings for both username and password and have hardcoded the expected error message: "Login Test - Both Username and Password fields empty".
We are using a little helper function that opens the browser, enters the provided username and password, then clicks the log-in button and then checks for the error message. And this function is called by every test.
But notice that it uses the locator [By.id] to find the expected message.
In the second test, you are passing just the username String [“someUserName”] and you are expecting this error message ["Password must be present"].
In the 3rd test you are passing just the password ["somePwd"] and you are expecting this error message ["Username must be present"].
In the last test [testDataForSuccess] you are passing both username and password and you are expecting this text to appear in some locator in the app page after logging in.
Now, let’s run the test.
So far so good. All the tests have passed.
Now, let’s say a new build has appeared, and you ran the test again.
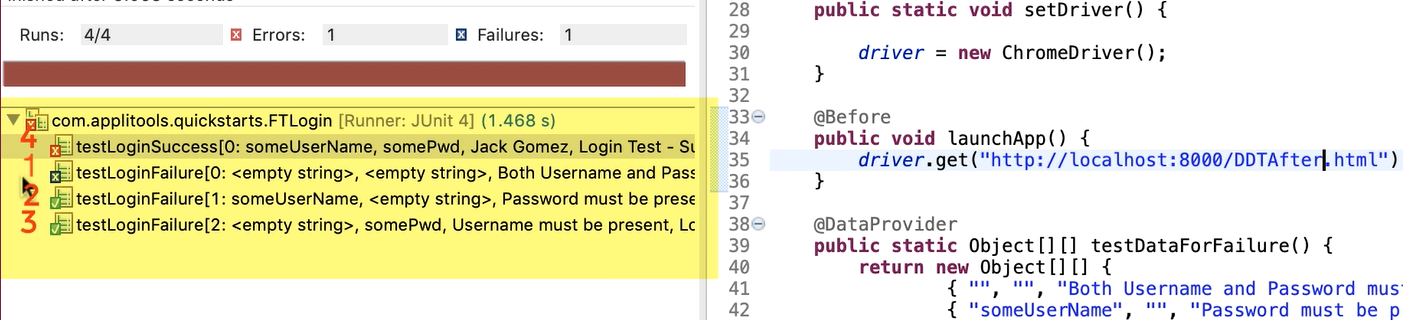
As you can see the 1st and the 4th tests have failed but the 2nd and 3rd tests have passed.
Now let’s look at the new version of the application and see if the results are accurate.
In the first test, when we don’t enter any values, the error text has changed.
Let's say this is the updated message.
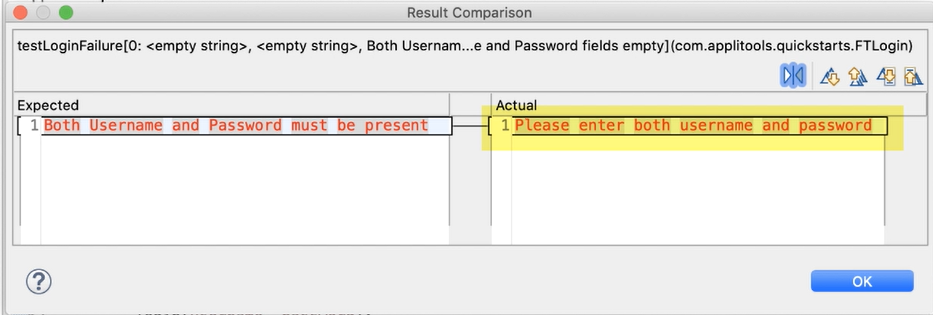
Now you need to update your test. That’s maintenance.
But let’s move on.
In the second test, the error message is present in the DOM but is not visible.
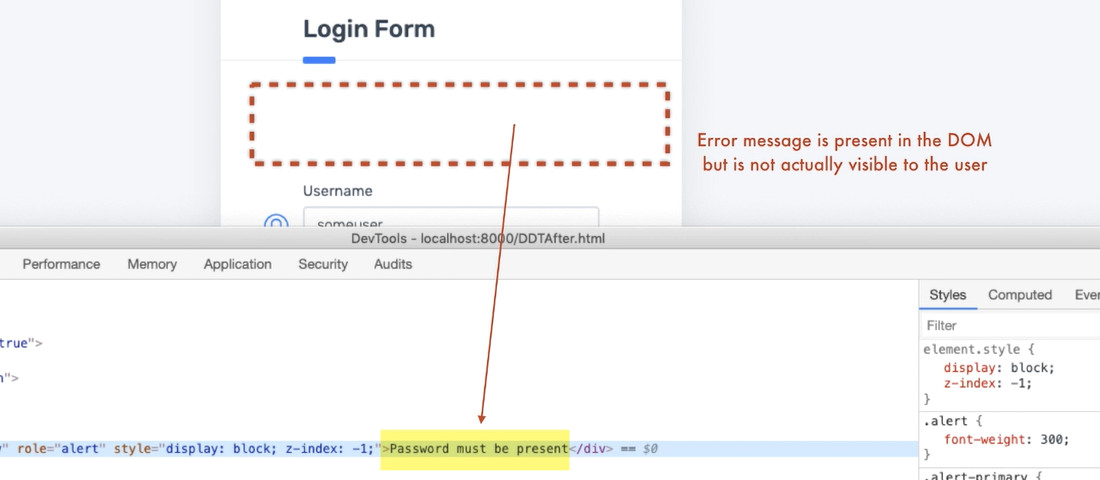
But just because it’s in the DOM, the test passed!
This is a false positive.
In the 3rd test, the error message has a visual bug, but then again, the test passed.
Another false positive.
The 4th test has failed because the locator that we were using to grab some unique text from the logged in page has changed.
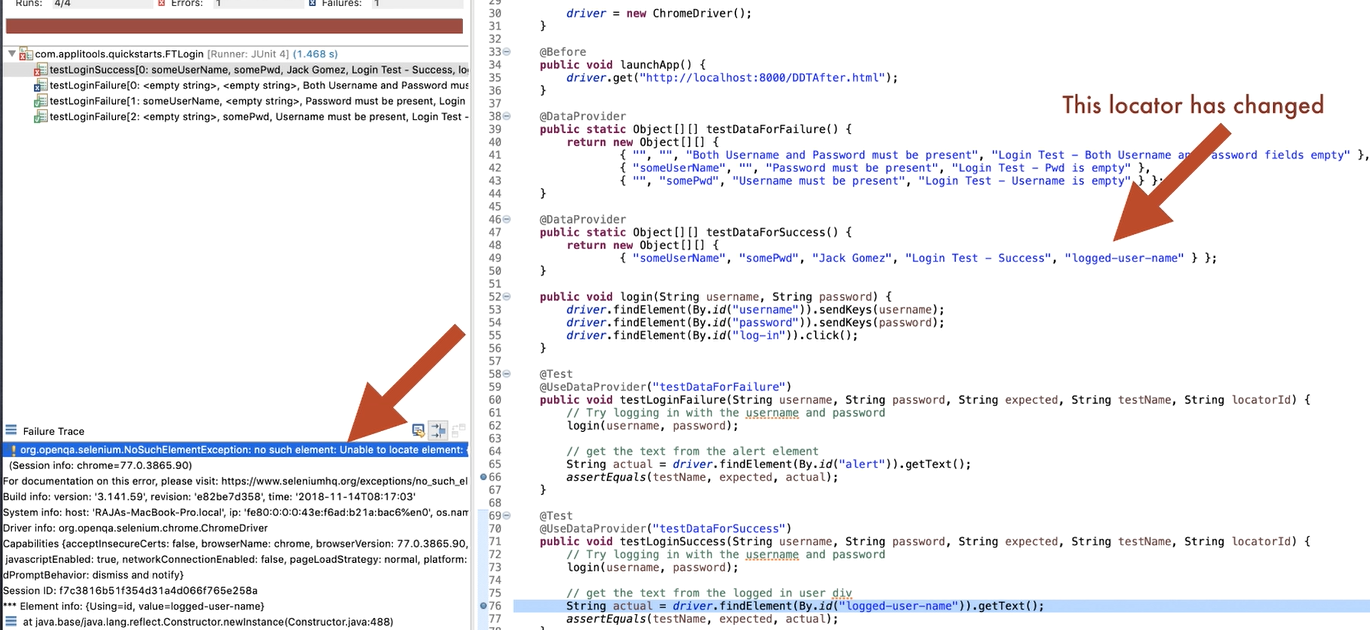
Although the login functionality is not broken, the test is failing! Another issue.
So, all 4 tests have issues!
Now, this situation is quite common if you are maintaining 100s of tests and if your app is constantly changing.
It may not happen to the same test all the time, but something or the other constantly breaks.
# Now let’s look at the modern code.
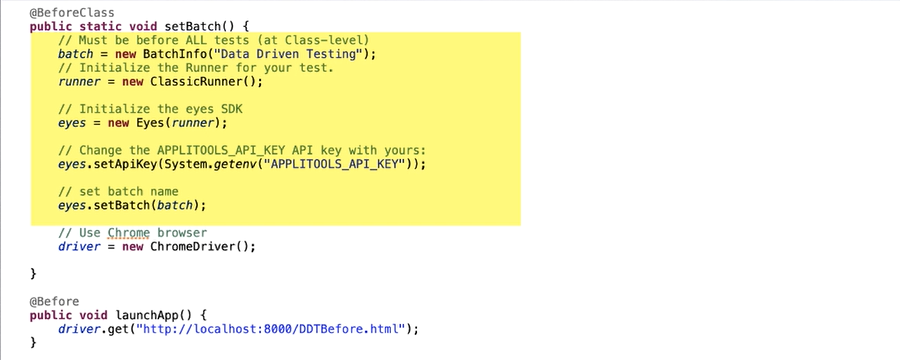
As you can see, we have the Applitools setup code.
And then the actual test code.
If you look at the test code, it’s actually much simpler because we are no longer depending on alert message locator and the user name locator like in the previous code.
So, we don’t need 2 data providers and can just have a single dataProvider and test both the success and failure scenarios.

But it’s up to you how you want to organize your code.
And instead of additional validation code, we simply take screenshots.
To do that we simply start Applitools test by calling eyes.open method and take screenshots using eyes.checkWindow method.
And finally end the Applitools test by calling eyes.closeAsync.
That’s pretty much all the change you need to do in order to and the SDK takes care of taking the screenshot and uploading it to the server.
Now I have run this test twice, once with the old version of the app and then again with the new version of the app. Remember there are actually 4 changes in the newer version of the app.
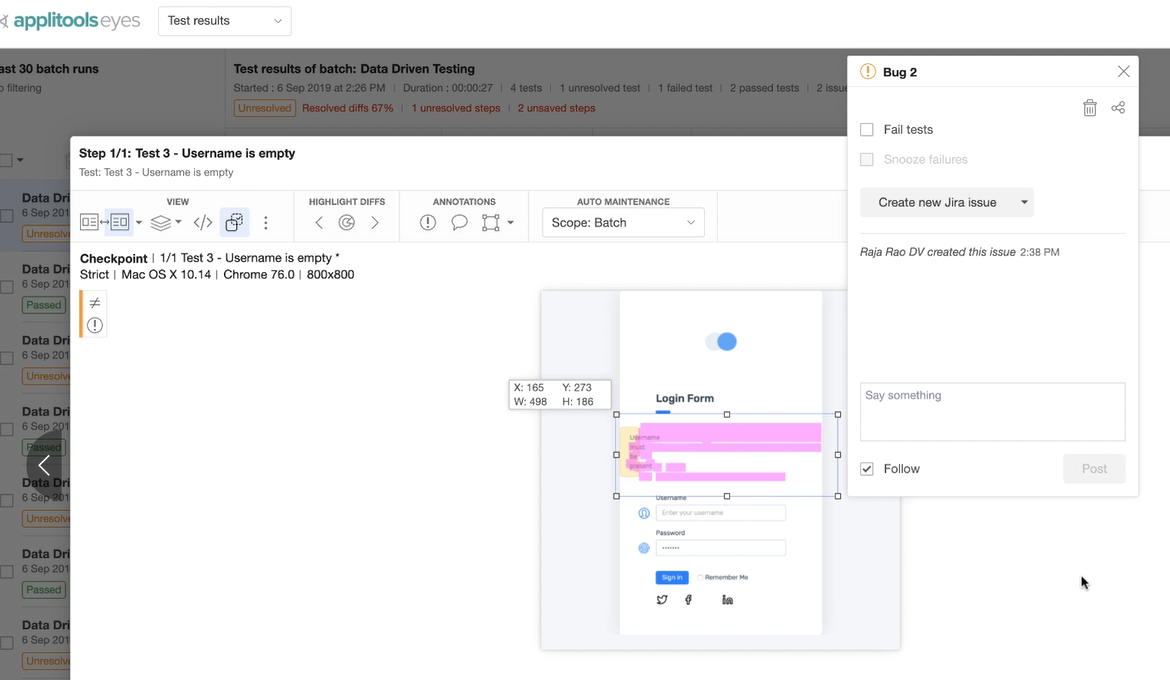
Let’s look at the results in Applitools dashboard and see if it caught all of them.
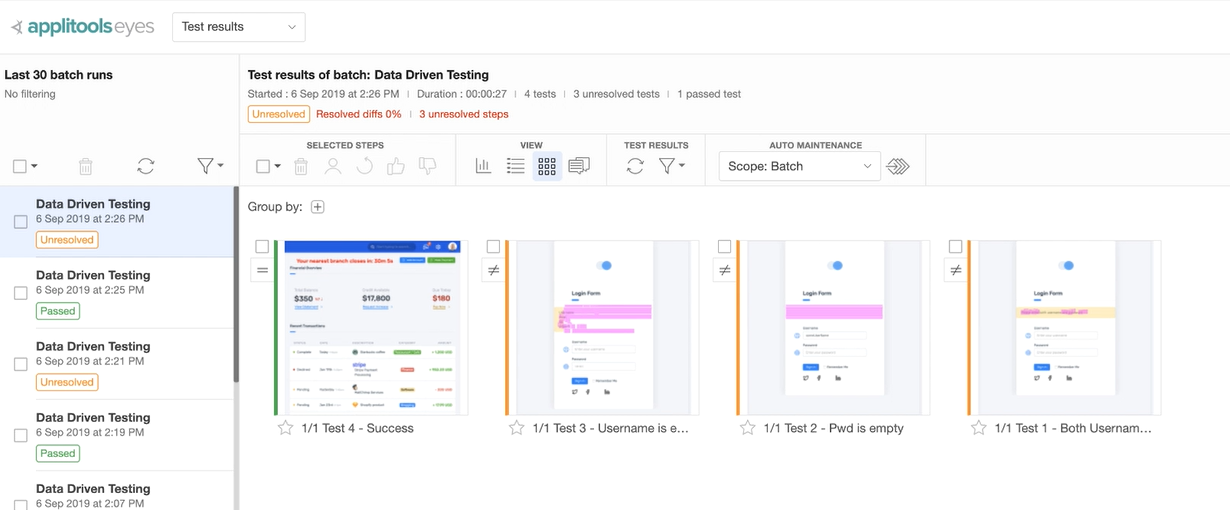
What you see here are 4 screenshots.
For the 1st test, since it’s an enhancement, to update the test, all we need to do is to thumbs up and save it.
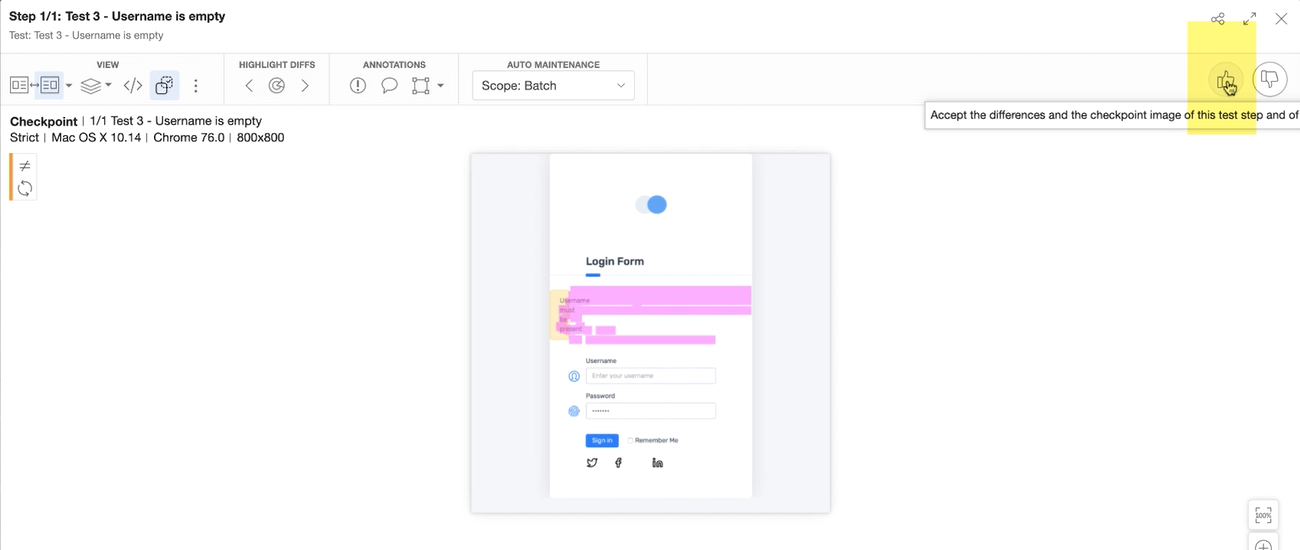
This will update the baseline image and this new image will be used for comparison purposes in the future test runs.
For the second and the 3rd one, we are going to create bugs and mark them as failures.
Pretty simple isn’t it?
Now imagine if you are managing 1000s of tests, how much simpler your life would be?
That’s the power of the modern functional testing using Visual AI.
So, as you saw it’s not only pretty simple to do data driven testing using the modern way, but is also extremely effective in finding bugs, updating tests and overall making you highly productive.
	@Before
	public void launchApp() {
		driver.get("http://localhost:8000/DDTBefore.html");
	}

	@DataProvider
	public static Object[][] testData() {
		return new Object[][] {
				{ "", "", "Both Username and Password must be present", "Login Test - Both Username and Password fields empty" },
				{ "someUserName", "", "Password must be present", "Login Test - Pwd is empty" },
				{ "", "somePwd", "Username must be present", "Login Test - Username is empty" },
				{ "someUserName", "somePwd", "Jack Gomez", "Login Test - Success" } };
	}

	public void login(String username, String password, String testName) {
		eyes.open(driver, "Demo App", testName, new RectangleSize(800, 800));

		driver.findElement(By.id("username")).sendKeys(username);
		driver.findElement(By.id("password")).sendKeys(password);
		driver.findElement(By.id("log-in")).click();

		eyes.check(testName, Target.window().ignoreDisplacements());
		eyes.closeAsync();
	}

	@Test
	@UseDataProvider("testData")
	public void tetLogin(String username, String password, String expected, String testName) {

		// Try logging in with the username and password
		login(username, password, testName);

		// get the text from the alert element
		String actual = driver.findElement(By.id("alert")).getText();
		assertEquals(testName, expected, actual);
	}
}
