

Transcripted Summary
In this chapter, let's learn about expanding Appium's functional testing capabilities with image processing. What I mean by this, is using image processing to help make sure our app functions appropriately. We're not really talking here about visual validation or checking whether visual aspects of the app haven't changed.
We're talking about using images to help us navigate our app when Appium's traditional UI elements just don't cut it for us.
For example, here's a fun little game I found for Android that involves solving little math puzzles in a series of increasingly difficult levels.
Let's say I wanted to automate this game with Appium to make sure its functionality is correct.
The first thing I do is load up Appium desktop and take a peek at the app hierarchy to see what elements I have access to using the standard locator strategies.
Here's a screenshot of what happened when I tried to do that.
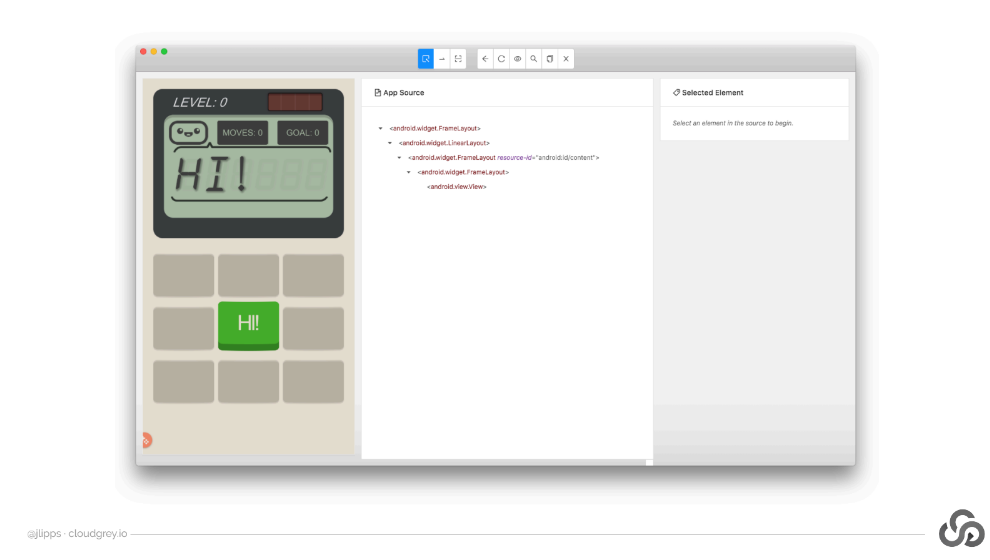
Unfortunately, there is only one leaf note element, which is an abstract Android view.
It appears that the app developer is using some game framework like Unity 3D, for example, to develop the entire functionality of the game — with the result that there are no standard Android UI controls anywhere. In other words, it looks like I'm out of luck.
With no elements to find and interact with, how can I write a test for this?
It's always helpful to ask how a user would respond in this situation. Would an actual human user be stumped here? Of course not.
A typical human user has eyes and a brain and can see and interact with the elements just fine whether they're standard Android components or not. So, what we want to do is use image processing to attempt the same feat.
Let's break down the problem a bit to see how we might solve it with Appium.
So back to our game.
What would make it possible for us as testers to interact with some of these elements?
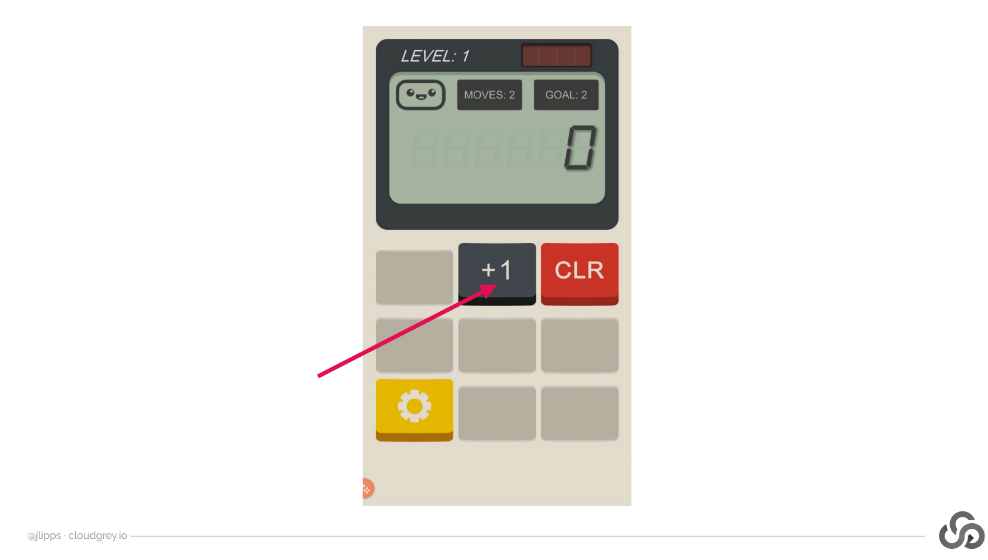
Well first of all, we know that we can use Appium to tap on arbitrary screen coordinates.
So, if we can find some way to get the coordinates of a particular button, like this one, then we can definitely tap on it.
Ideally, what we'd want to be able to do is take a little cropped screenshot of the button we want to tap, like this:
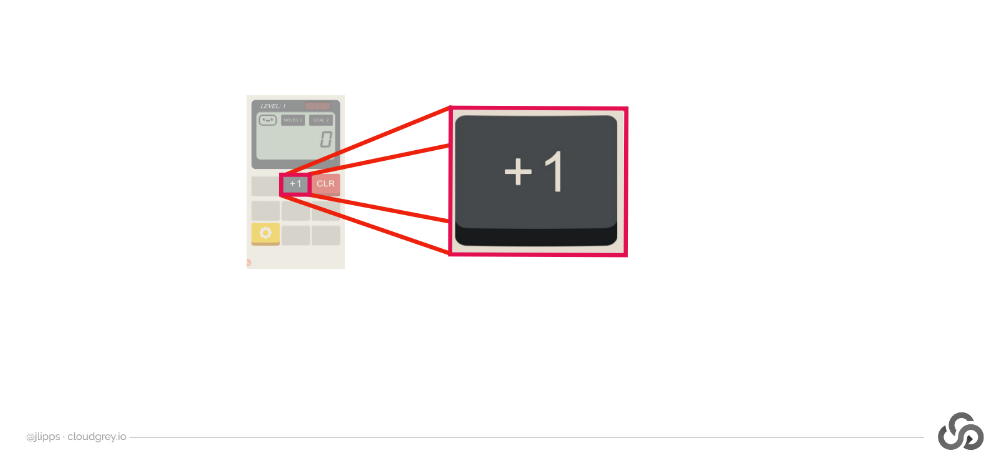
And send it to Appium and say, "Hey Appium, do you see anything that looks like this on the screen at the moment? If so, send me back the screen coordinates for it. That way I can use them to tap on the button."
And essentially, that's what we've built into Appium.
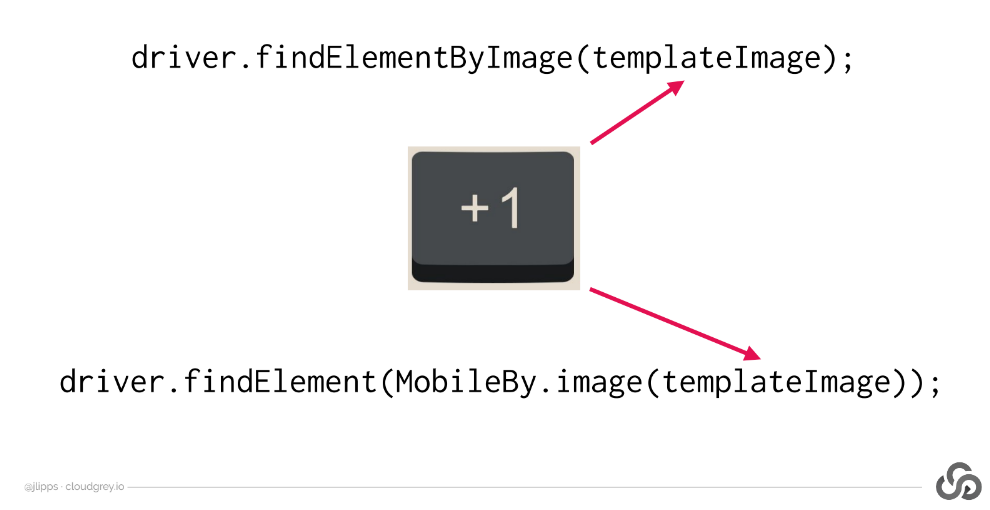
You can now send in images to Appium as base64-encoded strings, and if it finds a match on the screen, it will return to you something call an ImageElement, which in your test code looks just like a regular old web or mobile element.
You can then call the click method on it directly without even needing to explicitly determine coordinates. Appium will handle that for you under the hood.
Note than you can match images in this way using either a driver.findElementByImage or driver.findElement with a MobileBy.image by class.:
driver.findElementByImage(templateImage);driver.findElement(MobileBy.image(templateImage));
Either way, you pass in the same base64-encoded version of your template image.
Using this technique, we can navigate apps that don't have traditional UI components, which makes it possible to test games, for example.
# How does it work?
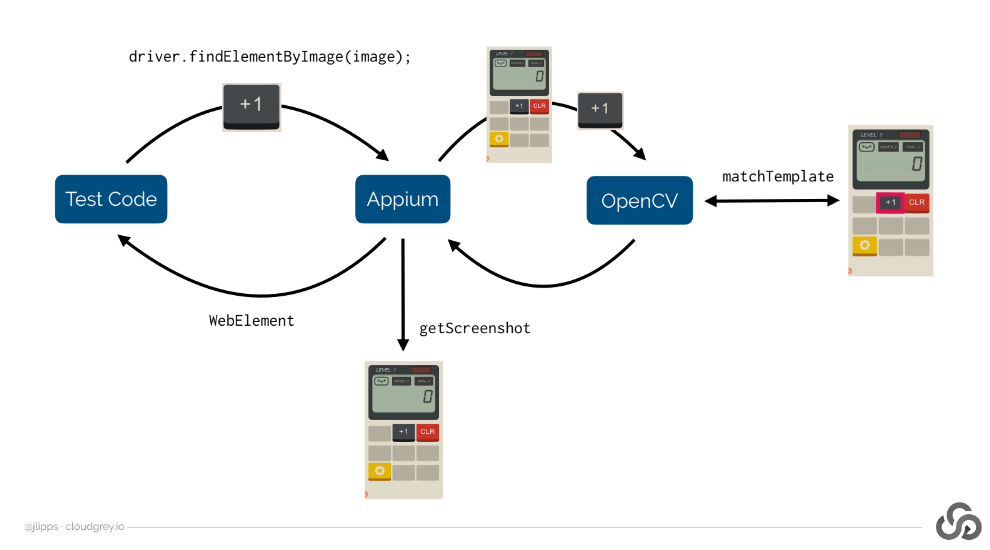
Well, when you request Appium to find you an ImageElement using an image you've saved, like this plus one [“+1”] button here, Appium takes a screenshot of the app at that point in time. Then, it uses the OpenCV image processing library to find any matches of your image template, for example, the plus one button here, inside the screenshot that was just taken.
OpenCV will find the most likely position and size of the matched region in the screenshot and let Appium know how confident it was of the match. If the confidence is high enough, Appium will wrap up that match as an ImageElement and send it on back to you. What this means is that it's important to select your template images so that they generate high confidence matches whenever possible.
For example, when you take a screenshot of the element you want to find, it's important to make sure it's done in the same resolution as the device screenshot Appium will ultimately use.
Tip for High Confidence Screenshots
The safest method is to generate a screenshot from Appium then open that up in an image editor cropping out the element you're interested in. That guarantees that the template you send in will match the resolution of the screenshot Appium's currently using internally for comparison.
It's also possible to adjust the confidence threshold Appium uses to determine whether a match was successful, which we'll see shortly in the demo.
Okay, so this technique makes it possible to test games like the calculator one I've been showing, but what about apps whose screens change much more frequently?
The fact that Appium has to take a screenshot and compare with your template image means that the screen might have changed by the time you go to tap.
It's important to make sure that Appium's screenshot action takes as little time to complete as possible. For this reason, I consider it essential** NOT** to rely on Appium's built in screenshotting capabilities since they're based on Android methods which can be quite slow, sometimes taking several seconds per screenshot. Instead, I recommend using an MJPEG Server.
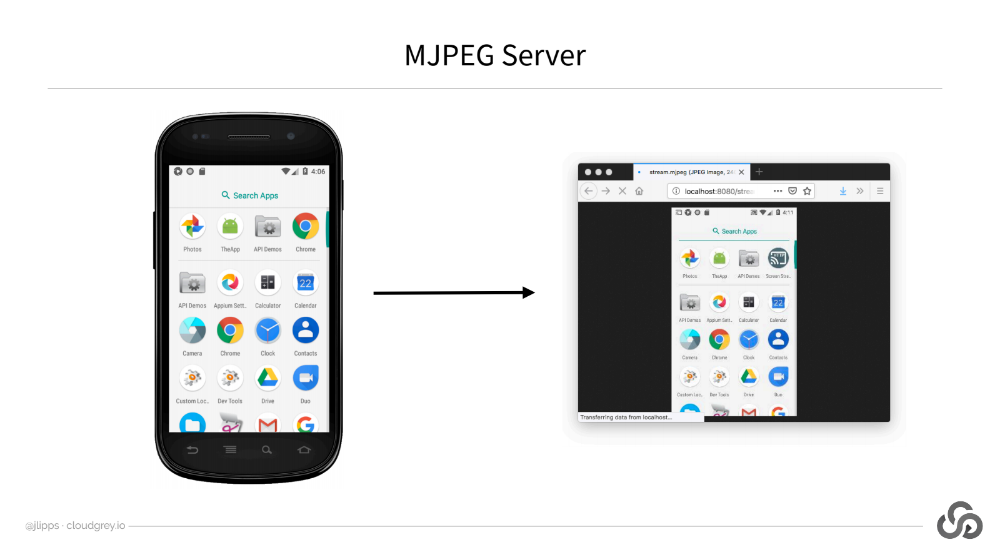
MJPEG is just a streaming JPEG image format, and Appium knows how to attach to this image stream and use it for screenshots if you tell it to.
# Using an MJPEG Server
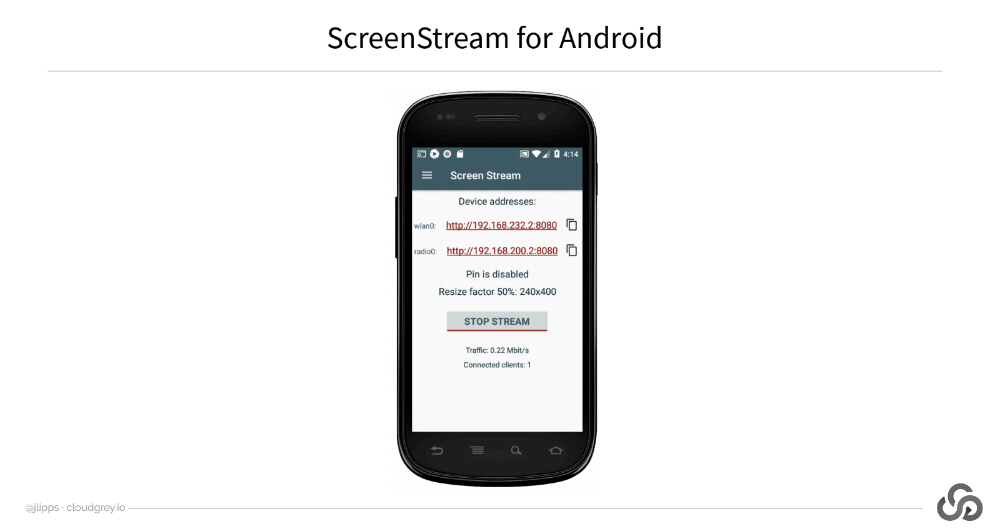
Let's first look at how to get an MJPEG server up and running. There are many ways to do this, but I downloaded and installed a free app on my Android devices called Screen Stream, which streams what's on the screen in MJPEG format.
Here's my Android Emulator and here's the screen streaming app. You can see that when we launch it, it gives us a URL we can use to see the stream.
So, I have the stream already running, let's try and visit this URL and see what happens.
Well, nothing is happening.
That's because I actually don't have access to this host from my machine here. This is a network address that's running on the Android Emulator only, not on my local machine. So, I need to actually forward this port to my local machine to be able to use it.
Let's go to a terminal and I'll go ahead and run this command, which I've previously run.
adb forward
adb -s emulator-5554 forward tcp:8080 tcp 8080
and it just forwards the TCP port of 8080 on the emulator to the same port on my local machine.
So, let's run that.
Now in my browser, I should be able to simply navigate to “localhost:8080” and voila!, here we have the screen on my browser. You can see that if I make a change in the emulator, the change is reflected very quickly in the MJPEG stream. That's what we want.
Now, we just need to tell Appium how to consume this stream and use it for screenshots rather than taking screenshots on its own.
We do this by using the mjpegScreenshotUrl capability.
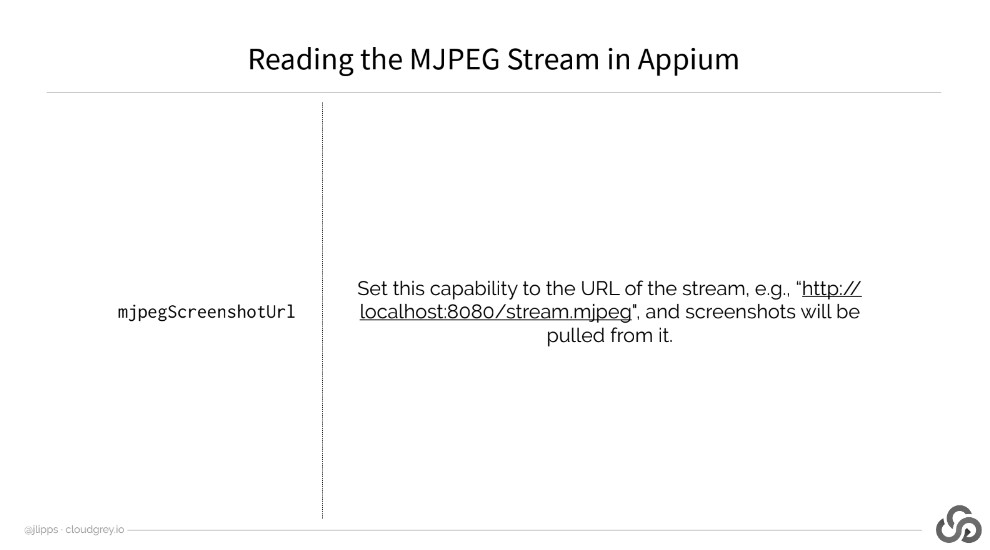
Basically, we set it to the URL of the MJPEG stream and anytime Appium needs a screenshot, it will use the last image it found on the stream.
Okay, now that we have all the conceptual pieces, let's work on a real example of playing the first few levels of this calculator game we've been looking at. But first, I'm going to close down my Android emulator because I'm actually going to run this particular example on a real device for performance. We'll be able to watch the stream in browser as before, even though my device is of course offscreen.
To do that, I'm going to use my real device and get the correct URL of the stream. And here we go. So, this is now my real device that we can watch here in Firefox.
# Okay, let's go to our code project.
This is IntelliJ and this is our project over here.
We've got some Java files and some resources, which we'll explore in a moment.
The first thing we want to do is have a look at our Gradle file.
So, this is a Gradle-based project, and here's our “build.gradle” file.
# build.gradle
group 'io.cloudgrey.tau_course'
version '1.0-SNAPSHOT'
apply plugin: 'java'
sourceCompatibility = 1.8

repositories {
    mavenCentral()
}

dependencies {
    testCompile group: 'junit', name: 'junit', version: '4.12'
    testCompile group: 'io.appium', name: 'java-client', version: '7.0.0'
    testCompile group: 'com.applitools', name: 'eyes-appium-java4', version: '4.0.2'
}
You can see that the dependencies are pretty minimal. Basically, involving junit for running tests, the Appium client for talking to Appium, and the Applitools SDK, which we'll talk about later.
Now here's a file called “BaseTest.java” and this is just a base test class which helps us keep our actual test code clean.
# BaseTest.java
import io.appium.java_client.android.AndroidDriver;
import java.io.IOException;
import java.net.URISyntaxException;
import java.net.URL;
import java.nio.file.Files;
import java.nio.file.Path;
import java.nio.file.Paths;
import java.util.Base64;
import org.junit.After;
import org.junit.Before;
import org.openqa.selenium.remote.DesiredCapabilities;

public class BaseTest {

    AndroidDriver driver;

    protected DesiredCapabilities getCaps() throws Exception {
        throw new Exception("Must implement getCaps");
    }

    @Before
    public void setUp() throws Exception {
        URL server = new URL("http://localhost:4723/wd/hub");
        driver = new AndroidDriver(server, getCaps());
    }

    @After
    public void tearDown() {
        if (driver != null) {
            driver.quit();
        }
    }

    Path getResource(String fileName) throws URISyntaxException {
        URL refImgUrl = getClass().getClassLoader().getResource(fileName);
        return Paths.get(refImgUrl.toURI()).toFile().toPath();
    }

    private String getResourceB64(String fileName) throws URISyntaxException, IOException {
        Path refImgPath = getResource(fileName);
        return Base64.getEncoder().encodeToString(Files.readAllBytes(refImgPath));
    }

    String getReferenceImageB64(String fileName) throws URISyntaxException, IOException {
        return getResourceB64("images/" + fileName);
    }
}
All it does is handle setup and tear down as well as define some helper methods for loading the various image template files, which we'll be storing in our resources directory over here.
In fact, let's take a look at that now.
So, here are all the images in this images directory that I've taken from the different screenshots from the game representing the buttons I want to try and tap through the course of the test. For example, here's a button that we want to try and tap, a green OK button.
Finally, we can take a look at the actual test we're interested in running.
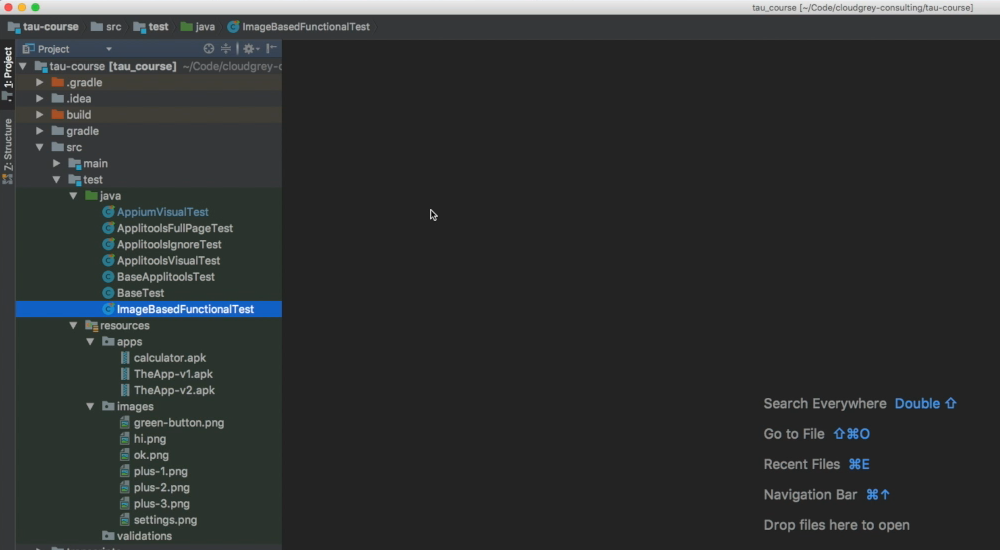
Let's go through it. It's this one here, “ImageBasedFunctionalTest.java”.
# ImageBasedFunctionalTest.java
import io.appium.java_client.MobileBy;
import io.appium.java_client.Setting;
import java.net.URISyntaxException;
import org.junit.Test;
import org.openqa.selenium.NoSuchElementException;
import org.openqa.selenium.TimeoutException;
import org.openqa.selenium.WebElement;
import org.openqa.selenium.remote.DesiredCapabilities;
import org.openqa.selenium.support.ui.ExpectedConditions;
import org.openqa.selenium.support.ui.WebDriverWait;

public class ImageBasedFunctionalTest extends BaseTest {

    private WebDriverWait shortWait;

    @Override
    protected DesiredCapabilities getCaps() throws URISyntaxException {

        DesiredCapabilities capabilities = new DesiredCapabilities();
        capabilities.setCapability("platformName", "Android");
        capabilities.setCapability("deviceName", "Android Emulator");
        capabilities.setCapability("automationName", "UiAutomator2");
        capabilities.setCapability("app", getResource("apps/calculator.apk").toString());
        capabilities.setCapability("appWaitActivity", "com.unity3d.player.UnityPlayerActivity");
        capabilities.setCapability("mjpegScreenshotUrl", "http://172.20.10.4:8080/stream.mjpeg");
        return capabilities;
    }

    @Test
    public void testCalculatorGame() throws Exception {

        // set the image match threshold for these finds
        driver.setSetting(Setting.IMAGE_MATCH_THRESHOLD, 0.85);

        shortWait = new WebDriverWait(driver, 2);

        navToFirstLevel();
        playLevel(1);
        playLevel(2);

        try { Thread.sleep(3000); } catch (Exception ign) {}
    }

    private WebElement waitForImage(WebDriverWait wait, String image) {
        return wait.until(ExpectedConditions.presenceOfElementLocated(MobileBy.image(image)));
    }

    private void clickImage(String image) {
        waitForImage(shortWait, image).click();
        actionDelay();
    }

    private void actionDelay() {
        try { Thread.sleep(1000); } catch (Exception ign) {}
    }

    private void navToFirstLevel() throws Exception {

        final String greenButton = getReferenceImageB64("green-button.png");
        final String settings = getReferenceImageB64("settings.png");

        boolean settingsVisible = false;
        int count = 0, maxCount = 20;

        while (!settingsVisible && count < maxCount) {
            count += 1;

            try {
                clickImage(greenButton);
            } catch (TimeoutException skip) {
                continue;
            }

            try {
                driver.findElement(MobileBy.image(settings));
                settingsVisible = true;
            } catch (NoSuchElementException ign) {}
        }

        if (count >= maxCount) {
            throw new Exception("Could not navigate to first level");
        }
    }

    private void playLevel(int level) throws Exception {

        final String plus1 = getReferenceImageB64("plus-1.png");
        final String plus2 = getReferenceImageB64("plus-2.png");
        final String plus3 = getReferenceImageB64("plus-3.png");
        final String okButton = getReferenceImageB64("ok.png");
        final String greenButton = getReferenceImageB64("green-button.png");

        WebElement el;

        switch(level) {
            case 1:
                el = waitForImage(shortWait, plus1);
                el.click(); actionDelay();
                el.click(); actionDelay();
                break;

            case 2:
                el = waitForImage(shortWait, plus3);
                el.click(); actionDelay();
                el.click(); actionDelay();
                clickImage(plus2);
                break;

            default:
                throw new Exception("Don't know how to play that level yet");
        }

        // complete level
        clickImage(okButton);

        // go to next level
        clickImage(greenButton);
    }
}
First of all, we have a method, getCaps, that sets up our capabilities which are all standard capabilities for starting an Appium Android test.
And you can see that we included the mjpegScreenshotUrl capability —
capabilities.setCapability("mjpegScreenshotUrl", "http://172.20.10.4:8080/stream.mjpeg");
— pointing to the stream at a particular, specific local network URL, the same one that we're looking at in Firefox. As I said before, I'll be using a real device to run this test so we can watch it proceed via the browser.
Then we have our main test method, testCalculatorGame, which does a few things.
It first of all sets the image match threshold to what we want using this
Setting.IMAGE_MATCH_THRESHOLD. We're setting it to 0.85. This is a number that I tweaked while developing this test to make sure we are finding the elements that we want and not finding the elements that we don't want.Then all we do is navigate to the first level [
navToFirstLevel], which takes some doing because there's a lot of intro stuff in this game.And finally, we play level 1 [
playLevel(1)] and play level 2 [playLevel(2)].Then we
sleepa bit just to make sure we see that we actually finished level 2.
For Independent Learning
There's a fair amount of complexity in the navToFirstLevel method down here, because I wanted to keep the code free of repetition, even though the actions we have to take in the app are very repetitive, involving tapping a green button almost a dozen times before we get to the game itself. So, I won't go through this method in detail now, just have a look at the code yourself if you're interested later on.
Instead, let's take a look at the playLevel function.
It's basically a big switch statement that we can add to as we want to teach Appium how to play additional levels of this game.
At the top of it, in these lines here:
private void playLevel(int level) throws Exception {
    final String plus1 = getReferenceImageB64("plus-1.png");
    final String plus2 = getReferenceImageB64("plus-2.png");
    final String plus3 = getReferenceImageB64("plus-3.png");
    final String okButton = getReferenceImageB64("ok.png");
    final String greenButton = getReferenceImageB64("green-button.png");
}
We define our image templates that we're going to use to find image elements throughout the course of the test.
You can see that we're using our helper methods from our base class to load the saved images as base64-encoded strings. That's this getReferenceImageB64 method.
Then, depending on the level, we merely find the appropriate elements and click them, for example, “plus-1” or “plus-3”.
I've added a short delay after each action because I don't want Appium to look for the next button until it has had a chance to appear.
Some of the buttons in the app look so similar or are in fact identical that I don't want Appium to tap one twice instead of waiting for the next instance of the button to actually be ready.
So that's basically it.
Let's run the test to see how it goes.
So, I'll go up here to our test and run it. Of course, I didn't mention this, but I also have an Appium server running, so make sure you have your Appium server running.
We can see that things are happening over here with the Appium server.
Here we have the calculator game running and we're trying to now find the parts of the game that match the template images that we've saved before. So, you can see that we tapped on one button and another and we can see the really cute aspects of this game here with this little robot that we get to interact with, and the robot is teaching us how to play and so on and so forth.
So, this is a huge waste of time. If we were actually testing this app for real, we would want to find some way to shortcut, maybe by using Android activities, maybe by relying on some saved state of having played this game before. Something like that.
Anyway, we have now worked through the little tutorial, so the game is about to present us with level 1, which basically involves hitting the “+1” button twice to get to the desired answer of 2.
And then once we've done that, we can click OK and then we can tell the app that we're ready for level 2, which is the last level that we're going to try and play in this demo.
And again, it involves hitting the “+3” button twice and the “+2” button once. And we look for the OK button to make sure that we actually completed the level successfully.
And at this point, our test is done.
And we should be able to go back and see that it passed in IntelliJ, which means everything worked fine.
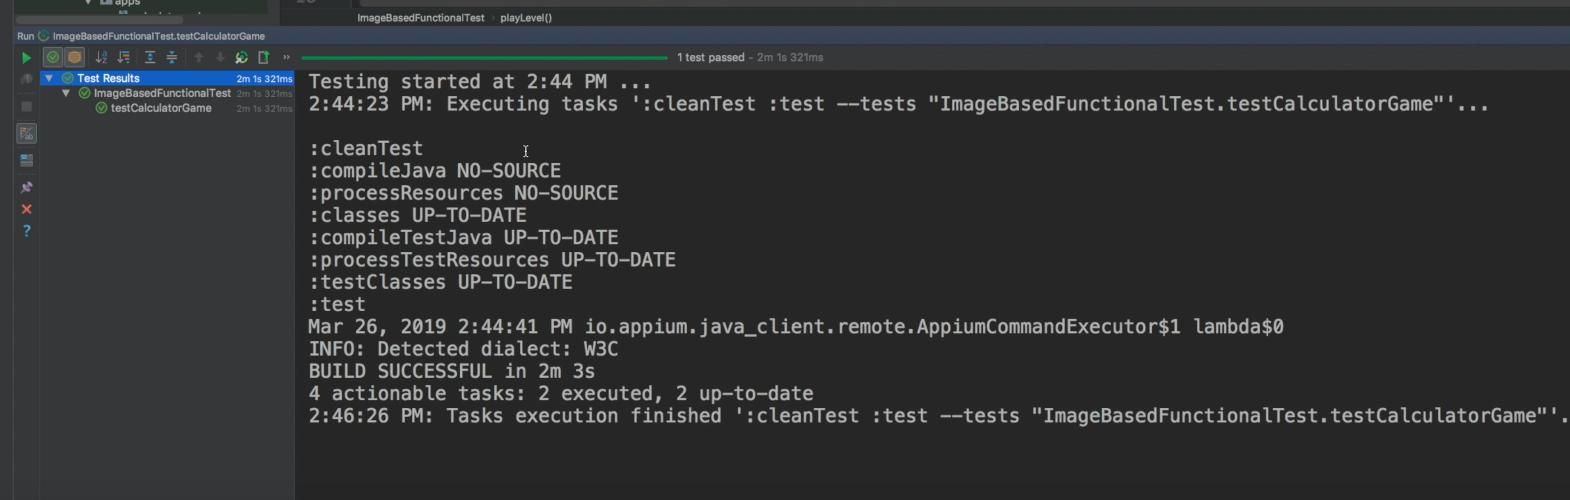
Great. Our test passed.
So, you can see how using the image locator strategy, driver.FindByImage and waitForImage here, and here's where we're actually doing the find using the WebDriverWait which does the driver.FindByImage internally.
private WebElement waitForImage(WebDriverWait wait, String image) {
    return wait.until(ExpectedConditions.presenceOfElementLocated(MobileBy.image(image)));
}
So, you can see how using this image locator strategy is a powerful tool for navigating and testing apps when using traditional UI element locator strategies just doesn't work.
