

Transcripted Summary
In this chapter, we'll explore how to use Appium's image processing for a new purpose, visual validation of our app.
What's visual validation? Basically, it's checking that there were no inappropriate visual changes between versions of our app.
Let's dig into this a bit more.
The first thing we need to discuss is the difference between functional and visual testing.
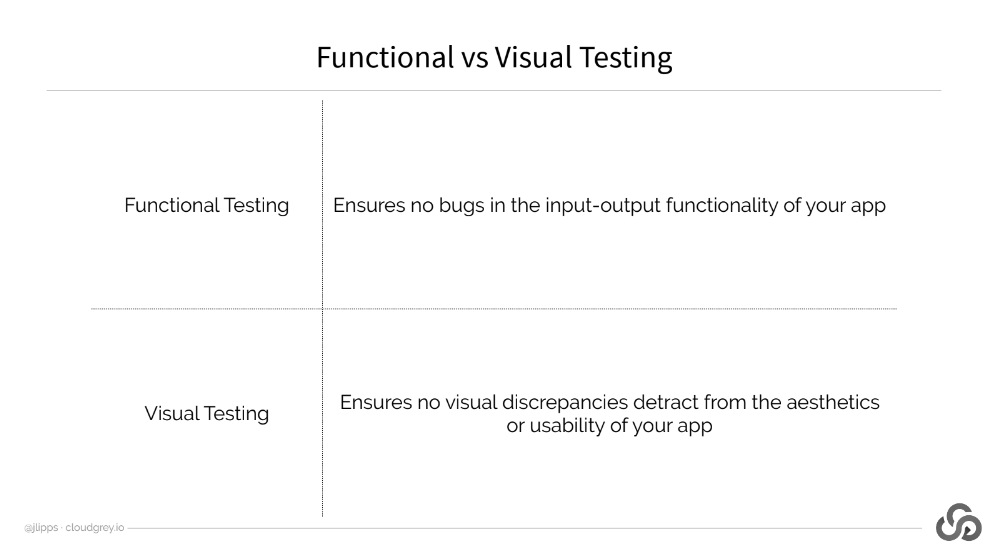
Functional testing ensures your app has no regressions or bugs in the functioning of your app. But as we all know, usability is about function and form.
Form or visual design is very important to a user's experience of your app. And there can be visual bugs or visual regressions that, while they may not technically affect the functionality of your app, might very seriously impact the usability or user experience of your app.
If a button, for example, changes from a color that stands out in the background to one that doesn't, users might think the button has disappeared, even if to Appium it's just as tappable.
# So, how do we use Appium for the purpose of visual validation?
It's all about screenshots. Basically, for every view that we want to visually validate in the course of a visual test, we need to first take a screenshot of that view and save it.
We'll call these the baseline screenshots.
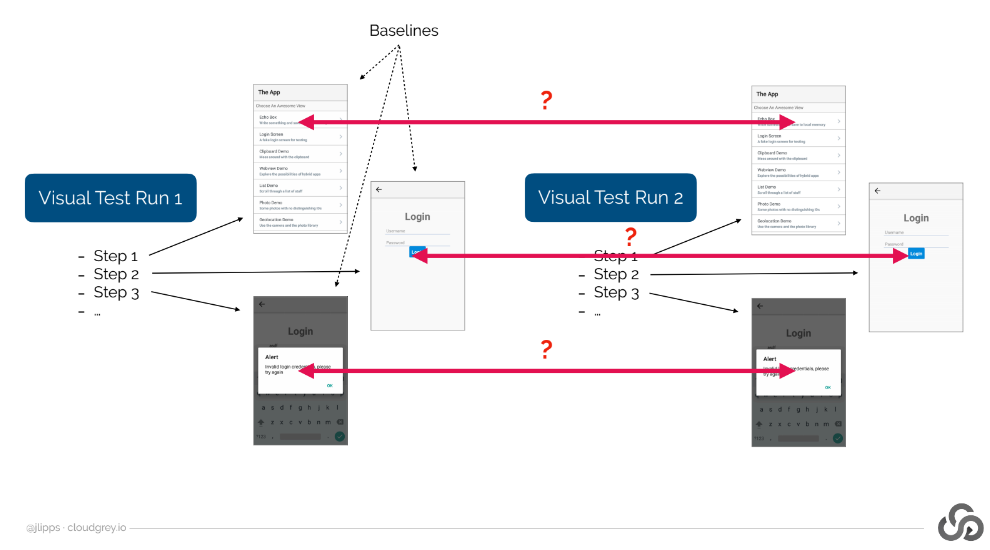
They're the gold standard that we'll be comparing our future test runs against.
Once we have our baselines, then it's easy to mix visual validation in with our existing functional validation. As we move through subsequent runs of our tests and steps of those tests, we can simply add visual assertions by comparing a fresh screenshot with our baseline.
If the comparison is sufficiently strong, we consider the test to have passed. Otherwise, we say it failed.
We do this comparison using Appium's image processing capabilities powered by OpenCV.
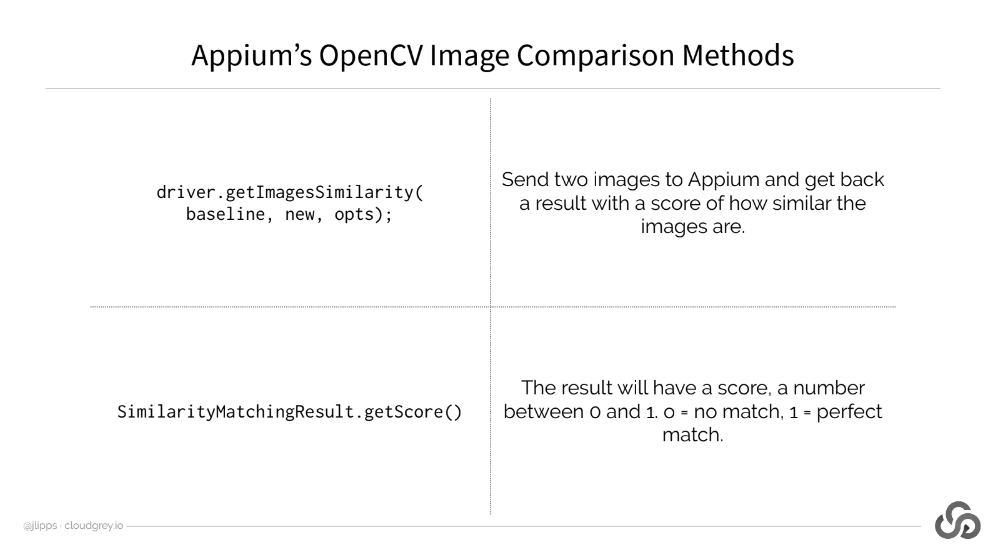
In the Appium Java client, this takes place using the driver.getImagesSimilarity command.
This command takes 2 image byte arrays as input. And the output is a score that tells us how similar the 2 images are.
At this point, we have to just look at the score.
If it's low, then it means a lot has changed visually between the current test run and our baseline.
If it's high, it means not a lot has changed.
But what do low and high mean?
Well, in a perfect world, high would mean a score of 1, which is a pixel for pixel match between the 2 images.
In the real world though, we can't assume we'll ever get a perfect match due to factors like the system clock showing a different time in our baseline image than the current test image.
So, in practice, I found a value of about 0.99 to be pretty reliable.
Anything above this and it's likely that nothing changed.
Anything below that value, and it's likely something changed other than the system UI.
But of course, you'll need to find the right numbers for your particular app and platform experimentally.
Unfortunately, Appium's image comparison is pretty basic. And to get more sophisticated, you'd need to adjust images on your own, say by writing code to paint over areas of the screen you know tend to change.
But what if the match score is too low?
What do we do then? Well, depending on our validation strategy, we might decide to fail the test by throwing an exception or writing to a log, or whatever makes sense for our team.
But in any case, we probably want to see what changed exactly. To do this, we can pass an option to the comparison method, which will cause Appium to send an image back with the comparison result. This image will be a side by side view of the baseline image in the current image with changed sections highlighted in red as you see here. Saving these images somewhere to facilitate review of failures later on is an essential step.
Okay, let's stop talking theory and look at a real-world example.
Here's my test app. It's a simple little thing, but even it can have bugs.
In fact, I have created 2 versions of this app, and one of them does contain a visual bug that wouldn't affect the functionality of the app but does make it more ugly.
So, we're going to use what we've learned to detect this visual regression automatically.
Okay, back to our project in IntelliJ.
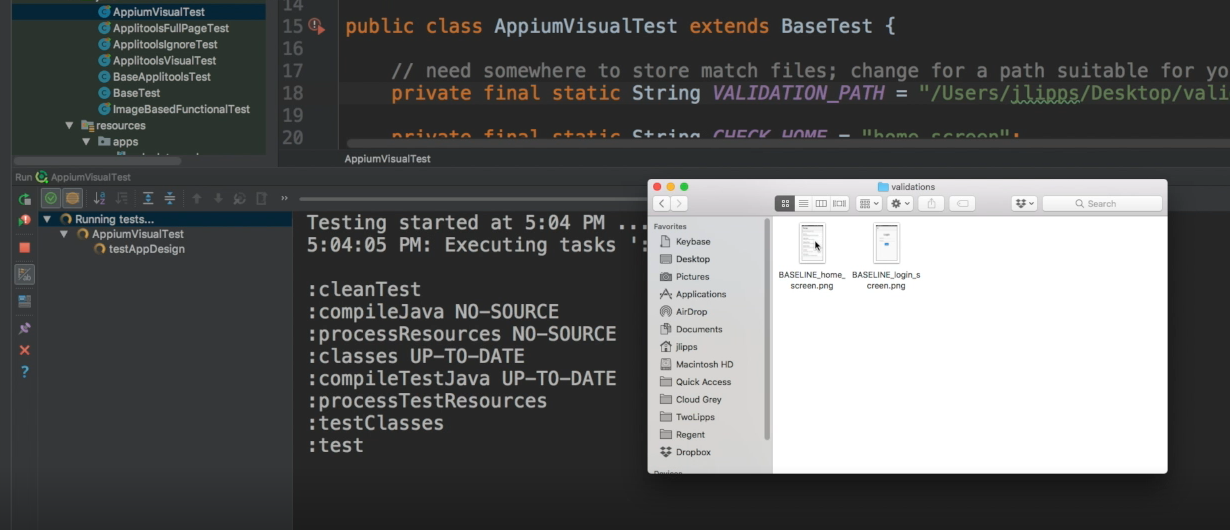
Let's open up a new file. This one is called “AppiumVisualTest.java”.
# AppiumVisualTest.java
import io.appium.java_client.MobileBy;
import io.appium.java_client.imagecomparison.SimilarityMatchingOptions;
import io.appium.java_client.imagecomparison.SimilarityMatchingResult;
import java.io.File;
import java.net.URISyntaxException;
import org.apache.commons.io.FileUtils;
import org.junit.Test;
import org.openqa.selenium.By;
import org.openqa.selenium.OutputType;
import org.openqa.selenium.WebElement;
import org.openqa.selenium.remote.DesiredCapabilities;
import org.openqa.selenium.support.ui.ExpectedConditions;
import org.openqa.selenium.support.ui.WebDriverWait;

public class AppiumVisualTest extends BaseTest {

    // need somewhere to store match files; change for a path suitable for your system
    private final static String VALIDATION_PATH = "/Users/jlipps/Desktop/validations";
    private final static String CHECK_HOME = "home_screen";
    private final static String CHECK_LOGIN = "login_screen";
    private final static String BASELINE = "BASELINE_";
    private final static double MATCH_THRESHOLD = 0.99;
    private final static By LOGIN_SCREEN = MobileBy.AccessibilityId("Login Screen");
    private final static By USERNAME_FIELD = MobileBy.AccessibilityId("username");

    @Override
    protected DesiredCapabilities getCaps() throws URISyntaxException {
        DesiredCapabilities capabilities = new DesiredCapabilities();
        capabilities.setCapability("platformName", "Android");
        capabilities.setCapability("deviceName", "Android Emulator");
        capabilities.setCapability("automationName", "UiAutomator2");
        capabilities.setCapability("app", getResource("apps/TheApp-v1.apk").toString());

        // make sure we uninstall the app before each test regardless of version
        capabilities.setCapability("uninstallOtherPackages", "io.cloudgrey.the_app");

        return capabilities;
    }

    private WebElement waitForElement(WebDriverWait wait, By selector) {
        WebElement el = wait.until(ExpectedConditions.presenceOfElementLocated(selector));

        try { Thread.sleep(750); } catch (InterruptedException ign) {}

        return el;
    }

    @Test
    public void testAppDesign() throws Exception {
        WebDriverWait wait = new WebDriverWait(driver, 5);

        // wait for an element that's on the home screen
        WebElement loginScreen = waitForElement(wait, LOGIN_SCREEN);

        // now we know the home screen is loaded, so do a visual check
        doVisualCheck(CHECK_HOME);

        // nav to the login screen, and wait for an element that's on the login screen
        loginScreen.click();
        waitForElement(wait, USERNAME_FIELD);

        // perform our second visual check, this time of the login screen
        doVisualCheck(CHECK_LOGIN);
    }

    private void doVisualCheck(String checkName) throws Exception {

        String baselineFilename = VALIDATION_PATH + "/" + BASELINE + checkName + ".png";
        File baselineImg = new File(baselineFilename);

        // If no baseline image exists for this check, we should create a baseline image
        if (!baselineImg.exists()) {
            System.out.println(String.format("No baseline found for '%s' check; capturing baseline instead of checking", checkName));
            File newBaseline = driver.getScreenshotAs(OutputType.FILE);
            FileUtils.copyFile(newBaseline, new File(baselineFilename));
            return;
        }

        // Otherwise, if we found a baseline, get the image similarity from Appium. In getting the similarity,
        // we also turn on visualization so we can see what went wrong if something did.

        SimilarityMatchingOptions opts = new SimilarityMatchingOptions();
        opts.withEnabledVisualization();

        SimilarityMatchingResult res = driver.getImagesSimilarity(baselineImg, driver.getScreenshotAs(OutputType.FILE), opts);

        // If the similarity is not high enough, consider the check to have failed
        if (res.getScore() < MATCH_THRESHOLD) {
            File failViz = new File(VALIDATION_PATH + "/FAIL_" + checkName + ".png");
            res.storeVisualization(failViz);

            throw new Exception(
                String.format("Visual check of '%s' failed; similarity match was only %f, and below the threshold of %f. Visualization written to %s.",
                    checkName, res.getScore(), MATCH_THRESHOLD, failViz.getAbsolutePath()));
        }

        // Otherwise, it passed!
        System.out.println(String.format("Visual check of '%s' passed; similarity match was %f",
            checkName, res.getScore()));
    }
}
You can see that it extends our same BaseTest class as before and we have some constants pulled up to the top of the class.
VALIDATION_PATH is where we are storing baseline images and any failure responses.
So, if you're running this code at home, you'll need to point it to a valid directory on your system somewhere.
Then for our sanity, we're giving names to the different visual checks we'll be doing, like "home_screen" check [CHECK_HOME] or "login_screen" check [CHECK_LOGIN] based on the screen that we're checking.
We also have our match threshold value set to 0.99 [MATCH_THRESHOLD = 0.99] as I discussed earlier.
Finally, we pulled up some selectors that we'll use later on to find elements and navigate through our app.
In our get capabilities method — DesiredCapabilities getCaps — the only thing to pay attention to is the app capability.
capabilities.setCapability("app", getResource("apps/TheApp-v1.apk").toString());
You can see that right now, it's pointing to v1 of the app — this is the version we are using as a baseline.
We'll run through the test one time with this version, which will set our baseline images. Then we'll mimic an actual CI run by running it again with a second version of the app, during which the image comparison will actually take place and we'll be confronted hopefully with the bug that I introduced in v2 of the app.
Next, I have a little helper method called waitForElement, which just uses a WebDriverWait here, to wait for an element, but then waits an additional 750 milliseconds statically on top of the WebDriverWait.
I use this as a helper because I want to make sure that before I take a screenshot of any view, all graphical animations and transitions have stopped. Otherwise, our screenshots might be a composite of multiple views as we transition from one to another.
Now we get to our actual test method, testAppDesign.
It's pretty simple.
We first find an element to be sure our app has loaded, in this case the
loginScreenelement.Then we do a visual check of the home screen — [
doVisualCheck(CHECK_HOME)].Then we tap a button —
loginScreen.click— the login screen button to get to the login screen.We wait for another element there —
waitForElement(wait, USERNAME_FIELD)— in this case, a username field.And finally do a visual check of the login screen [
doVisualCheck(CHECK_LOGIN)].
So, all the magic happens inside this method called doVisualCheck.
Let's take a closer look because it's doing a lot of heavy lifting. First of all, we look for a baseline image named after the particular check we're trying to do.
private void doVisualCheck(String checkName) throws Exception {

    String baselineFilename = VALIDATION_PATH + "/" + BASELINE + checkName + ".png";
    File baselineImg = new File(baselineFilename);

    // If no baseline image exists for this check, we should create a baseline image
    if (!baselineImg.exists()) {
        System.out.println(String.format("No baseline found for '%s' check; capturing baseline instead of checking", checkName));

        File newBaseline = driver.getScreenshotAs(OutputType.FILE);
        FileUtils.copyFile(newBaseline, new File(baselineFilename));
        return;
    }
}
So, if we're doing the home screen check, we're looking for an image called “baselineHomescreen.png” in our validation path. If that file doesn't exist, we assume that this is the first time we're running the test.
And so, what we want to do is actually generate a baseline image, not compare the current state with one because there is no baseline to compare it with anyway. So, we get a screenshot from Appium and write it as our baseline and that's it.
What this means, again, is that the first time we run our test, we won't do any comparing. Instead, we'll be populating our baselines.
Then in subsequent runs of the test, we'll do comparisons with the baseline images. The way to generate a new baseline is simply to delete the old one and rerun the tests. Pretty basic.
Okay, let's take a look at the comparison logic now.
// Otherwise, if we found a baseline, get the image similarity from Appium. In getting the similarity
// we also turn on visualization so we can see what went wrong if something did.

SimilarityMatchingOptions opts = new SimilarityMatchingOptions();
opts.withEnabledVisualization();

SimilarityMatchingResult res = driver.getImagesSimilarity(baselineImg, driver.getScreenshotAs(OutputType.FILE), opts);
If we did find a baseline image, we use it as the first argument to driver.getImagesSimilarity.
The second argument, the image we're comparing against will of course be the current screenshot.
We're also passing in an option argument here, which tells Appium that we're interested in the visualization of the match. This visualization is the image file that will show us what didn't match and help us know what went wrong in the case of a validation error.
After Appium performs the match, we check the match score against our threshold.
// If the similarity is not high enough, consider the check to have failed
if (res.getScore() < MATCH_THRESHOLD) {

    File failViz = new File(VALIDATION_PATH + "/FAIL_" + checkName + ".png");
    res.storeVisualization(failViz);

    throw new Exception(
        String.format("Visual check of '%s' failed; similarity match was only %f, and below the threshold of %f. Visualization written to %s.",
            checkName, res.getScore(), MATCH_THRESHOLD, failViz.getAbsolutePath()));
}

// Otherwise, it passed!
System.out.println(String.format("Visual check of '%s' passed; similarity match was %f",
    checkName, res.getScore()));
}
If the score is below the threshold, that means the match wasn't strong enough and we throw an exception to fail the test.
But before throwing the exception, we save the visualization using the storeVisualization method to our directory with the checkName in the file, of course, so we can easily find it and look at it.
So, this is how we write a very basic visual validation engine using Appium.
Now, let's give it a whirl and see what happens.
Okay, our test is running. We can see the Appium server logs going here, meaning it's handling our test. We can switch to the emulator and wait for our app to load. Okay. The test is running.
Remember that on this first run, we're not doing any comparing, so all that's happening was the basic functional part of the test and we were hopefully storing baselines as we went.
As you can see, this was a very short and simple test. We just got to one new view and checked for the presence of an element. The test passed in IntelliJ as we expected it would.
Now, let's update our test to use v2 of the test app, and let's rerun the test.
This time, we'll be comparing against the baselines we stored last time.
Let's open up the finder and make sure that they're there.
Yep, there they are.
Okay, now let's watch our test execute. Okay, now the test is running.
To our eyes, everything should look basically the same. And if we got a pass, we would know that not only were the elements findable, but the visual stayed the same as well.
But of course, we did not get a pass. We got a failure.
So, let's dig in. The first place to look is the IntelliJ standard output. We got an error like we thought we would.
The message here has a lot of helpful details because we decided to put them in the error string. In this case, it tells us that the visual check of home screen failed because the similarity was only 0.95, and that was below the threshold that we had set.
Well, what was different? Let's look at the failure message that we captured. Aha, I see what went wrong.
In the new version of the app, there are more list items here than in the old version.
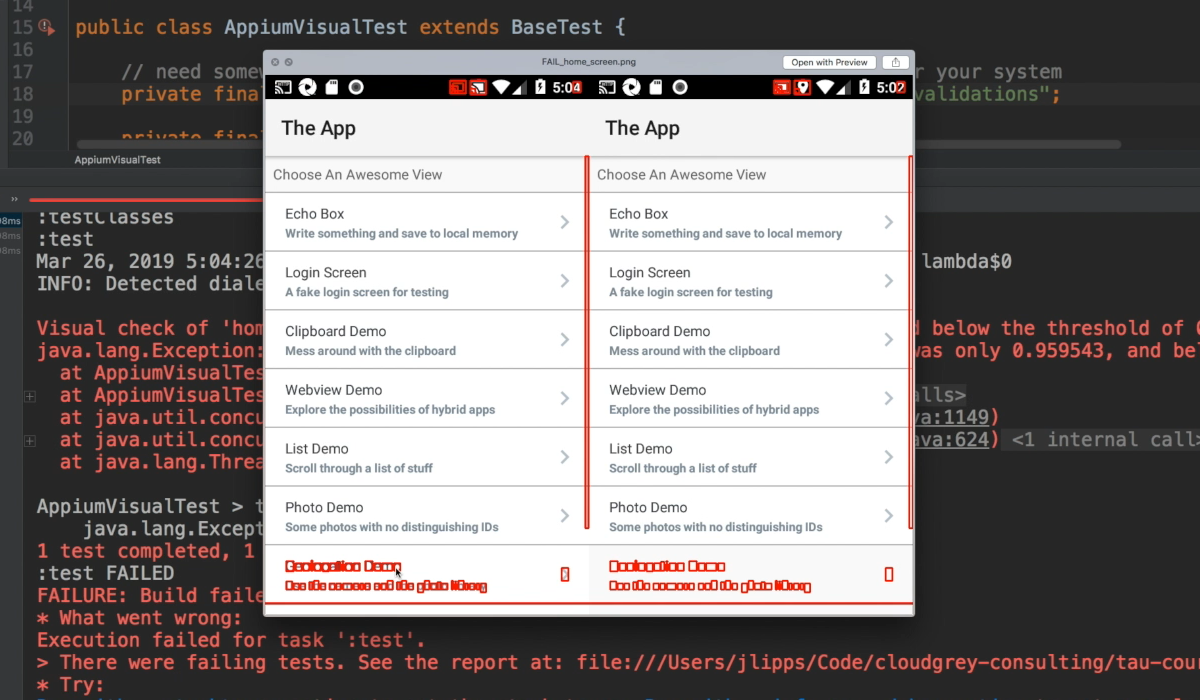
As you can see, it says geolocation demo.
Well, that's not actually a problem. As we like to say, that's a feature, not a bug. Except in this case, it's actually true. So, what do we do now?
Well, what we want in essence is to set a new baseline for the screen based on the new feature.
So, all we have to do is delete the old baseline and then rerun the test, which will cause our script to use the new screenshot as the baseline.
Let's do that now. We're going to delete the home screen baseline.
Now back in IntelliJ, we can try this again. Now the test is running and hopefully we'll at least get to the next screen, which we did.
But alas, there was another failure. What is it this time?
Well, we can see that in this case, the failed check was not the home screen, but the login screen. So again, let's take a look at our failure image and see what went wrong.
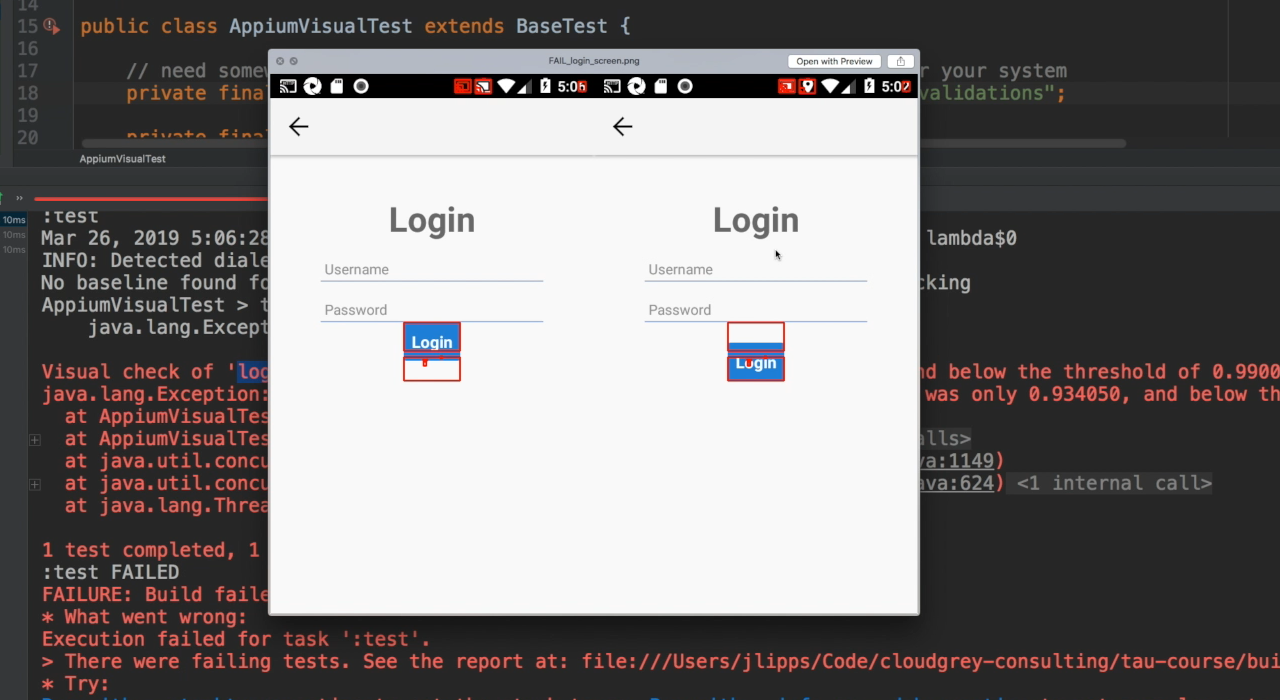
Interesting. This looks like a probable bug.
In our baseline image, the login button was at a nice distance from the box above it. But in the current version of the app, it's all squished together. That's a bug that our visual validation caught for us. Now, I can just send this image to our app developers and tell them to fix it. I'll keep the baseline around though. That way, once they tell me they fixed it, I can prove it by rerunning the test.
In the meantime, if I want to keep running this test functionally, I can just comment out the visual check, and that's basically it.
Using Appium and the power of OpenCV, you can cobble together your very own visual validation system and get some pretty respectable results.
The biggest pain points though, are what to do about false positives or situations where we get a failure, even though nothing meaningful changes in the image.
And managing our various baseline images can be a pain too. Just having a directory on our machine as a repository for all this stuff is pretty unmanageable in a production environment.
So, head on over to the next chapter and we'll talk about using Applitools as a more advanced and full featured visual validation engine that hooks into your Appium tests.
