

Transcripted Summary
Selenium IDE has the ability run all of the tests that you create in a cross-browser and parallel execution environment, and that's through the use of what's called the Command-line runner. The “SIDE runner” for short.
You can learn more about it on the Selenium IDE homepage. In the “Docs” tab we have documentation dedicated to the Command-line runner.
The way it works is you save your project file in order to preserve anything that you've recorded or modified in your project for Selenium IDE. And then you, from the Command-line, can execute your test from that project file using the SIDE runner, which is effectively just an NPM package.
To get it working, the documentation for the Command-line runner is spelled out here (on the documentation page) for all the prerequisites.
But the gist is, you need to install Node and with it, NPM.
There's a few different ways to do that. On this page we link to all of the requisite installation instructions. But just to show you quickly.
There's installing Node through a package manager, so various operating systems have the ability to install from the command-line very easily, like on Mac there is Homebrew, and so on and so forth. This documentation outlines all the different options.
There's also downloading the binaries and installing them yourself, all from the Node website.
Once you have that, if you're going to run your test locally on your machine, there's some additional setup.
But thankfully, some people have contributed additional NPM packages which wrap all the different dependencies for each of the browsers. So, for Chrome, there's a small application you need ChromeDriver. For Firefox, there's geckodriver. For Edge, there's EdgeDriver. Internet Explorer, IEDriver, and Safari, SafariDriver.
And so, with the exception of SafariDriver, there are four different NPM packages depending on your needs. In this example, I'm going to show Chrome and Firefox.
So, I'll need to make sure I install, not only the SIDE runner but chromedriver and geckodriver. And to do that, it's just npm install and then the name of the NPM package.
So, I'm going to install Selenium side runner.
npm install selenium-side-runner
And then, I'm also going to install chromedriver
npm install -g chromedriver
And then, geckodriver.
npm install -g iedriver
That's it for our initial setup.
Before we start executing our test with runner, we're going to want to make a few small changes to our test in the IDE.
So, using the test from earlier that we recorded for “Login”, and reusable test cases, we're going to make a couple of changes.
First one is, for symmetry between valid credentials and invalid credentials, we want to have a check window command for both of our tests, and we'll just call this one, not logged in, since this is for the invalid credential case.
Command: eyes check window
Target: not logged in
And then, also for the suite, we want to make sure that we don't have an empty test suite. The way that execution in the runner happens, is it looks at each suite and executes all suites. If there's an empty suite it's going to actually show a failure. So, we want to make sure, we don't have and empty suite.
And also, parallel execution, this is another important point, by default, parallel execution happens in the runner, but only at the suite level. So, if we had two suites, those two suites would execute in parallel.
But, since we have just a single suite, this would actually would only execute in series. It would execute this test, and then this test.
To run this in parallel, what we need to do is just come into the settings for the suite and make a quick change. The change is here for it to run in parallel. By checking this and clicking submit, we actually get parallel execution at the suite level for each individual test.
And that's it. There are some other settings here, but right now, we're not going to worry about them.
So, we'll submit this, and we'll go ahead and save the project. We'll save it to the “Downloads” folder.
And then, we'll go ahead and run from the Command-line using Selenium SIDE runner, and then we'll specify the path to the project.
Also, since we're using the Eyes extension for it to work in the runner, we need to pass in the API key for Applitools.
If we didn't have Eyes commands and we weren't using them in our test, then we wouldn't have to do this. We would just run it as is right now. But, since we have the Eyes extension, we need to specify that.
We can do that by specifying an environment variable of APPLITOOLS_API_KEY and setting it equal to the string value, and we'll get that from the dashboard or our account in Applitools Eyes, just like we did when we setup the extension in the first place. Paste it in.
On Windows use:
set APPLITOOLS_API_KEY = your-key && selenium-side-runner
And, we'll go ahead and run it.
As we see, both tests are running at the same time. We can actually see two windows running. One for the valid case, and for the invalid case. And then the eyes check window commands are running, and the results get outputted here.
The test passed, there were no visual diffs found, and they both ran in parallel.
Now, if we wanted to run our test on a different browser, I'll go ahead and show you that now.
If we hop over to the documentation, we actually see the different incantations for running a different browser locally, under run time configurations.
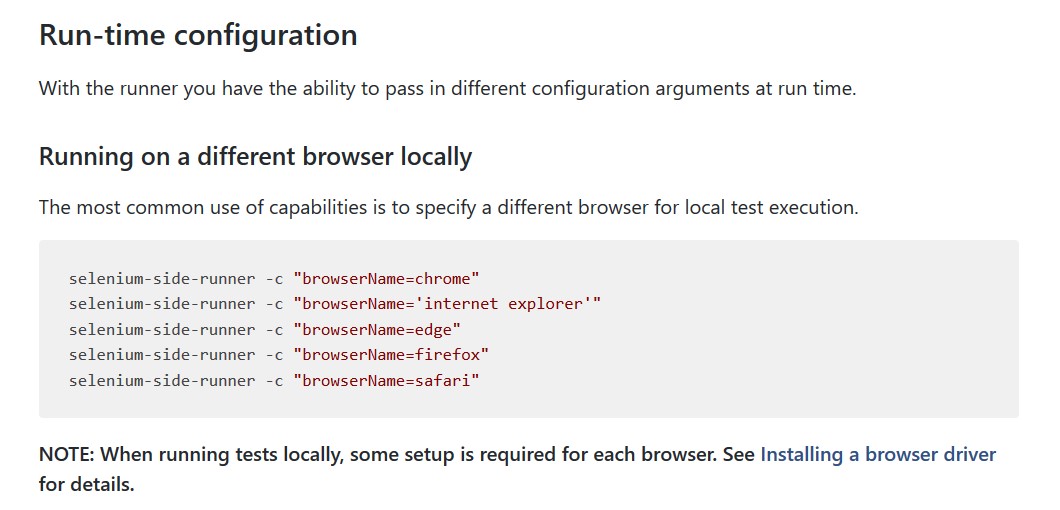
So, there's the option to use specify capabilities with a -c option, and then in quotes you pass in browser name equals and then the name of the browser.
If we come back to our execution line here, and after Selenium side runner by before the file name, we to -c, space, browser name equals Firefox.
selenium-side-runner -c "browserName=firefox"
And then we run this, and our tests will run just like before as they did in Chrome, but this time in Firefox, in parallel.
If you wanted to, you could also specify browser specific options through capabilities.
And that's actually shown here in the documentation under Chrome specific capabilities.
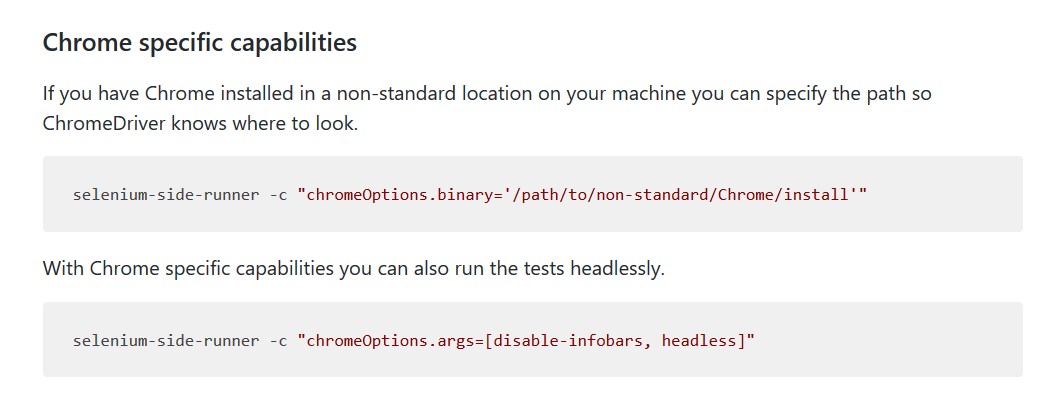
In the -c for capabilities you specify chromeOptions and then what the specific option is.
For example, if we want to run headlessly, we would do chromeOptions.args and then pass an array of “headless”. Let me show you that real quick. We'll switch browser name to Chrome, and we'll specify chromeOptions.args equals, and we'll just specify headless,
selenium-side-runner -c "chromeOptions.args=[headless]"
And we'll go ahead and run that.
If we wanted to run just a single test or a set of tests within the project file, we have the option to specify a filter.
If we hop over to documentation and go to the section titled “A framework at your fingertips.” there's a few different things here.
How to change the base URL, if you wanted to point your test at a different environment.
But then there's one here called “Filter tests”. It's just the --filter command. And, it's just a regular expression value that you'd pass. So, if we want to filter by the name of something, then we could do that.
Let's go ahead and step through an example with that.
We just come here, before we specify where the file is, and after we specify the capabilities, we just do --filter and then the thing that we want to filter with. For instance, if we want to just run just the invalid credential status, we can just say “invalid” and it will match for the name invalid.
selenium-side-runner --filter invalid
And run just that test.
Now, if you wanted to take your tests and run them on a grid remotely, either a grid you control or have access to through a third-party provider, like Sauce Labs for instance, we could do that with the runner.
It's just a matter of passing some additional runtime flags and some changes to our capabilities to be able to specify the different browser and OS combinations that we want.
Let’s step through how to do that.
In Sauce Labs, we'll need to get our API key from our account page. So first need to sign in. Once signed in, you can grab that from my account, and just copy the API key.
Then we'll need to specify this as part of the server URL in the —remote capability in the runner.
We'll say selenium-side-runner, and then we specify an optional server URL, this is how we can connect to a grid.
Then, this takes the URL of the end-point for the grid.
And so, for Sauce Labs, it's going to be the user name, which in my case is “the-internet”, “: the access key” and then it is “@ondemand.saucelabs.com:80”, that's port 80, “/wd/hub”.
So: http://the-internet:{access_key}@@ondemand.saucelabs.com:80/wd/hub
And then after that, we specify the capabilities that we want and that would be again in quotes just like before up here, where we specify the browser name.
In addition to browser name, we'll also specify the browser version and the operating system. For instance, we can have access to any OS, any browser, so we'll go ahead and do Internet Explorer, and Internet Explorer is specified as two words with a space, so we need to wrap that in single quotes. So, 'internet explorer'. Then we'll do version 11, “version=11”. You can do with or without quotes for the version.
And then, platform, and this is going to be on “windows 8.1”.
selenium-side-runner http://the-internet:YourAccessKey @ondemand.saucelabs.com:80/wd/hub -c ‘internet explorer’ version=‘11.0’ platform=‘windows 8.1’
If you want you can go over to the Sauce Labs platform configurator, on the Sauce Labs wiki, and select the different combinations you want.
Say you want a Windows PC and you want IE 11. Then it will show you down here the different configuration options for each of the different language bindings, and then I'm just using the node.js tab as the reference for what strings to pass in.
After that we need to pass in the path to the file, the project file for Selenium IDE, like we did before.
Which is under the downloads directory, and it's “the-internet”. And like with what we did before, we also need to, since we are using Applitools Eyes, pass in the API key.
We can go ahead and run this, and we will be able to see in the Sauce Labs dashboard that our tests are running in Sauce Labs and they're going to be running on Windows 8.1 with IE 11.
That's running on a grid.
Now it's worth pointing out that there are obviously quite a lot of things typed into this command-line execution. It's a lot to remember, it's a lot to type out.
So, I want to show you a way that we can clean this up a bit.
With the SIDE runner, there is the option, if you come to the documentation you can see it, under the “ A framework at your fingertips” section, there's specifying a default configuration.
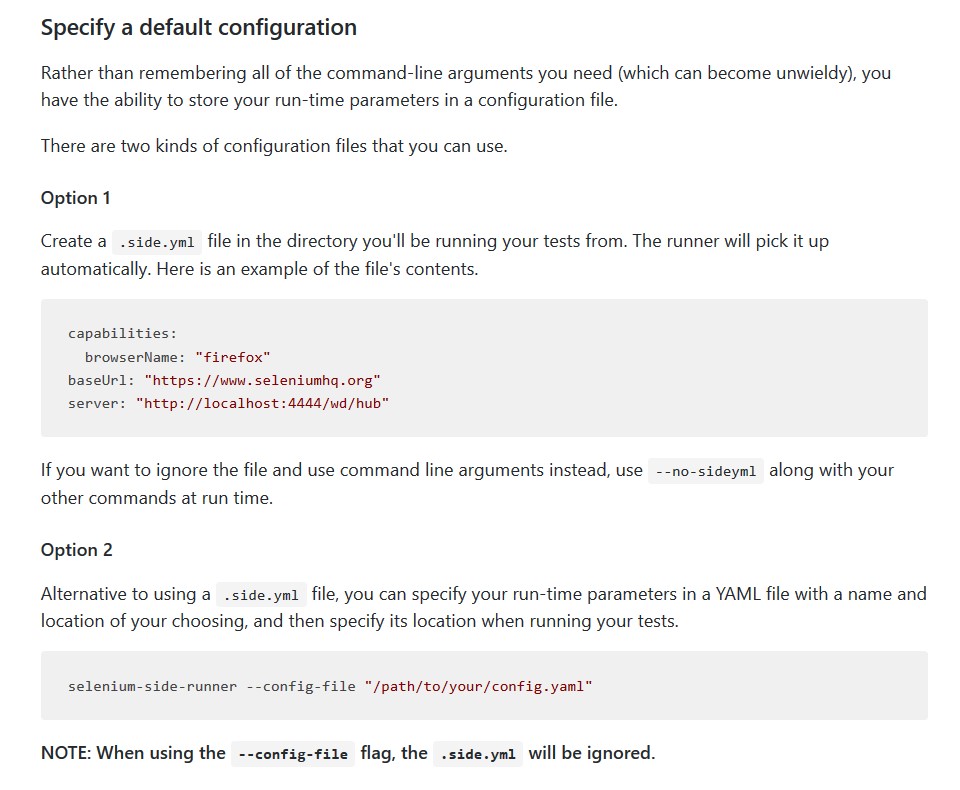
What this does is give you the option, one of two options basically. In either option basically you specify a ‘yaml` file, it can either be a dot file that lives in the project folder from where you are running your tests, or you can just create a file, have it live anywhere, and then at run time, you would just specify where that file lives.
Let's go ahead and go with the latter option.
We'll create a file and we'll put it somewhere. We'll just specify where it is at runtime. So, I'm going to just create one on my desktop. I'm just going to call it “config.yaml”.
Let me just open up the config yaml.
So, once we're in here, we can specify all of the same values that we had on the command-line. So, things like the server and the browser name, and so it would just be capabilities and then indented for the key, it would just be browserName and internet explorer, and then version and we specified version 11. And then we had also the platform of Windows 8.1.
Also, outside of capabilities we had the server, and the server we can just copy and paste, and paste that in.
capabilities:

	browserName: ‘internet explorer’

	version: ‘11.0’

	platform: ‘Windows 8.1’

server: http://the-internet:YourAccessKey@ondemand.saucelabs.com:80/wd/hub -c ‘internet explorer’
And, that should be it. Let's go ahead and save this.
And then when we want to run everything, we can come back to the original incantation that we had, and we can just before specifying where the project file is, we can remove everything up until the selenium-side-runner option and then specify --config-file and then the path to where this file is, config.yaml.
selenium-side-runner --config-file = /Desktop/config.yaml
And then, we can go ahead and run this.
Then if we hop over to the Sauce dashboard, we can see that everything runs just like it did before.
