

Transcripted Summary
Now that we have created a successful Cucumber Scenario, it's time for us to see some of the cool features that Cucumber offers us.
One such feature is Repeatable Annotations.
# Repeatable Annotations
Let's assume that you have two Given statements that do the same functionality. It's easy to map two Gherkin statements to the same Step Definition.
Let's see that now.
In this Scenario, we have the Given statement as “Given I am in the login page of Para Bank Application”. Now, let's say I'm going to write another Scenario like, “Given I'm in the login page”.
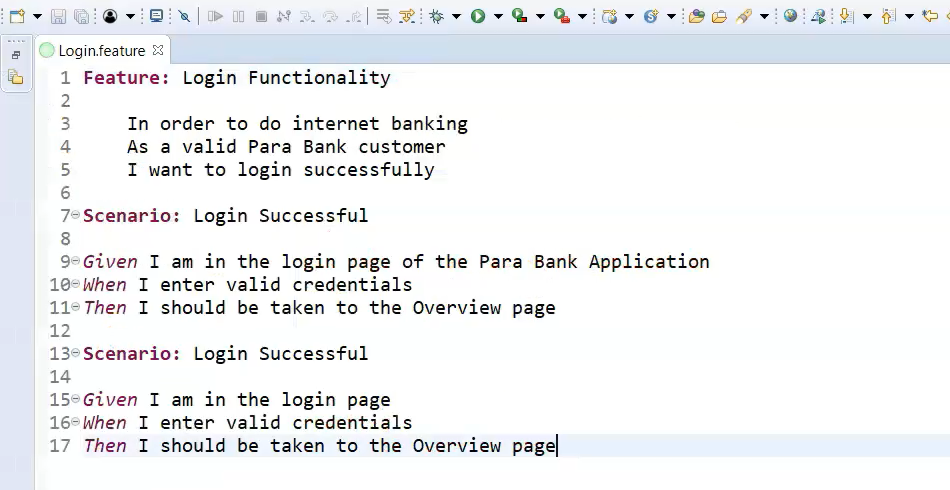
We know that both the statements resemble the launch of Para Bank URL.
So, I will add the second step to the Step Definitions like this ...
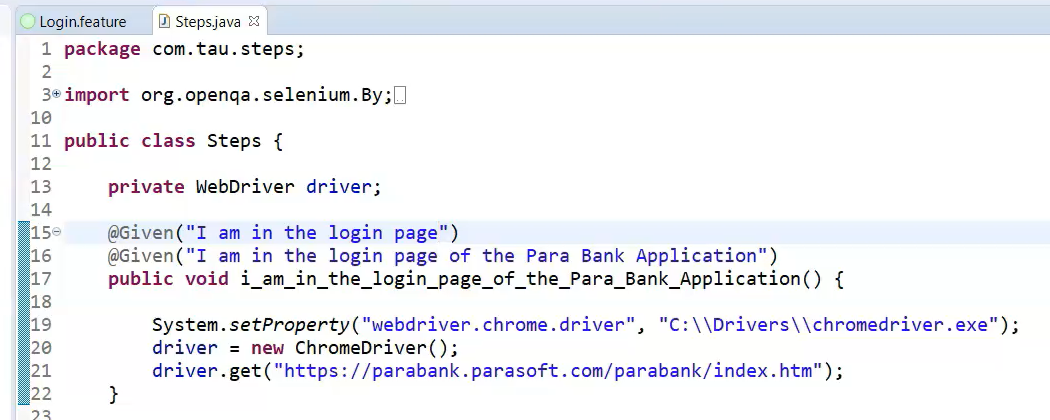
By doing this, we can avoid writing multiple step definition methods for the same Gherkin Statement.
Now let's execute the test and see how it gets executed.
We can now see that there are 2 Scenarios that passed, even though we have 2 different Gherkin statements.
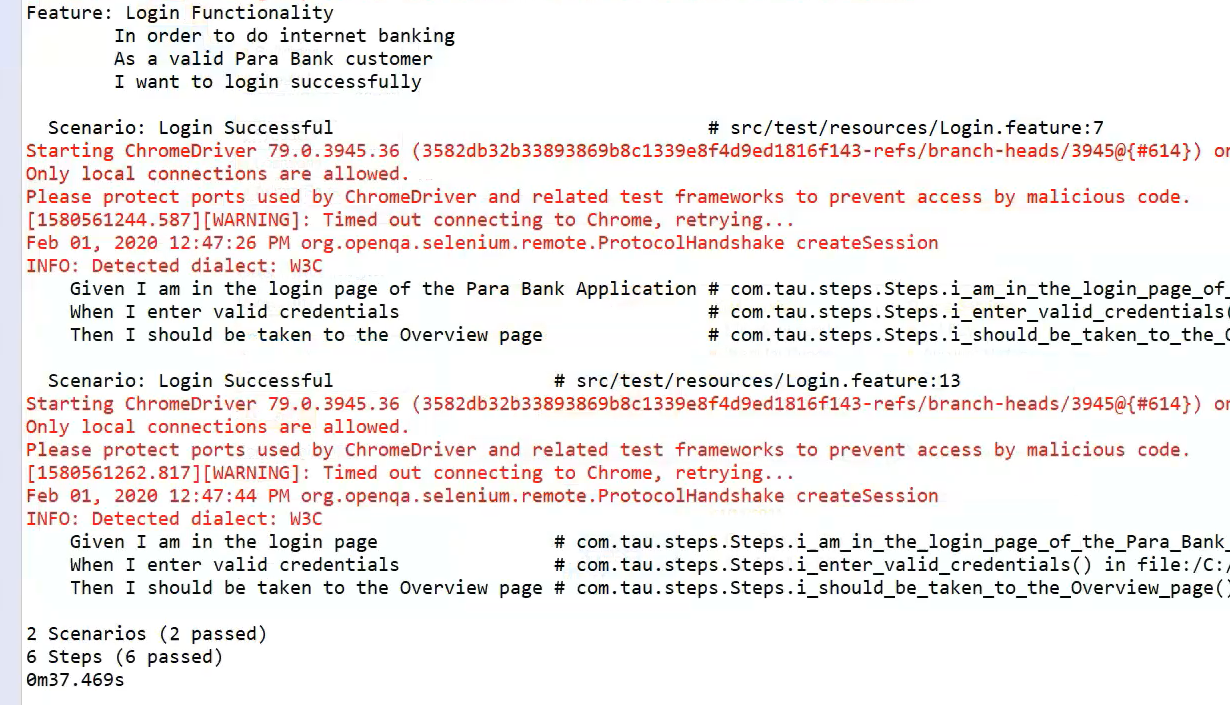
So, this is how we use repeatable annotations to assign more than two statements to a Step Definition method.
Now we will look into Scenario Outline.
# Scenario Outlines
This feature helps us in running the same Scenario with different test data. Here is how we can achieve it.
I'm going to delete this particular Scenario (the second one we just created), which is of no use for now, and then in this particular Scenario I'm going to modify the Scenario as Scenario Outline.
Now, we need to slightly modify the When Statement, like this, with parameters, “username” and “password” within the angular bracket.
Now let's do that.
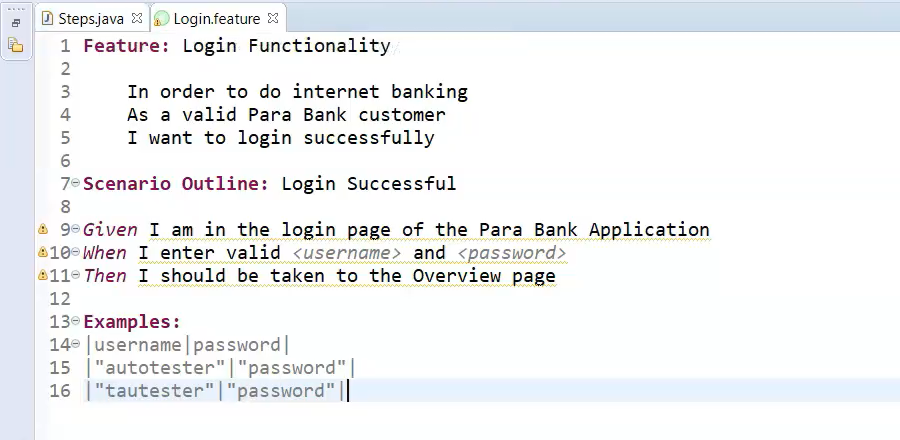
Feature: Login Functionality
	In order to do internet banking
	As a valid Para Bank customer
	I want to login successfully

Scenario Outline: Login Successful
    Given I am in the login page of the Para Bank Application
    When I enter valid <username> and <password>
    Then I should be taken to the Overview page
Now, we need to add something called Examples where we add the test data combinations, so that should be something like this.
When you are passing the parameters, make sure you send the data between the pipe characters like this ...
Examples:
    |username|password|
    |“autotester”|“password”|
    |“tautester”|“password”|
Now let's go to the Step Definitions and modify the When statement.
Since we are passing two parameters, we just have to change the When statement like this. Now we need to add the parameters to the method with “String username” and “String password”.
Then, all we need to do is just copy the “username” variable (and the “password” variable) and add it to where we are parameterizing this.
	@When("I enter valid {string} and {string}")
	public void i_enter_valid_credentials_(String username, String password) {
		driver.findElement(By.name("username")).sendKeys(username);
		driver.findElement(By.name("password")).sendKeys(password);
		driver.findElement(By.name("username")).submit();
	}
Cucumber will take the values automatically according to the Gherkin Steps parameters that we are sending.
That's it. Now let's execute the tests.
So, if you see the Feature File, we are having only 1 scenario, but we are parameterizing with 2 different test data and those test data will eventually become 1 separate Scenario.
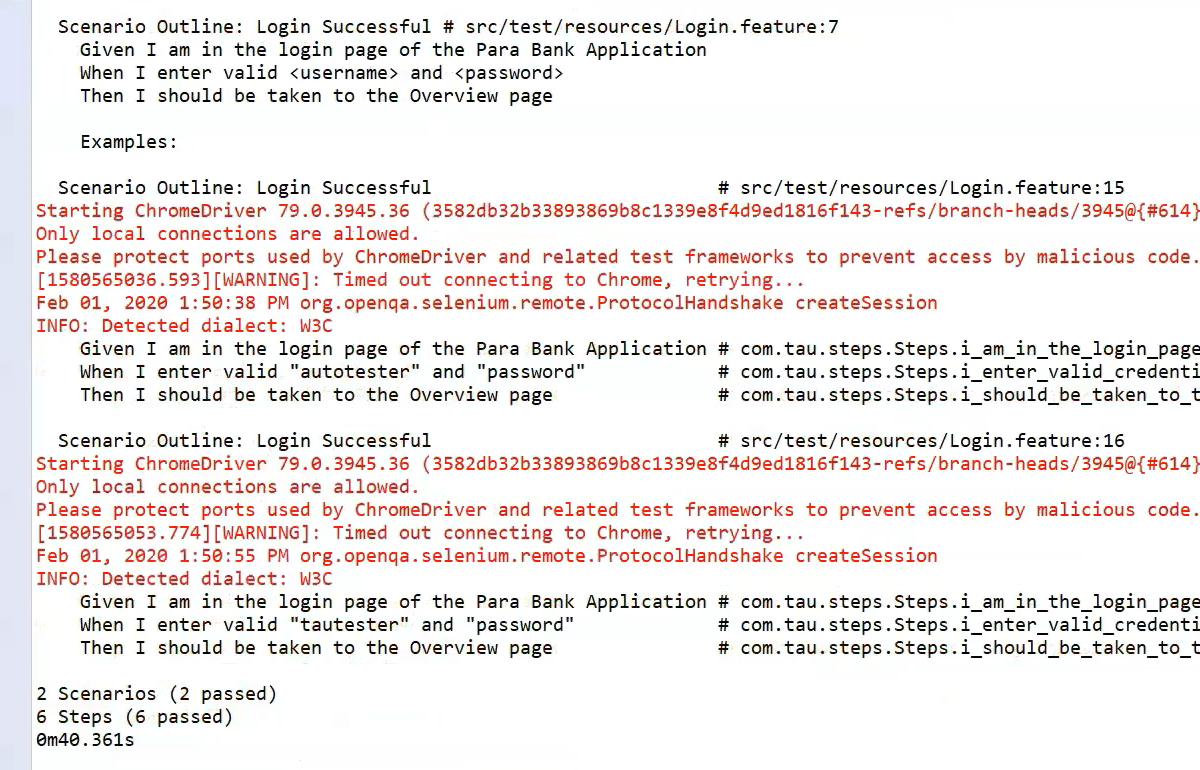
And when executed, you will be able to see 2 Scenarios got executed.
So, this is how we use Scenario Outline to parameterize the tests with multiple test data.
# Data Tables
The next cool feature is the Data Tables. Data tables are used for parameterization like Scenario Outline, but it differs from the way that we send the parameters.
In Data Tables, we send the parameters from the Step level rather than sending it from the Examples level like Scenario Outline.
Let's see how to do this.
Let's go to the Feature File and modify the Scenario like this, with the in-step parameters and change the Scenario Outline to Scenario.
Scenario: Login Successful - Inline Parameters
    Given I am in the login page of the Para Bank Application
    When I enter valid credentials
        |autotester|password|
    Then I should be taken to the Overview page
Once we modify the Feature File, it's time for us to change the Step Definitions as well.
So, for that, I'm opening my Step-Definitions class and I'm going to the When statement and modifying the statement like this.
And we need to parameterize the method with DataTable.
And since it is a table, we need to iterate the data that is present inside the table and we need to assign it to a List.
Once we assign the table to the List, all we need to do is parameterize like this.
	@When("I enter valid credentials")
	public void i_enter_valid_credentials(DataTable table) {
		List<String> loginForm = table.asList();
		driver.findElement(By.name("username")).sendKeys(loginForm.get(0));
		driver.findElement(By.name("password")).sendKeys(loginForm.get(1));
		driver.findElement(By.name("username")).submit();
	}
That's how we do the Data Tables in the Step Definitions.
Now let's go to the Feature file and execute the tests and see how it is getting executed.
So, in our Scenario we have kept only 1 parameter where we will be able to see only 1 test execution with the login.
If you see here the test got passed with only 1 parameter that we have given it.
Please keep in mind if you want to execute more than one scenario with multiple sets of test data, you cannot use Data Table — in that case, you would be using Scenario Outline.
This is how we execute the test cases using Data Tables.
# Hooks
The next feature is Hooks. Hooks are blocks of code that runs before and after each Scenario or Steps.
This can be used for launching the browser instances, setting up this data or even closing the browsers.
There are different types of Hooks in Cucumber. We will see about 2 commonly used Hooks in our course. The first one is @before and the second one is @After.
Now let's see them in action.
I'm going to use the example that we have used for Scenario Outline here with two different sets of test data.
In order to implement Hooks, we need to go to these Step Definitions and add the Hooks here.
Say, for example, we are going to use @before annotation, which means we have to use this particular statement of telling where the Chrome driver is and opening the Chrome driver in the @before annotation.

And likewise, we will be adding this driver.quit() in the @After annotation.
Let's do that now.
I have created the 2 annotations, @before and @after, so I'm going to import the references.
All I need to do is to cut this particular code and put it over here.
@Before()
public void setup() {
	System.setProperty("webdriver.chrome.driver", "C:\\Drivers\\chromedriver.exe");
	driver = new ChromeDriver();
}
Likewise, move this code from the Then statement inside of this one and I need to change this as “quitBrowser”.
@After()
public void quitBrowser() {
    driver.quit();
}
It's pretty simple, right?
This is how we use Hooks to define what has to happen before every Scenario and what has to happen after Scenario.
Now let's go to the Feature file to execute and see how it gets executed.
If you see here, both of our test cases were executed, which means the value or the code that we have given inside @Before and @After has executed successfully here.
So, this is how we use the basic @Before and @After Hooks.
# Dependency Injection
We will now see about Dependency Injection.
Say for example, if you need to share a state between different Steps, like passing values from one Step to another, we can use this feature of Dependency Injection.
Let's see how to do this.
To use the Dependency Injection, we use something called Cucumber PicoContainer.
<dependency>
        <groupId>io.cucumber</groupId>
        <artifactId>cucumber-picocontainer</artifactId>
        <version>${cucumber.version}</version>
        <scope>test</scope>
</dependency>
We need to add the Maven dependency for cucumber-picocontainer in the pom.xml.
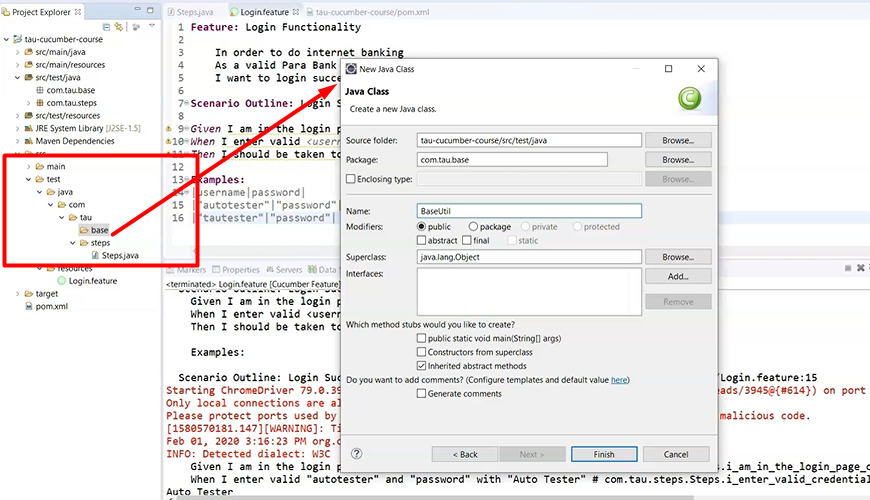
To make sure the data is passed across the Steps, we need to create something called a Base Class and we can create it again under the Java folder or rather the “tau” folder and I'm going to call it “base” folder.
And inside that I'm going to create a Java class called “BaseUtil”.
Anything that we wanted to share between the Steps, be it whether it is a WebDriver instance or the String or any other value, we can just add that over here.
So, in my case, I'm going to share a variable called "userFullName" across two different Steps.
I'm going to add that particular String variable here like this.
package com.tau.base;

public class BaseUtil {
	public String userFullName;
}
Once I have added this, it's time for me to go back to the Step Definition and extend the Steps with the BaseUtil class.
Now it's time for me to create a constructor and pass the private instance of the BaseUtil to that.
public class Steps extends BaseUtil {

	private BaseUtil baseUtil;

	public Steps(BaseUtil util) {
		this.baseUtil = util;
	}

	private WebDriver driver;

    //The rest of the Step Definition code follows
}
Once I have added this, I want to go and modify the Feature file now.
So, like I said earlier, I'm going to add the third parameter called the "userFullName" and I'm going to add it to the Examples.
Feature: Login Functionality
	In order to do internet banking
	As a valid Para Bank customer
	I want to login successfully

Scenario Outline: Login Successful
    Given I am in the login page of the Para Bank Application
    When I enter valid <username> and <password> with <userFullName>
    Then I should be taken to the Overview page

Examples:
    |username|password|userFullName|
    |"autotester"|"password"|"Auto Tester"|
    |"tautester"|"password"|"TAU Tester"|
Now I need to go and change my Step Definition as I have introduced 1 more parameter here.
What I'm going to do now is I'm going to "userFullName" String variable that we have created in the BaseUtil.
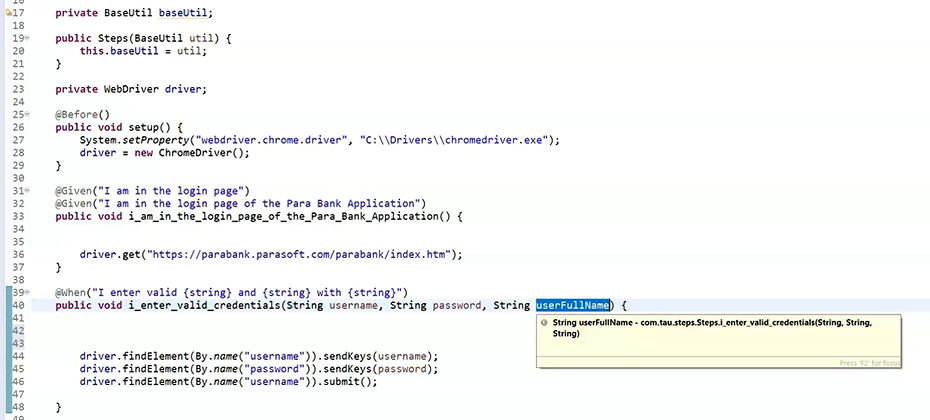
To do that, all I need to do is I just have to type baseUtil.userFullName = userFullName;.
Probably we might get some issues over here so rather I'm going to put it as “userFullName1”.
	@When("I enter valid {string} and {string} with {string}")
	public void i_enter_valid_credentials(String username, String password, String userFullName) {
		baseUtil.userFullName = userFullName;
		driver.findElement(By.name("username")).sendKeys(username);
		driver.findElement(By.name("password")).sendKeys(password);
		driver.findElement(By.name("username")).submit();
	}
That means the full name that I'm going to get from the Login.feature file has now been assigned to the BaseUtil.java String variable.
Now let's see how we can utilize it in the next Step.
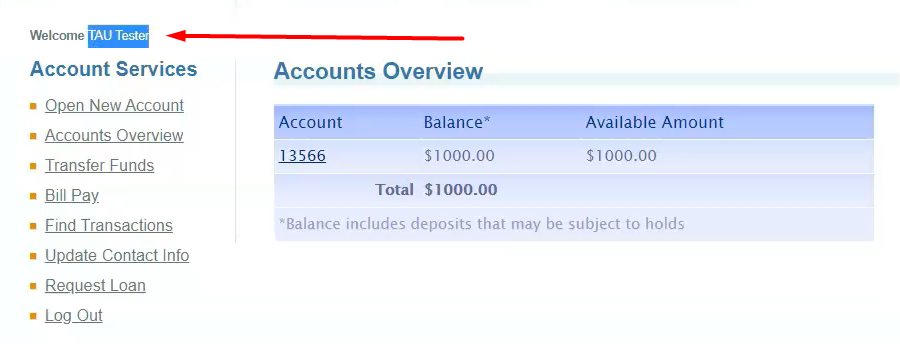
So, the ultimate aim of this particular Scenario is to validate whether we are getting the user’s full name in the Overview page.
Now let's do a small assertion over here.
I need to remove this:
driver.findElement(By.xpath("//*[@id='rightPanel']/div/div/h1")).isDisplayed();
	@Then("I should be taken to the Overview page")
	public void i_should_be_taken_to_the_Overview_page() throws Exception {
		String actualuserFullName = driver.findElement(By.className("smallText")).getText().toString();
		assertTrue(actualuserFullName, actualuserFullName.contains(baseUtil.userFullName));
		driver.findElement(By.linkText("Log Out")).click();
		driver.quit();
	}
Basically, what we are trying to do here is we are going to send the user details from the When statement, like the username password and the full name of the user, and then take that particular data and assign it to the baseUtil String variable.
And we are going to validate whether that particular user name is coming in the Account Overview page or not.
Now let's see how it executes.
This is the set of data that we have given in order to see what is the data that we are sending it through our Feature files is getting displayed or not and it is getting printed over here.
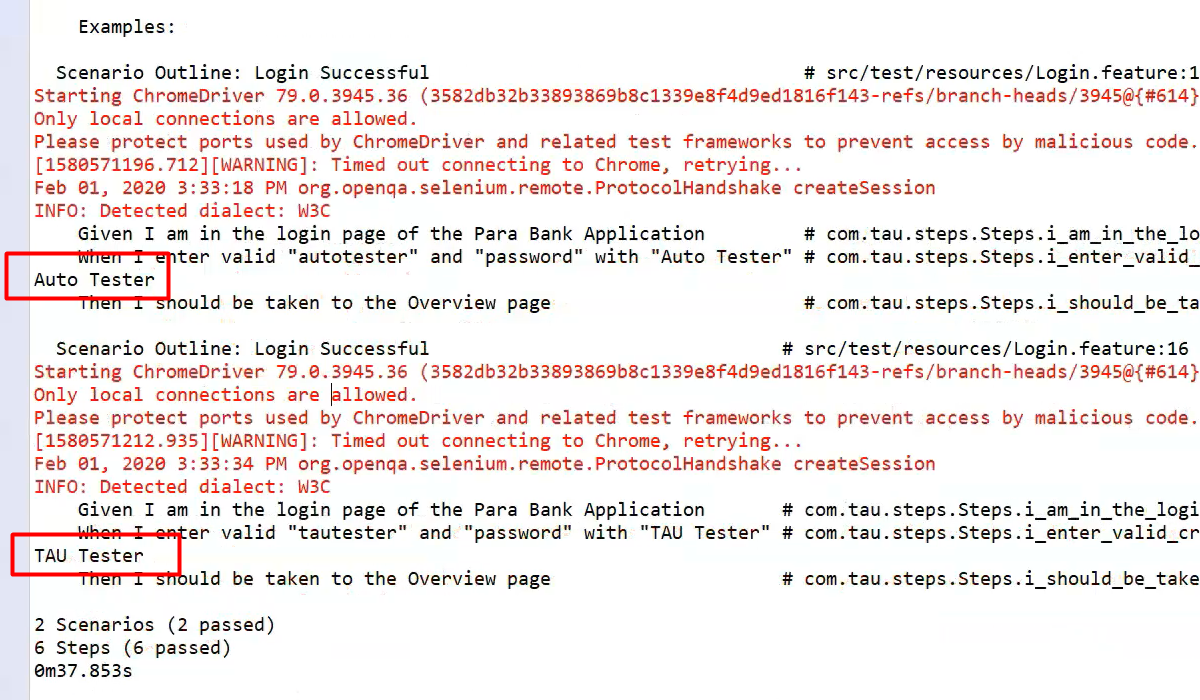
And this makes sure that the value is shared between 2 different Steps.
And this is we achieve Dependency Injection.
