

Transcripted Summary
Let's get ready to start our engines, and by that, I mean let's put our hands to keyboard and start putting these things into practice. But speaking of engines, let's say I brought you my brand-new Maserati and I said, "Something is definitely up for the engine and I need you to test it and find out exactly what was wrong with it."
How would you go about testing it?
Well, luckily the way these things are designed and built, each individual component of this very large and complex object is individually testable.
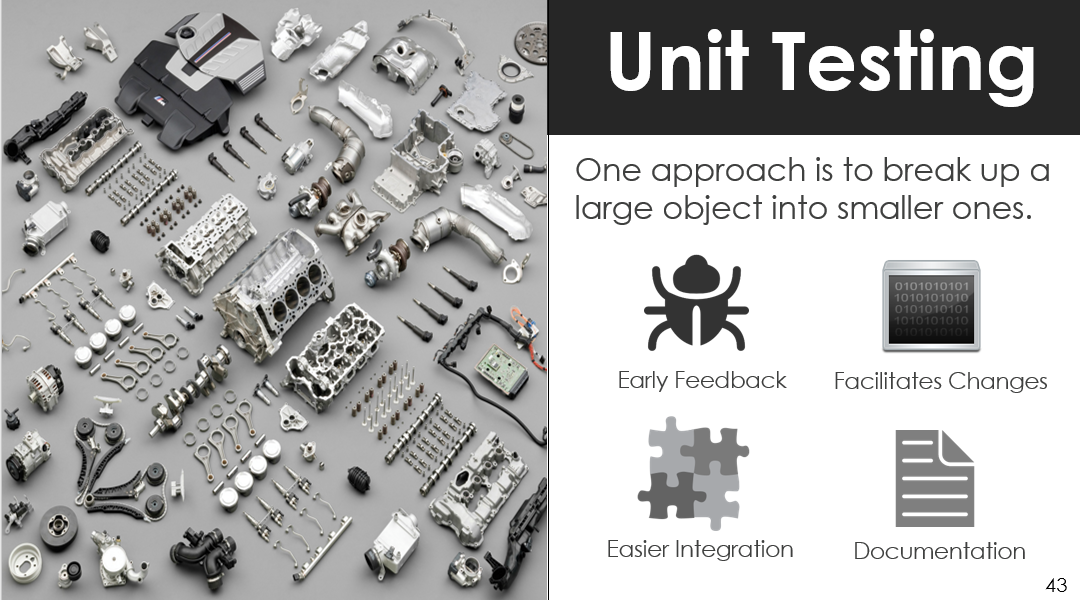
This is exactly how we want to build software.
We want to have small individual components that we can test because that allows us to have early feedback on quality.
It also facilitates making changes, so as the components evolve, we can make sure that we haven't broken previous functionality.
It also makes integration easier and debugging and pinpointing issues.
These unit tests also serve as a viable piece of documentation.
What do we mean when we say unit testing?
Well, this is really about validating the basic units of the program in isolation.
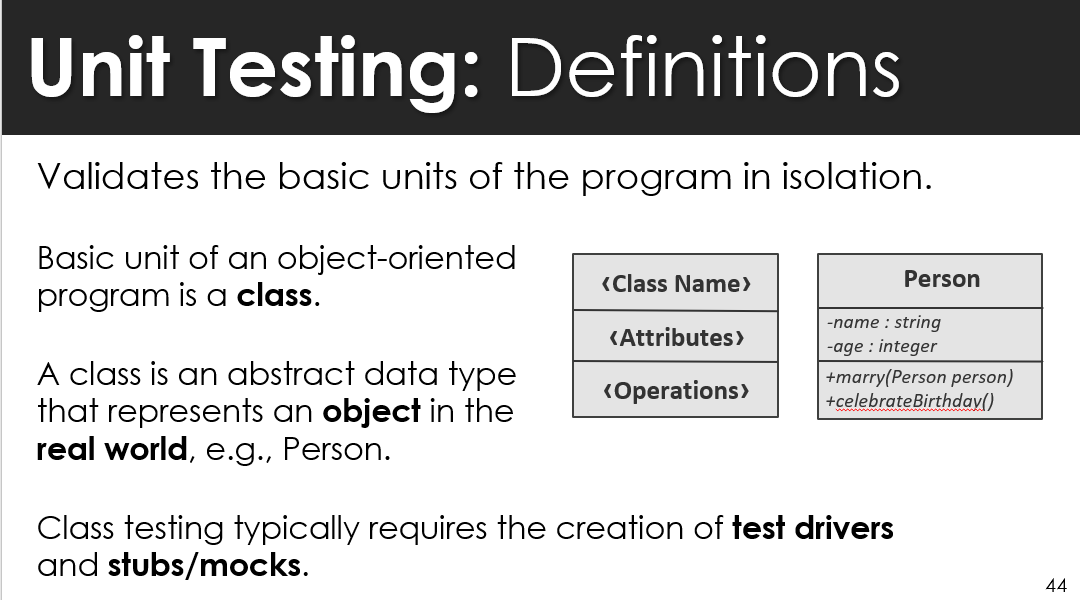
And in an object-oriented program this is called a class. Classes have names, attributes, and operations.
This is really just an abstraction for a datatype that represents an object in the real world, for example, a person. Testing classes typically requires us to create drivers and or stubs and mocks.
Let's start thinking about some objects in our practical example — we're going to use a banking system.
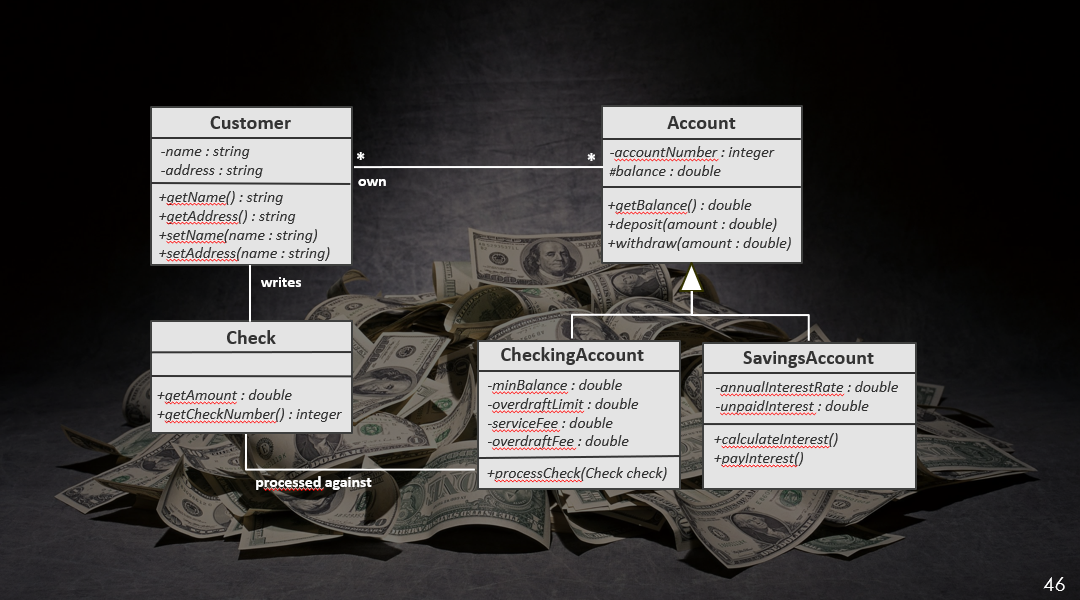
What are some objects that you would need to track in a biking system?
The first thing that comes to mind is we definitely need customers, because they're the ones that are really going to be owners of an account, and so we have that many customers can own multiple accounts.
They can be different types of accounts, maybe a checking and a savings account.
The customer can write a check and that is processed against his or her checking account.
Now's a good time to pause and start getting your environment set up. You can check our course materials where they set up instructions which should be available for Mac as well as windows.
Test Drivers
We're going to start by looking at test drivers, which are classes or utility programs that execute our drive test cases against the system under test. There are two types of test drivers.The first one that we'll look at comes embedded in a programming language called a main method.
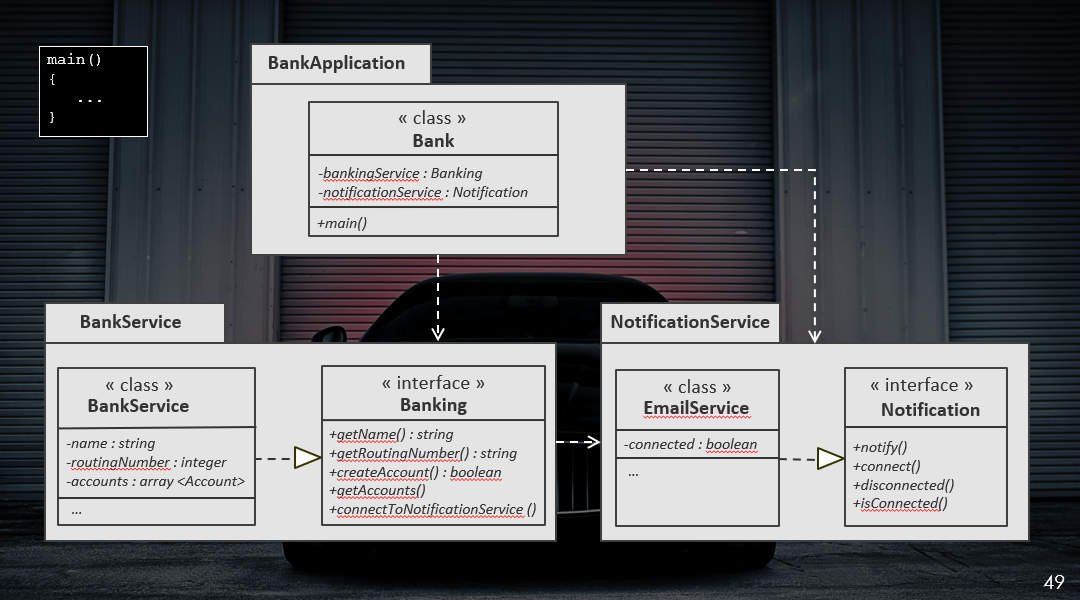
And here we see a package called “BankApplication” that has one single class in it called “Bank”. And that “Bank” has a main method as one of its operations.
There are also two other packages in our project. There's a “BankService” and a “NotificationService”. And those have different classes and interfaces within them.
Well, enough talking. Let's get started.
You open your project in IntelliJ, you'll see a folder containing the project itself.
There's a number of subfolders, including a folder containing libraries, containing the output of the project that you build, the source code, and then a test folder that should be empty right now, but that's where it will start to create our first test.
And so, let's take a look at the source code.
If you expand the src folder, you'll see the three high level packages that we just discussed. You can go into “BankApplication” and you can double click and open the “Bank” class.
Recall that this is the class that contains the main method, which will be our first look at what a test driver is.
And so here, you'll see that there's a number of comments that help to indicate the author of this particular class and a little bit about what the purpose of the class is.
/**
 * A commercial bank or credit union with a limited scope of services.
 * @author Tariq King
 */
These are called JavaDocs.
This type of documentation is very useful because you can actually go to the tools menu and click “generate Java Doc”, click “okay”, and it will start to build and generate this wonderful HTML view of your API.
This includes all the classes, all the packages, and all the methods and parameters, and any documentation has been embedded in the code. And so, anyone can use this, anyone from the testing or development team to get an idea of what the different components are supposed to be doing.
Let's take a look now at that main method.
If you go down, you'll start to see the main method, which is part of the Bank Application.
    /**
     * Driver for the Bank Application.
     */
    public static void main(String[] args) {

        // Initialize required services
        Banking bankService = new BankService("Partners Federal Credit Union", 256074974, 500135210, 100769310);
        Notification notificationService = new EmailService();

        // Create a new bank and the first customer
        Bank bank = new Bank(bankService, notificationService);
        Customer customer = new Customer("Mickey Mouse", "Disneyland", "Mickey@Disneyland.com");

        // Create a checking and savings accounts for the customer
        bank.getBankService().createAccount(customer, 2000.0, Checking);
        bank.getBankService().createAccount(customer, 10000.0, Savings);
        bank.getBankService().createAccount(customer, 10000.0, Savings);

        // Print some information on the bank
        System.out.println("Bank Name: " + bank.getBankService().getName());
        System.out.println("Routing Number: " + bank.getBankService().getRoutingNumber());
        System.out.println("Total Accounts: " + bank.getBankService().getAccounts().size());
    }

}
Here, we've just used this to illustrate that if we were developing this and we wanted to test out that the bank application was working, we could create a number of different instructions that help us to visualize and see what the system and the behavior of the system is like.
We start to initialize the required services.
Then we create a bank and its first customer.
Then we dive into creating bank accounts and we create three bank accounts for that customer, one checking and two savings.
Then there's a portion where we ought to just print out some of the details in the banking system so that we can verify and see if what we think is happening is actually happening behind the scenes.
If we run this, if you go to and hover over this play icon, you can click on it and select Run 'Bank.main()'.
When you run Bank.main(), you will see a system build and then it would output in the console at the bottom here the different instructions that we ask it to print out. Everything looks good.
In addition to the main method, there's a number of frameworks that allow us to do automatic setup, input, verification, and tear down. The most common of these is the xUnit style family of frameworks, things like JUnit, Nunit, PHPUnit, and pytest.
The one we're going to look at specifically during this course is TestNG. Let's get right into it.
If you head back over to the IDE, I want you to drill into the source, or into the bankService package and then open the Customer class.
package bankService;

/**
 * Facilitates storing, retrieving, and updating customer information.
 * @author Tariq King
 */
public class Customer {

    private String name;
    private String address;
    private String email;

    public Customer(String name, String address, String email) {
        this.name = name;
        this.address = address;
        this.email = email;
    }

    public String getName() {
        return name;
    }

    public void updateName(String name) {
        this.name = name;
    }

    public String getAddress() {
        return address;
    }

    public void updateAddress(String address) {
        this.address = address;
    }

    public String getEmail() {
        return email;
    }

    public void updateEmail(String email) {
        this.email = email;
    }

}
This is a relatively simple class within our application, and it provides a good means for us to start learning some of the constructs of these xUnit style frameworks, and specifically TestNG.
Recall that the first thing that we need to do in terms of our guidelines is to know what we're testing.
Let's take a look at this class and try to determine exactly where, in the big picture, this class fits.
It says that the customer class facilitates storing, retrieving, and updating customer information.
There's a number of attributes that are there: name, address, and email.
There's was a constructor that takes that information and creates a new customer object.
There's also a public interface that allows us to retrieve the name and update the name. Similar, the address, as well as the email.
And so, we know in the grand scheme of things there might be a lot more information that we want to capture from our customers. However, for this small project we'll assume that this is sufficient.
So, let's create our first test based on Customer.
If you click the class theme, you'll see that there's a little light bulb that appears that tells us some of the intent actions. If you click it, you can actually go to “create tests”. Alternately, you can hold the option key if you're on the Mac and hit return, or ALT+Enter on a Windows machine, to popup that intentions menu.
Let's create the test.
Here, you'll want to make sure that the appropriate test library is selected, which is TestNG.
You'll also want to make sure that name is populated accordingly. Here we're not going to generate any of these test methods, we're just going to create an empty shell, so simply click okay and move to the next step.
With that, you should have a blank CustomerTest.
::tip Where are tests stored? If you're wondering exactly where this is stored, recall that test folder. If you drill into that test folder, now you'll see that there's a “BankService” package which mimics the structure of our production code. And within there, you'll see your “CustomerTest”. This is a great reminder that we want our test code to be held to the same standard as our production code, and the IDE helps to facilitate that, even with this structure. ::
Let's start by creating our first test scenario.
CustomerTest.java
import org.testng.annotations.Test;

import static org.testng.Assert.*;

public class CustomerTest {

    /**
     *  The system should be able to store information on a new customer using valid data.
     *  Scenario:
     *  1. Given I create a new customer named Mickey Mouse
     *  2. When I initialize the customer object with valid details.
     *  3. Then Mickey's information should be stored in the system.
     */
    @Test
    public void creatingCustomerWithValidData_StoresSpecifiedData() {

        // Given and When
        Customer customer = new Customer("Mickey Mouse", "Disneyland", "Mickey@Disneyland.com");

        // Then
        assertNotNull(customer);
        assertEquals(customer.getName(), "Mickey Mouse");
        assertEquals(customer.getAddress(), "Disneyland");
        assertEquals(customer.getEmail(), "Mickey@Disneyland.com");
    }

    /**
     *  The system should be able to update customer information using valid data.
     *  Scenario:
     *  1. Given I create a new customer named Mickey Mouse.
     *  2. When I update Mickey's customer information with Minnie's information.
     *  3. Then Minnie's information should be stored in the system.
     */
    @Test
    public void updatingCustomerDataWithDifferentValidValues_StoresNewValues() {

        // Given
        Customer customer = new Customer("Mickey", "Disneyland", "Mickey@Disneyland.com");

        // When
        customer.updateName("Minnie Mouse");
        customer.updateAddress("Disney World");
        customer.updateEmail("Minnie@Disneyworld.com");

        // Then
        assertEquals(customer.getName(), "Minnie Mouse");
        assertEquals(customer.getAddress(), "Disney World");
        assertEquals(customer.getEmail(), "Minnie@Disneyworld.com");

    }
}
We want to make sure that we write or test scenario first and design the tests before we just jump right into writing test automation code.
One way that we can do that — and maintain that same standard with test scores and production code — is by using the same documentation structures. Here we're going to use the Java Docs to actually define what is our high level of test scenario.
With this, we want to be able to say that “The system should be able to store information on a new customer using valid data”. Here is just our first happy day scenario, being that if we have with customer that has valid information, the system should be able to store that as part of the requirements. We're going to use the BDD style. We're going to come up with our scenario and use Given/When/Then. If you're not familiar with this technique, just check Angie Jones's tutorial on BDD.
Here we want to say that “Given I create a new customer named Mickey Mouse”.
“When I initialize the customer object with valid details”,
“Then Mickey's information should be stored in the system”. Here it is just a high-level scenario where we're creating a fictional customer Mickey Mouse and populating an object with his details. Now we can start creating our test method. The first thing is that we have to make sure that every test method has an annotation of tests.
We can create
public void, because all testing methods are accessible and they usually don't return anything because we're just running a procedure and verifying from results, and the system will take care of reporting exactly what those results are. Now we need a name for our test method. Recall that we want to make sure that names are very descriptive and maybe that they had contained in the first portion, a part of the scenario, and then in the second half the expected results.Here we're going to say
creatingCustomerWithValidData_StoresSpecifiedData. Here we have our scenario where are we going to create a customer with valid data on our expectation is that that specified data is stored.
Now we can start implementing or tests.
Recall that we have a constructor that allows us to do this “Given and When” all in one. We just provide a construct to create a new object and we can pass in those customer details in one shot.
Here, customer is a new Customer, and here we can supply information: our name, address, and email:
Customer customer = new Customer("Mickey Mouse", "Disneyland", "Mickey@Disneyland.com");
Here we're going to say Mickey Mouse. And say that he lives in Disneyland. And the email is Mickey@Disneyland.com. There we have our set up and our input.
Now we need to do our verifications — what happens next.
Some of the things that we want to make sure that we assert and that we can show you some of these constructs is that when you create an object, there's a basic assertion that you can do to make sure that that object indeed has memory allocated and is not null and void.
And so here we will do assert not null, and pass in the customer object — assertNotNull(customer);
What this does is that this will return true if customer is actually allocated to a valid space in memory. That doesn't help us to know the contents yet, but at least tells us that the object was created.
Now, to validate the contents of your object we can use what is the assertEquals command.
In TestNG, you have to be very careful. The actual result needs to be first in the parameter list followed by the expected results. In other frameworks like JUnit, you may see this as reversed, but here what we want to say is that the actual value that we have within the customer.
-Let's start with the name, customer.getName. We want to make sure that that's equal to “Mickey Mouse”, because we expect that his name is stored — assertEquals(customer.getName(), "Mickey Mouse");
Similarly, to the other attributes, for address — assertEquals(customer.getAddress(), "Disneyland");
And we have to assert that the email is equal to “Mickey@Disneyland.com” — assertEquals(customer.getEmail(), "Mickey@Disneyland.com");
Now we have our first test. We have our set up on our inputs; and then we have a set of verifications that can be done automatically.
Let's run this.
You just need to click on the arrow and go to “run tests”. And you can start to see your test results in the window below.
In here we can see our test is green. And that we ran one test, and one test passed.
However, we really didn't do much to actually validate whether or not we're truly testing this thing. In other words, one of the things that you need to be able to do, and do it very frequently as you're developing tests, is to check and see that they're actually verifying what you think they are.
One of the ways that we can start to check this is that we can actually modify maybe some aspect of our setup.
And so instead of “Mickey Mouse”, we'll just put “Mickey” there.
Customer customer = new Customer("Mickey ", "Disneyland", "Mickey@Disneyland.com");
And now our tests should fail if our verification actually works. Let's rerun that test.
And here we see, yes indeed, we are verifying that Mickey Mouse was there.
It says we expected Mickey Mouse, but we found Mickey. You can actually “Click to see the difference”, and therefore if you had a lot of information, you'd be able to drill in and look at these attributes and expectations side by side.
And so now we have our first basic tests and we can start to see the constructs of the framework and how they allow us to do automatic verification.
Resources
Quiz
The quiz for Chapter 4 can be found at the end of Section 4.4
