
Transcripted Summary
# How to use Appium with built-in applications in iOS
After we tried Appium with iOS in the first demo, it's time now to use Appium for the built-in applications in our iOS Simulator.
Let's assume that we need to work with the "Contacts" application.
We need to open "Contacts" and then maybe we can click on "Add", and then we can enter the "First Name" or the "Last Name", and then maybe we can click on the "Done" button.
This is our case, but how can we get the application or the bundle ID, which is the appPackage and appActivity in Android?
We need to get the bundle ID from the iOS Simulator to be able to use it.
In this case, we can open the console.
So we will search for Console from our Mac and then in the simulator, we can click on "Contacts" to open the application here.
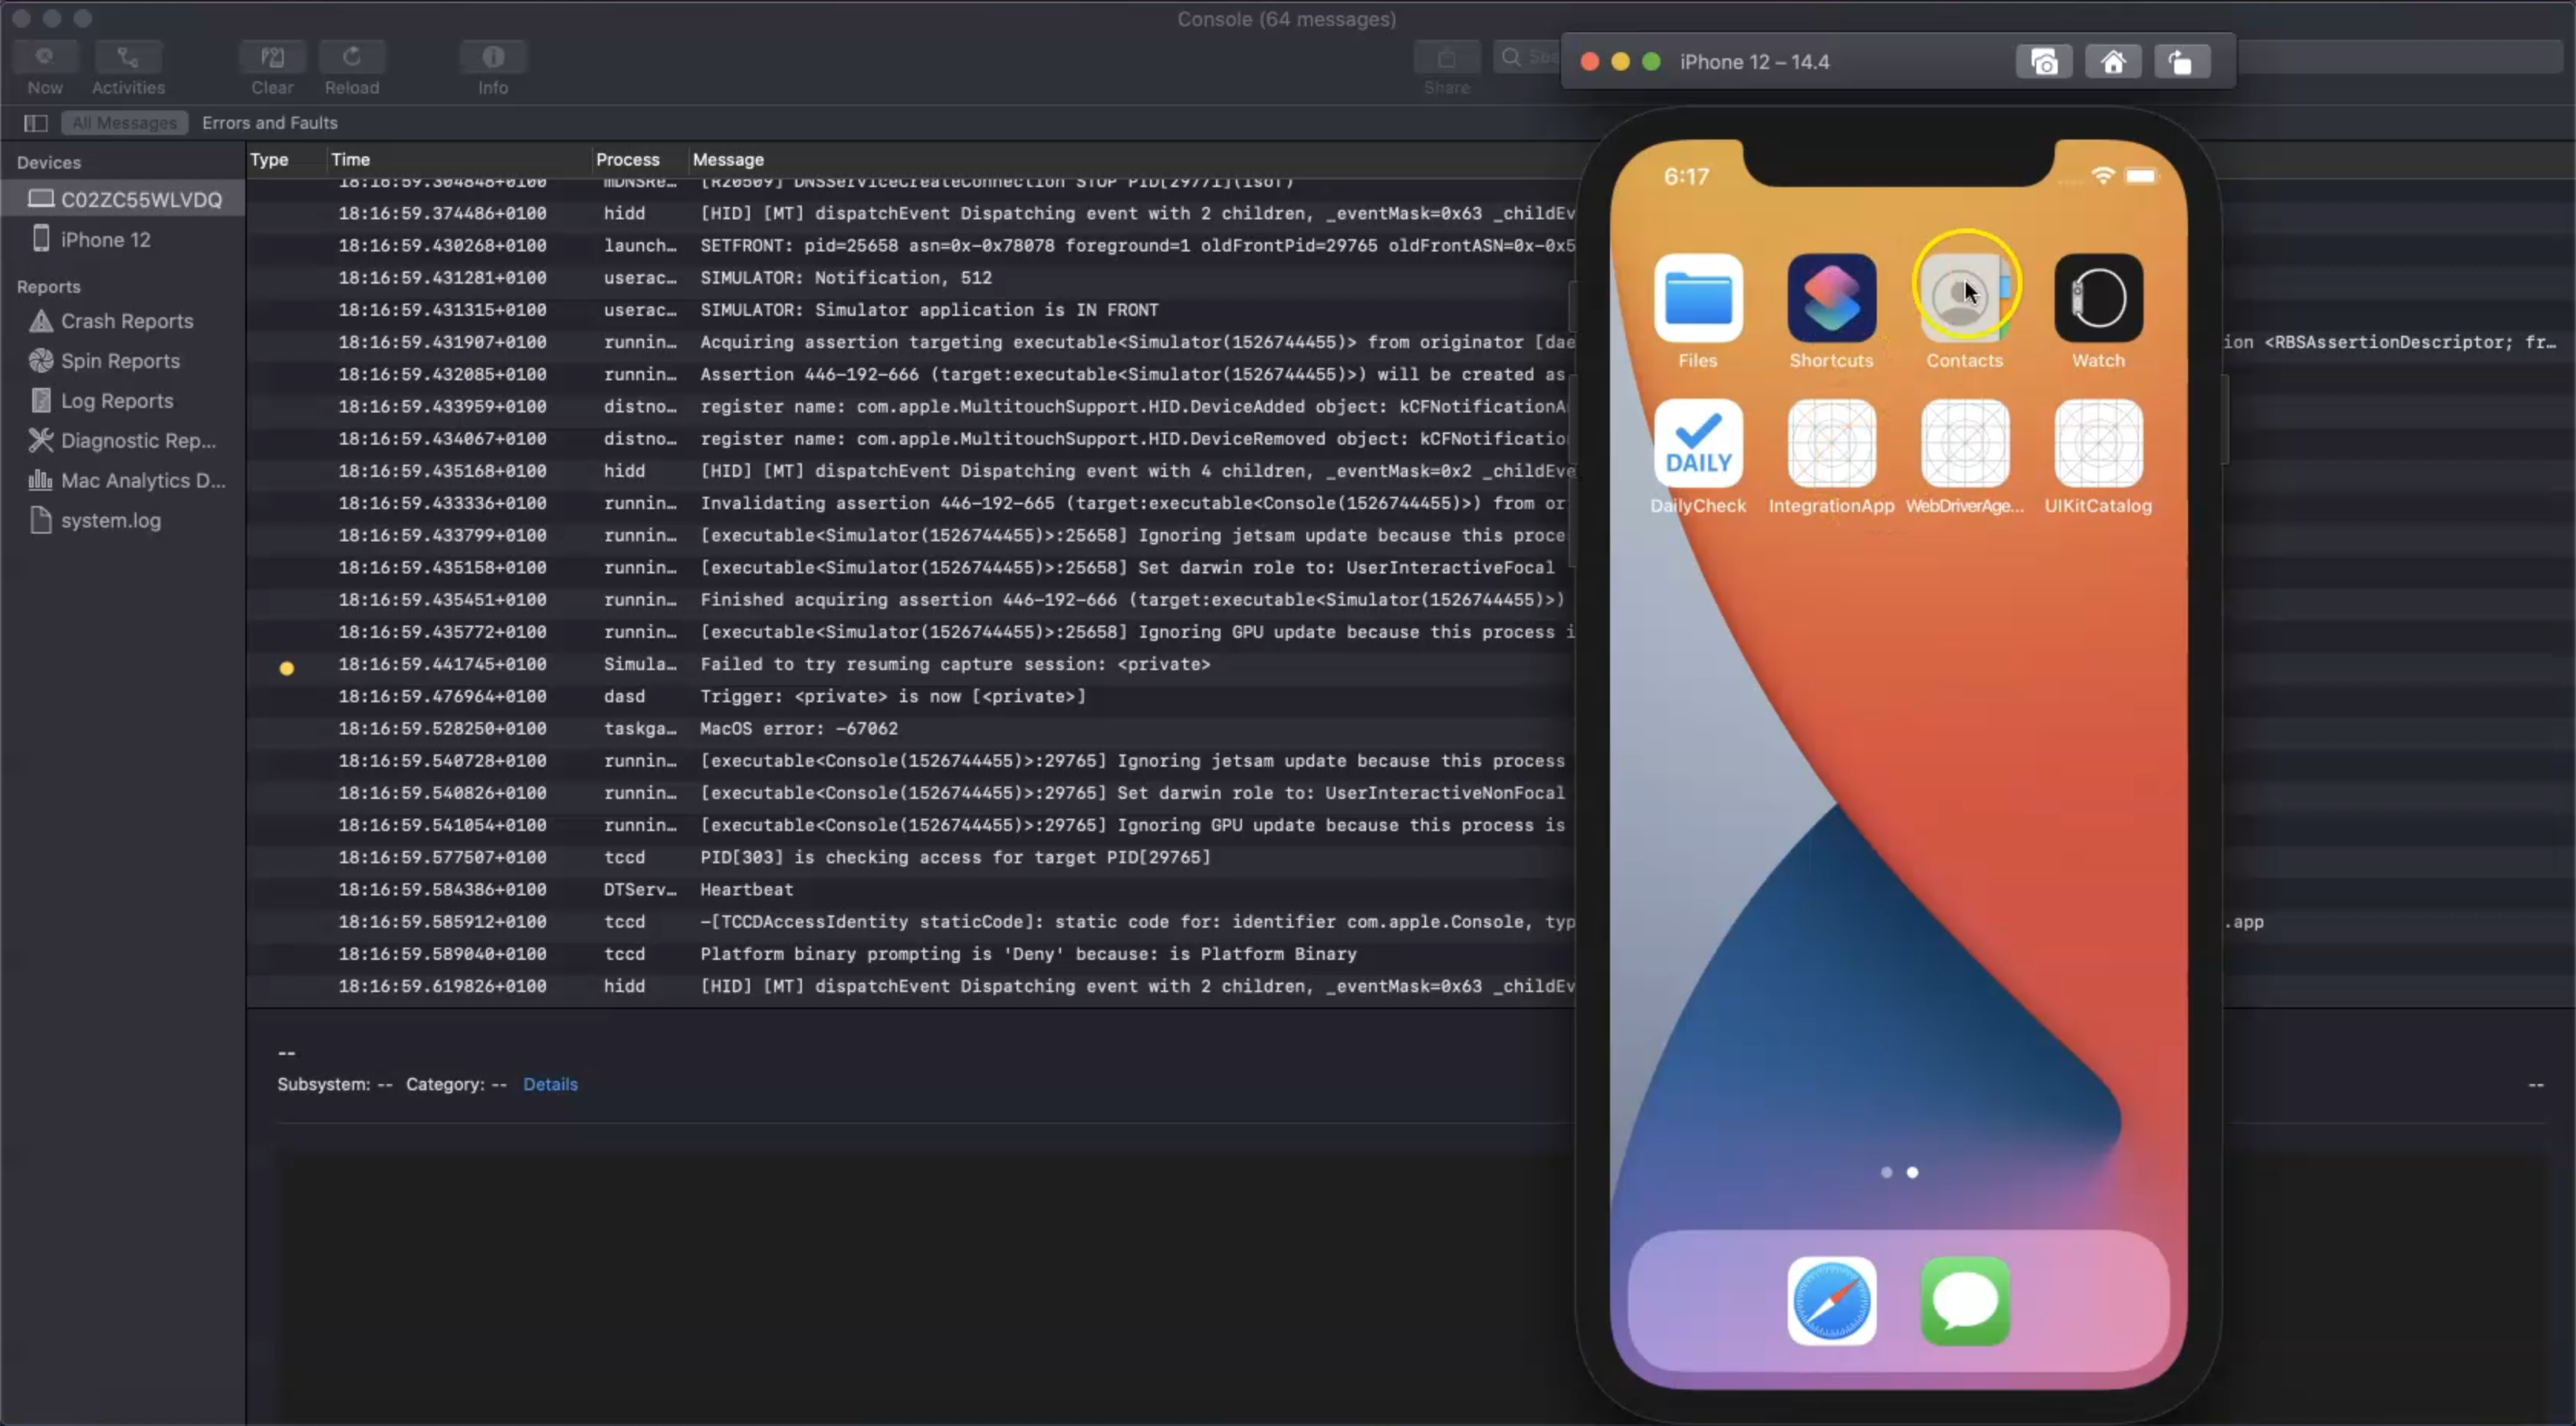
Then we need to start searching for anything that contains "com.apple" in the bundle ID.
It should be something like "com.apple.contacts".
We can search for anything that is related to our address book or our mobile contact application.
Here, there is one for TimeMachine, backup, RegisterHooks; we need to find something for our com application.
In our case, we can search for "addressbook", and here is the application.
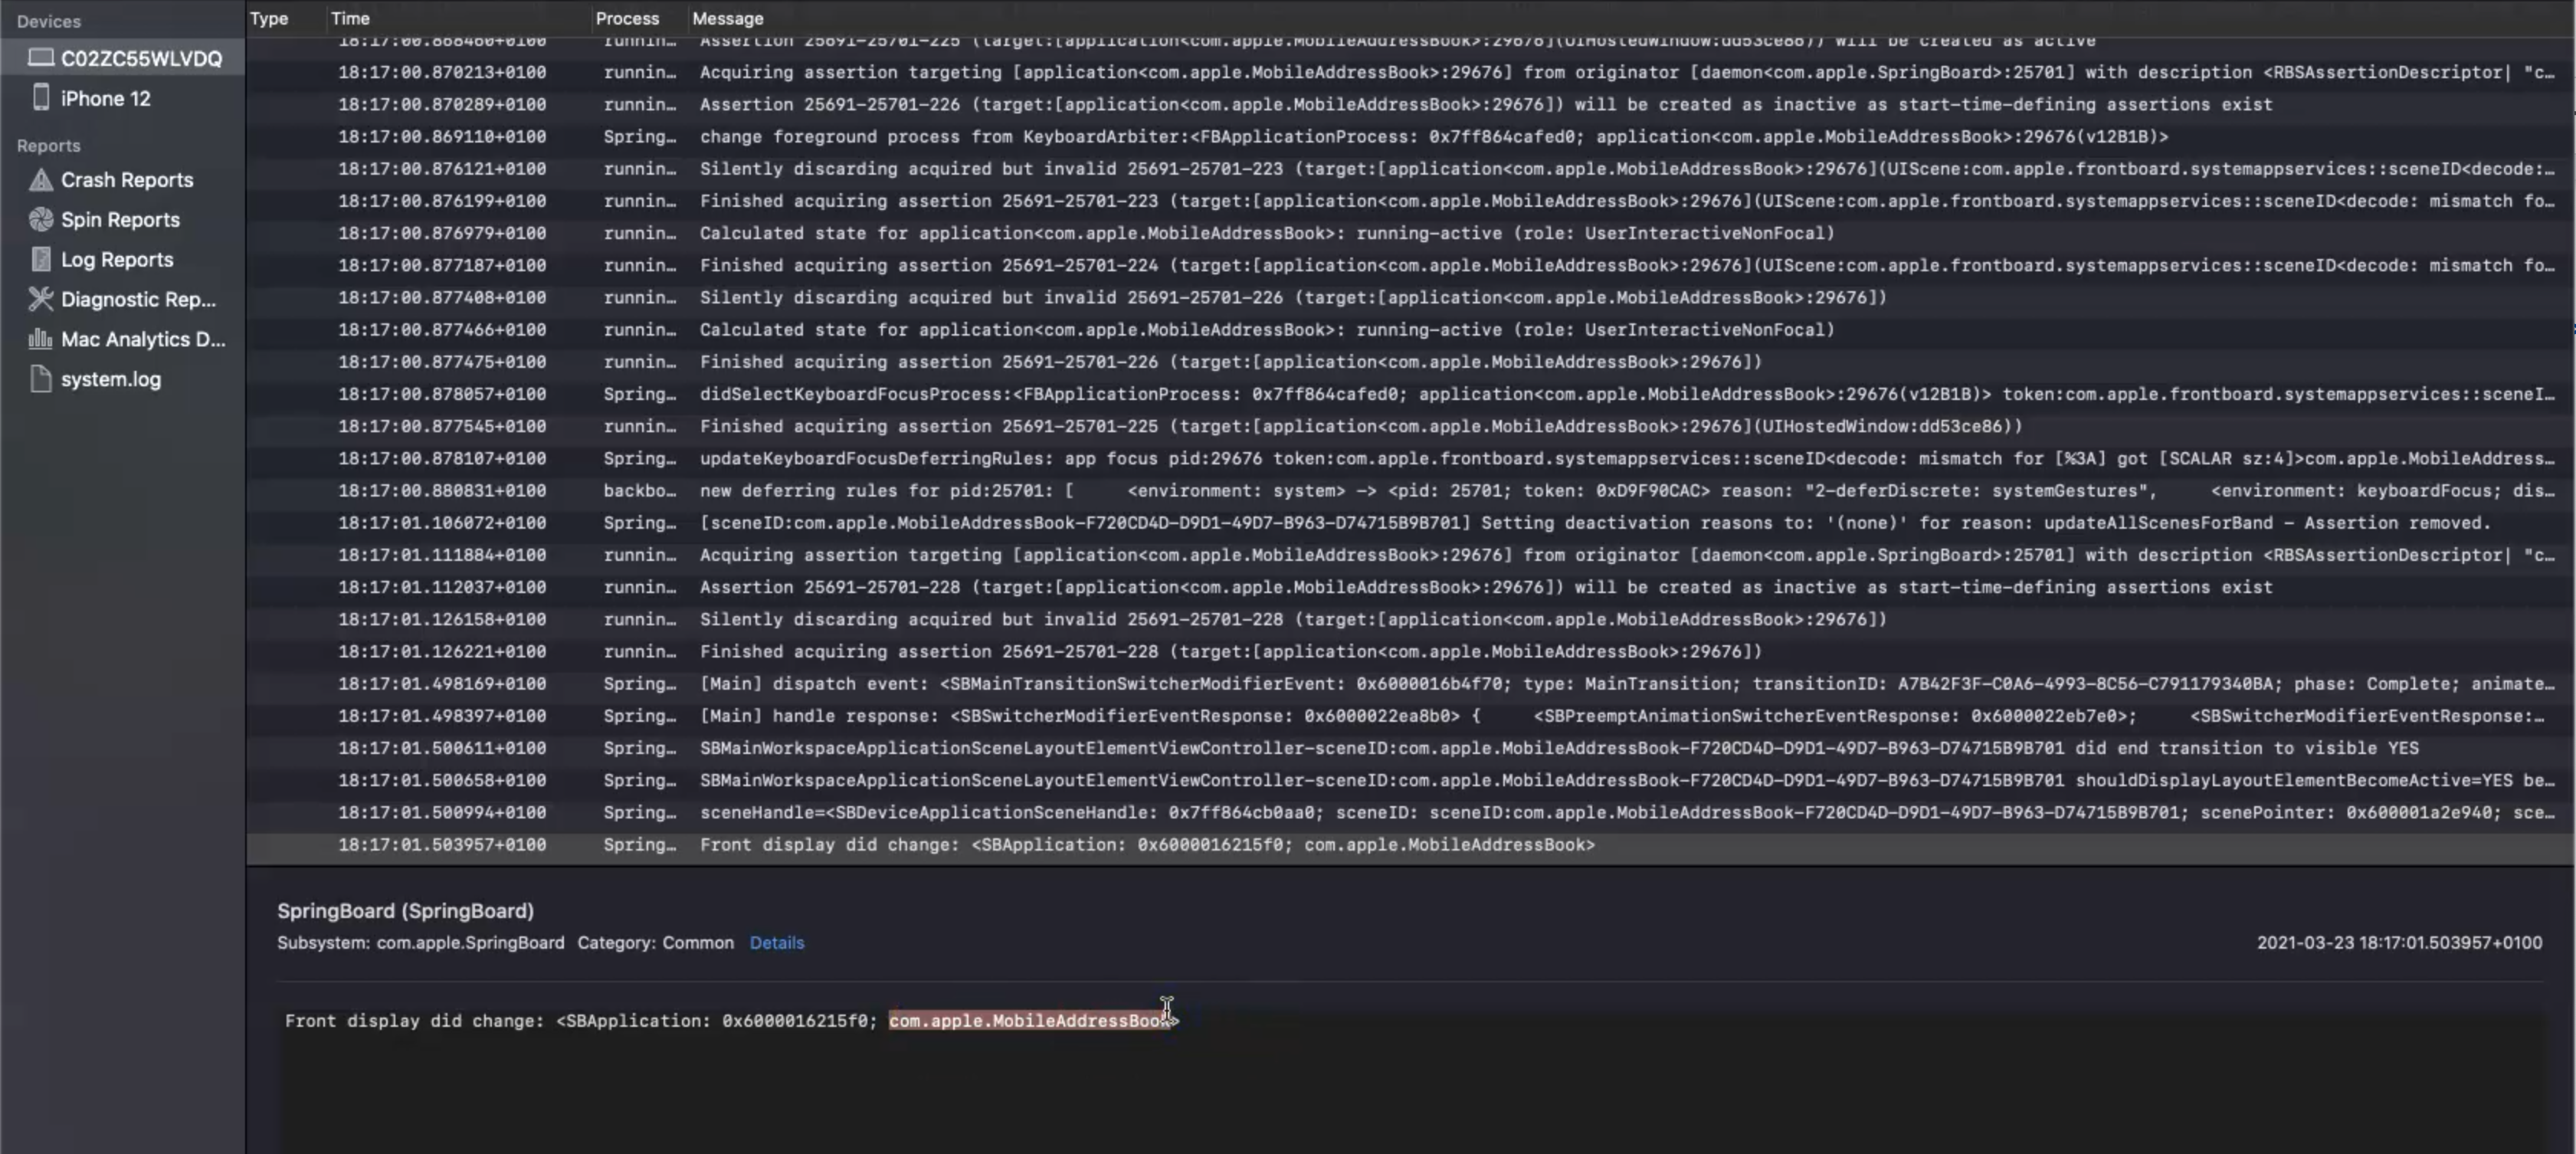
The application is usually from SpringBoard and the application usually starts with "com.apple", or something like "com.android" if it's a built-in application.
This is the bundle ID - "com.apple.MobileAddressBook".
We can copy this and then close the console again, and from our Appium server, we can open our inspection session to inspect our application.
Here we have iOS_Builtin and I already added the desired capabilities here - I will just change the value for the version to "14.4" since this is the device that I'm already using, and the bundleId is "com.apple.MobileAddressBook".
I will save and start a session to be able to inspect our elements in this application.
It's already opened, so now we are ready with the inspection session to start clicking on these buttons.
Sometimes you may not be able to click on this one, so we will open it from the App Source section, but first, let's copy our first iOS application.
We will copy FirstiOSTest and create FirstiOS_Built_InTest.
Here, we will replace app with the bundleId and the value is "com.apple.MobileAddressBook".
We will remove the code in click_App_Button() because we use different elements in this application.
package iOS;

import io.appium.java_client.AppiumDriver;
import io.appium.java_client.ios.IOSDriver;
import org.openqa.selenium.remote.DesiredCapabilities;
import org.testng.annotations.AfterTest;
import org.testng.annotations.BeforeTest;
import org.testng.annotations.Test;

import java.net.MalformedURLException;
import java.net.URL;

public class FirstiOS_Built_InTest {

    AppiumDriver driver;

    @BeforeTest
    public void setUp() throws MalformedURLException {
        DesiredCapabilities caps = new DesiredCapabilities();
        caps.setCapability("platformName", "iOS");
        caps.setCapability("automationName", "XCUITest");
        caps.setCapability("platformVersion", "14.4");
        caps.setCapability("deviceName", "iPhone 12");
        caps.setCapability("bundleId",  "com.apple.MobileAddressBook");
        driver = new IOSDriver(new URL("http://localhost:4723/wd/hub"), caps);
    }

    @Test
    public void click_App_Button() {
        // code
    }

    @AfterTest
    public void tearDown() {
        if (null != driver) {
            driver.quit();
        }
    }
}
Let's redirect to our inspection session and here I just need to click on the "+" to be able to add a new contact.
Here in the "XCUIElement", I will start opening this chain, just to be able to click on this one.
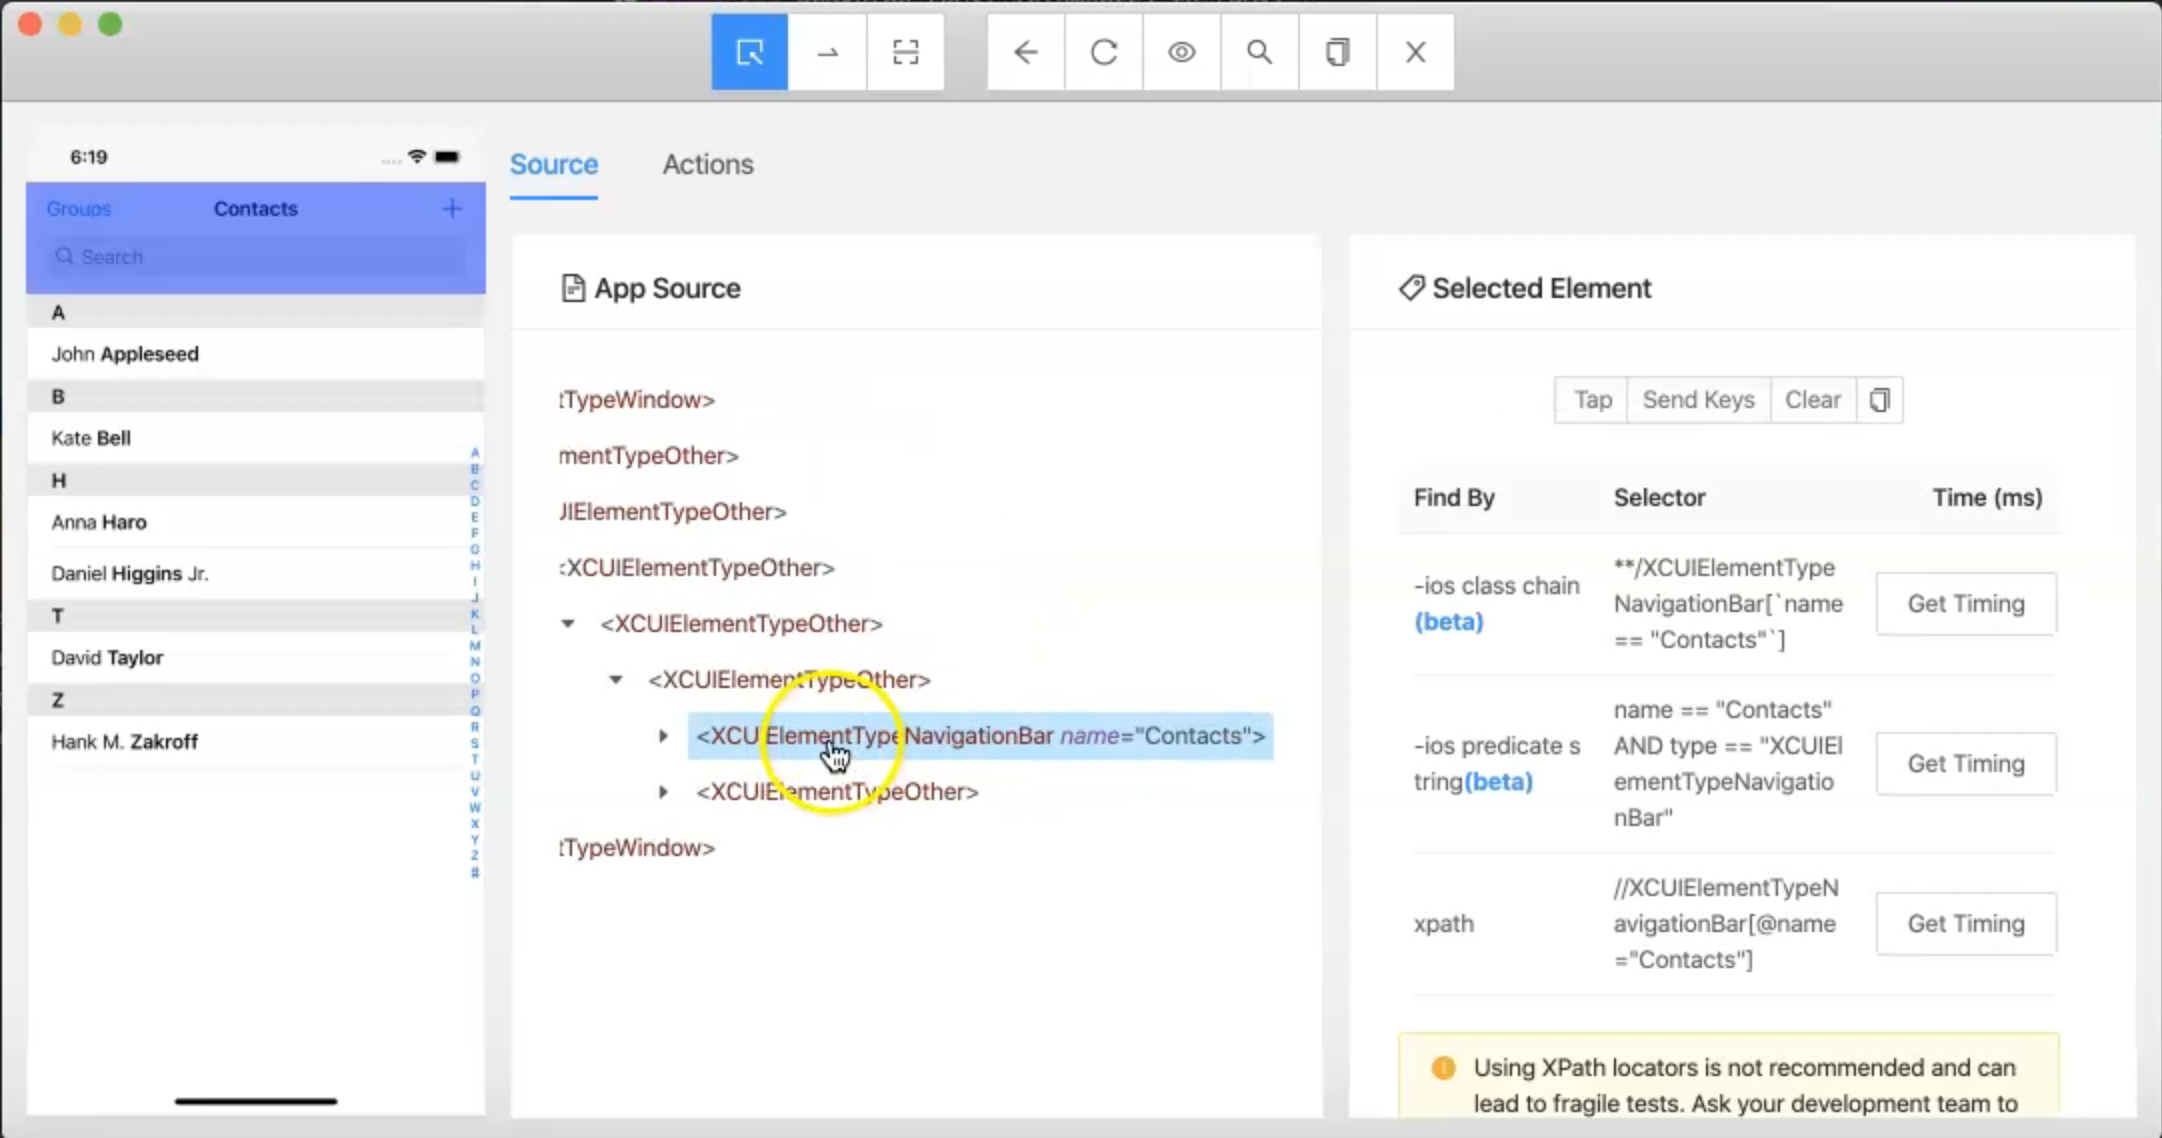
This is a NavigationBar, and here we have "Contacts" - this is the title - and inside the title, we have "Groups", "Contacts" and we have an "Add" button.
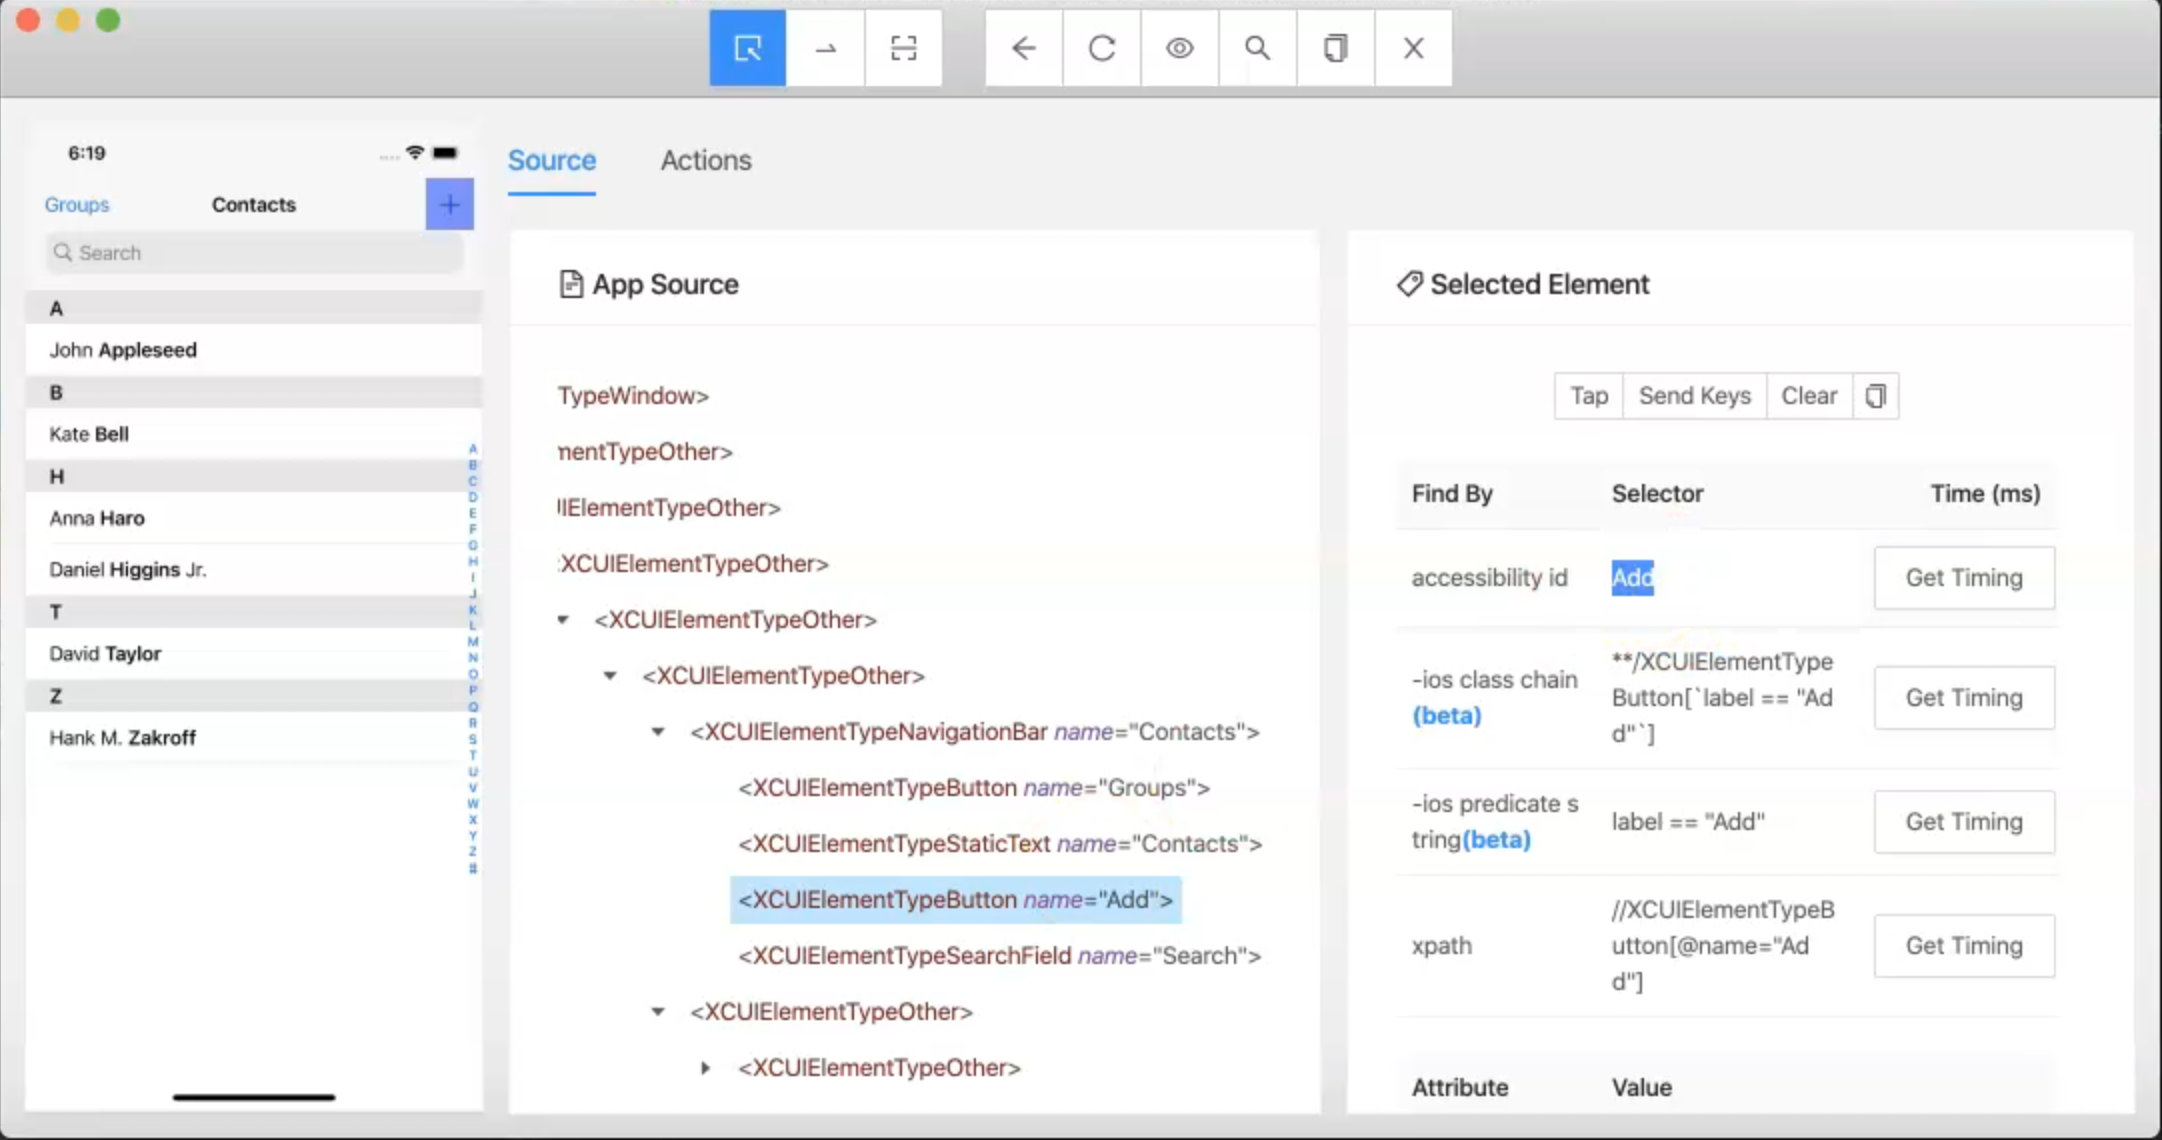
This is the accessibility id for this button so we need to copy this one.
From here, we will call driver.findElementByAccessibilityId() and in this case, it's "Add" and then .click().
Now we are clicking on "Add New Contact" and then after we click - we can Tap in the inspector session and it opens the "New Contact" screen.
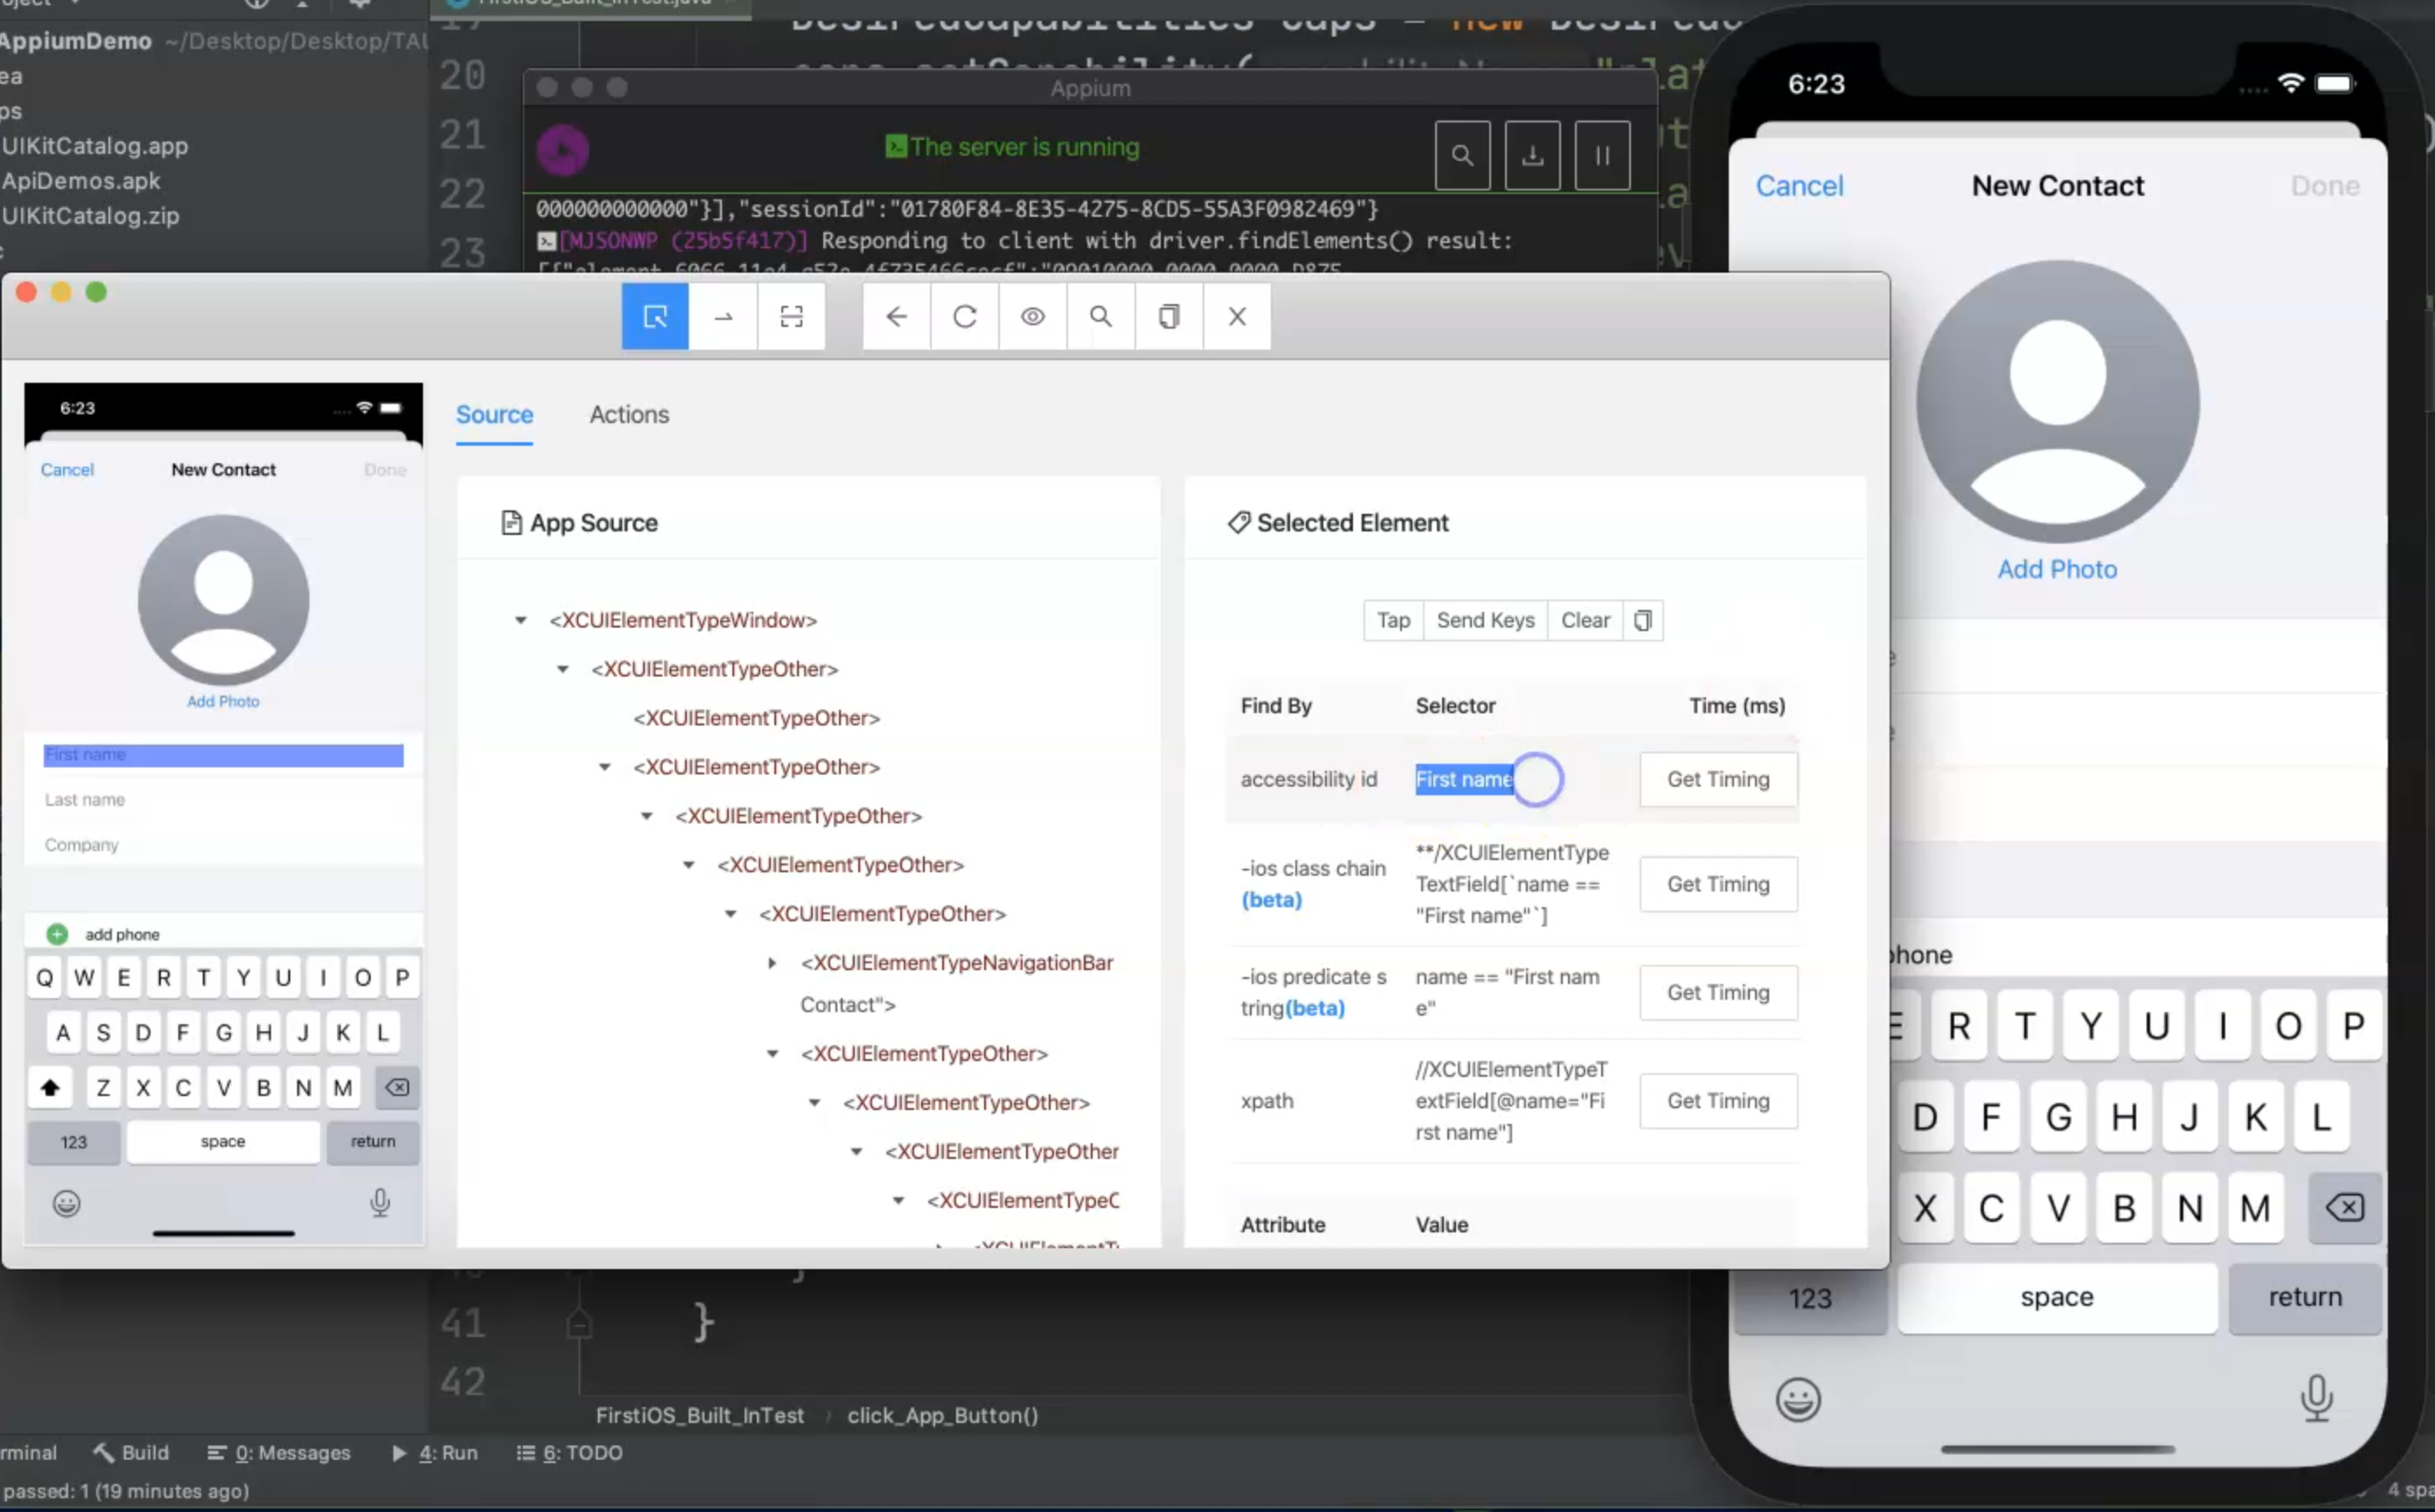
Then we can select "First name" and the "accessibility id" is "First name" so we can copy this one and we can use it in driver.findElementByAccessibilityId.
We will not click, but we will call .sendKeys() - for example, I can add my name as the first name.
Then, we can call driver.findElementByAccessibilityId() for "Last name" and the accessibility id is "Last name".
Then I will call .sendKeys() and I can add my second name, and then I need to add on that "Done" button.
I need to go to the NavigationBar menu and there is "New Contact" and then I should click on the "Done" button.
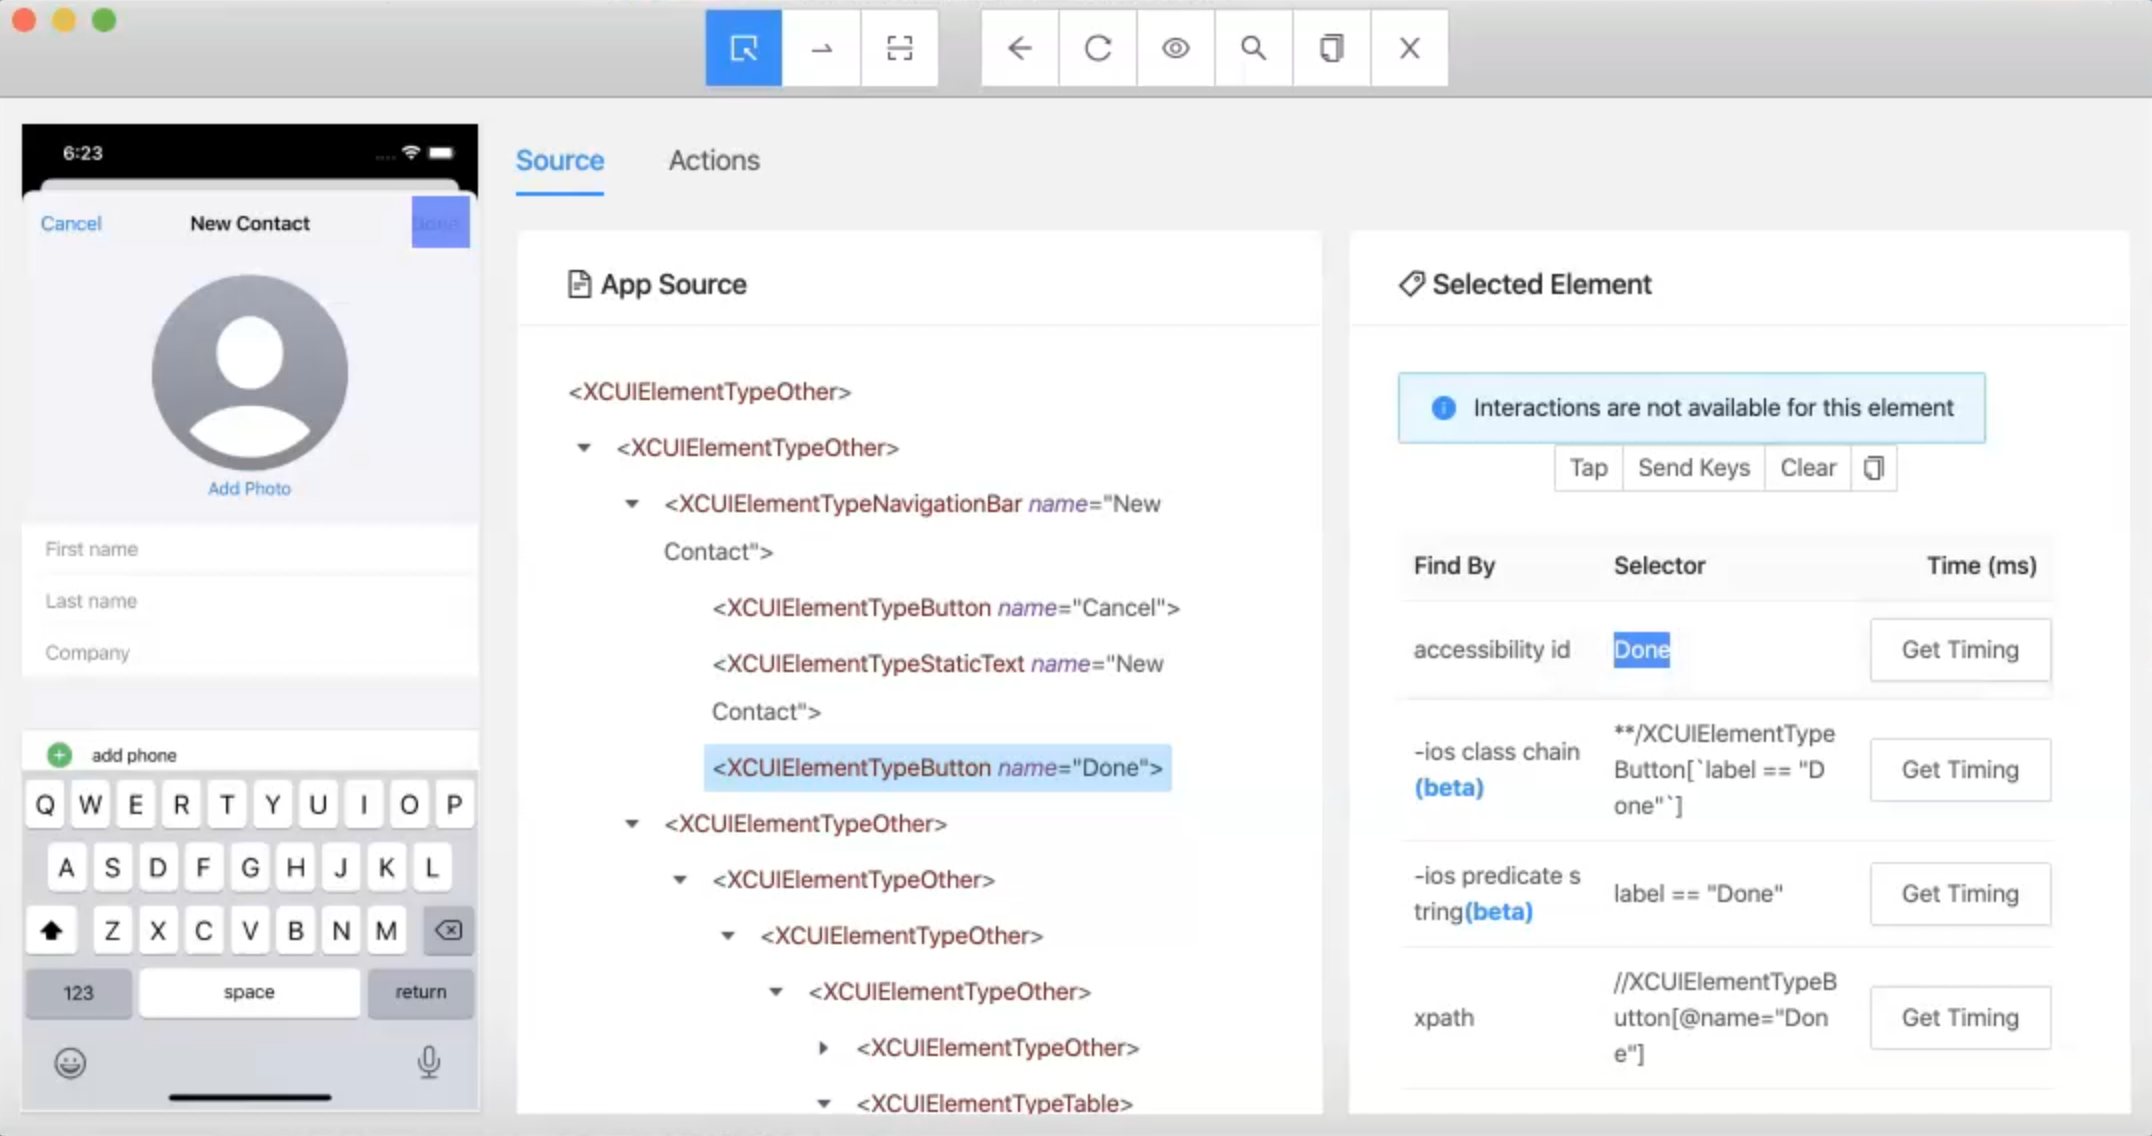
So then, I will add driver.findElementByAccessibilityId(), which is "Done" then .click().
package iOS;

import io.appium.java_client.AppiumDriver;
import io.appium.java_client.ios.IOSDriver;
import org.openqa.selenium.remote.DesiredCapabilities;
import org.testng.annotations.AfterTest;
import org.testng.annotations.BeforeTest;
import org.testng.annotations.Test;

import java.net.MalformedURLException;
import java.net.URL;

public class FirstiOS_Built_InTest {

    AppiumDriver driver;

    @BeforeTest
    public void setUp() throws MalformedURLException {
        DesiredCapabilities caps = new DesiredCapabilities();
        caps.setCapability("platformName", "iOS");
        caps.setCapability("automationName", "XCUITest");
        caps.setCapability("platformVersion", "14.4");
        caps.setCapability("deviceName", "iPhone 12");
        caps.setCapability("bundleId",  "com.apple.MobileAddressBook");
        driver = new IOSDriver(new URL("http://localhost:4723/wd/hub"), caps);
    }

    @Test
    public void click_App_Button() {
        // code
driver.findElementByAccessibilityId("Add").click();
        driver.findElementByAccessibilityId("First name").sendKeys("Moataz");
        driver.findElementByAccessibilityId("Last name").sendKeys("Nabil");
        driver.findElementByAccessibilityId("Done").click();
    }

    @AfterTest
    public void tearDown() {
        if (null != driver) {
            driver.quit();
        }
    }
}
This is a simple script for how we can use elements with iOS and a built-in application.
From this session, we will just close the inspection session and then redirect to our device.
We will start our test and check from the Appium server what happened during our test.
We open the application, we click on "New", and then we click "Done", and then our test case is passed.
Then you can do anything - maybe we can add an assertion that the contact is added to the list, for example, in the next step.
Anything that you want to do, we can do it using Appium.
This is the script for a built-in application, and this is the same concept - just that we are using bundle ID instead of the application to install it every time, and then we are using the application in our code.
Resources
Quiz
The quiz for this chapter can be found in Chapter 4.8
