

Transcripted Summary
Welcome to our next chapter covering Match Levels. You can think of a Match Level as an AI algorithm that Applitools uses to compare two screenshots.
In the first course of this series, we touched on the default Match Level known as Strict. However, there are other options beyond Strict such as Layout and Ignore Colors. Each of these Match Levels has their own use cases so it's important to understand how they work in order to choose the correct one for each situation.
Also, we're going to see how you combine multiple Match Levels per test by applying them to certain regions on the page. In this chapter, we're going to go over each of the main Match Levels that Applitools offers and fully understand when to use each one. Let's go ahead and dive in.
We went over Strict in the last course but I am going to touch on it briefly in this course as well. If you'd like a more in depth look, definitely check out the first course in this series.
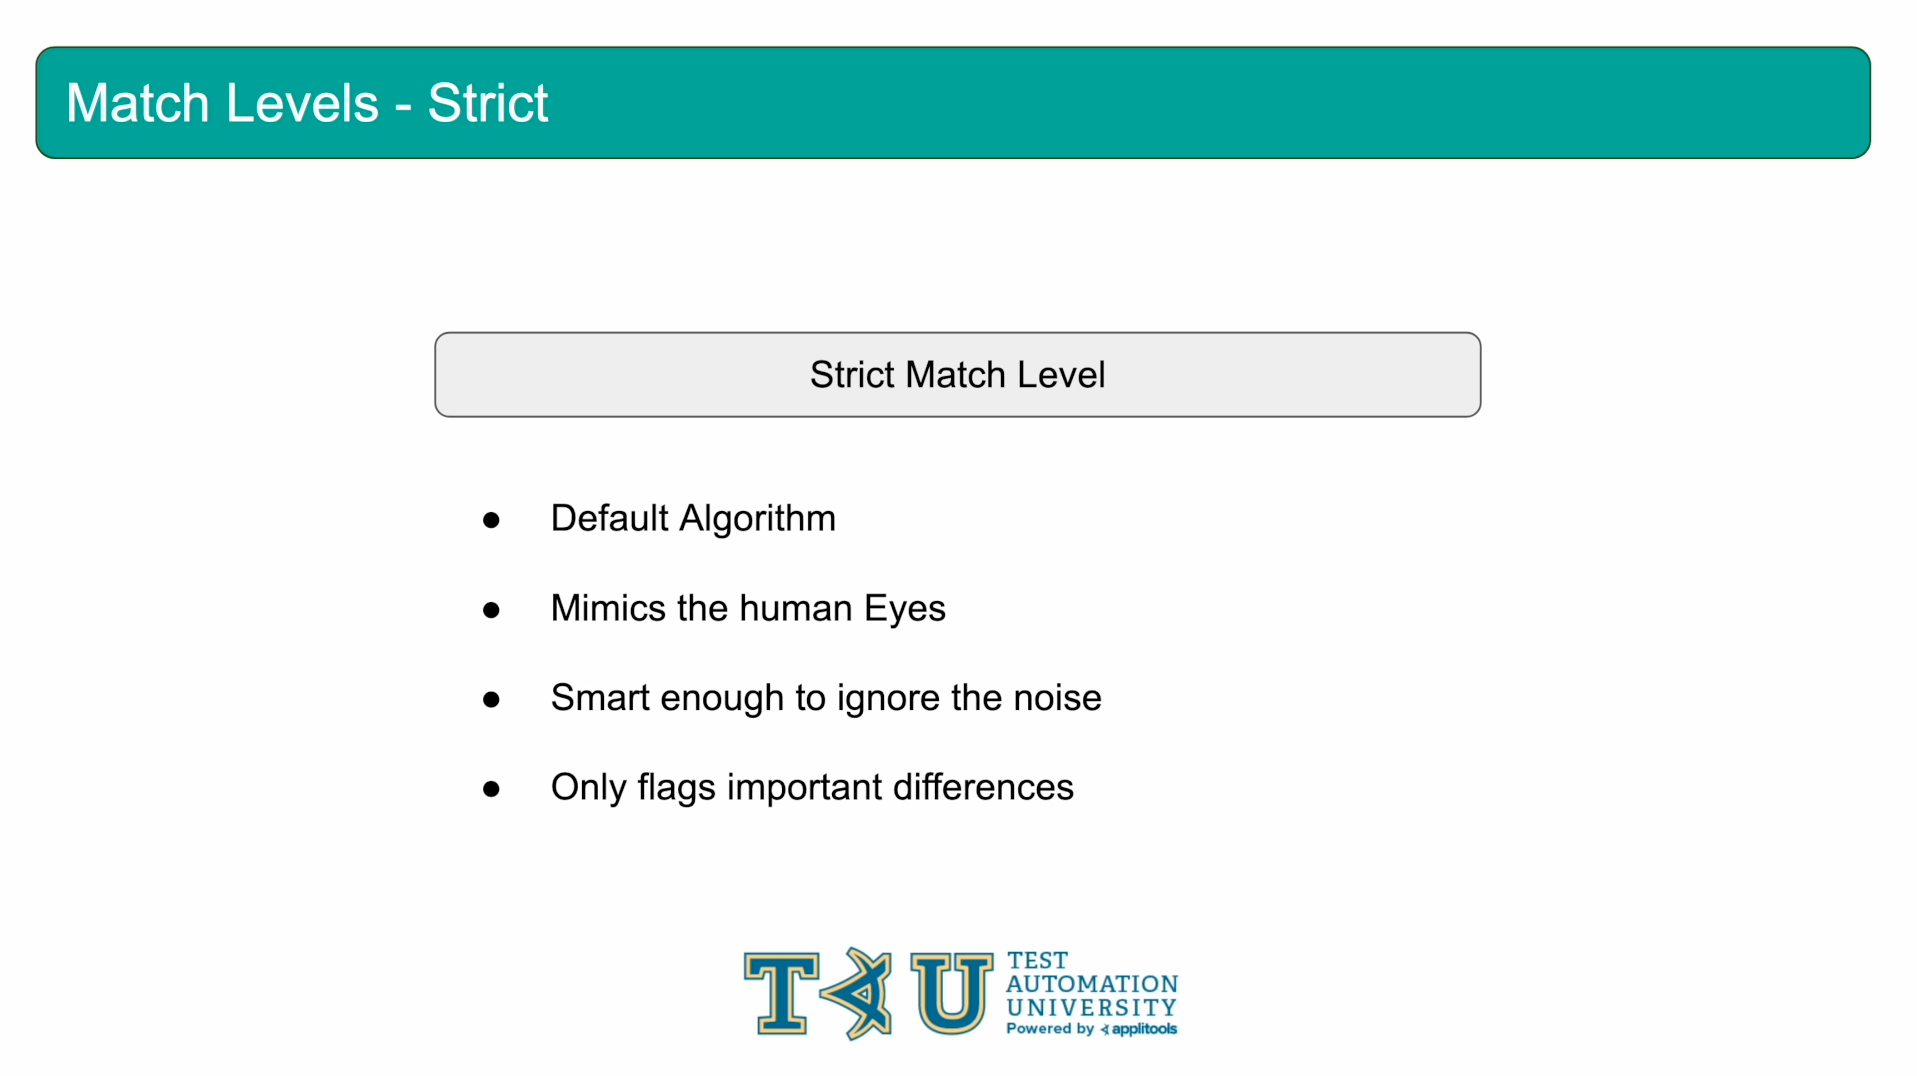
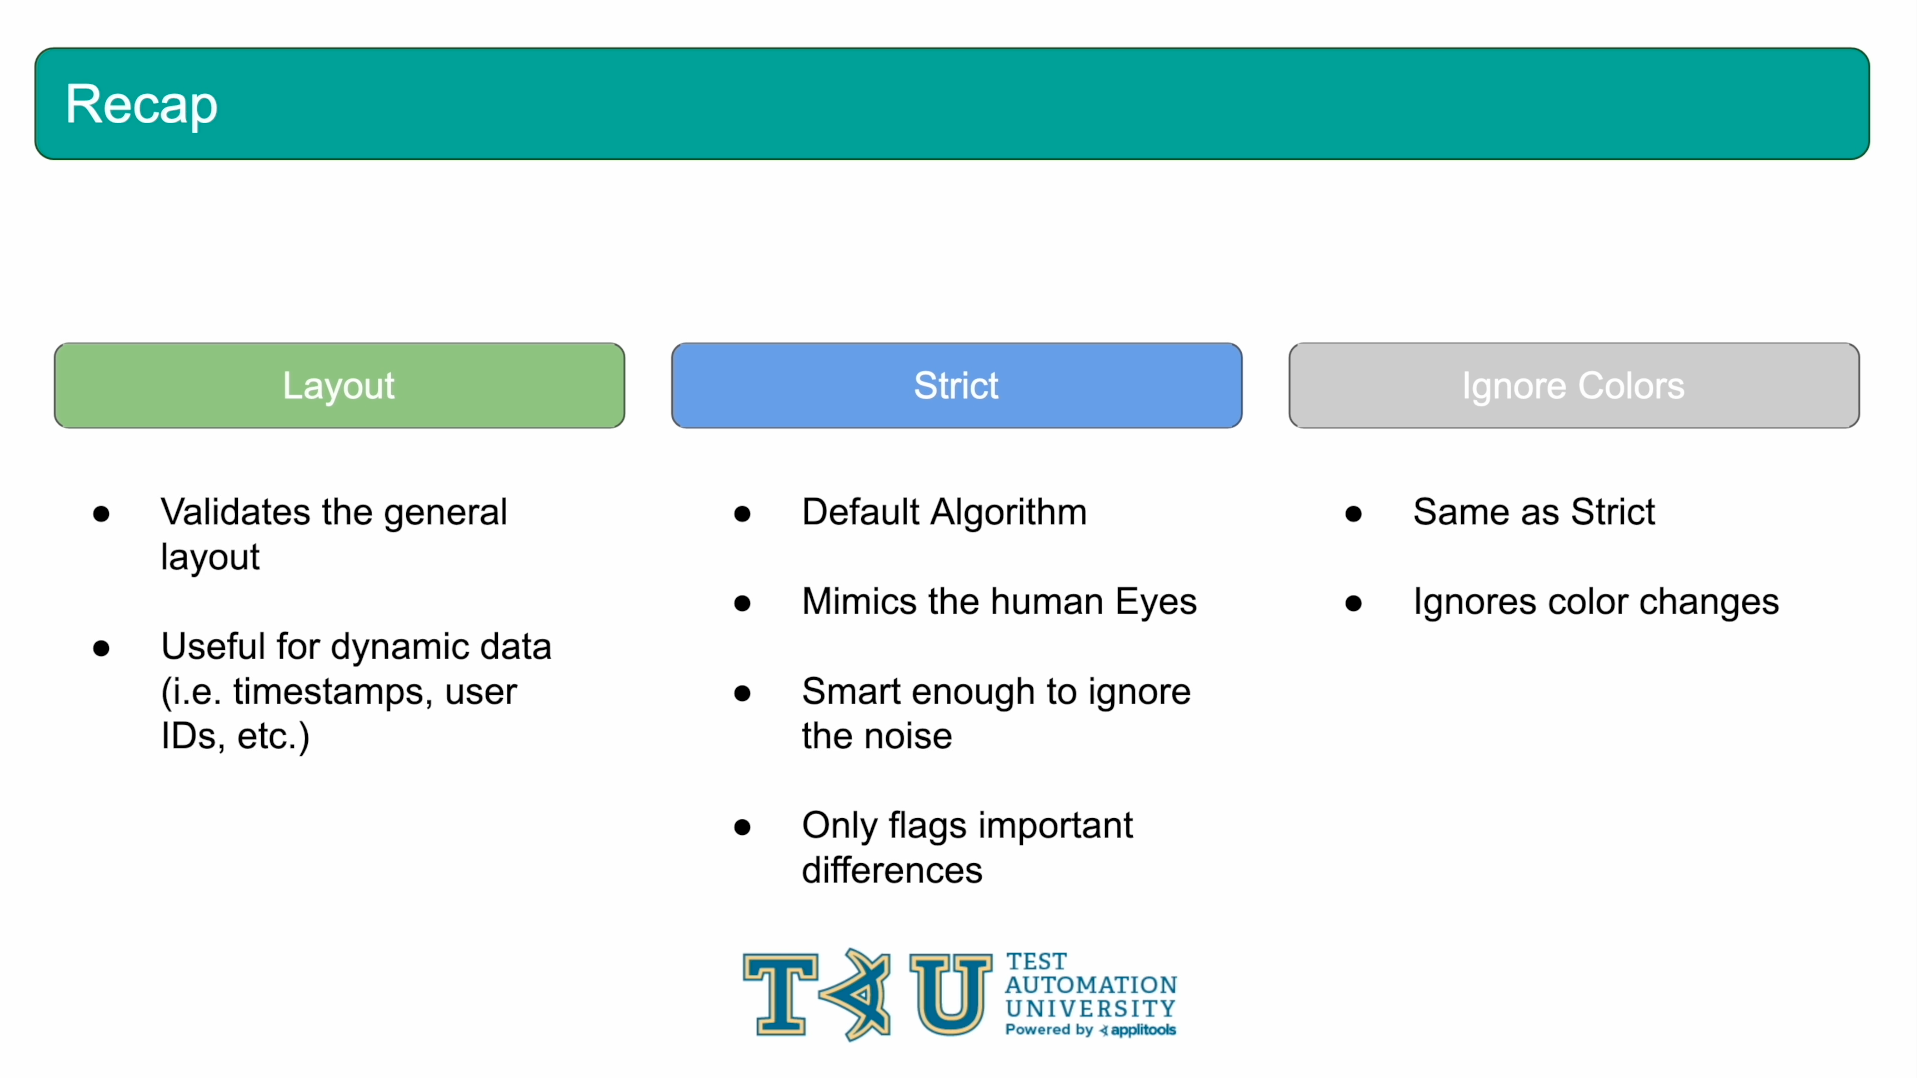
Strict is the default algorithm that Applitools uses across the board. It doesn't matter if you're running with the Classic Runner or the Ultrafast Grid Runner, if you don't specify a Match Level, you'll be using Strict. Therefore, each of our examples in this course so far have been using Strict.
This Match Level is trained to mimic the human eyes and only highlight differences that are important. It is smart enough to ignore small rendering changes that can cause traditional visual tests using Pixel-to-Pixel comparisons to fail. Let's run through a quick example showing how the Strict Match Level works.

Let's go over all the code changes. First, I changed the page that we're testing to the Applitools helloworld page.
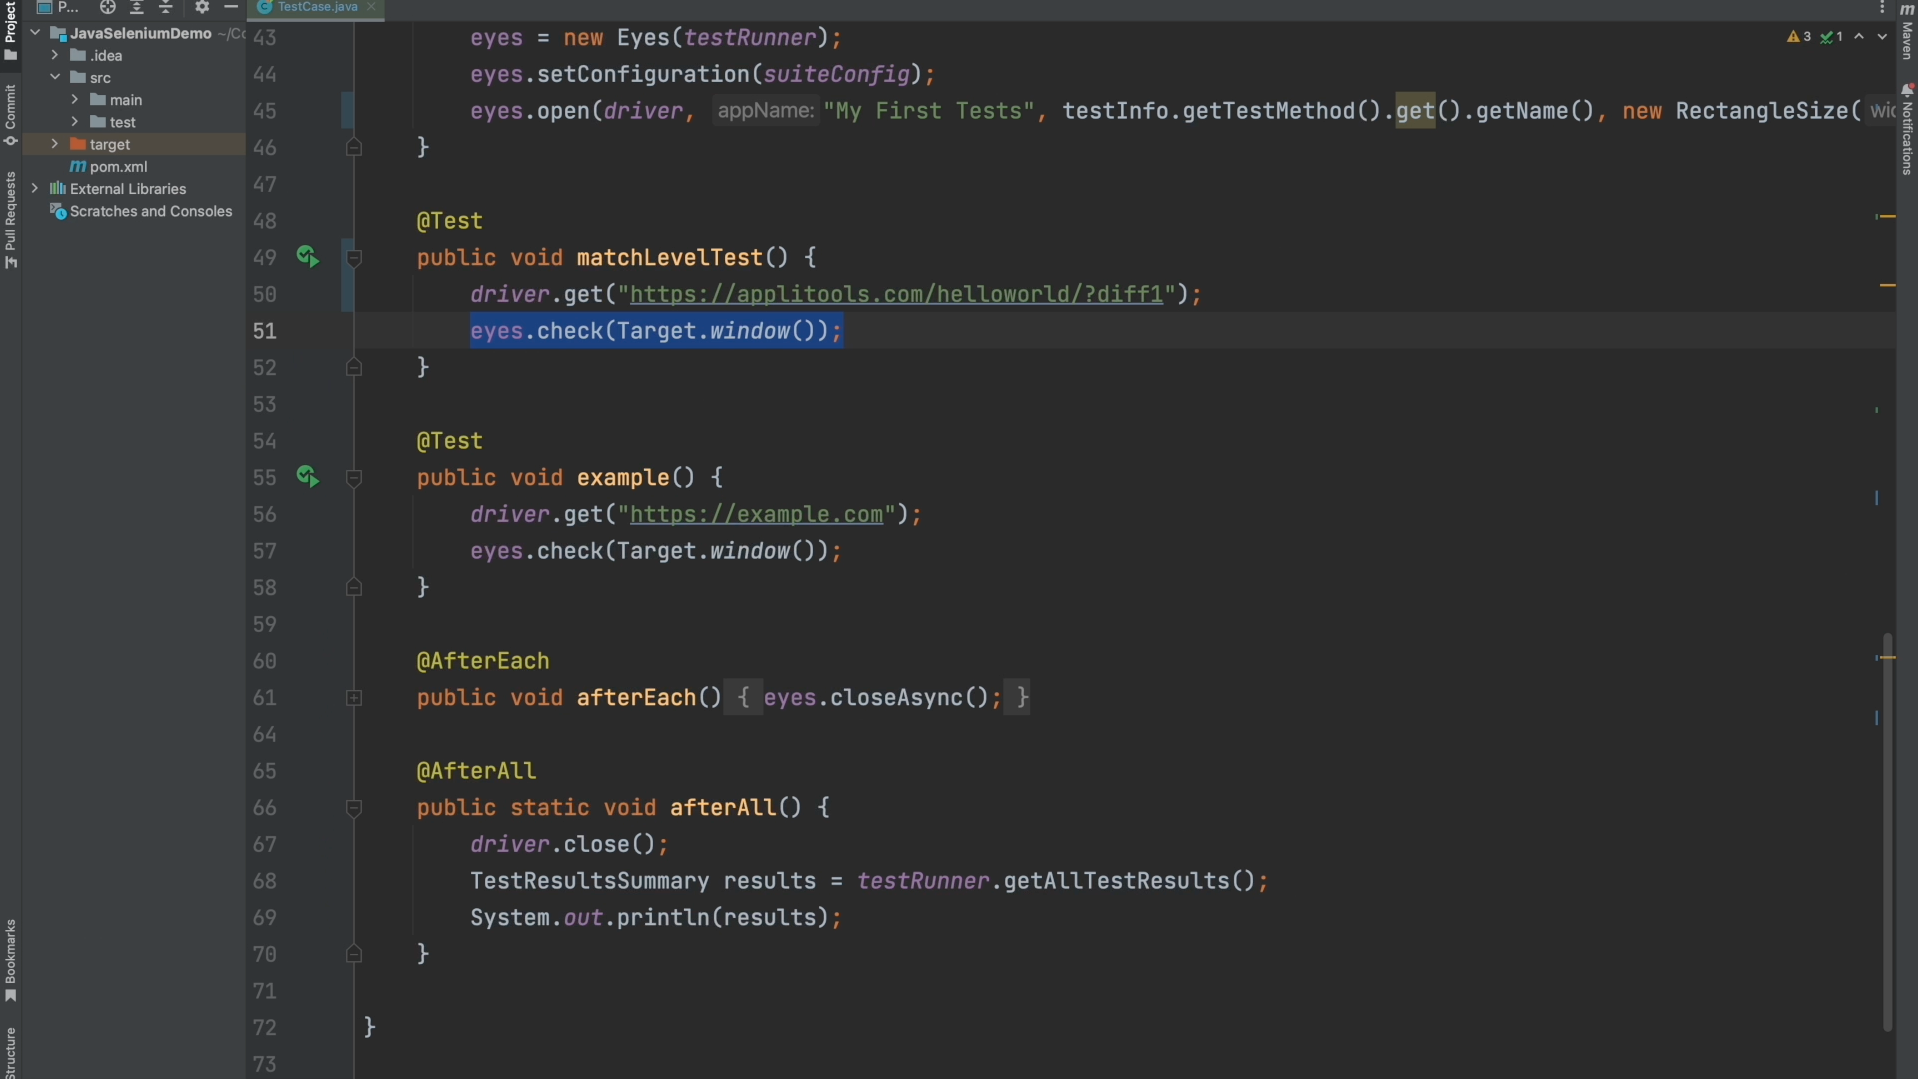
I then changed our check call back to target.window() rather than target.region(). This is so we can capture the entire page and really see how the Strict Match Level works.
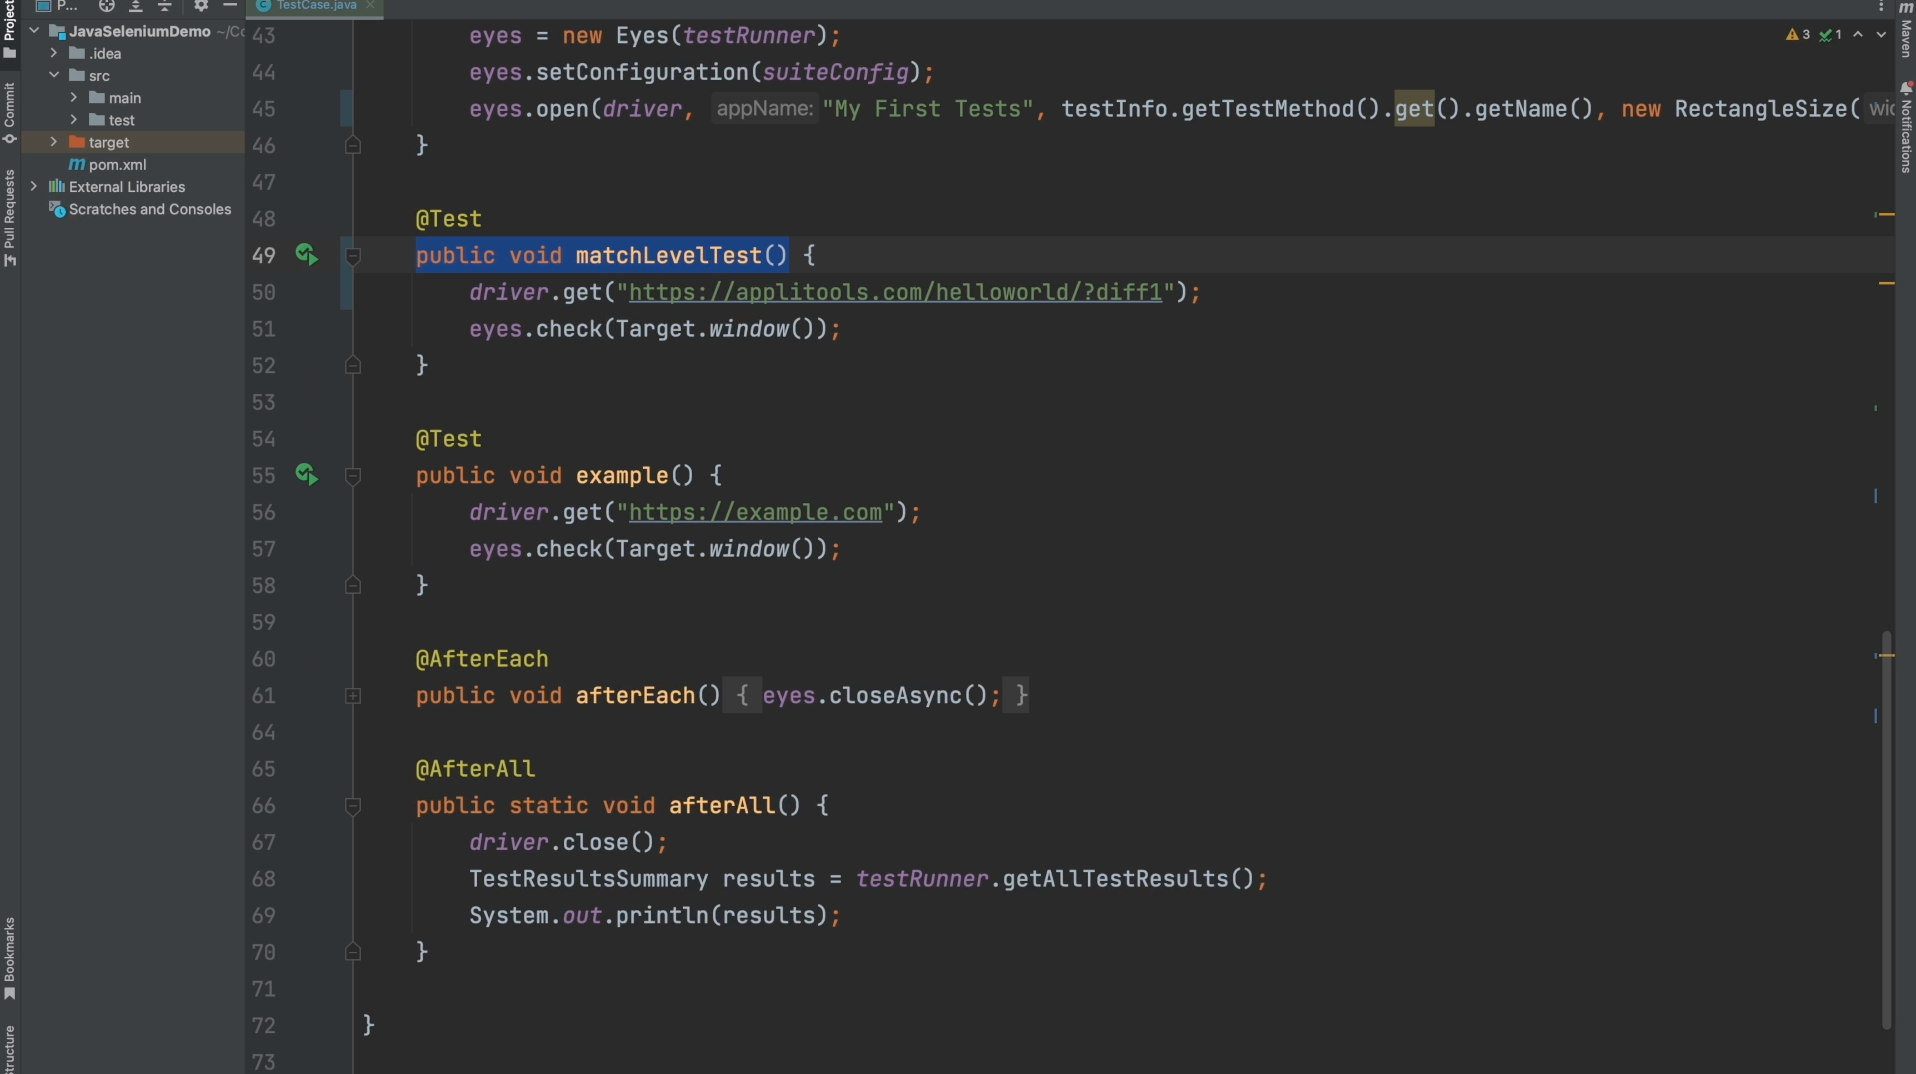
And Once again I changed our test name so that we get a fresh baseline. As I mentioned earlier, Strict is the default Match Level so there's no need for us to change our Configuration object for now. Go ahead and run this test again then head over to the dashboard.
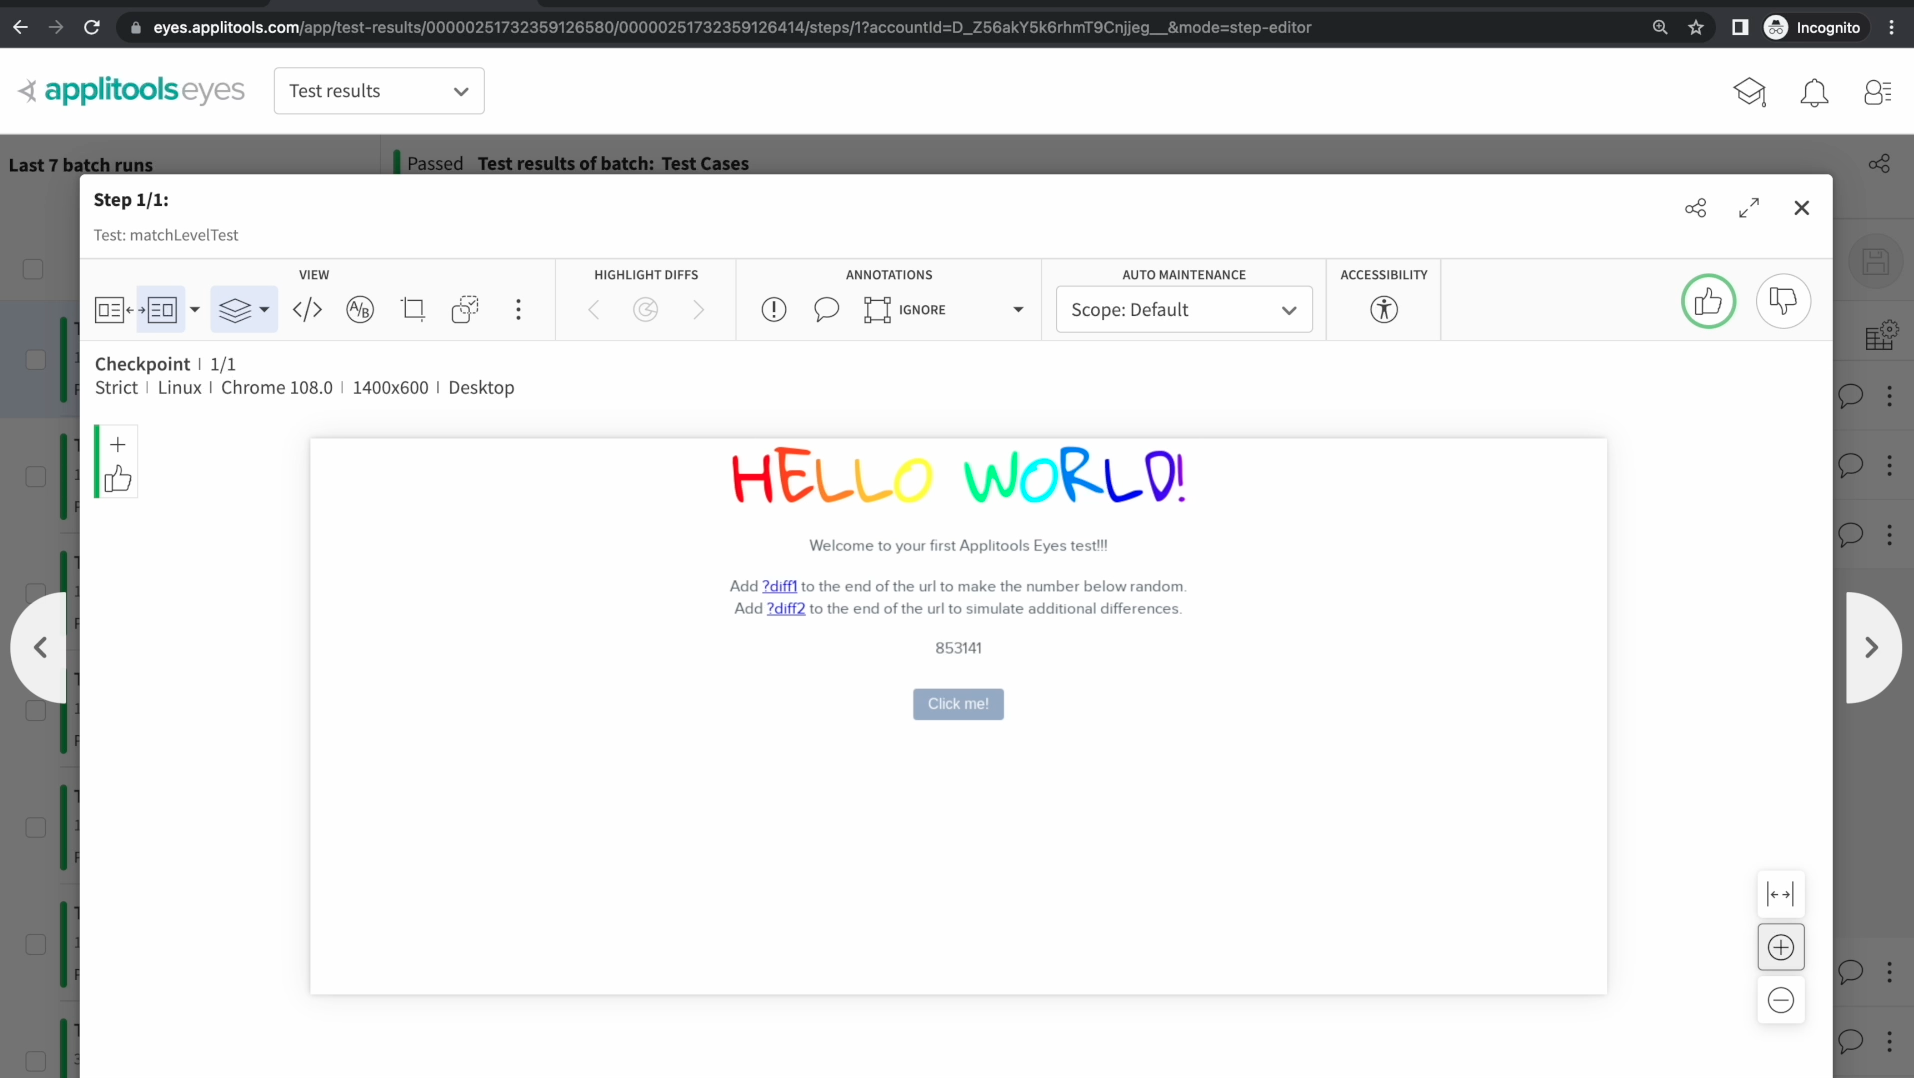
We see on our dashboard our test was marked as New. So no visual comparison has been performed just yet. Let's go ahead and make one slight change in the code, run the test again and then see the Strict algorithm in action.
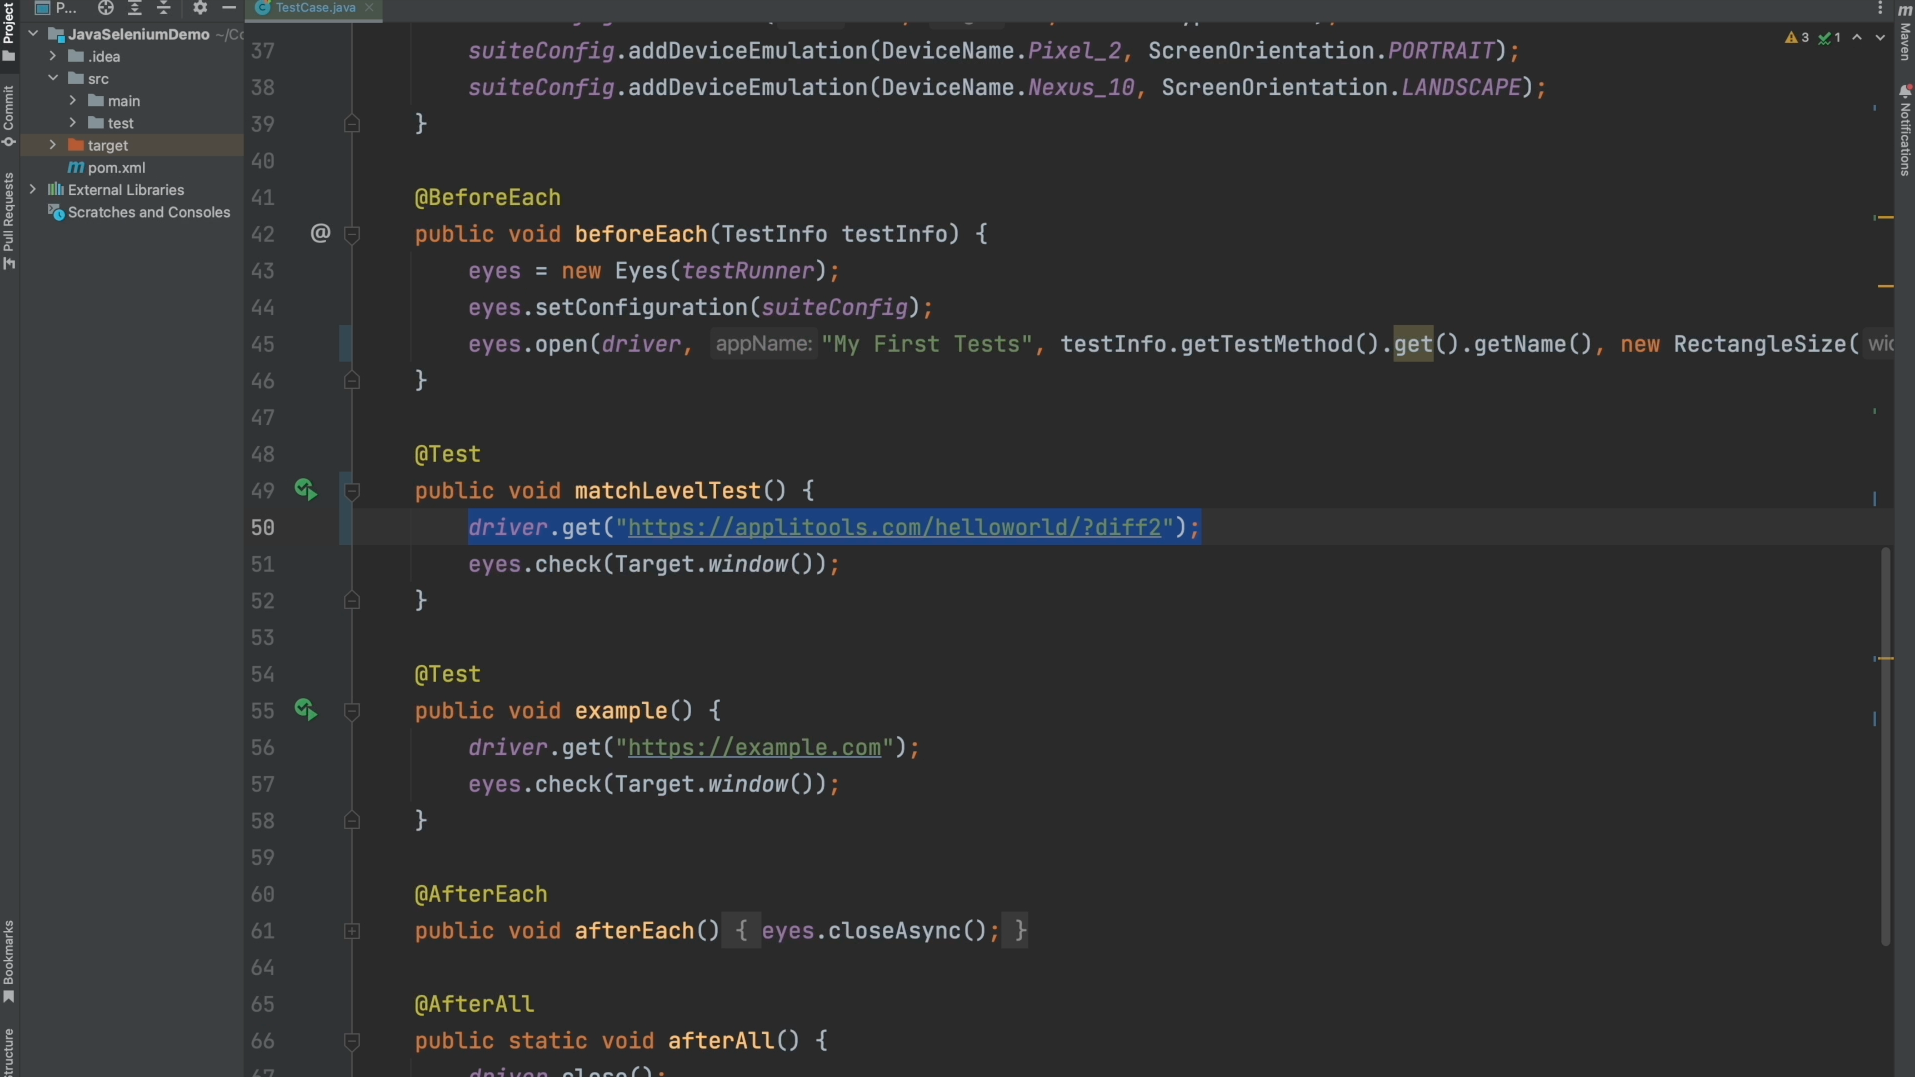
I've gone ahead and changed the URL from ?diff1 to ?diff2. This will change the page and generate a nice difference for us to review. Let's go ahead and re-run our test and then check out the results.
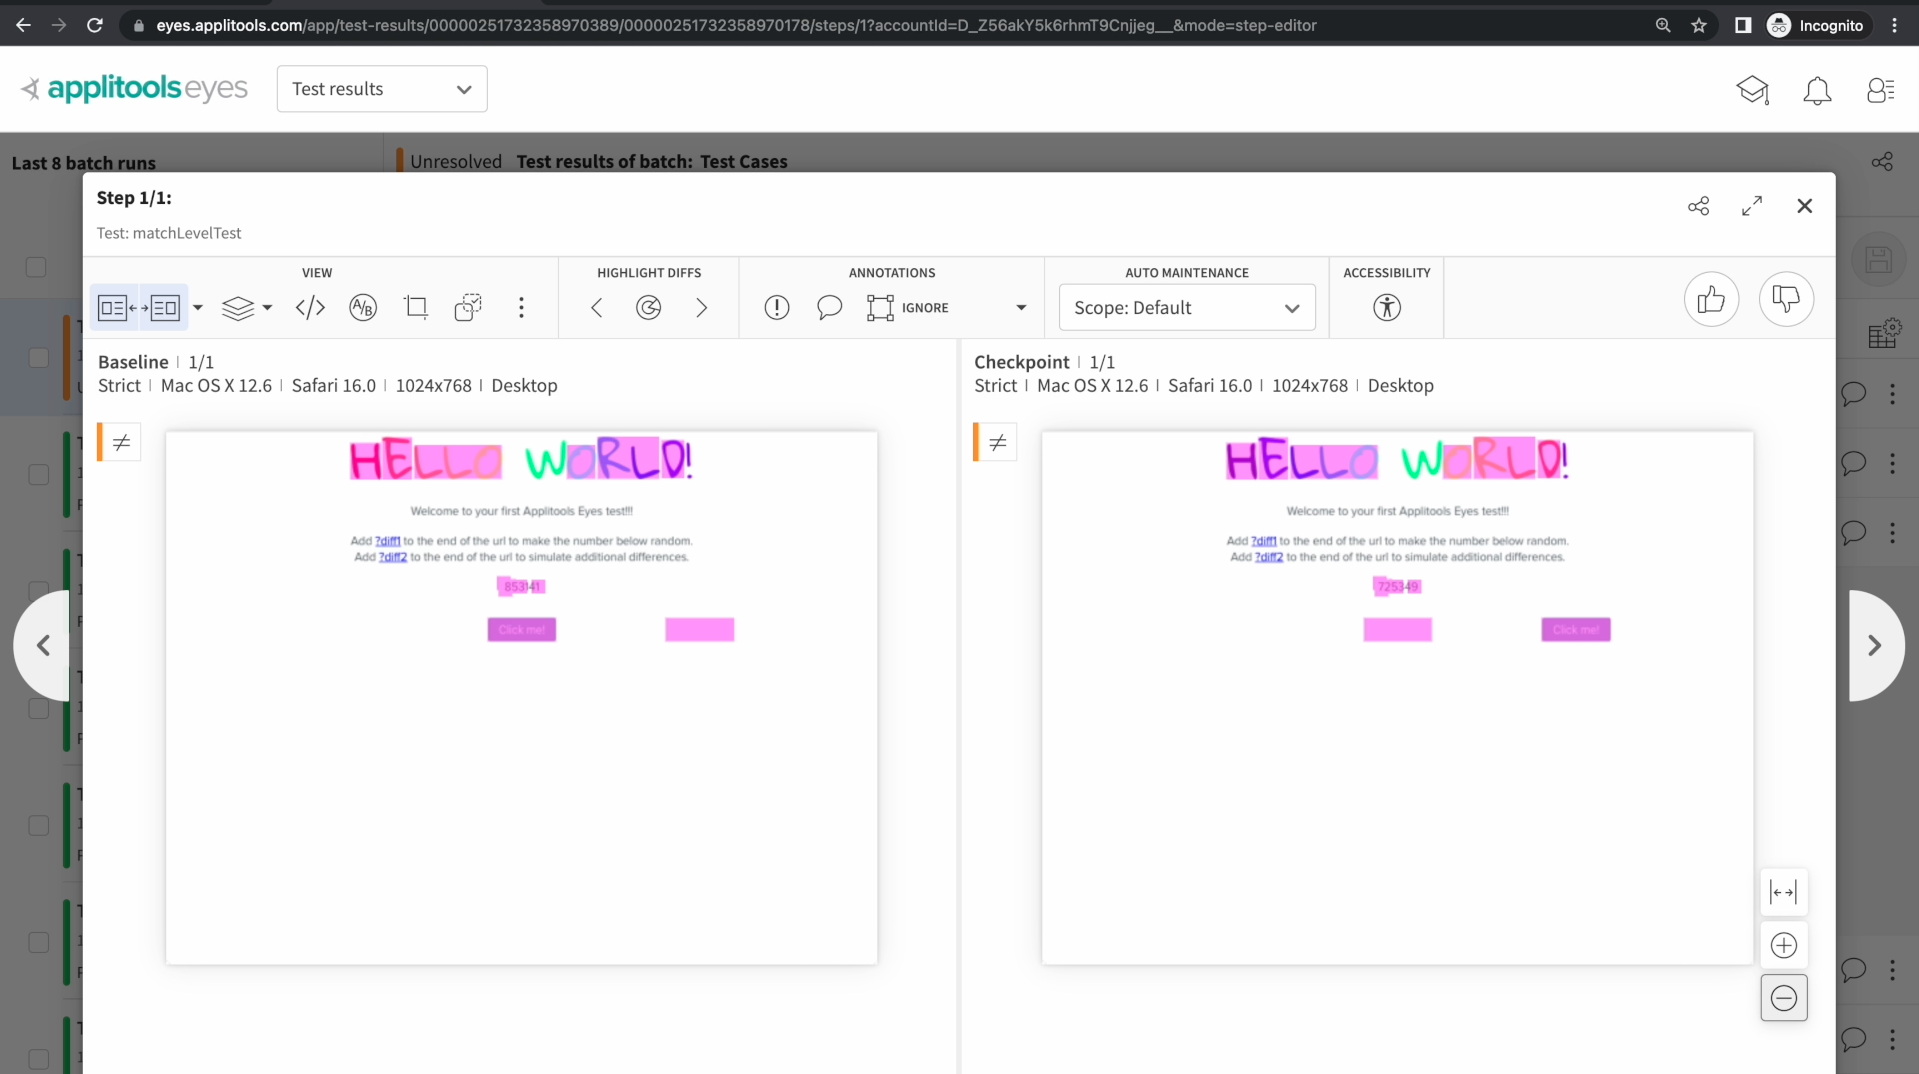
On our dashboard, we see that the Strict Match Level has done its job and highlighted a number of differences for us to review. We can see that the heading at the top has changed colors, the numbers in the middle are different and the button has moved from the center of the screen over to the right. Strict has flagged all of these differences for our review and now it's up to us to decide if they're visual bugs or if they are expected changes.
Now that we've seen how Strict handles these two images, let's transition into our next Match Level: Layout.
The next Match Level we're going to look at is called Layout. Layout cares only about the relative positioning of the elements on the page. It is perfect for cases where you have dynamic data, such as dates or prices, as it only focuses on the layout of the page and not the content.
Let's head back to our code and set up our test to use the Layout Match Level.

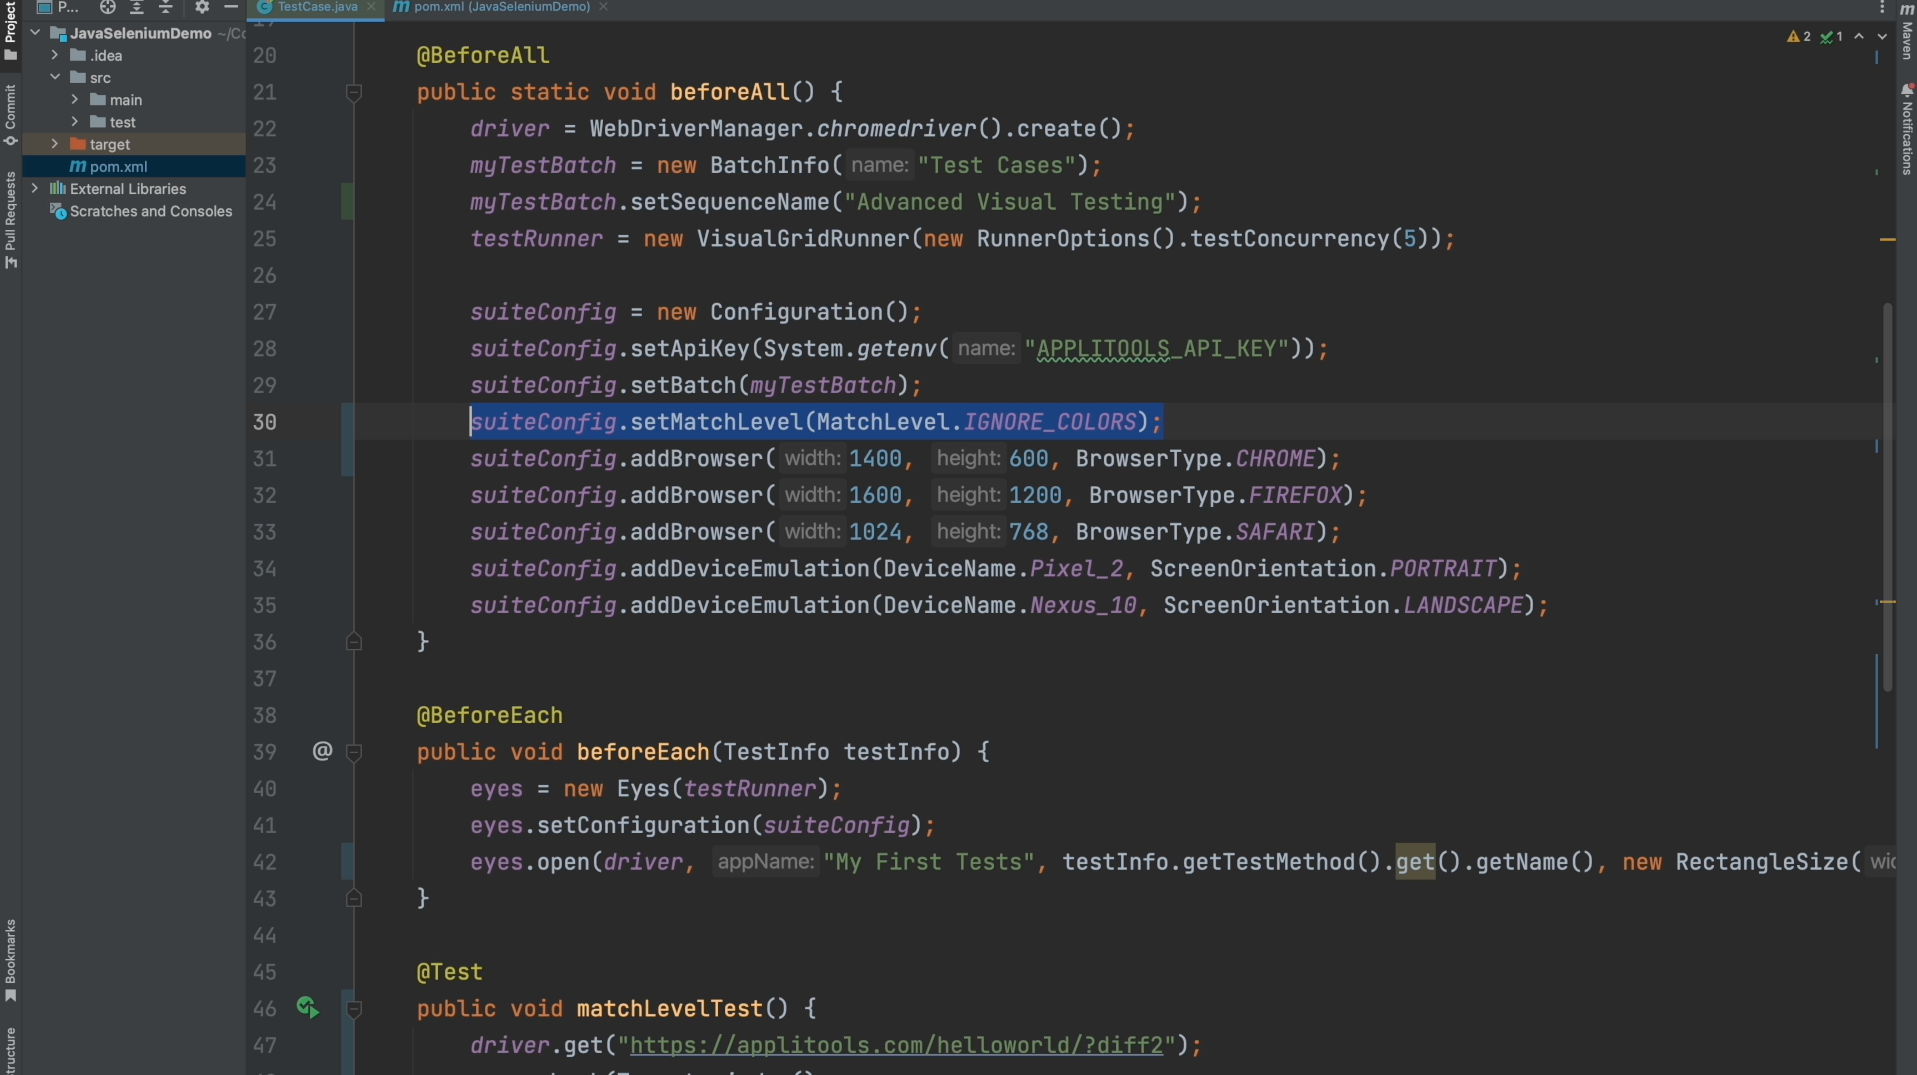
To specify a Match Level, we can call setMatchLevel on our configuration object. Now, every test that we run that uses this configuration will now compare screenshots using the Layout algorithm.
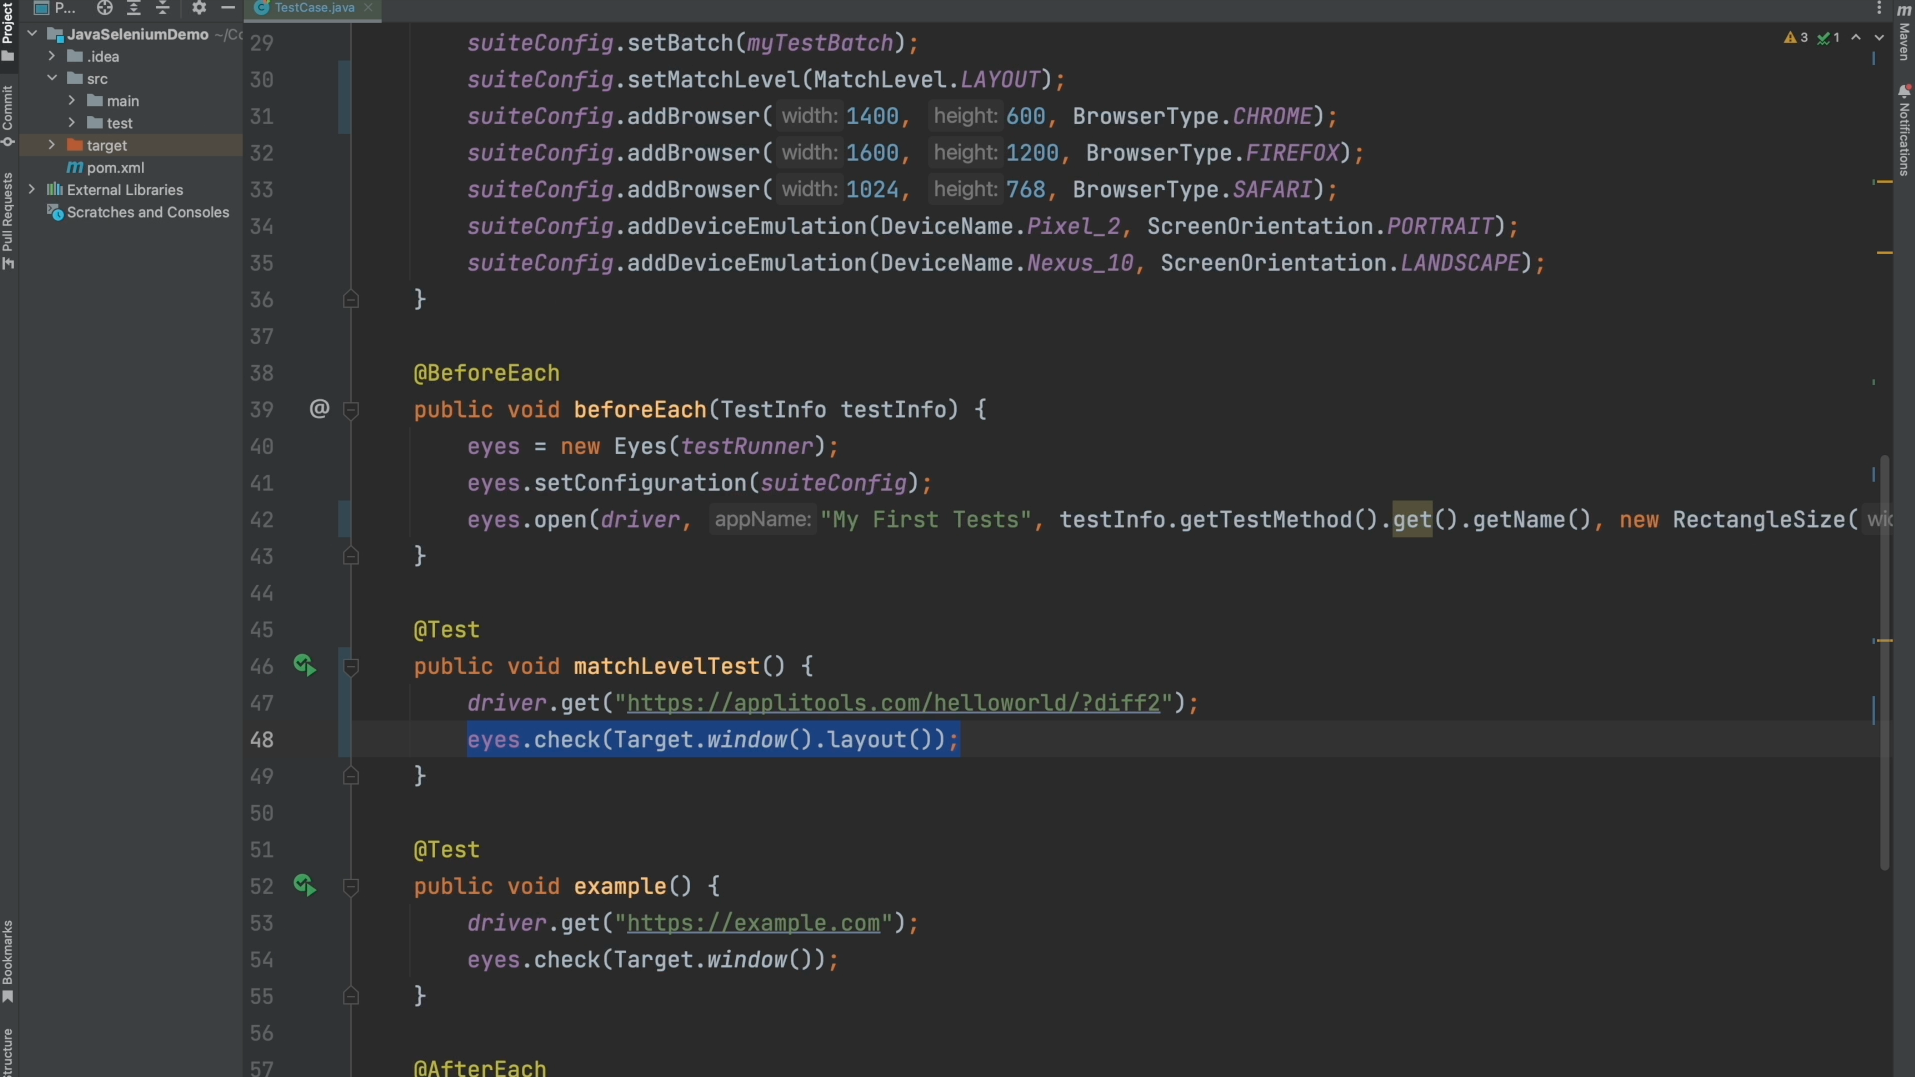
I also want to show you that you can also configure the Match Level at the check level. Instead of globally setting the Match Level in the Configuration object, you can set it only for a specific screenshot by calling the .layout() method as shown here. Some tests make sense to run with Strict and others make sense to run with Layout. Configuring the Match Level within the check command gives you much more control over your test's configuration.
Feel free to pick which one you'd like to use, I've gone ahead and configured it within my check call rather than my Configuration object as we generally recommend this as a best practice. Go ahead and run this test once again and then we'll check out the results on the dashboard.
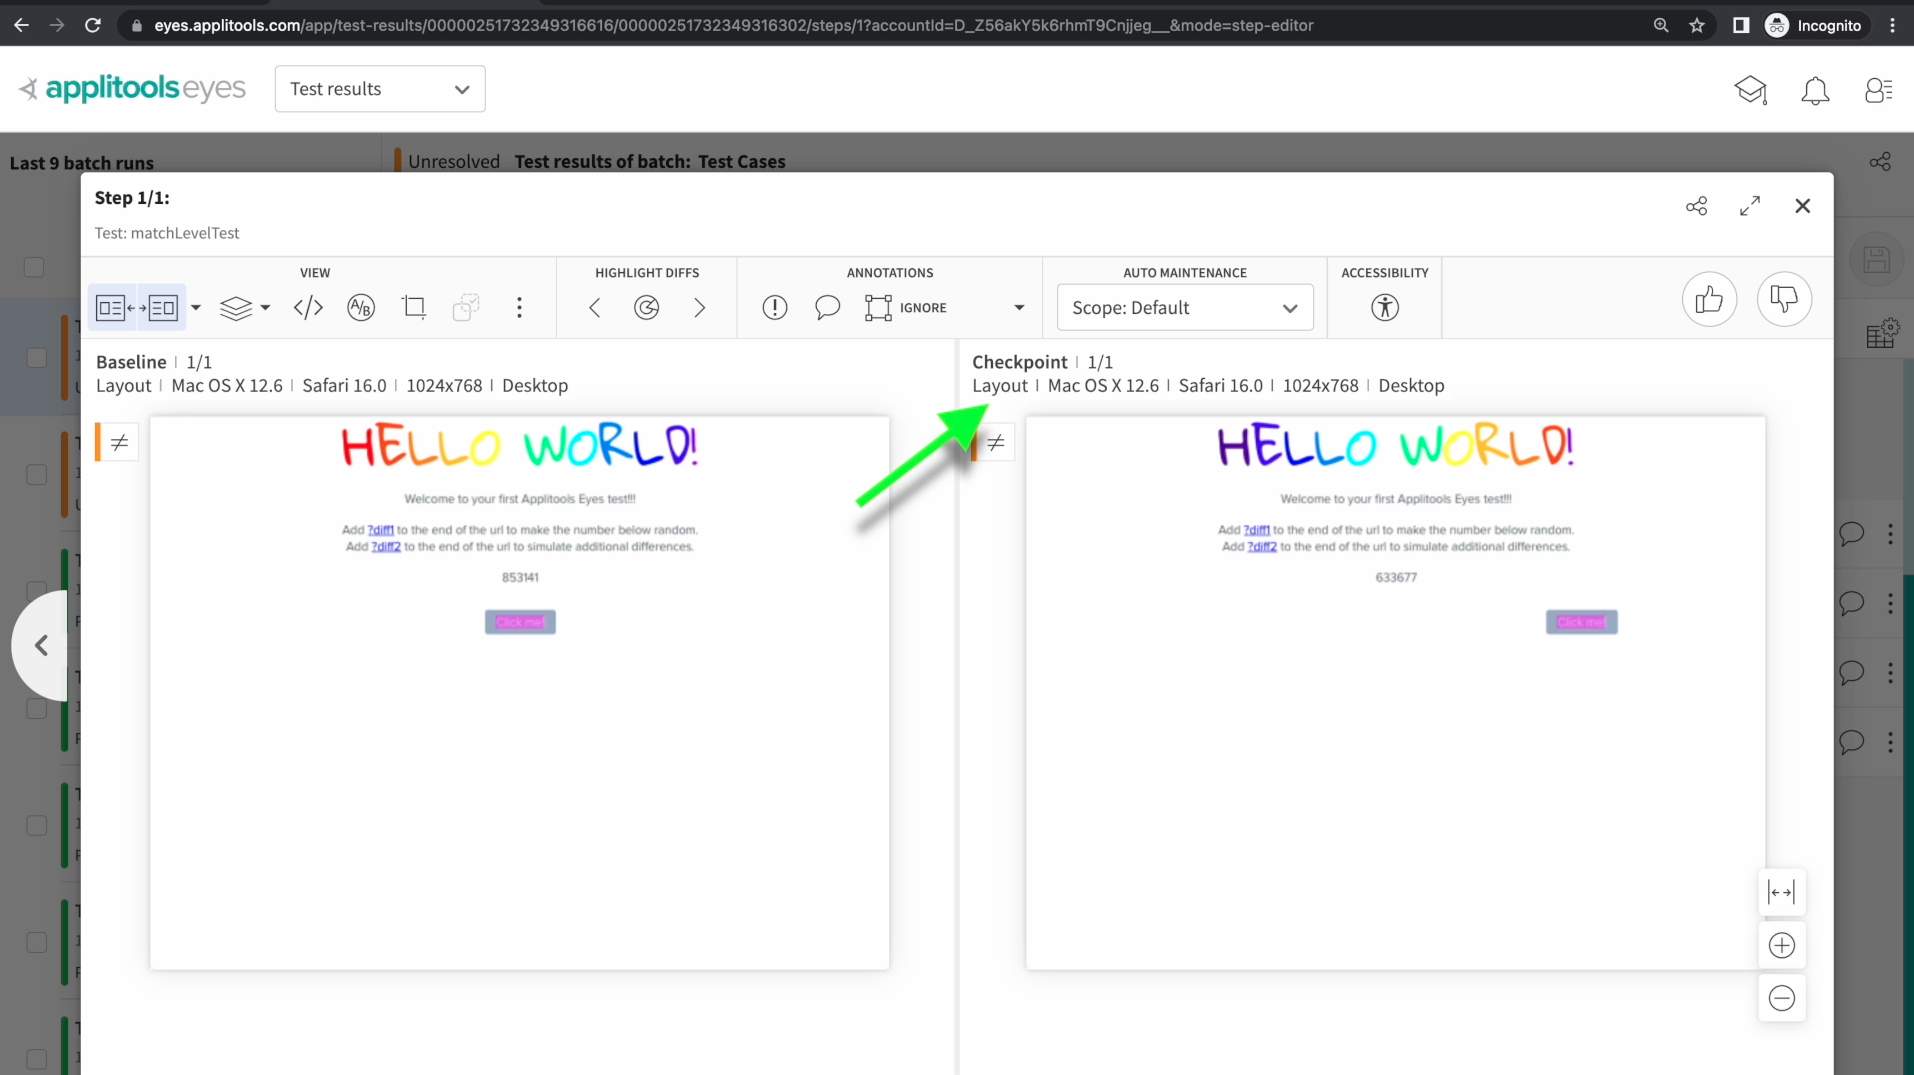
Looking at our test result, we see in the top of left that we are now running with the Layout Match Level. We notice immediately how Layout ignored the dynamic data changing, such as the colors in the title and the different numbers in the middle. It has only highlighted the button which has moved from the center of the screen over to the right side of the screen. This is flagged as a difference because the relative position of this button has changed.
When we ran our tests with the Strict Match Level, all of these changes were highlighted even though most of the elements did not change their position. If we expect the numbers to change and we aren't interested in things like color changes, then we should use the Layout algorithm to prevent this dynamic data from failing our tests.
Now that we've seen how the Layout Match Level works, let's go ahead and move on to the next Match Level, Ignore Colors.
The final Match Level that we're going to cover in this section is called Ignore Colors. This Match Level works the exact same way as the Strict algorithm except it ignores any color changes. Let's go ahead and jump right into an example.
In our code, we have the same choice as last time where we can either apply our Match Level to our Configuration object or we can apply it within our eyes.check() method.
Ignore Colors used to be named content and for backwards compatibility, we can call the .content() method in the check settings. Make either of these changes on your end and then run the test again.
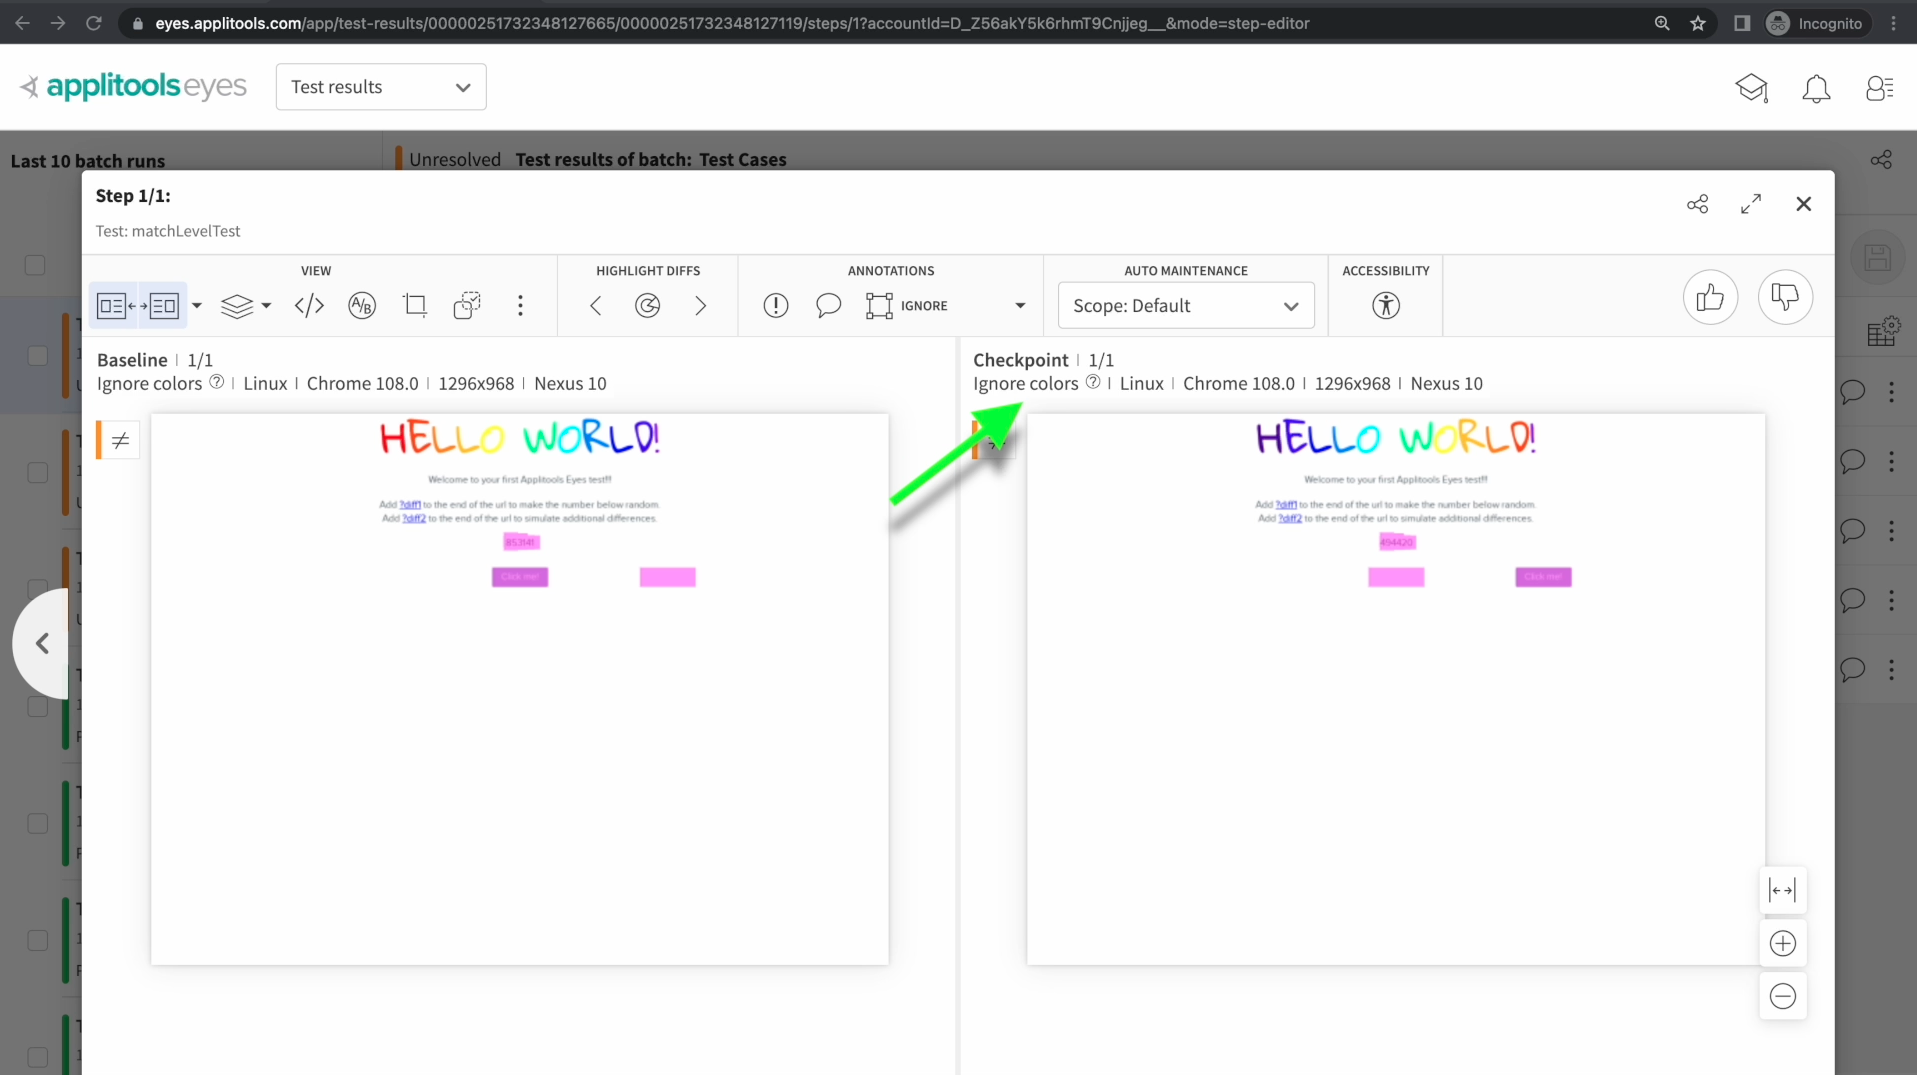
As we can see to the top left of each of our screenshots, we're now running with the Ignore Colors Match Level. Just as we discussed, the same things are being highlighted as the Strict Match Level except for the color changes in the header. There should be no surprises with this result and we've now seen how each of the 3 Match Levels, Strict, Layout and Ignore Colors can be used to generate different results.
However, these Match Levels perform at their best when used in conjunction with each other to handle different sections of our page. Let's jump into the next section where we'll go over how to apply a Match Level to a specific portion of the page.
So far, we've only been running with one Match Level per test. In practice, our pages are often much more complicated such that we need more than one of these Match Levels to achieve full coverage without unnecessary failures.
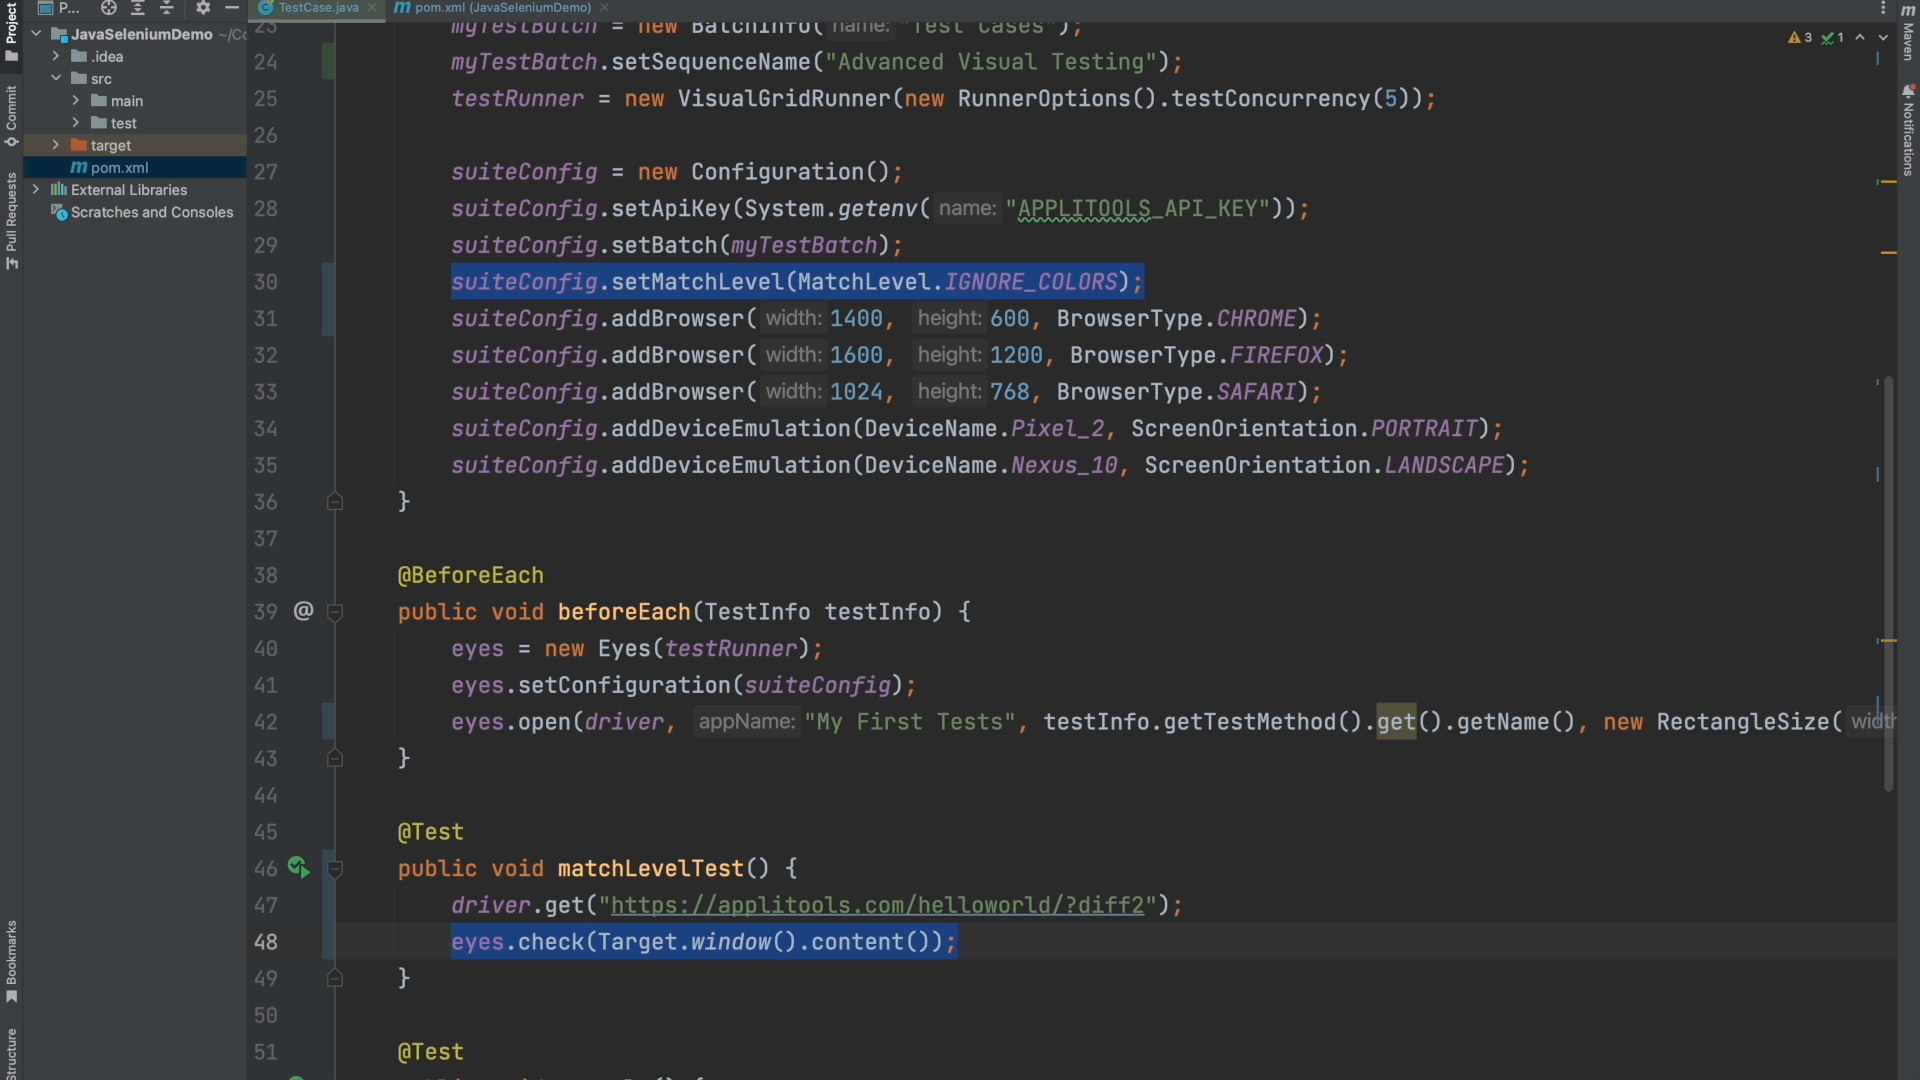
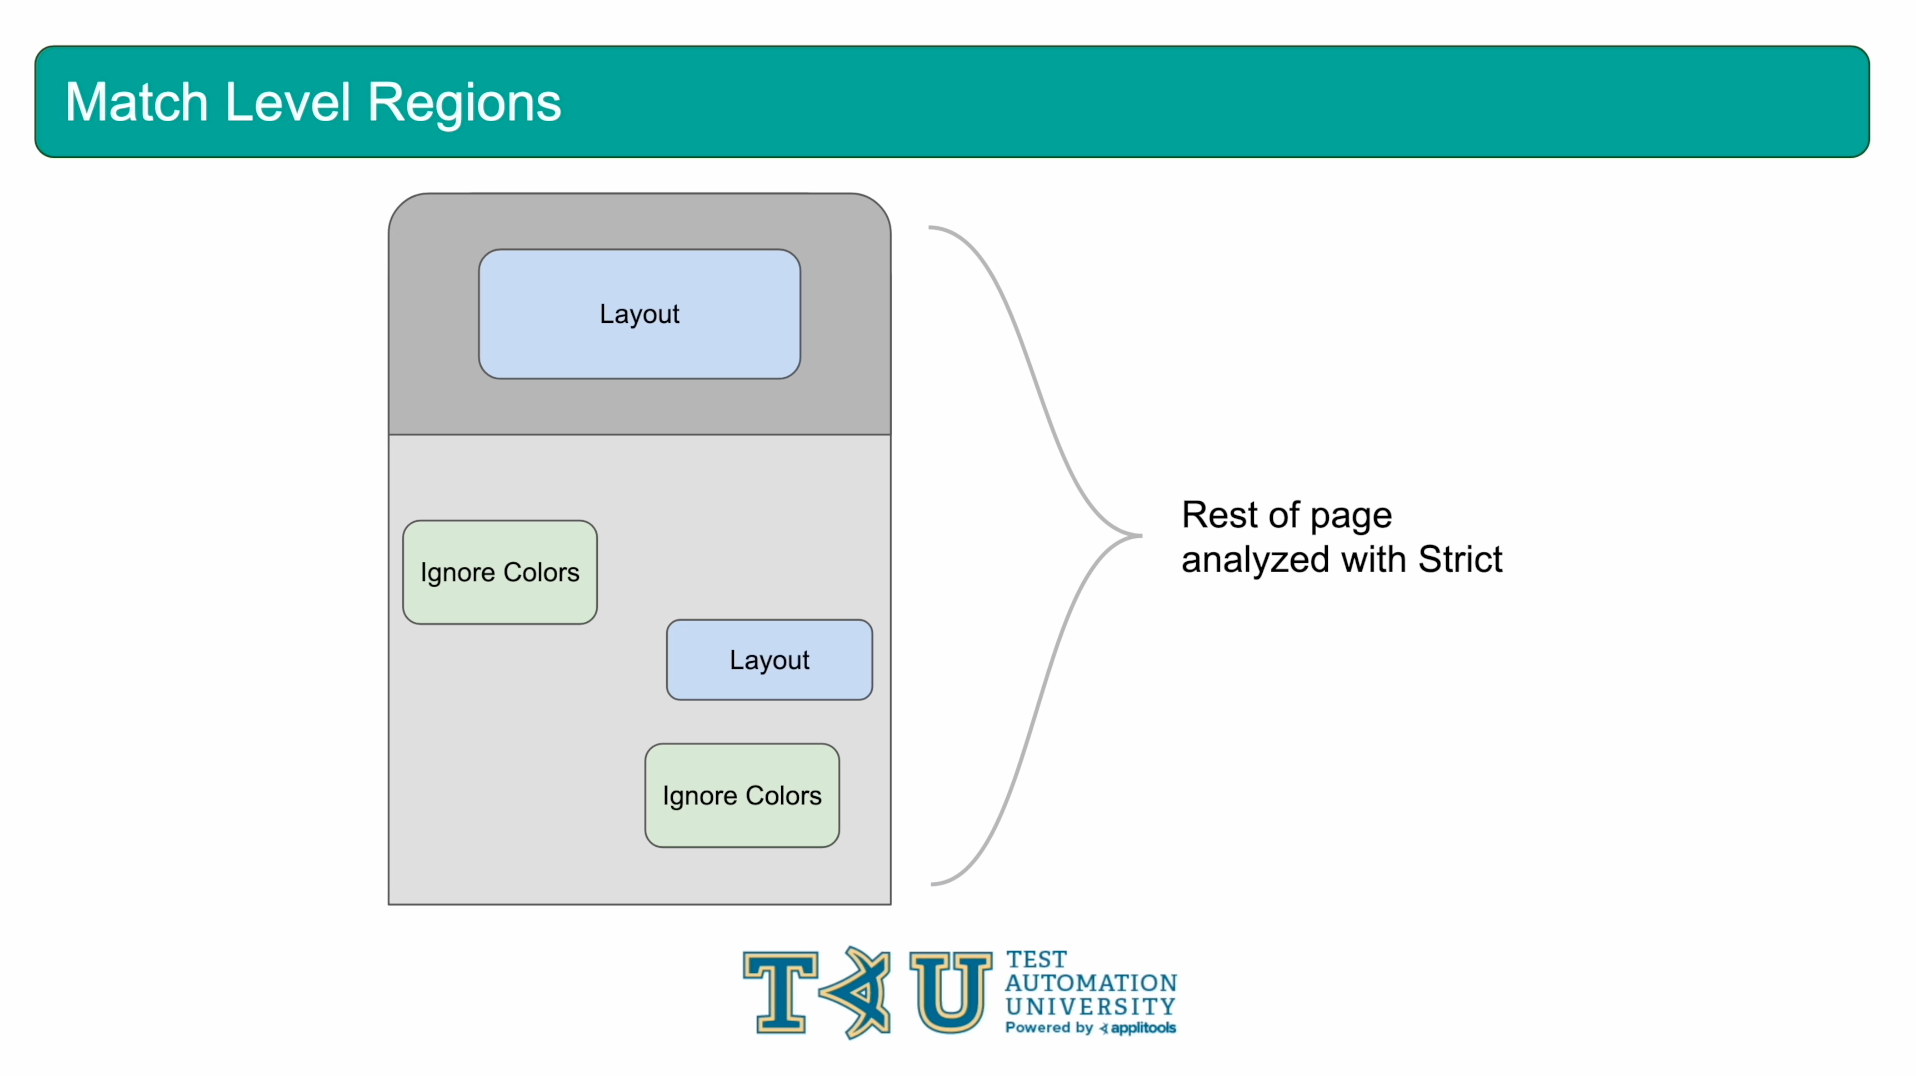
We can achieve this by using Match Level Regions. The way that this works is by passing in selectors to the .layout() or .content() functions in order to target certain sections of the page. The syntax is very similar to how we captured a region screenshot in the last chapter.
We can see here on this example in front of us that we are validating the entire page with Strict. However, we've also specified certain sections of our page to be validated with Layout or Ignore Colors. Perhaps the Layout regions cover dynamic data such as Dates and the ignore color regions cover icons that randomly change colors.
This is, in general, the recommended best practice: to use Strict for the entire page and then use Layout and Ignore Color regions to cover certain sections of the page as needed.
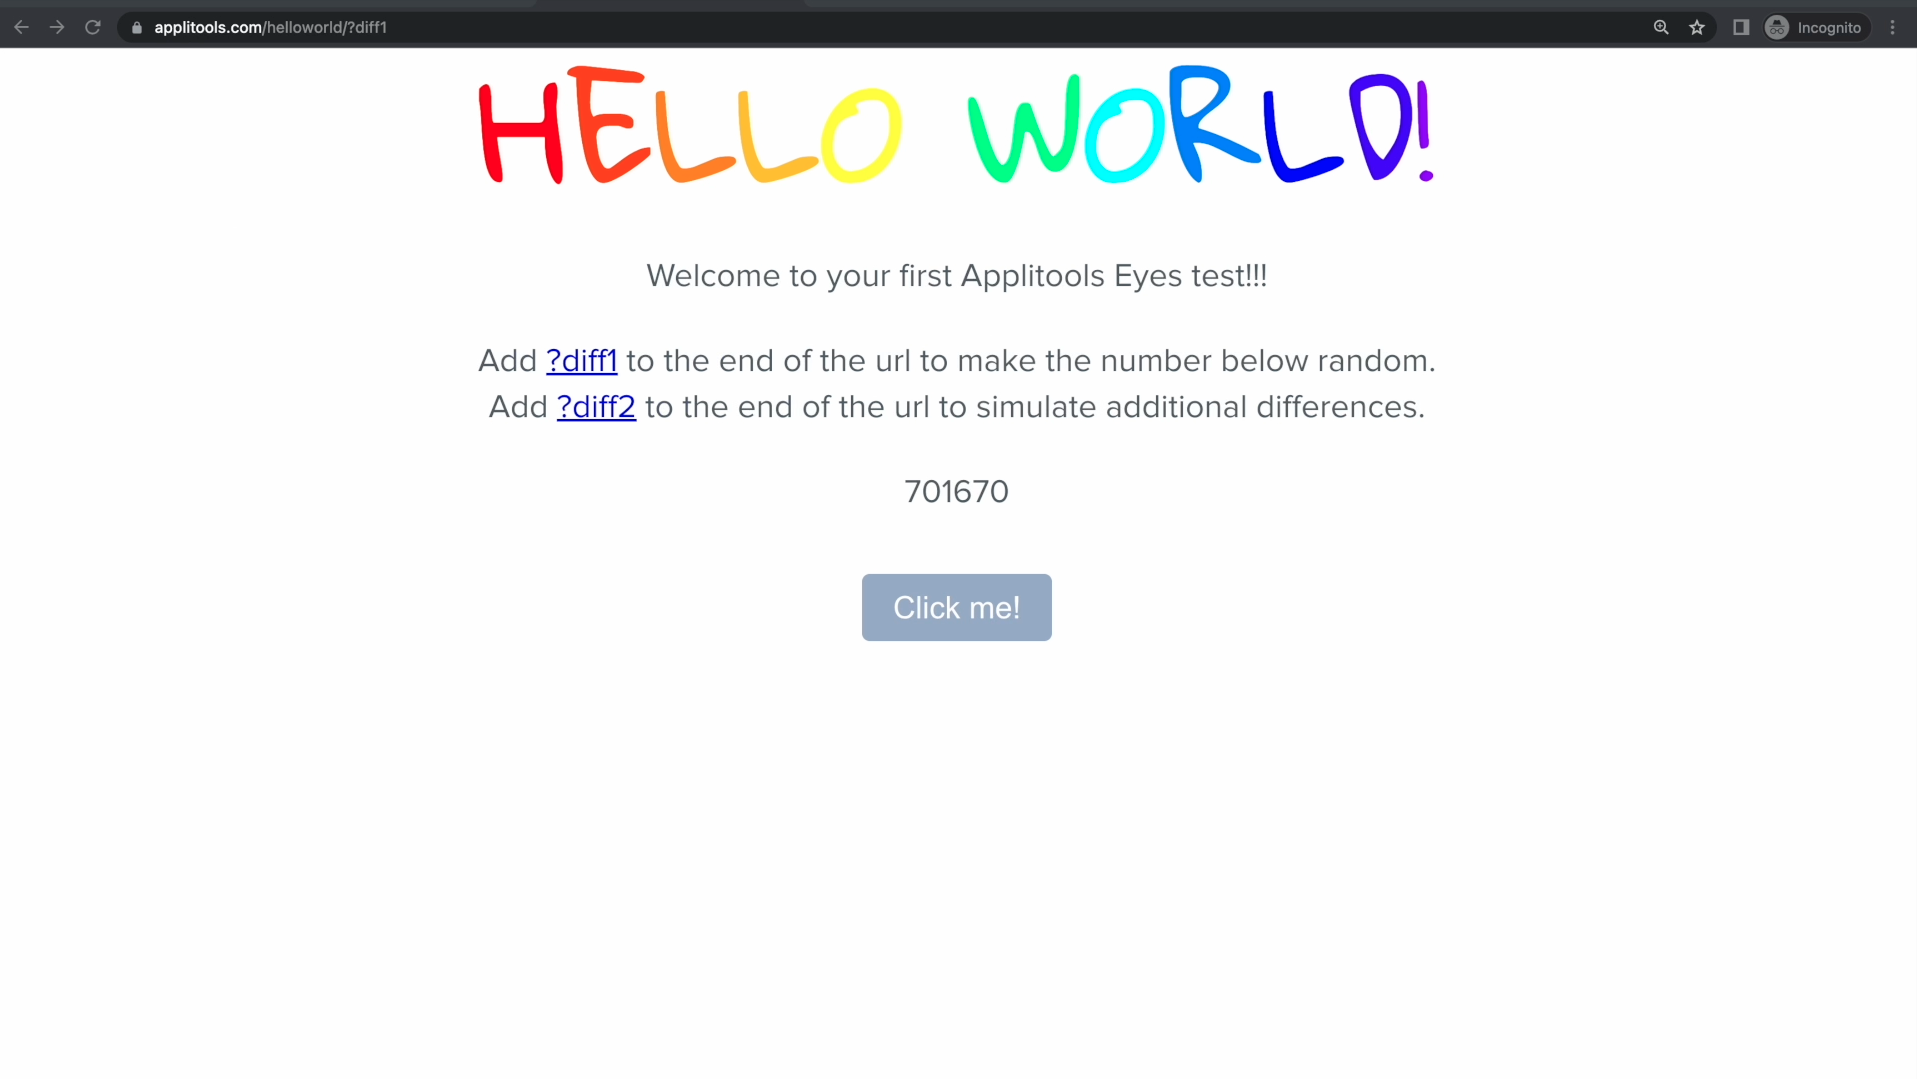
Here we are on the page that we're about to test. We've seen how sometimes the colors in the header change and the numbers in the middle of the page are randomized. Both of these changes can be expected and we should handle these gracefully so that they don't repeatedly fail our tests.
For the heading, we only expect the color to change but not the text. If the text in the heading changes to something else, we would want our tests to fail. Therefore, we should use the Ignore Colors Match Level for this section.
For the random numbers, we expect these to change every time. However, if the numbers are not present, or if they've shifted their position, we still want our tests to fail. The Layout algorithm is a good choice for this section.
Let's head over to our code and execute this test plan.
If you've been setting the Match Level on the configuration object, be sure to comment this out or remove it for the upcoming test.
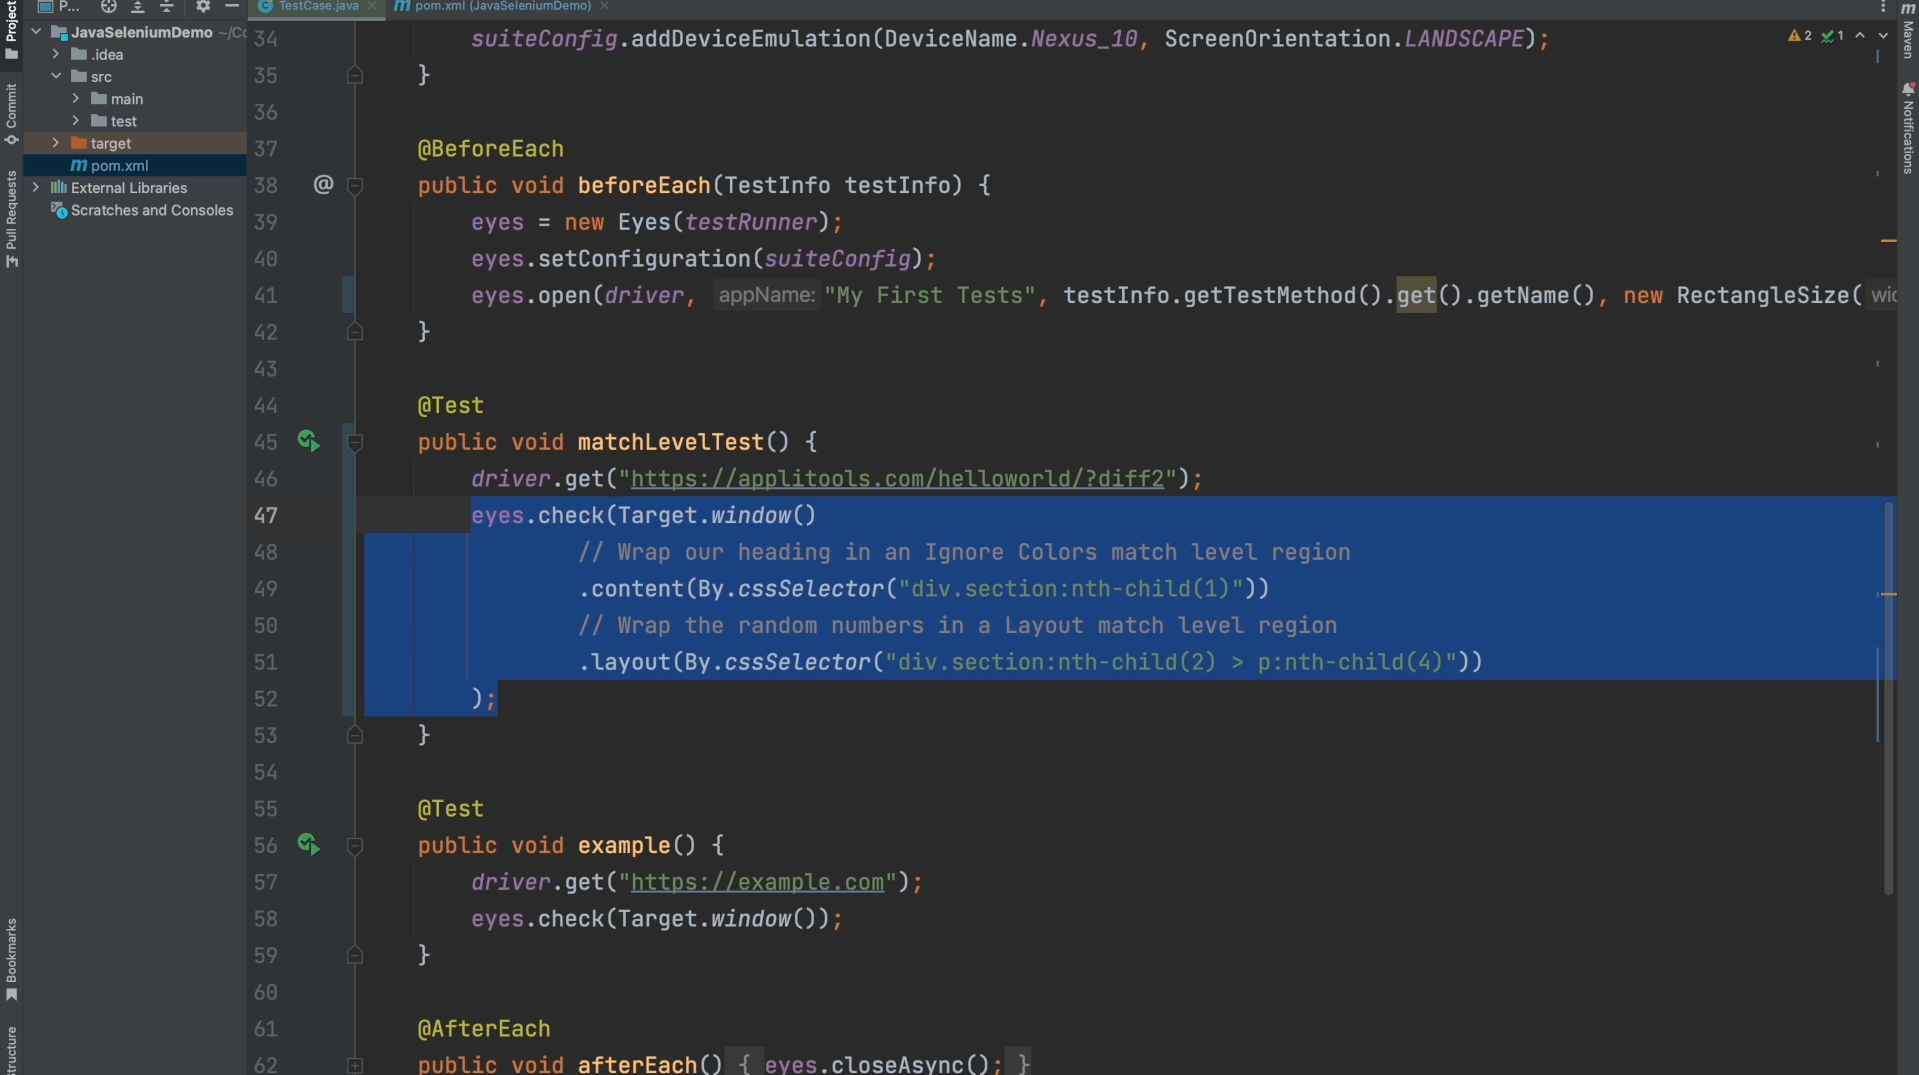
I've modified our call to eyes.check() to look like this. I'm making a call to the .content() method and passing a By Object that corresponds to the colorful header on our webpage.
I'm also calling the .layout() method and passing a different By Object that corresponds to the random number in the body of our webpage.
Earlier, we called both of these methods without any arguments which meant that we wanted to apply the specified Match Level to the entire screenshot. When we pass in an argument, the Eyes server will then only apply the specified Match Level to the specific region that corresponds to our By Object. You can pass in as many regions as you'd like or just a single one, like we're doing in this case.
Let's go ahead and run this test again and then review the results on the dashboard.
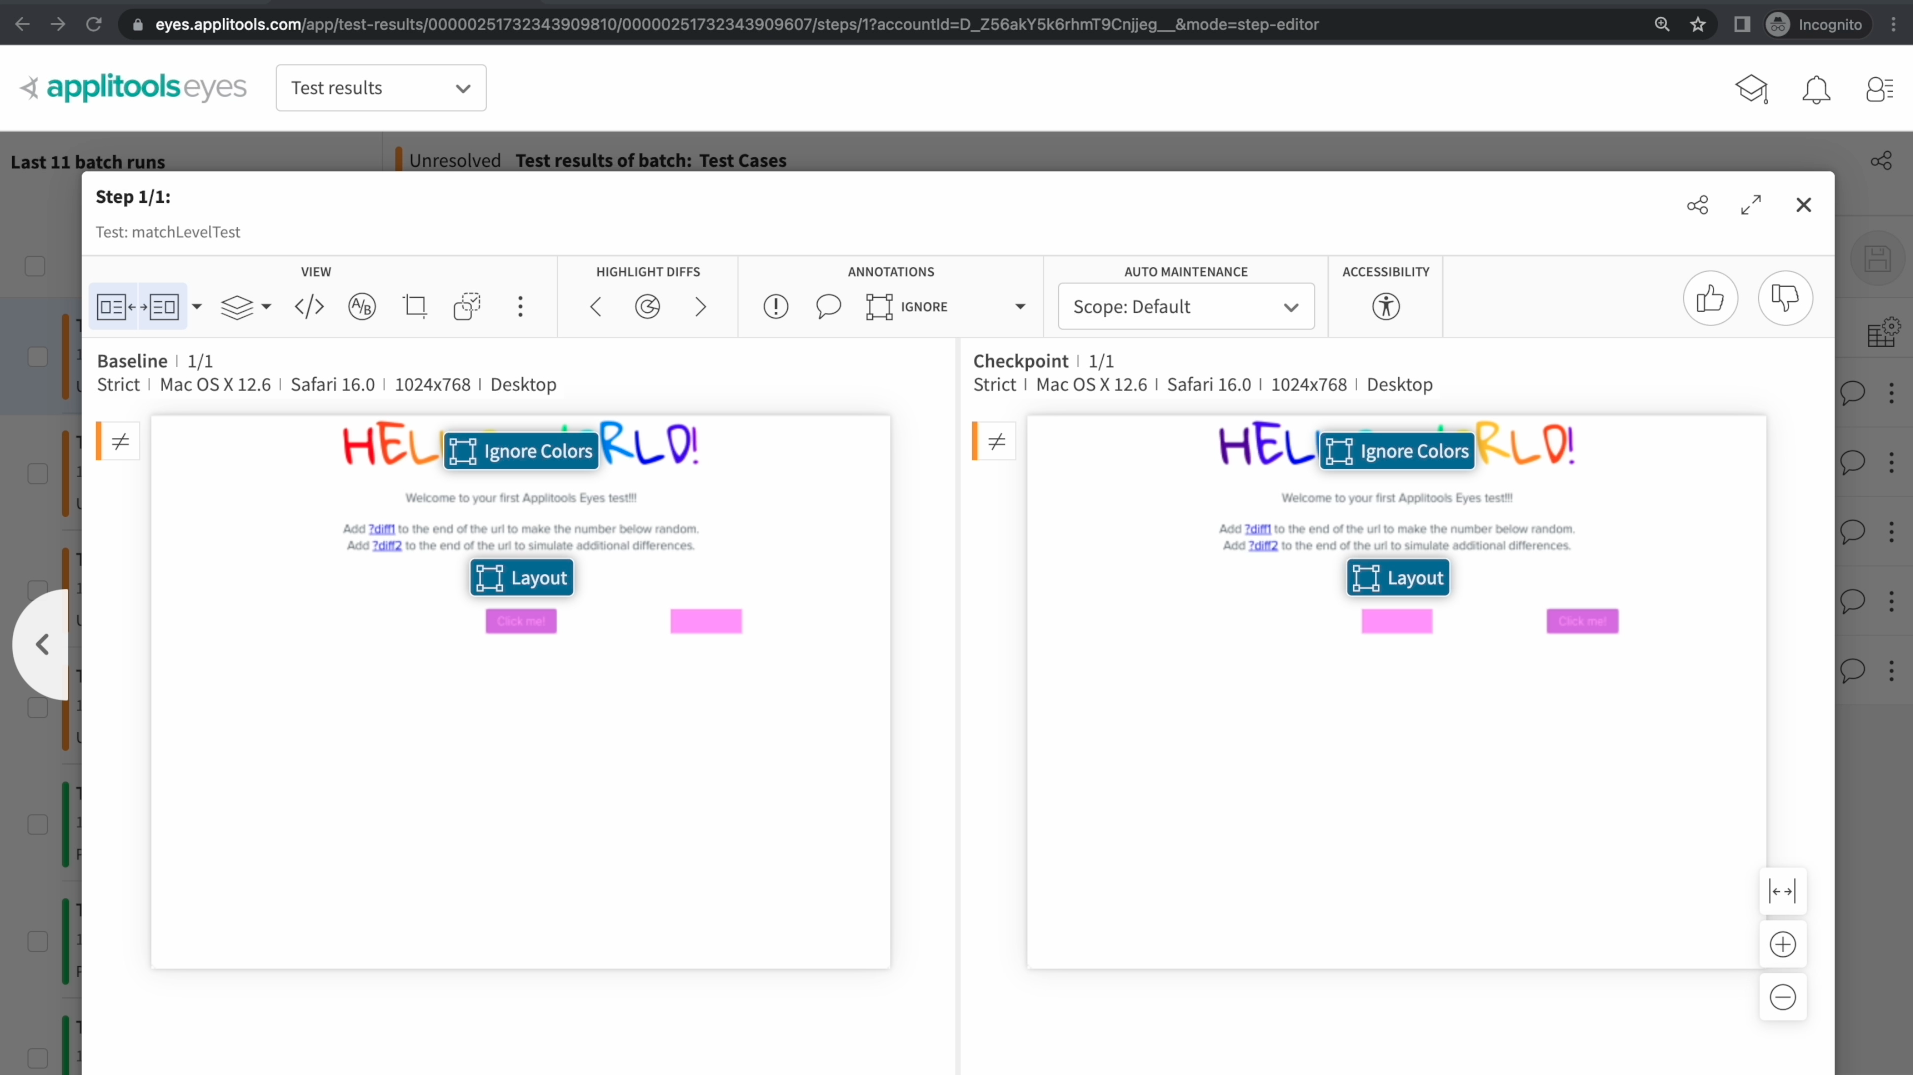
Sticking to our plan, we applied the Ignore Colors algorithm to the header and the Layout algorithm to the random string of numbers. Now, no differences are being thrown in these sections even though we're still running with Strict at the top level.
Using regions like this allows us to get all the benefits of the Strict algorithm while also taking advantage of the benefits of the other Match Levels at the same time. This allows you to have incredible flexibility over what you want to validate on your webpage. It also helps cut down on test failures occurring from expected color changes and dynamic data.
To review, in this chapter we went over the 3 main Match Levels that Applitools offers. We first reviewed the Strict Match Level and saw how it captured all changes on the page including positional, content and color changes.
We then looked at the Layout Match Level and saw how it didn't flag changes to the content of the page and only flagged changes to the overall layout and positioning of the elements on the page.
Next we looked at the ignore colors Match Level and saw how it worked the same way as strict except for ignoring color changes.
Finally, we used all 3 of these algorithms at once by applying Match Level regions. Using these regions, we were able to take advantage of all the Match Levels in a single checkpoint.
Great job working through this chapter. As usual feel free to reach out to us on the support channels mentioned earlier if you have any questions about these Match Levels. Otherwise, I'll see you in the next chapter.
