

Transcripted Summary
In this chapter, we're going to introduce a new topic called Branching. Branching allows you to create and maintain multiple versions of your baselines similar to how you create branches in your code using something like git.
We're going to set up and run some examples showing how to create branches, how to compare and merge branches as well as how to run tests directly against a specific branch.
We'll also analyze what happens when you try to merge branches that produce a conflict and show you how to handle that situation.
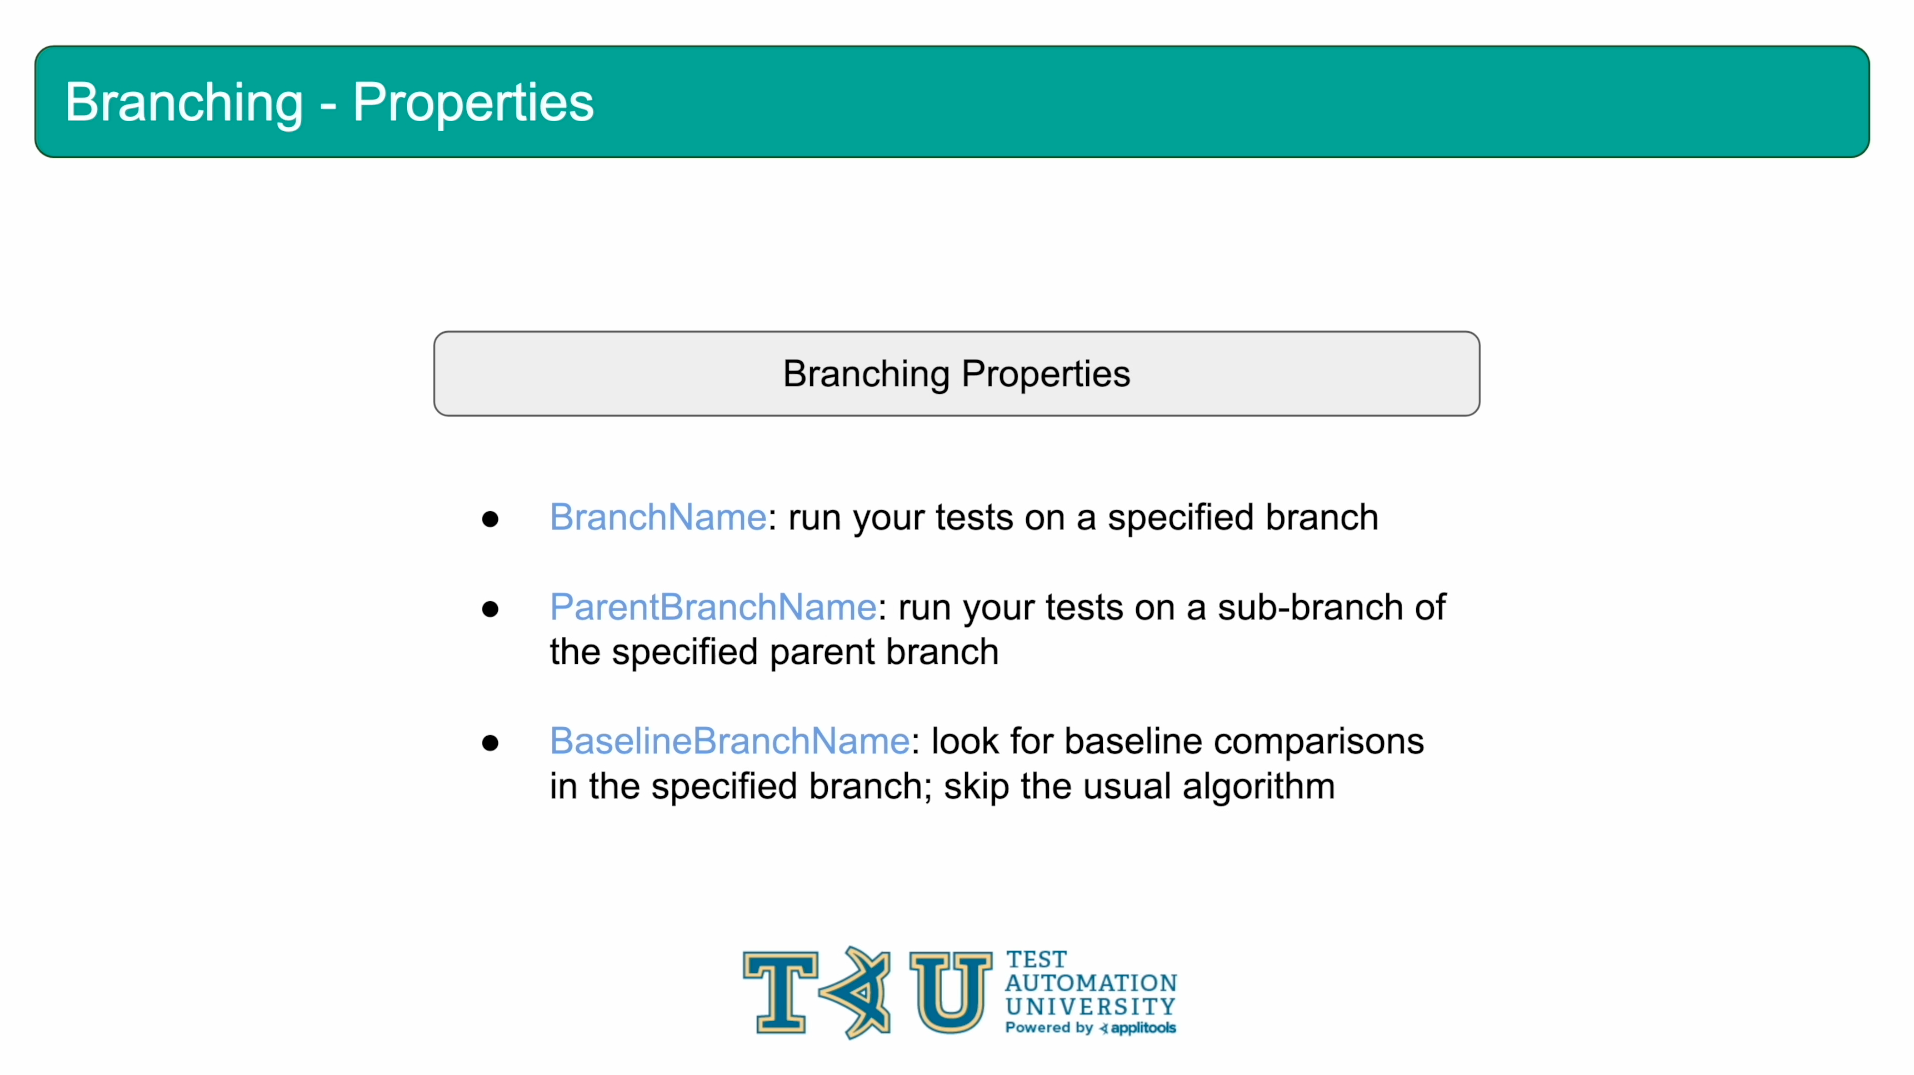
Before we get started with our examples, let's first define some properties that we're going to use in this chapter. The first property is the BranchName and this allows you to run your tests on a specific branch. If the branch does not yet exist, a new branch will be created.
The 2nd property I want to highlight is the parentBranchName. When you specify a parentBranchName you're essentially saying that the branchName we're currently running with should be a child of the branch that we set as the parent.
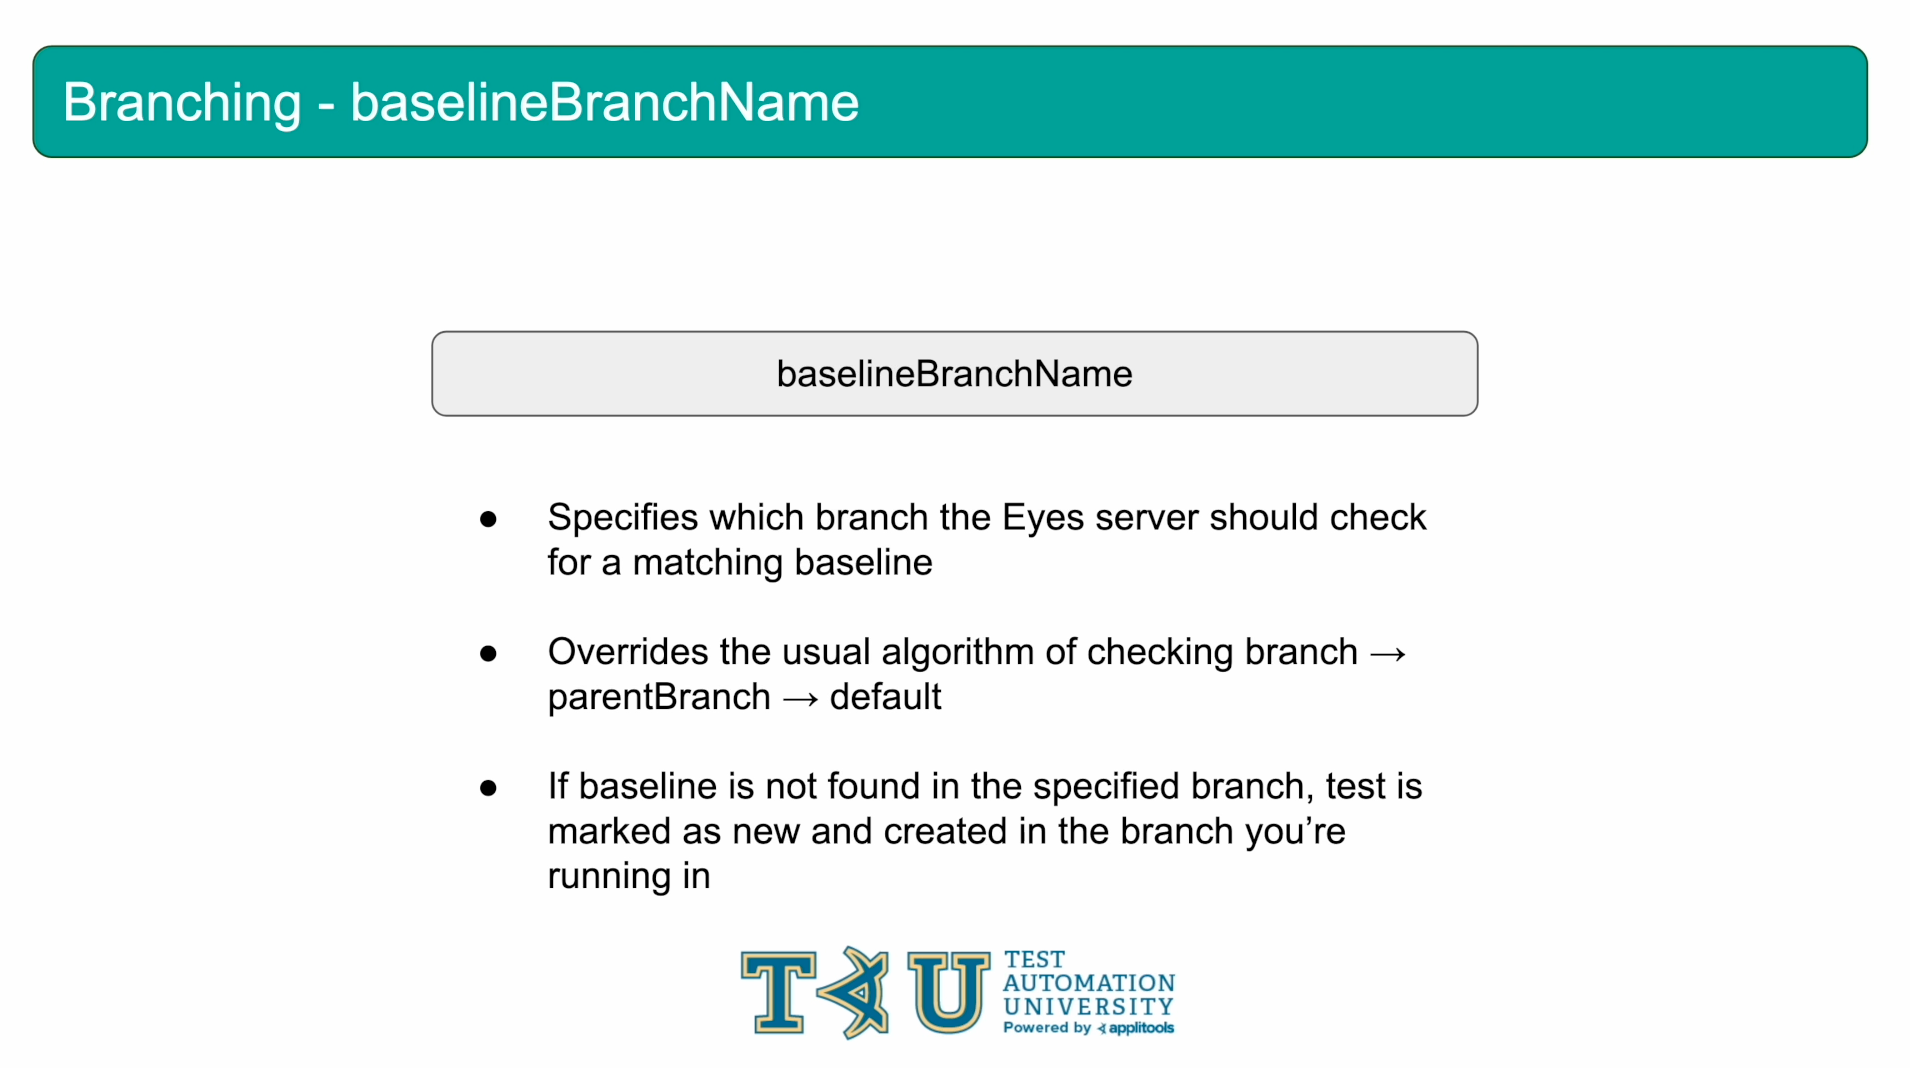
The 3rd property that I want to highlight is the baselineBranchName. When you set this property, it allows you to specify which branch the Applitools server should check when searching for a baseline to compare with. We'll be using all of these properties in our examples for this chapter and don't feel like you need to memorize all of this right now. Feel free to refer back to these definitions as we work through this chapter if needed.
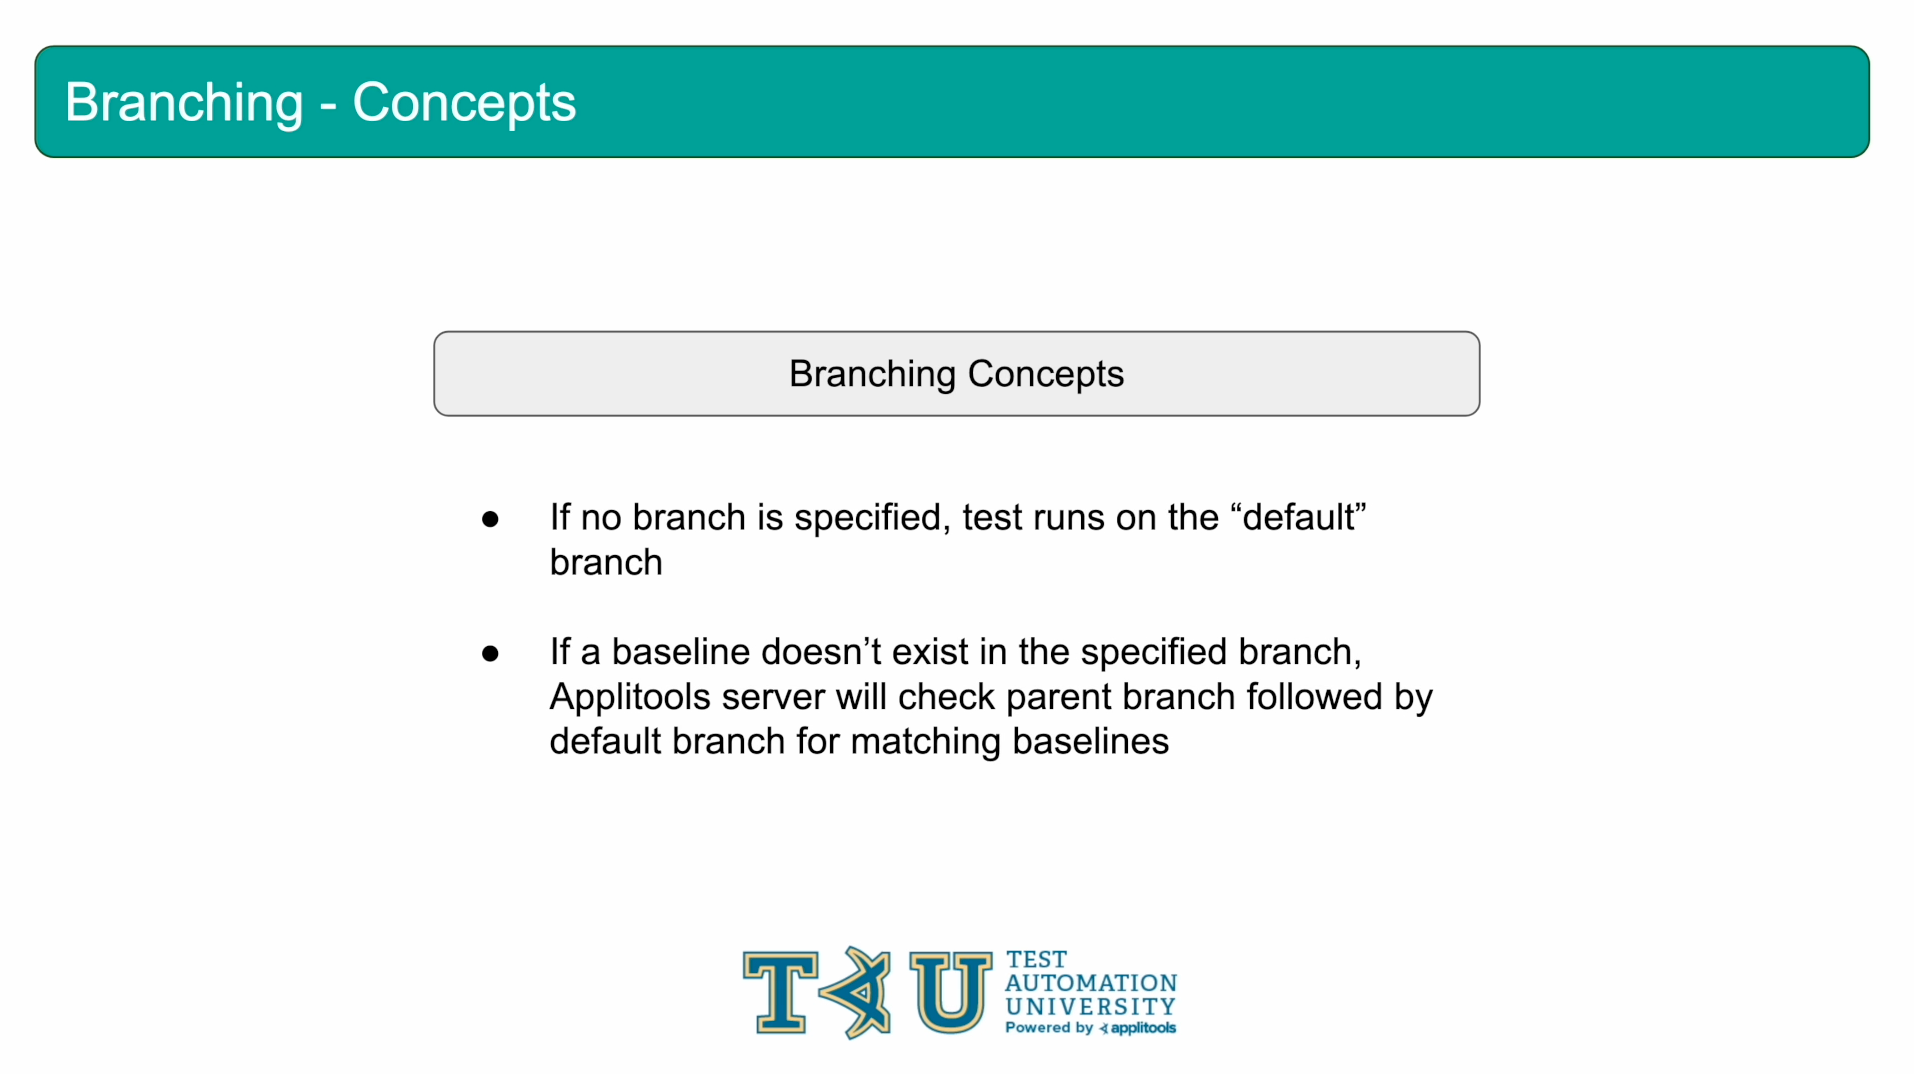
I also want to cover some general topics that govern the logic for Branches in Applitools. First, If you run your tests with no branching properties configured, the test will run on the "default" branch. Every test that we've run up to this point in this course has been run on this branch.
Also, if you're running a test on a certain branch, Applitools will first check that branch for a matching baseline. If no matching baseline is found, it will then check the parentBranch. Finally, if still no matching baseline is found, it will check the default branch. If a matching baseline isn't found on any of these checks, a "New" baseline will be created in the branch that you're running your tests on.
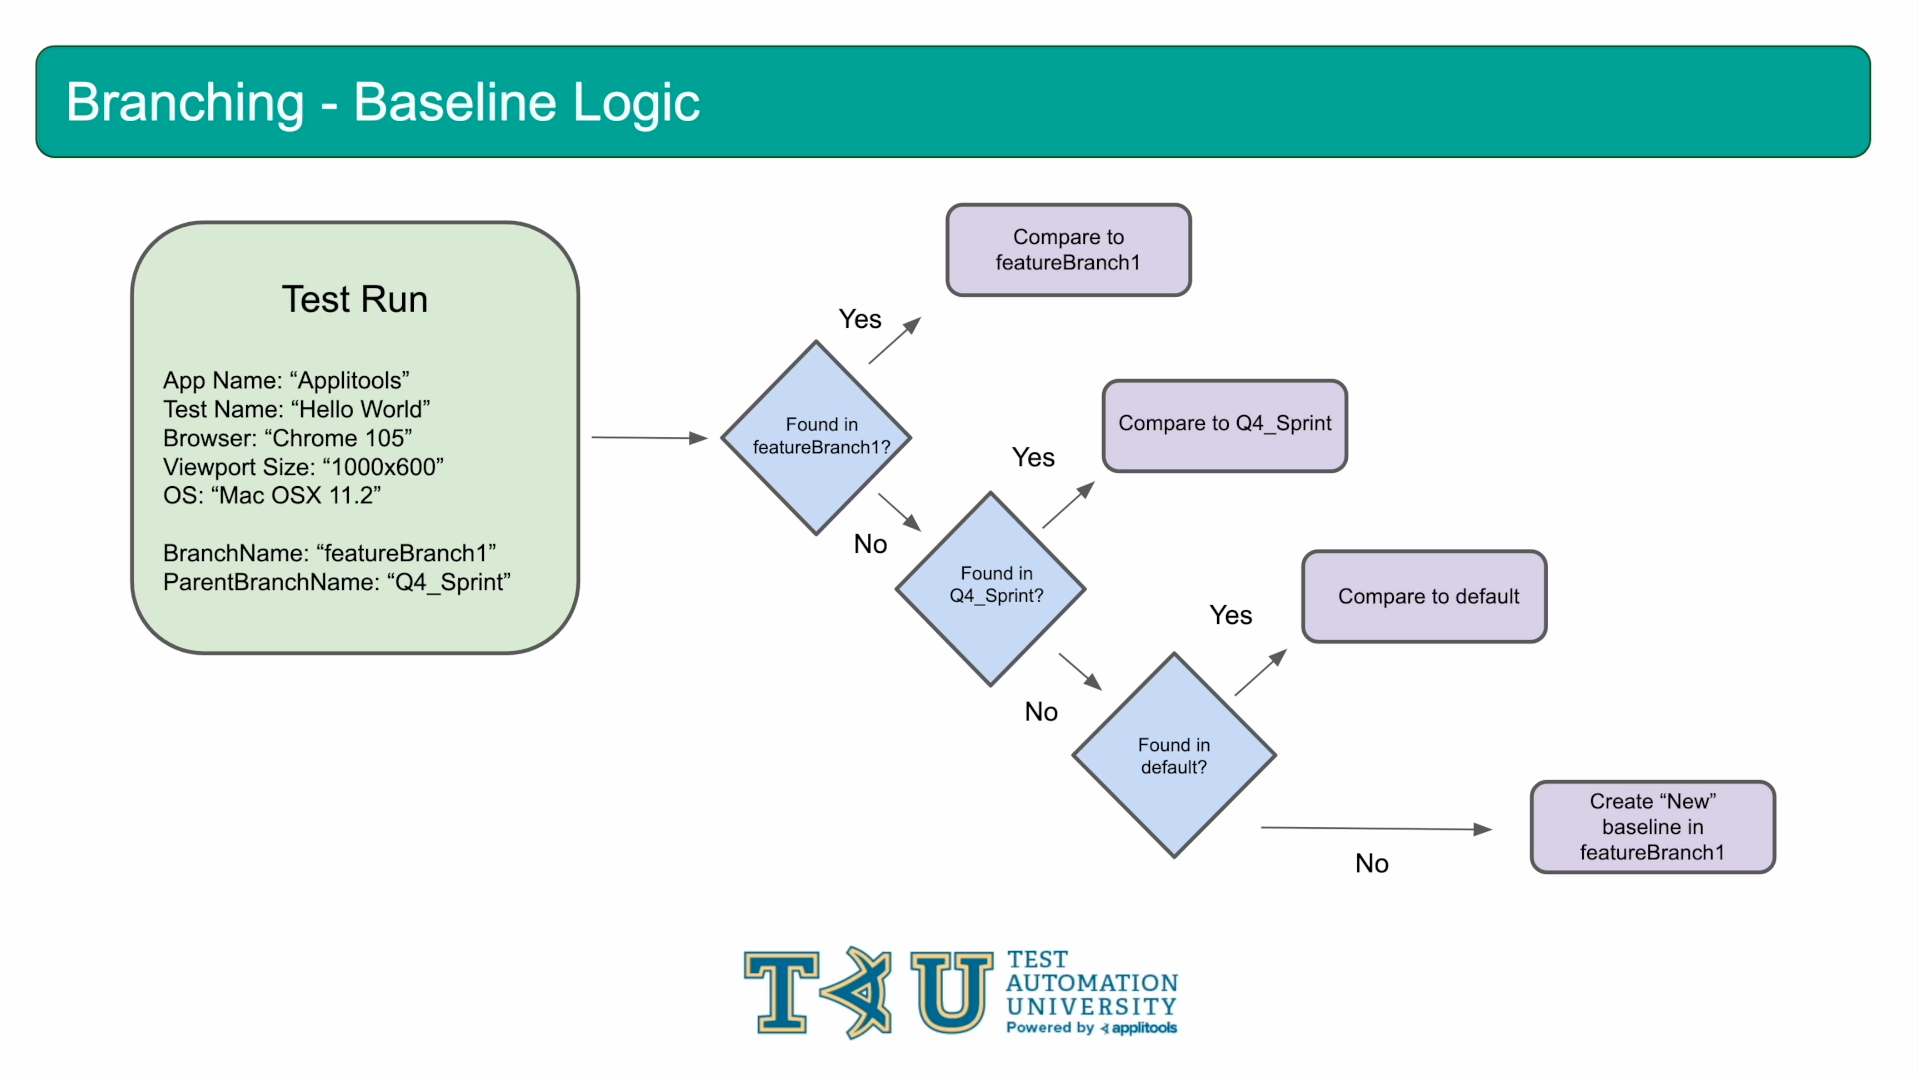
Let's go over a visual example that will outline the baseline logic that I just went over. Let's say we have this test run here that's running on a branch called featureBranch1 with a parent branch of Q4_Sprint.
When the Applitools looks for a matching baseline, it will first check in the featureBranch1 branch. If a baseline is found it will compare to that baseline and we'll be done. If no baseline is found, we move on to the parent branch, Q4_Sprint.
If a baseline is found here, it will compare to that baseline and then we'll be done. If no baseline is found, then we'll make our last check against the default branch. Again, if a baseline is found here, then we'll compare it. Otherwise, a new baseline will be created in the target branch, featureBranch1.
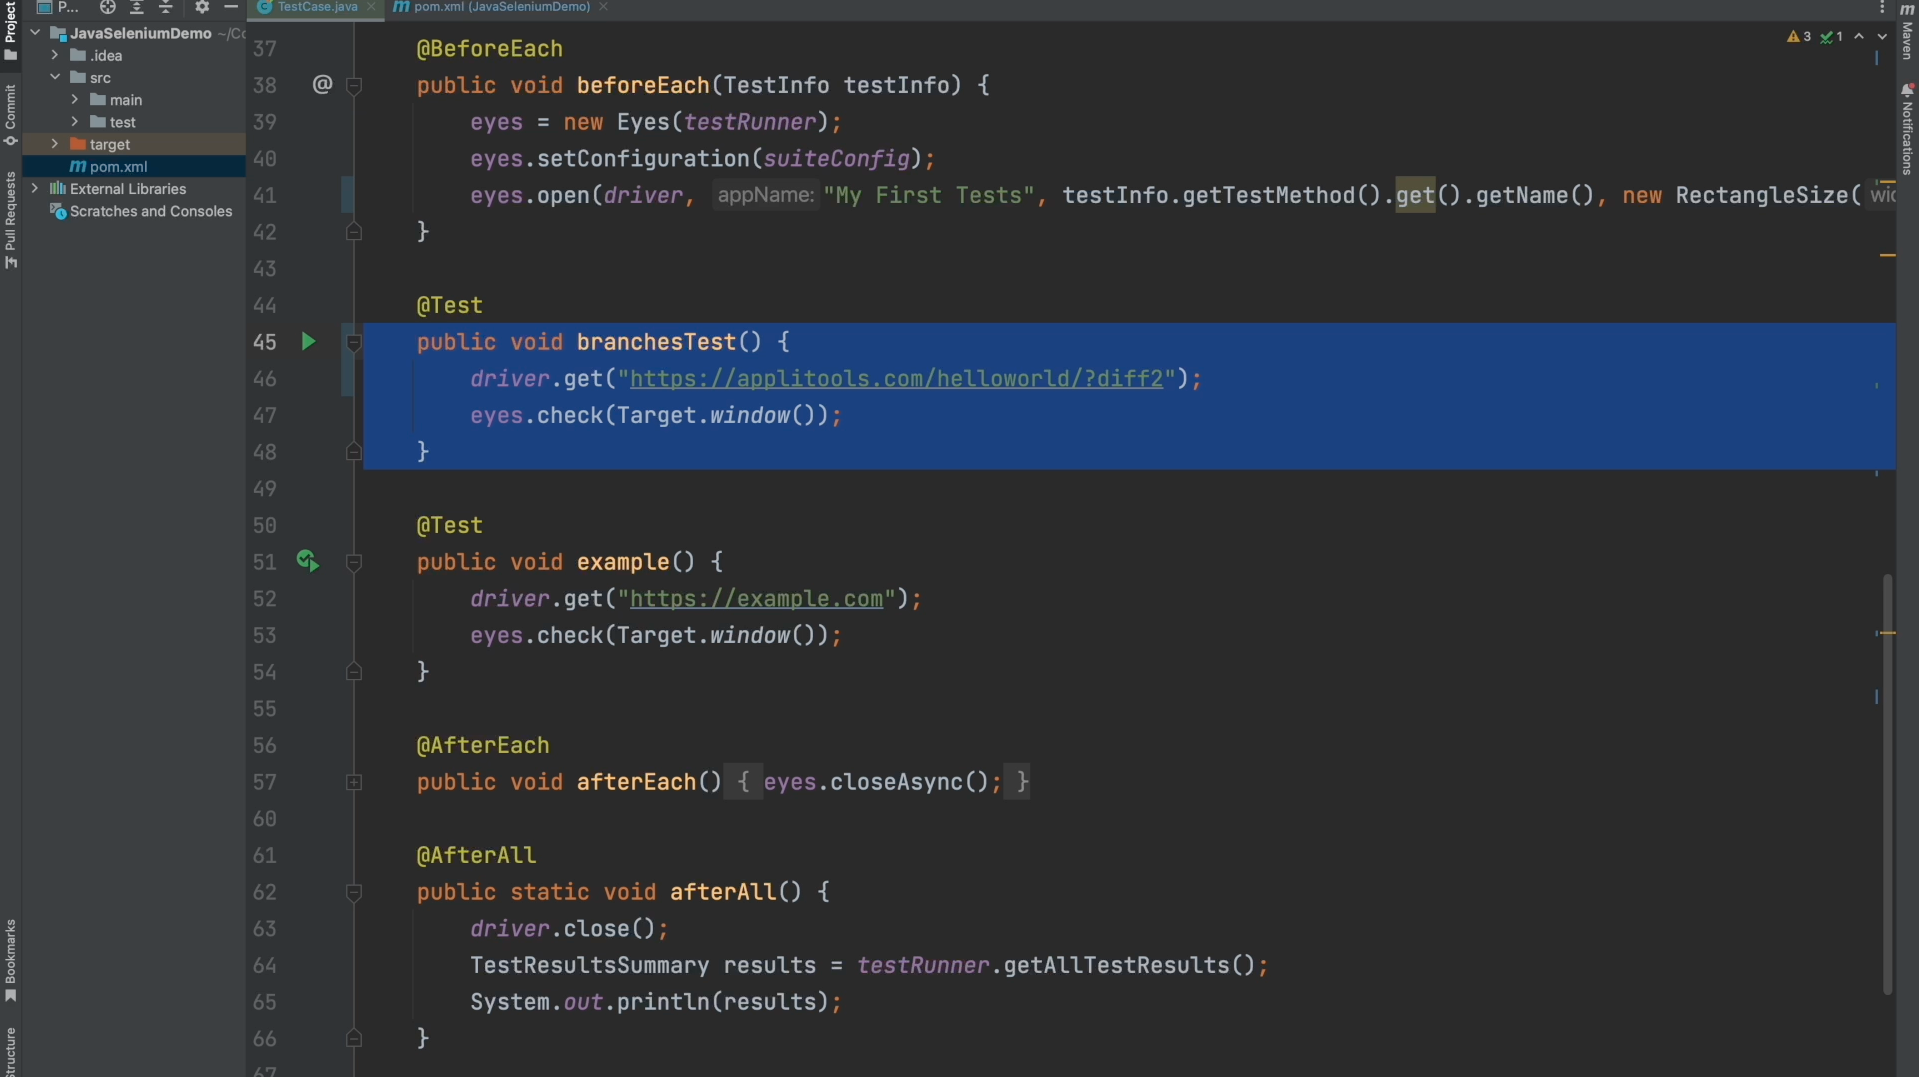
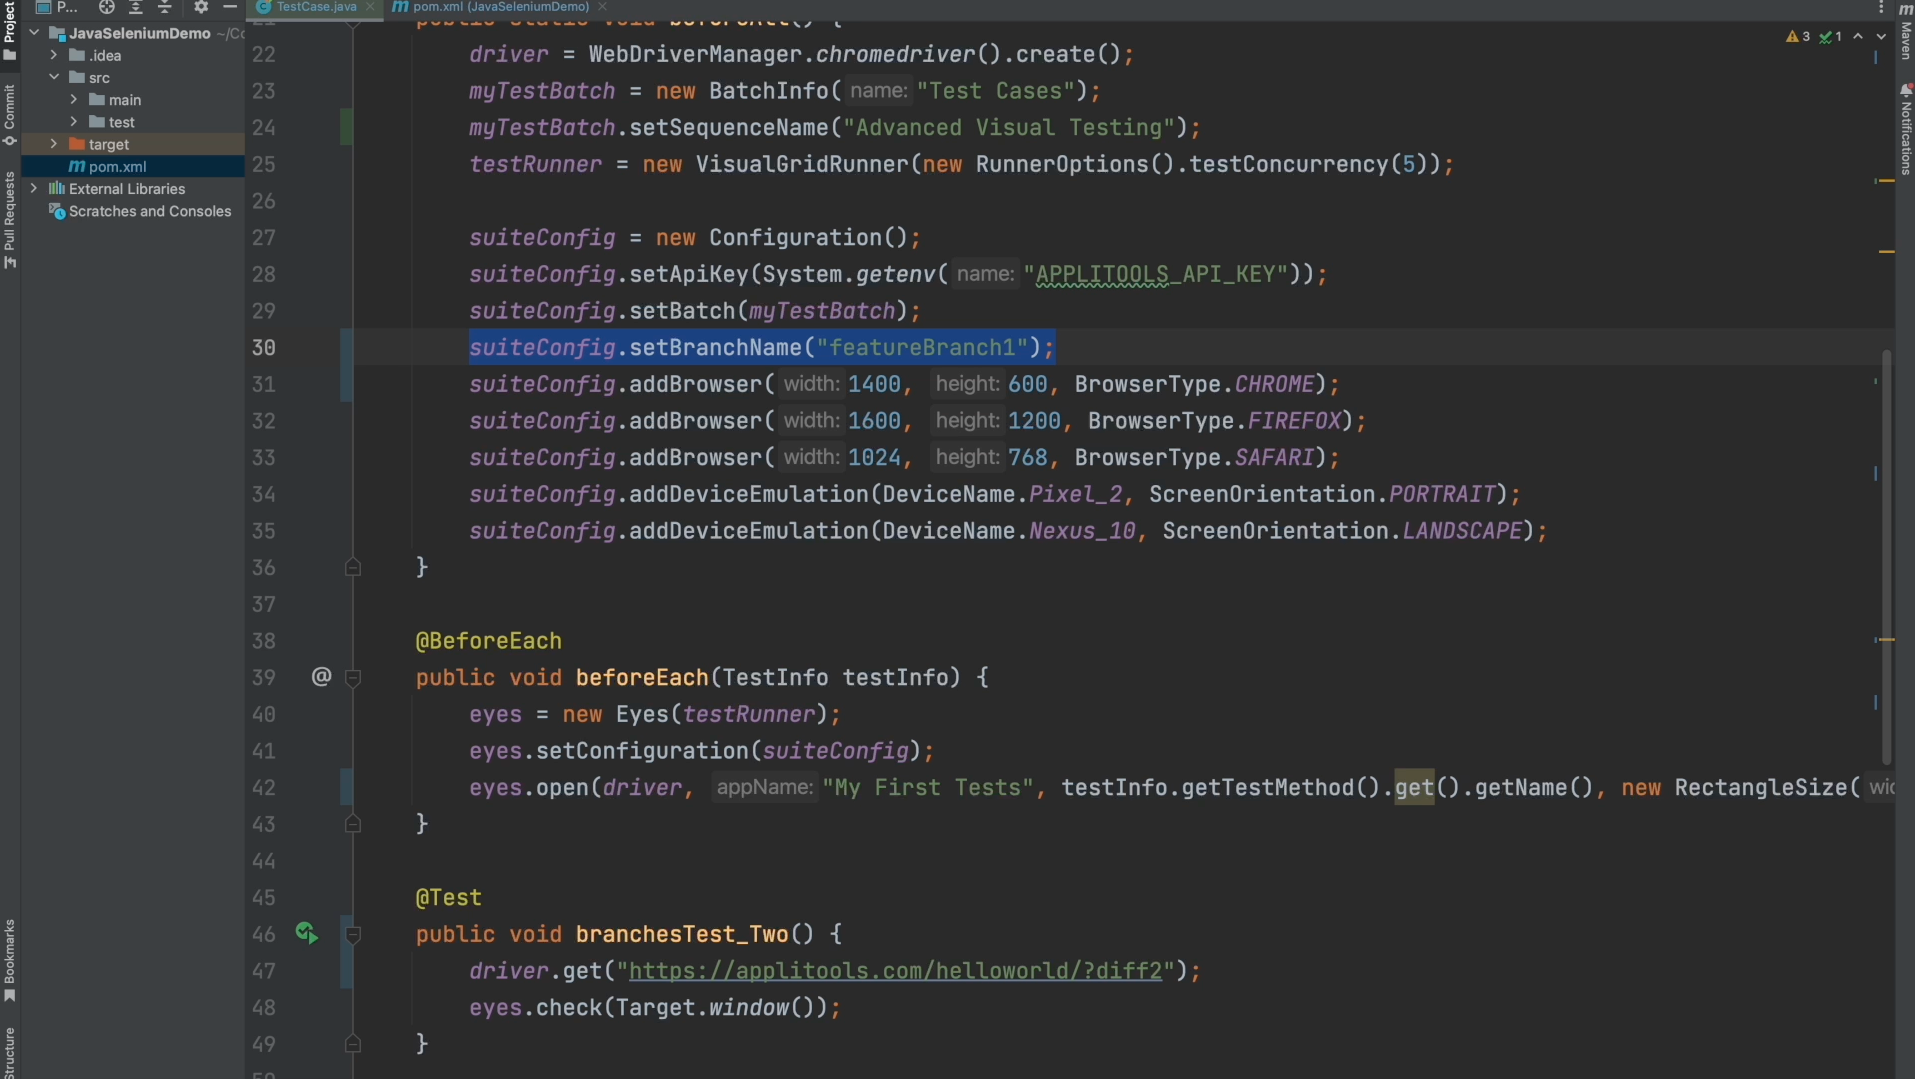
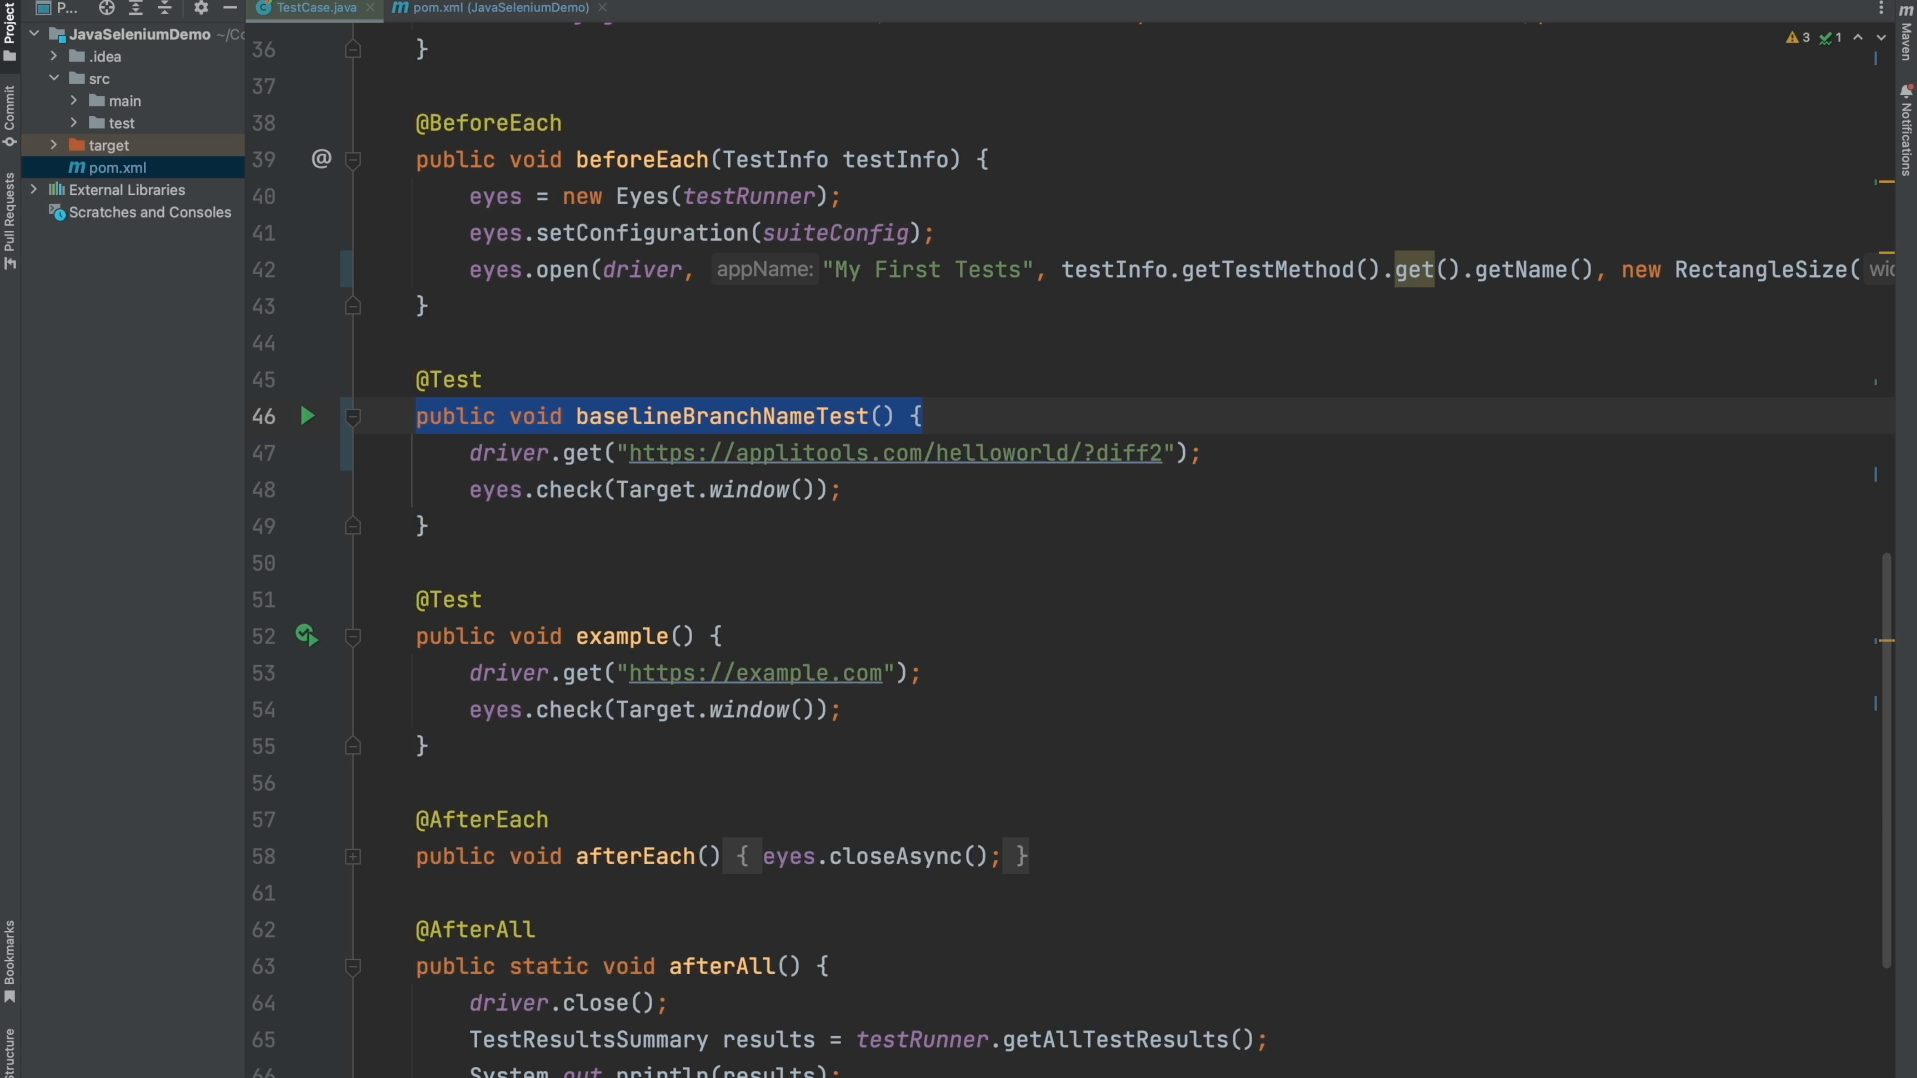
To prepare for a simple branching example, I've modified our test code slightly. For simplicity, I changed our call to eyes.check() back to a simple target.window() without the match level regions that we had before. I also changed the test name to branchesTest so that we get a clean baseline to work with. Go ahead and run this test after making these changes.
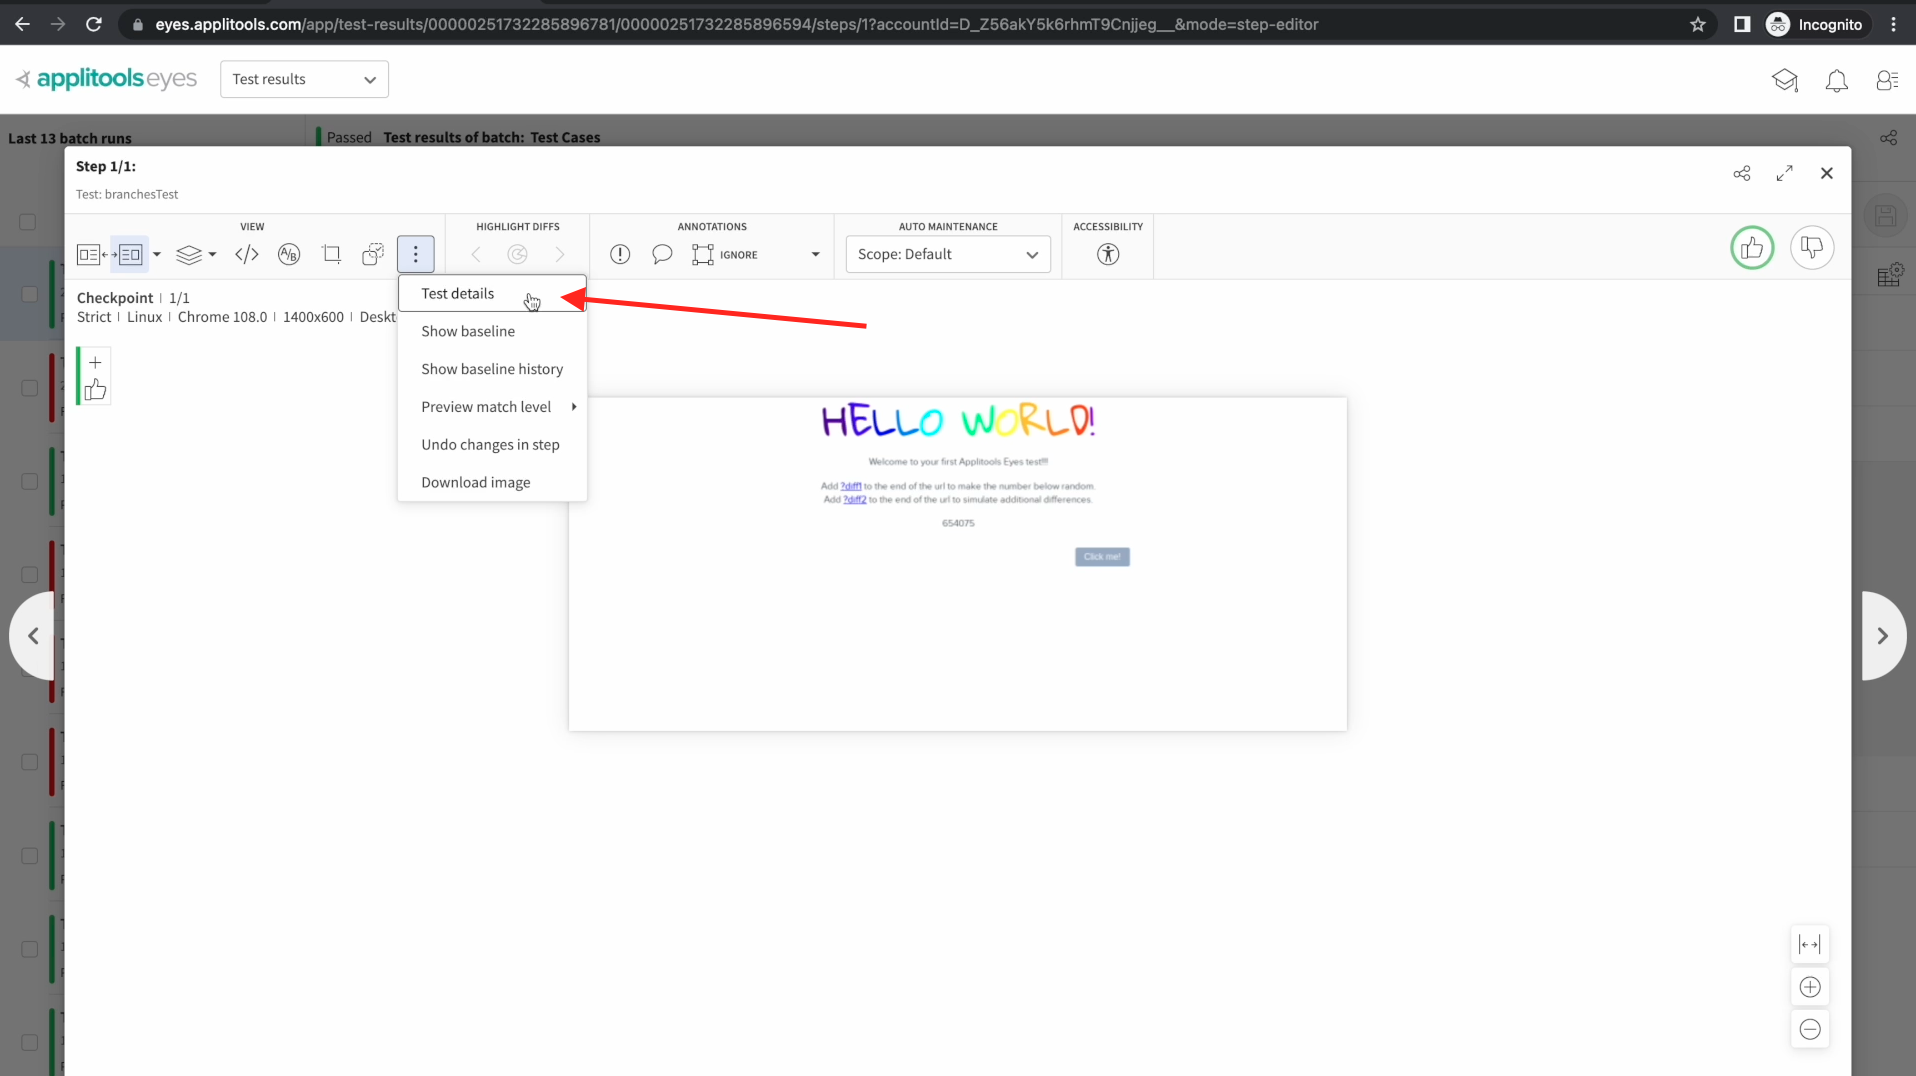
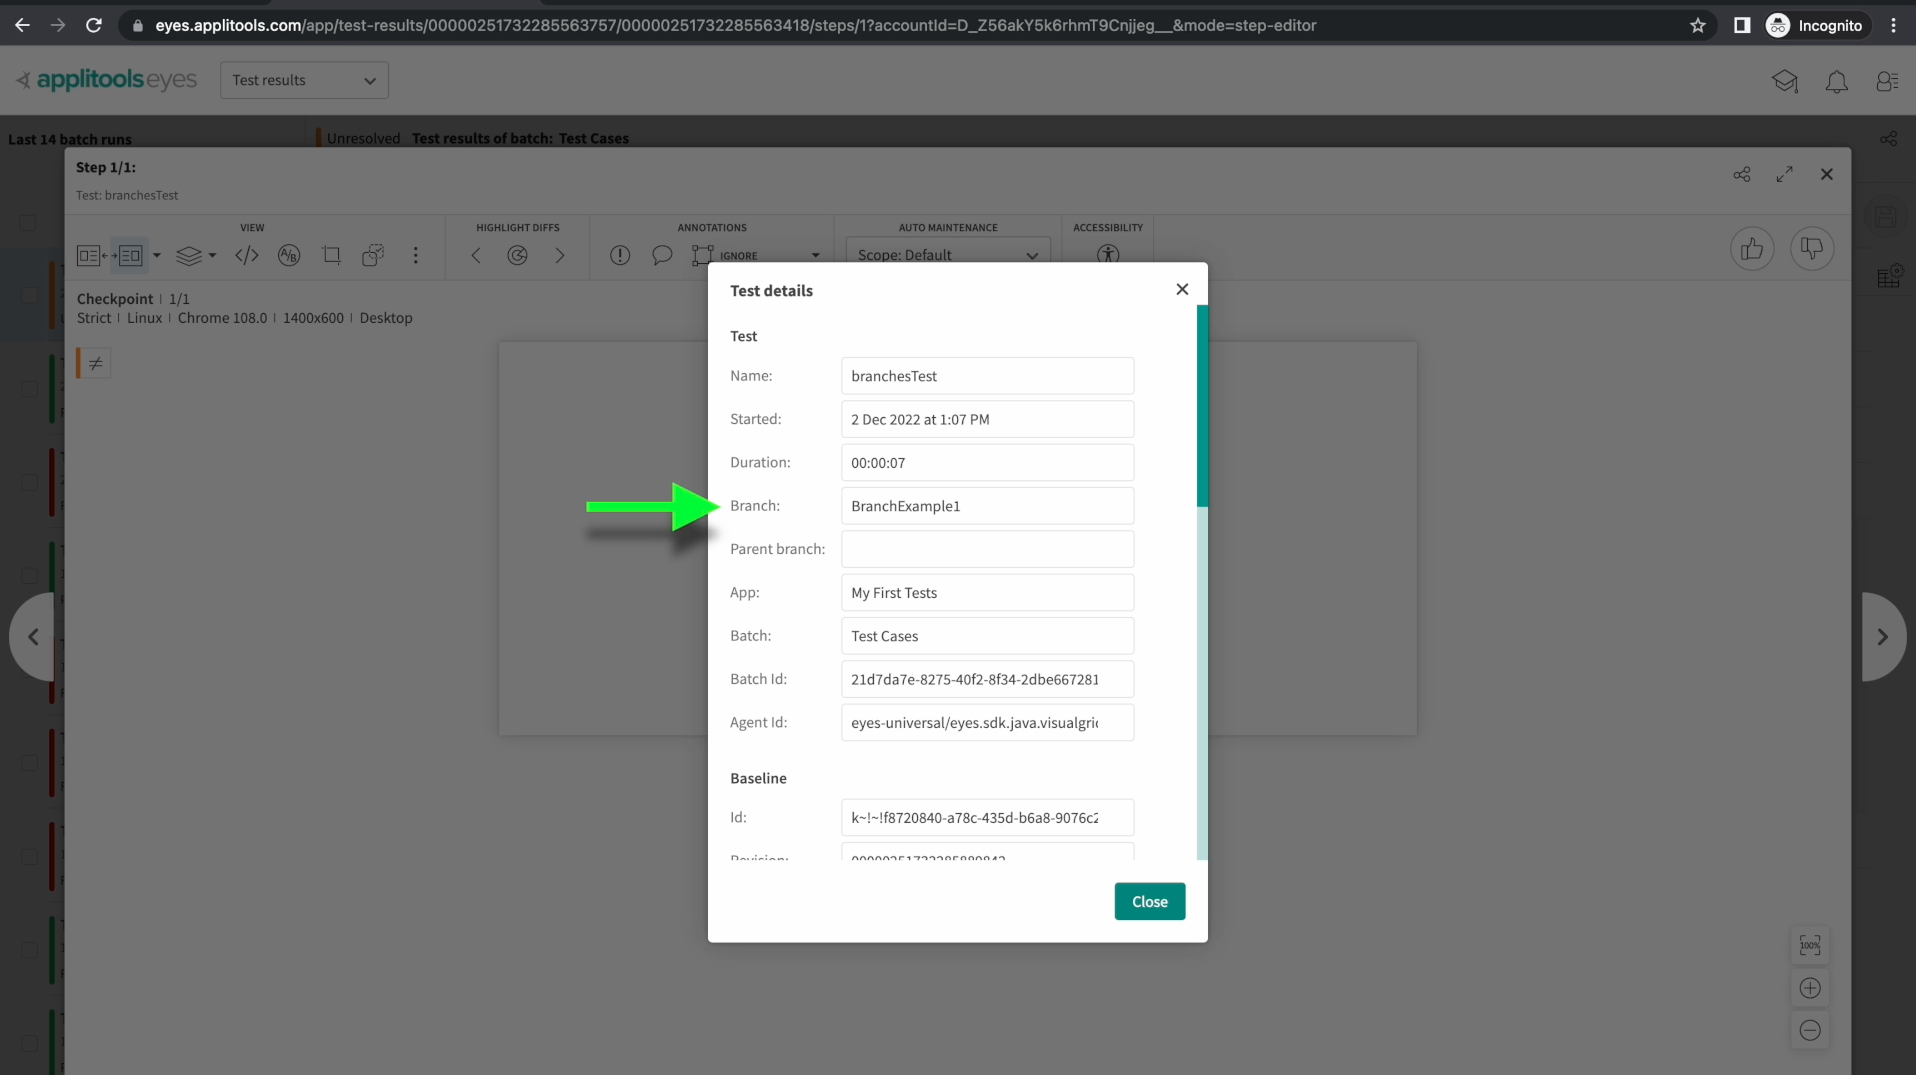
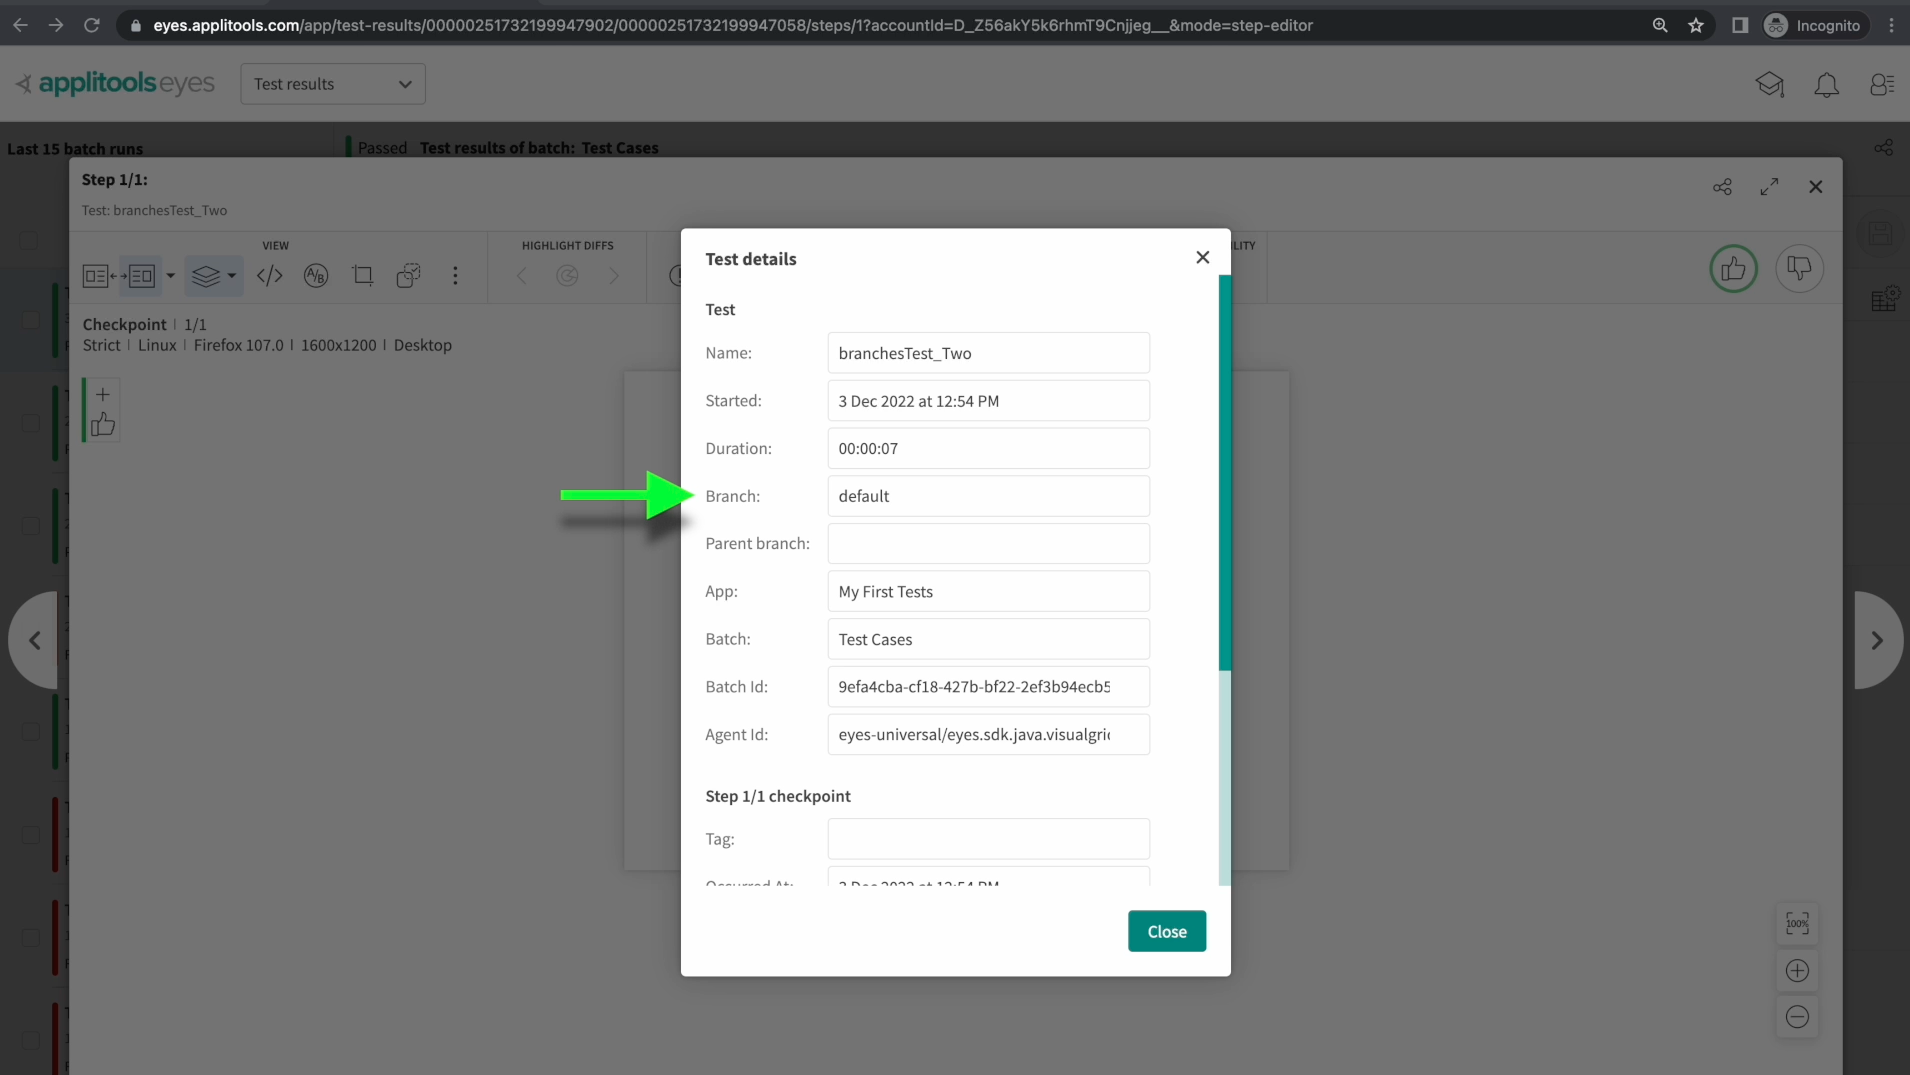
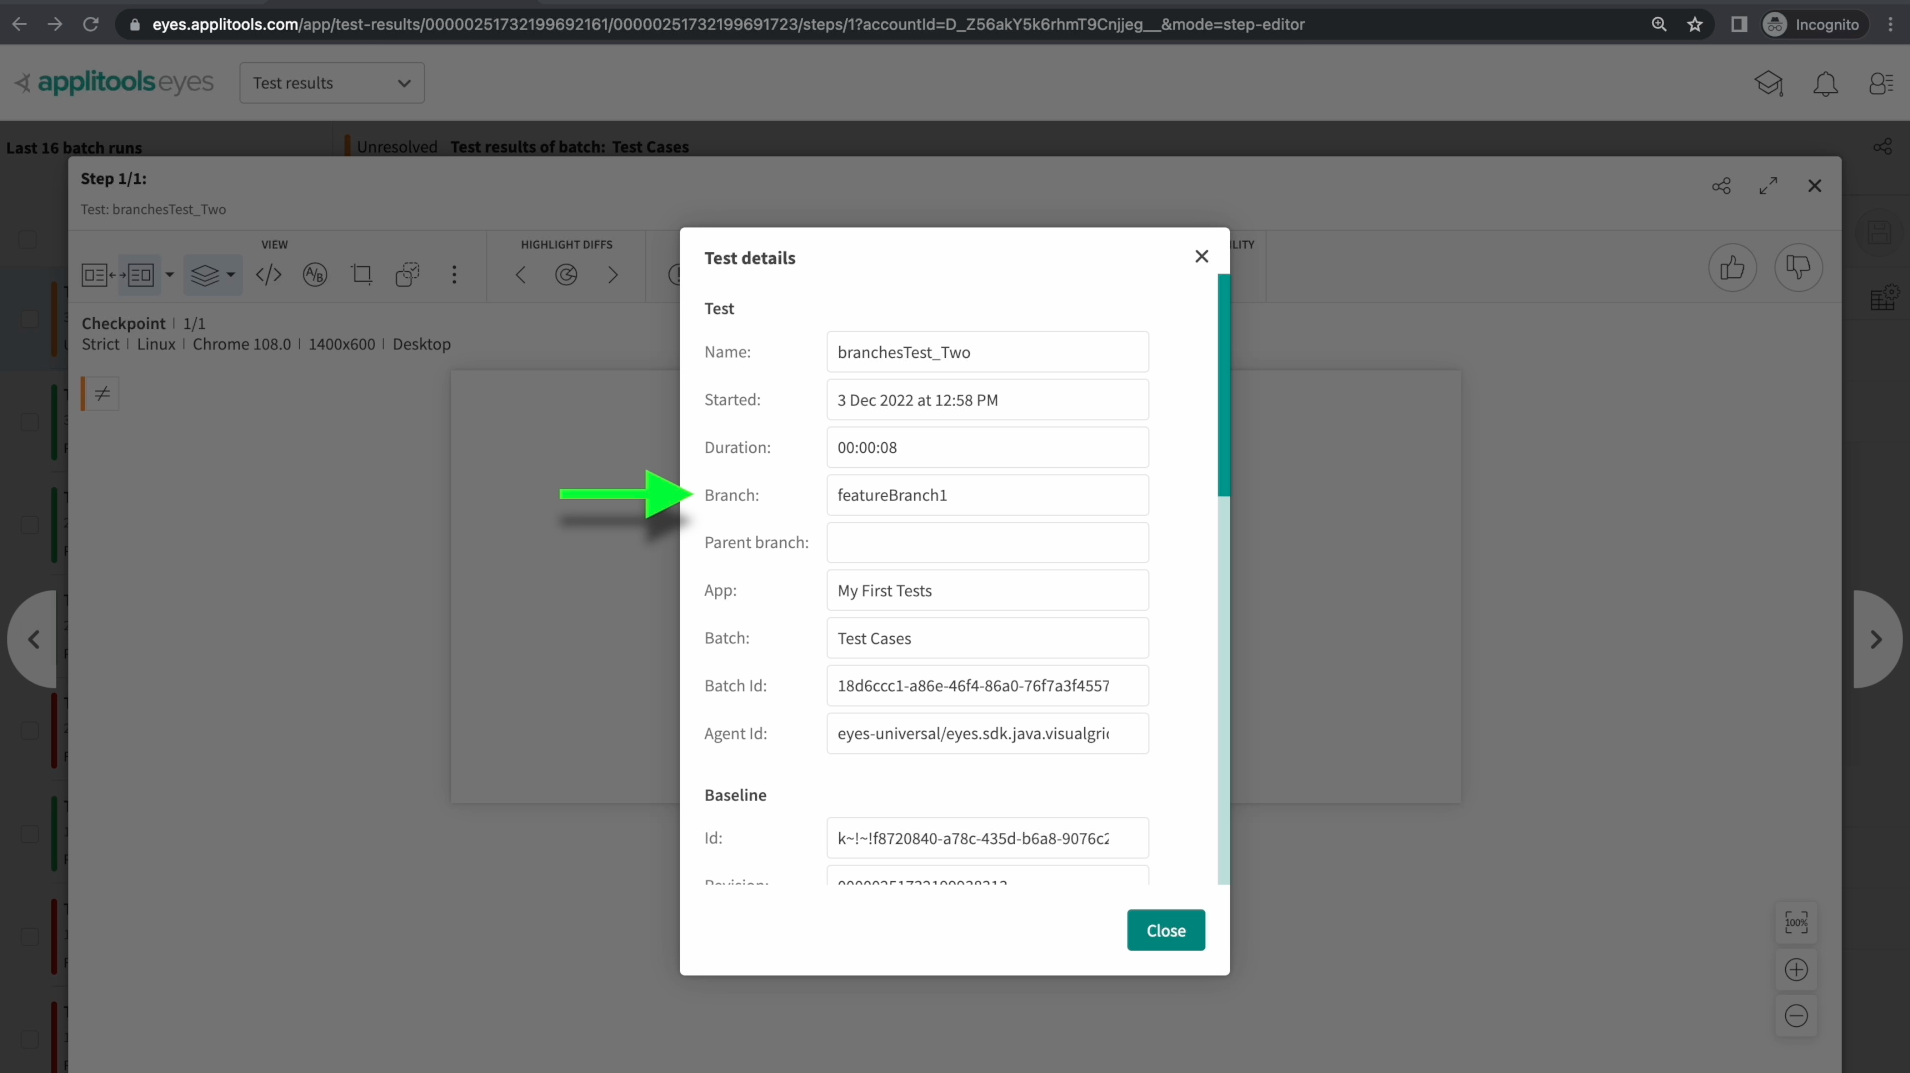
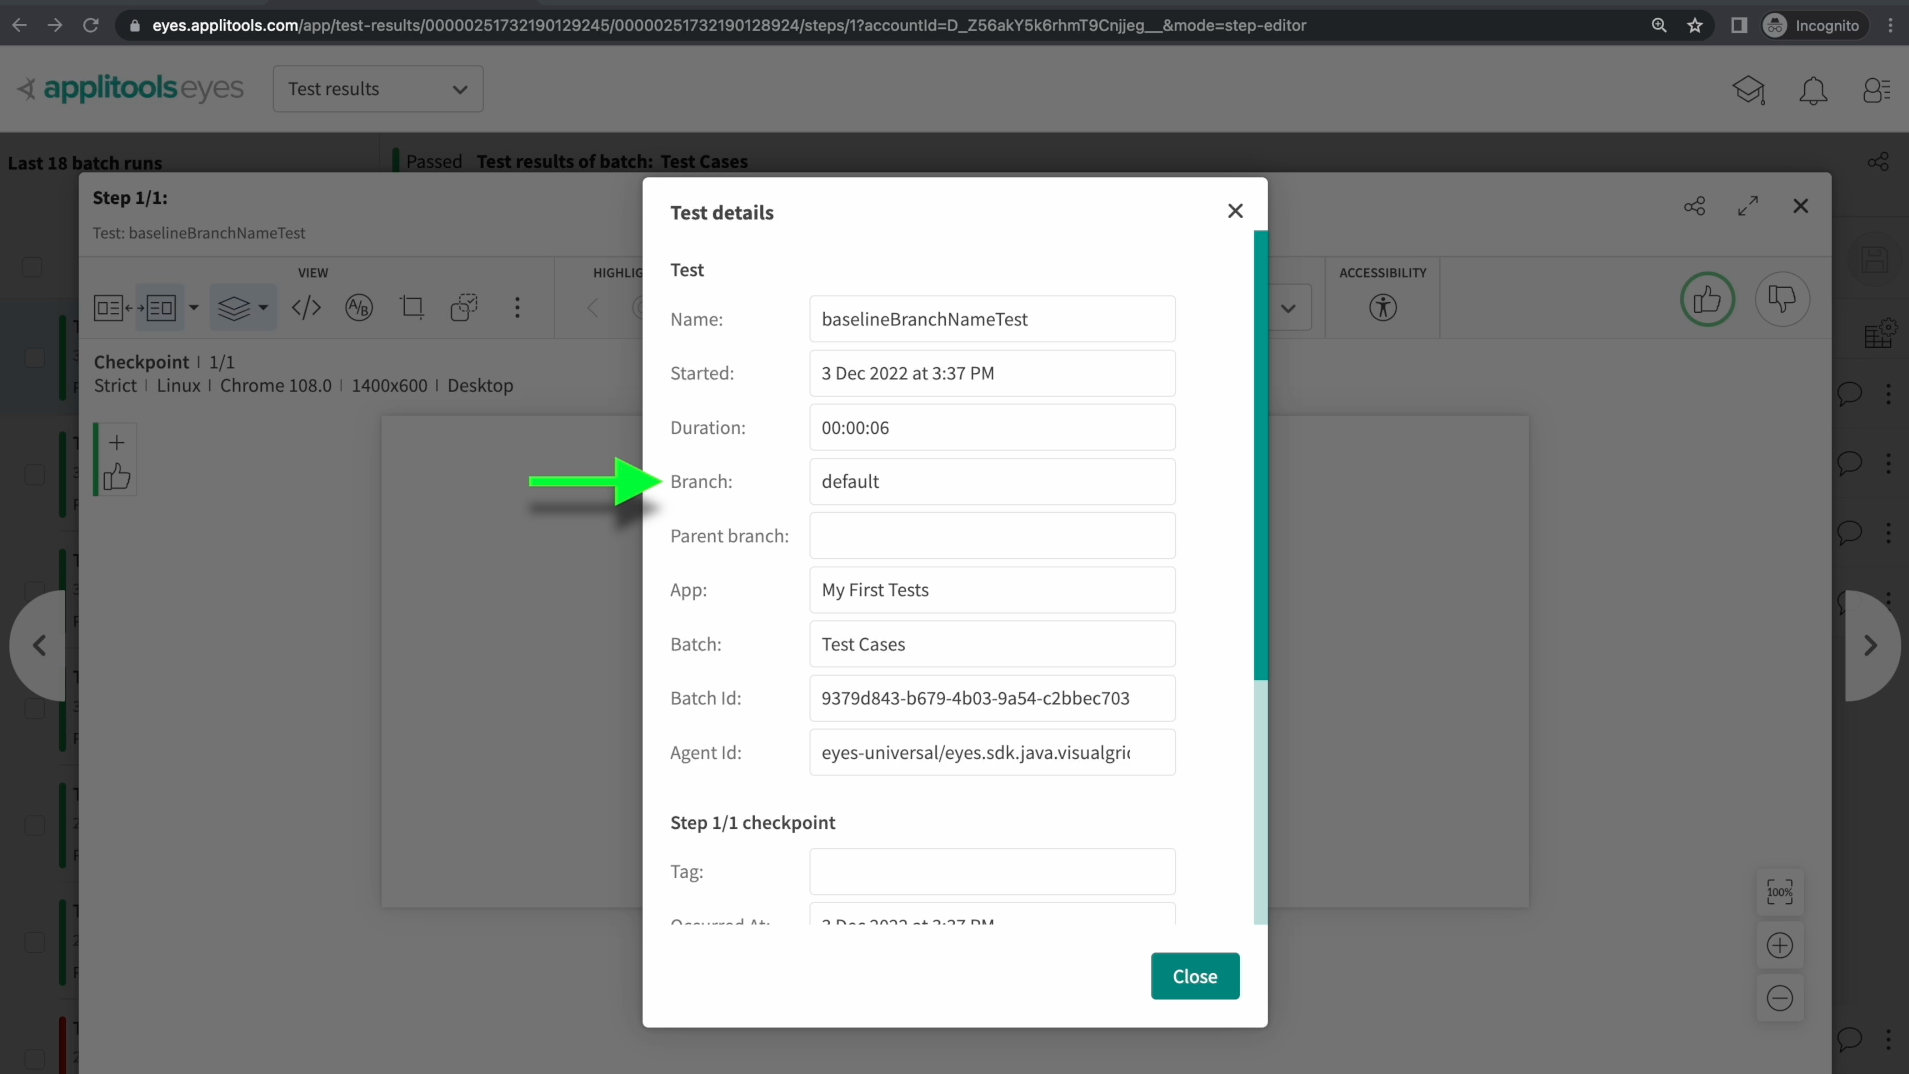
On your dashboard, open up one of the images that you just captured and click on the 3 dots button followed by the Test details option.
In the dialog that is shown when you click on Test Details, we can see the branching information for this test run. As mentioned, all tests are run on the default branch...by default, which makes sense. Let's head over to our code and modify it to run with a specific branch.
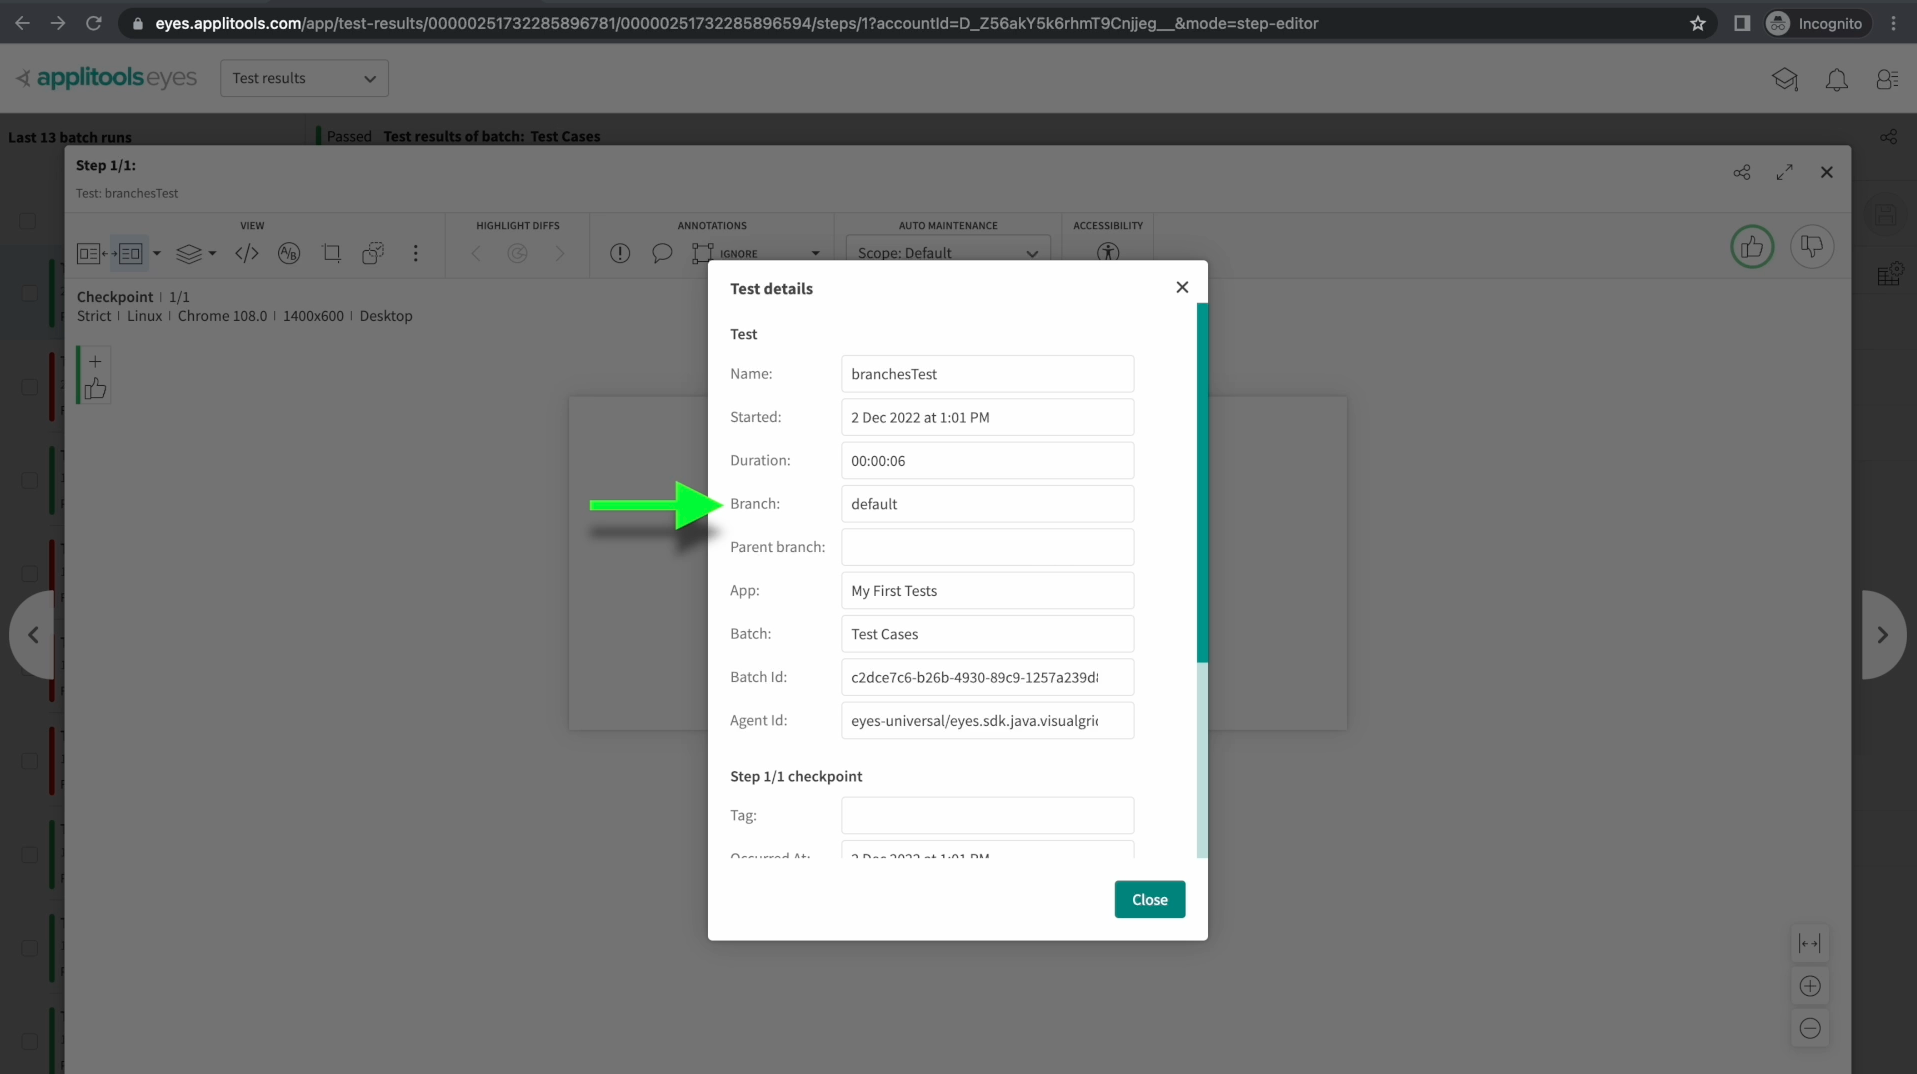
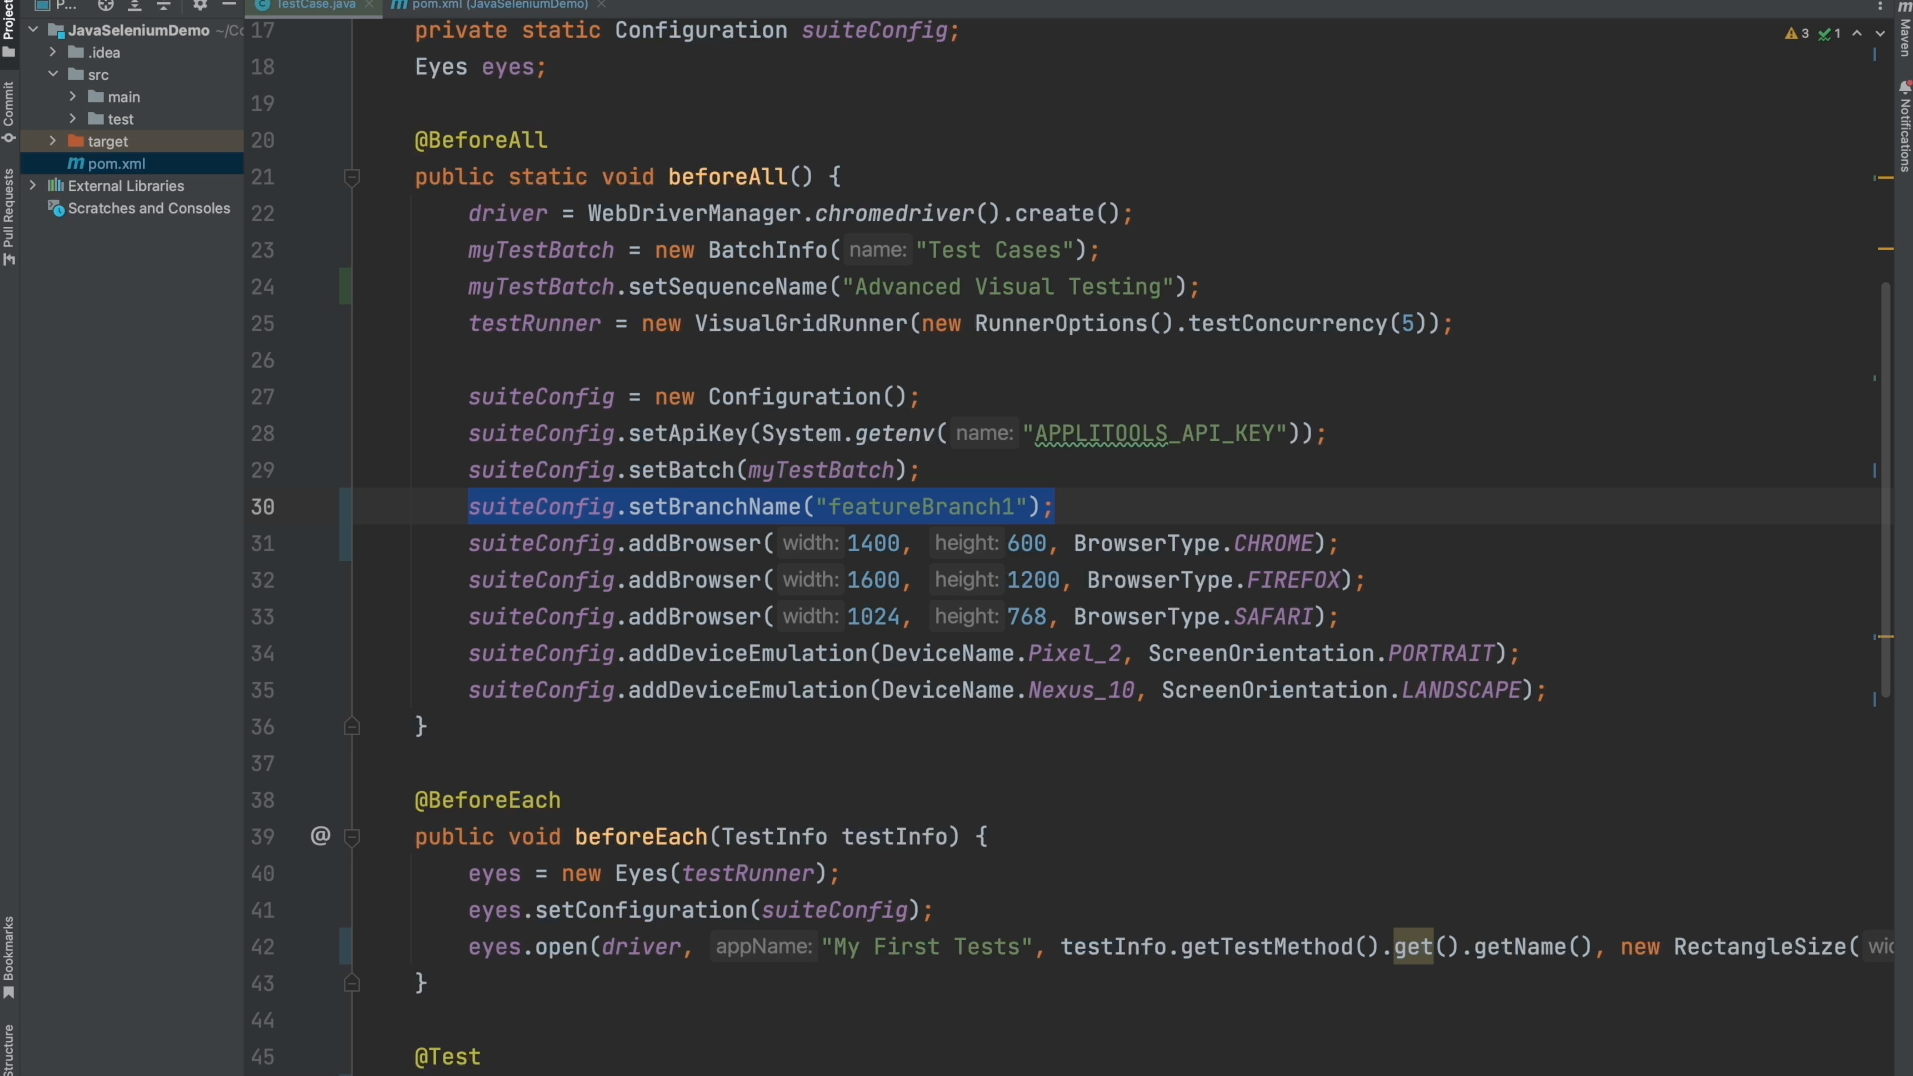
In our config, I've made a call to setBranchName and passed in a name for this branch. Feel free to name this branch anything that you'd like and after adding this in, run your test once more.
Checking the test details once again shows us that we're now running our tests on the branch that we specified.
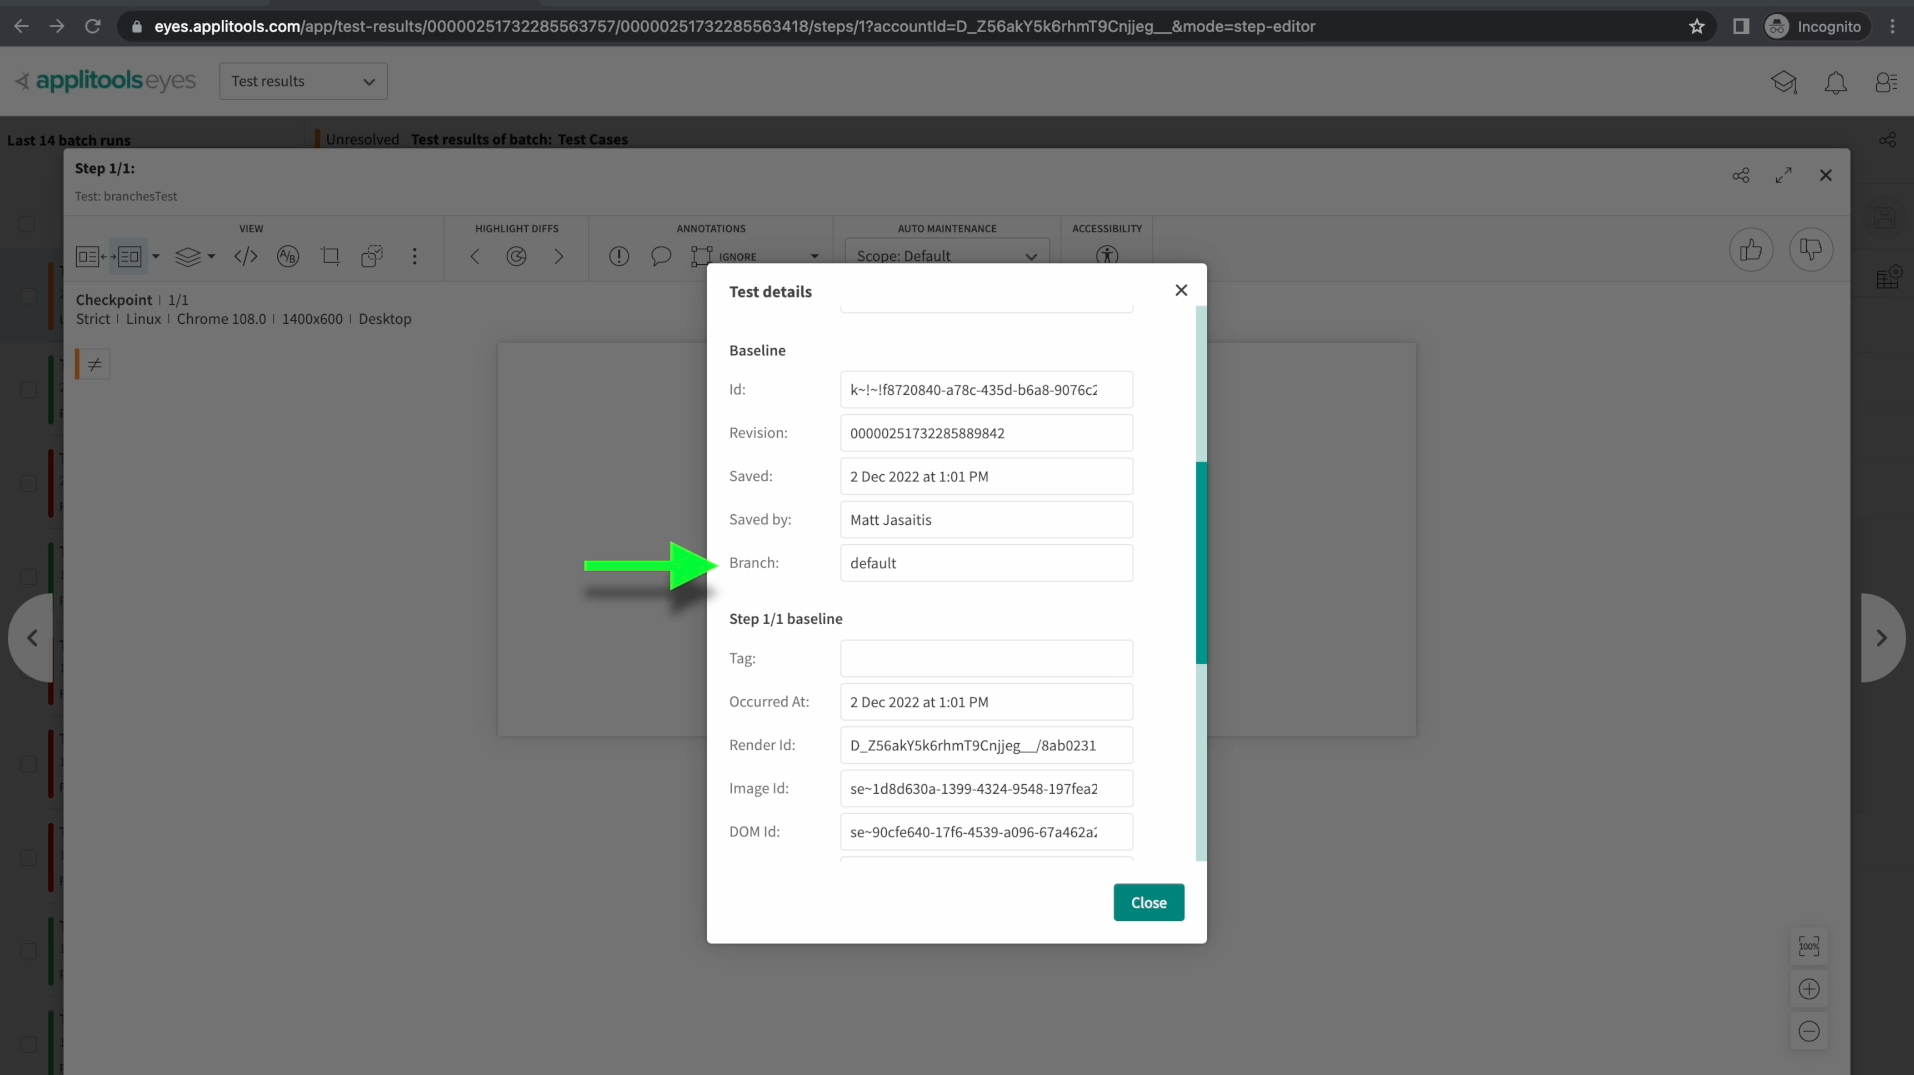
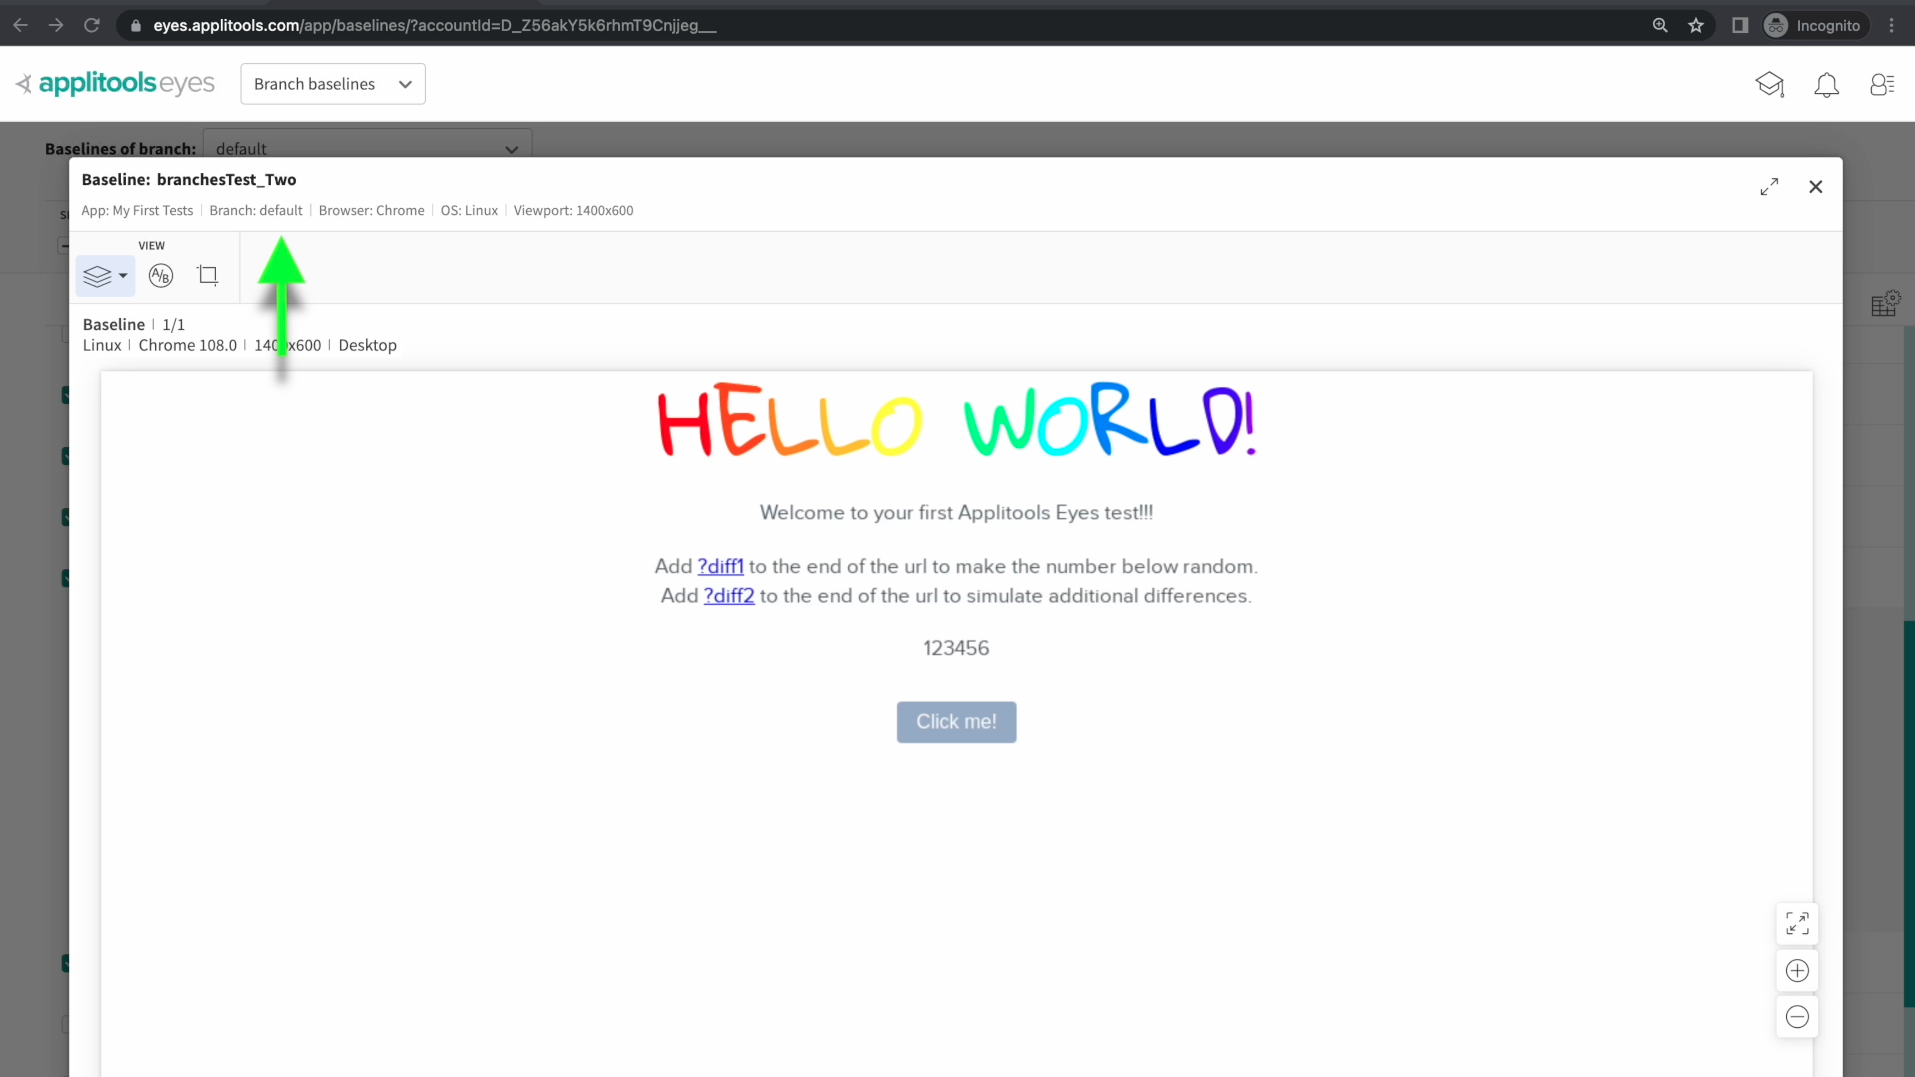
If we scroll down a bit and checkout the baseline details, we also notice that the baseline we're comparing to is the one from the default branch. This is because of that baseline progression logic that I mentioned earlier. No baseline was found in this new branch that we created but there was a baseline found in the default branch. Therefore, we are comparing this test run to the baseline in the default branch.
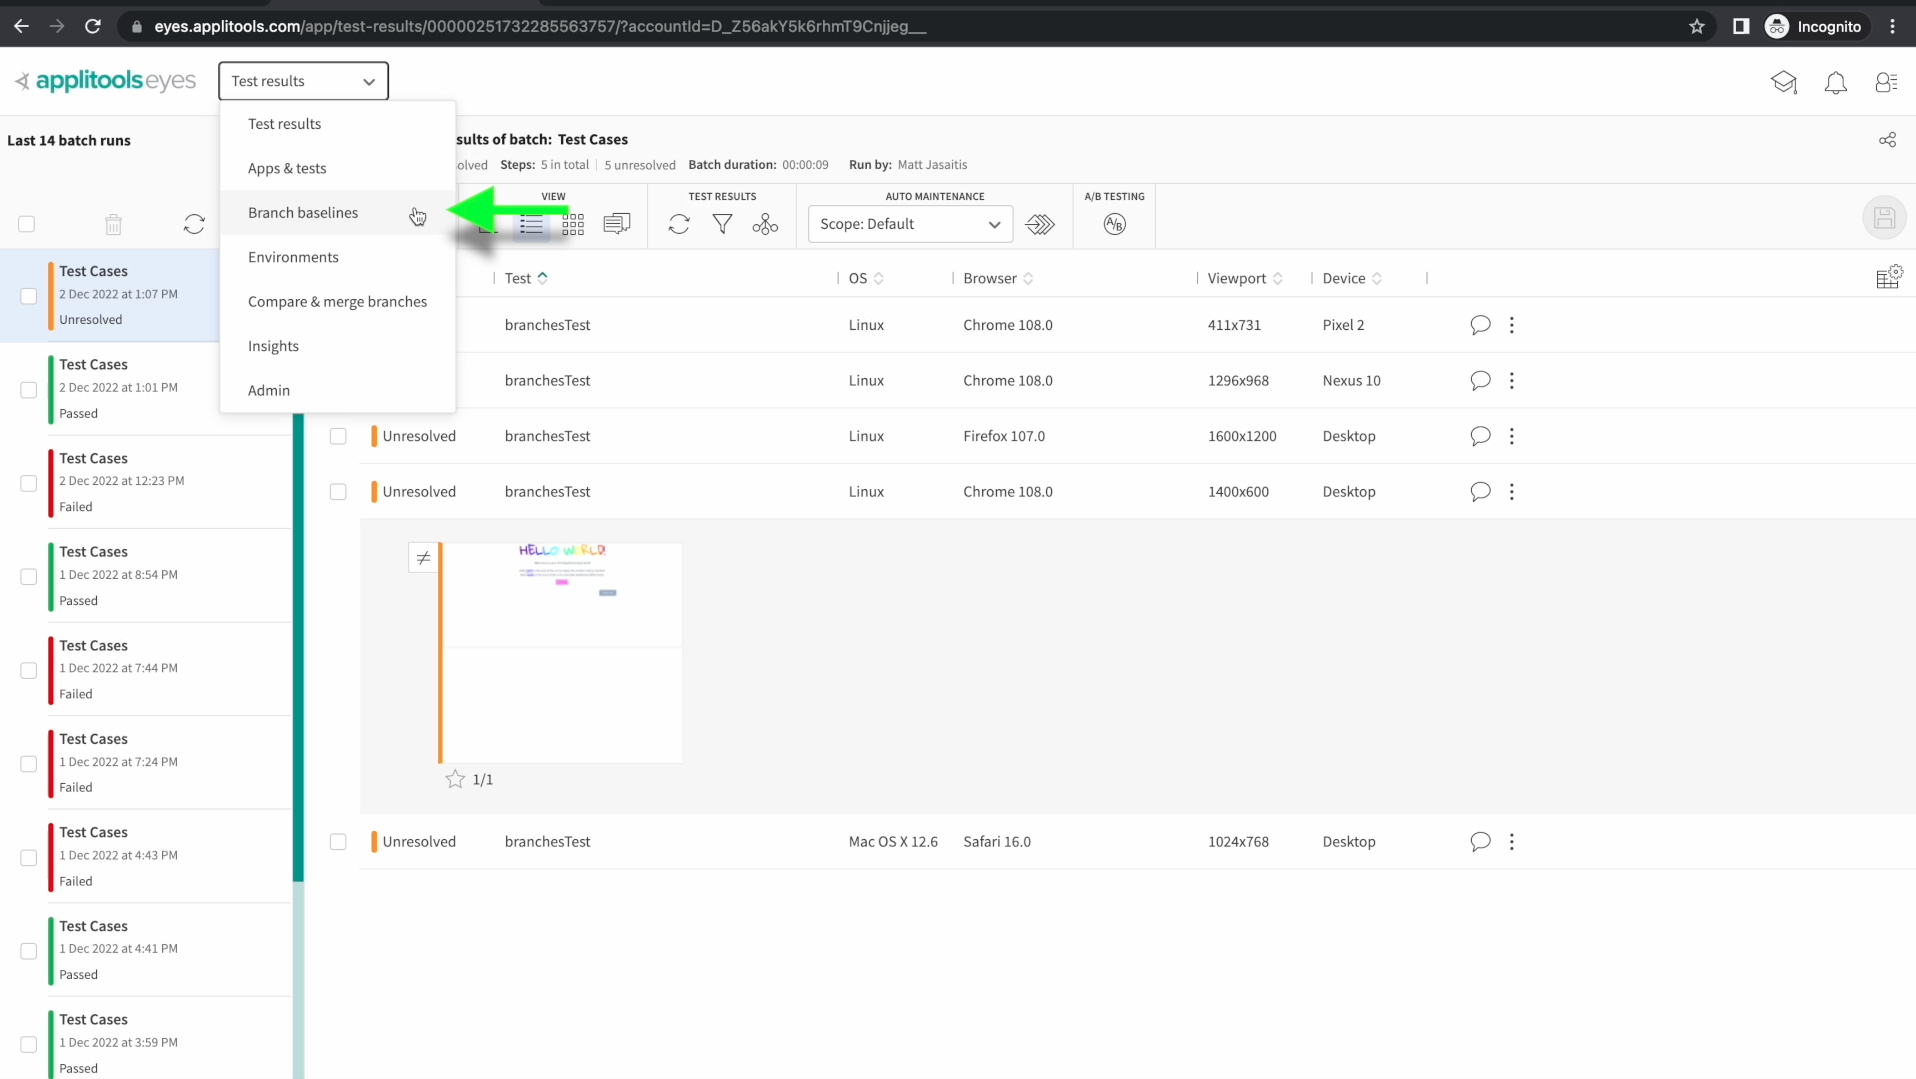
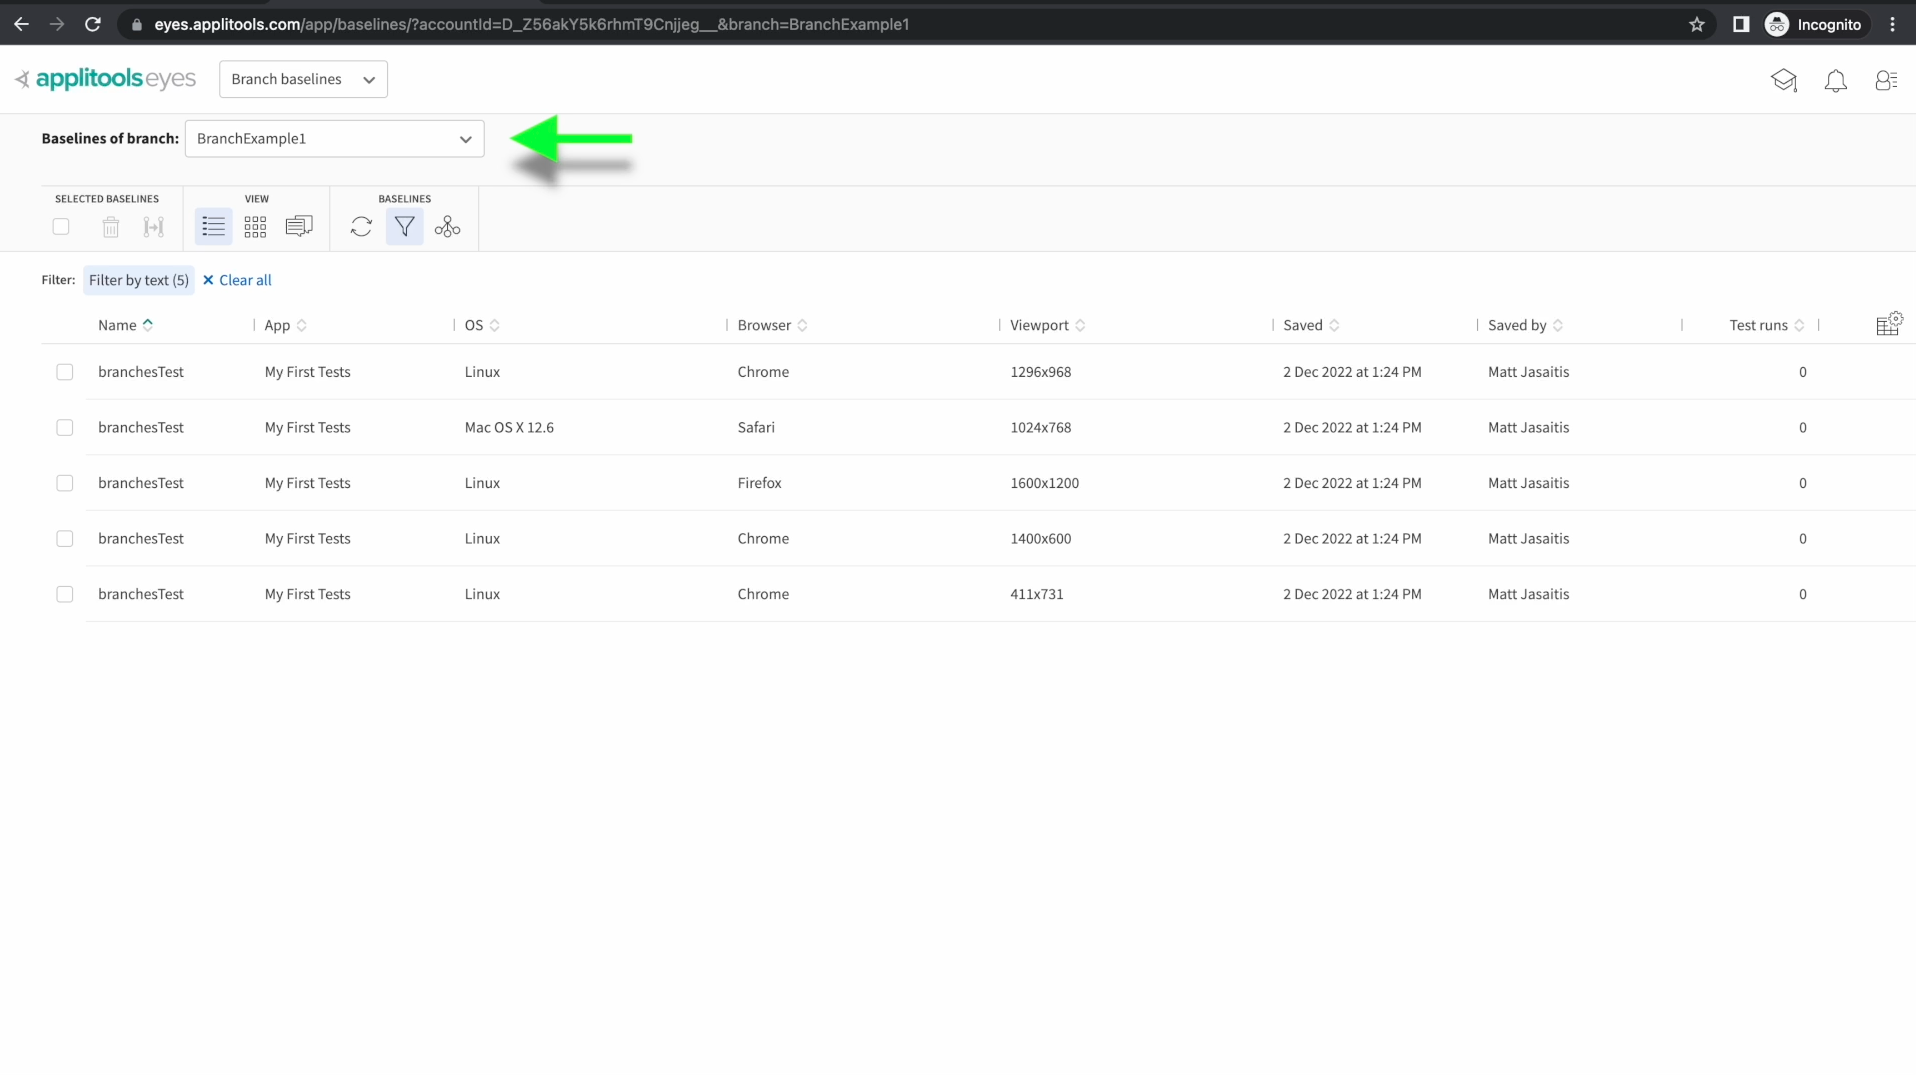
Let's confirm this by navigating to the branch baselines screen.
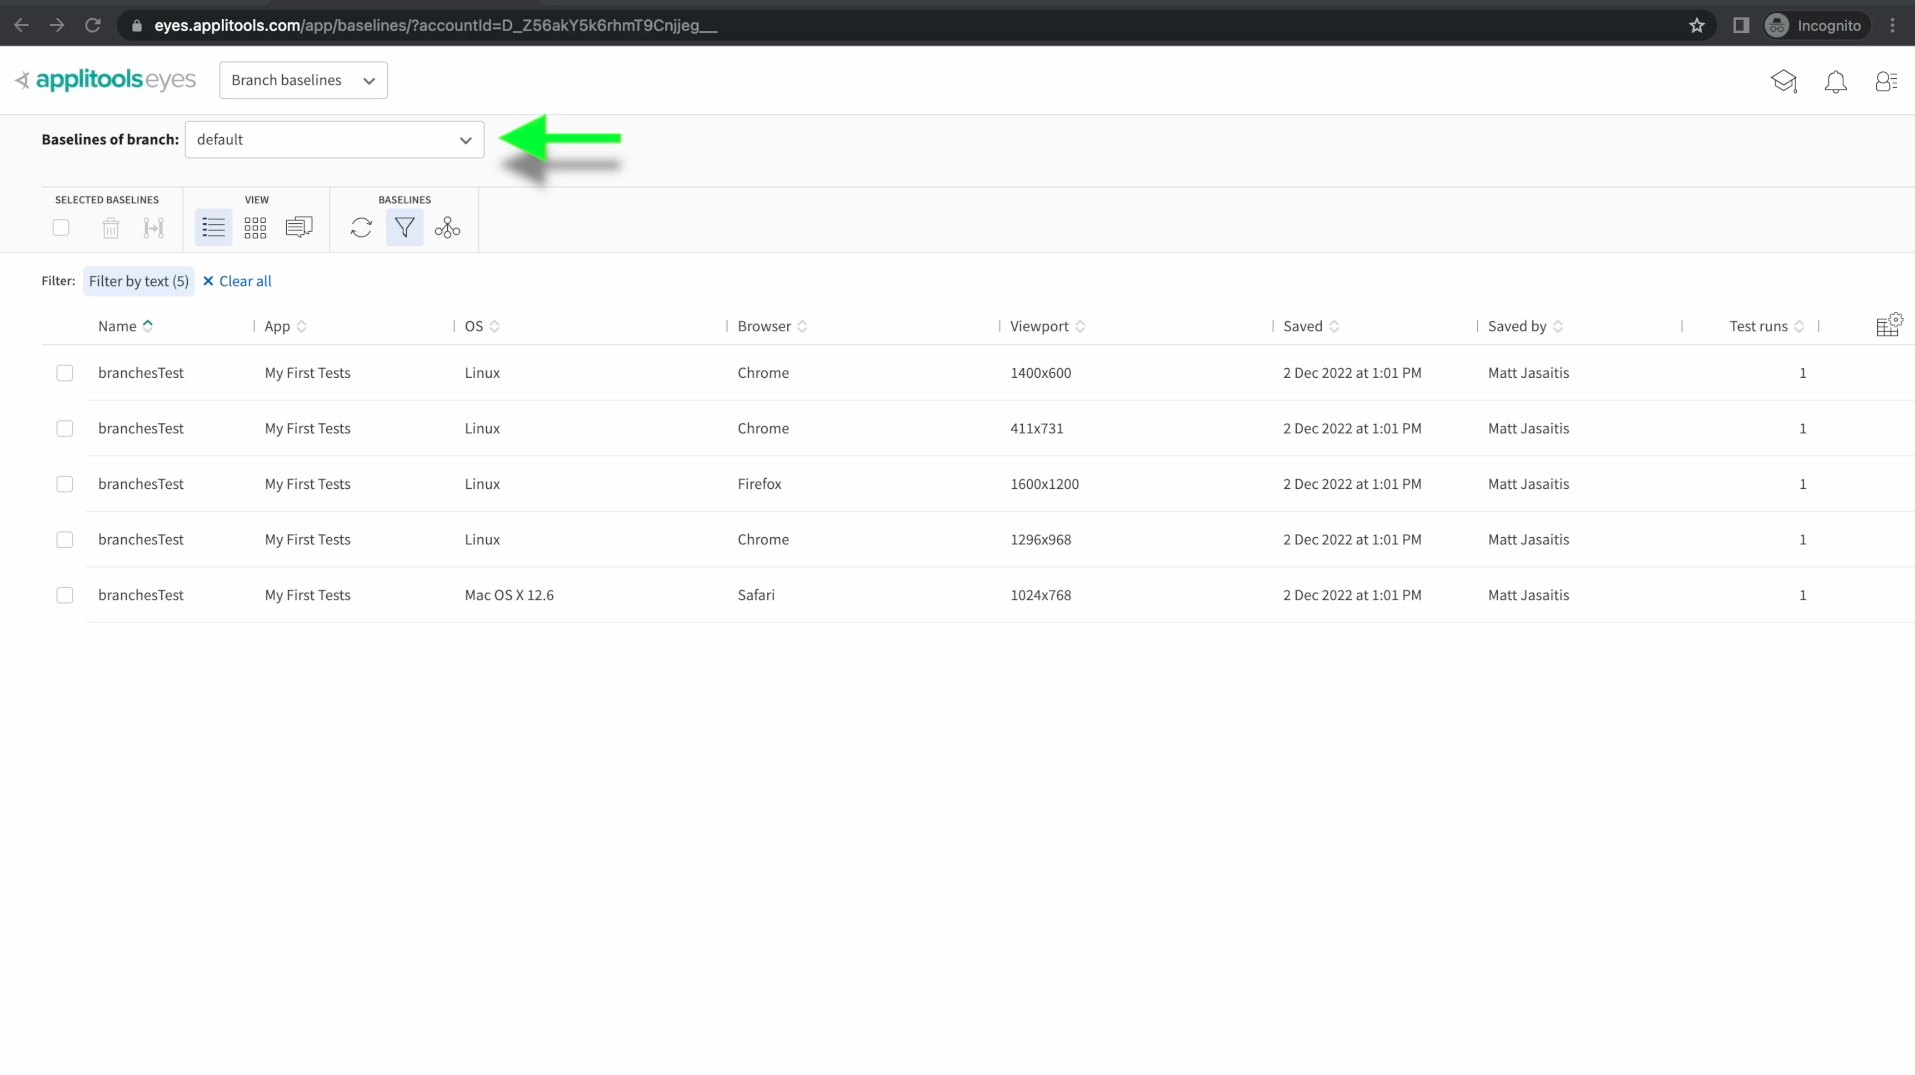
On the branch baselines screen, I've selected the default branch from the dropdown at the top. I've also added a filter that is searching for our test name: BranchesTest. We see that in the default branch, we have our baselines for this test. Our baselines were created in the default branch because we didn't specify a branch name when we first ran this test earlier in the chapter.
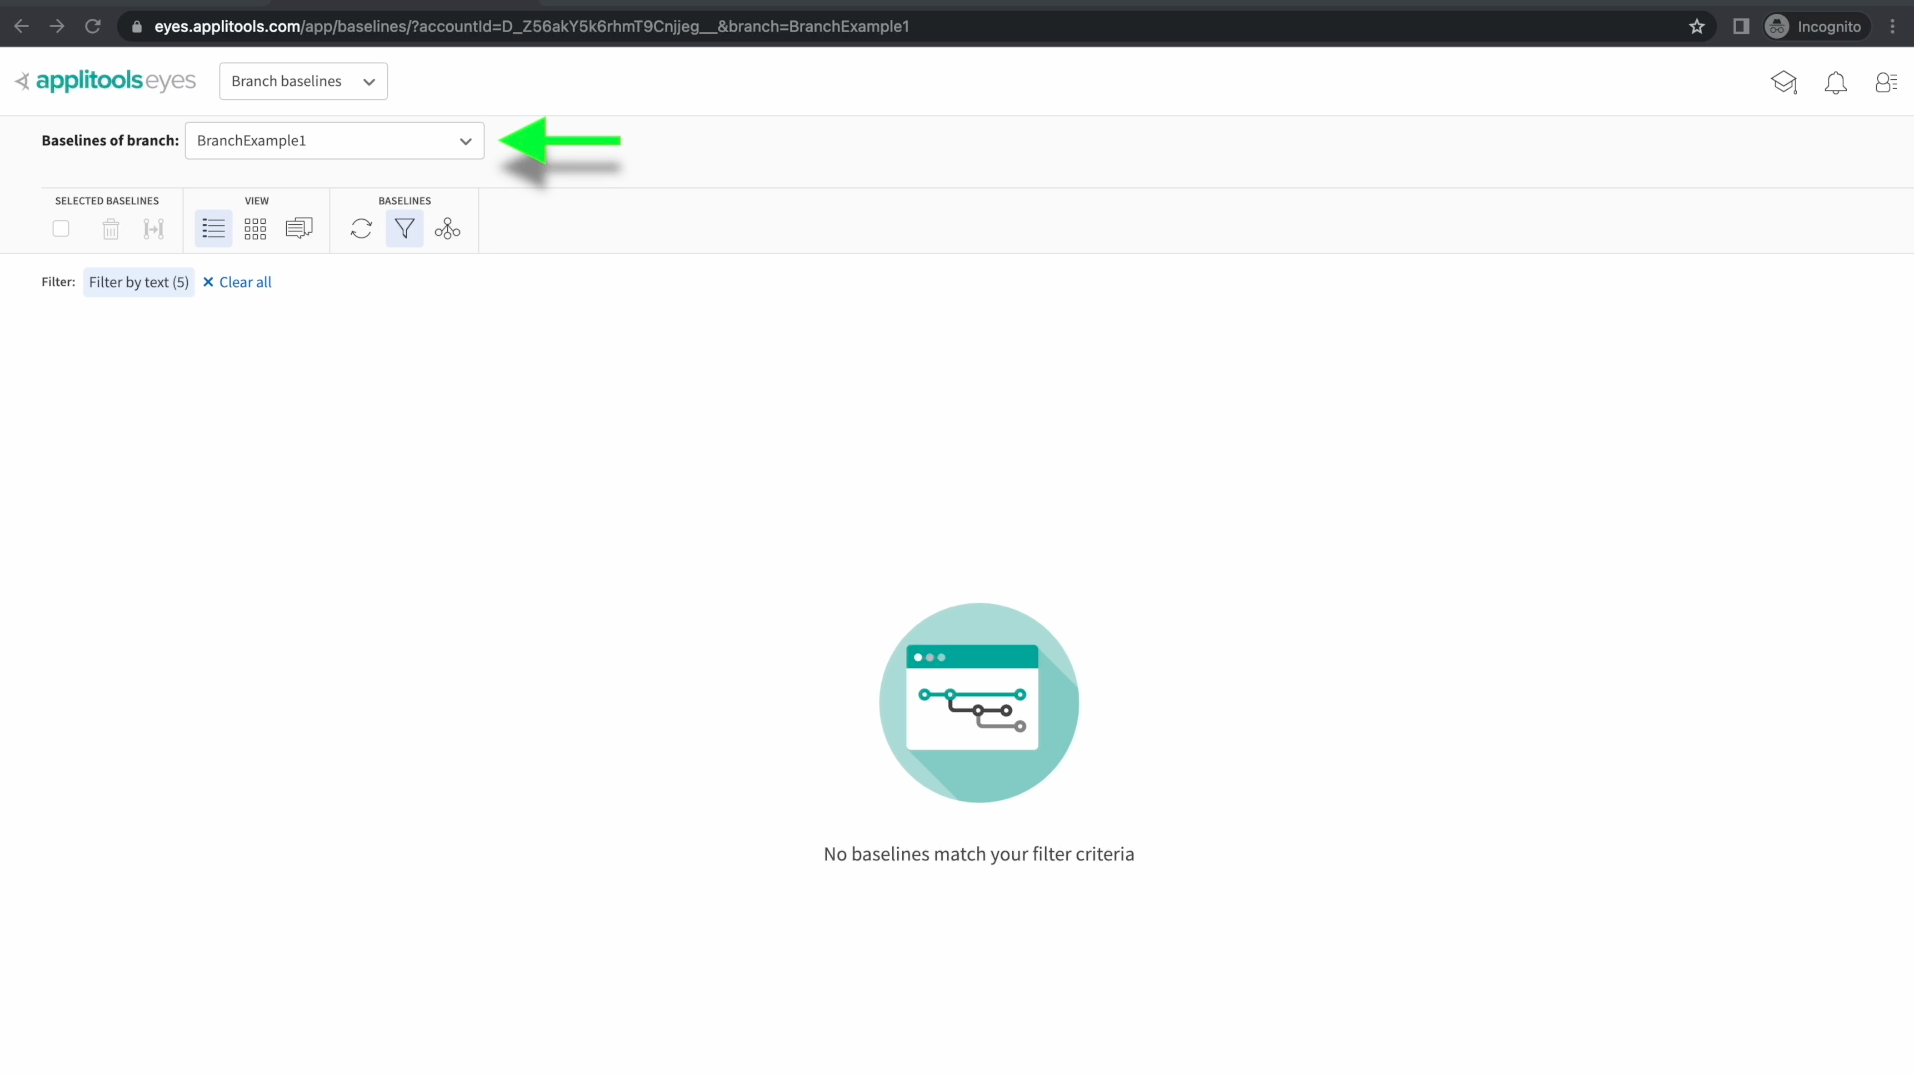
I've now selected our new branch, BranchExample1, from the dropdown at the top. As we can see, no baselines have been created on this branch so far.
To get baselines onto this branch, we need to perform one of the following options: copy baselines into this branch from another branch, make a change to a baseline when running tests on this branch or, create a new baseline that doesn't already exist in the default branch.
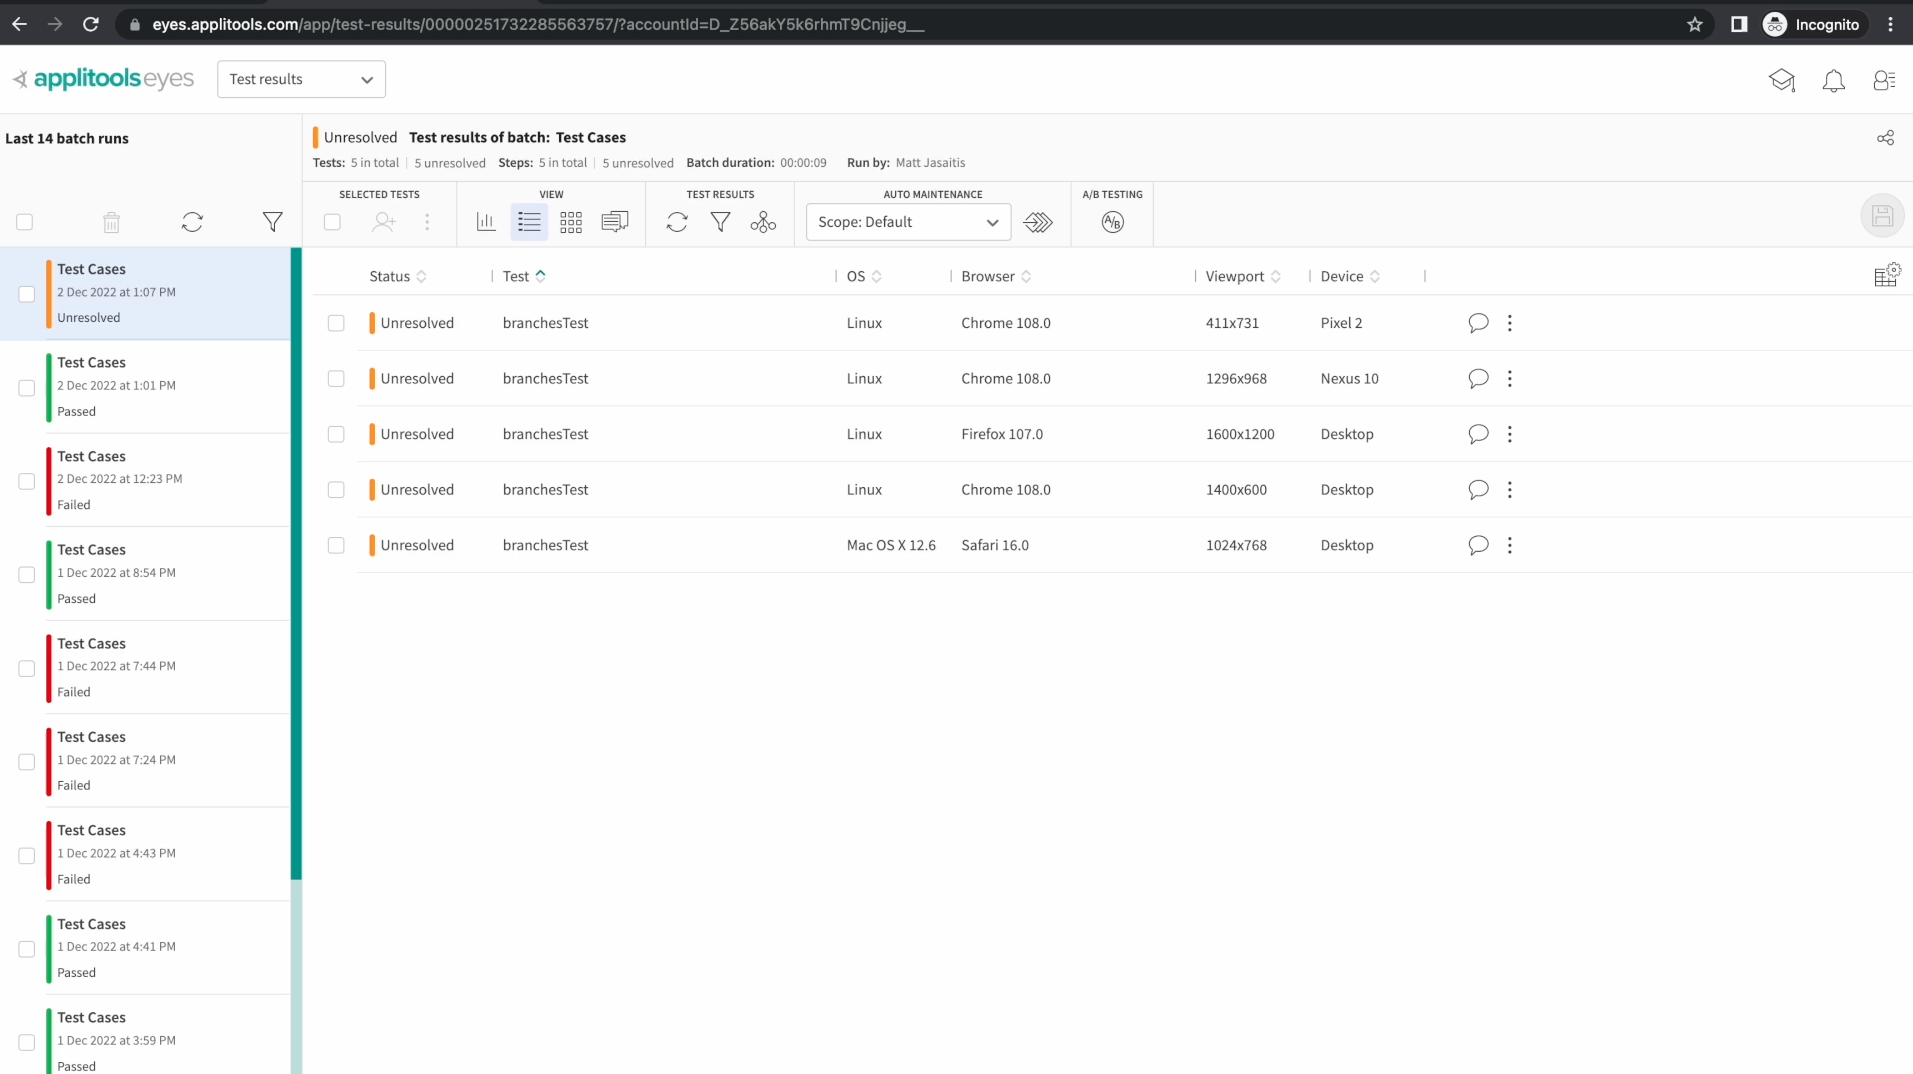
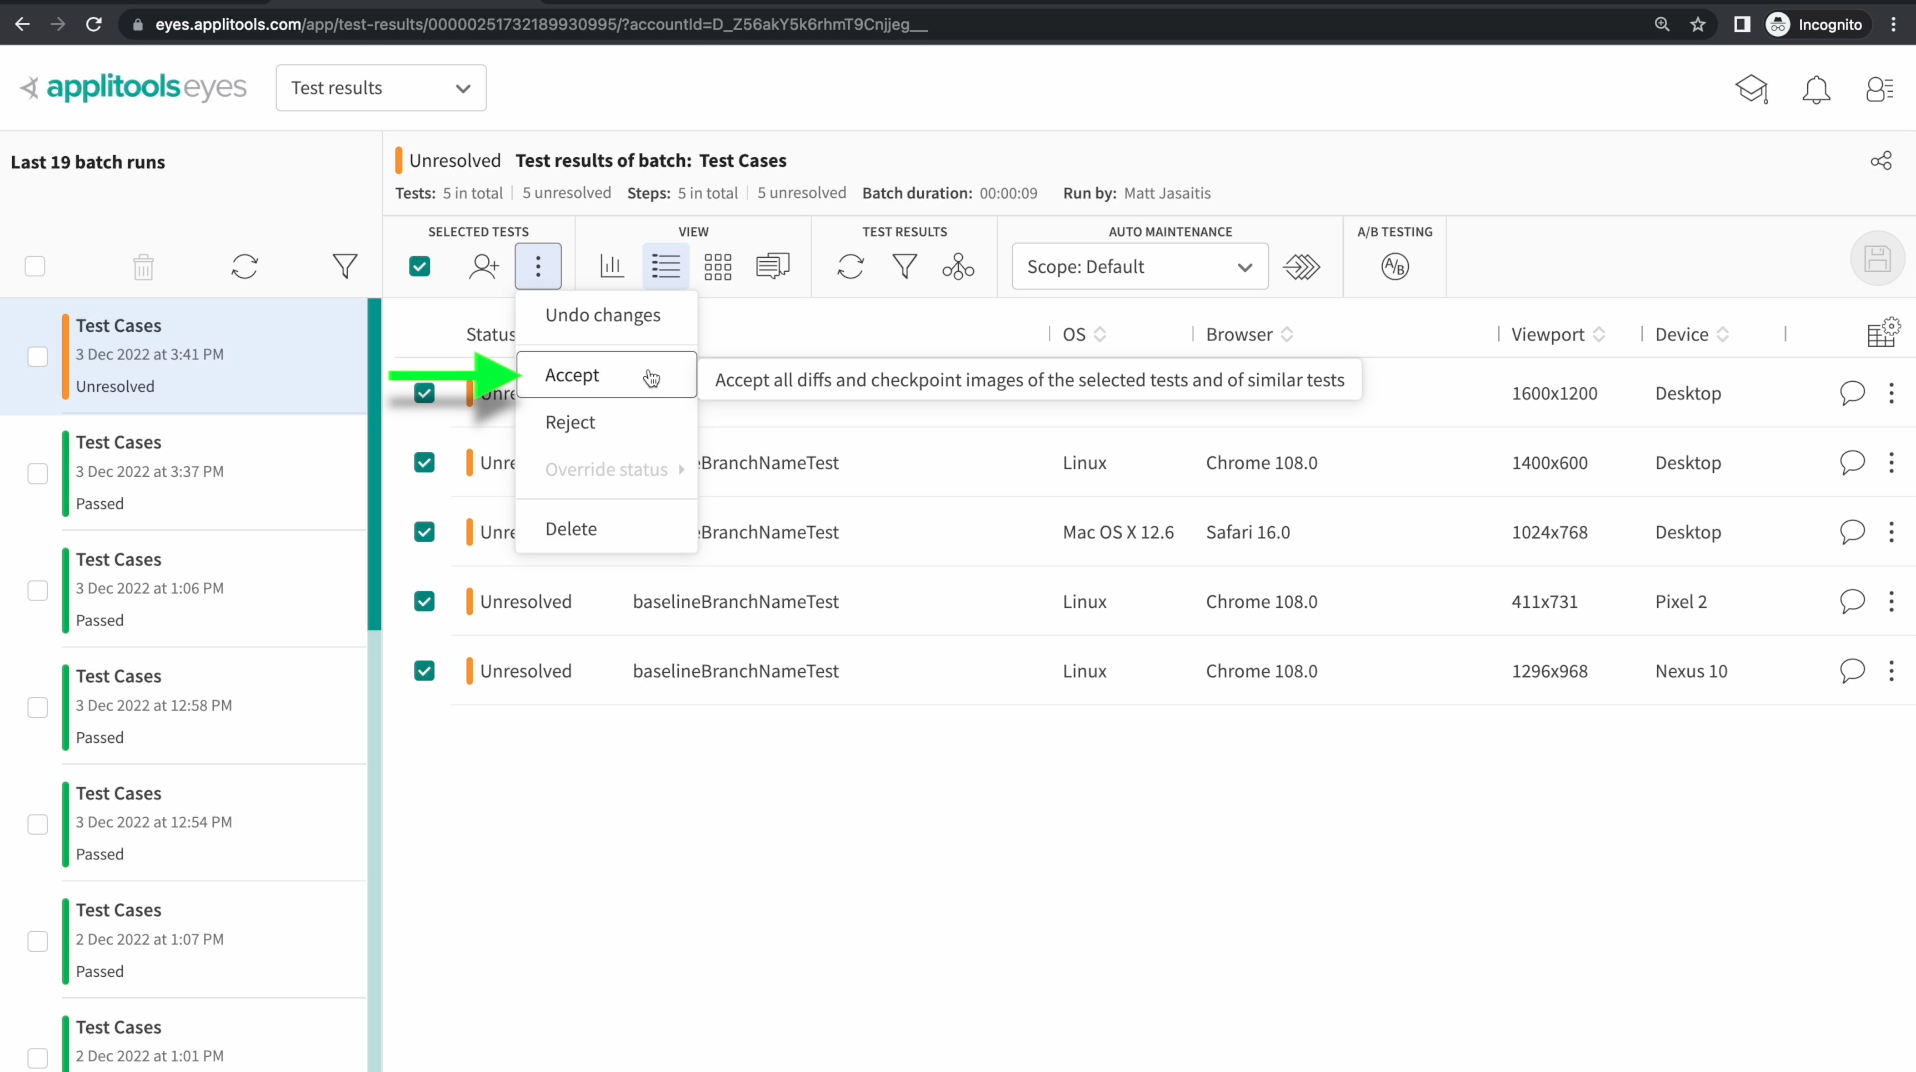
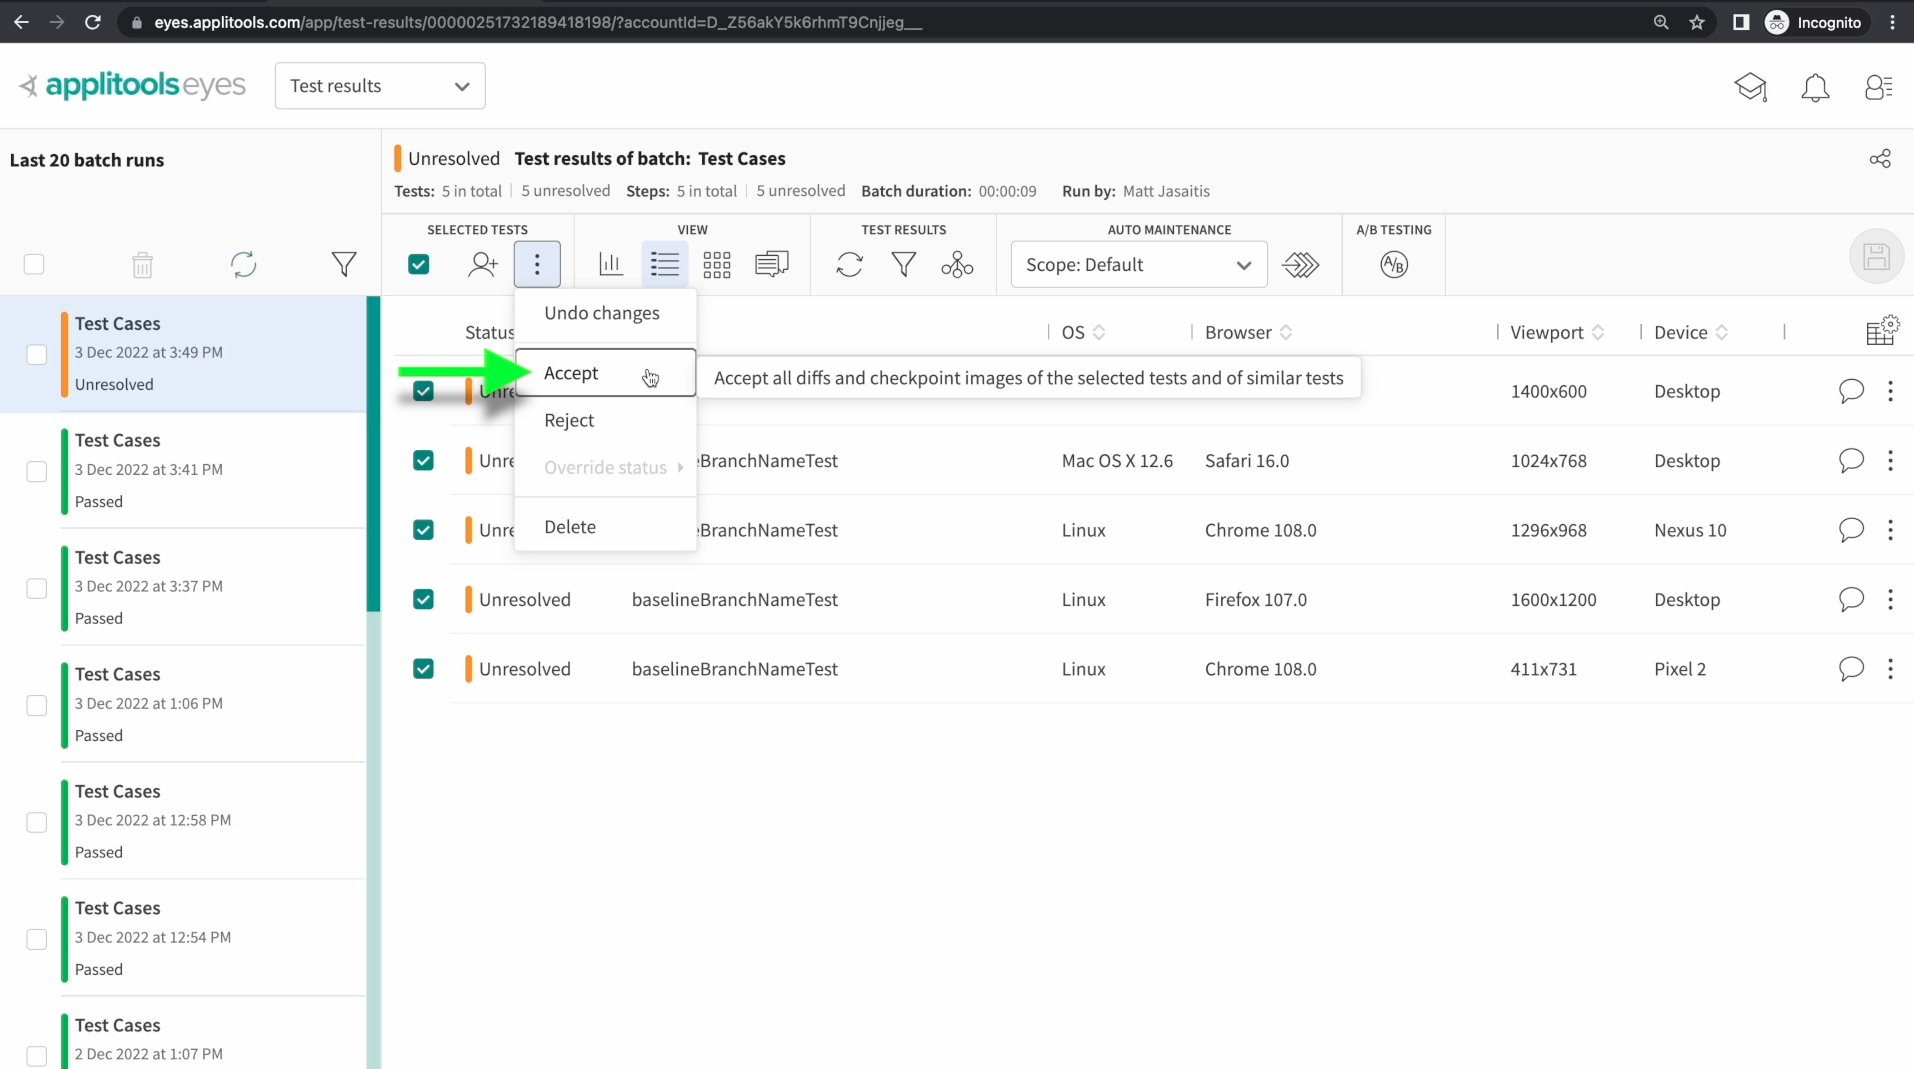
If we head back to the test result that we just ran on our new branch, we can see that these tests are marked as unresolved. One of the options for getting baselines into our branch is to make a change to a baseline that was run on this branch. So, let's go ahead and select all of these tests, accept the differences and then save.
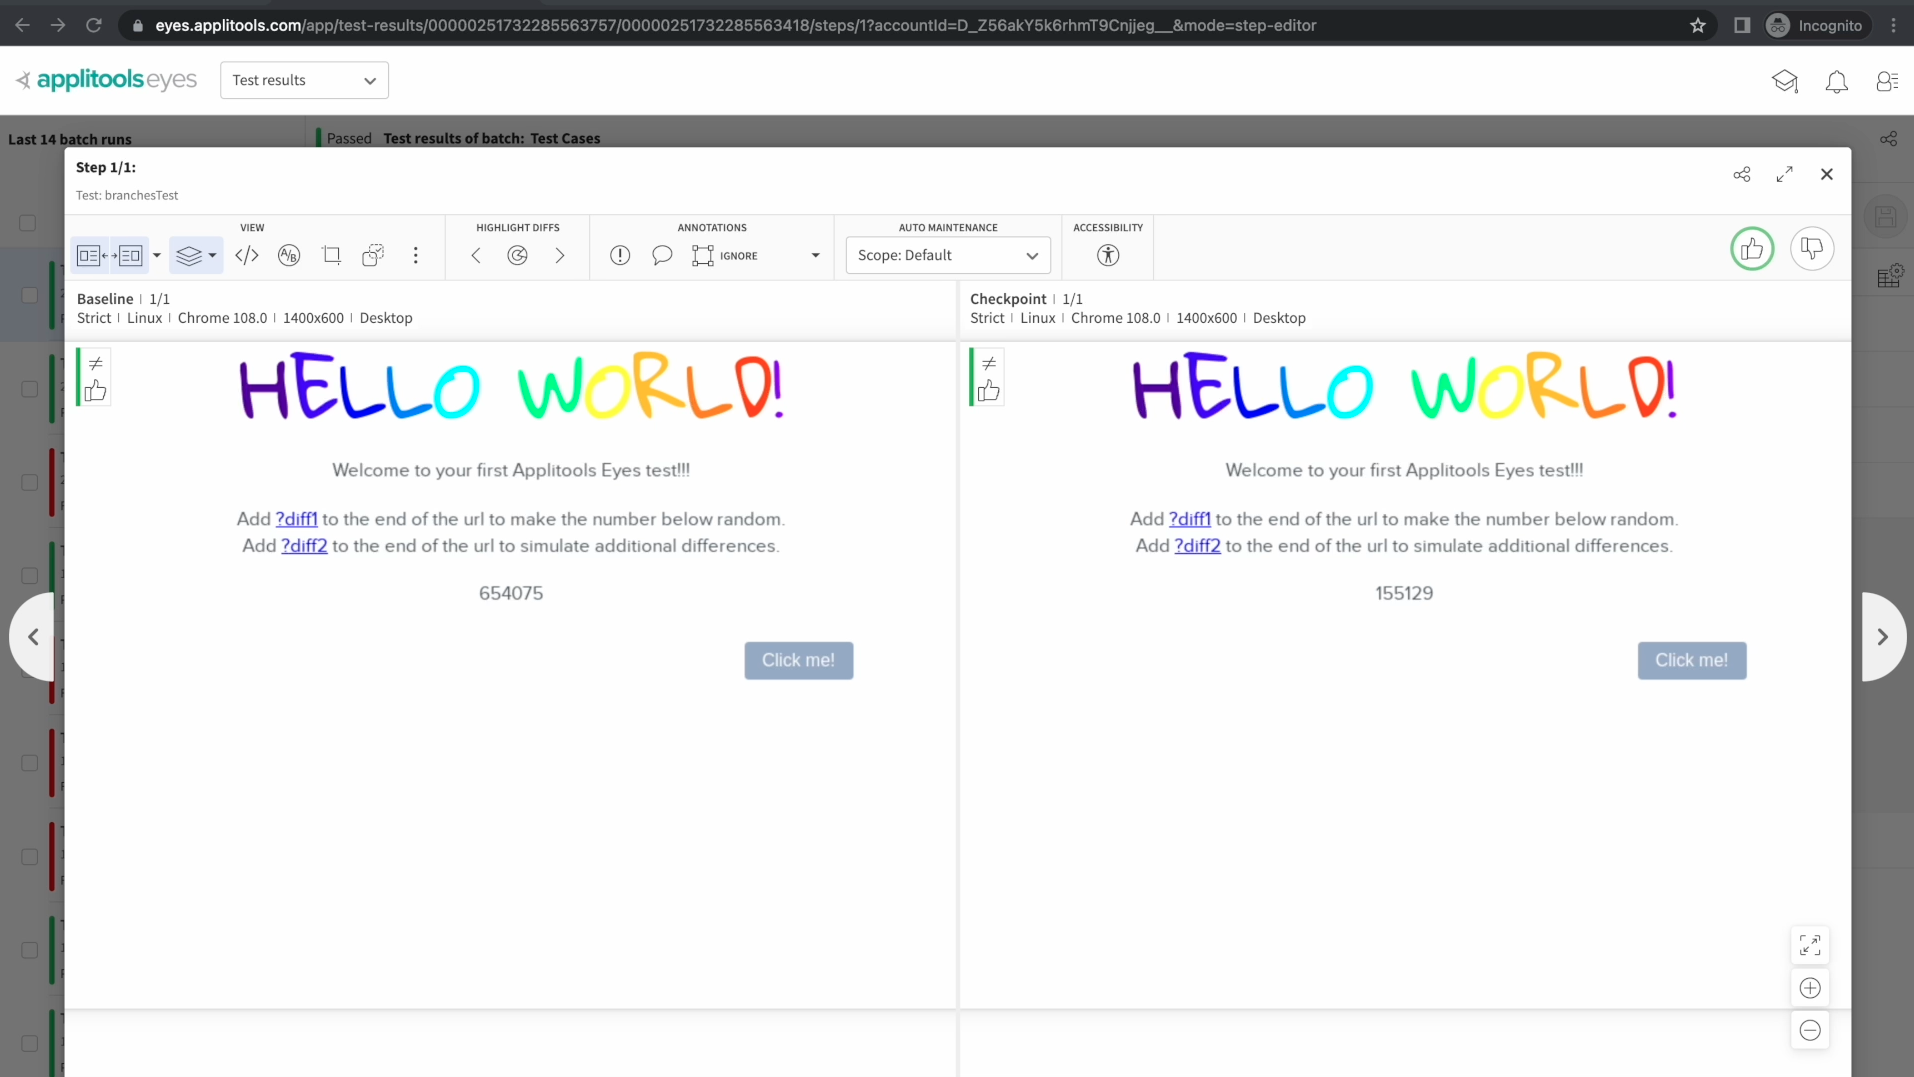
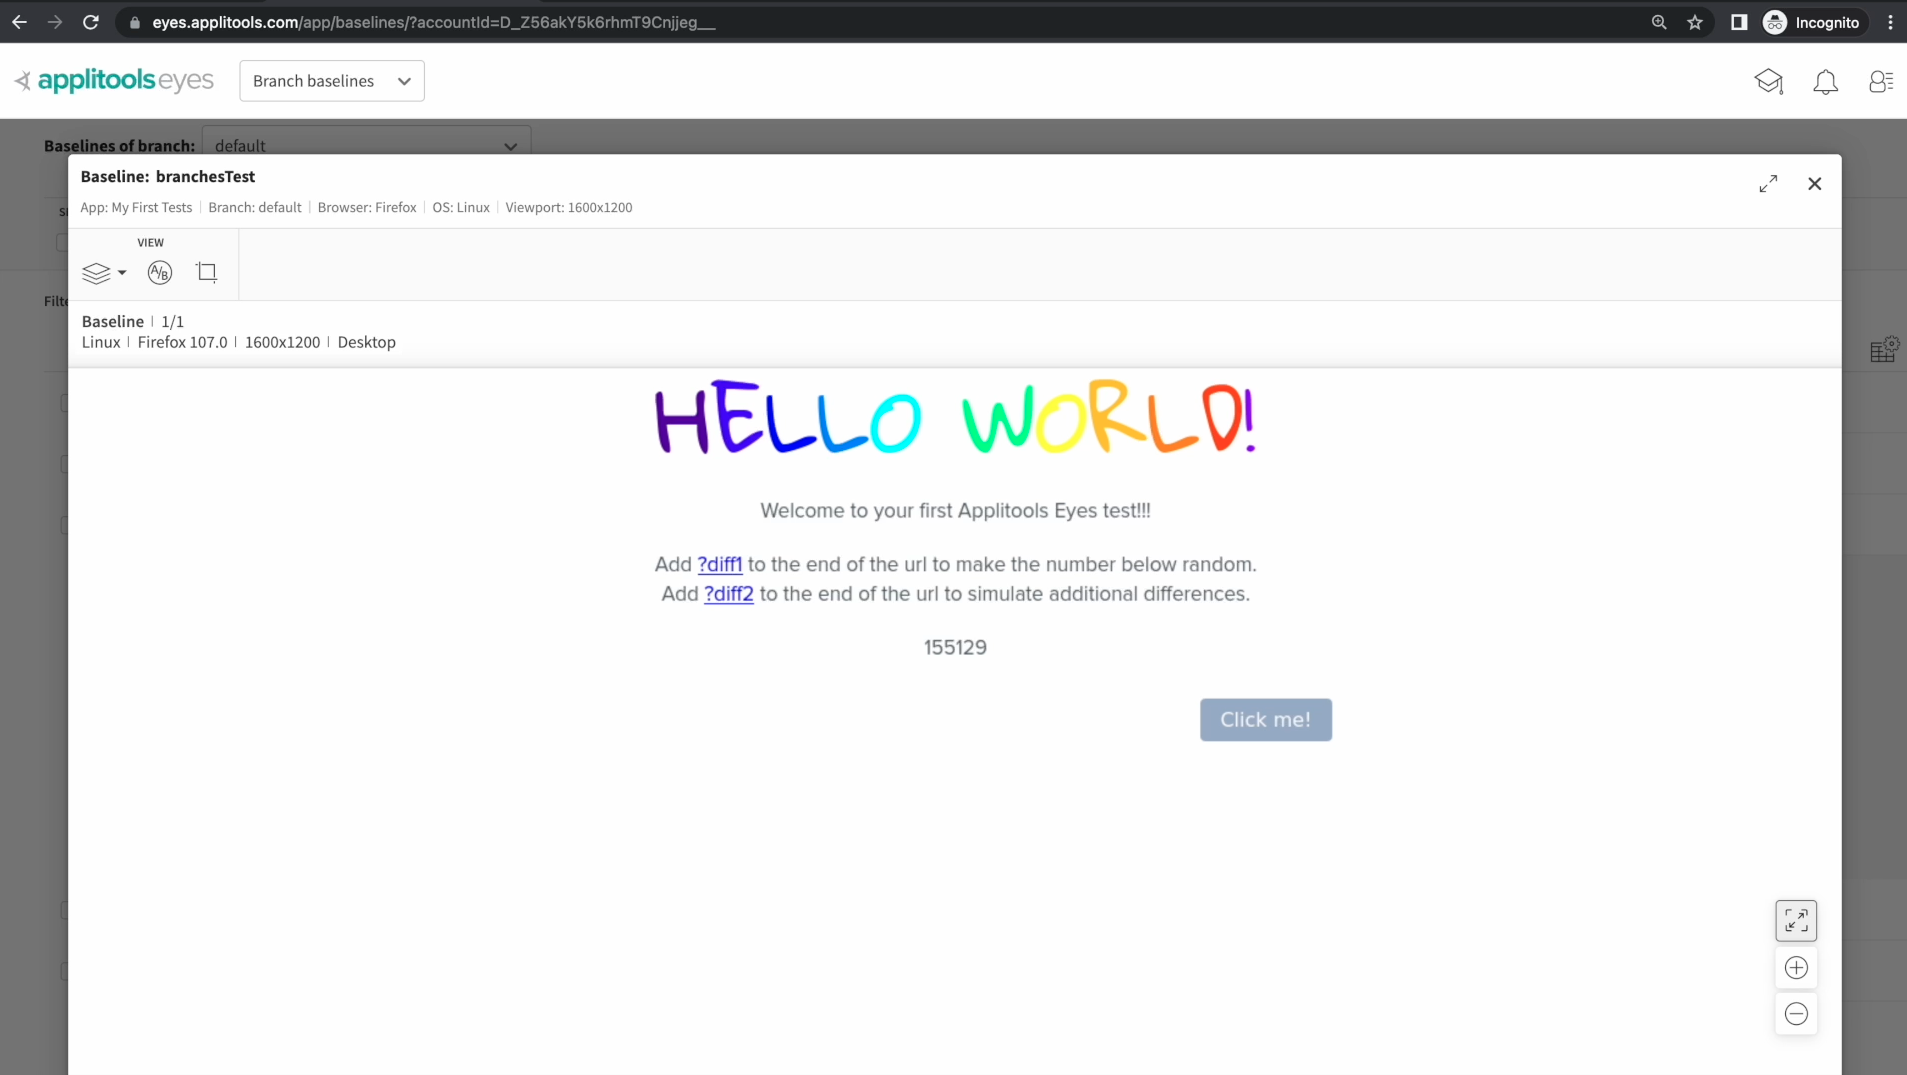
One quick thing before we head back to the branch baselines screen, take note of the numbers that are shown in the baseline image on the left. We have 654075. This is the baseline that lives in the default branch.
Back on the branch Baselines screen, If we check out our feature branch, we see that we now have baselines within this branch. This is because we made an update to our baseline when we accepted the differences and then saved. The update we made is only reflected in this branch just like any code changes that you make with Git are only reflected in the branch that you're currently working in.
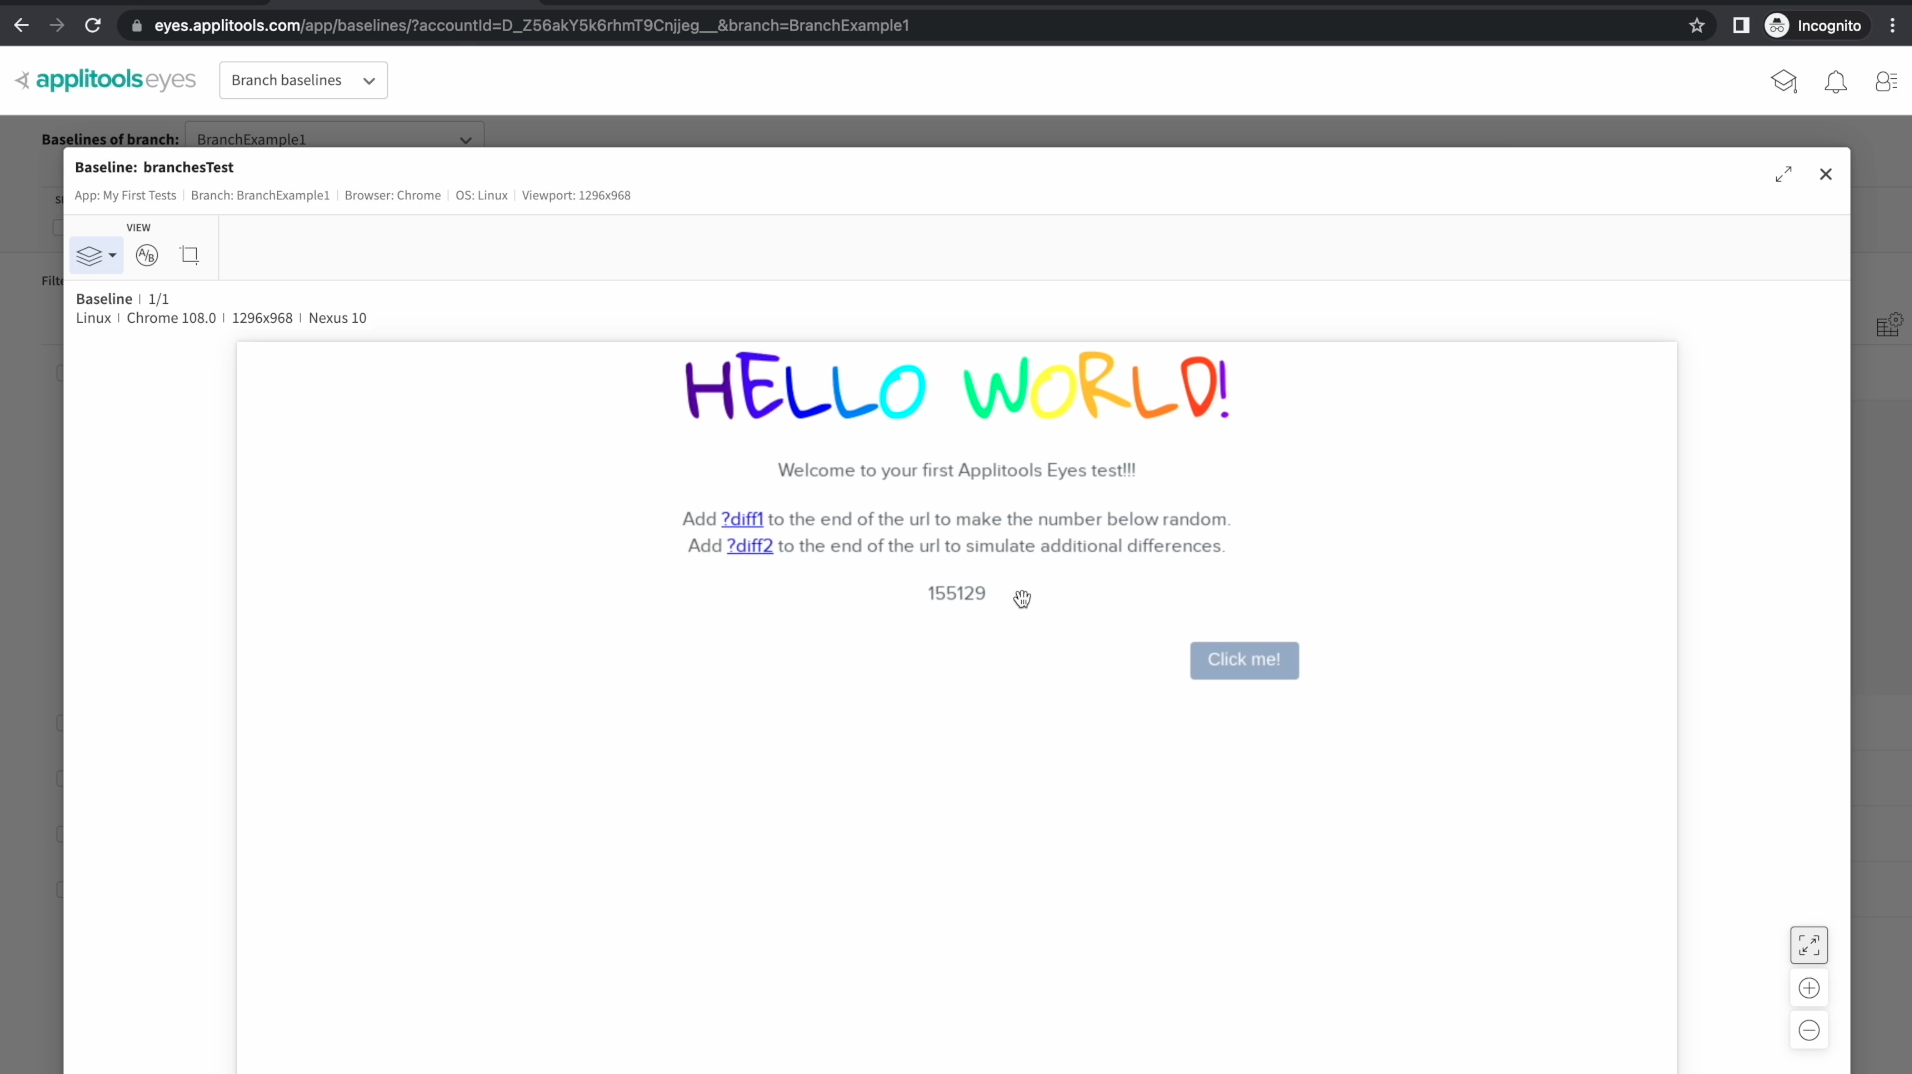
If we click on one of the baselines here followed by the thumbnail, we see that this image has the updated baseline with the new numbers: 155129
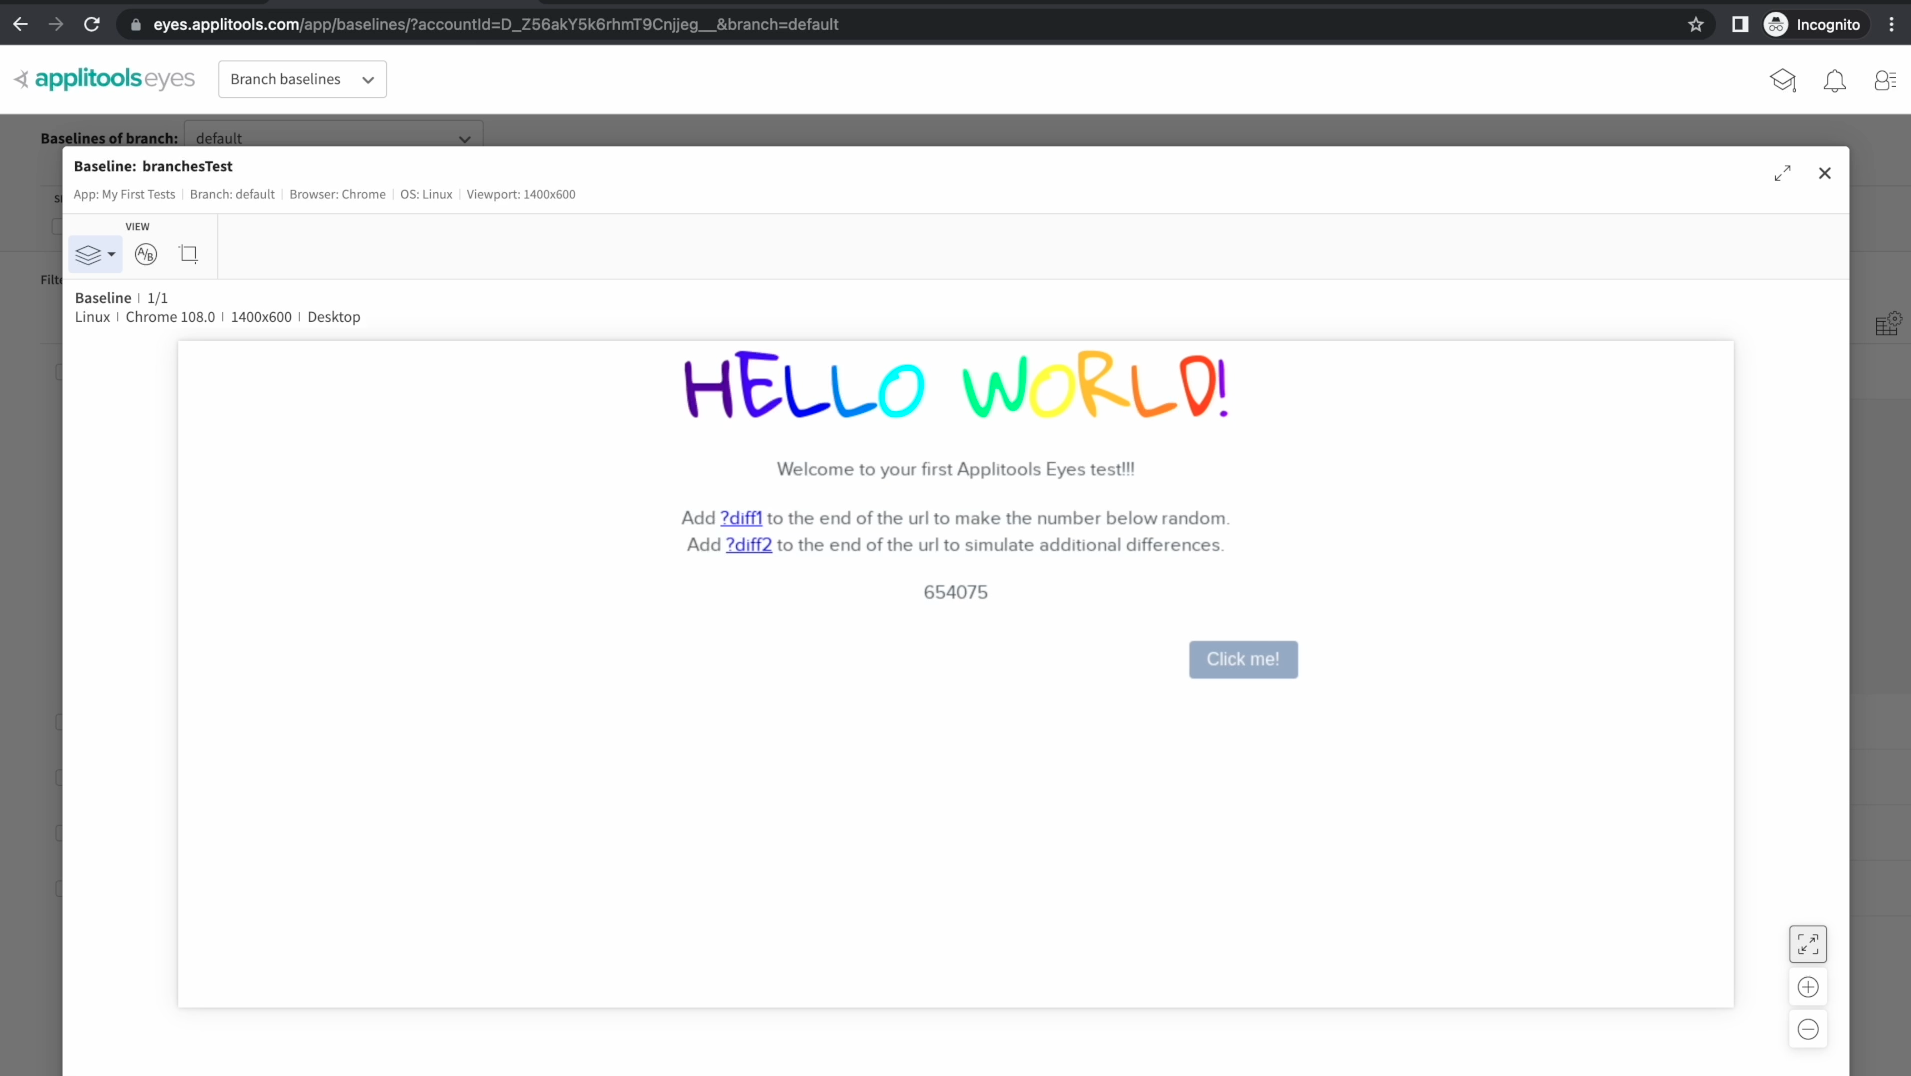
If we perform that same exercise on our default branch, we see that the numbers are still the same as before, 654075. This shows us that the update we made has only occurred within our new branch and hasn't affected our default branch. In order to update the baseline in our default branch with the changes that we saved, we need to merge our new branch into our default branch.
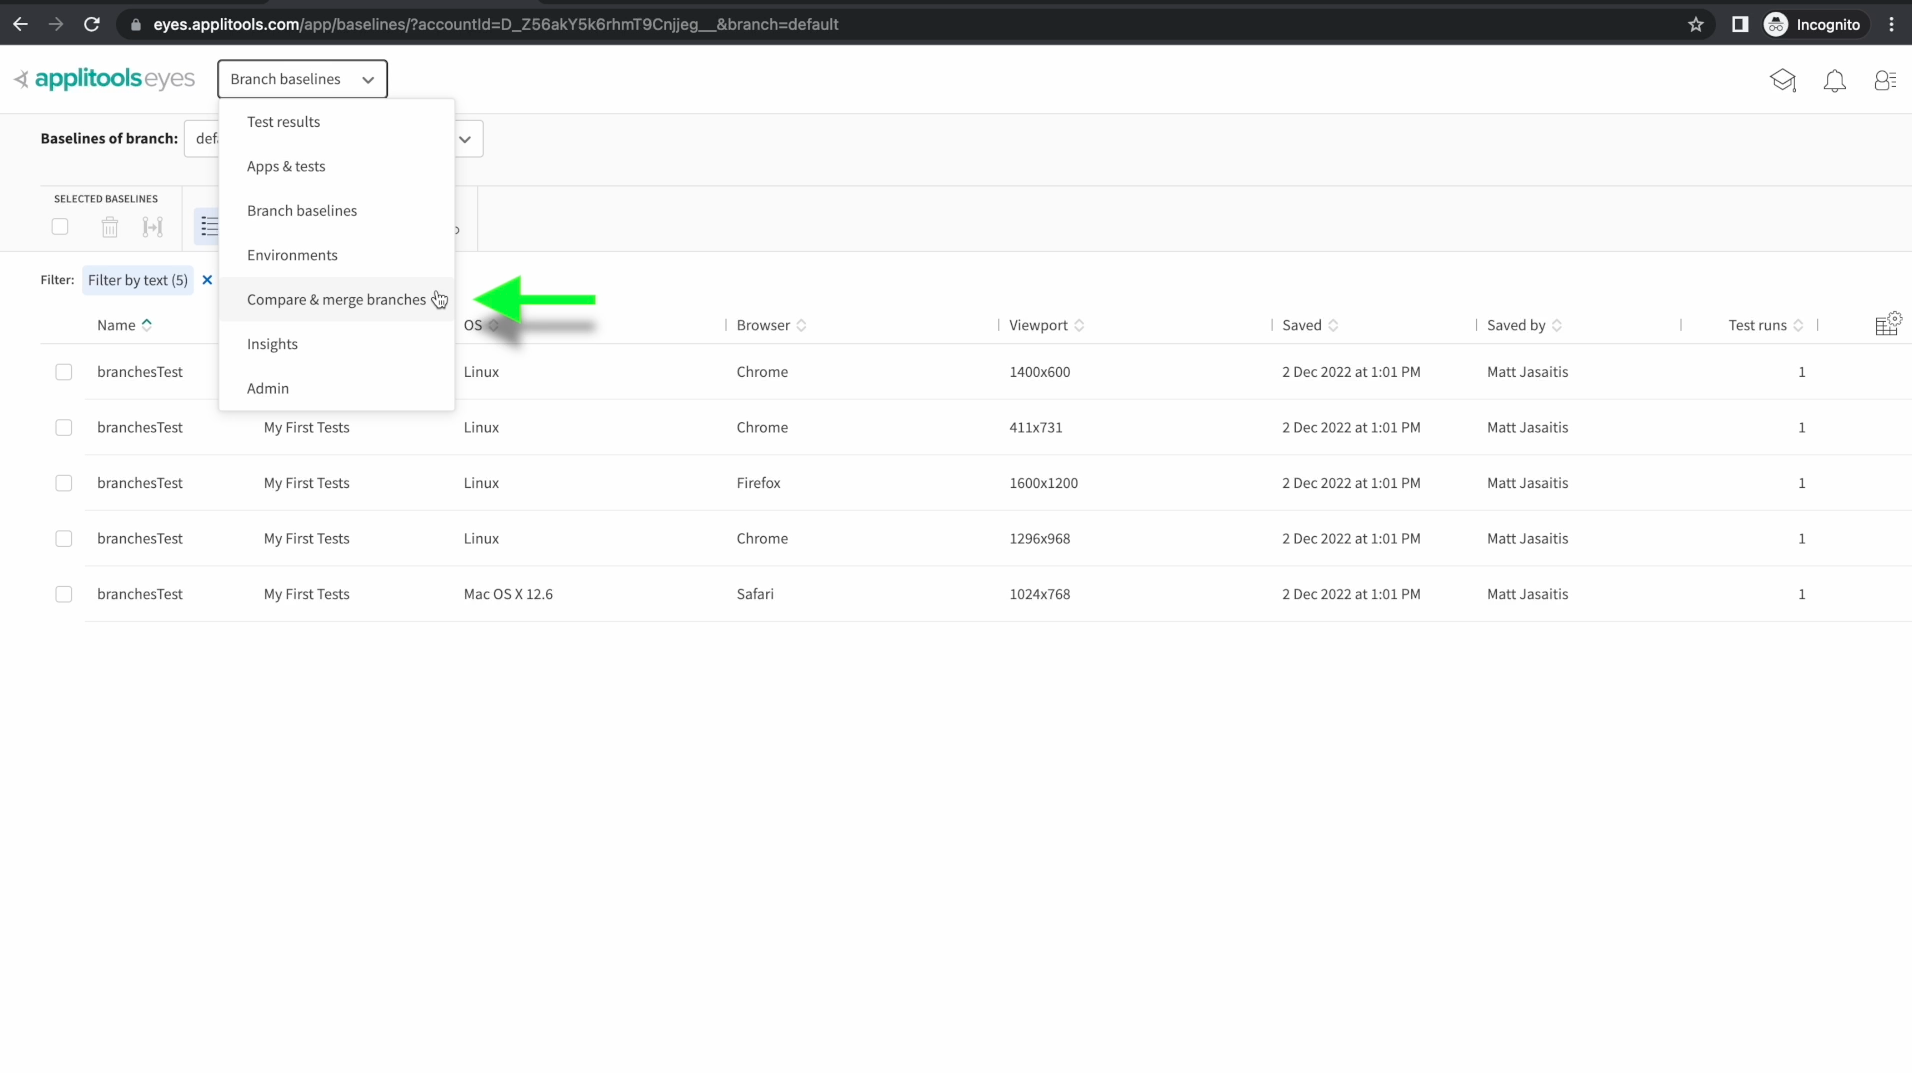
To perform this merge, select the compare and merge branches option from the dropdown at the top of your dashboard.
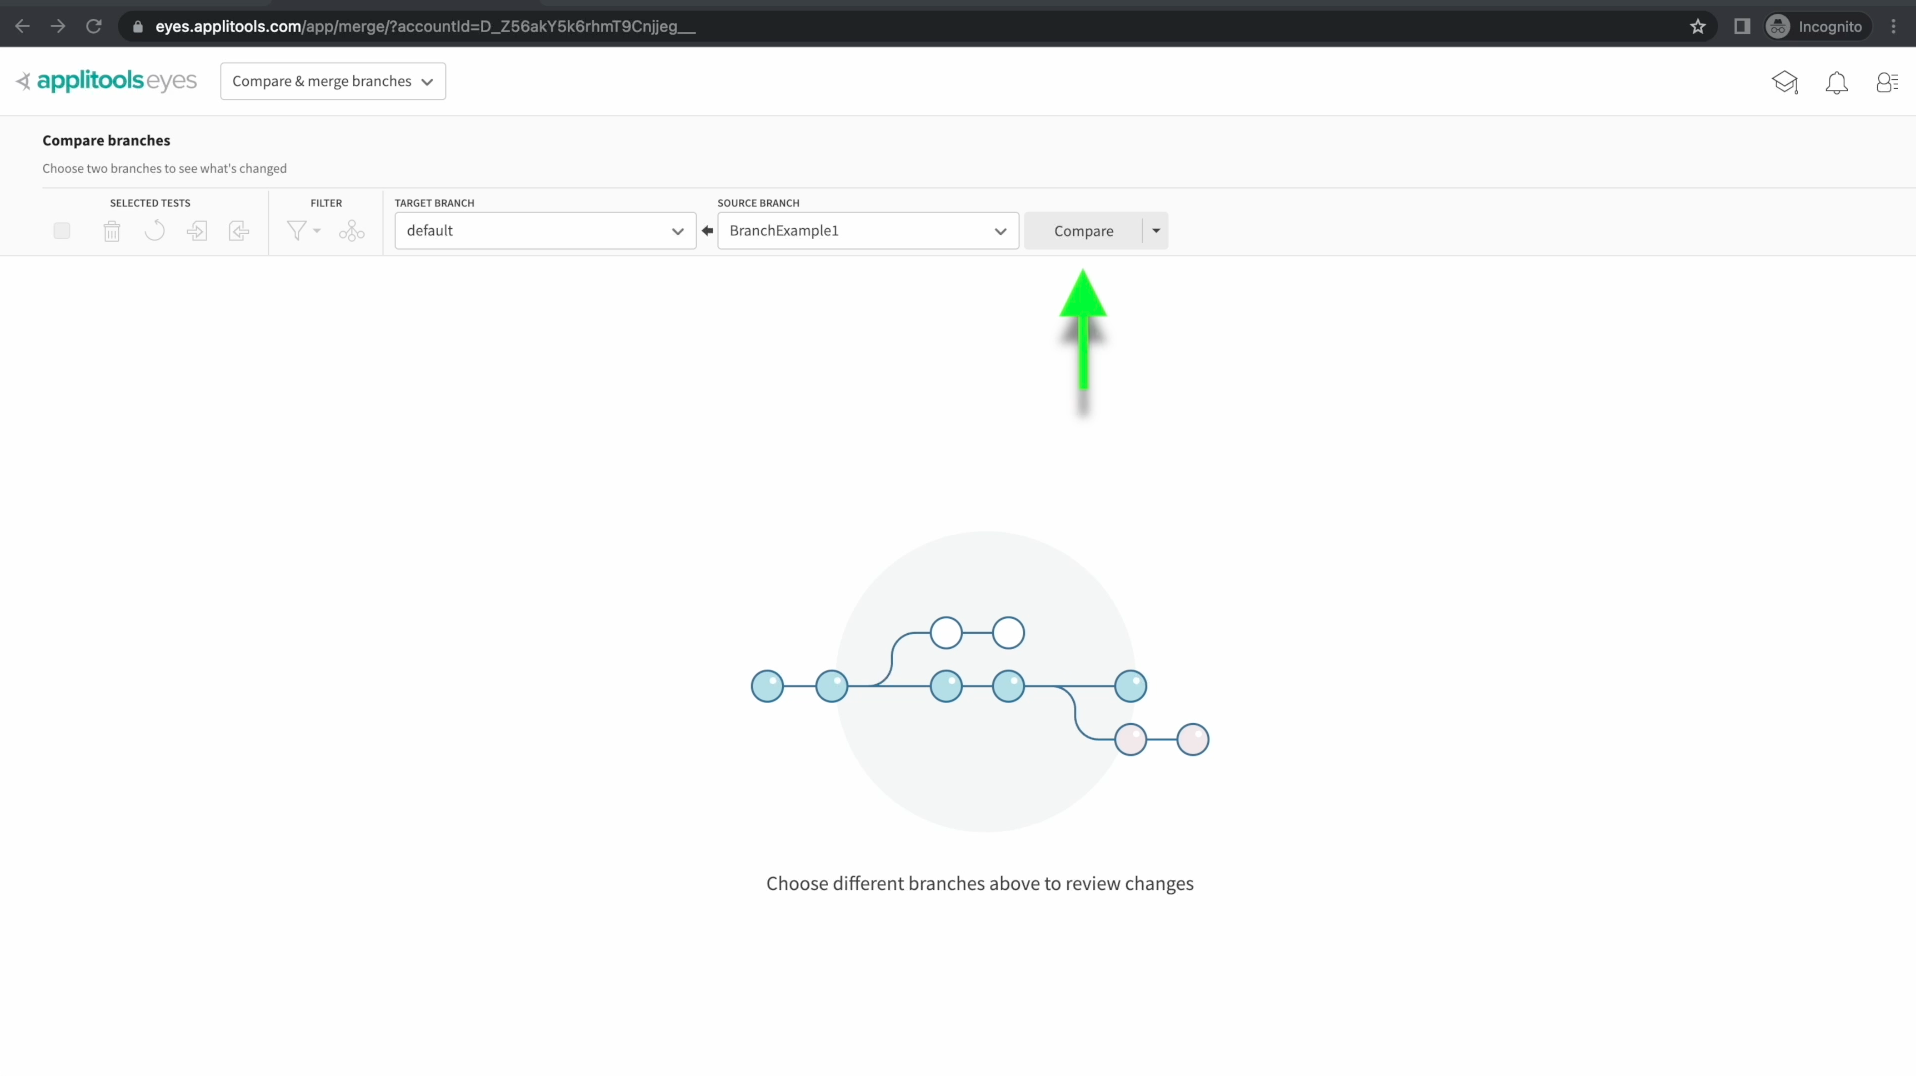
On this screen, I've set default as the target branch and our new branch that we just created as the source branch. After selecting these options, click the Compare button.
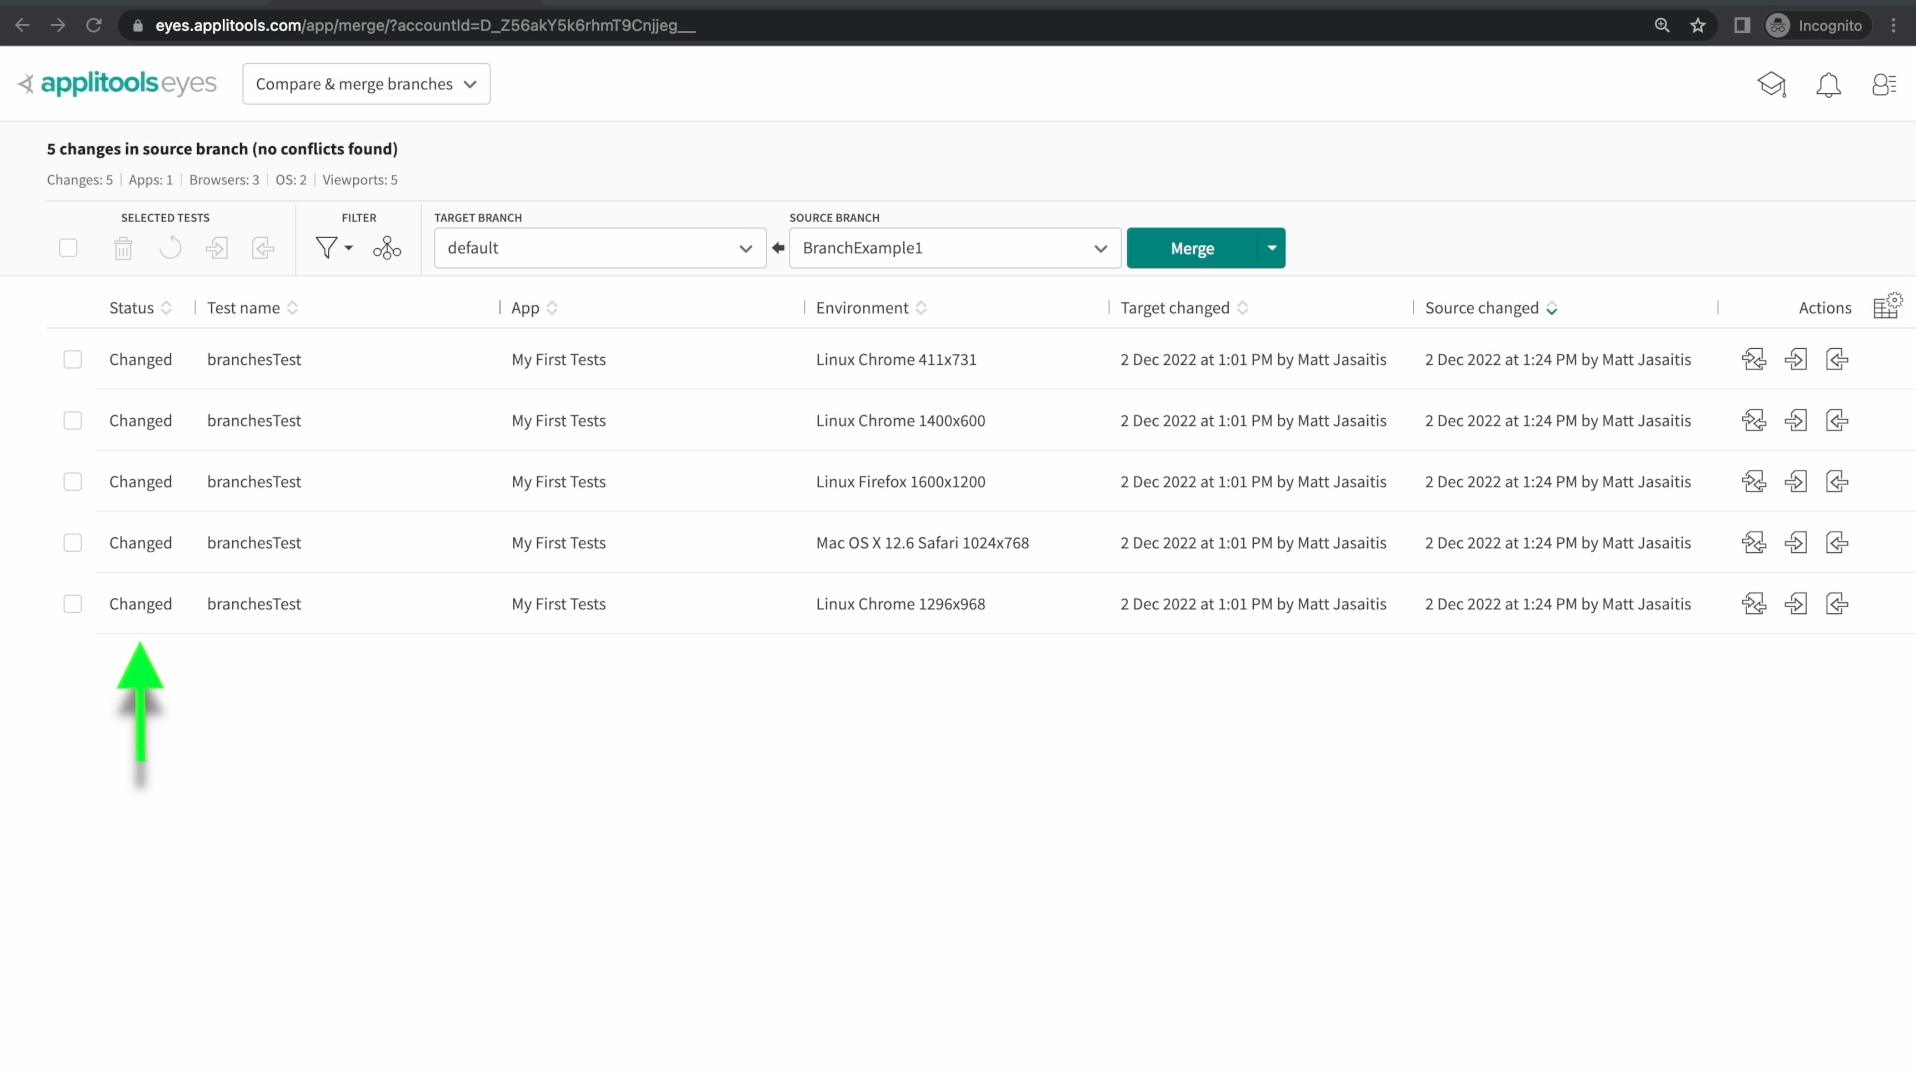
When we compare these two branches, we're shown that we have some baselines that have changed. You can tell by checking the status column on the left side of our screen.

On the right side of the screen, we have some action options. The first action allows us to compare the baselines between our target branch and our source branch. Go ahead and click on one of these buttons.

Clicking on that first button in the actions column takes us to the compare baselines screen which runs a visual comparison between the two images in our branches. As we can see, all that's changed is the string of numbers in the middle. This screen helps us understand exactly what has changed between our two branches before we merge them together.
After comparing our images, we can then decide if we want to include the change or ignore the change. The button to the right of the compare button will ignore the change and the button furthest to the right will include the change. By default, if no option is selected, all changes will be included.
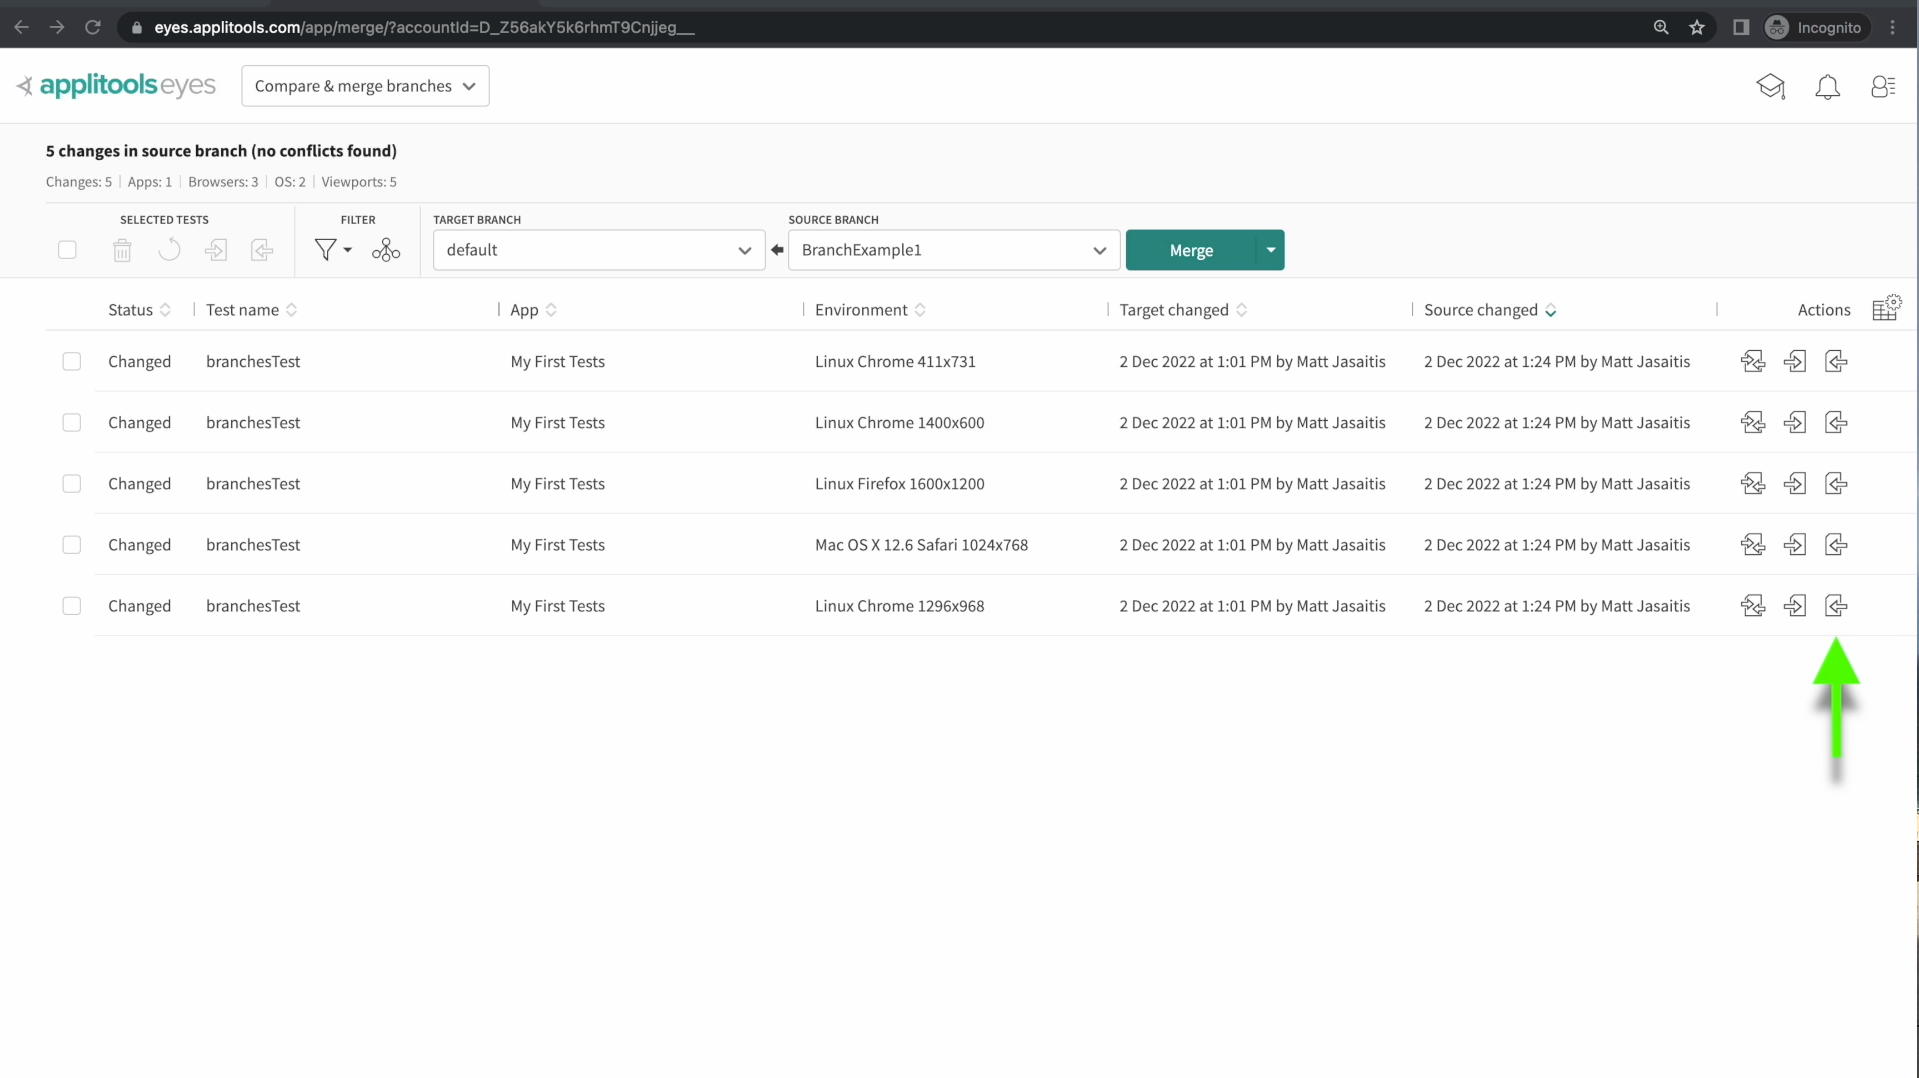
After you've reviewed your changes, feel free to click the merge button.
After merging, let's once again check our baseline image in our default branch. As we can see, the baseline within our default branch has indeed been updated and it shows the numbers string from the baseline in our other branch that we just merged in. Going forward, we will now be comparing to this updated image when running on the default branch.
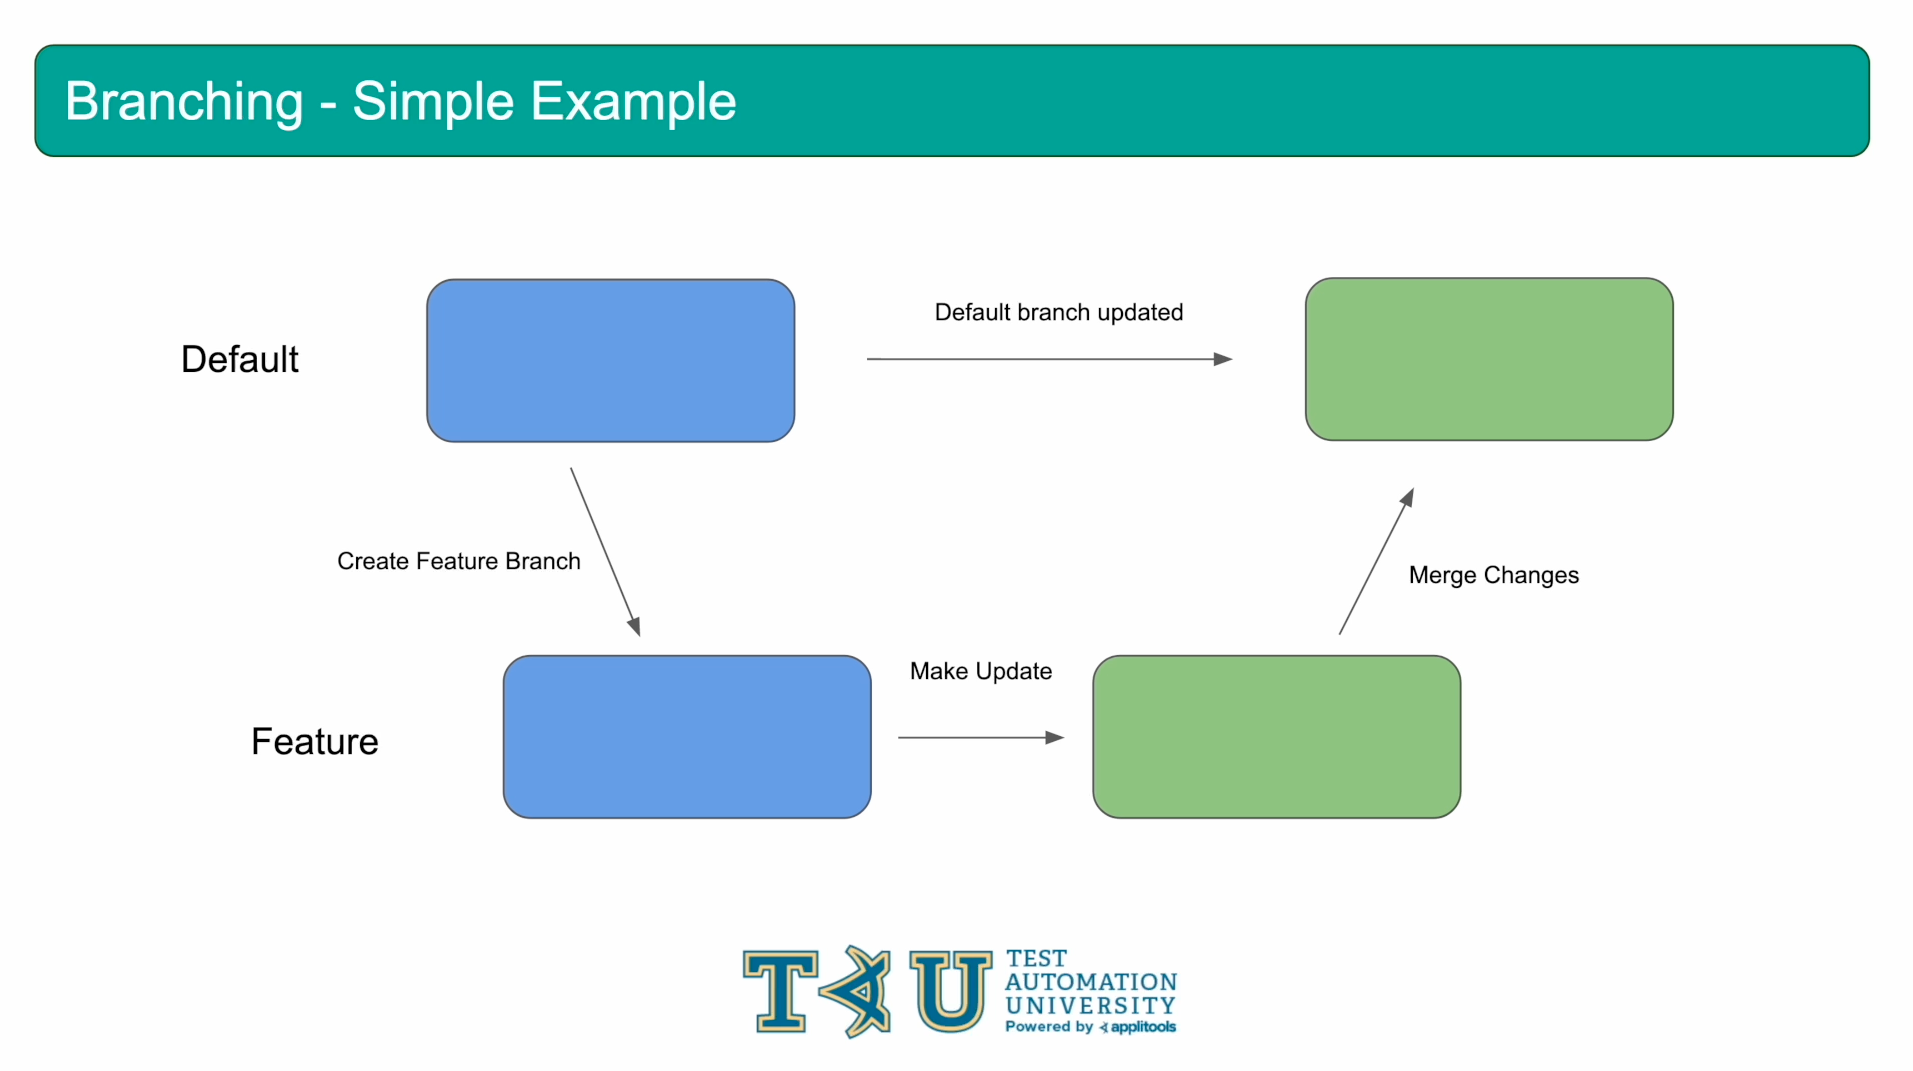
Before moving on, let's visualize the example that we just performed. We started off by creating a baseline in the default branch, as shown here. We then created a feature branch and updated that baseline on the feature branch. We then merged our feature branch into our default branch overwriting the original baseline on the default branch.
This is a very simple example to get our feet wet with Branching. Let's run through one more example that will be a bit more complicated.
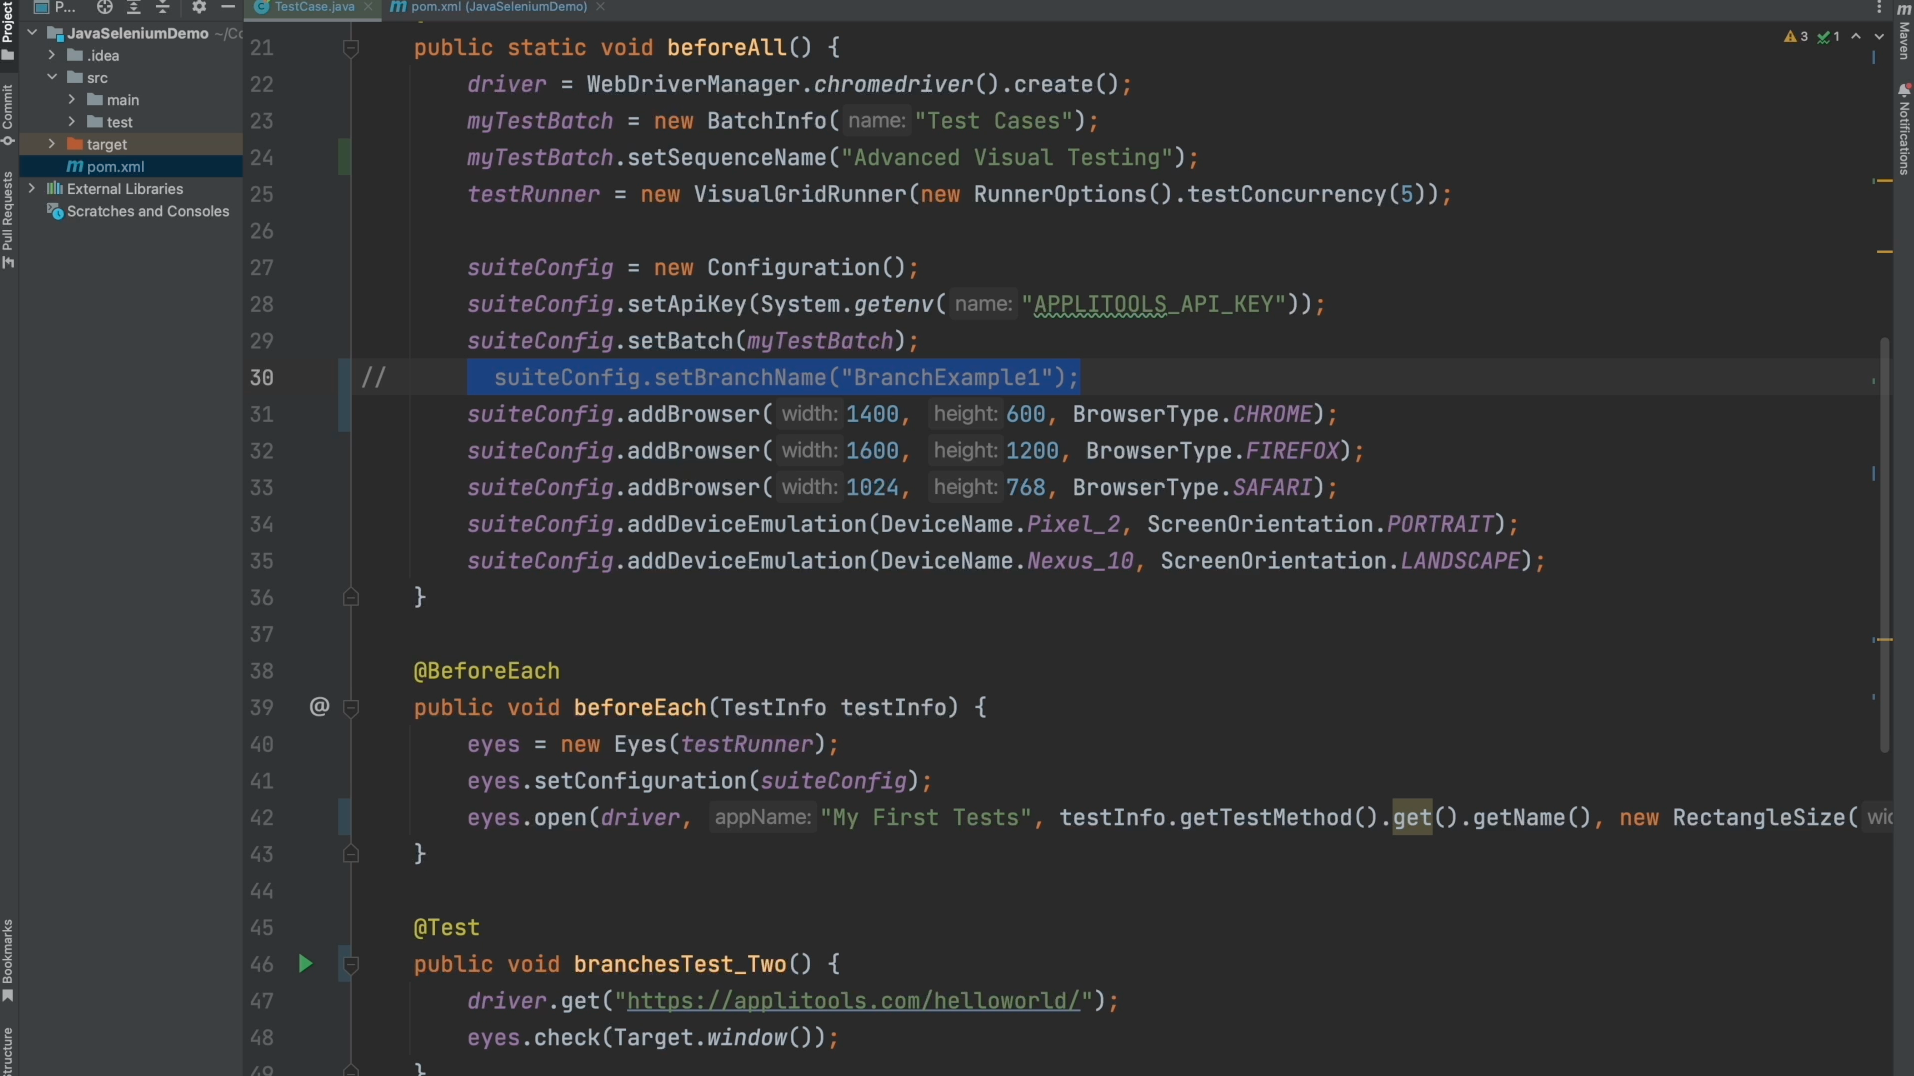
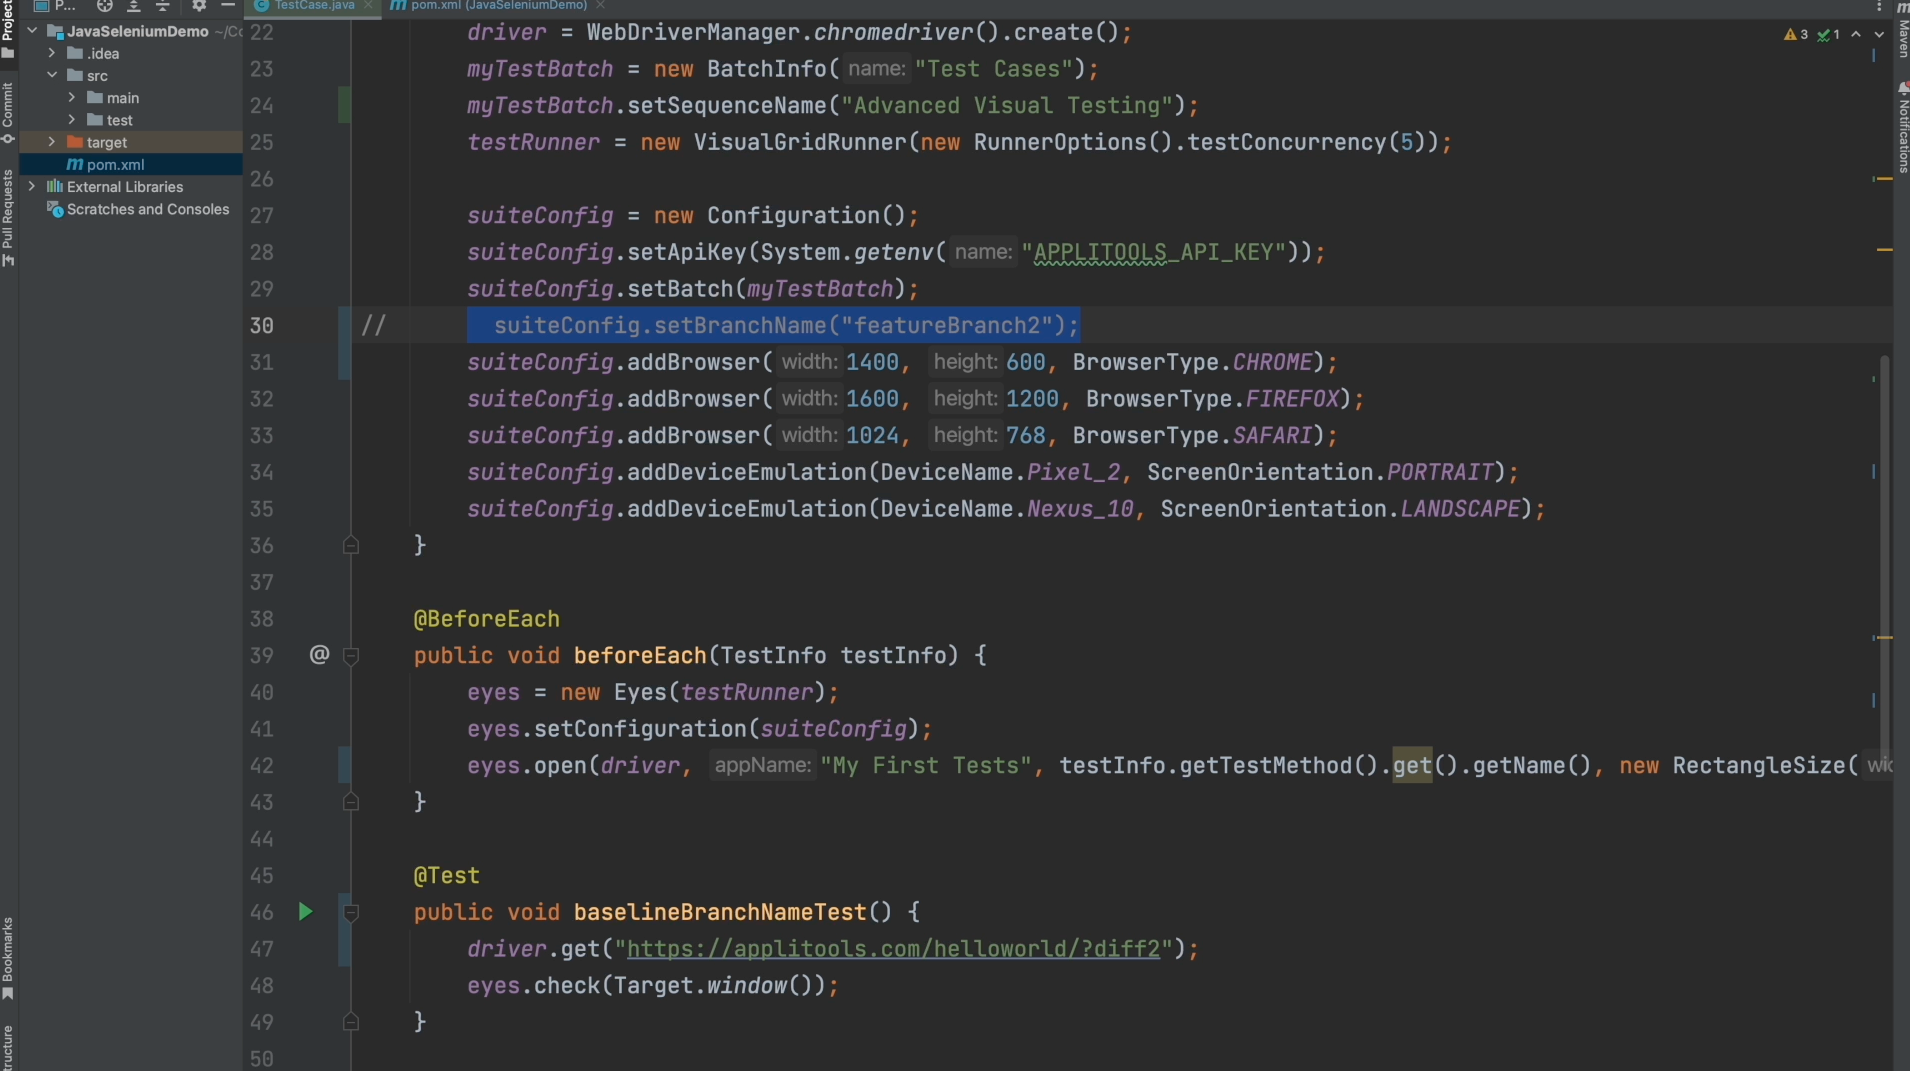
I've made some quick changes to our code starting with commenting out the branch name configuration for now as I want to run this test on the default branch.
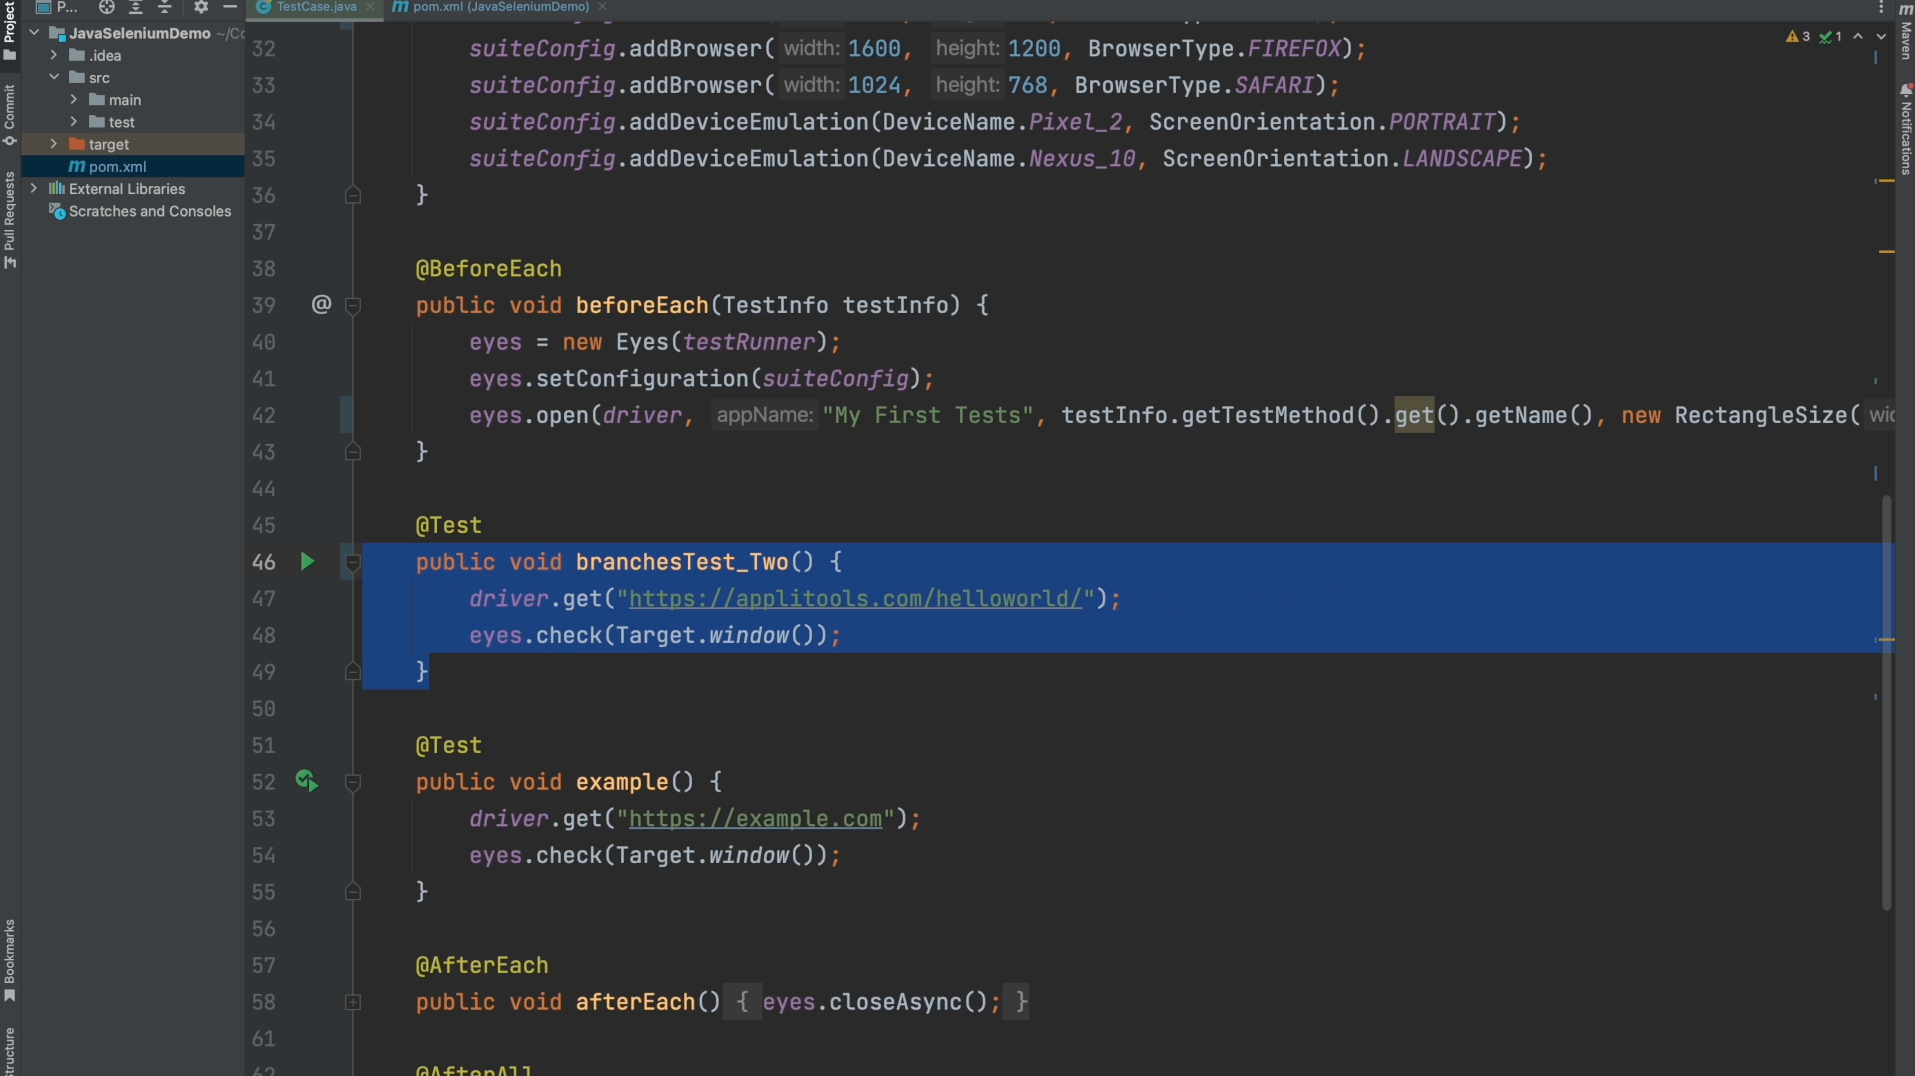
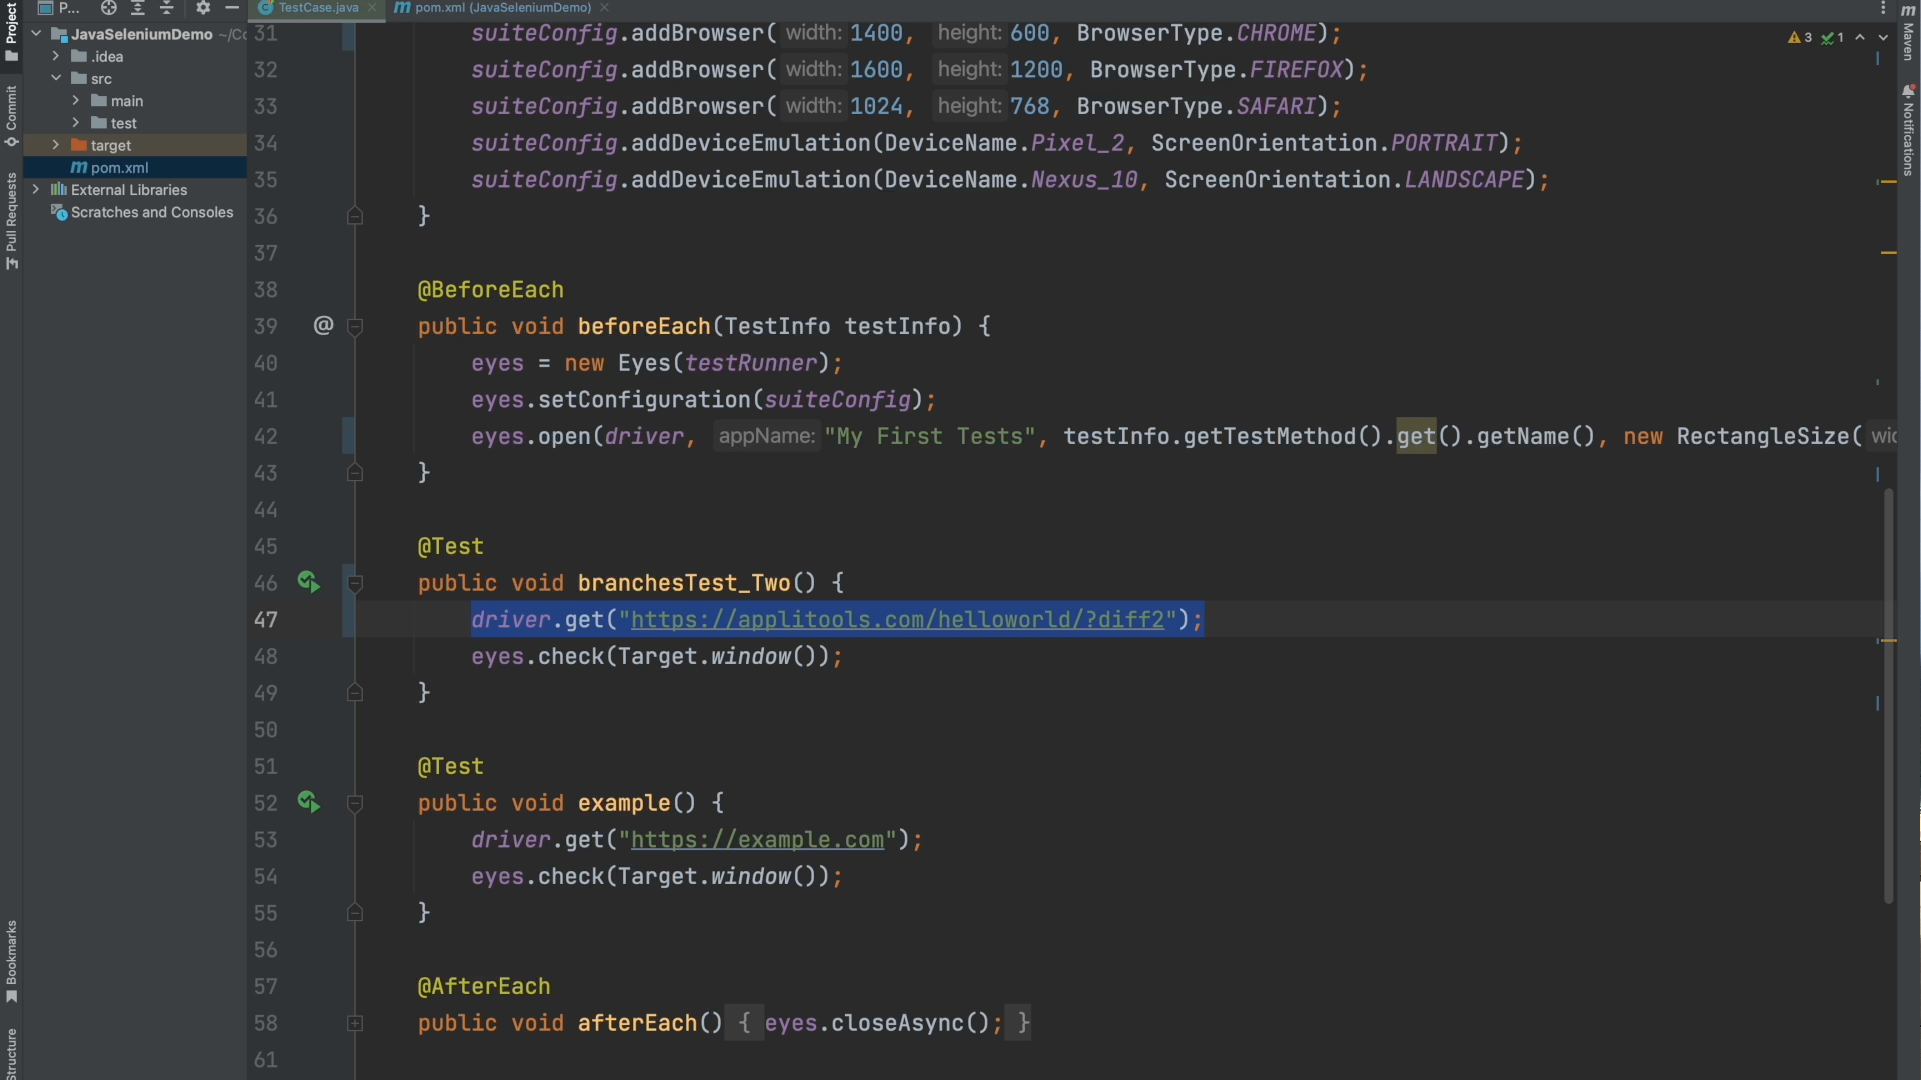
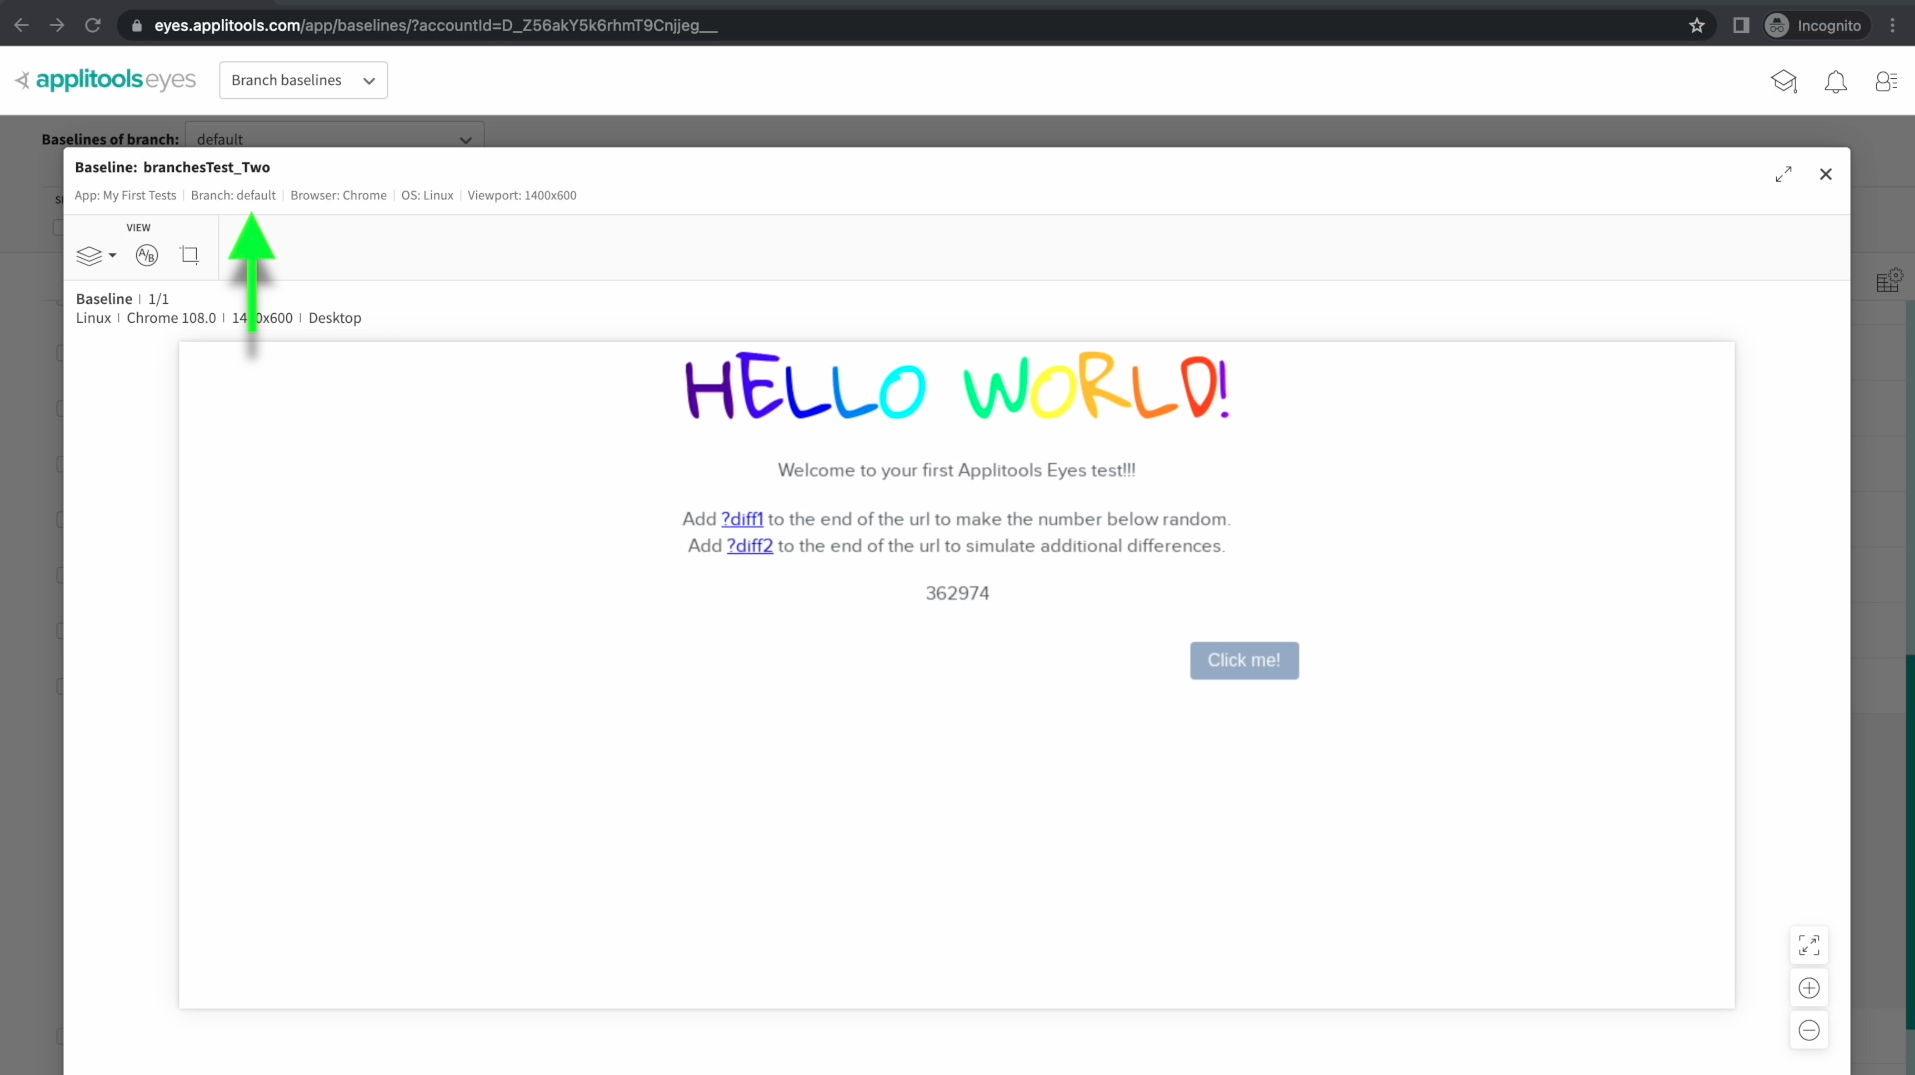
I've also changed the test name to branchesTest_Two and changed our URL back to the default path of the hello world website. Go ahead and run this test and then head to your dashboard.
Checking the test details, we can confirm this test was run on the default branch. Let's head back to our code and modify our test once again.
For our next test, I've set our branch name to be featureBranch1 in the Configuration. This will run our tests in this branch as well as create a new branch on our dashboard.
I've also added ?diff2 back to the end of our URL so that we get visual differences. Let's go ahead and run this test case once again.
Looking at our test details, we can confirm that we ran our test on featureBranch1.

Let's go ahead and accept and save all of the differences that were found so that we update our baseline.
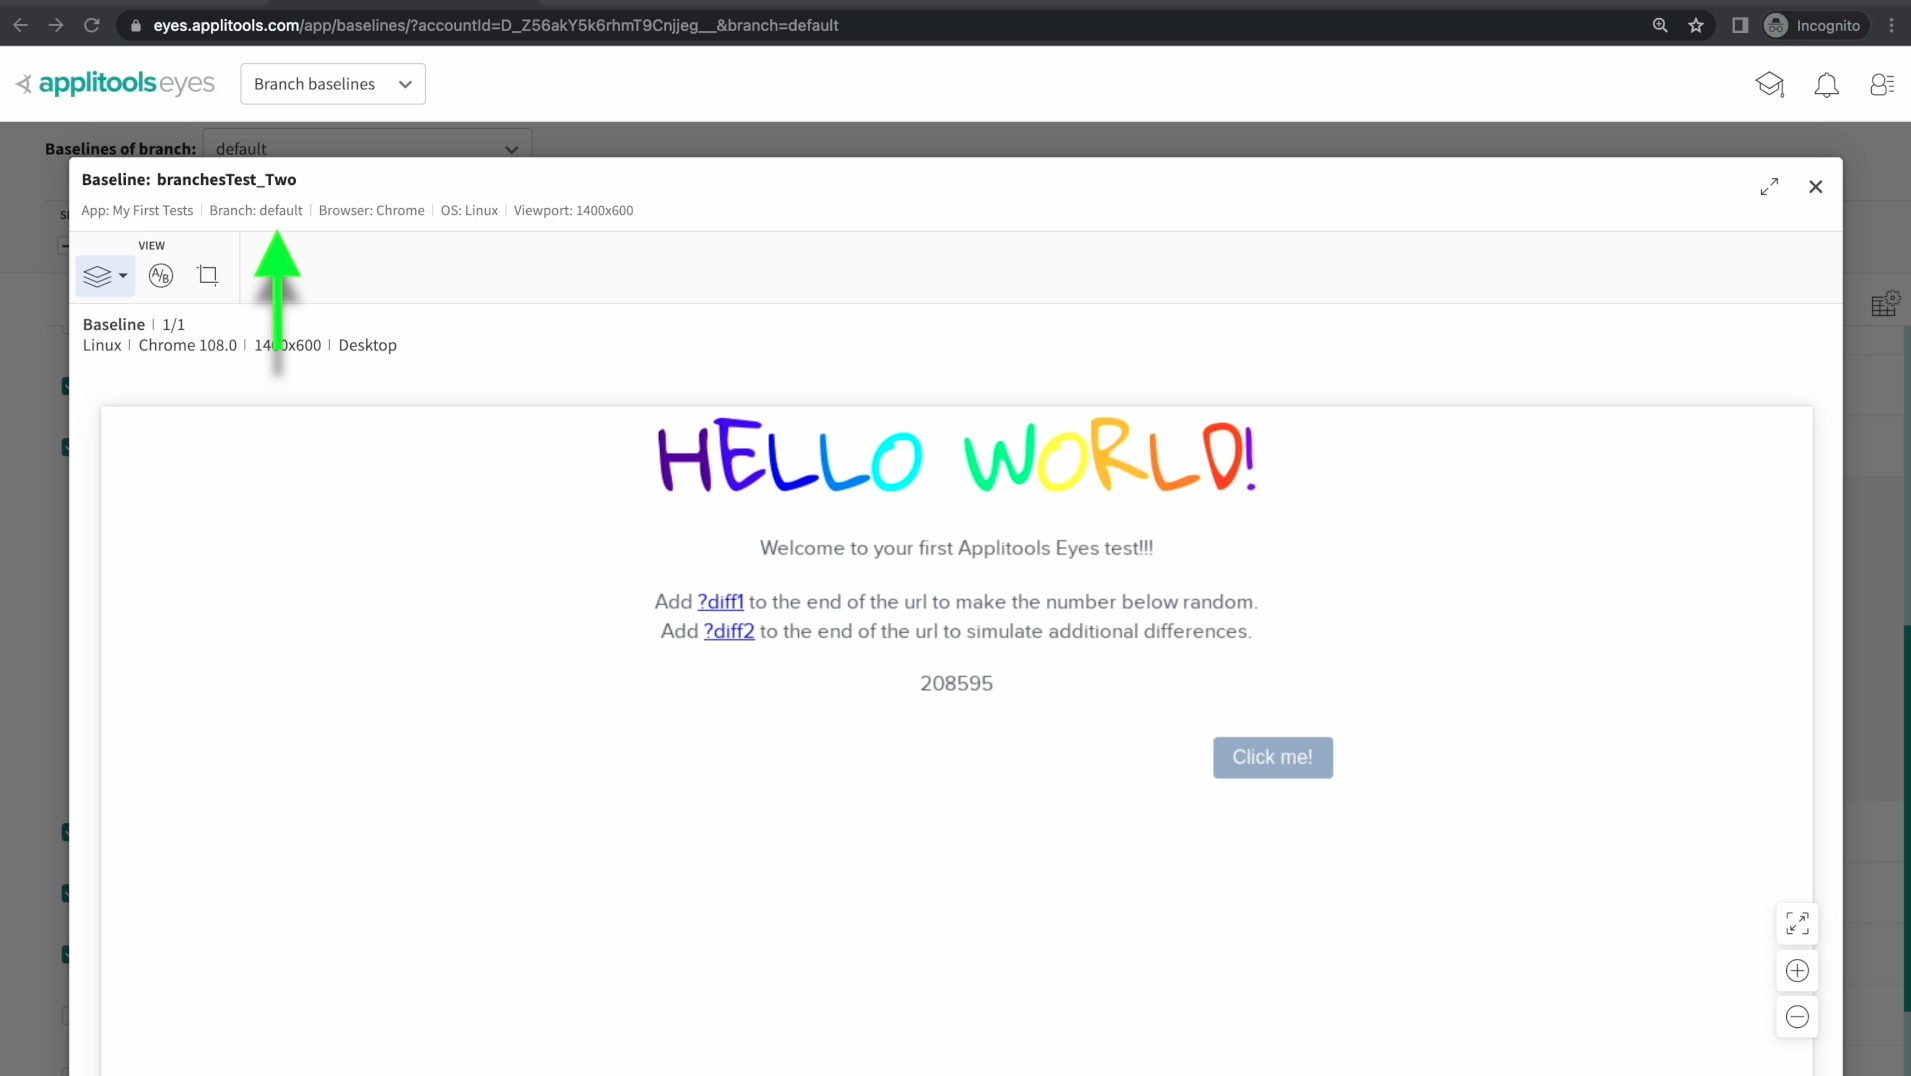
Let's pause for a second to take stock of our current state. On the branch baselines screen, our baseline on the default branch looks like this, where the button is in the middle and the numbers are 123456.
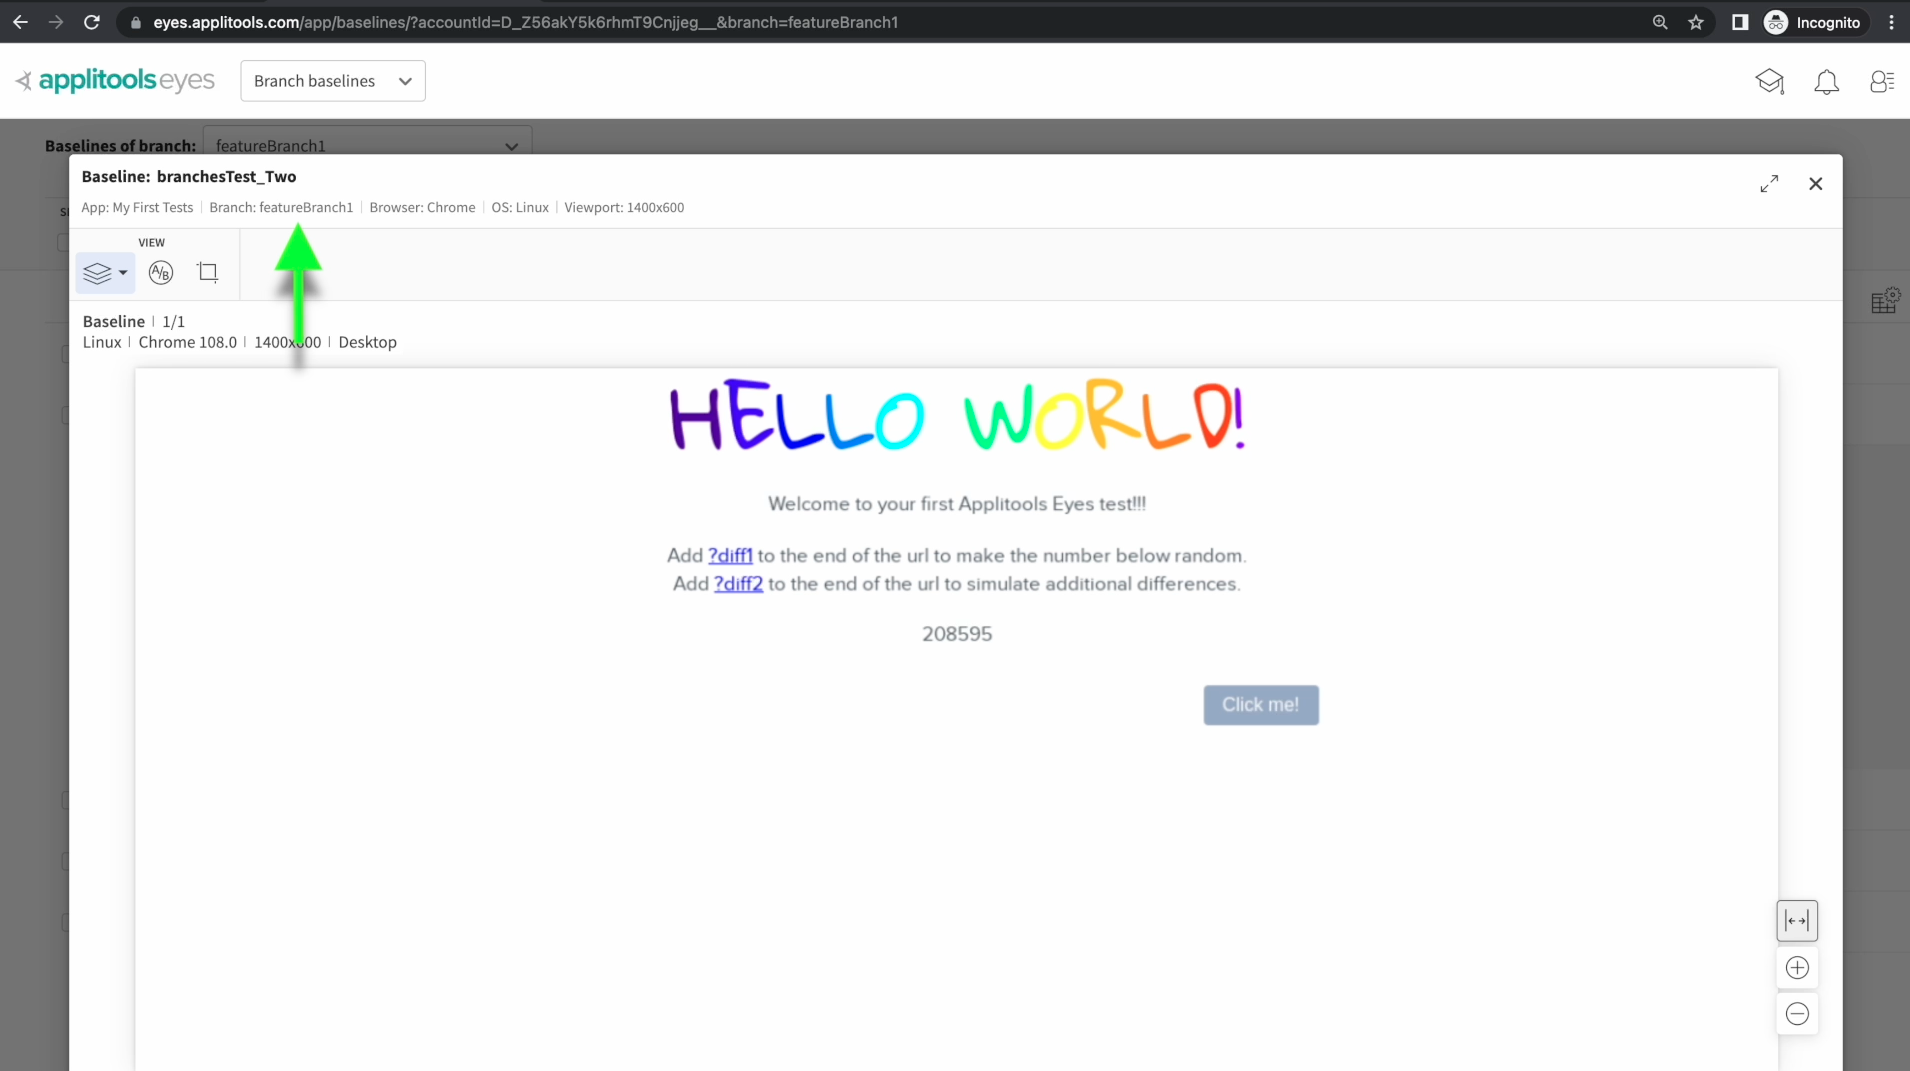
We then ran a test on featureBranch1 which updated the baseline on that branch. On featureBranch1 our baseline now looks like this where the numbers are 208595 and the button is over on the right. Before we merge in these changes to the default branch, let's head back to our code and create one more featureBranch.
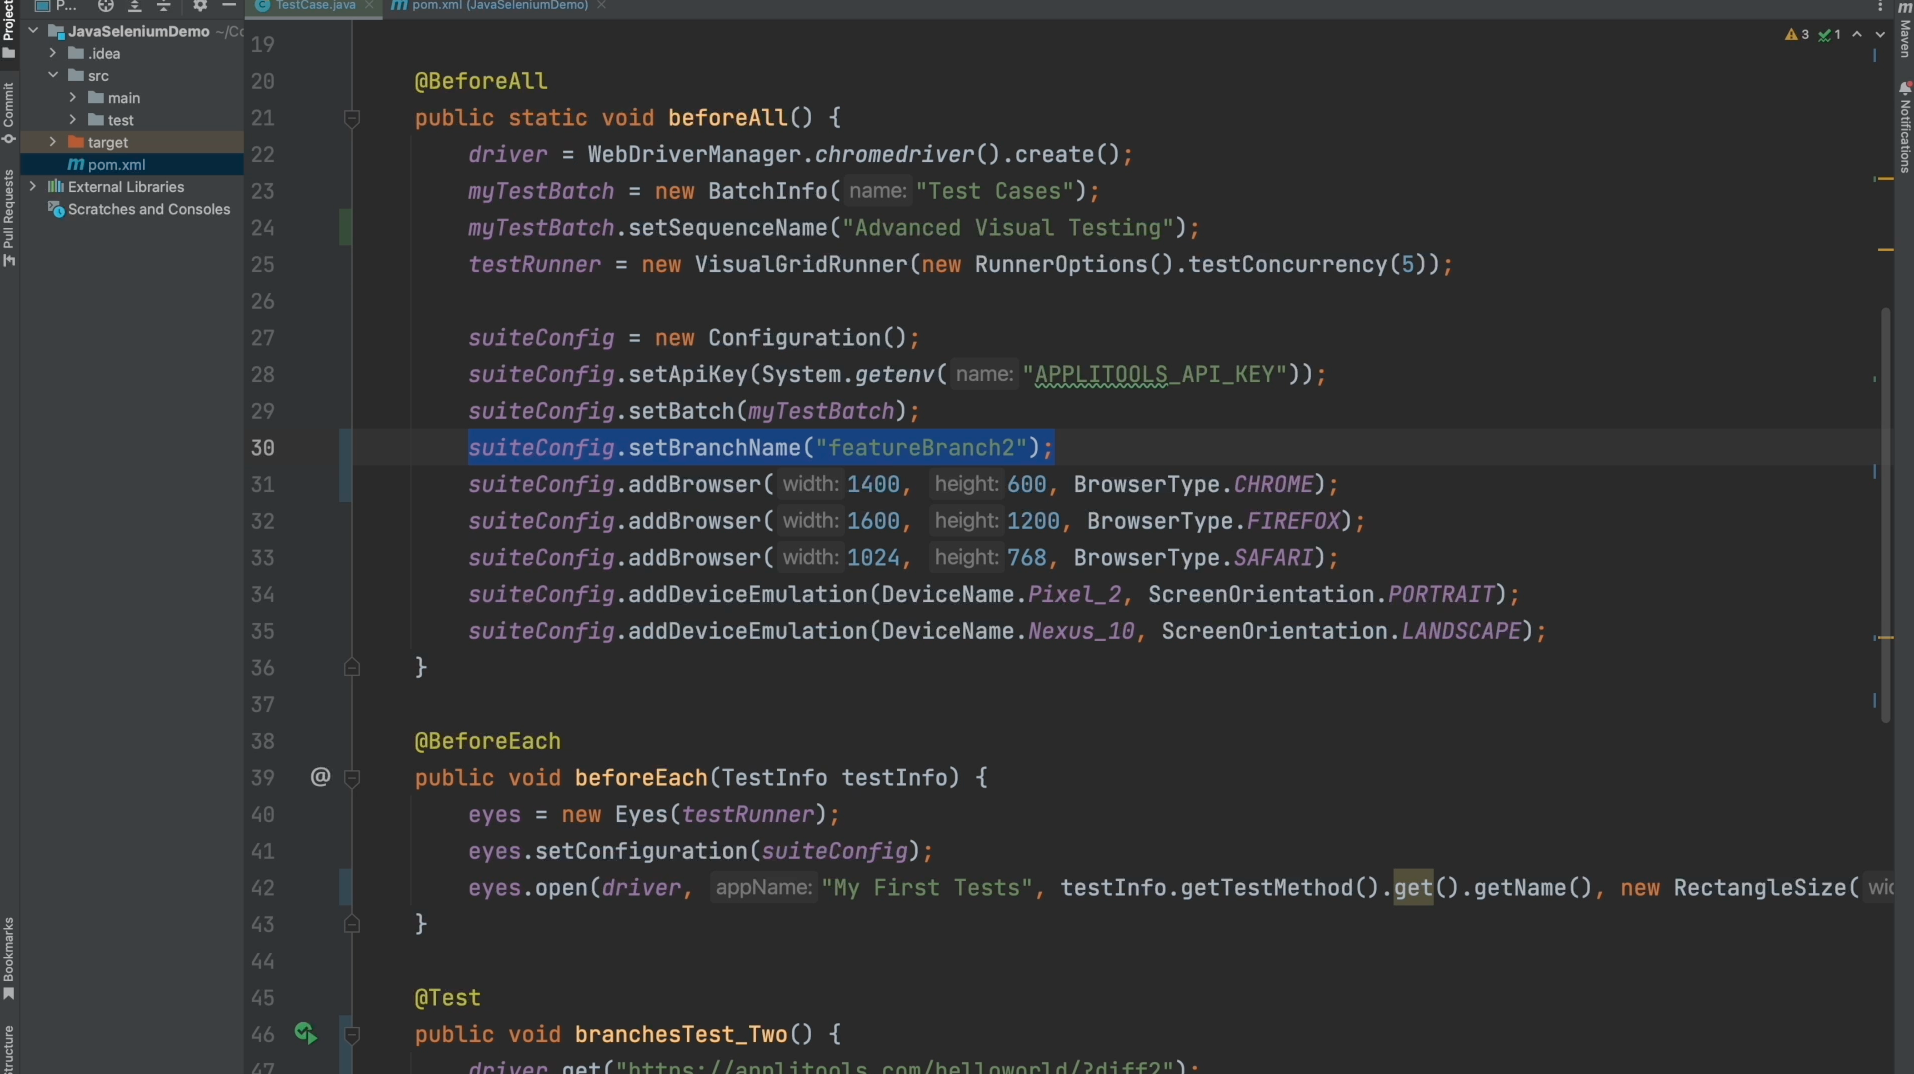
To create another feature branch, change the branch name in our Configuration to featureBranch2 and then run your test once more.
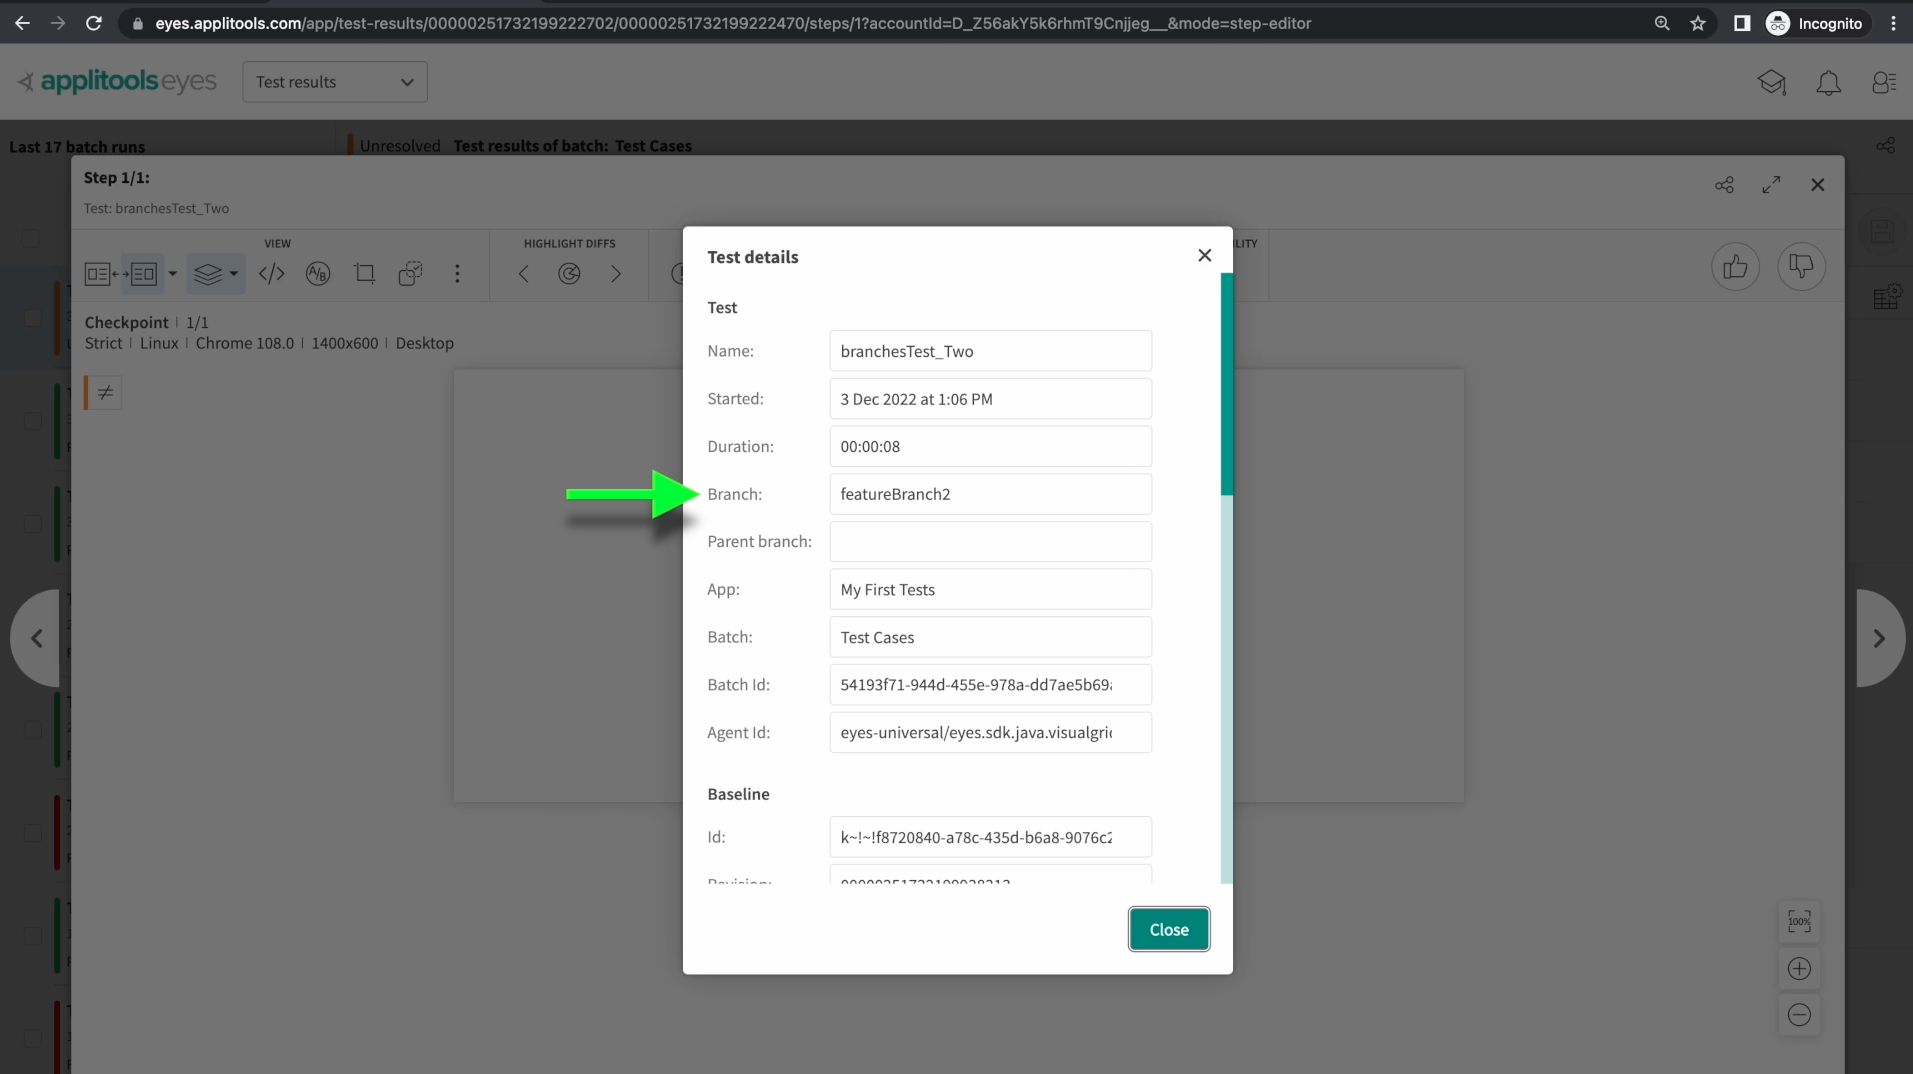
Looking at our test details, we can confirm that we ran our test on featureBranch2.
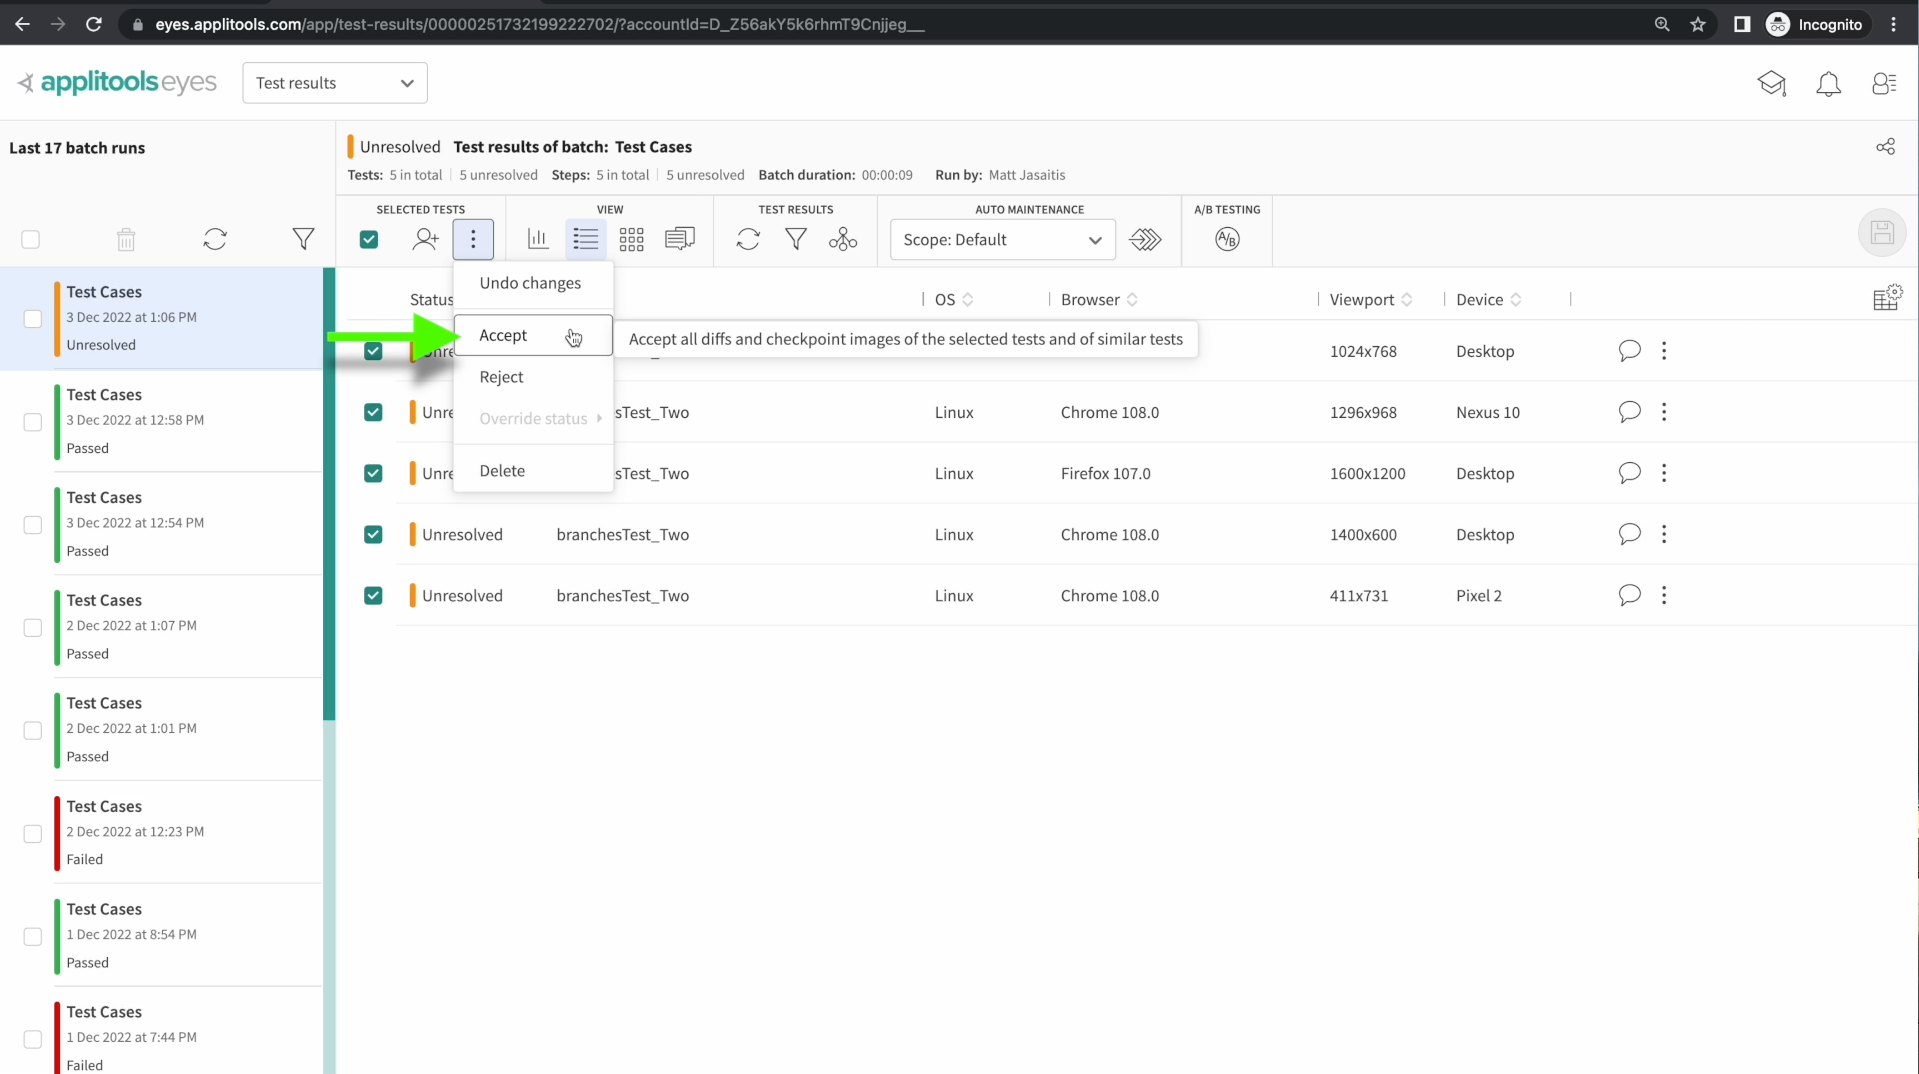
And once again, let's accept and save the differences found and update our baseline on this new branch.
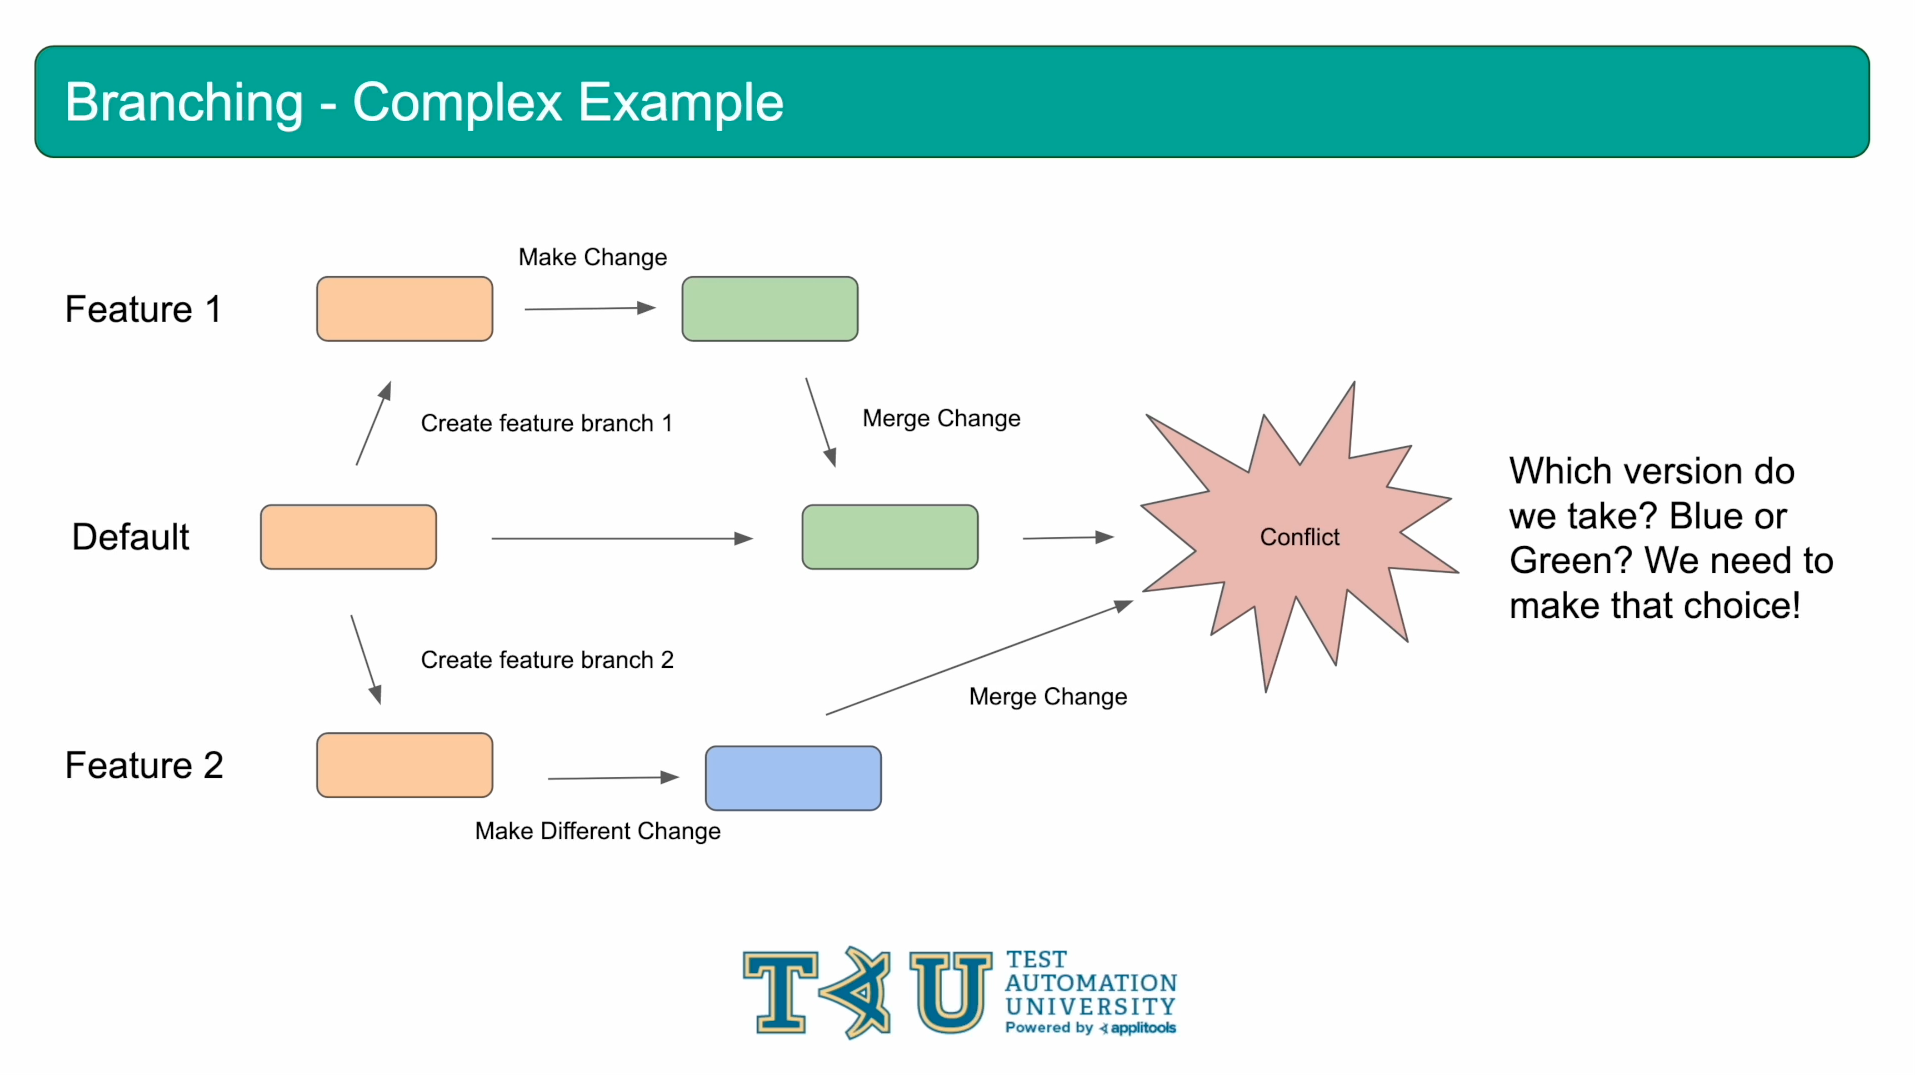
Let's pause for a second and review what we've done so far. We created two feature branches and performed a different update in each of them. Our branches currently look like this. Let's now head over to the compare and merge baselines screen and perform a merge.
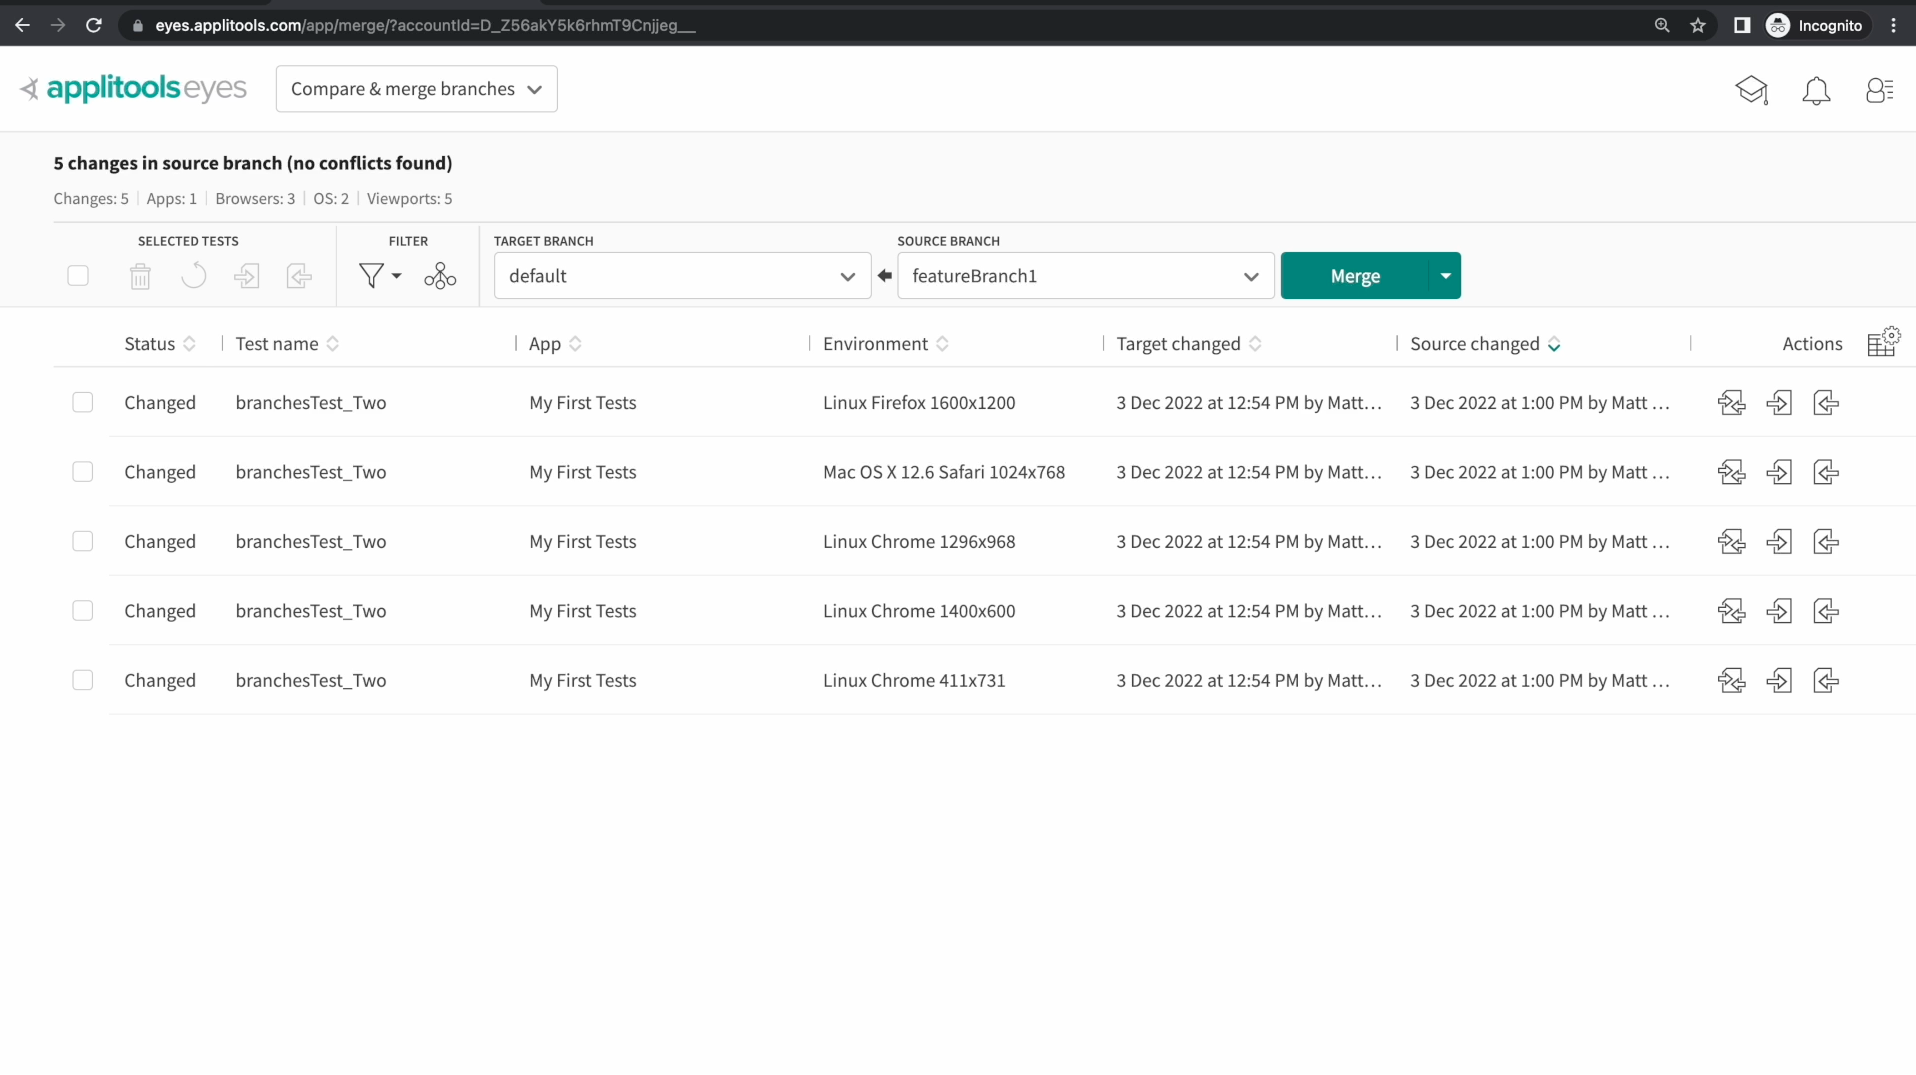
For our first merge in this example, I've selected default as the target branch and featureBranch1 as the source branch. As expected, the comparison of these two branches is telling us that our baselines have changed. Let's go ahead and merge in these changes into our default branch.
If we check the branch baselines screen, we see that the baseline in the default branch has now been updated to the baseline that we just merged in from featureBranch1. Let's now see what happens if we try to merge in featureBranch2.
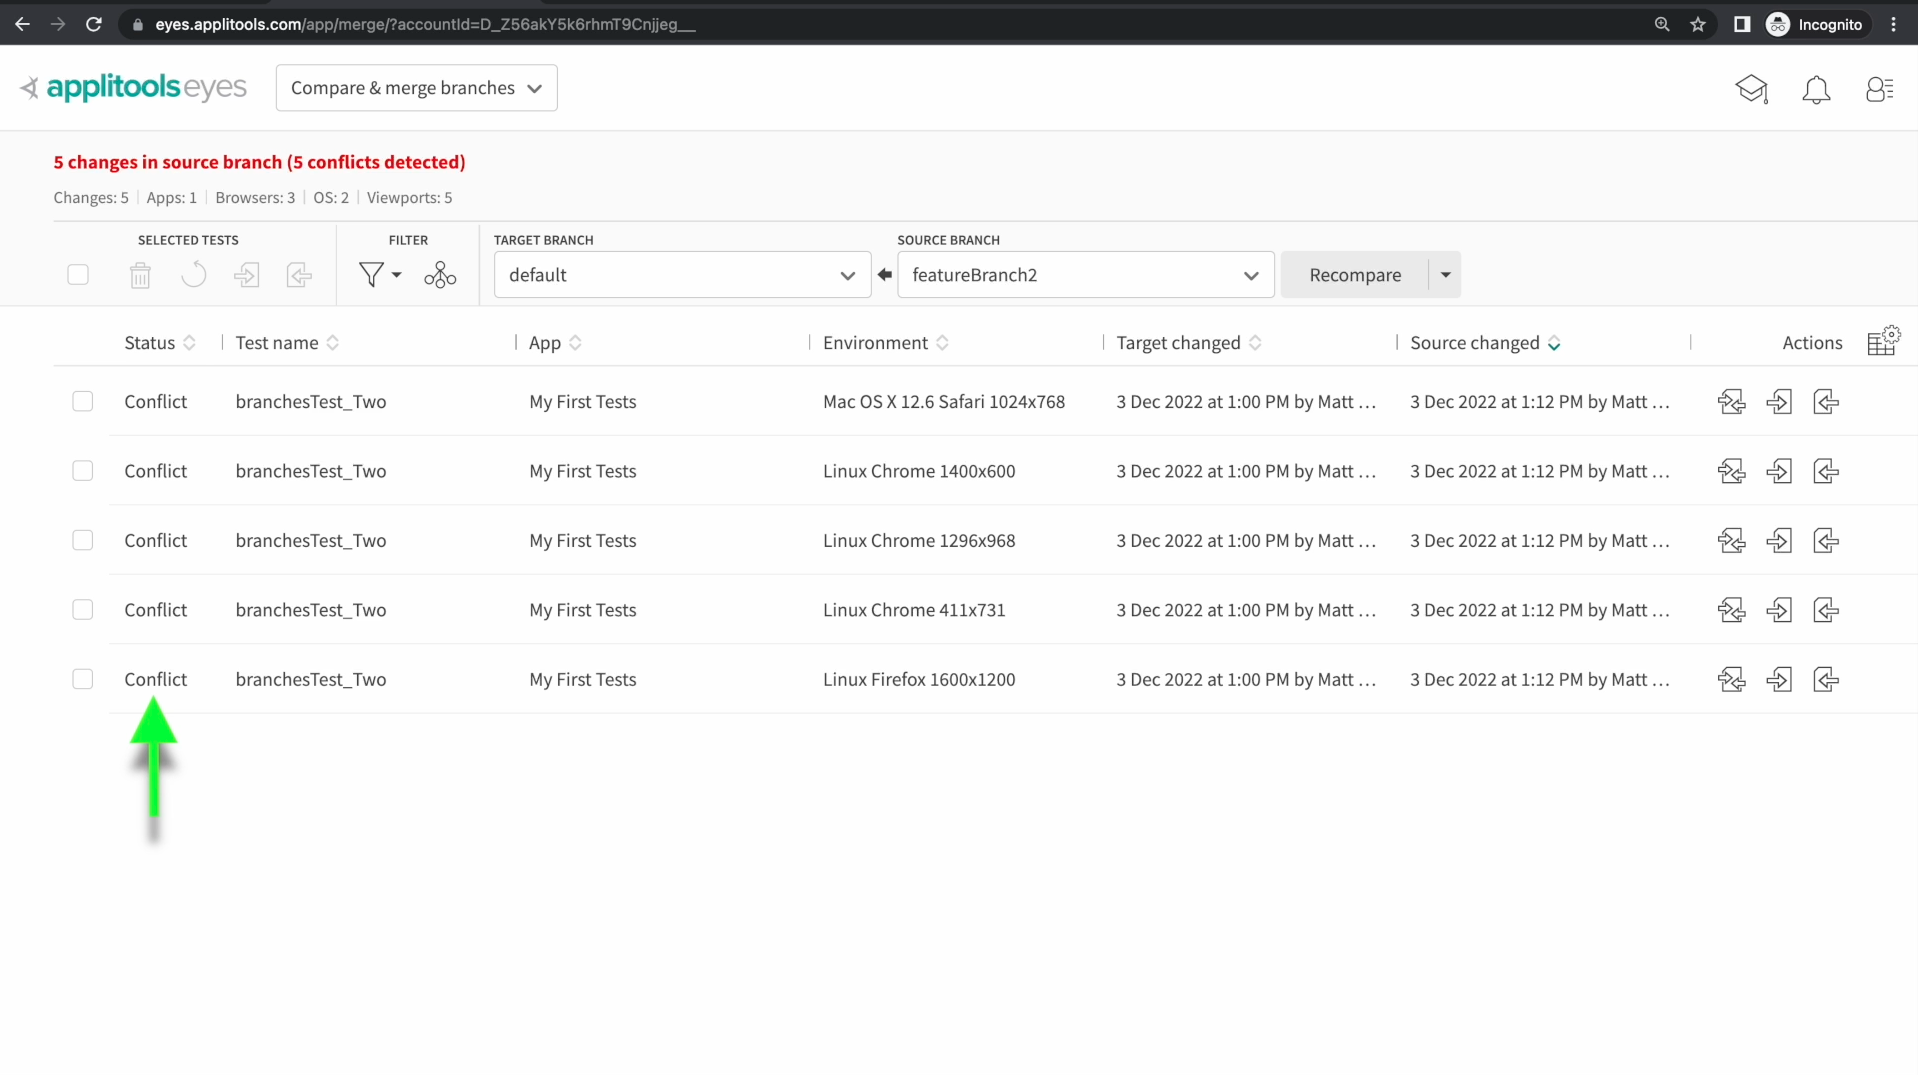
I've now selected default as the target branch and featureBranch2 as the source branch. This time, when we try to merge in, we get presented with a new status called "Conflict".
We have a conflict in this case because there was an update made to the default branch when we merged in featureBranch1. This update occurred after we had already created featureBranch2 but before we merged featureBranch2 back into default. Therefore, we get the Conflict status rather than the changed status.
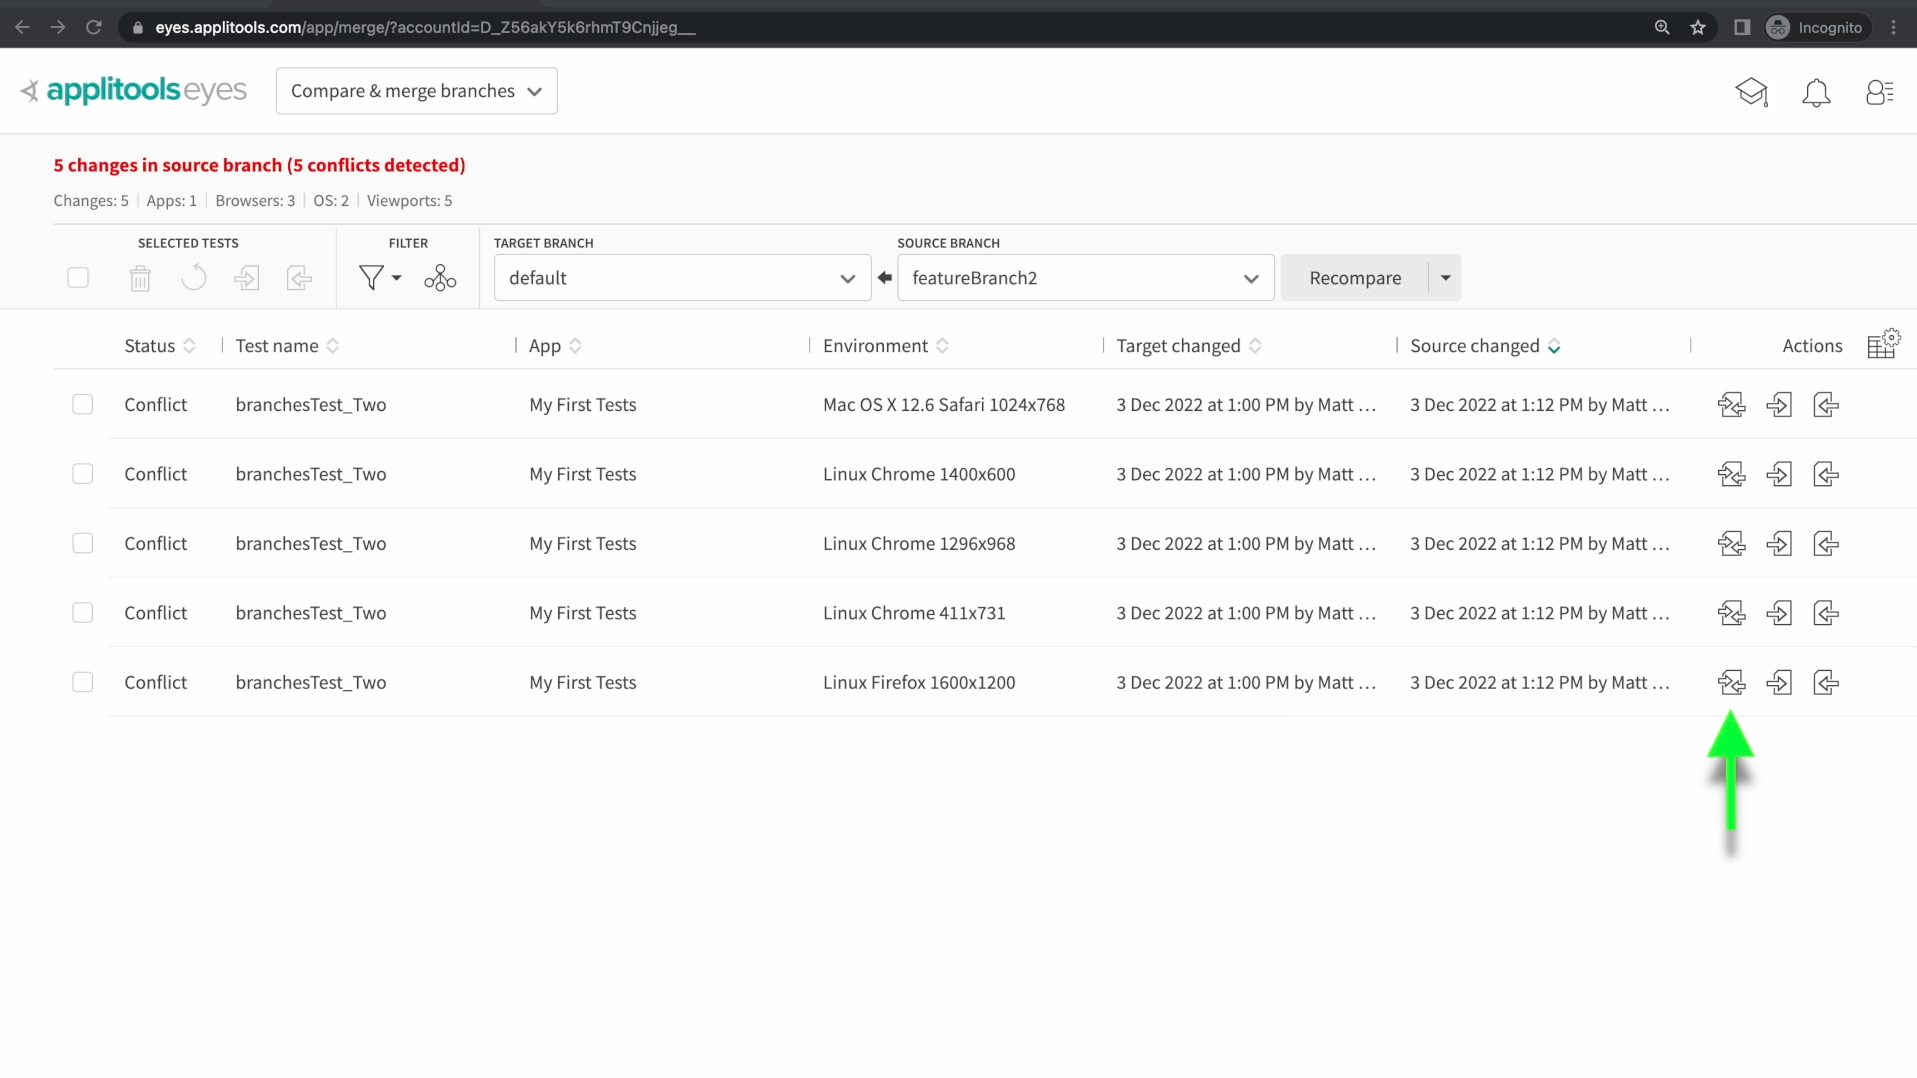
For each of the conflicts, we now must decide which version of the baseline we want to take. We can use the compare buttons to review the screenshots
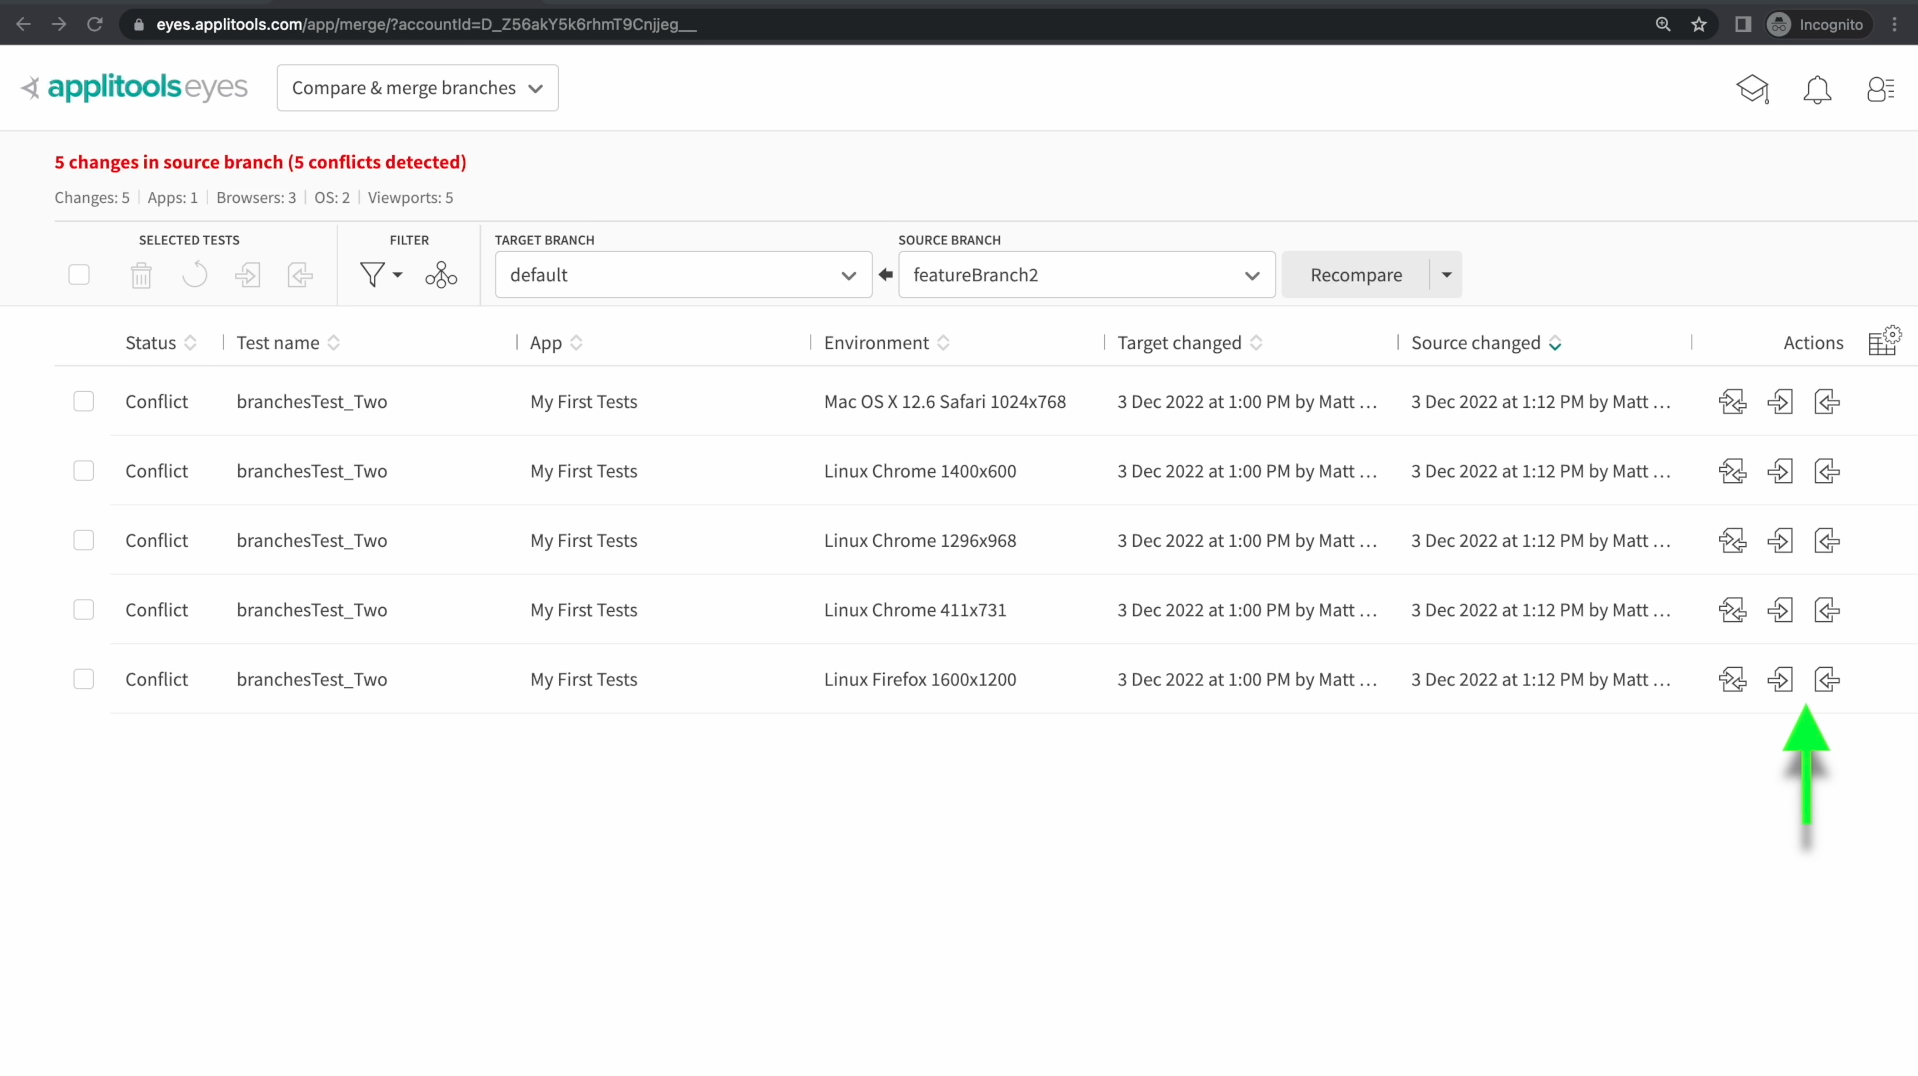
and then make our selection by clicking one of these two options here.
I've decided to take all of the changes from featureBranch2 and merge them into the default branch. You can see my selection highlighted in blue on the right side of the screen.
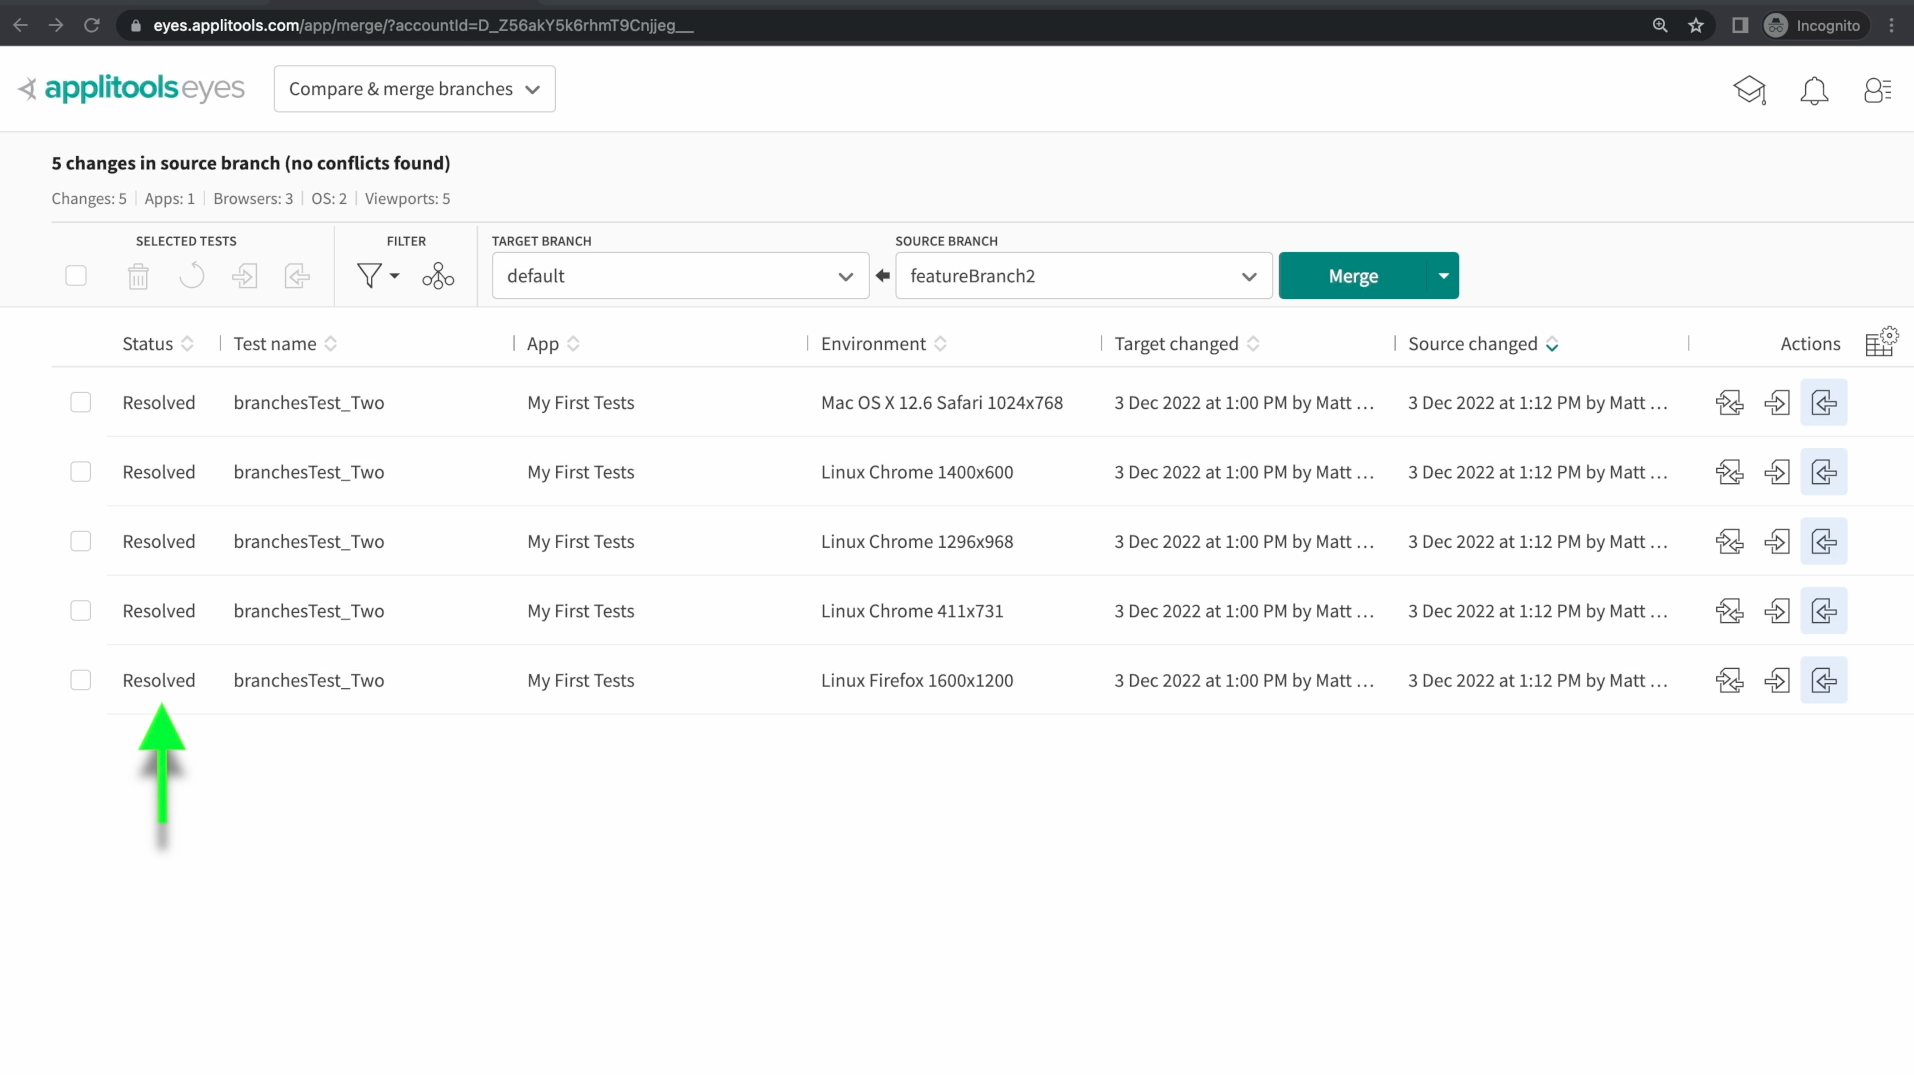
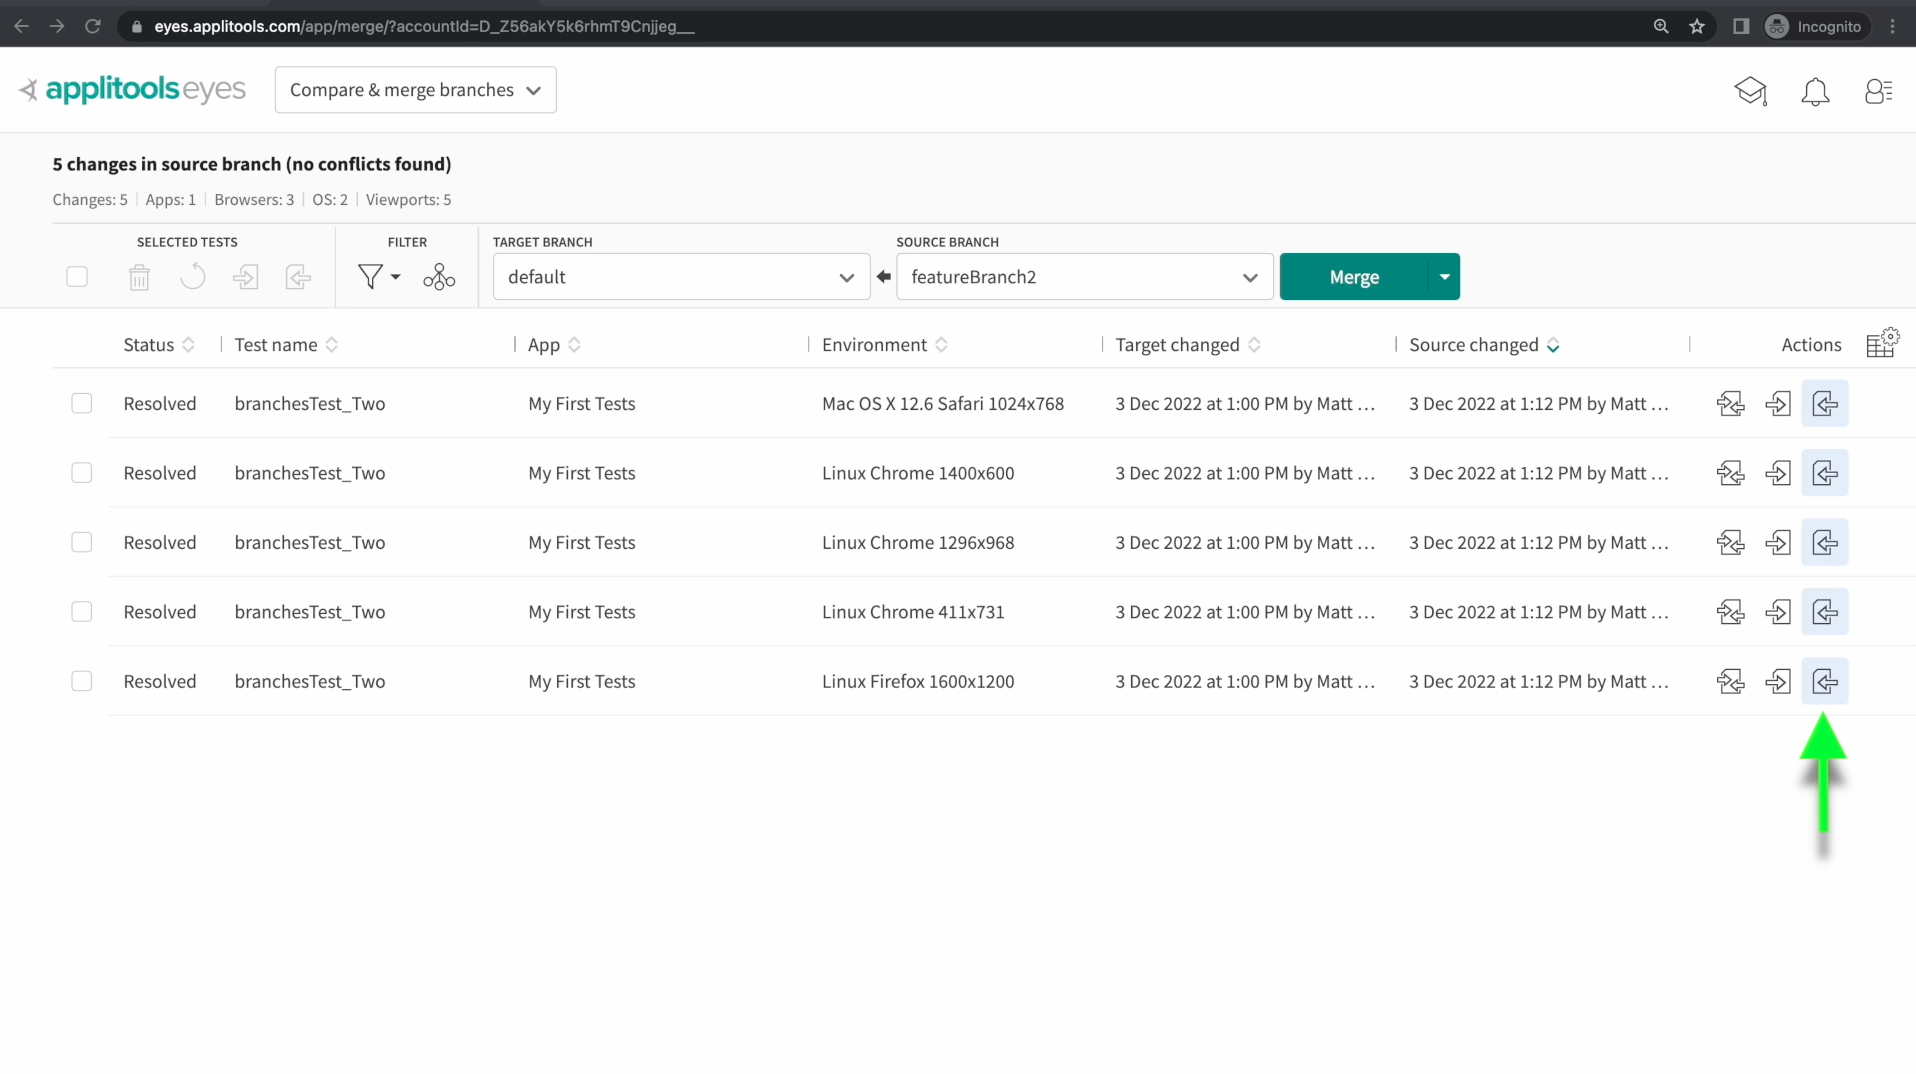
Now that I've made this choice for all of the conflicts, they've been marked as Resolved and the merge button at the top is available to me. Let's go ahead and merge the branch in.
Checking our baseline again over on the branch baselines screen, we can confirm that our baseline in the default branch now reflects the changes that we merged in from featureBranch2. We can tell because the numbers in the middle have been updated once again.
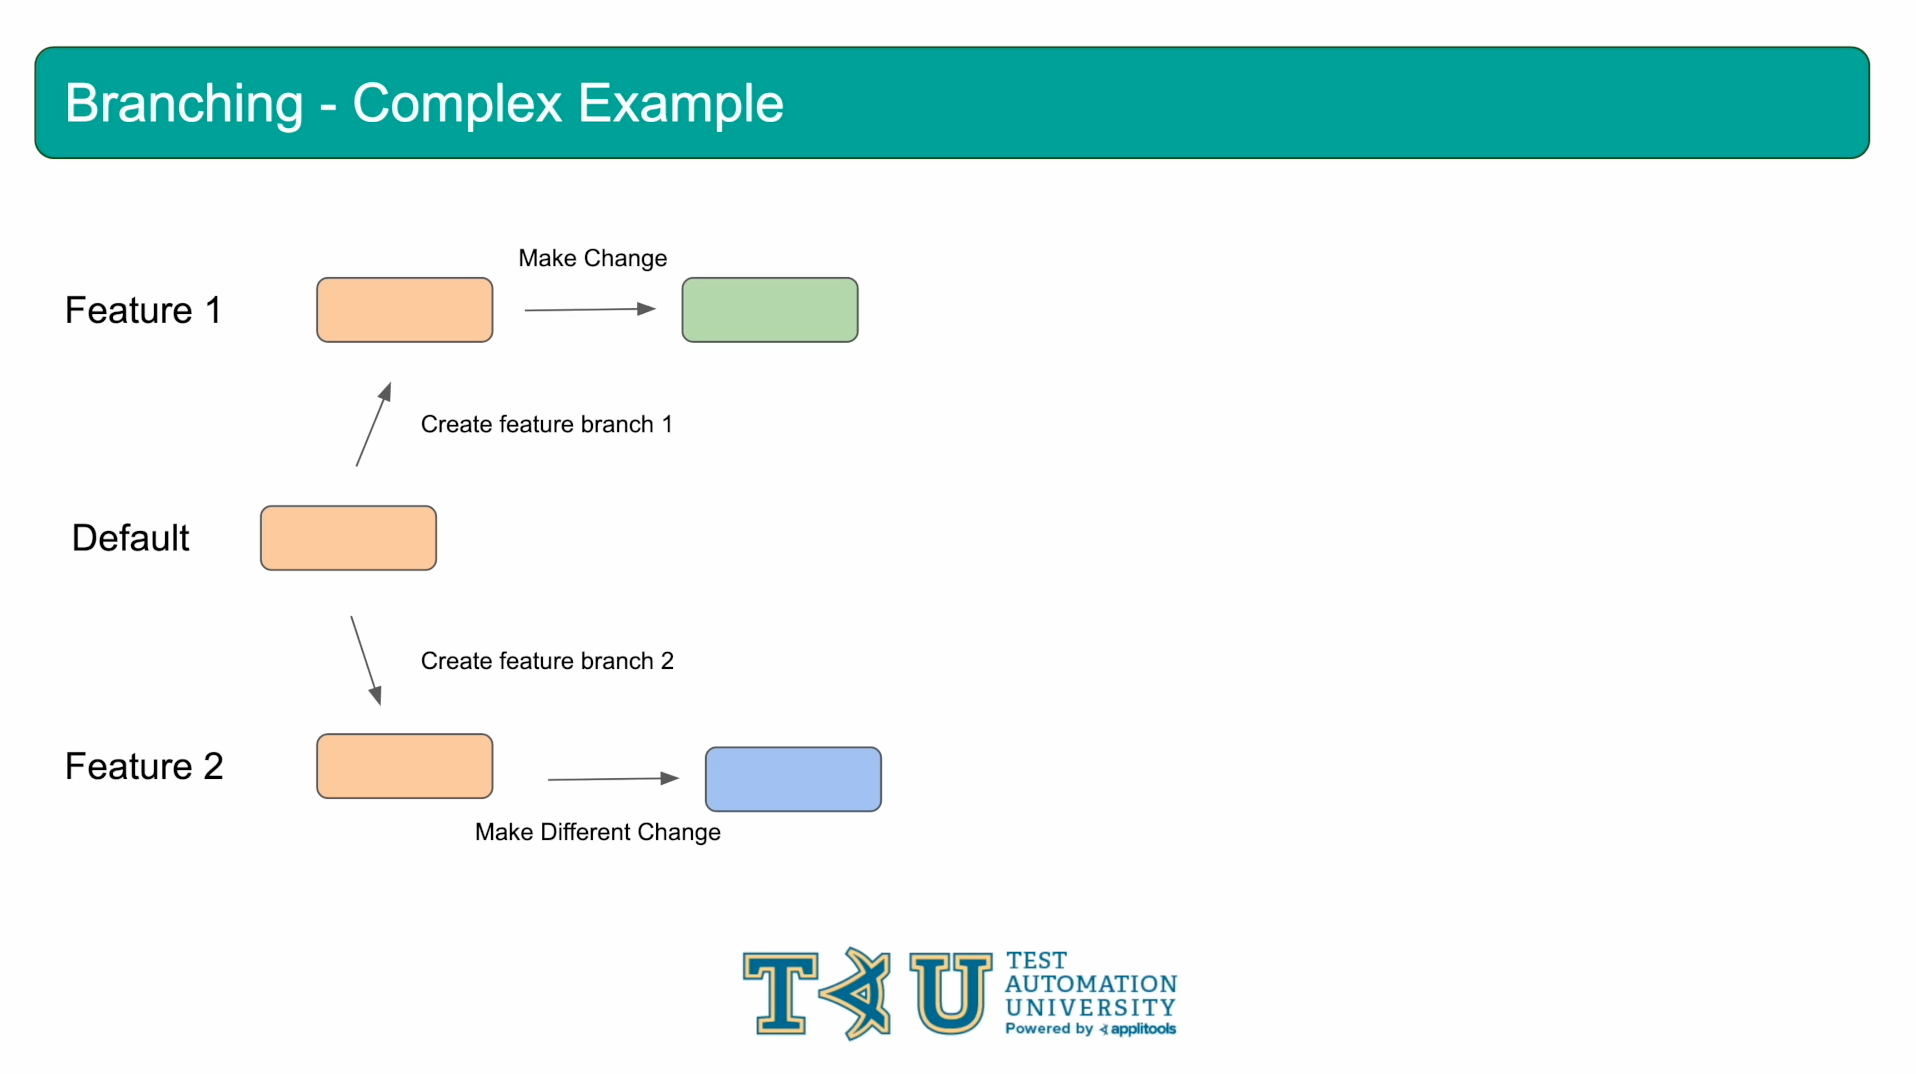
Let's close out this section by visualizing the branching example that we just ran through. We first created a baseline on the default branch.
Next, we created two feature Branches and then made changes to our baseline on both of those branches.
We then merged in the changes from featureBranch1 which updated our baseline on the default branch.
When we then tried to merge in our changes from featureBranch2, we were presented with a conflict. To resolve this conflict, we had to decide which version of the baseline we should take. After making our choice, the baseline on the default branch was updated once again.
The final example we're going to go over will cover the baselineBranchName property that I mentioned at the beginning of this chapter.
When using this property, the usual algorithm of checking the current branch then the parent branch then the default branch is ignored and we only check the specified baselineBranchName. If a baseline is not found in this specified branch, then a new baseline is created in the current branch that we're running our tests in. Let's head over to our code and make some small changes to start our example.
The first change I made is to comment out the branchName property in our config.
And then, as usual, I've changed the test name once again. Let's go ahead and run this test.
As you may have guessed, we now have a new baseline that was created on the default branch. Let's head back to our project and make some more changes.
I've uncommented our call to setBranchName in our config and am passing in featureBranch1. Let's run this test once again.
On our dashboard, let's go ahead and accept and save these diffs so that the baseline gets updated on featureBranch1.
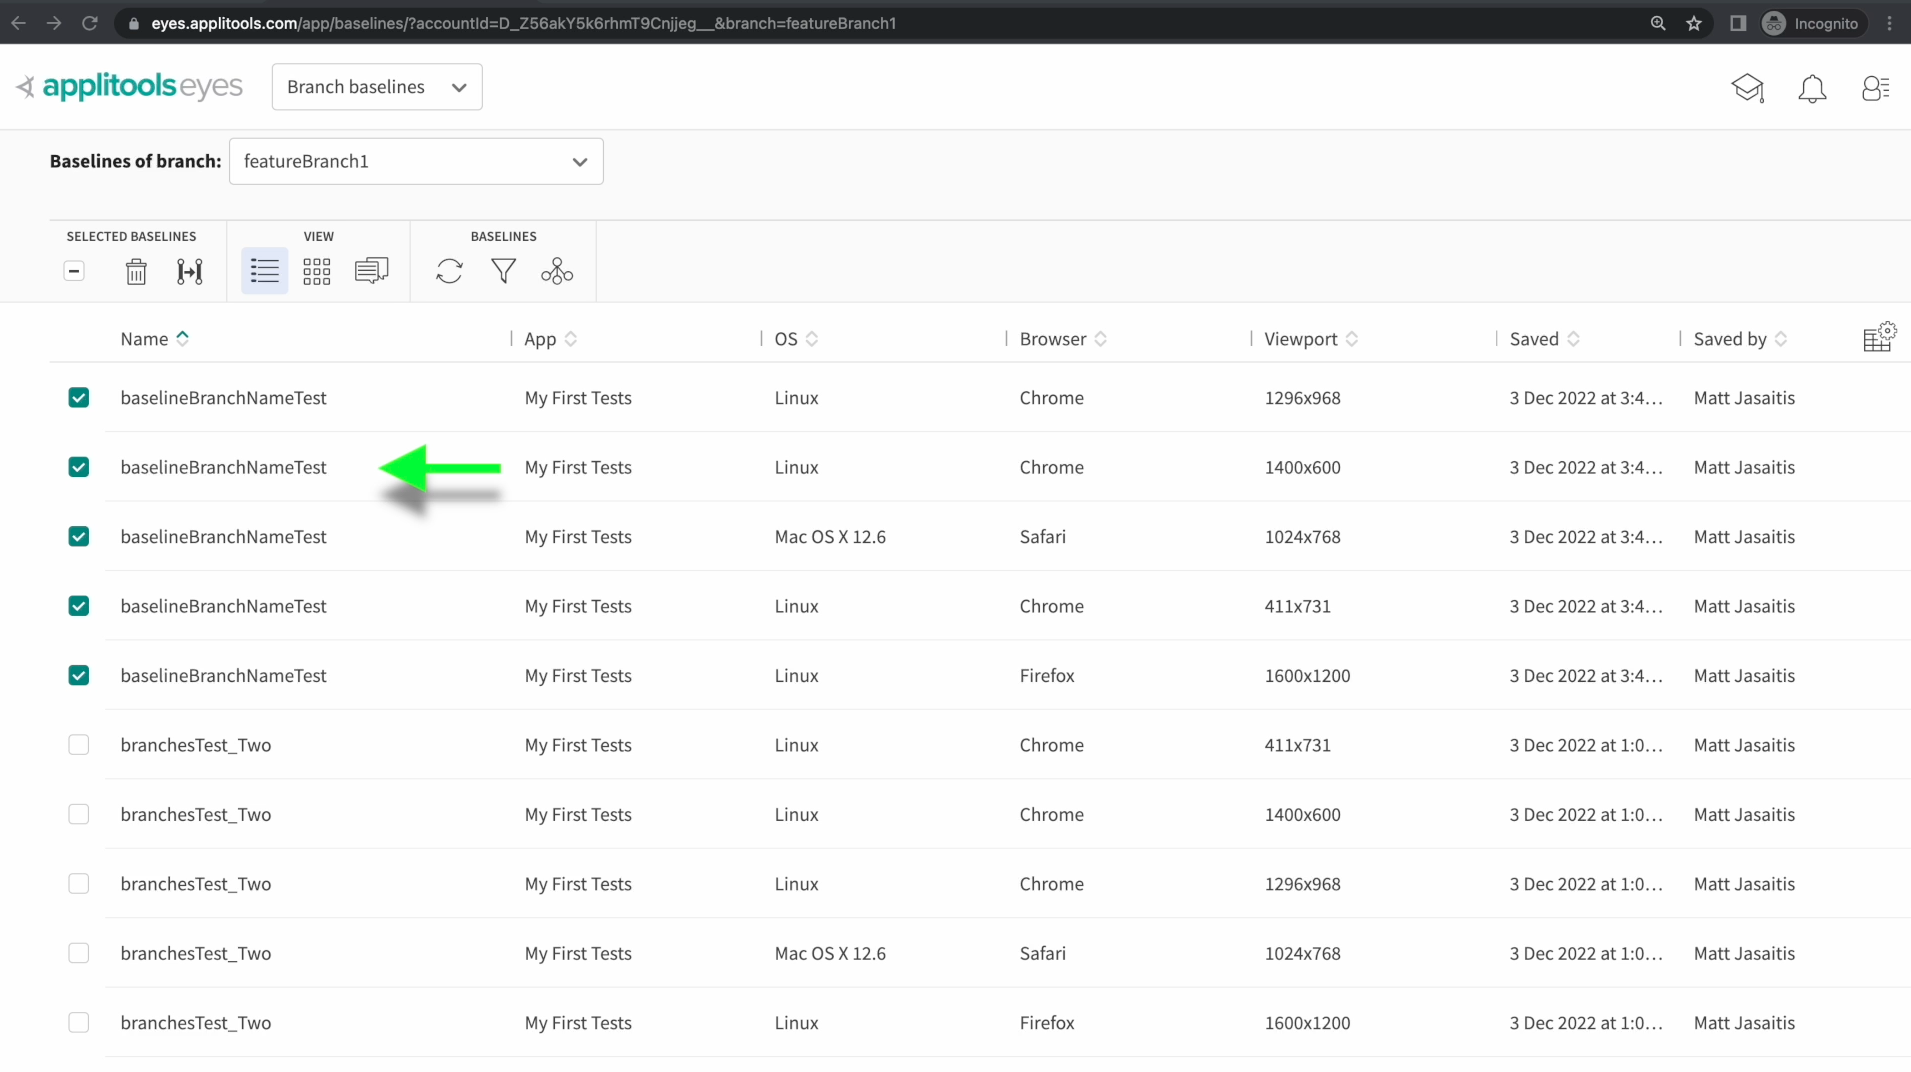
On the Branch Baselines Screen, we can confirm that we now have baselines for our baselineBranchName test in featureBranch1. Let's head back to our code for the next step.
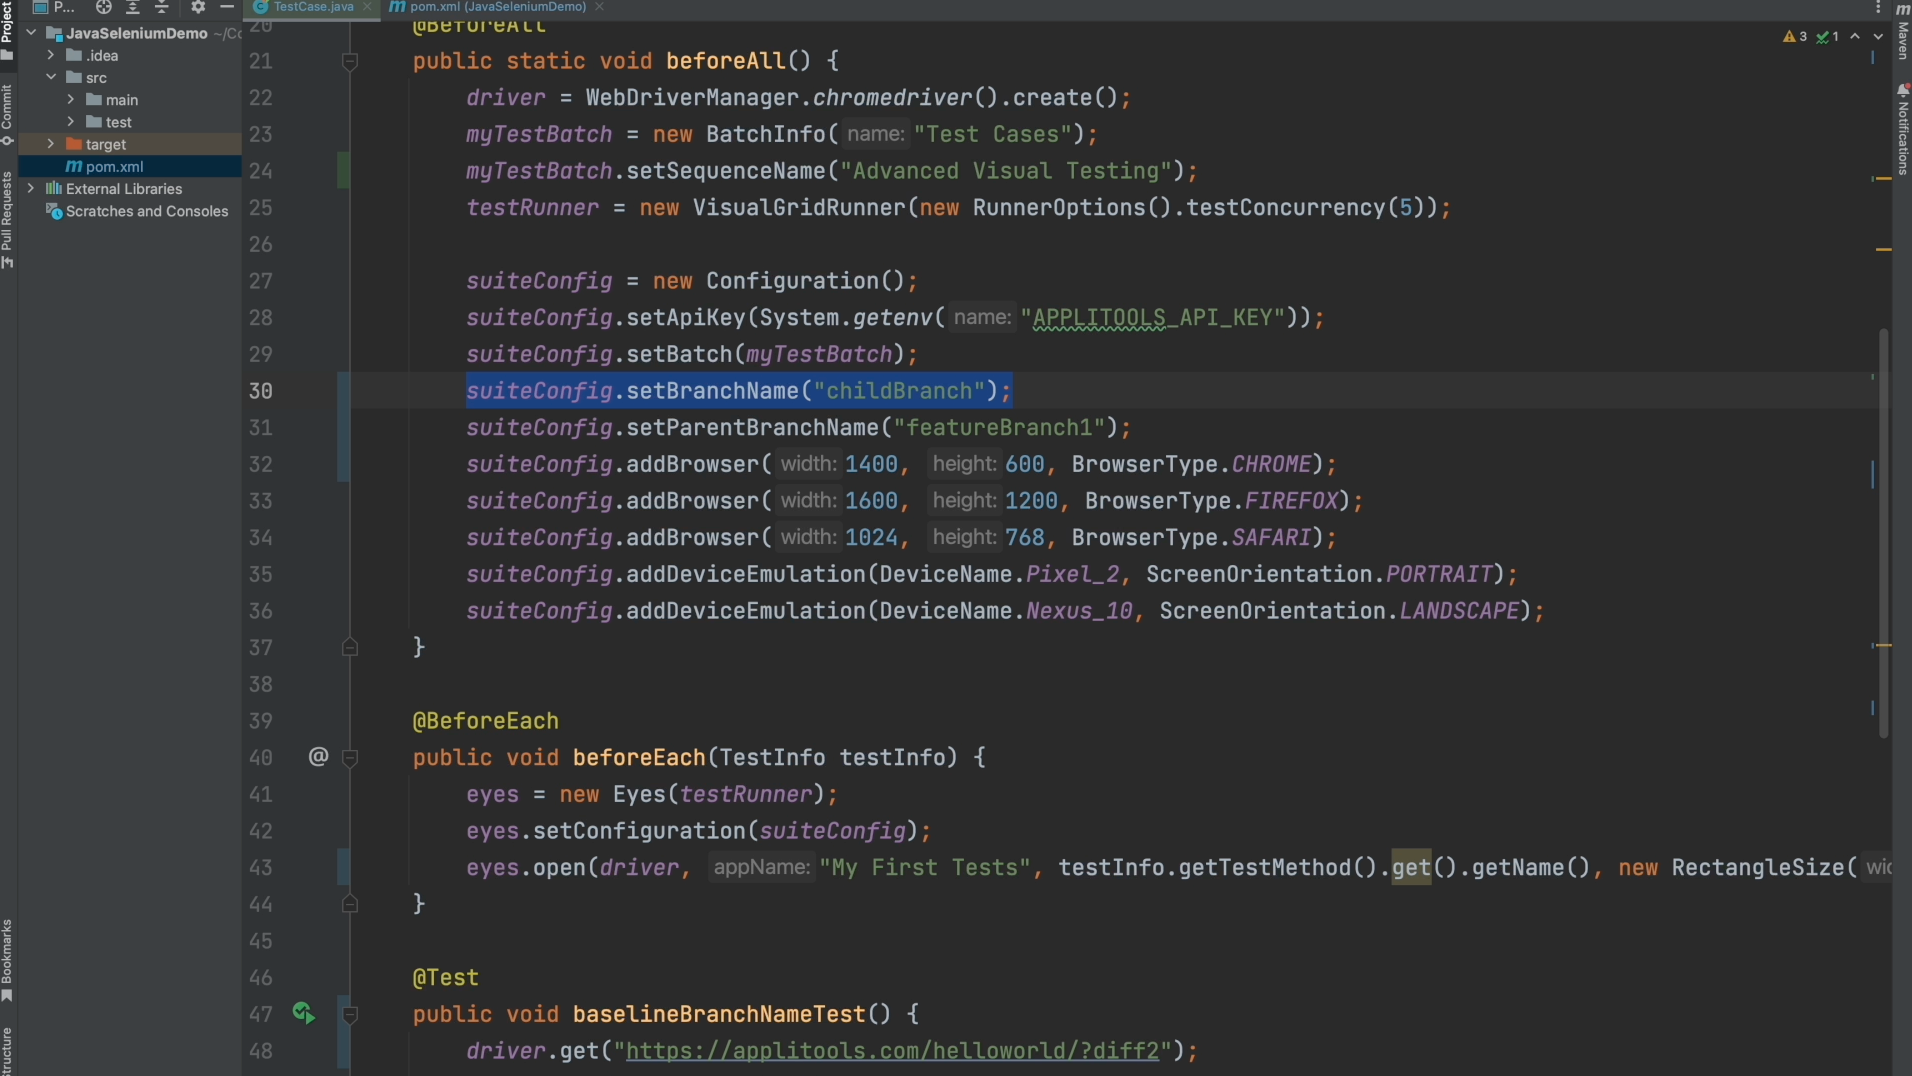
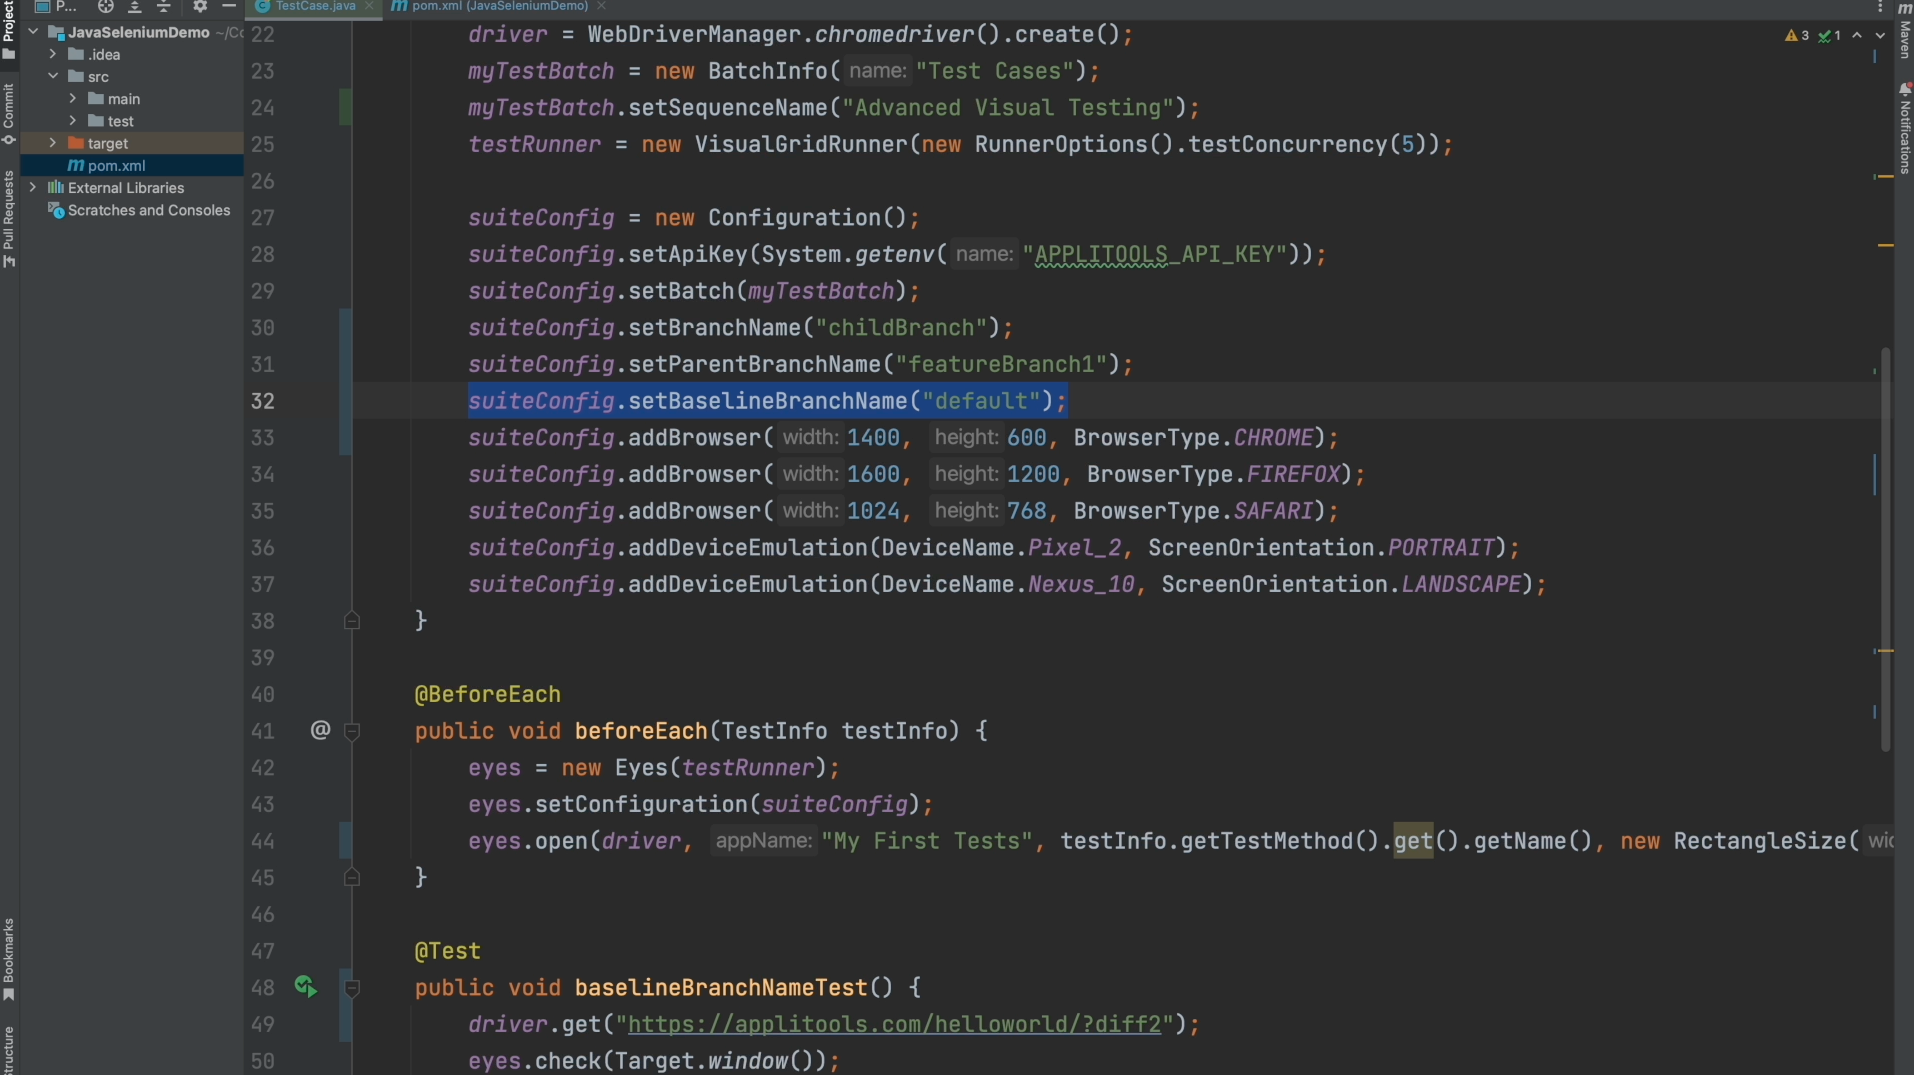
The first change I've made is updating our branch name for this next test to be childBranch.
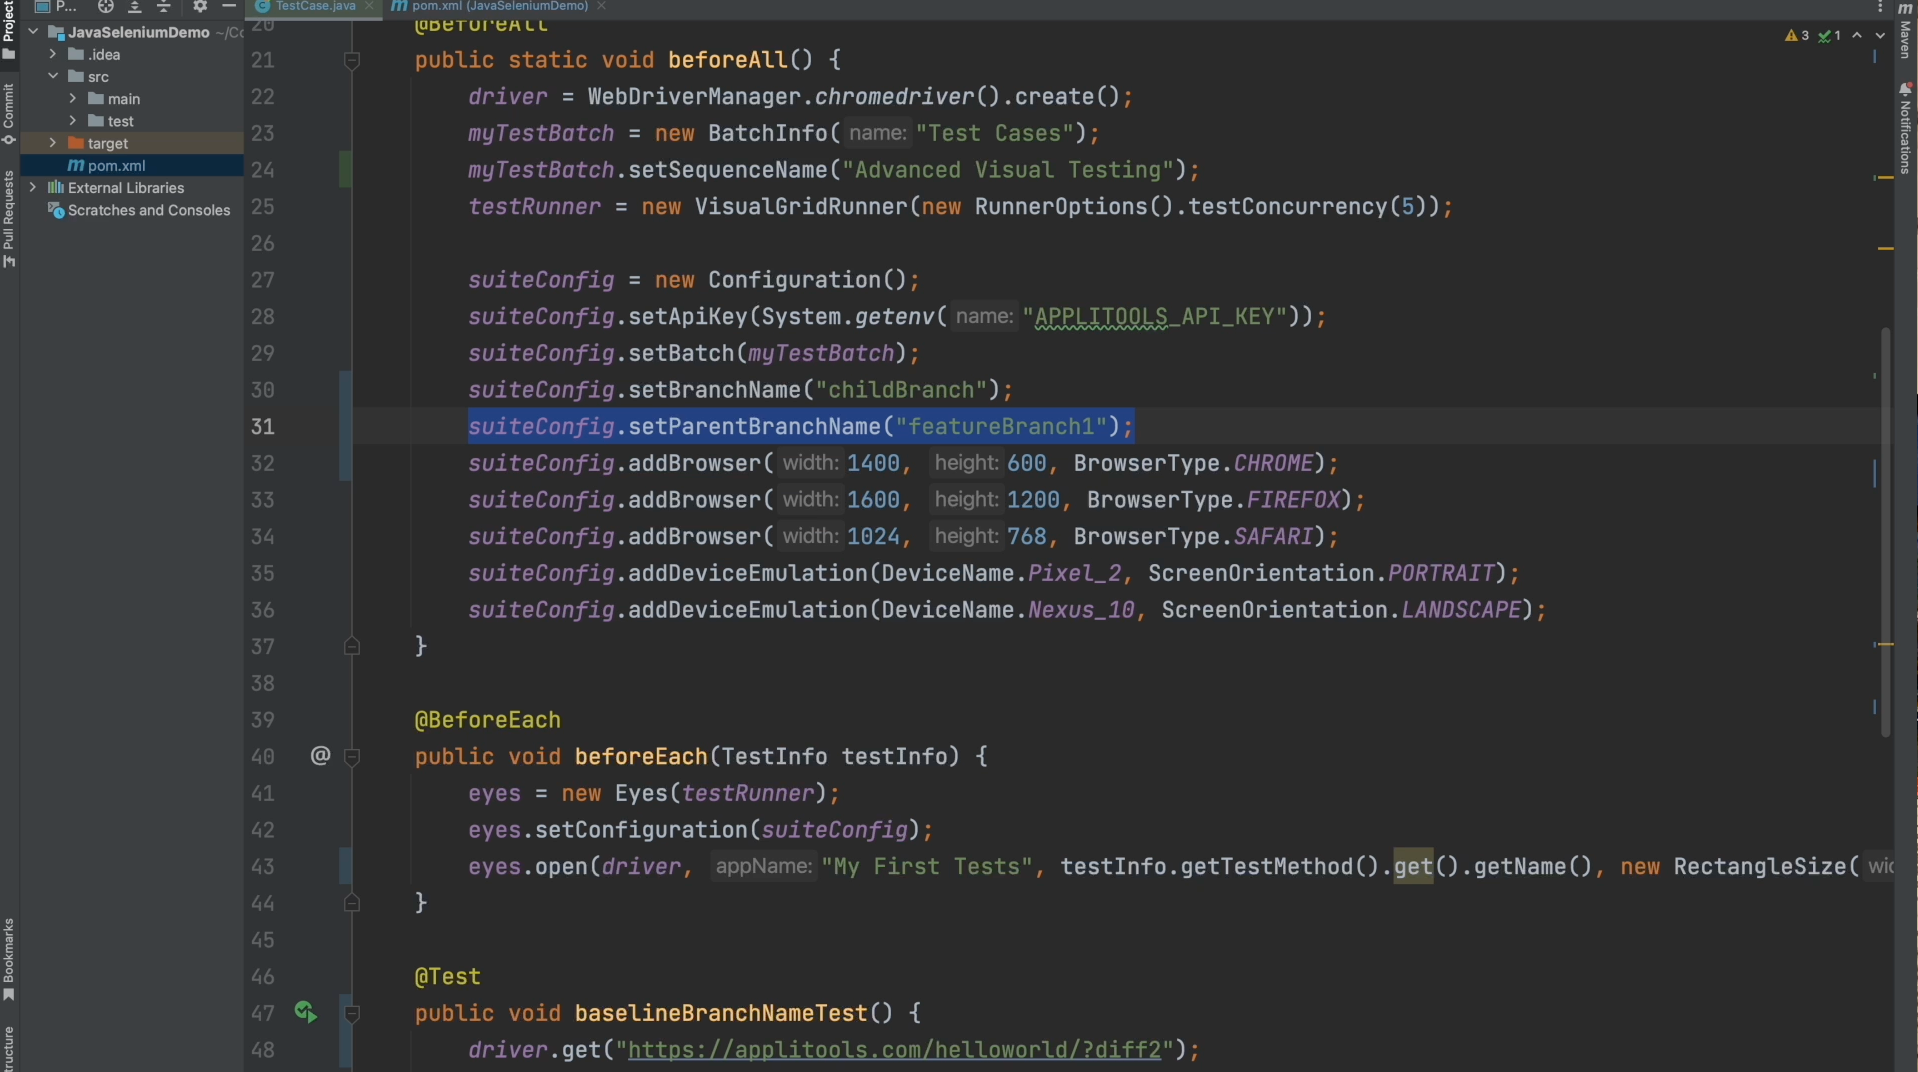
I've also added in the parentBranchName for the first time in this chapter. If you remember from the beginning of this chapter, this property will indicate that the parent branch of the branch we're running on should be featureBranch1. With this configuration, go ahead and run the test once again.
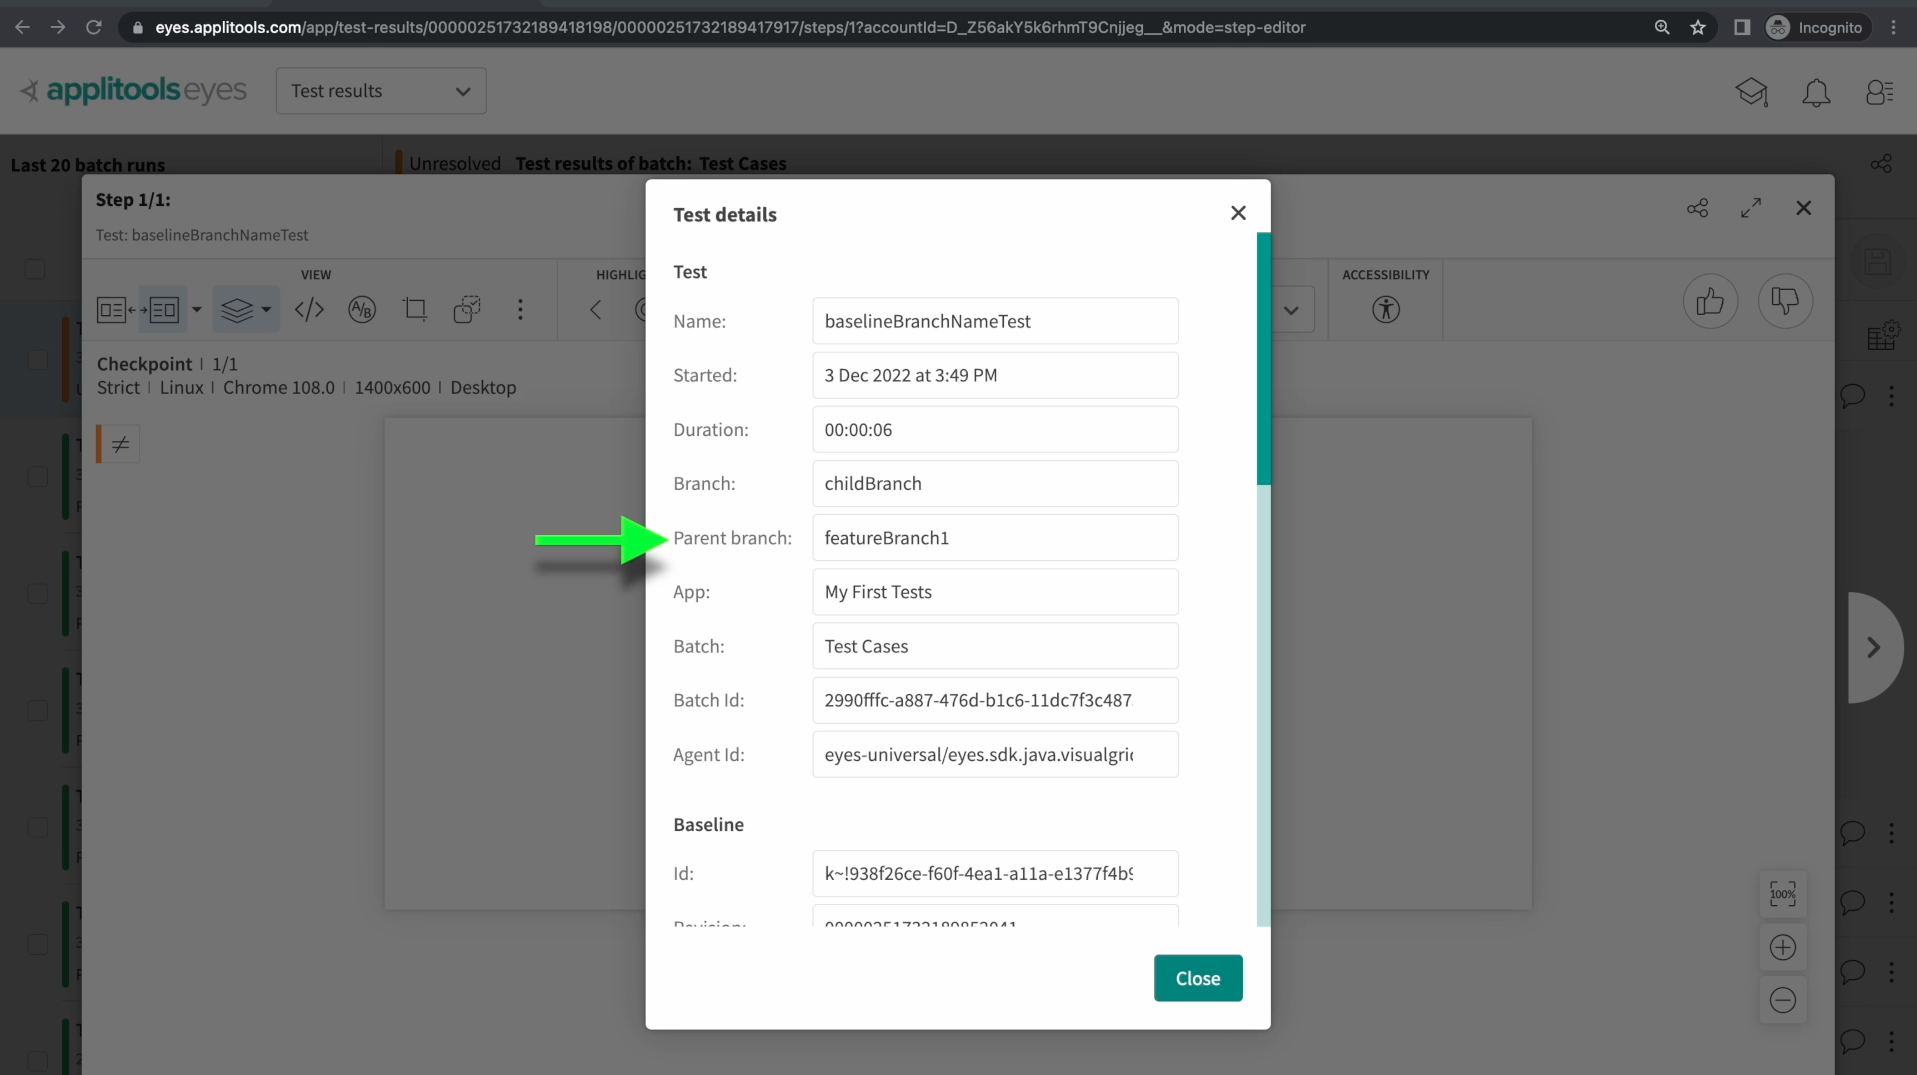
Looking at the test details for this run, we see that we now have the parentBranch property set to featureBranch1.
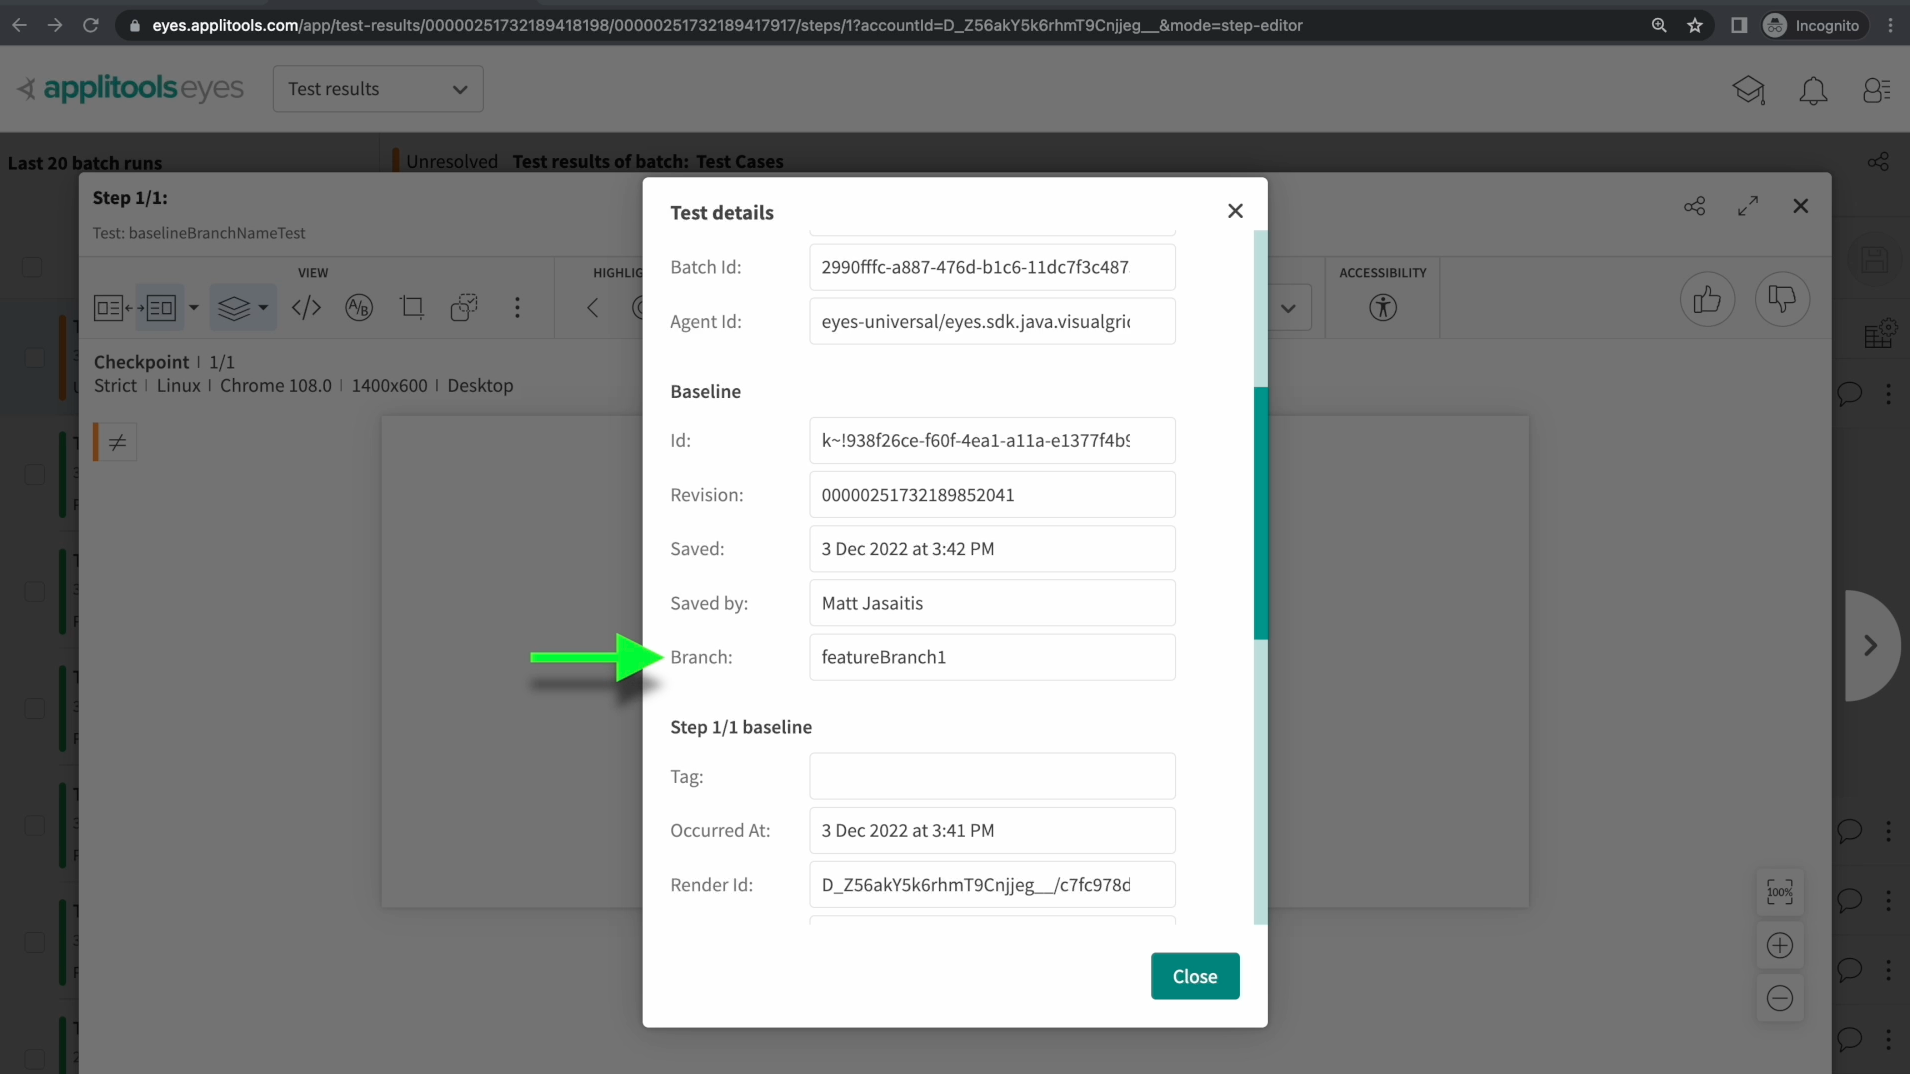
Scrolling down a bit further we also notice that the baseline we're comparing to is located in featureBranch1. We're comparing to this baseline because of the baseline progression logic I covered at the beginning of this chapter.
The Applitools server first checked in childBranch for a matching baseline but one wasn't found. It then checked our parent branch, featureBranch1, and we did find a matching baseline. A comparison was then made to the baseline in featureBranch1 and we got our test result.
Let's go ahead and accept and save all of those differences which will then create an updated baseline in childBranch.
A baseline now exists in default, featureBranch1 and childBranch for the baselineBranchName test that we've been running.
Let's head back to our code and make the final change for this example.
In our code, I've set the baselineBranchName property to default. Before moving on, go ahead and pause this video and write down a guess about how this will affect our test result. Which baseline will our test be compared to now? Once you've made your guess, go ahead and run your test again.
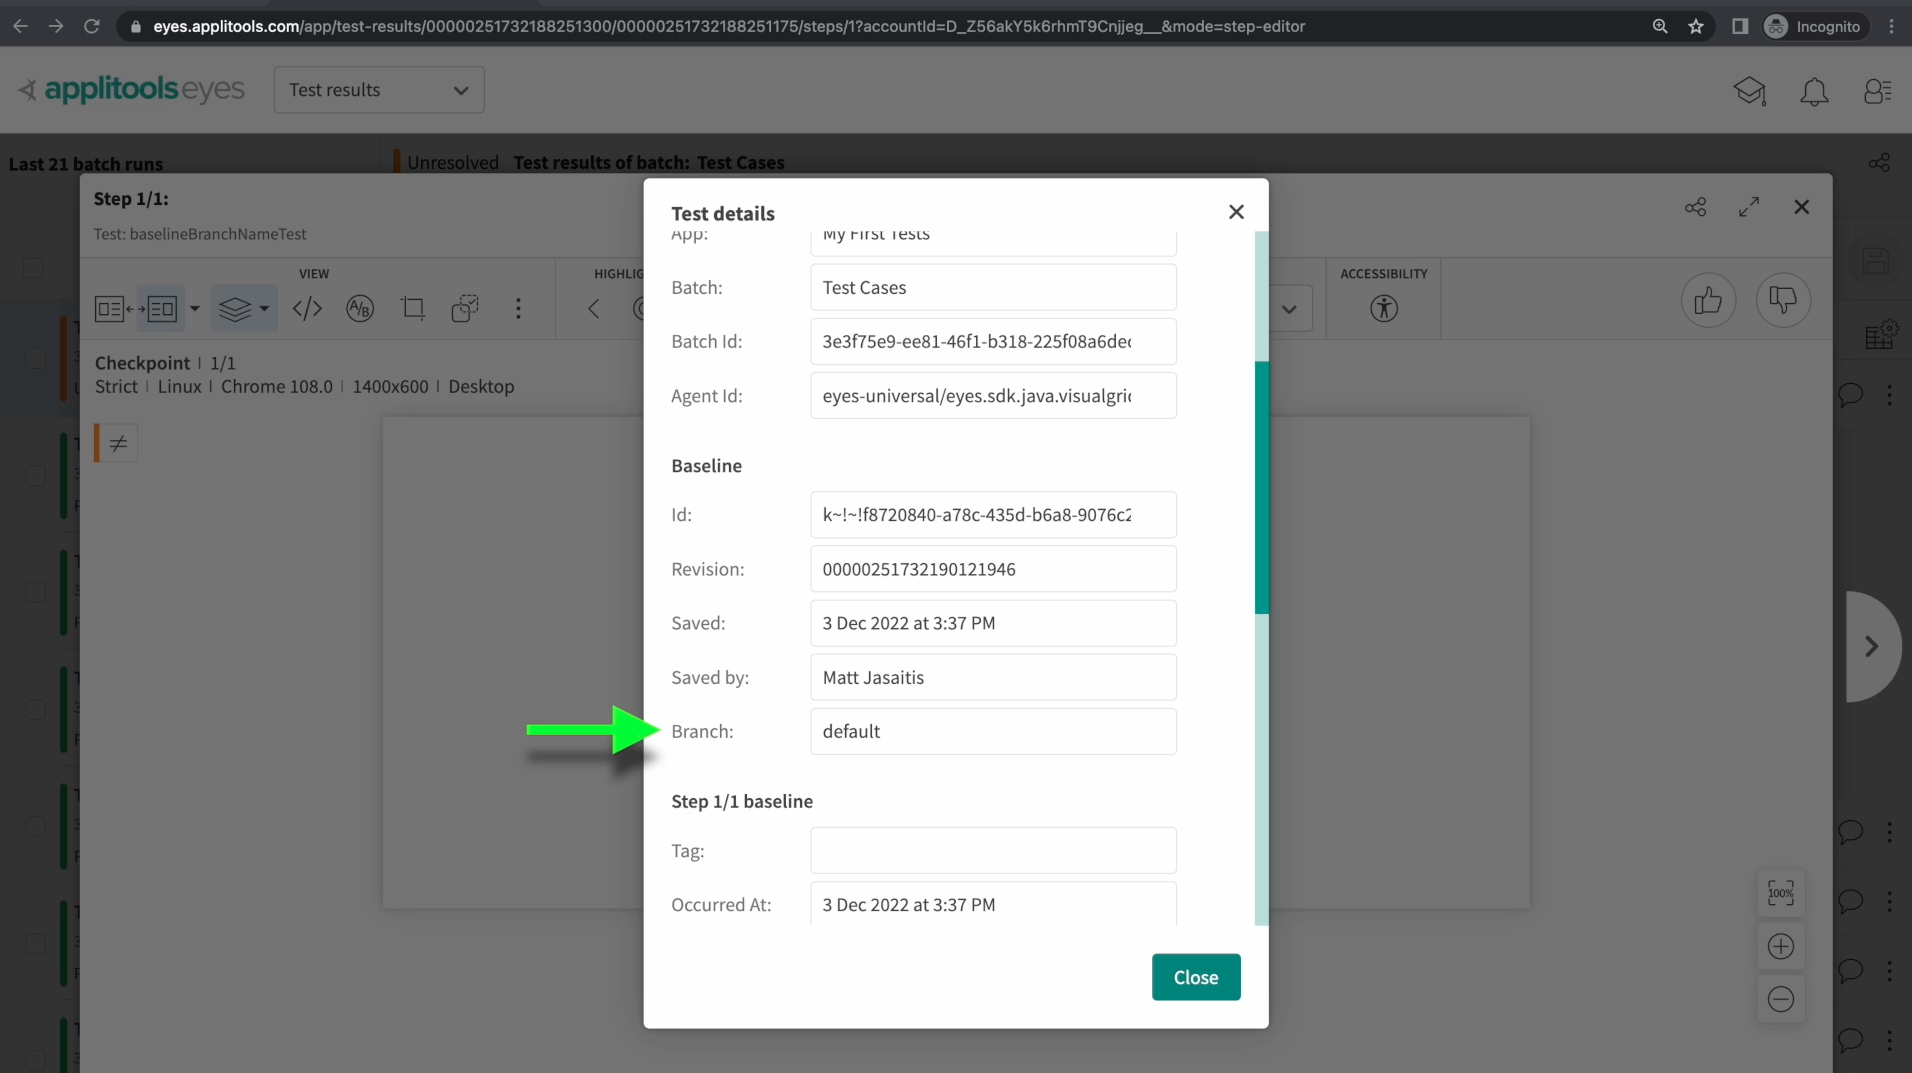
Reviewing our test details for the latest test that we just ran, we see that our test was compared to the baseline in the default branch. The baselineBranchName property told the Applitools server to skip the usual baseline progression and allowed us to choose which branch we wanted to compare to.
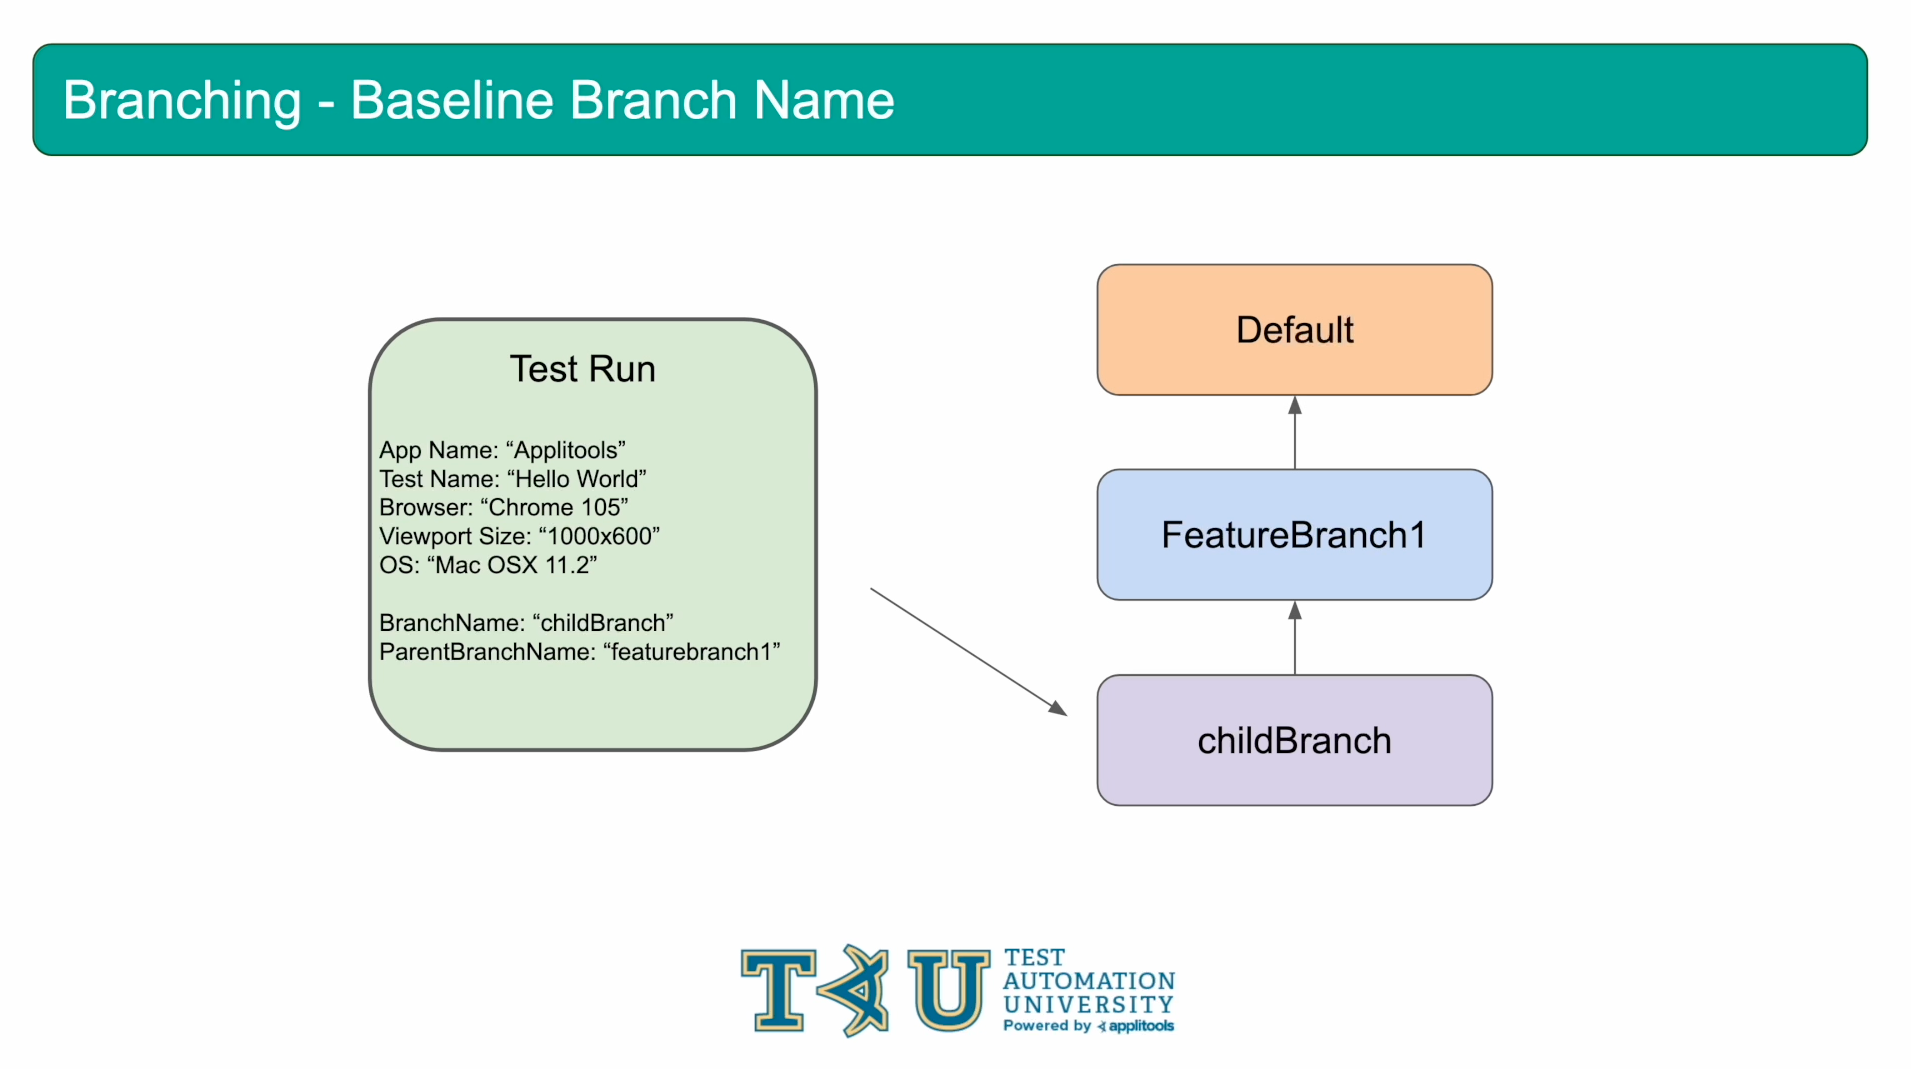
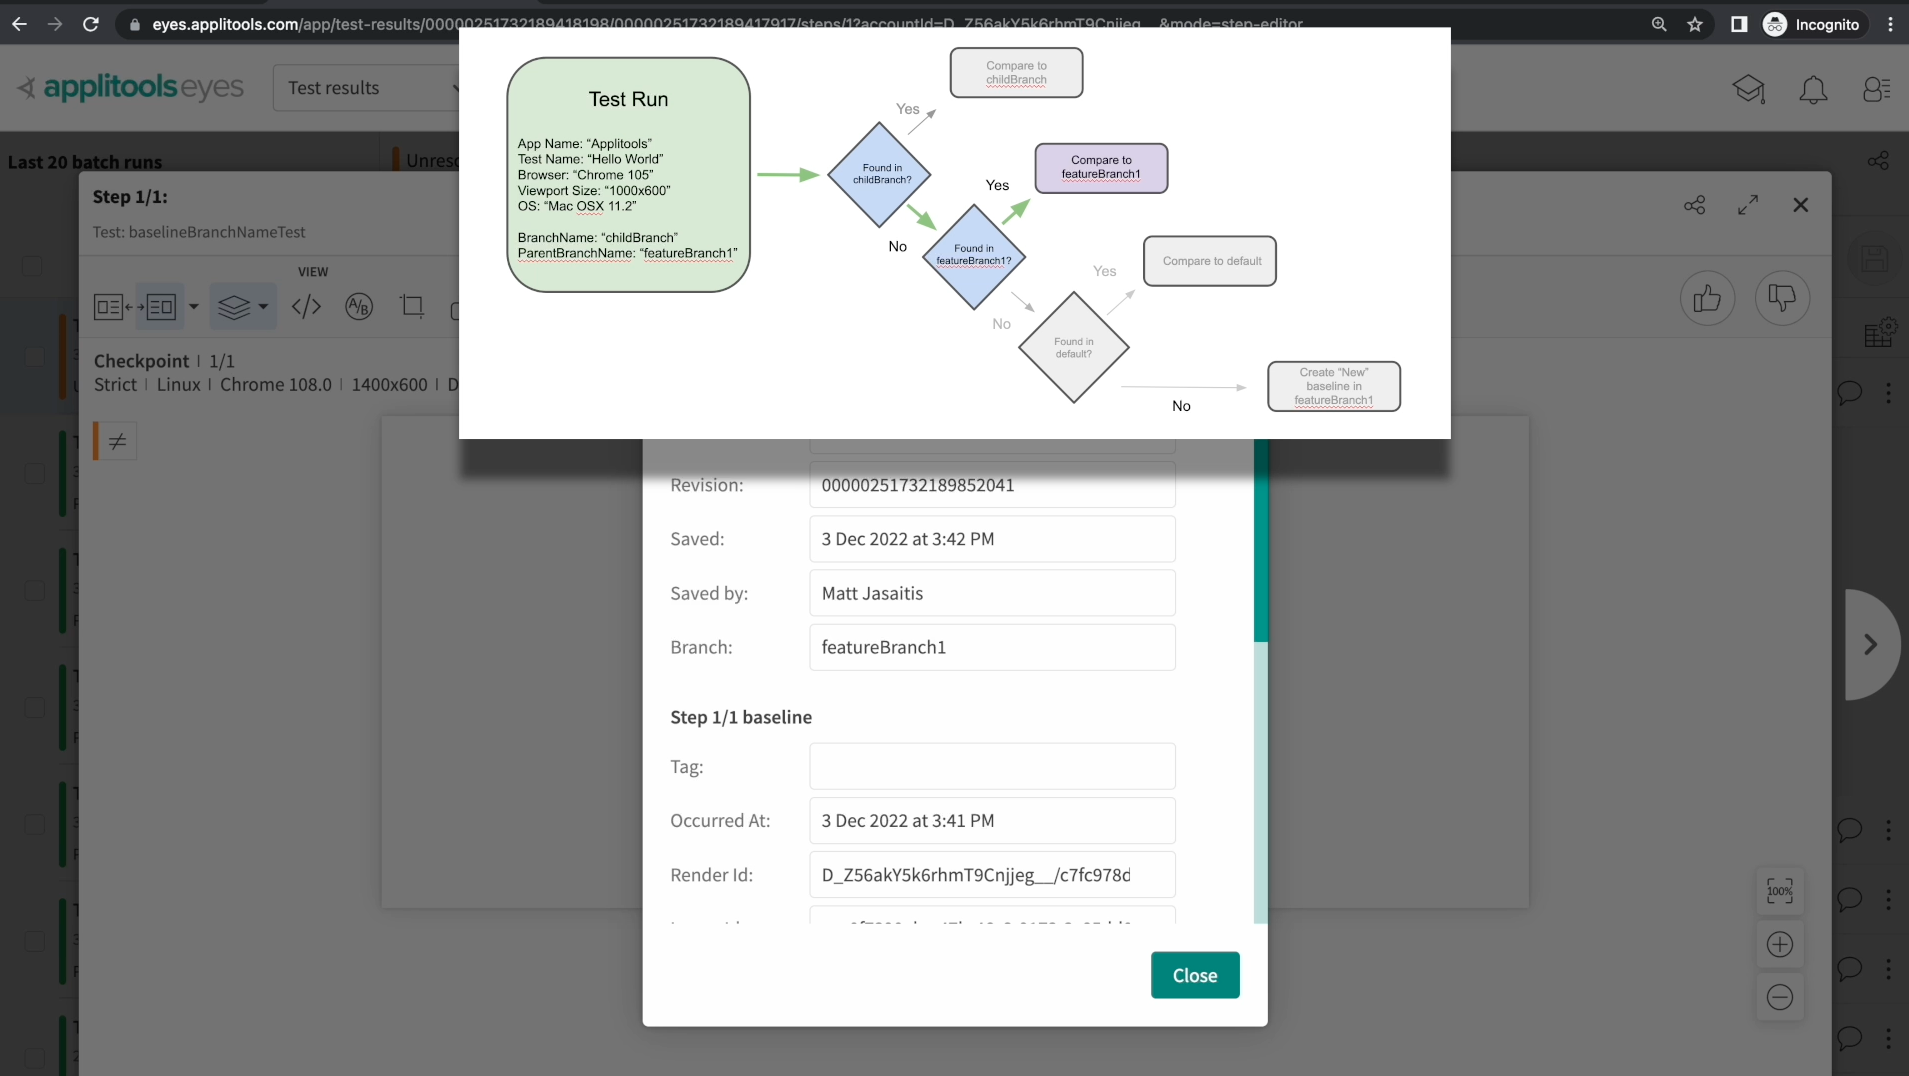
To wrap up this example, let's visually walk through what we just did. On the screen we have a test run with branchName set to childBranch and parentBranchName set to featureBranch1.
If we run this test without the baselineBranchName property, it will follow the typical progression of searching for a baseline by first checking in the current branch, followed by the parent branch and then finally the default branch.
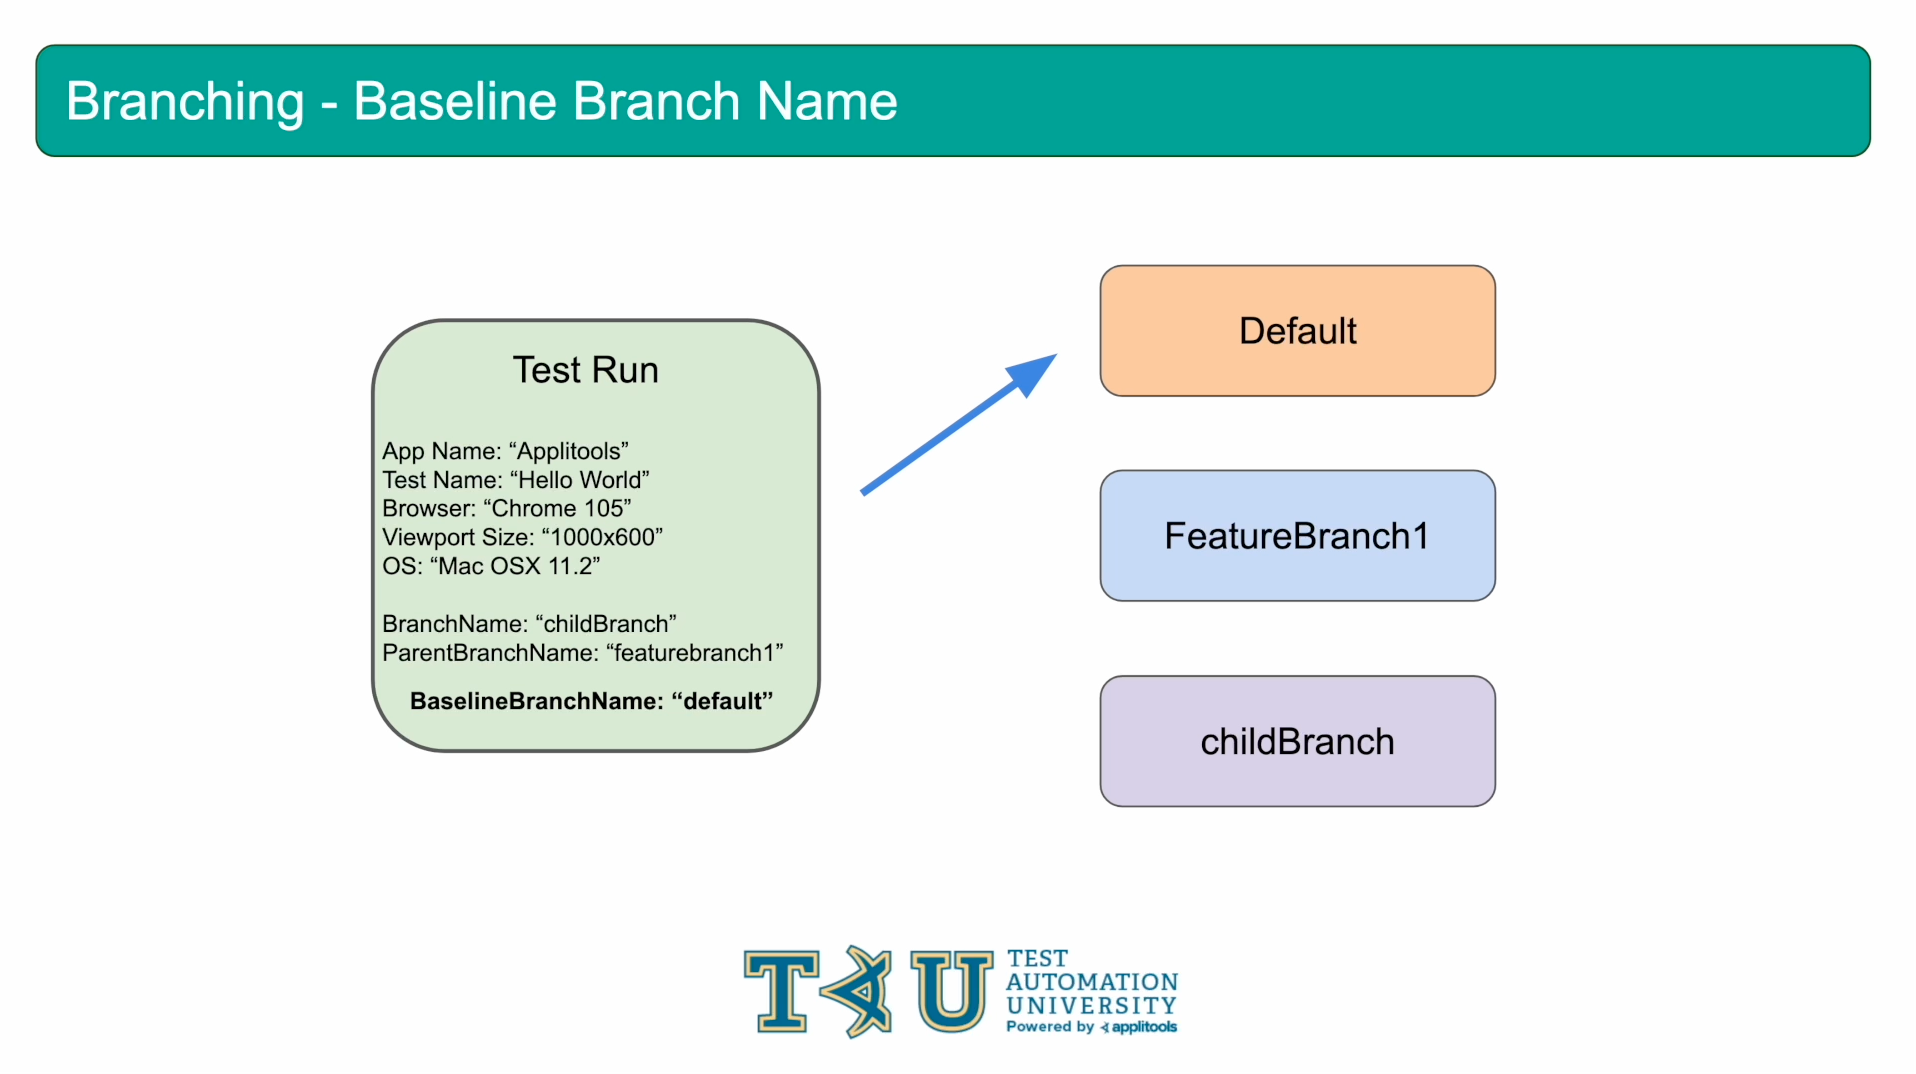
If we add in the baselineBranchName property and set it to default, this progression will be skipped and we will check for matching baselines directly in the default branch.
This chapter went in depth on Branching and many of the core concepts surrounding it.
We first learned how to create, compare and merge branches as well as what to do when conflicts came up when merging. We then learned how to compare directly to a specified branch by using the baselineBranchName property.
This was a ton of information so feel free to go back through this chapter once more if everything did not make sense right away. Also, please don't hesitate to reach out to us on the support channels mentioned earlier if anything needs clarification.
Resources
- Branching Docs: https://applitools.com/docs/topics/test-manager/pages/tm-page-branch-baselines.html?Highlight=branching
