

Warning!
This course was created with an older version of pytest-bdd.
Over the years, updates to the framework introduced backwards-incompatible changes.
The example project code and transcripts are updated, but the videos still show the old code.
Please review the pytest-bdd docs to see
specific syntax changes in newer versions.
Transcripted Summary
Now, that we know a little bit about pytest-bdd, let's write our first test.
Reminder
For all code examples in this course, I'll be using PyCharm Professional Edition as my IDE. Also, remember you can follow along with the code from my GitHub repository linked in the resources by chapter.
So, here's the project that we created from the previous chapter, it's called tau-pytest_bdd.
In it we can see it has basic contents like a .gitignore file, the Pipfiles from pipenv, and also a README.
I've also added a module called cucumbers.py.
# cucumbers.py
"""
This module contains a simple class modeling a cucumber basket.
Cucumbers may be added or removed from the basket.
The basket has a maximum size, however.
"""

class CucumberBasket:

    def __init__(self, initial_count=0, max_count=10):
        if initial_count < 0:
            raise ValueError("Initial cucumber basket count must not be negative")
        if max_count < 0:
            raise ValueError("Max cucumber basket count must not be negative")

        self._count = initial_count
        self._max_count = max_count

    @property
    def count(self):
        return self._count

    @property
    def full(self):
        return self.count == self.max_count

    @property
    def empty(self):
        return self.count == 0

    @property
    def max_count(self):
        return self._max_count

    def add(self, count=1):
        new_count = self.count + count
        if new_count > self.max_count:
            raise ValueError("Attempted to add too many cucumbers")
        self._count = new_count

    def remove(self, count=1):
        new_count = self.count - count
        if new_count < 0:
            raise ValueError("Attempted to remove too many cucumbers")
        self._count = new_count
And this module contains a `CucumberBasket` class, which we'll use for some of our example test cases.
The CucumberBasket is pretty simple code: it's the idea that you have a holder for cucumbers.
You can give it an initial count of cucumbers [
initial_count], as well as a maximum count [max_count].It has properties that hold its
count, that hold itsmax_count, and it also has boolean properties for if it'sfull, or if it'sempty.The class also provides methods for adding [
add] and removing [remove] cucumbers.And if the amounts being added or removed are invalid, according to the maximum or the zero, then value errors will be thrown as exceptions.
Common Python & pytest-bdd File Conventions
For Python projects, it's a common practice to put all test cases into a “tests” directory, just beneath the root project directory, and pytest follows this convention as well. However, for pytest-bdd, it's also convention to put a “features” directory within the “tests” directory for all of the Gherkin feature files, as well as a separate “step_defs”, or step definitions directory, for all the Python modules that include step definition code for each of those lines of Gherkin.
Now, pytest is very flexible, and you can change this layout as you like. But the “features” and “step_defs” underneath the “tests” directory is the most common practice; and it's the one that most people will recognize. So, I'm going to use it for our examples here.
Now, let's write our first feature file.
Here under the “features” directory, I've created a feature file called cucumbers.feature and it's opened here.
# cucumbers.feature
Feature: Cucumber Basket
    As a gardener,
    I want to carry cucumbers in a basket,
    So that I don't drop them all.

    Scenario: Add cucumbers to a basket
        Given the basket has 2 cucumbers
        When 4 cucumbers are added to the basket
        Then the basket contains 6 cucumbers
Feature files are written in Gherkin, and they're pretty easy to read.
First of all, they start with a Feature section.
The Feature section describes the feature under test, in our case, it's a “Cucumber Basket”.
Tip: Best Practice for Readability
As a best practice, I always recommend people put the user stories and any other helpful information just beneath the Feature title. These lines will be treated as comments by the pytest-bdd framework. So, you can basically put whatever you want.
Under a Feature section there can be one, to many scenarios.
A Scenario is basically a test case; it's also a behavior specification.
Scenarios are meant to be self-descriptive and self-documentative of what the behavior is doing.
Each Scenario starts with a title. In this case, our title is “Add cucumbers to a basket”, because that's the name of the test case or the behavior that we'll be coding here.
Scenarios are written in “Given/When/Then” format. And as we remember, Given sets up initial state, When takes an action, and Then verifies the outcome.
For our CucumberBasket that we saw in the cucumbers.py module, I can write a simple scenario that exercises the adding behavior. So, Given the basket has 2 cucumbers, When, 4 cucumbers are added to the basket, Then, the basket, contains 6 cucumbers.
This is what we mean when we say Specification by Example.
We are providing real world examples of adding cucumbers to the cucumber basket with hard numbers: 2, 4 and 6.
And the reason why we use these concrete examples, is because it's much easier to communicate with real examples than with abstract descriptions. We know 2 plus 4 is 6, and so, this scenario makes intuitive sense to us.
We write our test cases in Gherkin first because that helps us, as authors, focus on writing good test cases rather than worrying about test code.
Now that we've written our test case, let's see how we add those Python step definition functions to be able to run these as test scripts.
If you're using PyCharm Professional Edition, you'll notice that anytime you write a step that doesn't have a step definition file, the editor will highlight it in yellow.

If we put our cursor on the line and go to this yellow light bulb, we can choose the option to Create all step definitions automatically. It'll pop up with this little dialogue here.
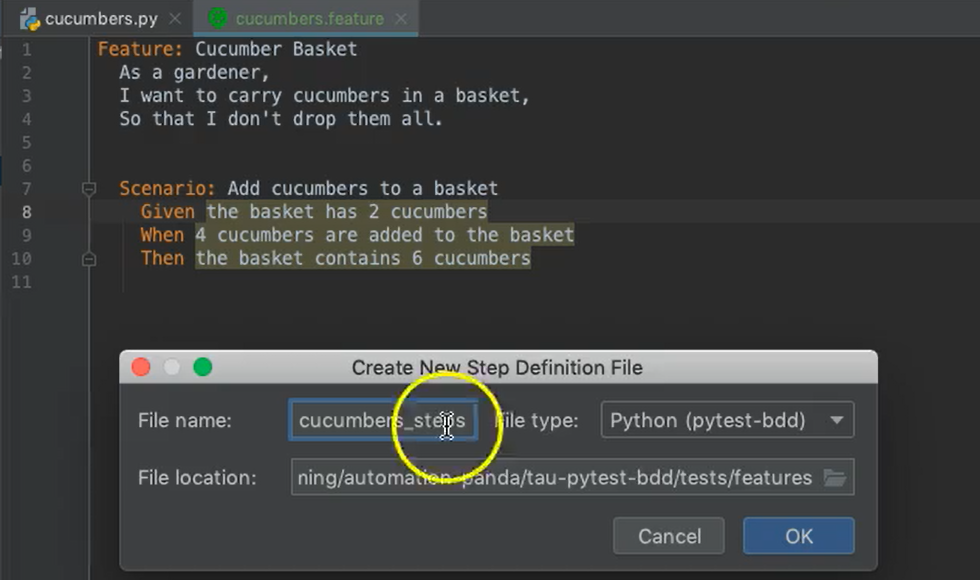
I'm going to name this “cucumbers_steps”, and I'm going to put it in the “step_defs” directory. Hit OK.
I'll add it to Git. And we can see here, cucumbers_steps.py is an automatically generated module, and it provides stubs for each of those steps: Given, When, and Then.
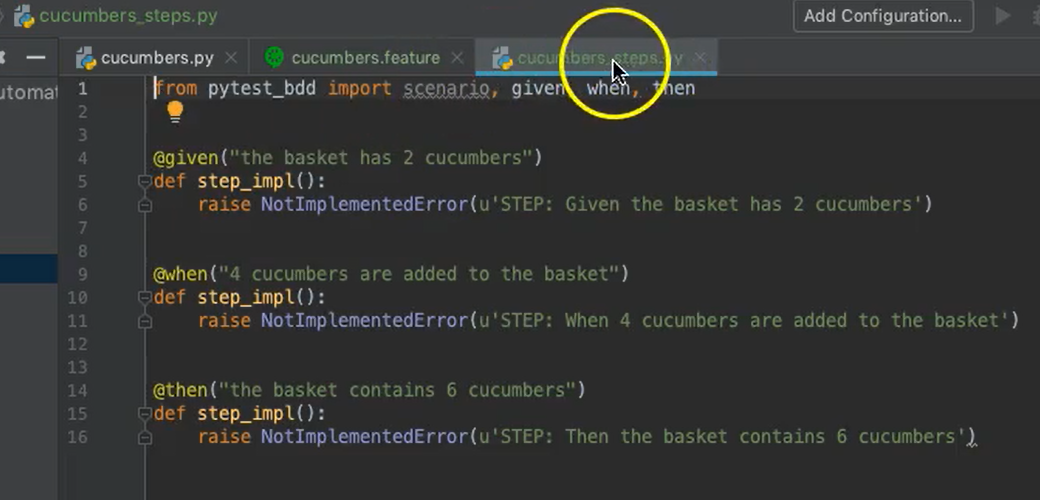
We can see that each step definition is a function.
Each function has a decorator that's imported from the pytest_bdd module, and each decorator is given the step text as an argument, that corresponds directly to what we saw in the feature file.
When pytest_bdd goes to run the feature file as a test script, it will look for all the functions that have decorators of that step type, and then it will search for the matching step text for those decorated functions.
When generated as a stub the functions are just given not implemented exceptions, which is okay because we'll implement those next.
I also want to point out that the step definitions package, under your “tests” folder, should include the standard __init__.py Python module, to make it clear that this is a Python package.
So now, let's look at how we should implement these step definition functions.
# cucumbers_steps.py
from pytest_bdd import scenario, given, when, then

from cucumbers import CucumberBasket

@scenario('../features/cucumbers.feature', 'Add cucumbers to a basket')

def test_add():
    pass

@given("the basket has 2 cucumbers", target_fixture='basket')
def basket():
    return CucumberBasket(initial_count=2)

@when("4 cucumbers are added to the basket")
def add_cucumbers(basket):
    basket.add(4)

@then("the basket contains 6 cucumbers")
def basket_has_total(basket):
    assert basket.count == 6
Within the cucumber_steps module, I'll need to import my CucumberBasket from the cucumbers module.
Also, I'll need to declare what the scenario is that I intend to run. I use a scenario decorator [@scenario], I provide a path to the feature file [../features/cucumbers.feature] and I also provide the scenario name, which is “Add cucumbers to a basket”.
So, we can see here I have to declare it like a regular pytest test, using a standard function with the test prefix.
I don't necessarily need to put anything in here except “pass", because the steps will come from the feature file. But you could add some other content in here if you want to. Whatever you put inside of the scenario function, will be executed after all of the scenario steps.
Now, let's take a look at the step definition implementations from our stubs.
The first one is for the Given:
@given("the basket has 2 cucumbers", target_fixture='basket')
What I want to do in this function is simply construct a CucumberBasket object with the initial count of 2 as our step dictates, and then I want to return it. This may seem a little funny, but we'll see why we're returning it in a moment.
This function is a pytest fixture. And as I've highlighted it here, you can see it's used by all of the other step definition functions as a fixture. What that means is, when this step is called, and this value is returned, it becomes the fixture value that is dependency-injected into all of the other step definition functions that declare that a fixture by name as an argument.
So, in my When Step, @when I want to add 4 cucumbers to the basket, I simply declare that as a dependency, and whatever value was constructed here and returned, is the value that I'm going to get here.
So, I can start with 2, and then I can add 4, just like that.
Very clean, very cool, and a very, very nifty way to share context between steps. Like I said, it's simply uses the existing functionality of pytest fixtures.
Similarly, with the Then step [@then], we can see we use that fixture again. And now this time in Then Step, we're looking to make an assertion that the basket count is 6, because that's what I would expect based on my previous steps.
pytest is really great in that you can use a basic assert statement for all of your assertions, and it will do advanced introspection to give you good logs and to dump all the values.
Another really nice facet of BDD test frameworks, like pytest-bdd, is that these step definitions can easily be reused.
We can write the Python code for each one of these steps once, but then these steps can be reused by any number of scenarios. That makes BDD frameworks like this really extensible and really reusable, and that can really enable rapid test automation development.
So now, that we've written, not only the Gherkin feature file, but also the Python step definition module, we can run the scenario as a test script.
And we can do it two ways:
- We can run it through our IDE, or
- We can run it from the command line.
First, let's run it through PyCharm.
In order to do that, it's simple: right-click on the step definition module and go down to the Run.
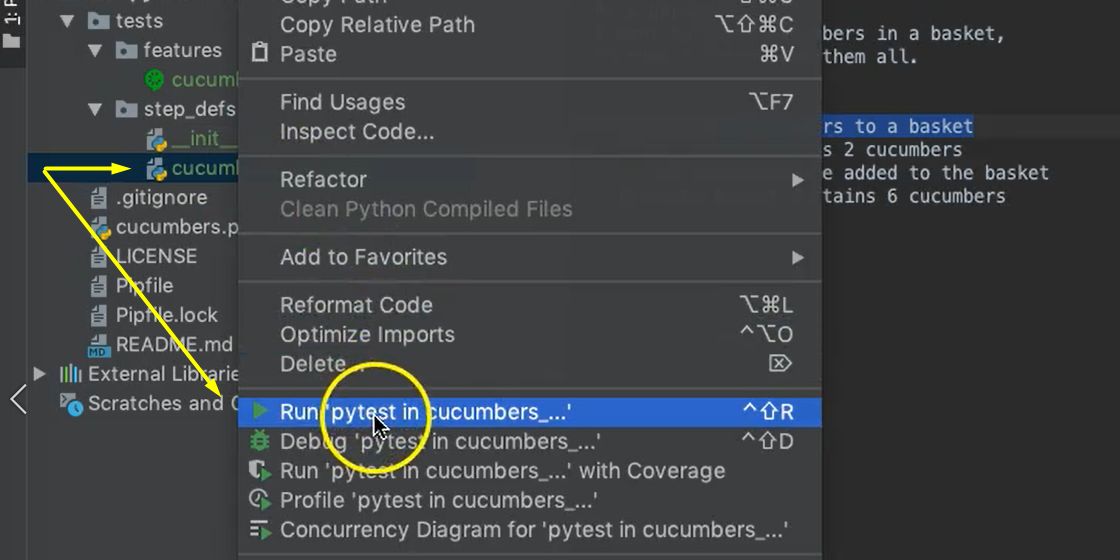
You'll see the output window appear at the bottom, and the standard pytest log will appear. It ran very quickly.
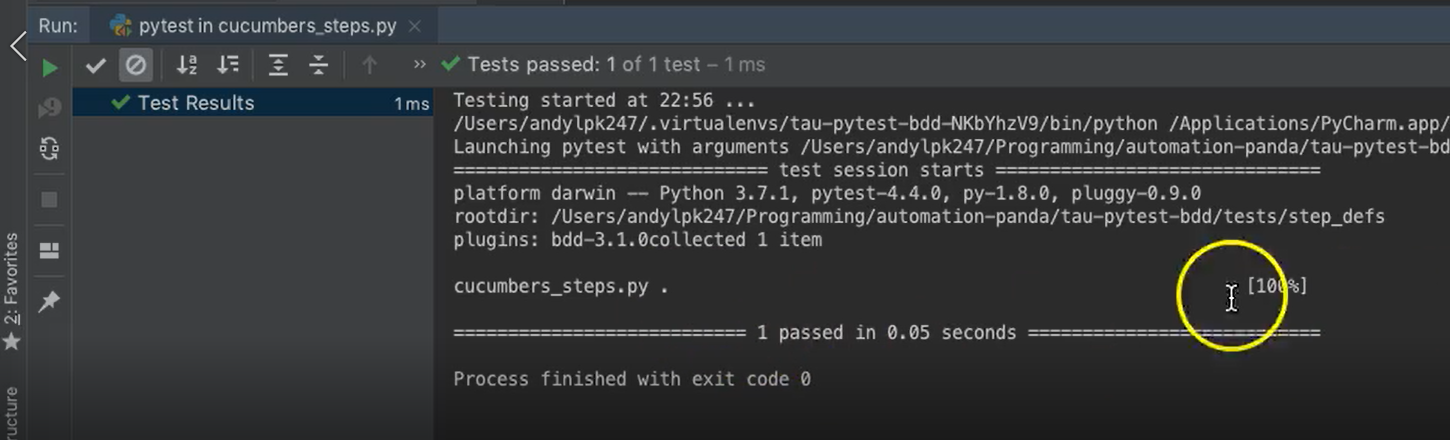
100% passing. Shows here in the GUI, we're good to go.
So now, let's try to run our tests from the command line.
I'm already in my project directory, we can see all the directories and the files are there.
To run pytest, I say
pipenv run python -m pytest
and it should pick up all of my tests using discovery and run them one by one.
Unfortunately, though, it can't find my tests.
No test ran because no tests were found. That's a little peculiar.
Let's go back and fix that.
Module Naming Convention for Python Tests
The reason why no tests were discovered is because pytest expects all test Python modules to be prefixed with “test_”. Our cucumber_steps.py module does not have that prefix.
So, if I name it test_cucumbers_steps.py, and I try to rerun the command, this time, we can see it picked up.
I could also run individual step definition modules like this, by giving the full path.
pipenv run python -m pytest tests/step_defs/test_cucumbers_steps.py
And if I did it this way, I wouldn't need that “test_” prefix.
I do recommend using that prefix as a best practice though, because it's much easier to run all tests with one simple pytest command, than trying to spell out every single path for every single step definition module.
I should also point out that pytest-bdd does not allow you to run feature files directly.
This may seem odd, but the reason is due to how pytest-bdd has its tests implemented.
Remember, since it's piggybacking off of pytest, every test is essentially in a test module, those step definition models. That's why in the step definition modules, we have to link the scenarios by name because that's what tells pytest that, "Hey, this feature file is actually a pytest style test."
And there you have it. We've written and run our first test using pytest-bdd. In the future chapters, we'll cover some more advanced examples.
