

Warning!
This course was created with an older version of pytest-bdd.
Over the years, updates to the framework introduced backwards-incompatible changes.
The example project code and transcripts are updated, but the videos still show the old code.
Please review the pytest-bdd docs to see
specific syntax changes in newer versions.
Transcripted Summary
In the previous chapter, we learned how to automate REST API tests with pytest-bdd.
Now in this chapter, let's up the ante by learning how to write Web UI tests.
Web UI tests aim to automate user-like test scenarios — clicking buttons, entering text and navigating through pages.
Gherkin is a natural fit for writing these tests because it writes those interactions in plain language that everyone can understand. And it pushes grittier details like web locators and Selenium WebDriver calls down into the Python Code, so we have a nice separation between test case and test code.
Let's learn how to do it.
For our example tests, we'll use the DuckDuckGo search engine as our product under test.
It's pretty simple. It works like any other search engine. You type in a phrase and you get search results with links.
So, you may be wondering how can we automate web interactions with a real browser?
That's where Selenium WebDriver comes in.
WebDriver is the de facto standard for automating browser interactions, and it works with real browsers like Chrome, Firefox, Safari, IE and more.
The Python package for Selenium WebDriver is simply called selenium, with lowercase and we'll be using that in our tests.
You can use any browser with Selenium WebDriver like we just said. But for our tests, will be using Firefox.
SeleniumWebDriver Browser Compatibility
One important thing to note, regardless of the browser type you use, you'll also need to install a WebDriver executable that's compatible with that browser. Selenium WebDriver calls from your test automation will call the WebDriver executable, like a proxy server, which will then go and make the calls directly to the browser under test.
For Firefox, we need to use geckodriver. so, make sure you have that installed on your machine as well as that it's accessible from the system path.
Let's look at some Web UI tests with pytest-bdd.
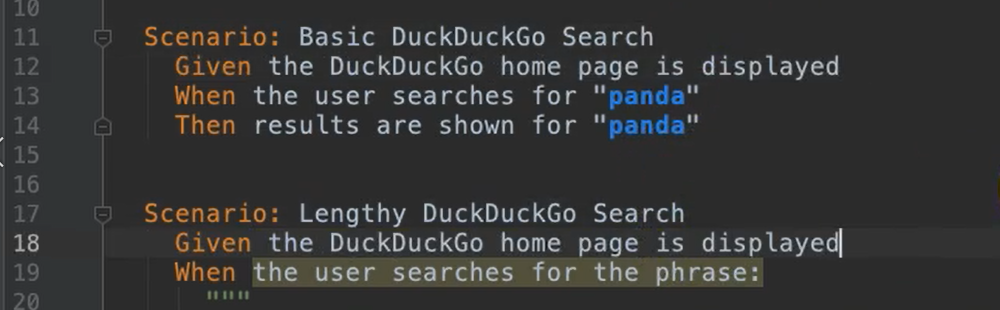
Here I have a feature file called web.feature.
# web.feature
Feature: DuckDuckGo Web Browsing
  As a web surfer,
  I want to find information online,
  So I can learn new things and get tasks done.

  Background:
    Given the DuckDuckGo home page is displayed

  Scenario: Basic DuckDuckGo Search
    When the user searches for "panda"
    Then results are shown for "panda"

  Scenario: Lengthy DuckDuckGo Search
    When the user searches for the phrase:

    """
    When in the Course of human events, it becomes necessary for one people to dissolve the political bands which have connected them with another, and to assume among the powers of the earth, the separate and equal station to which the Laws of Nature and of Nature's God entitle them, a decent respect to the opinions of mankind requires that they should declare the causes which impel them to the separation.
    """

Then one of the results contains "Declaration of Independence"
I've named it “DuckDuckGo Web Browsing” and I've given it two different scenarios for searching.
Now you may be intrigued to see that there's some new Gherkin syntax we see here.
The first thing we see is the Background section.
Background section simply provides additional steps that will be run almost like a setup function. The Background runs once before each Scenario. So, in this case for this feature file, it'll be run twice — once before the first scenario and once before the second one.
It would be almost as if the scenarios were written like this:
Moving common setup steps to a Background section simply eliminates duplicate lines of code.
A second thing you might notice is that there's this multi-line step here.
We have 1 step line and then a whole bunch of lines here within these triple quotes. This is called a multi-line step. This is simply passed as a String input and we'll see how to do that in the pytest-bdd step function in just a moment.
But let's actually look at what these steps are do, or what these scenarios are doing.
Our first scenario is a basic DuckDuckGo search.
Giventhe DuckDuckGo home page is displayed.Whenthe user searches for “panda”, the results are shown for panda.
It's very descriptive, very intuitive.
We don't see anything with Selenium WebDriver at this level. We simply see the plain language descriptions of what this behavior is.
Our second scenario is a lengthy DuckDuckGo search, so:
Giventhe DuckDuckGo home page is displayedWhenthe user searches for the phrase "when in the course of human events such and such and such blah, blah, blah"Thenwhat do we expect — one of the search results contains “Declaration of Independence”
Why? Because this is a snippet from the Declaration of Independence.
Again, specification by example, intuitive, readable, understandable, simple.
I would also like to point out as well that these 2 scenarios are independent.
Test case independence is hugely important because we want to make sure that these tests don't annihilate each other or collide with each other, so to speak. That's why the Background section is run once per scenario because this startup, or this setup step, will start the test at the DuckDuckGo homepage for each test.
It's almost like a reset, so to speak.
Now that we've seen our feature file, let's look at the step definition module.
# test_web_steps.py
Warning!
The example code shown here in the transcript is up-to-date and will work with pytest-bdd version 6. It matches the code in the example repository. The code shown in the video is from pytest-bdd version 3 and is outdated.
"""
This module contains step definitions for web.feature.
It uses Selenium WebDriver for browser interactions:
https://www.seleniumhq.org/projects/webdriver/
Setup and cleanup are handled using hooks.
For a real test automation project,
use Page Object Model or Screenplay Pattern to model web interactions.

Prerequisites:
 - Firefox must be installed.
 - geckodriver must be installed and accessible on the system path.
"""

import pytest

from pytest_bdd import scenarios, given, when, then, parsers
from selenium import webdriver
from selenium.webdriver.common.by import By
from selenium.webdriver.common.keys import Keys

DUCKDUCKGO_HOME = 'https://duckduckgo.com/'

scenarios('../features/web.feature')

@pytest.fixture
def browser():
    # For this example, we will use Firefox
    # You can change this fixture to use other browsers, too.
    # A better practice would be to get browser choice from a config file.
    b = webdriver.Firefox()
    b.implicitly_wait(10)
    yield b
    b.quit()

@given('the DuckDuckGo home page is displayed', target_fixture='ddg_home')
def ddg_home(browser):
    browser.get(DUCKDUCKGO_HOME)

@when(parsers.parse('the user searches for "{text}"'))
@when(parsers.parse('the user searches for the phrase:\n{text}'))
def search_phrase(browser, text):
    search_input = browser.find_element(By.NAME, 'q')
    search_input.send_keys(text + Keys.RETURN)

@then(parsers.parse('one of the results contains "{phrase}"'))
def results_have_one(browser, phrase):
    xpath = "//*[@data-testid='result']//*[contains(text(), '%s')]" % phrase
    results = browser.find_elements(By.XPATH, xpath)
    assert len(results) > 0

@then(parsers.parse('results are shown for "{phrase}"'))
def search_results(browser, phrase):
    # Check search result list
    # (A more comprehensive test would check results for matching phrases)
    # (Check the list before the search phrase for correct implicit waiting)
    assert len(browser.find_elements(By.CSS_SELECTOR, '[data-testid="result"]')) > 0
    # Check search phrase
    search_input = browser.find_element(By.NAME, 'q')
    assert search_input.get_attribute('value') == phrase
You can see here that we've imported some stuff from the selenium package.
We also have our DuckDuckGo URL and we've declared the feature file using the scenarios helper function.
One important thing to know with Selenium WebDriver is that you need to do careful setup and cleanup; and pytest makes that easy with the power of fixtures.
So here I have a browser
fixturethat will initialize a Firefox WebDriver set an implicit wait time of 10 seconds.It will
yieldthat for setup so that anytime thisfixtureis called by a step, it will receive that Firefox WebDriver instance.And then after the test is done, it will quit the WebDriver.
Importance of Quitting
Quitting is very important because if you don't quit, there's a chance that the browser process or the WebDriver process could become a zombie. And if it's a zombie, it will use up system resources and it could even lock system resources like files or directories. So, you always want to make sure that your tests will clean up the Firefox, or whatever WebDriver you're using.
Now, let's take a look at the step functions — our givens, whens and thens.
You'll notice that each one uses that browser fixture to get a reference to the browser that we've initialized.
Other than that, the steps are pretty much the same as for any other types of pytest-bddstep functions. They use the same types of step matching, the same decorators. They just happen to use Selenium WebDriver calls because they're web steps.
Here, for our first Given Step, the DuckDuckGo home page is displayed.
We use the browser to navigate to the DuckDuckGo home URL. As we remember from our feature file, that was the setup step — make sure you're on the page.
For our When Steps we're just running searches, when the user searches for some text or the user searches for some lengthy phrase.
If you've recalled the multi-line step, that's accommodated by this particular when decorator here.
@when(parsers.parse('the user searches for the phrase:\n"""{text}"""'))
All we did is we use the “\n” to denote that there's a new line and we put the triple quotes so that we know we're going to parse the text between them.
For both of these steps though, the searching behavior is basically the same.
You'll say —
browser.find_element_by_name('q')— and “q” is that search bar on the DuckDuckGo home page.And then we're going to send the text keys to it and hit enter and that'll run our search.
Our Then Steps verify what we find on the results page.
So, the first one, one of the results contains our phrase — what we want to do is we want to go to our browser, find an element where the one of the links contains that search phrase text and
assertthat we find at least one element like that.For my other step, results are shown for the phrase — what I want to do is I want to find all the links and make sure that I get some. Then I also want to make sure that the search input at the top has a value equal to whatever my search phrase was.
So, as we can see, Selenium WebDriver calls can be pretty complex. It's easy to get lost in the details, when you start looking at things like xpaths or finding elements or getting attributes.
In this course, I don't want to get down too deep into the details of Selenium WebDriver. I simply want to show how you can use pytest-bdd in order to automate your web tests.
If you want to learn more about Selenium WebDriver, definitely check out some of the other Test Automation University courses such as:
Web Element Locator Strategies where you can learn how to form good locators like xpaths or CSS selectors.
You can also check out the Selenium WebDriver courses for the various programming languages.
Overall though, this is why I really like using pytest-bdd — because I can separate my test cases from my test code.
When I read my feature file, it's very intuitive as to what's going on, right? I go to DuckDuckGo, I perform a search and I expect to get the results. Whereas when I look at my python step functions, it can be pretty easy to get lost in the details.
I should also say the putting inline selenium calls like this [the way it is in the sample code], or like this is typically not a best practice.
What's better is to use a design pattern like Page Objects or the Screenplay, or we'll move these calls to different modules so that they're more reusable. I haven't done that here simply to keep my example as simple as possible, but when you do this for realsies, I strongly recommend using something like Screenplay or Page Objects.
Now that our tests are written, let's run them.
I'm going to run these from the command line so that it's easier to see the Firefox browser pop up as they run.
Pipenv run python -m pytest tests/step_defs/ test_web_steps.py
And they're off.
Now, if you look at the background, you'll see the browser pop up. First test goes pretty quickly. Second test, you'll see it pop up again, and this time you might catch a glimpse of some of the searching it does.
Boom, done, both passed.
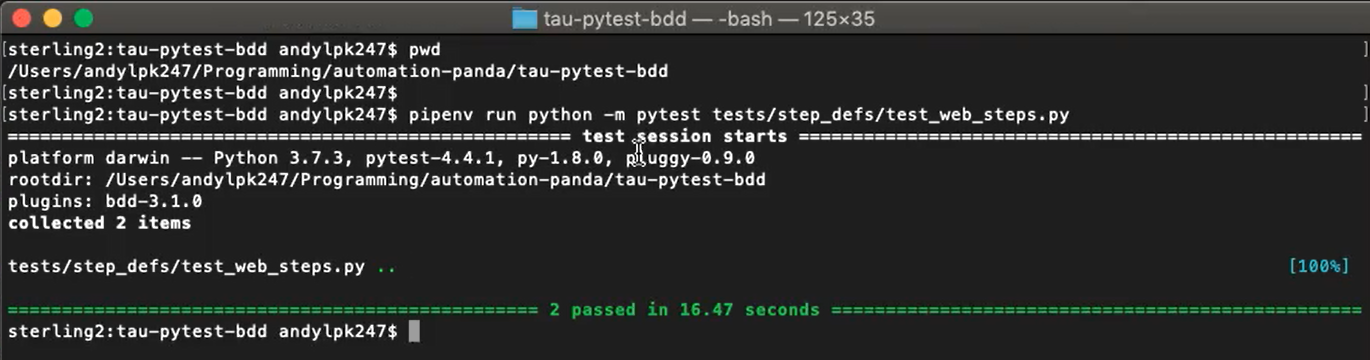
We're in good shape.
And that's how you can do web testing with pytest-bdd. Python makes it really simple.
