

Transcripted Summary
In this lesson, we’ll set up Cypress so that we can start using it in this course.
# Installation Prerequisite
To even install Cypress, and to follow this course, we need to install a few things: NodeJS and NPM.
Remember, Cypress is a JavaScript automation tool, so to use it we need to work with the modern JavaScript toolset.
And that toolset includes things like NodeJS and NPM.
Make Sure NodeJS is Installed
If you haven’t installed NodeJS yet, now is the time to do so. Please install NodeJS from the NodeJS site. You can find the link down in the references.
If you already have NodeJS installed, ensure that the version is equal or greater than v8. Let’s see how.
Open a terminal window and type:
node --version
I have Node version 10.15.1, which is fine. Any version from 8.0.0 is fine.
We’ll also need an editor or IDE.
I’ll be using Visual Studio Code, as it is my favorite editor, and has excellent support for JavaScript.
If you have a different editor, then that’s fine. I will be using Visual Studio Code in this course, so it would be easier to follow if you’re also using Visual Studio Code.
# Installing Cypress
Now we’re ready to install Cypress.
Cypress is an NPM package, and usually, we install NPM packages locally, in the same folder as the test code itself. So, we need to start by creating the folder where our test code will be in.
Just so you know, I’m a command line freak, so these kinds of things, I’m going to do in the command line. All the commands I’m going to show will work in both Windows, Linux, and MacOS, so don’t worry — they’ll work for you to.
So, I’ll open a terminal window and navigate to the folder where all my code resides
Yours will be different. Many times, it’s called “work”, or “code”, or “projects” or “git”. But it could be called “cool-stuff” if you want.
Now let’s create our folder.
Let’s name it “todomvc-tests”.
mkdir todomvc-tests
Why “todomvc”? Because that’s the Application Under Test. Don’t worry, we’ll see it later, so you can get a feeling of what it is we’re testing.
We’ve just created our folder , where the test will reside.
From here on, I will be working inside my favorite editor: Visual Studio Code.
Note about Visual Studio Code
I love this editor! I’ve been using it for the past two years, and it’s become my favorite editor by far. And it’s great for JavaScript editing, so I would recommend using it, but, hey, as I said: feel free to use any editor you want. You should open the folder in your favorite editor.
As you can see the folder is empty.

Well, obviously: we didn’t create any files in it!
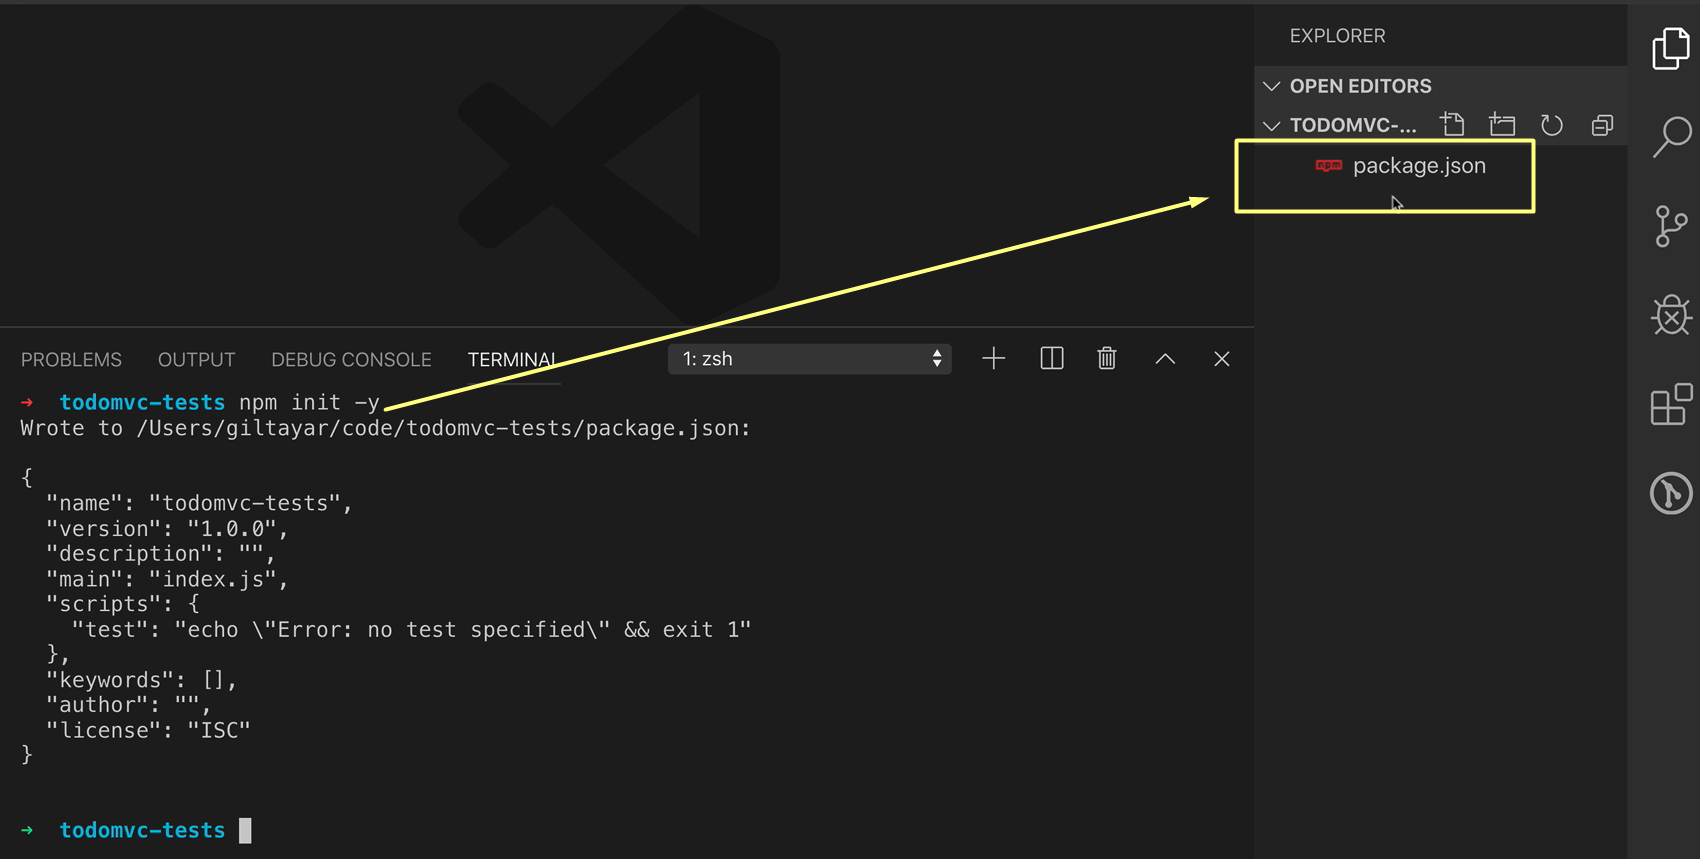
Let’s start by creating the package.json.
What is the package.json, you ask? Well, let’s create it, and then I’ll explain.
I’ll open a terminal and run npm init -y.
This time I’ll open a terminal inside Visual Studio Code, as this is the best way to run commands and edit code at the same time.
npm init -y
Using the npm command, we’ve created a package.json, which initializes the folder to be ready for npm commands.
What is NPM?
It’s JavaScript’s package manager.
- If you come from Java, it’s the equivalent of Maven
- If you’re from Python, then it’s like PyPi
- Ruby has Gems
- C# has NuGet
NPM comes built-in with NodeJS, so you don’t have to install it. And it has all these hundreds of thousands of packages in it, all available for installation.
We will be using NPM to install Cypress, which is just another package inside the NPM repository.
Cypress is Free, Open Source
Cypress is a free product. While it has some really good “to pay” components, which you can check out afterwards, it is open source. And you can use it for this tutorial, in your side projects, or at your company for commercial purposes, without paying for it.
When we install cypress, NPM needs to register the fact that Cypress is installed in our test folder, and it does so inside our package.json. This is why we need the package.json, and which is why we ran npm init -y.
So, let’s install Cypress.
When using NPM, all installations are local, so we will be installing it inside the folder we created. This is great, as this enables different projects to have different versions of Cypress, or any other package the project installs.
So, let’s do it!
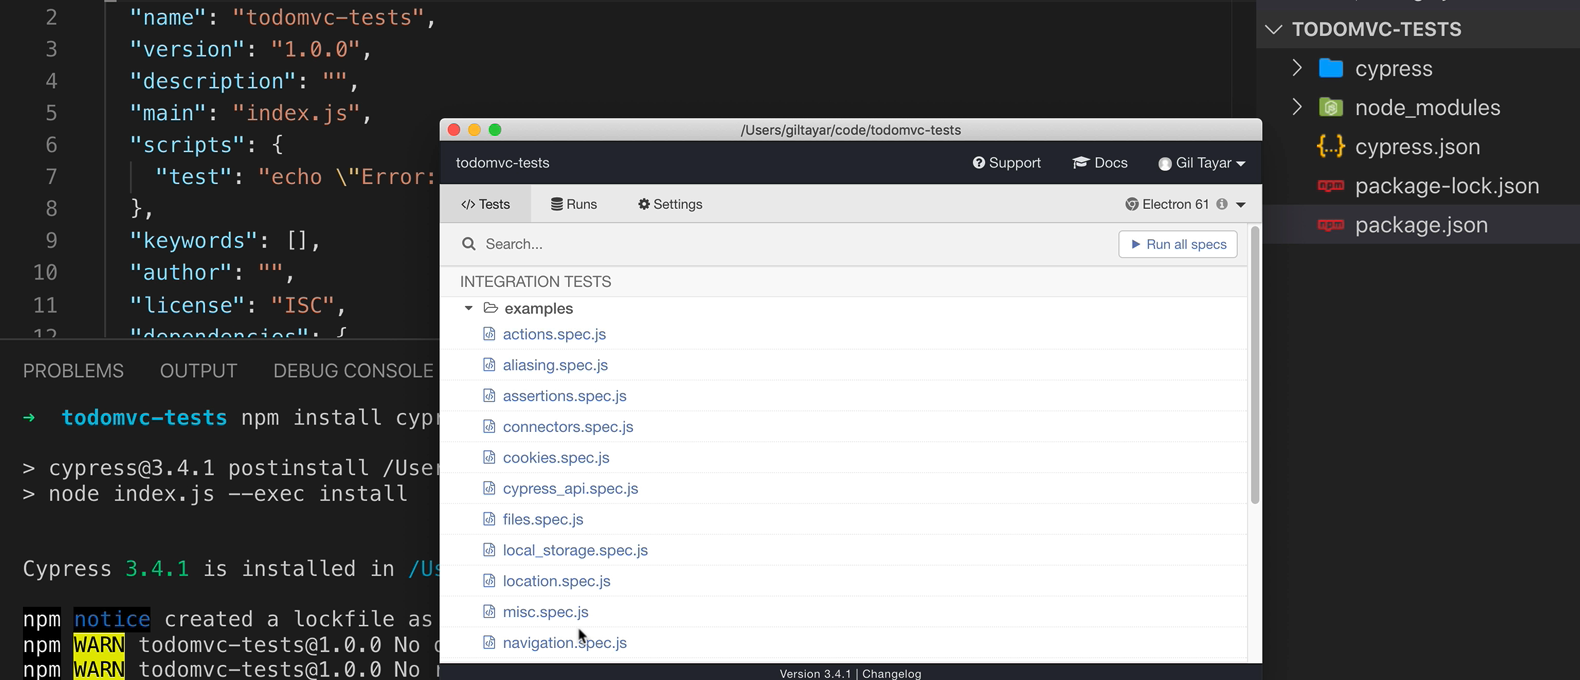
npm install cypress@3
And...that’s it! Cypress is installing.
I wish there was a “Cypress installed” badge in TestAutomationU! It would be an easy one to get. The magic of NPM, and the work of the Cypress developers made it very easy.
Note About Cypress NPM Installation
This time npm install was fast. But the first time on your computer, it might take a while, because besides the Cypress code, it’s also downloading a special version of Chrome that it will use to run the app and the tests. So, yeah, that’s another thing about Cypress — it currently runs your apps only under Chrome.
Why did we add the “@3” to the command?
That’s the version we want to install. It tells NPM, “don’t give me the latest version, but me version 3 of Cypress”.
Normally, we want the latest version and just npm install cypress without any version will give it. But by specifying version 3, I know that this course code will always work in the future, no matter what.
Now let’s run Cypress.
Yes, we currently don’t have tests, but we need to run it once so that it can create lots of folders with stuff that we’ll need.
So, let’s run it. To run a package command locally, one needs to use npx.
npx cypress open
Cypress installed a “local command”, called, obviously, “cypress”, which I ran using npx. I ran npx cypress, asked it to open, and it opened the UI, and told us it created a folder structure for us.
Now let’s close it.
Interesting: Cypress is not just an SDK. It has a UI! That’s a big difference from Selenium, which is just an SDK.
Let’s look at what it did:
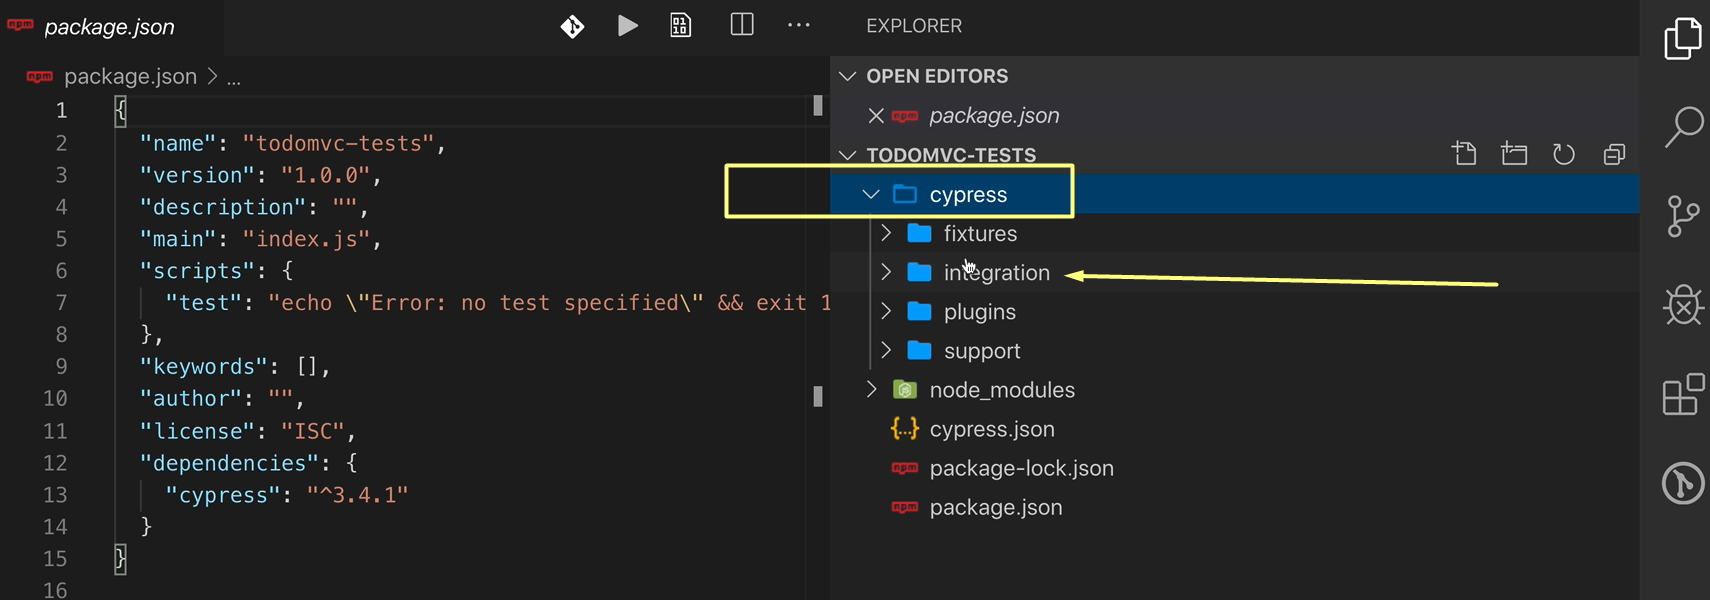
It created a folder called “cypress” with lots of subfolders inside it.
The most important one is “integration” — this is where we write out tests.
And look!
It made us some example tests for our use.
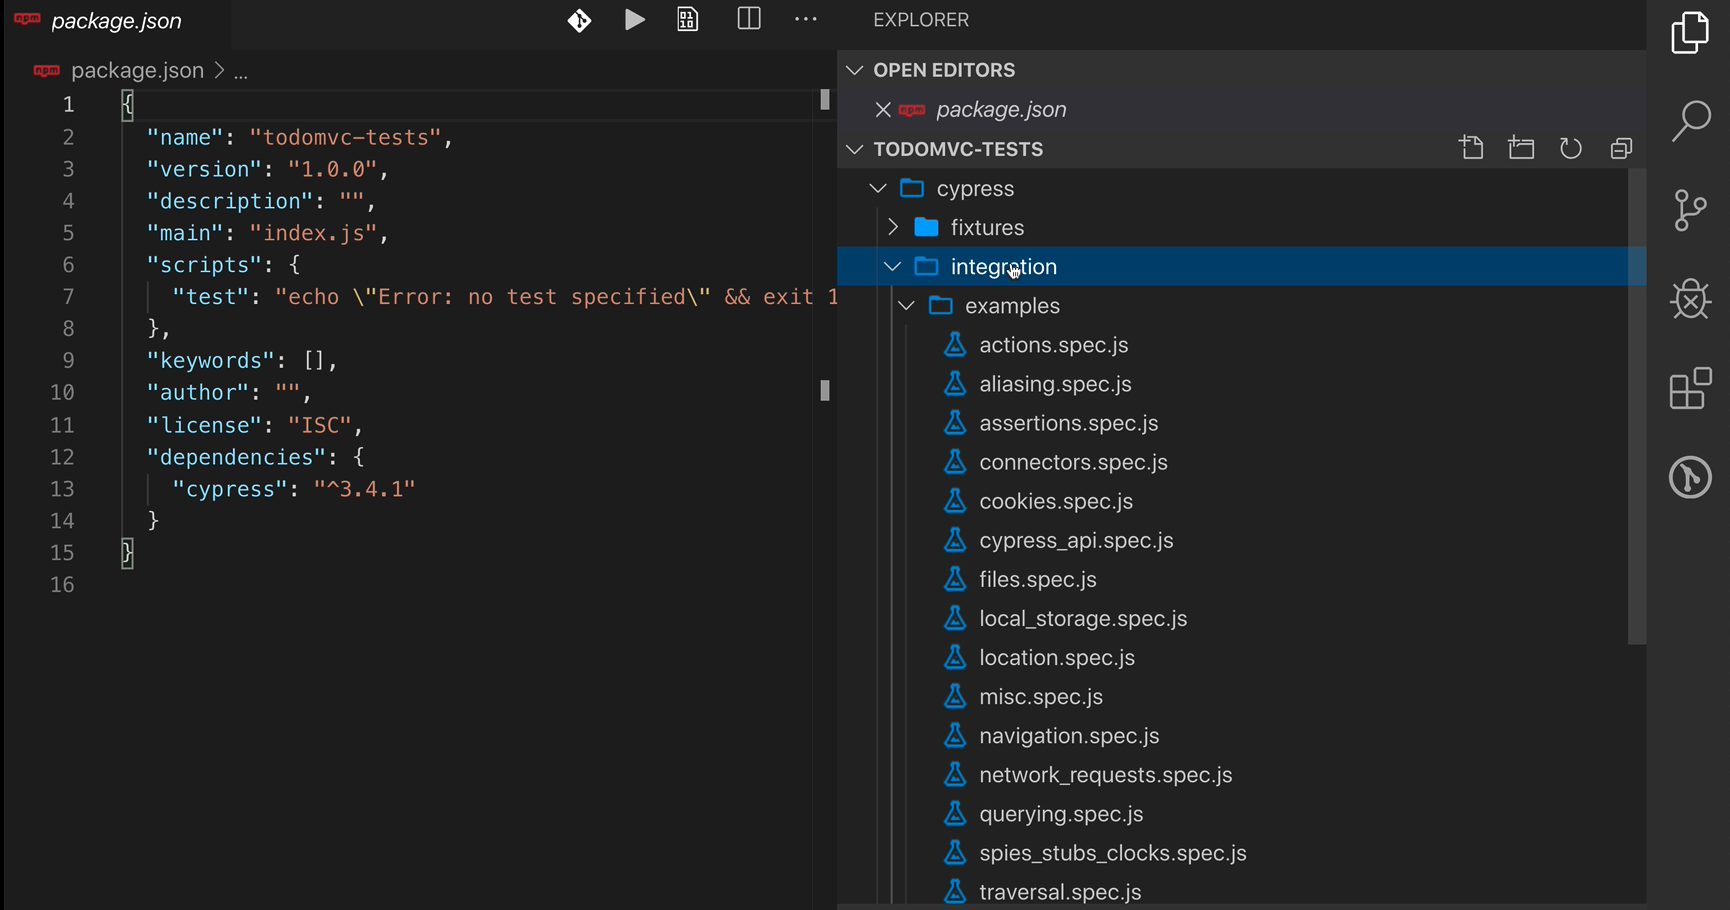
Let’s for now delete the examples folder so it won’t distract us.
We’re ready to write our first test! Which we will start doing in our next lesson.
