
Transcripted Summary
# How to store the auth for multiple roles in a project
When we have multiple roles or different users in our application, we have another strategy that we can use.
Here is an example in profile-stored-auth-multi-role-admin.spec.ts, which is under tests > ui > specs-auth.
In this file, we are using the storageState: '.auth/admin.json', and you can define it at the beginning of the file for all the tests or inside the describe, as it shows here.

In case you have more than one describe, you can have different JSON files within them.
It's important to remember that your application needs to support multi-session or multi-user so you are able to run those tests.
Another example here - we have one for the user - it's the same thing, but with the storageState inside the describe.
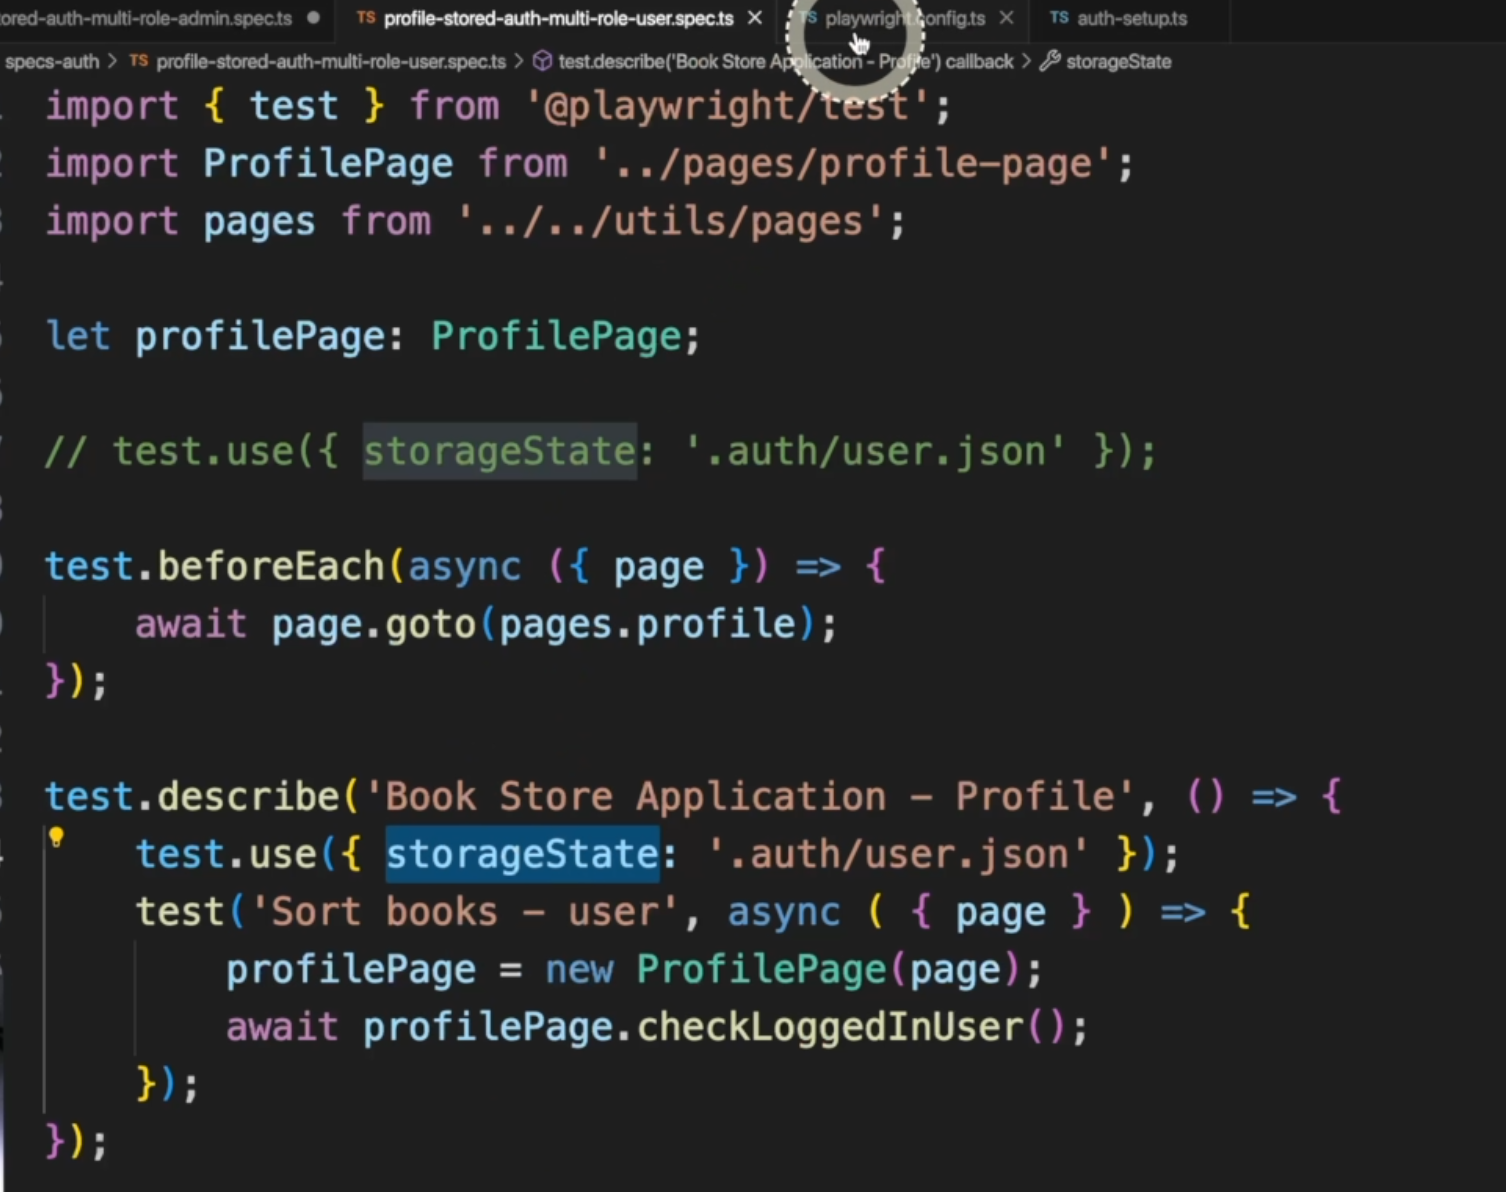
Those will have the same effect.
It doesn't matter if it's inside or outside, because in this file, we only have one describe.
In order to execute that, we will use a different strategy in the playwright.config.ts file.
We need to remove the globalSetup and the storageState because they cannot be used simultaneously.
We are going to implement a project called auth-setup and we are going to pass a regex that will find the auth-setup file, and for our project chromium-auth - you can name it as you prefer - we are going to add the dependency of that step we just created or project we just created.

Going straight to auth-setup.ts, it's pretty similar to the global setup that we just saw.
The only difference is that we are going to have one path for one user or role and another path for another user or role.
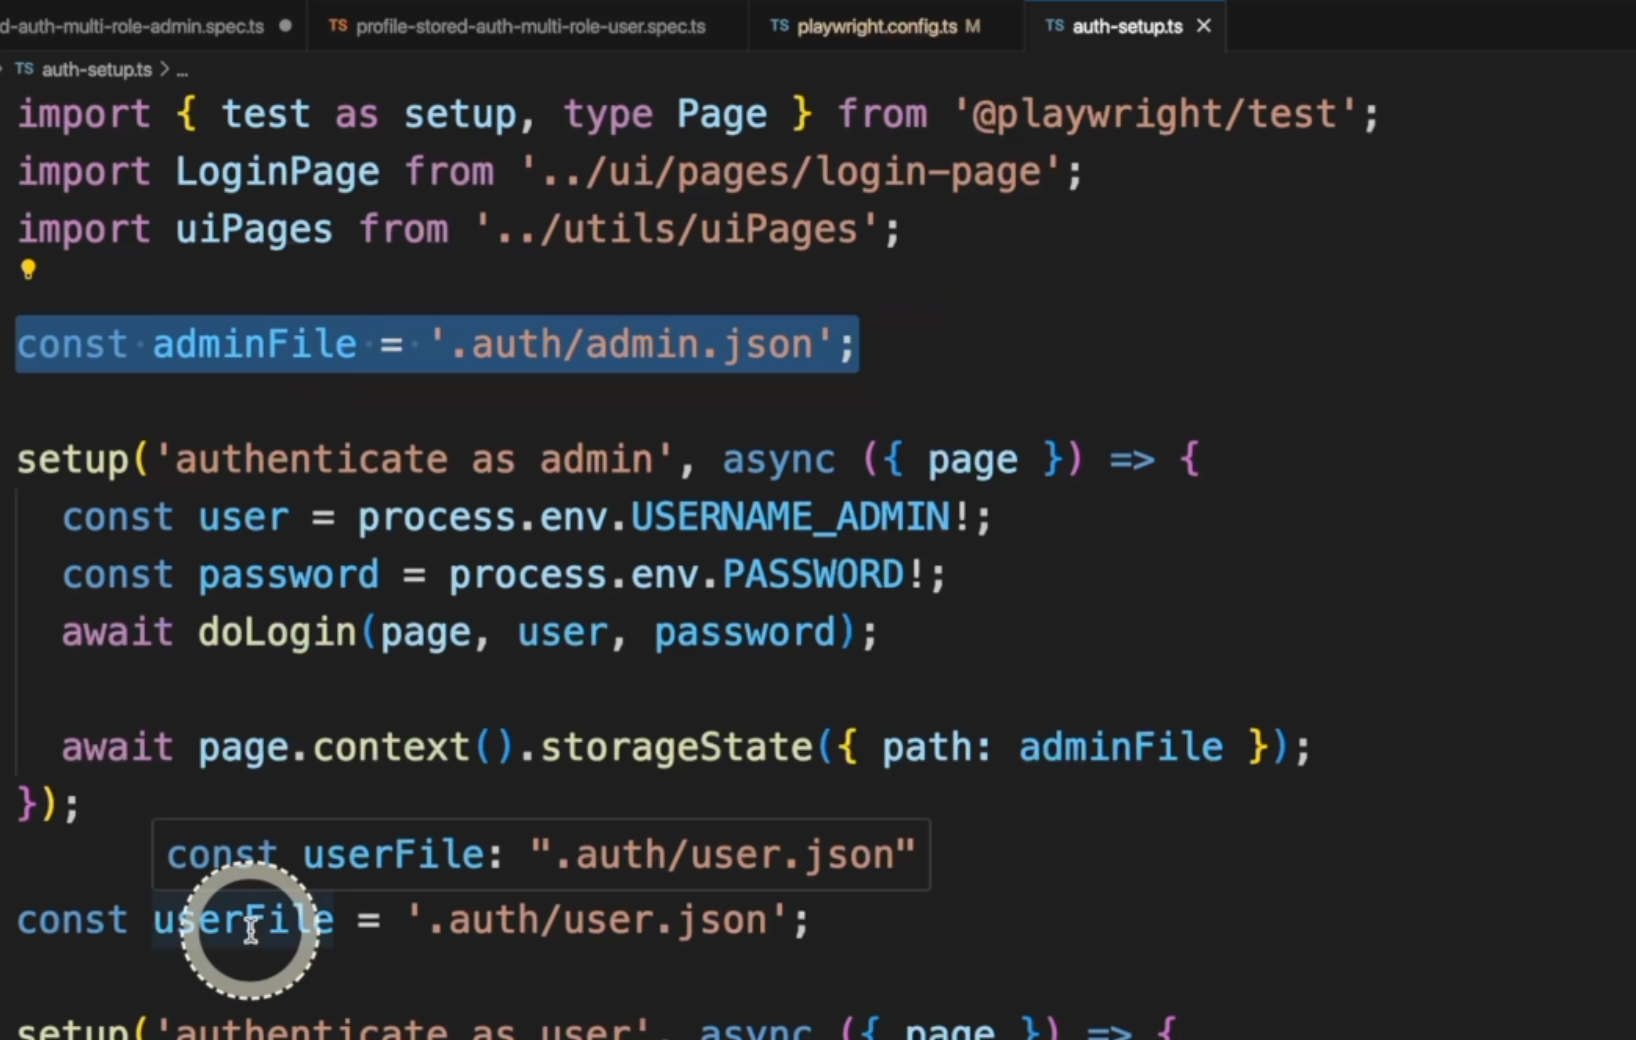
We are not going to have the full config here.
We are going to create two functions.
One will be called authenticate as admin, and the other one will be called authenticate as user.
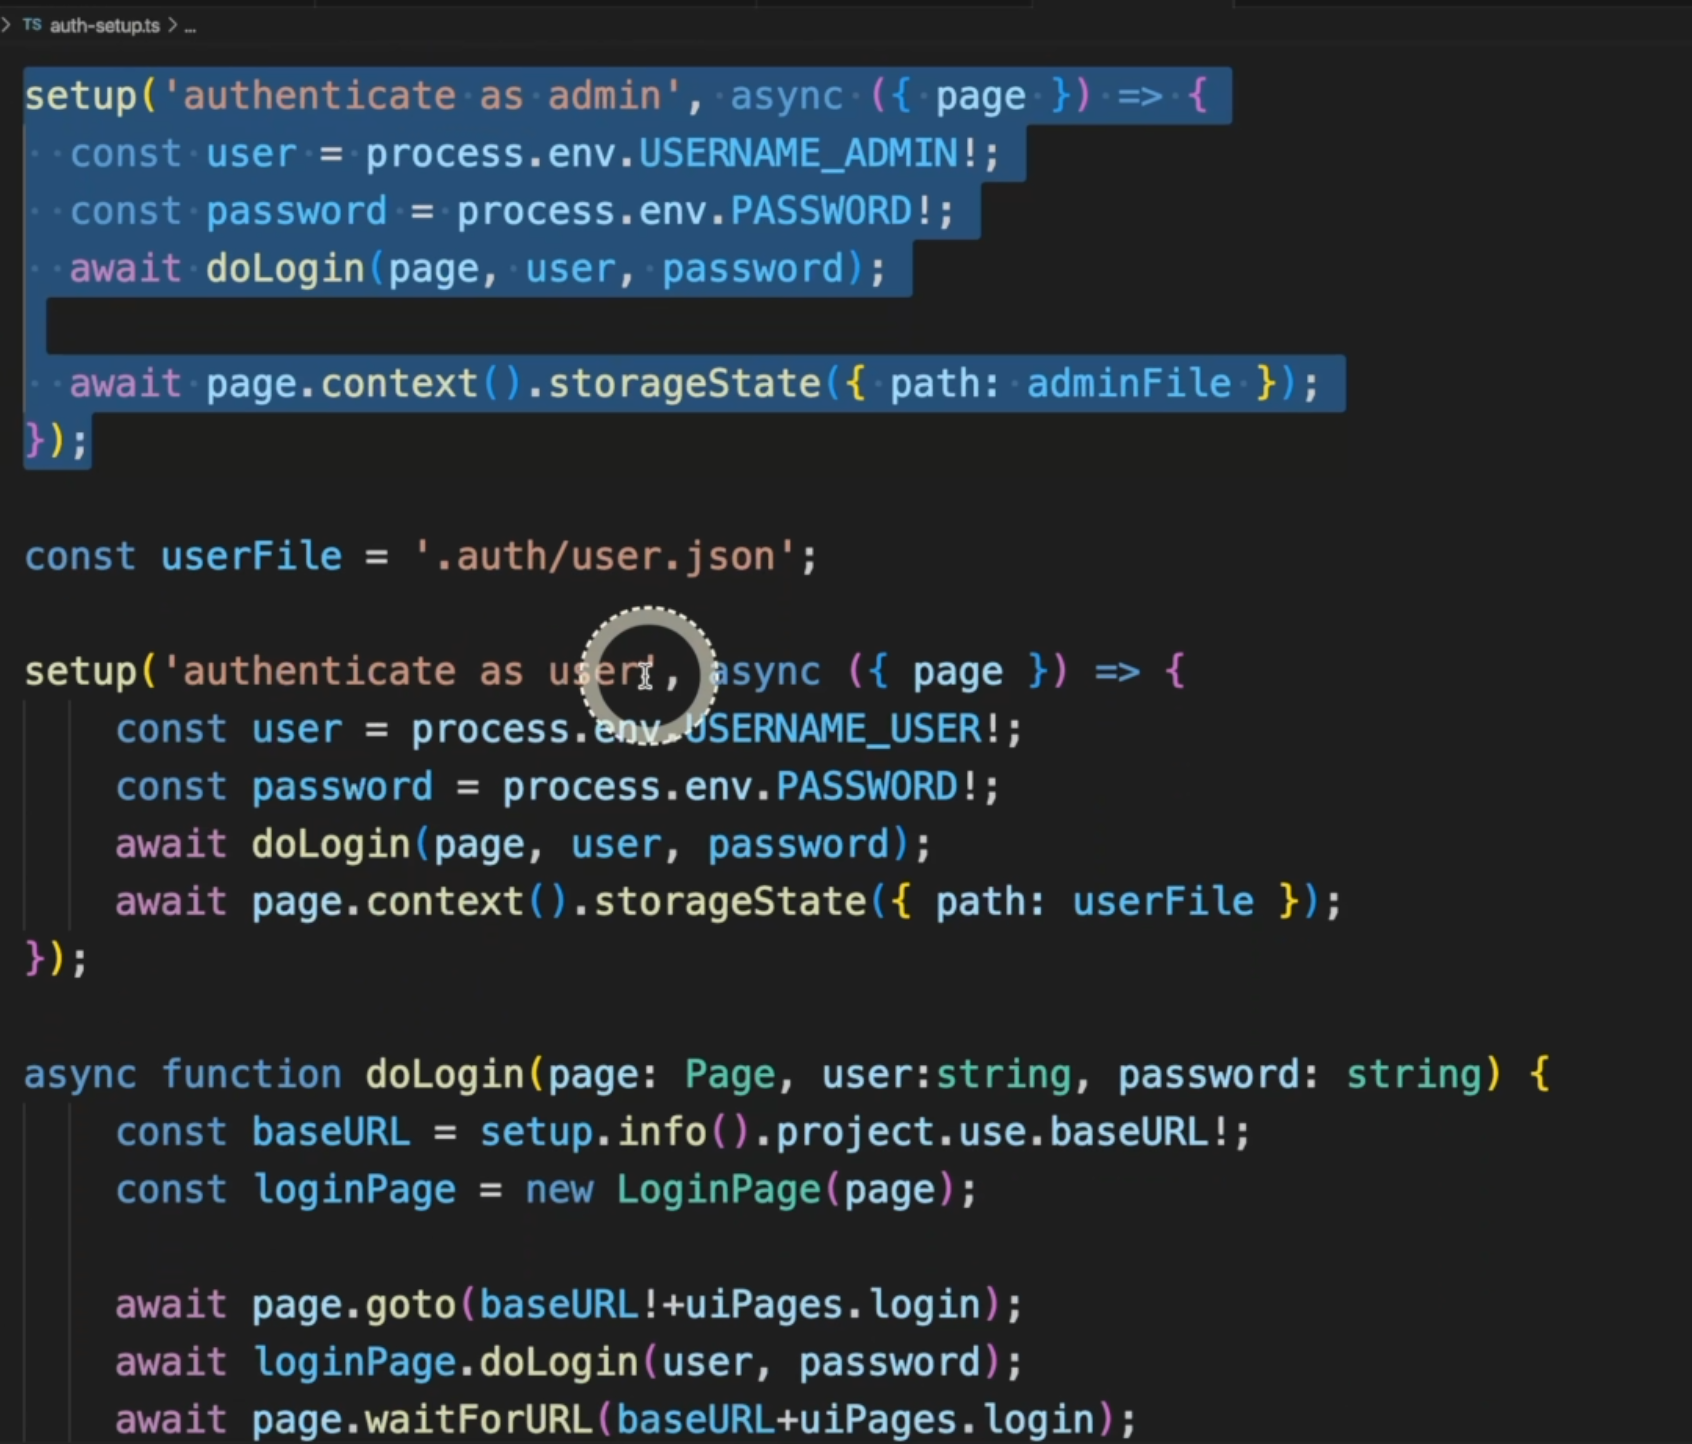
Both are using a common function called doLogin that will get the baseURL, create a new page object, go to a page, do the login, wait for the URL just to make sure the cookies are loaded, and check if it's logged in.
Right after that, for each method, we are creating a new storageState based on the path we just set.

Because in our playwright.config.ts, we had to remove the storageState and the globalSetup, the other tests will not run.
That's why I actually have them in a separate folder.
In our package.json, we can call three different commands to run those tests.
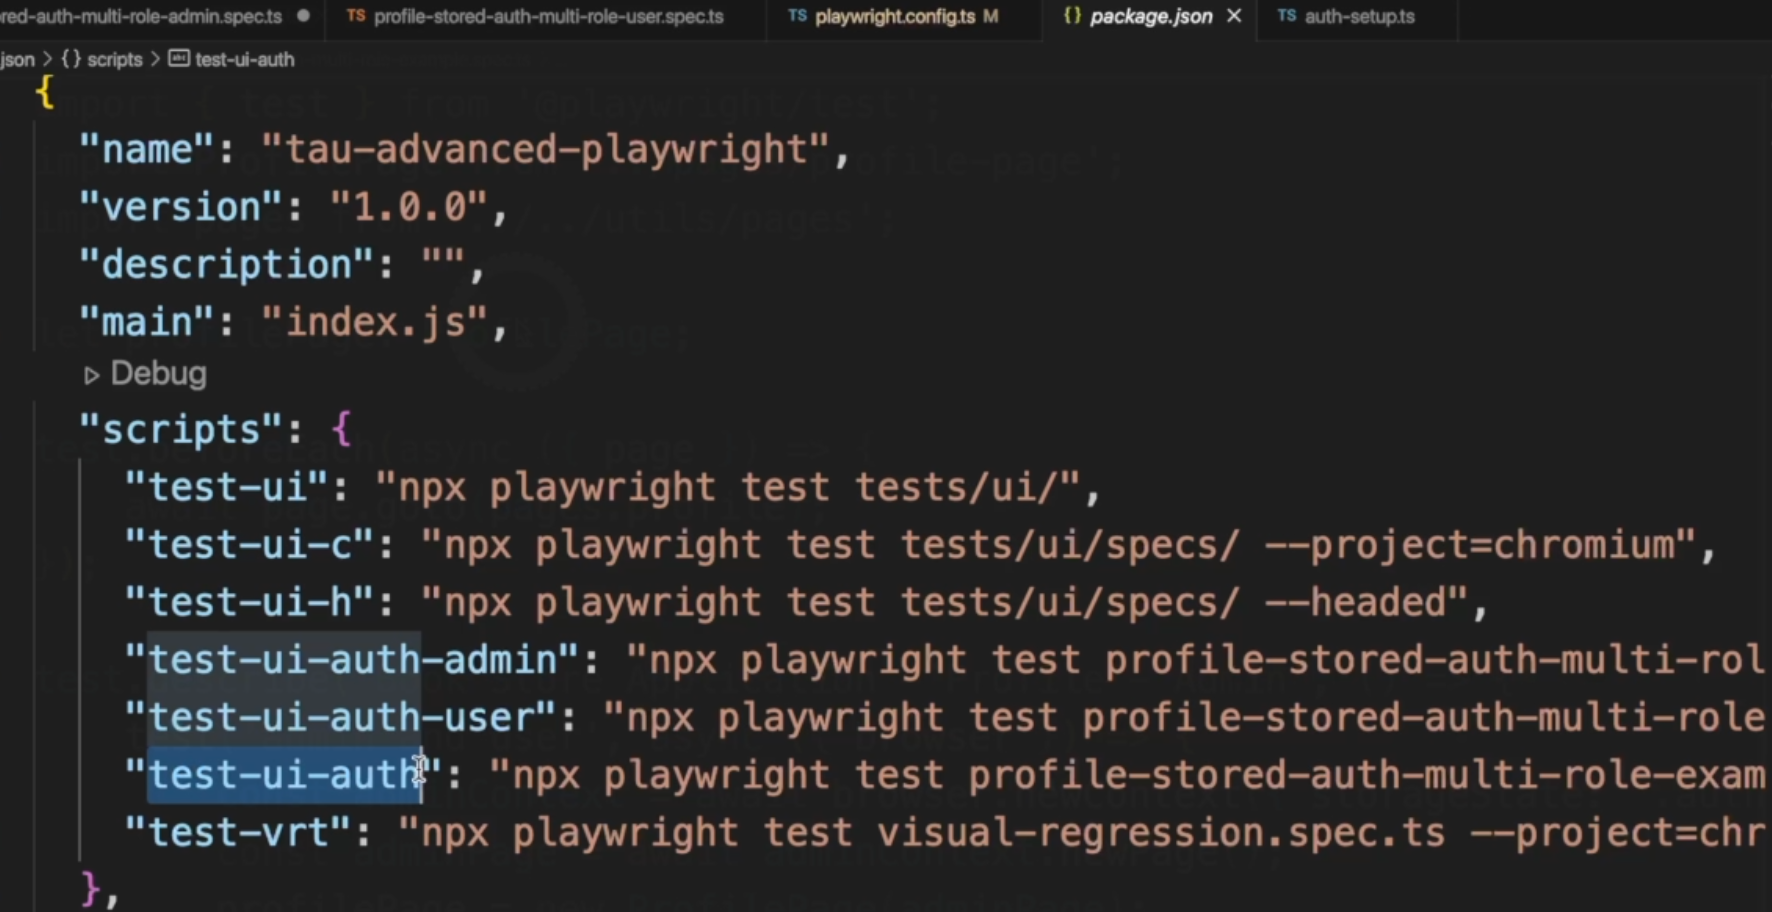
Let's take a look at the third example.
In this third example, profile-stored-auth-multi-role-example.spec.ts, which is also under the specs-auth folder, we will see something a little bit different.
We are also using the storageState, as we saw previously, but instead, inside one test, we are creating two different contexts, one with the adminContext and one with the userContext, and then we'll create a new page for the admin and a new page for the user.

With that, we can run two tests simultaneously with two different users.
It's important to remember here one more time that your application needs to support that, otherwise the test won't run.
For our demo QA application, this test doesn't work, but I wanted to give you the example so you could apply it for any other application that supports that.
However, for the other two examples, they do run and we can take a look at them right now.
In the Terminal, we will run npm run test-ui-auth-user which will trigger exactly this file - profile-stored-auth-multi-role-user.spec.ts - that is using the user.json created by our auth setup, according to the configuration we did on the playwright.config.ts file, and this is the result we got.
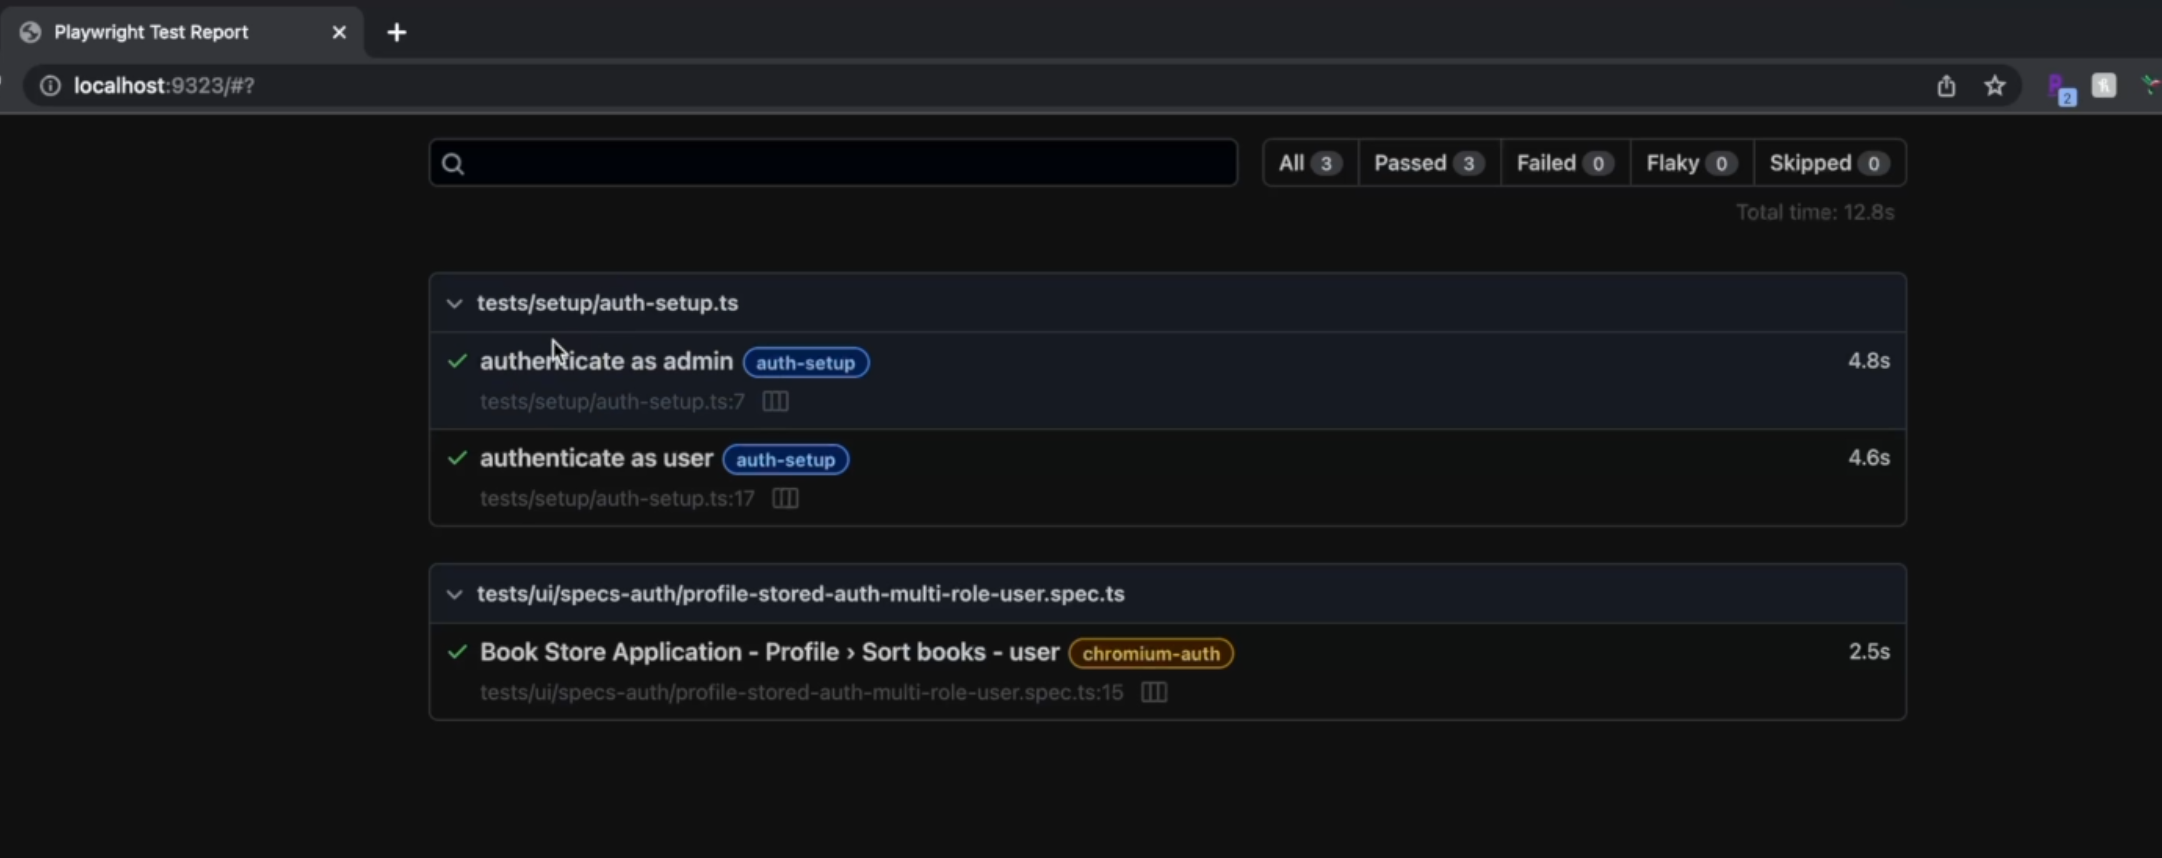
We see that it really listed the two steps inside the auth-setup.ts as tests as well.
If one of them fails, we will see them here as failures.
Of course, we can see the test and we can see that the user is already signed in as a user.

# How to store auth via API request
One more way to do your authentication is via API request.
Instead of using the global setup to do it via UI or the auth setup that uses the same UI methodology, we could create an API call via post and then get the authentication and store it in a file.
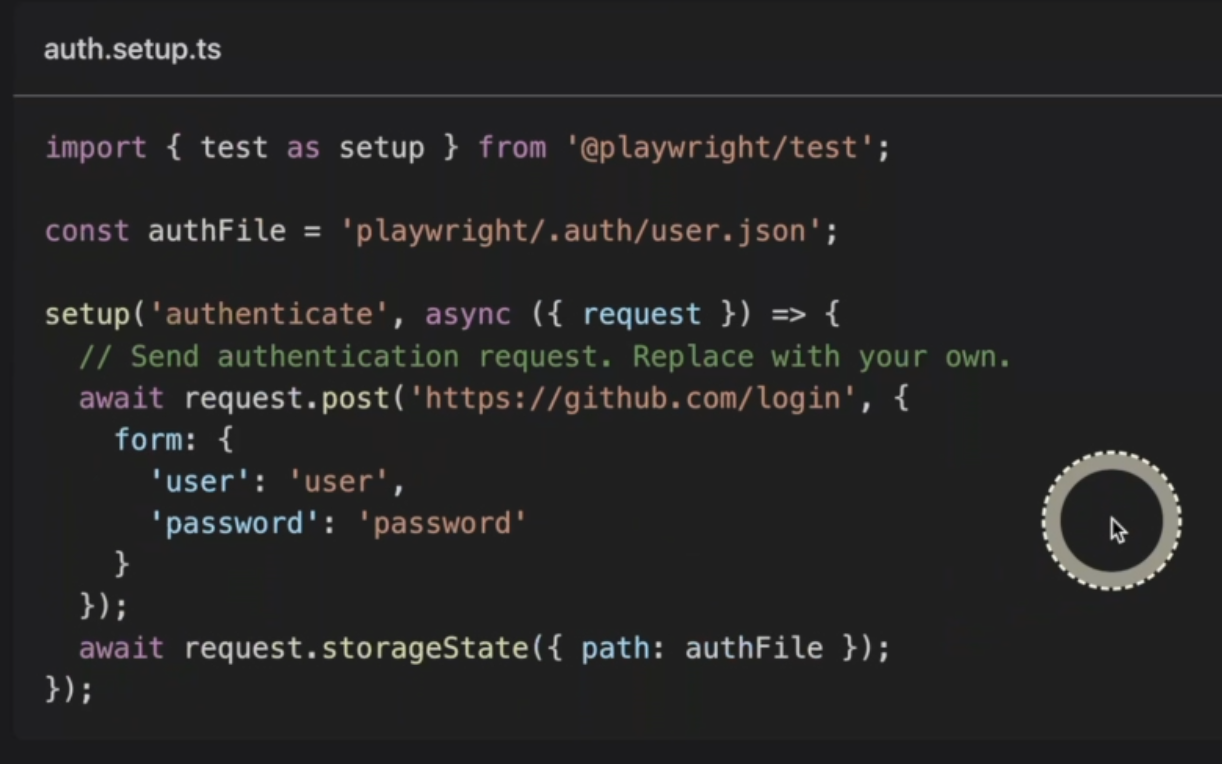
Here on the Playwright website, you can see an example of how to implement that.
We see that we have the import, the path for the authFile - the JSON file that will be created.
We will do a request.post on the URL of your application, passing the user and password, - and of course that depends on the application - and finally do a request.storageState with the path that we created at the beginning.
This way the file will be created and you can reuse it in your tests.
This is the fastest way because it doesn't need to load the UI and do all the things that take longer than just calling an API request.
To exemplify the gains of using a reusable sign-in state, in this first screen, we see that the test took 10.8 seconds to execute.
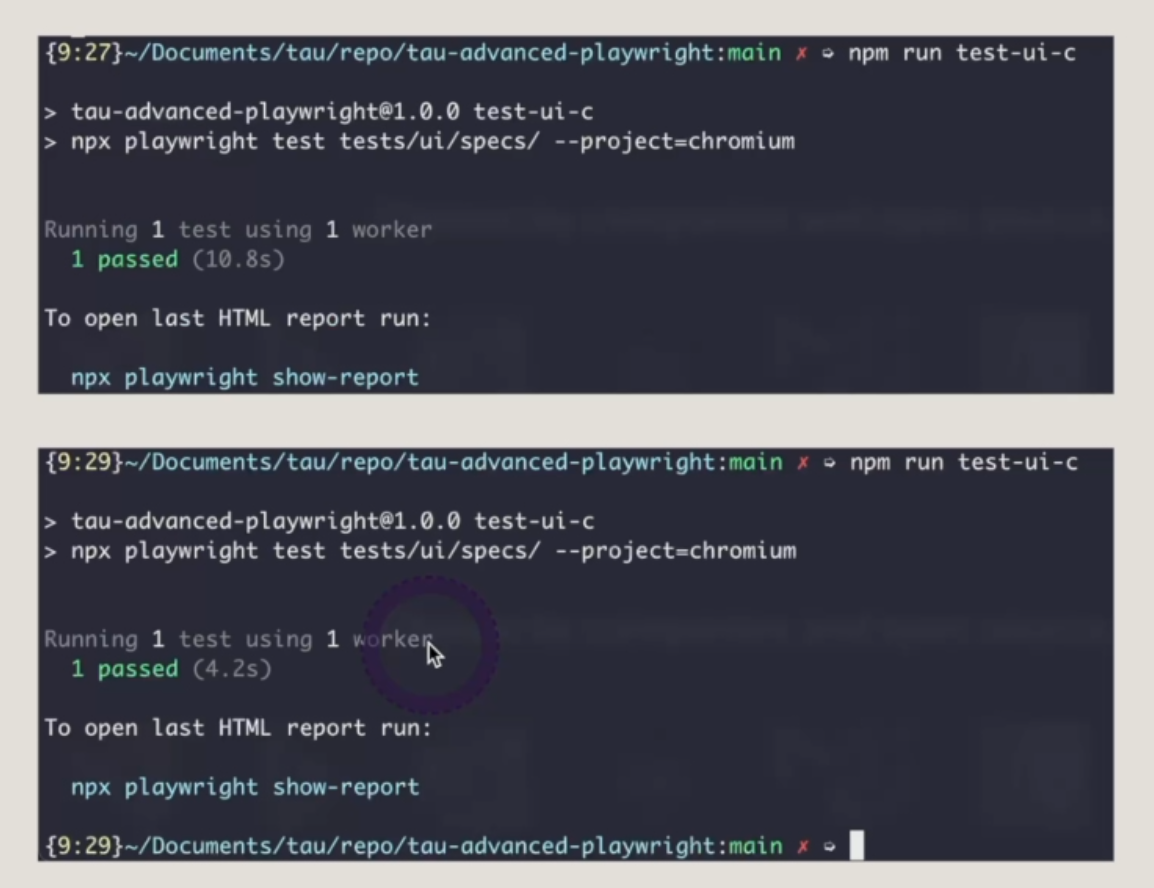
I ran one test without the reused sign-in state and in this second screen, we see that the test took 4.2 seconds, so less than half of the time to execute, and in this second case, we were using the reusable sign-in state.
It's a great tool to speed up your test.
This is only for one - imagine a test suite with more than a hundred.
Not to mention the lines of code.
In this first example, we are reusing the reusable sign-in state.
In this case, we have 18 lines of code, and in the second image, we have 22 lines of code.
The second example is not using the reusable sign-in.
We do have the imports, the variable declaration, and the methods inside the beforeEach.
For every single file, you would need to be typing that and that also consumes time, so make sure to check this feature out and make your tests run as fast as they can and write them as fast as you possibly can.
Congratulations. We just finished the first chapter. I'm sure you'll do great with the quiz down below.
Don't forget to take a look at the extra exercises and resources linked as well. I'll meet you in the next chapter. Happy testing.
