

Transcripted Summary
The first thing we are going to do is to open the file demo-todo-app.spec.ts, which is under tests-examples and make some changes.
I have added the tag @smoke to a few tests - please make sure you add it to the first test in this file.
Also, change line 24 - originally, the file has the value 0 here and we are going to change it to 1.
    // Make sure the list only has one todo item.
    await expect(page.getByTestId('todo-title')).toHaveText([
      TODO_ITEMS[1] // intentionally changed here to fail the test
    ]);
This change is intentional and it will make the test fail.
Next add @smoke to a few other tests.
As you can see here, it can be in any test of your preference, but make sure to add it at least five of them, please.
# Understanding package.json and test runner scripts
Next, let's understand the package.json file.
In this file, you can find all the versions of the dependencies that you are using for your project, and also you can create scripts to make your execution faster.
Here you can see that the first script that we have is the test end to end - test:e2e.
"test:e2e": "npx playwright test tests/",
Instead of typing npx playwright test tests/ in our Terminal, we could just do npm run test:e2e and hit enter and it would do the same thing that npx playwright test tests/ does.
Important to mention here is that if you have folders that start with the same words, it's important to have the slash at the end so you are sure that it's running against this folder only.
For example, in the second script we have the folder tests without the slash, so in this case, it's going to run for all the folders that start with the word "tests".
Let's go ahead and take a look at this command.
"test:e2e:all": "npx playwright test tests --project=all-browsers-and-tests",
It also has the npx playwright test and the folder, but it also has this --project here.
This links to the playwright.config.ts file project that we defined at the end, so it's going to take all the configurations defined here.
A quick clarification here - in order to run all the browsers, we do need the browser name inside project and for each browser, we'll have an instance of the project with the same name.

This way, whenever we call the all-browsers-and-tests project in package.json or the playwright command, all three instances will be called here and all three browsers will be executed.
If you want more browsers and devices, just add a new instance of it.
We can see that we are running against all the browsers, so that's what we're going to do.
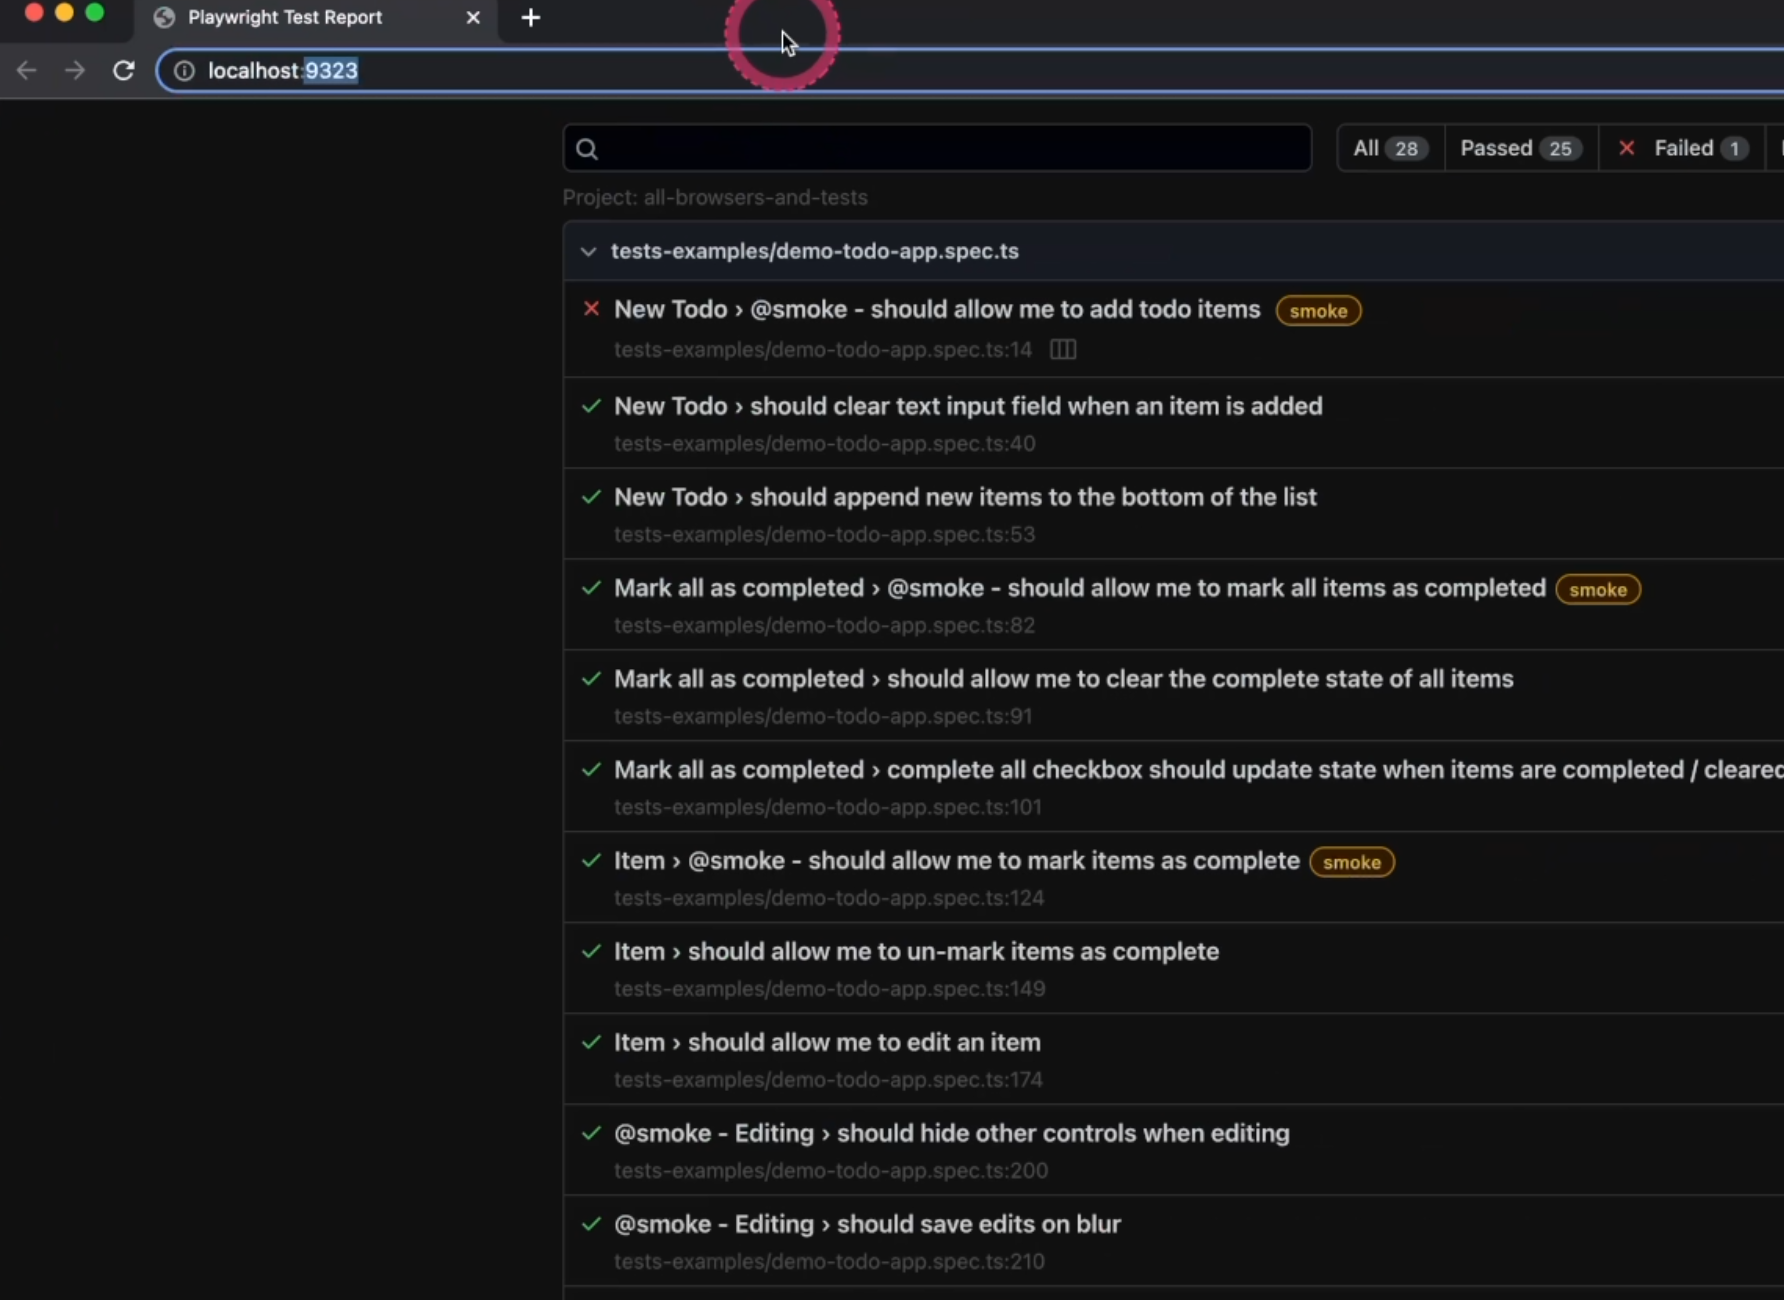
We can go ahead and type npm run test:e2e:all and it's going to run 28 tests.

In this case - again, we are going to run for all the folders that have the word "tests".
Here you can see that there are many more tests than these ones here, and because we have the retries defined as two here, as we saw earlier, we have one failing test that was retried two times.
At the end as we defined, to open the HTML report on failure, you can see here that it opened the report.
If you want to take a look, this is how it looks.
We are going to press Ctrl+C to quit the Terminal - this way the prompt is ready for our next execution.
Next we have the test:e2e:ci.
"test:e2e:ci": "CI=1 npx playwright test --project=ci --shard=$CI_NODE_INDEX/$CI_NODE_TOTAL",
Here you can see that I set the environment variable as 1.
In our playwright.config.ts, remember that we had this information here.
  /* Opt out of parallel tests on CI. */
  workers: process.env.CI ? 1 : undefined,
So, in case we do want to run our test in the CI, this is one way of setting it up.
You could also have a .env file with something similar to this where you could define your CI as 1.

You can have this file on your server, so when the test execution is happening, it will have access to it.
Then, we'll see the same commands again - npx playwright test - in this case, the project will be ci, so if you go to the playwright config and find the project ci, you are going to see that that is going to use the baseURL based on combined information, and you could also pass a few other environment variables here that would come, for example, from the machine, from GitHub or from whatever you want.
In this case, as we don't have the CI setup, we are not going to execute this command and let's go straight to the next one.
"test:e2e:dev": "npx playwright test tests-examples/ --project=chromium --headed --retries=0 --reporter=line",
By the way, you can define these names as you want.
In this case, we have dev here. You can do dev mode, or whatever you want - it's totally up to you.
In this mode, we have the same thing we've already seen. The --project here is going to be chromium, meaning that it's going to run only on Chromium.
I'm also setting it as --headed, so we will see the browser opening.
We have defined the --retries as 0, so in case it fails, it won't retry anything, and we have the reporter as line instead of HTML.
We can see that by passing these parameters on the command line, you will override the information on the playwright config.
Let's go ahead and give it a try by running npm run test:e2e:dev.
You can see that the browser is opening, and because it's running all the tests in parallel, it's super fast - you don't even see anything.
As we didn't set the reporter as HTML, you can see here only the list of the tests and you can see that one of the tests failed.
Next, we are going to take a look at smoke.
"test:e2e:smoke": "npx playwright test tests-examples/ --grep @smoke --project=chromium",
For this one, we are using tags.
If you open a test - let's see this test file real quick - you see that it has the @smoke tag.

This is how you set tags into your tests.
You can do it in any test that you want by just adding the word and here in package.json, you can do --grep @smoke and it will run only the tests that have this tag in it.
We can give it a try with npm run test:e2e:smoke.
So, only 12 tests and you can see here that it has the tag @smoke.
For this one, we didn't pass anything about the retries, so it's going to take the default from the playwright config, which is two, and as soon as it finishes, it will open the HTML report with only the tests with the tag smoke, and you can see here that one of them failed.
Last, we are going to see the non-smoke tests.
"test:e2e:non-smoke": "npx playwright test tests-examples/ --grep-invert @smoke --project=firefox"
The way to do it is using --grep-invert, so it's pretty similar to the one we just did.
We are going to come here run npm run test:e2e:non-smoke and it's going to run all the tests that don't have the tag @smoke.
I didn't mention it before, but all these commands are part of the Playwright test runner and you can find more in the docs under "Running tests".
You can navigate through these sections to go straight to where you desire and you can see a few more options here.
For example, to run the test with the title, you can pass -g and the test title and then it will do that for you.
You can combine those parameters with --debug - that will start the bug mode, and also --ui for the UI mode.
We'll see more about both of them in a little bit.
To sum up, the scripts inside the package.json file are totally optional.
You can type any of these commands in your terminal and they will do the same thing.
It's just a way to create scripts and make your typing easier.
This is the end of the second video of Chapter 2.
We still have one more video to go for this chapter.
Take a look at the quiz below and you can leave the extra exercises to the end of the whole chapter. I'll see you in the next video.
Resources
- Introduction to Playwright - GitHub repository - Branch 2
- Chapter 2 - Extra Exercises
- Chapter 2 - Extra Resources
Quiz
The quiz for this chapter can be found in 2.3.
