

Transcripted Summary
Keywords are a very important part of Robot Framework. You could say they're key.
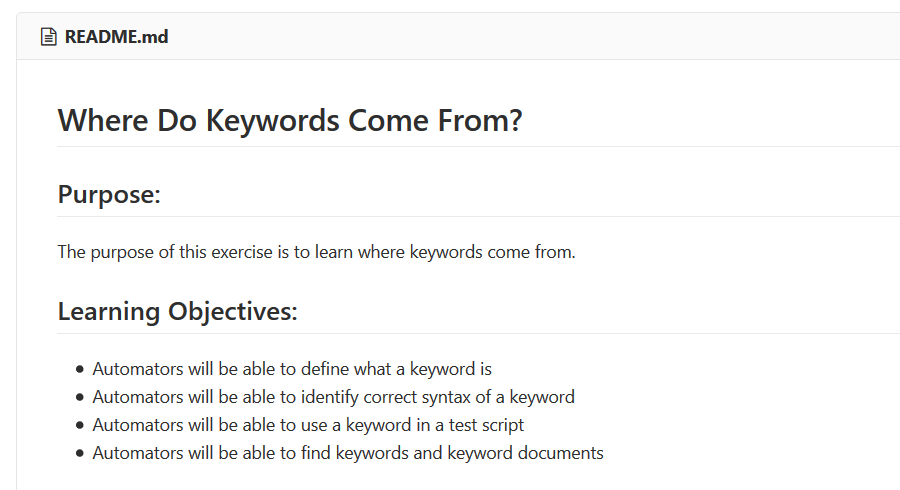
In this chapter, we're going to learn a few things.
The two places keywords can come from.
We're going to learn what a keyword is.
How to identify the correct syntax for a keyword.
We're going to use a keyword in a test script.
We will find keywords, and keyword documents.
You'll also create your own keyword.
There are 2 main ways to use keywords in your script — one is by a library, the other is by creating it yourself.
We're going to talk about using those created in libraries first.
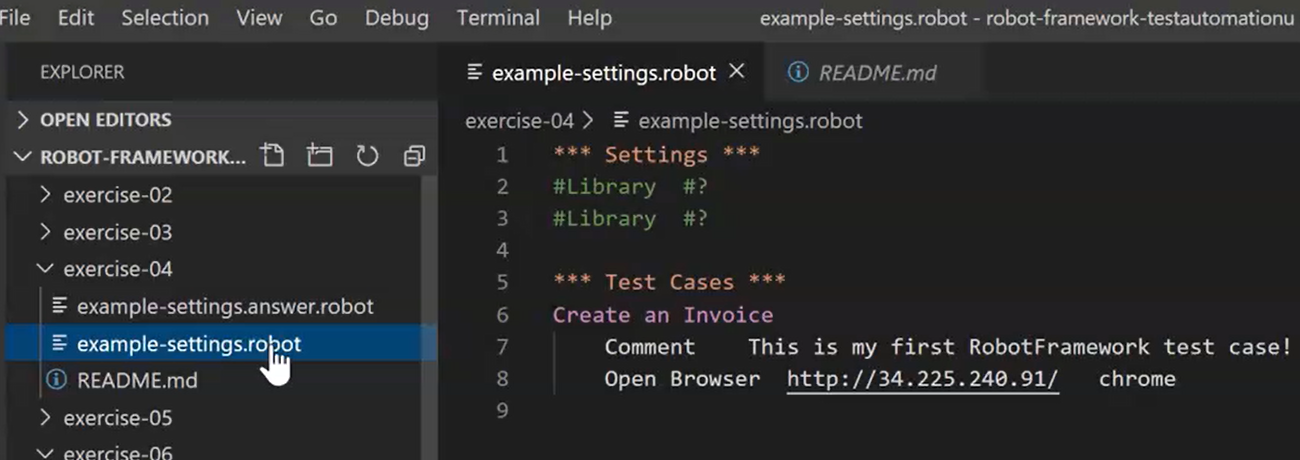
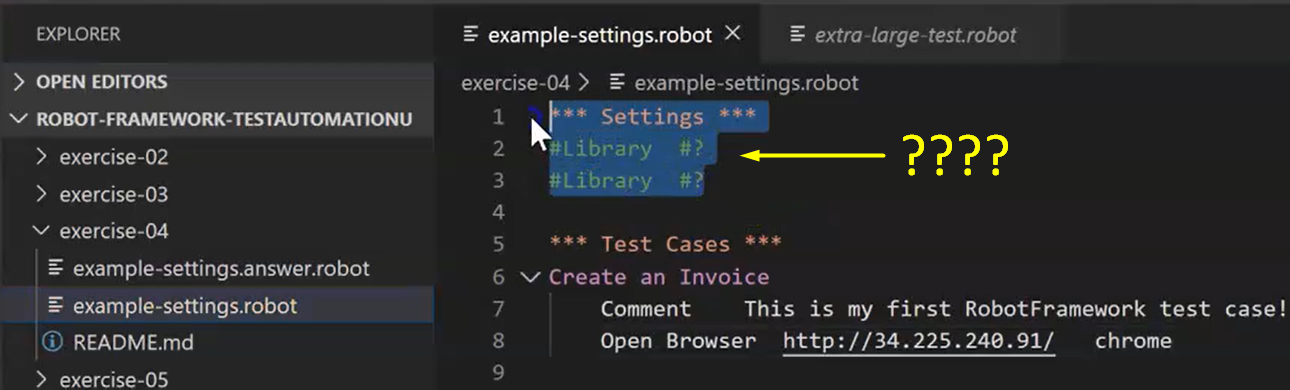
So, go with me into exercise 4 here. You'll notice that there is an “example-settings.robot” file.
In each of the exercises, I'm going to have a challenge for you, and that challenge is going to be set up with a file in the exercise.
The robot file, in this case, is “example-settings.robot”. The answer, in case you want to cheat, is in the “example-settings.answer.robot” file. But I know you guys don't want to cheat.
So, what is a keyword?
A keyword is a piece of functionality in a test case. We talked about test cases briefly earlier.
# Example Code - example-settings.robot
*** Settings ***
#Library  #?

#Library  #?

*** Test Cases ***
Create an Invoice
    Comment    This is my first RobotFramework test case!
    Open Browser  http://34.225.240.91/   chrome
We know that we've got a Settings section.
It's denoted by having three asterisks, a space, the word “Settings”, space, and then three asterisks again. It's completely left justified on the zero-th column.
We notice we have a Test Cases section in this file as well.
A Robot Framework test file is really a test suite. It can contain many different test cases, I guess, one or more would be valid.
The Test Cases section holds our test cases.
The name of a test case is defined at the top of a test case, and it's left justified.
Spacing in Robot Framework is absolutely key. Make sure you understand where the spacing is for things.
Cheat Sheet
If you need a cheat sheet for this, and other pieces of Robot Framework make sure to look it up on the beaufortfairmont.com website. We've got a reference sheet there for you.
Test cases, once again, are named and defined by being left justified.
This test case is called “Create An Invoice”.
There are only two steps to this test case:
We make a comment, the comment is, "This is my first RobotFramework test case!"
And then, we open a browser, and we point it to a URL, and we tell it to use the Chrome browser.
The keywords here are Comment, and Open Browser. How did I know that?
Well, in general, keywords will start a line.
Keywords are always defined by having 2, or more spaces between the keyword, in this case Comment, and an argument, in this case the String, "This is my first RobotFramework test case!".
An argument is a piece of information we give a keyword to tell it to do something special.
In this case, we're going to make a comment when the test case runs saying, "This is my first RobotFramework test case!"
The second line here uses a different keyword called Open Browser.
Open Browser is going to open the browser. The arguments are the URL, and the type of browser to use.
Where did these come from?
Well, that's the challenge I want you to figure out in this test case. So, I'm not going to give you the answer right here.
Instead, what I'd like to do is look at another example of keywords, and help you understand where keywords come from.
In exercise-06 we have an “extra large test.robot” file.
# Example Code - extra-large-test.robot
*** Settings ***
Library  SeleniumLibrary
Library  OperatingSystem
Library  RequestsLibrary
Library  String
Library  Collections
Suite Setup  Run Keywords
Suite Teardown  Run Keywords    Close Browser

*** Test Cases ***
Create an Invoice
    Open Browser    http://34.225.240.91		chrome
    ${invoiceId}=    Generate Random String    10    [LETTERS]
    Set Suite Variable   ${invoiceId}
    Set Selenium Speed    0.5 Seconds
    Click Link    Add Invoice
    Page Should Contain Element     invoiceNo_add
    Input Text  invoice   ${invoiceId}
    Input Text  company   my example company
    Input Text  type   plumbing
    Input Text  price   34.00
    Input Text  dueDate   2018-10-31
    Input Text  comment   Unclogged Drain
    Select From List By Value   selectStatus    Past Due
    Click Button    createButton
    Create Session	invoice-manager     http://34.197.198.114:8081
    ${resp}=  Get Request    invoice-manager    /invoices/${invoiceId}
    Should Be Equal As Strings  ${resp.status_code}	 200
    Dictionary Should Contain Value	 ${resp.json()}	 ${invoiceId}
    ${resp}=  Delete Request    invoice-manager    /invoices/${invoiceId}
    Should Be Equal As Strings	${resp.status_code}	 200
    ${resp}=  Get Request    invoice-manager    /invoices/${invoiceId}
    Should Be Equal As Strings  ${resp.status_code}  404

*** Keywords ***
It is really long. It does a lot of steps. The steps, in this case, almost all come from libraries. In fact, now that I look at it, they all come from libraries.
Many of these are from the SeleniumLibrary.
If you're familiar with Selenium, these keywords probably look familiar.
Open Browser, we saw earlier.Click Linksounds very familiar to Selenium users.Page Should Contain Elementwe're looking for a specific HTML element within a page.Input Textputting text into an input box, naming the input box, and then the text that will go into it.
But where are we getting these?
# Keyword Libraries
I mentioned the Settings section. In it, we can use a library to pull in keywords to make them available to us to use. A number of libraries have already been created for you for Robot Framework. You can use them with very little work.
We've already installed the SeleniumLibrary on this machine when you did the setup steps. But I want to show you what the SeleniumLibrary documentation looks like, and have you find it as well.
You can go to robotframework.org/seleniumlibrary to find the documentation for the SeleniumLibrary.
What you want to do here is look at the keyword documentation. So, the full URL is here. It's easy enough to Google as well.
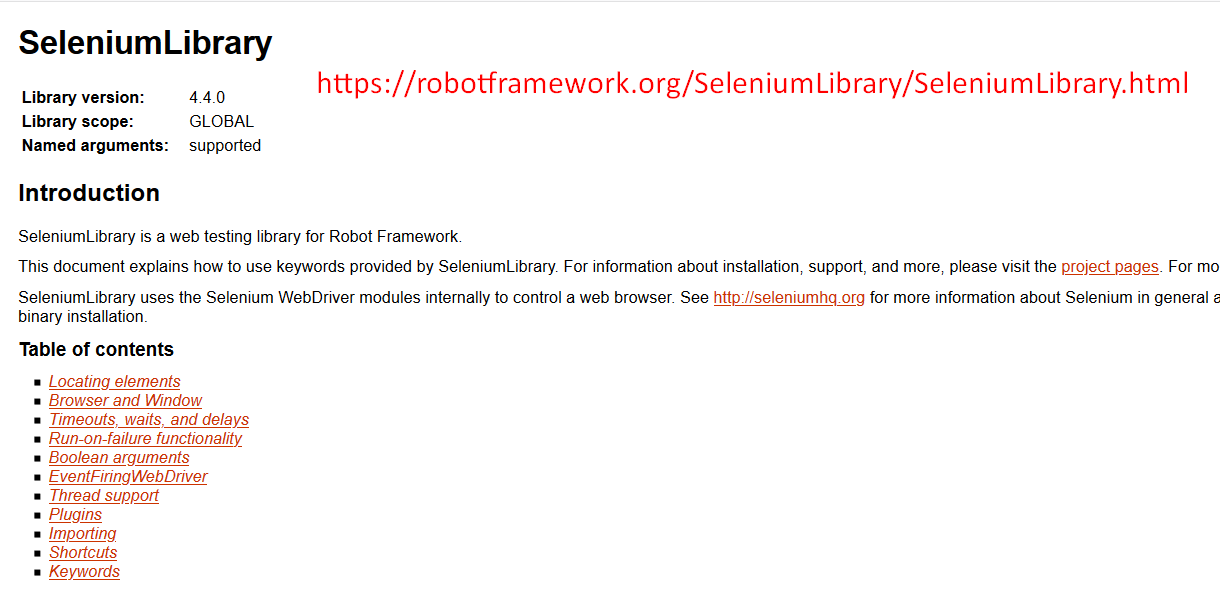
This document is in the format that nearly all Robot Framework documents are in.
It looks a little old, it looks a little archaic, it's not pretty. It's there for utility. You can find out what you need to know about this library from this document.
You'll notice several things: we have a table of contents, we have some information that is in general about this library, and how to use it. As you scroll down, you'll notice several things.
There's a lot of information here, but the key that you want to get to is this shortcut section and the keyword section.
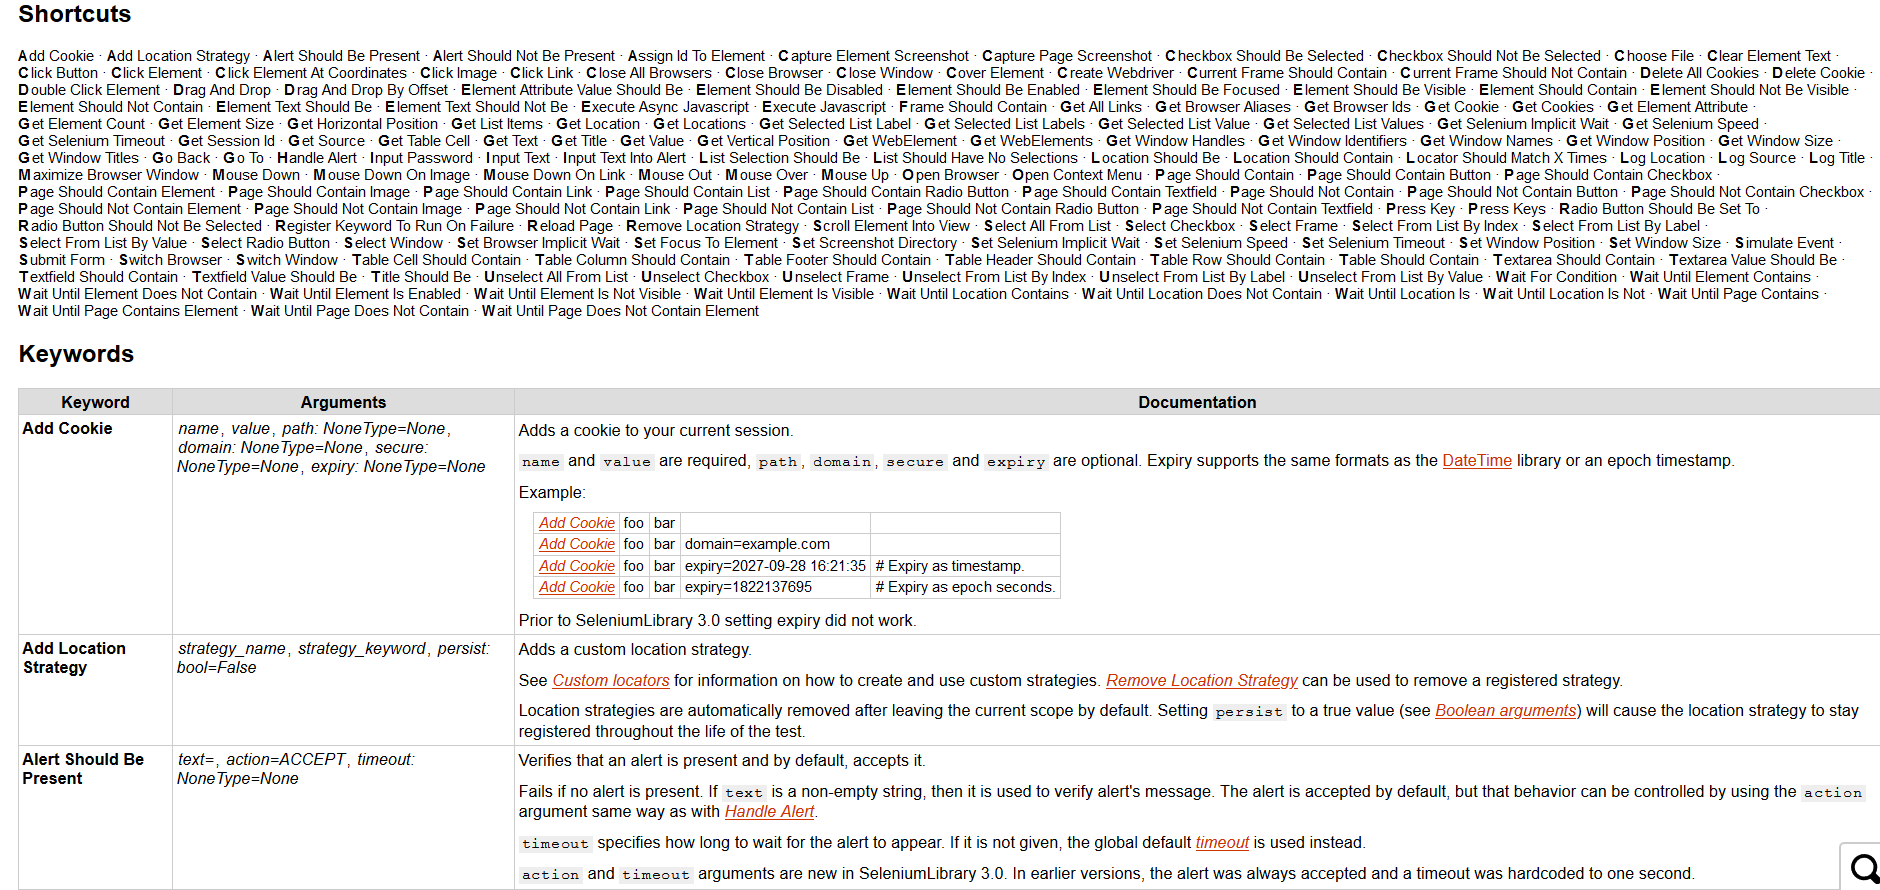
The shortcuts are a list of keywords available from this library.
Remember, the one we were looking at, the first one was Open Browser here on line 13.
Open Browser comes from the SeleniumLibrary. I can find it by searching for “open browser”. And you'll notice it shows up in a number of places where they've talked about how to use it. But it also shows up here in the shortcuts.
Notice the table down here for keywords, this shortcut will take me into this keywords table, and line me up with the definition for Open Browser.
The keywords table has a Keyword column, an Arguments column, and a Documentation column.
The keyword column holds the keyword, the arguments holds the arguments or information we're giving a keyword to do something special, and the documentation should explain about the usage of the keyword.
I just clicked on “Open Browser”, it took me to that keyword's information.
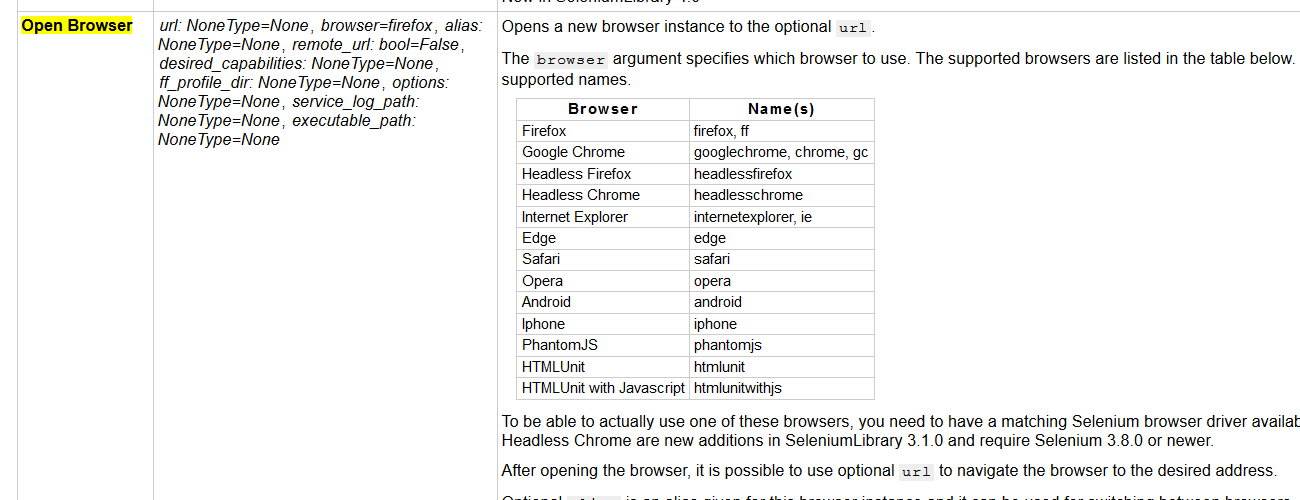
You're welcome to read through all of this, but notice, we gave it the URL and the browser in order to run our test case.
Here we are Open Browser — we pass in the URL, which happens to be an IP address, and “chrome” as the browser.
That's where that keyword comes from, that's how we use it.
You'll notice a lot of other ones here in our code example.
Generate Random Stringcomes from a different library. It comes from the String library, which we import here on line 5.You'll notice
Set Suite Variable, which comes from a built-in library for Robot Framework.You'll see
Click Link, which comes from the SeleniumLibrary, and several others.
These other libraries are just as easy to look up as the SeleniumLibrary.
So, you can use Google to go and look up the libraries. I'm typing in “operating system in Robot Framework”, and I notice the first thing that comes up is the library documentation.
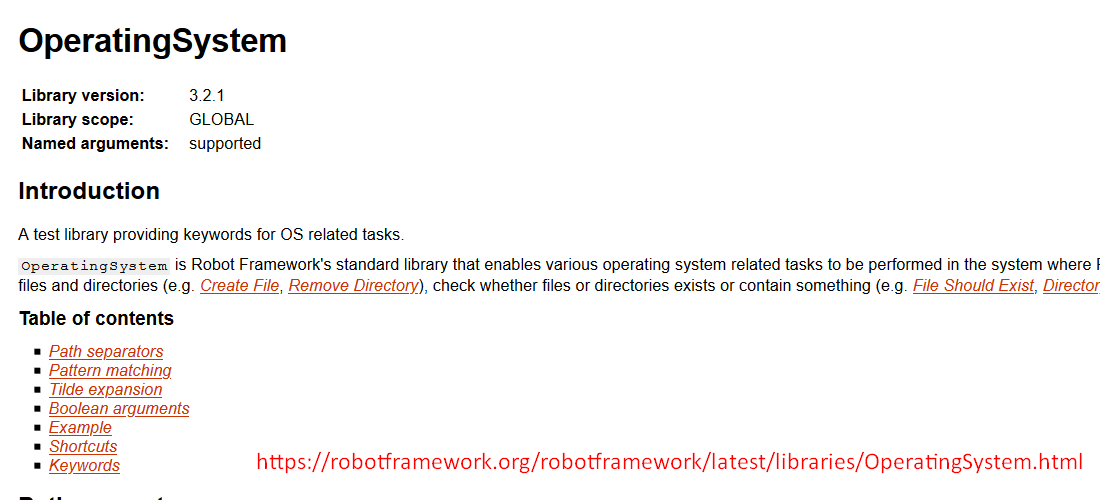
OperatingSystem is one that comes along with Robot Framework.
You'll notice this document looks almost exactly like the SeleniumLibrary. The only main difference is the content. The format is the same, SeleniumLibrary OperatingSystem.
OperatingSystem is one that's built to help you interact with the operating system that you have. There are many more of these.
If we go back and look for “Collections”, you'll notice there's a Collections library.
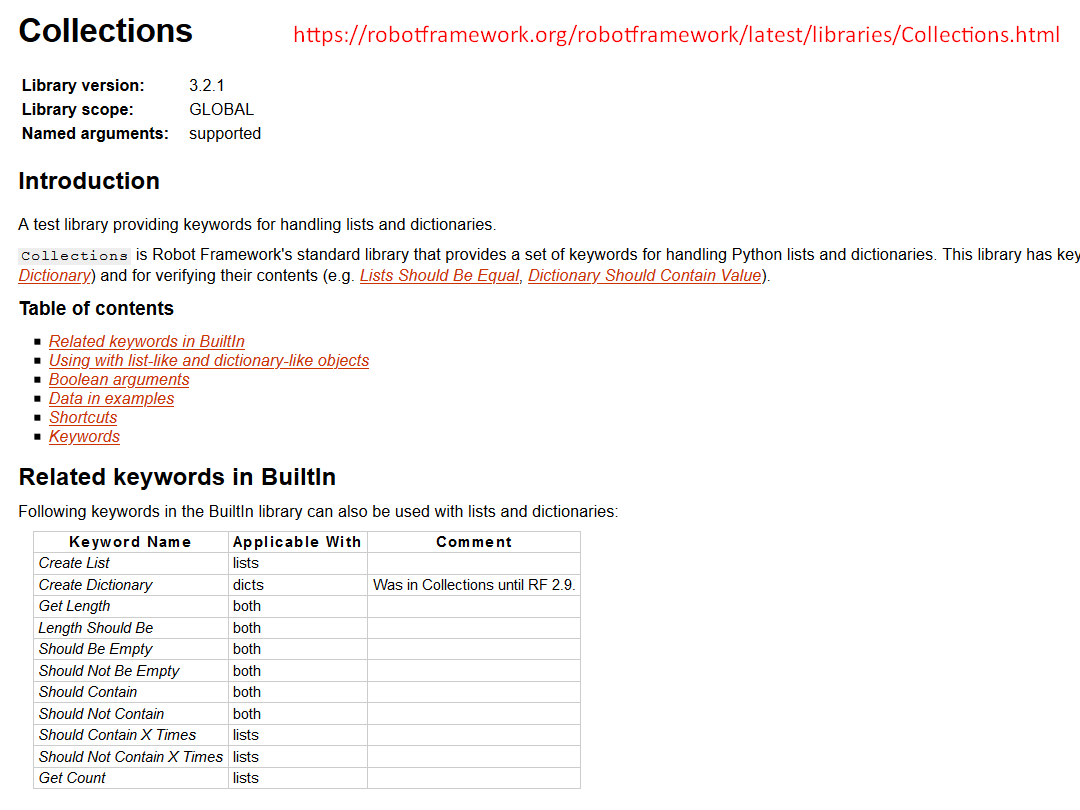
Collections are a data structure that can be used. It's helpful in building out your test from time to time.
You'll also notice, if we go back, there are a number of other ones.
BuiltIn is a library for Robot Framework.
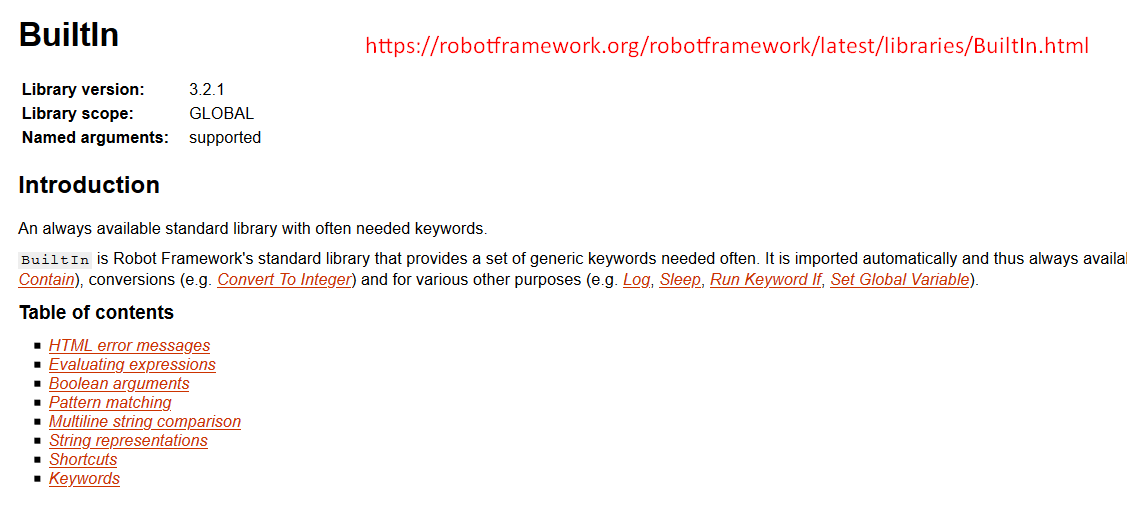
BuiltIn, you don't even have to use the library keyword for in the settings section.
Get comfortable with looking up the libraries. And make sure to make some bookmarks for things like SeleniumLibrary and the BuiltIn library, so that you can go back and reference them anytime.
So, to circle back, a keyword is a piece of text that allows us to do special things within Robot Framework.
Keywords correct syntax is to be used with spaces around it, two or more spaces before it, or any return value that's getting set in a test case, such as in line 14 here.
So, I'd like you to go back to exercise-04 and go to the “example-settings.robot” file and make this test case work.
You can try it by going to your command line, going into the proper directory (cd exercise-04), and running this test case.
If you remember, you run a test case by typing robot and then the name of the file — robot exercise-04.
You should have the same experience that I have here with a failing test, which is that this test case fails. It says “No keyword with name open browser found”.

Absolutely, it doesn't know how to find it.
If you were listening carefully, you already know how to make Robot Framework find the Open Browser keyword. I taught you one way so far to use keywords. Use that way to make sure that this test case works.
Spoiler Alert
If you don't want to see an answer to this, pause here, and try to make this work.
For those of you who have already answered this on your own and are checking how it worked, you'll notice in the answer we input the SeleniumLibrary library.
*** Settings ***
Library  OperatingSystem
Library  SeleniumLibrary

*** Test Cases ***
Create an Invoice
    Comment    This is my first RobotFramework test case!
    Open Browser  http://34.225.240.91/  chrome
And that really should be the only one you need, I believe.
I'm not sure if OperatingSystem is needed for comments, but let's run this and see how it works. Ah, we have a browser opening, it's the Chrome browser.
It went to the page we expected, and we see a nice green pass.
If you got that right, good work.
We want to do one more exercise, or challenge while we're here.
Go into exercise-06 and I have to go back up a directory with cd .. and then into cd exercise-06.
In exercise 06, you'll notice we have an “extra large test.robot” (the code we looked at earlier).
That's a good way to look at some of the keywords that can be used and to see how they're used within a long test case.
What I'd like to do now, though, is teach you another way to create keywords.
So, the first way we used was to use the keyword library in the setting section to pull in already created libraries with their keywords.
Now, we're going to do this a little bit differently.
# Creating Your Own Keyword
We're going to create our own keyword.
So, create a keyword section, like I have here — *** Keywords *** — asterisk, asterisk, asterisk, space, “Keyword”, space, asterisk, asterisk, asterisk. Pretty sure that has to be a capital K on the keyword as well.
One thing you could do here is to create a keyword. I'm going to create one called “my keyword”.
I'm going to tab over 4 spaces — 1, 2, 3, 4 — and give it something to do.
I'm just going to Comment, "this is a keyword I created."
*** Keywords ***
my keyword
    Comment    this is a keyword I created
You'll notice between the keyword Comment and the argument there's at least 2 spaces.
And I can use this keyword anywhere I want. So, I'm going to use it right here in the beginning.
All I have to do to use it is type it here in the Test Case, “my keyword”.
In fact, I'm going to make this even easier for you, so that we don't have to run through all this other stuff, and have only one line in this test case, it's going to be called my keyword.
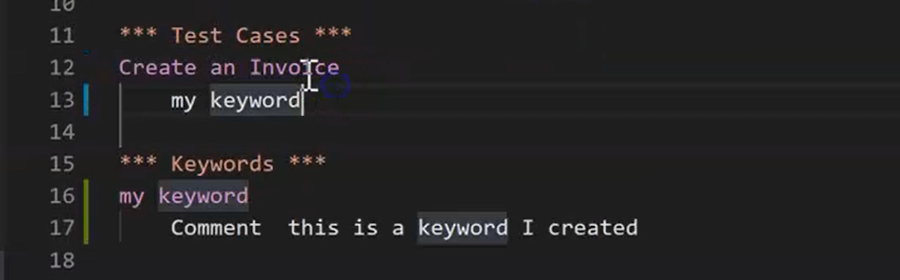
When I put that there, it's going to go in here to this keyword and make a comment, "this is a keyword I created".
So, I should see this text in my output, if this test case works.
Run the keyword by typing robot extra-large-test.robot. It ran very quickly. That's a pretty good sign because it's only supposed to do 1 step.
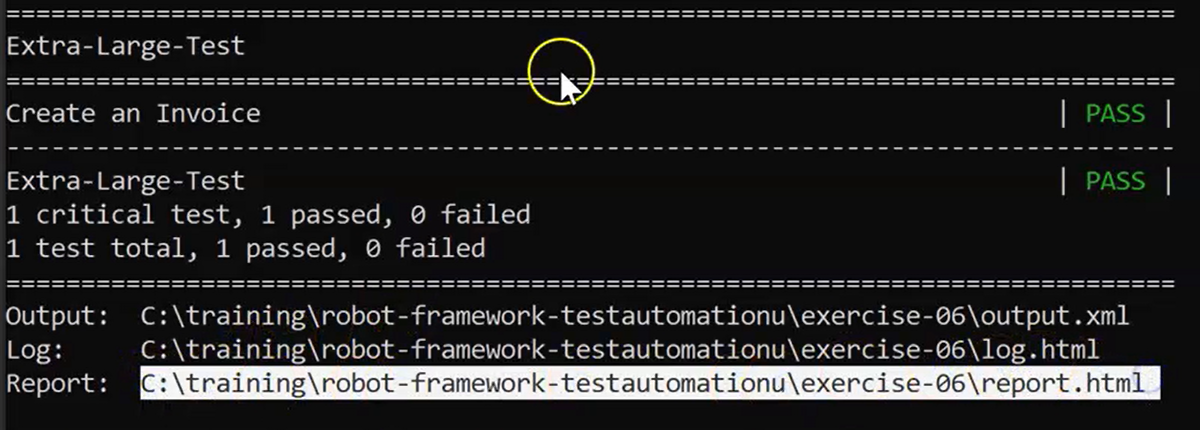
It says that it passed, but as good test automation engineers we're always skeptical of that.
We're going to go and take a look in our log and see if we see the output. Should be there because of our comment that we made.
So, we made a keyword called “my keyword”. I can see in the log it is getting called here with this “my keyword” section here.
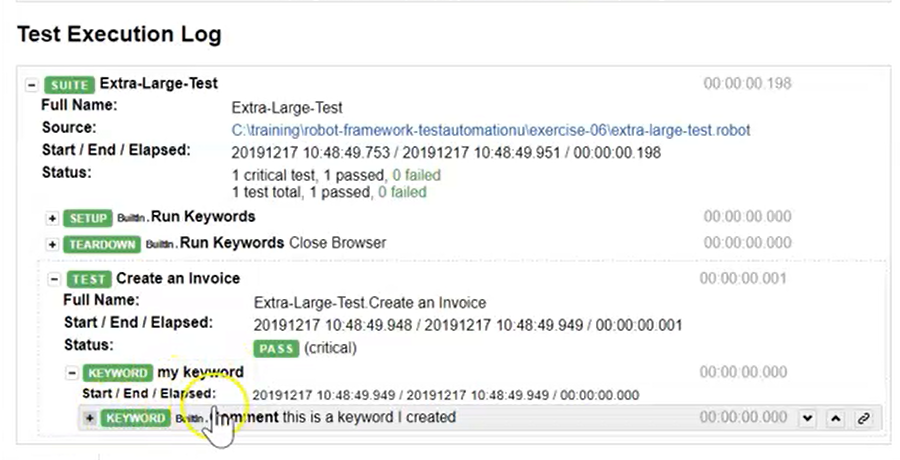
And we see that we actually output the text, "this is a keyword I created."
# Challenge
So, what I'd like you to do, look in the README file for exercise-06, create and use a keyword in your robot file called “Navigate to Home Page”.
And what this is, is you're going to look in this keyword-basics.robot file, and you're going to create a keyword in here called“Navigate to Home Page”.
# Example Code - keyword-basics.robot
*** Settings ***
Library  OperatingSystem
Library  SeleniumLibrary

*** Test Cases ***
Check invoice manager page
    Comment    We're learning how to create a custom keyword.
    Open Browser  http://34.225.240.91/   chrome
    Page Should Contain     Invoice Manager
I'll give you a hint, the steps are already in the test case.
You're going to replace the steps in the test case, probably these, by calling a keyword, just like we just did.
You'll need to create your own keyword section, and it will have these steps. Here, in the Test Case, you'll call the keyword you created.
Take a moment to do that and pause the video until we come back to look at that.
This is my answer for how I did that.
I created a keyword called “Navigate To Home Page”. I put it in a newly created Keyword section. And inside the Keyword I called the Open Browser keyword to open the browser.
# Example Code - keyword-basics.answer.robot
*** Settings ***
Library  OperatingSystem
Library  SeleniumLibrary

*** Test Cases ***
Check invoice manager page
    Comment    We've learned how to create a custom keyword!
    Navigate To Home Page
    Page Should Contain     Invoice Manager

*** Keywords ***
Navigate To Home Page
    Open Browser    http://34.225.240.91		chrome
If we look back really quickly at how we started, you'll notice we were already calling the Open Browser keyword.
So, all I had to do was copy line 8 into my Keyword section. And then call the keyword, or use it, or execute it by placing the name of the keyword here on line eight in place of what was there before.
So, we're now calling our own keyword instead of Open Browser on line 8 — we still call Open Browser inside the keyword we created. So, I'm just showing you how to create your own keyword.
Let me show you that this works.
And there we go.
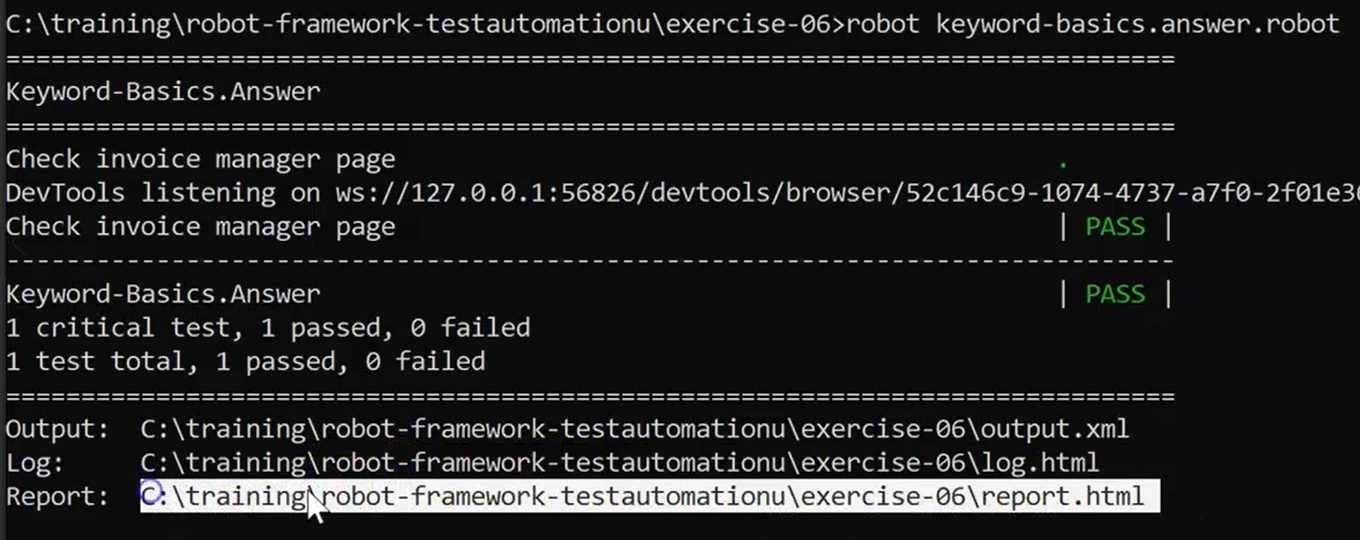
It worked, it passed, we saw it open the browser, everything seemed to work there. You're welcome to check the report.html file to make sure that it worked as you would have expected it.
# Another Learning Example
An example of how to create your own keywords is available in exercise-32.
Take a look inside that folder, and open up “example-keywords.robot”, as I have here.
# Example Code - example-keywords.robot
*** Settings ***

*** Variables ***

*** Test Cases ***
My Test Case
  ${nickName}=  Set Variable  Paul
  Print Profile  ${nickName}  Merrill  Trainer  dpaulmerrill
  ${nickName}=  Change Nickname  ${nickName}  Davie
  Print Profile  ${nickName}  Merrill  Trainer  dpaulmerrill

My Addition Test
  ${sum}=  Add  2  3
  Should be equal as integers  5  ${sum}

*** Keywords ***
Add
  [Arguments]  ${value1}  ${value2}
  ${value}=  Evaluate  ${value1} + ${value2}
  [Return]  ${value}

Change Nickname
  [Arguments]  ${original}  ${new}
  [Return]    ${new}

My Log
   [Arguments]  ${text}
   Log to Console   This is the message: "${text}"
   Log to Console   This is the message: "${text}"
   Log to Console   This is the message: "${text}"

Print Profile
   [Arguments]  ${firstName}  ${lastName}  ${title}  ${twitterHandle}
   Log to Console   \n__Profile__
   Log to Console   First Name: "${firstName}"
   Log to Console   Last Name: "${lastName}"
   Log to Console   Title: "${title}"
   Log to Console   Twitter Handle: "${twitterHandle}"
In this file, we have a Setting section which is empty, a Variables section which is also empty, a set of two Keywords.
One is called “My Test Case”; the other is called “My Addition Test”. Each of these test cases use keywords created within this test file.
You'll notice we use Print Profile in the first test case, which is defined down here at line 34 in the keyword section. All it does is print out a profile of a particular person.
We pass in arguments, which are the first name, the last name, a title and a Twitter handle, and it should log it to the console, which is our command prompt with our My Log keyword.
The second test case just does addition.
We pass in 2 and 3, and then we check to make sure that the answer is 5, or the sum.
Add is created here inside Keywords. We use the built-in keyword called Evaluate to add the first value to the second value.
Let's run this test case and see it work.
Remember, I have to change into the exercise-32 directory, and then I'll run the test case using robot example-keywords.robot.
There we go.
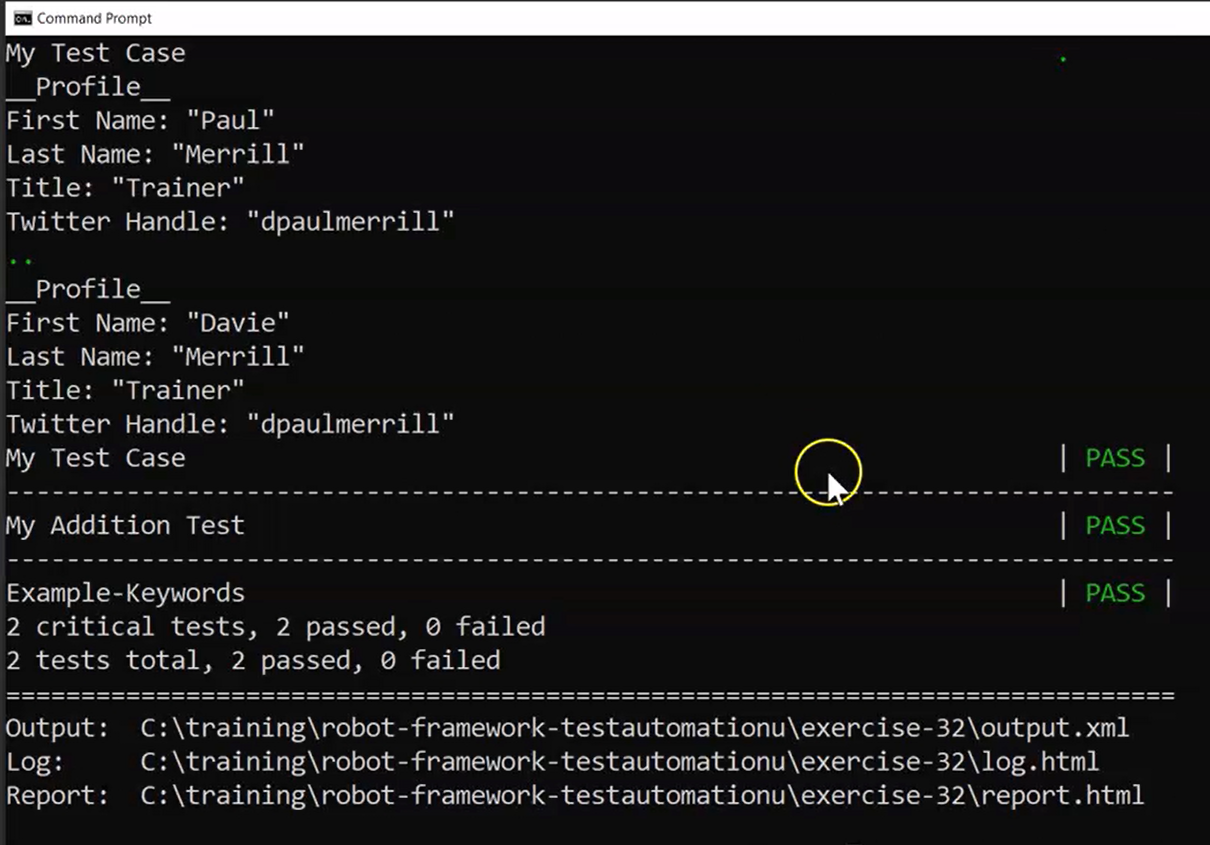
Remember, my first test case printed out a profile.
The first one was Paul Merrill, a trainer with my Twitter handle, dpaulmerrill.
The second time it was called within the first test case, or rather the second time the profile keyword was called within my test case, we printed this out: Davie Merrill, Trainer, dpaulmerrill, My Test Case.
The second test case was addition.
There was no output from it, but we can see that both “My Test Case” passed, as well as “My Addition Test” passed.
Looking back at those, remember, “My Test Case” is defined here — the entire test case is this section from line 8 down to line 12.
And the second test case, “My Addition Test”, is here from line 14 to line 16.
So, reviewing — there are two main ways to create and use keywords.
Keywords can come from a library, which may be supplied to you, in this case, we used SeleniumLibrary and OperatingSystem library.
Or you can create them on your own inside the test case using the Keywords section.
A keyword is defined by having two or more spaces around it. A keyword is a piece of functionality we can create or use to do something special.
Many keyword libraries are already developed for Robot Framework. Make sure to use them as much as possible in lieu of creating your own when possible.
Thanks for joining me for a walkthrough on keywords and I'll see you next chapter.
