

Transcripted Summary

In this chapter, we will cover an exciting End-to-end offering from Applitools called the Execution Cloud. We'll start with a comprehensive overview of the Execution Cloud and its functionalities. We'll demonstrate how to run both traditional functional tests in addition to Applitools Visual AI tests and we'll see how we can review both types of test results on the Applitools Test Manager Dashboard.
Additionally, we will explore a vital feature known as self-healing, which dramatically reduces flakiness of automation tests. Lastly, we will illustrate how tunneling can be effectively used to examine local resources on the Execution Cloud. Let's go ahead and jump right in.

Some of the most disruptive challenges facing QA teams today are flaky tests, managing test infrastructure such as the browsers & drivers as well as managing the environments themselves that the tests are executed on. Existing execution & infrastructure providers try to manage these for you but there is nobody that provides a full End-to-End solution that includes all of that plus AI capabilities. Additionally, many of these platforms are highly opinionated. This means you'd need to conform to their standards rather than build your test suite on top of them using the automation framework of your choice. Ultimately, you end up needing multiple tools and platforms working in conjunction with each other which leads to a disjointed test suite.
The Applitools Execution cloud is a complete End-to-End offering that addresses all of the challenges mentioned earlier. The Execution cloud allows you to use the automation framework of your choice and organize your tests however you'd like. It also provides built-in access to the Applitools Visual AI as well as Cross Browser Testing using the Ultrafast Grid. Lastly, the Execution Cloud is much faster when compared to existing solutions especially when running Cross Browser tests with the Ultrafast Grid. Concurrency and parallel execution are built into the platform and your test suites can be scaled up simply by requesting a higher concurrency.
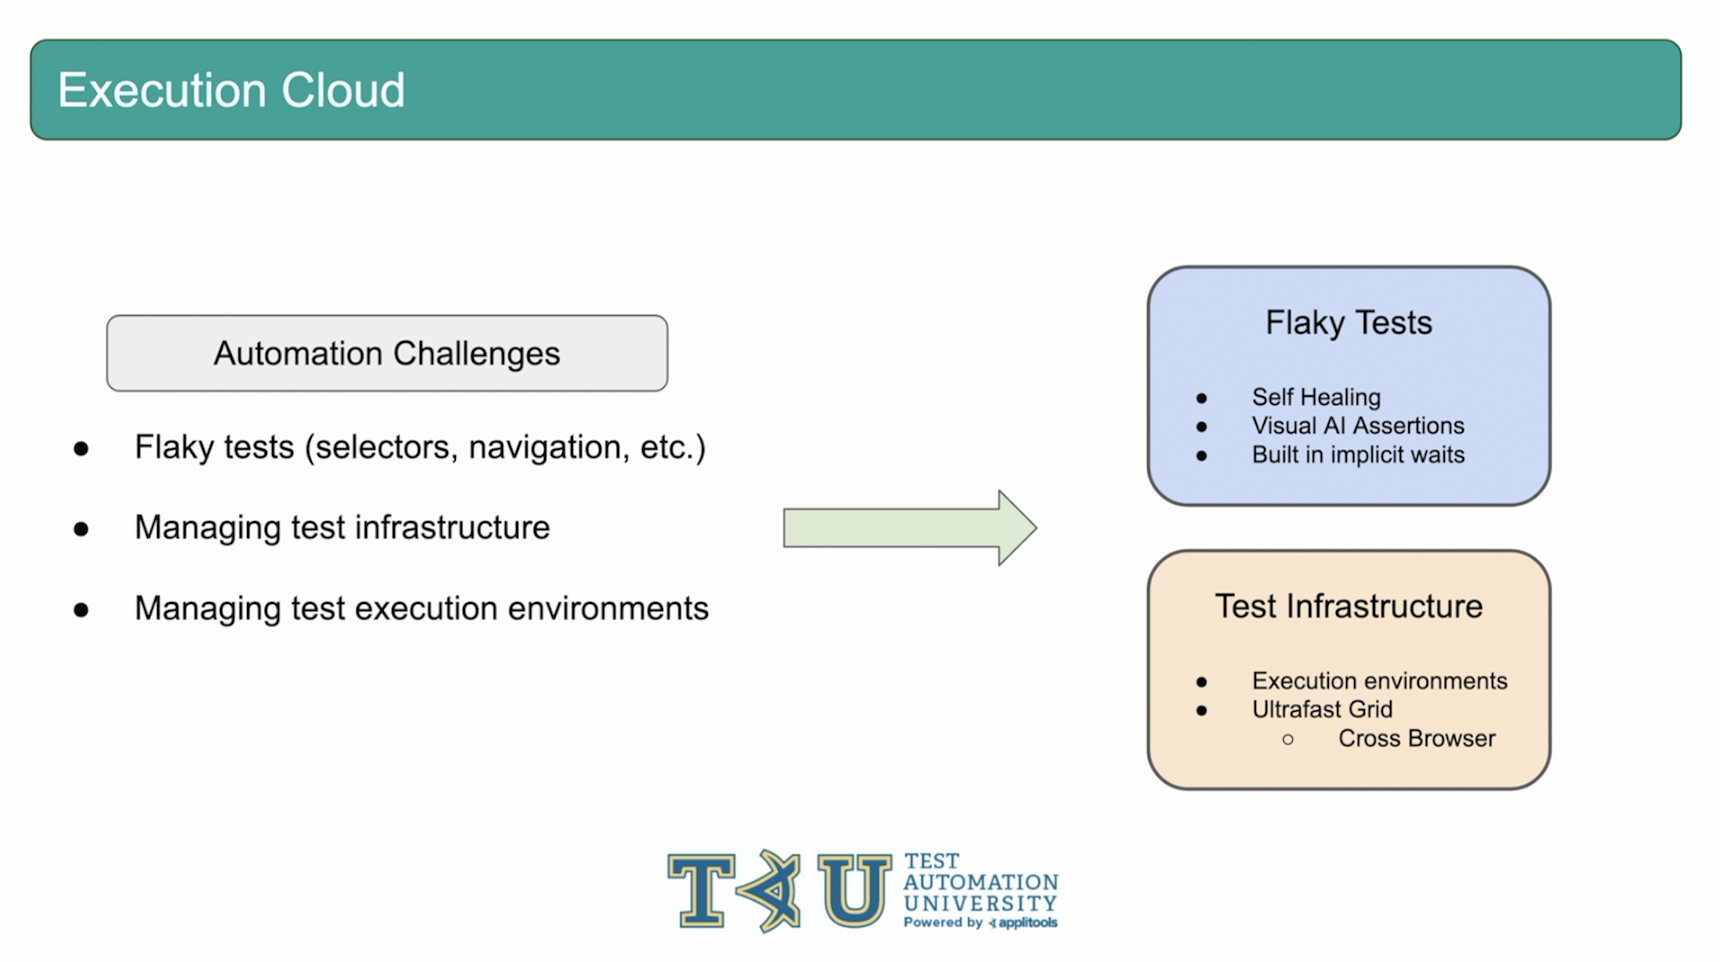
With the Applitools Execution cloud, flaky tests are resolved with Self-Healing, Visual AI assertions and built in implicit waits. Managing test infrastructure is solved by the fully managed execution environments and the direct integration with the Applitools Ultrafast Grid for Cross Browser Testing. The Execution cloud ties all of these technologies together with minimal setup and no longer requires you to connect different providers together.

The Execution cloud supports running both traditional functional tests and Visual AI tests. We highly recommend using Visual AI over traditional functional assertions since Visual AI can capture many things that traditional functional tests are unable to capture as we discussed in the first course in this series. However, the Execution cloud is flexible enough to support both types of tests if needed. It's important to note that all tests running on the Execution cloud, regardless of if they're a Visual AI test or not, have access to the Self-Healing and implicit wait features which we'll see later on.
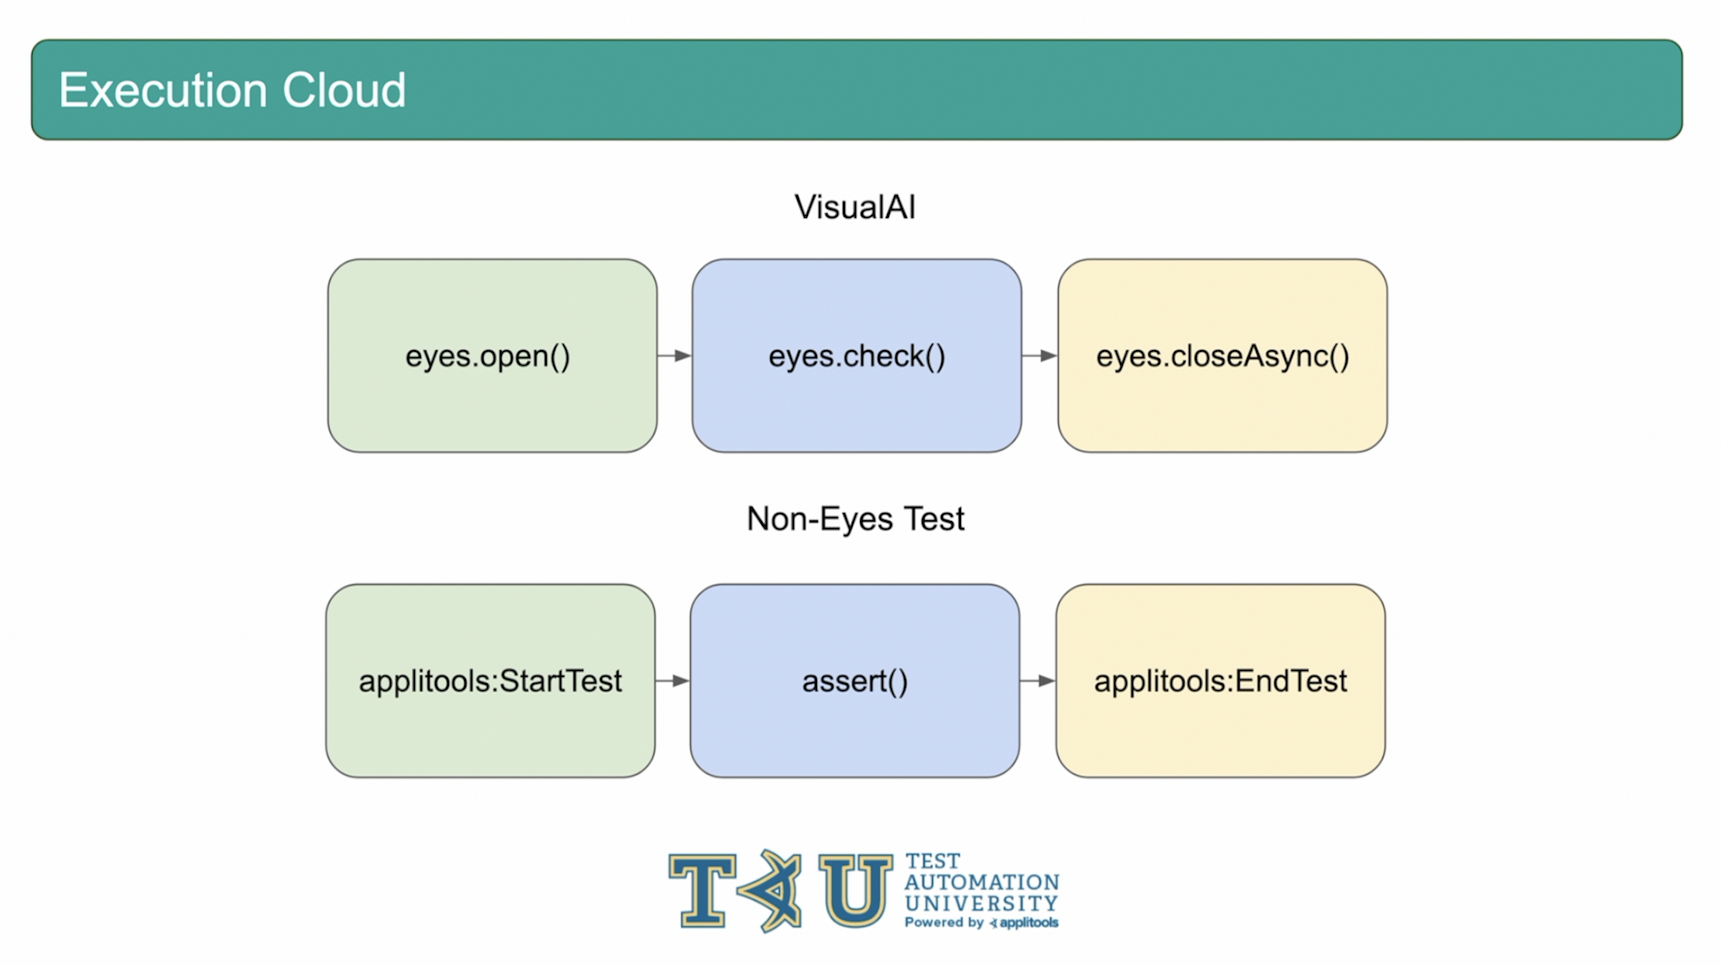
As we know, an Applitools Visual AI test has the format shown on the screen where we call eyes.open() to start the test, then eyes.check() to capture a visual AI checkpoint and then eyes.closeAsync() to end the test.
Running a Non-Eyes test on the Execution cloud follows a similar flow except it replaces eyes.open() and eyes.closeAsync() with calls to special APIs that are injected using driver.executeScript. To start the test, you can call the applitools:startTest script and pass an appName, testName and some other metadata. Then, you can perform any assertions that you'd like. Finally, you can end the test by calling applitools:endTest and passing a test status to it. Let's head over to our code and create a Non-Eyes test case.
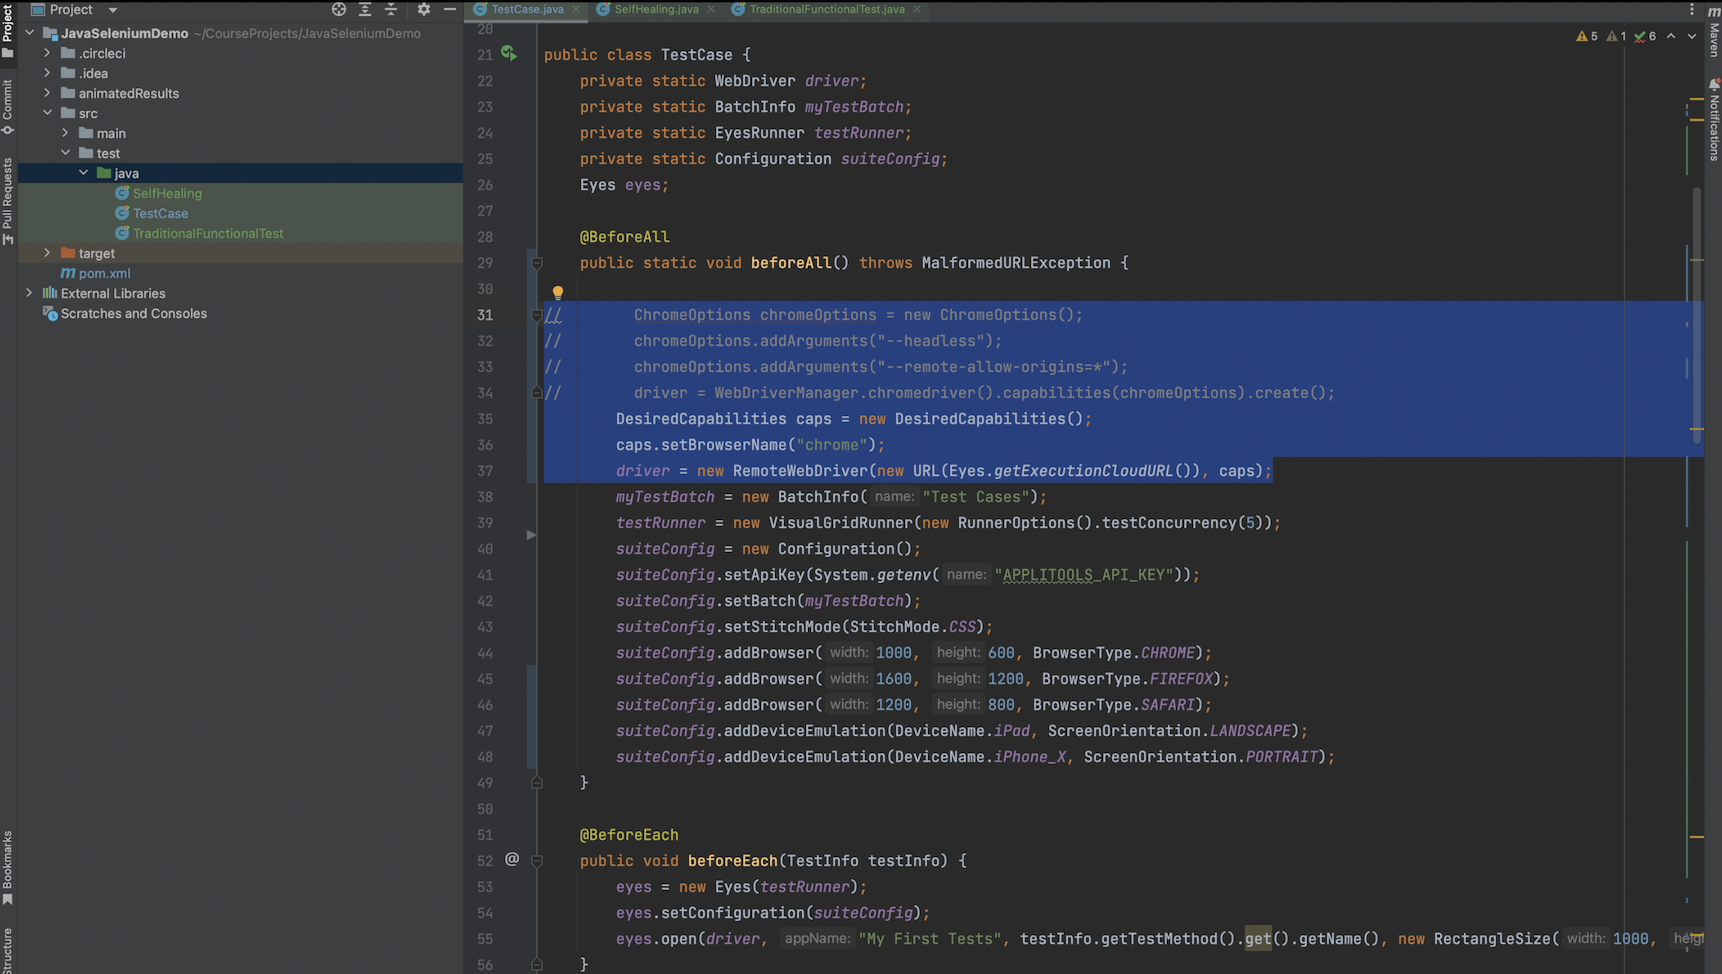
In our code framework, I've made quite a few modifications. Firstly, I configured our driver to run on the Execution cloud by using a RemoteWebDriver and passing it the Execution Cloud URL. You can call the Eyes.getExecutionCloudURL method to access the correct URL. This is the only change required to tell our driver to run on the Execution Cloud.
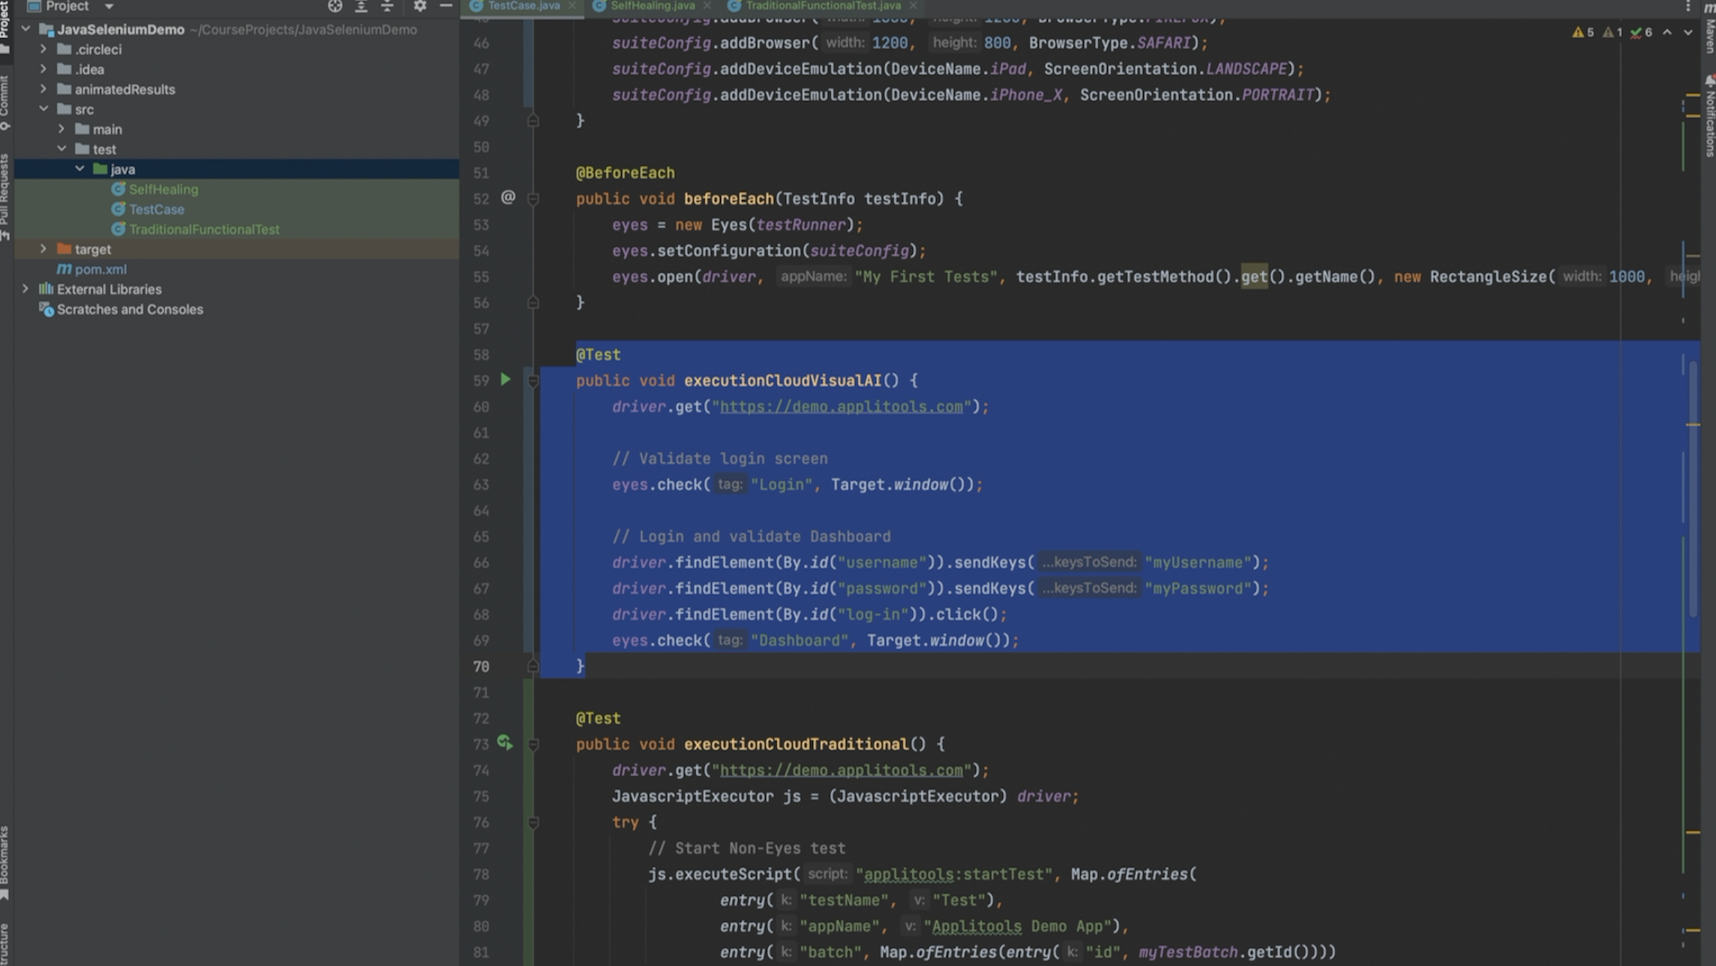
Next, I modified our VisualAI test case to run against the Applitools demo web page that has a login form. After navigating to the page, I capture a VisualAI assertion. Then, I login to the dashboard and take another visualAI assertion to confirm that the login was successful.
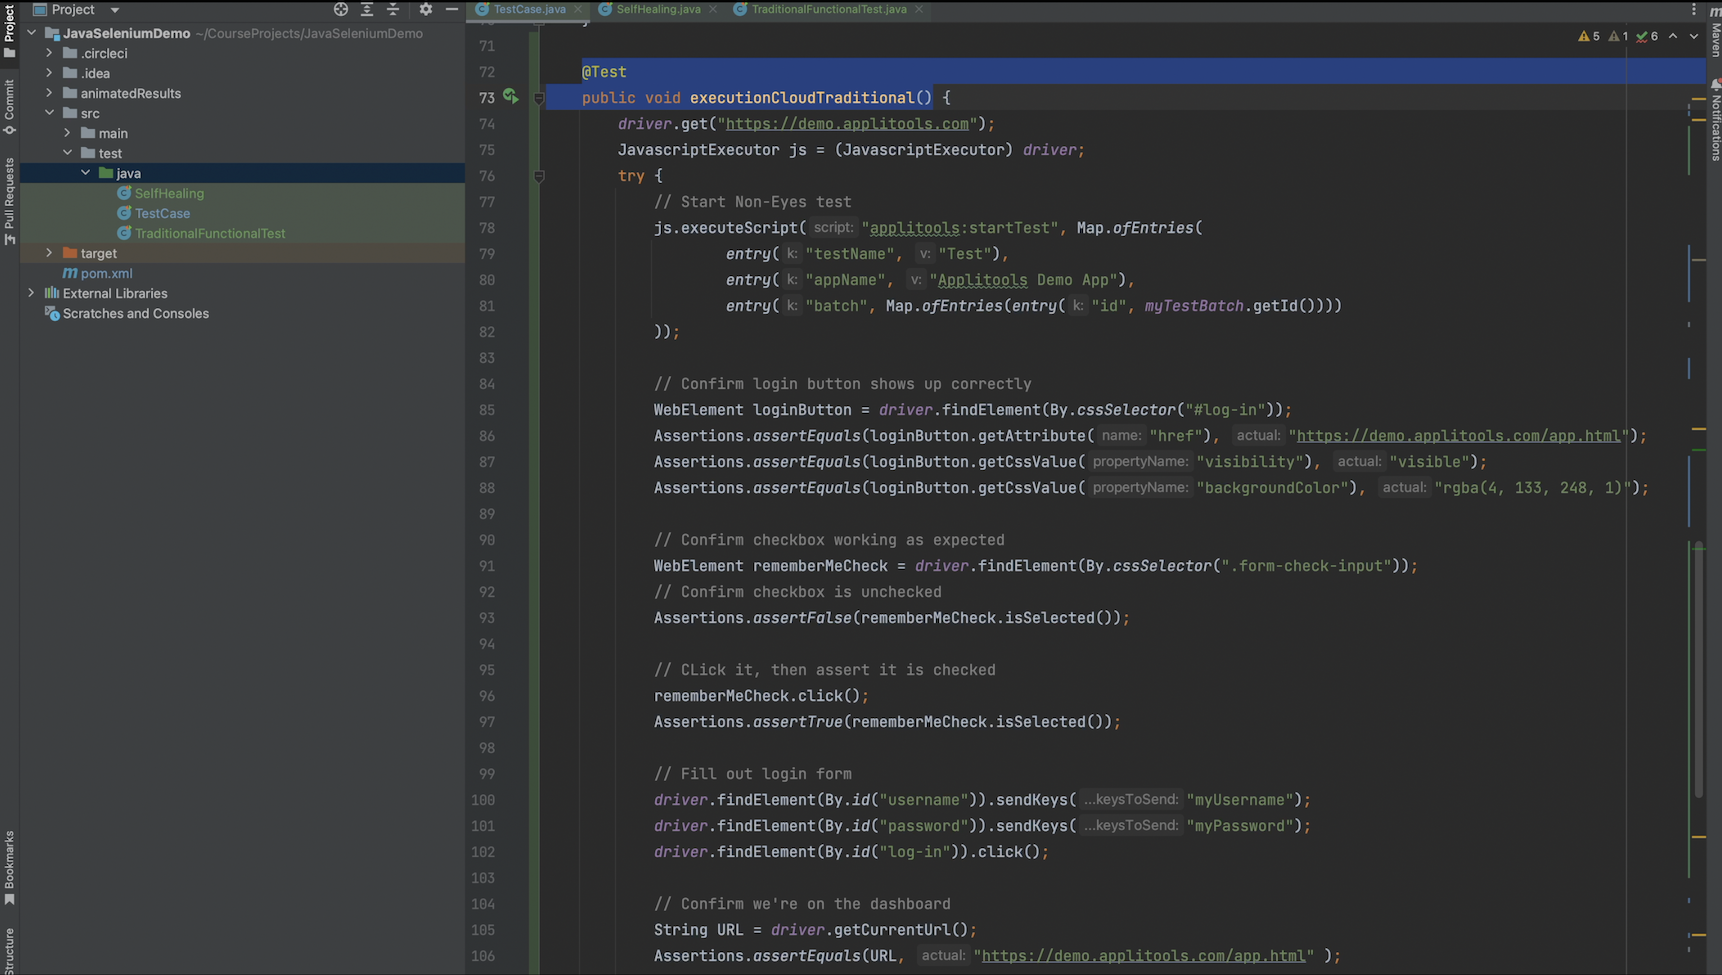
I also added a 2nd test case that uses traditional functional assertions. Instead of visual AI assertions, I'm validating a few properties for some of the elements on the login form such as the sign in button and the remember me checkbox. I then fill out the login form and submit before checking the URL of the page and ensuring we end up on the dashboard screen just like we did in the VisualAI test above.

To trigger a Non-Eyes test on the Execution cloud, you call this the applitools:startTest script at the beginning of your test as we discussed earlier. This script will be run on the Execution cloud and it lets the Applitools server know that you're running a Non-Eyes test so that it can track it. We're passing our appName and testName to this script just like we would pass them to eyes.open() for an Eyes test. We're also passing our batch information, specifically the batchID, so that this test will be grouped with our VisualAI tests on the Dashboard.
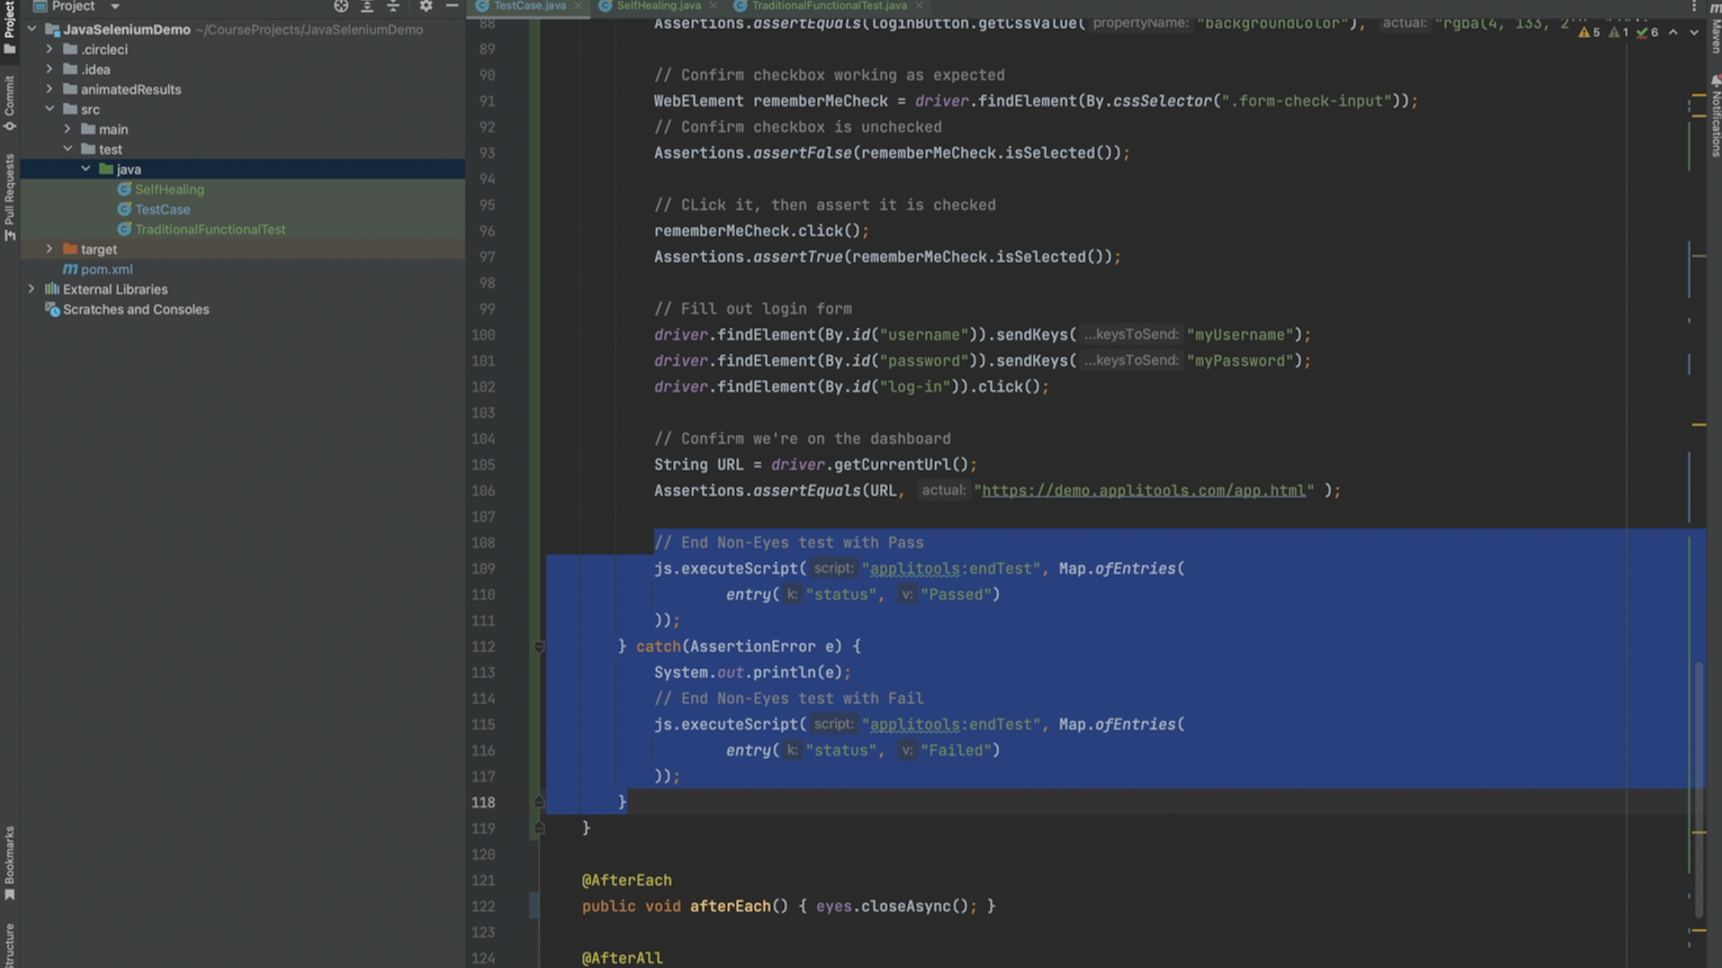
At the end of the test, we call the Applitools:EndTest script and pass a status to it. If the test wraps up with no failures, then we mark it as "Passed". If the test fails, then we mark it as "Failed". Only "Passed" and "Failed" are valid statuses to pass into this script.
Note that I'm using a try/catch block in my traditional functional test in order to capture the output of our assertions. In practice, I would highly recommend using a more robust solution such as a TestWatcher for JUnit or something else depending on the framework that you're using in order to access the results of the assertions. However, the try/catch block will work fine for demonstrating the functionality of the Execution cloud for now.

In order to differentiate our Non-Eyes test from our VisualAI test, I've also added a JUnit tag above our Non-Eyes test.

Then, in the beforeEach hook, I'm checking for this tag before calling our Eyes methods. This way, we won't call eyes.open() for our Non-Eyes tests.
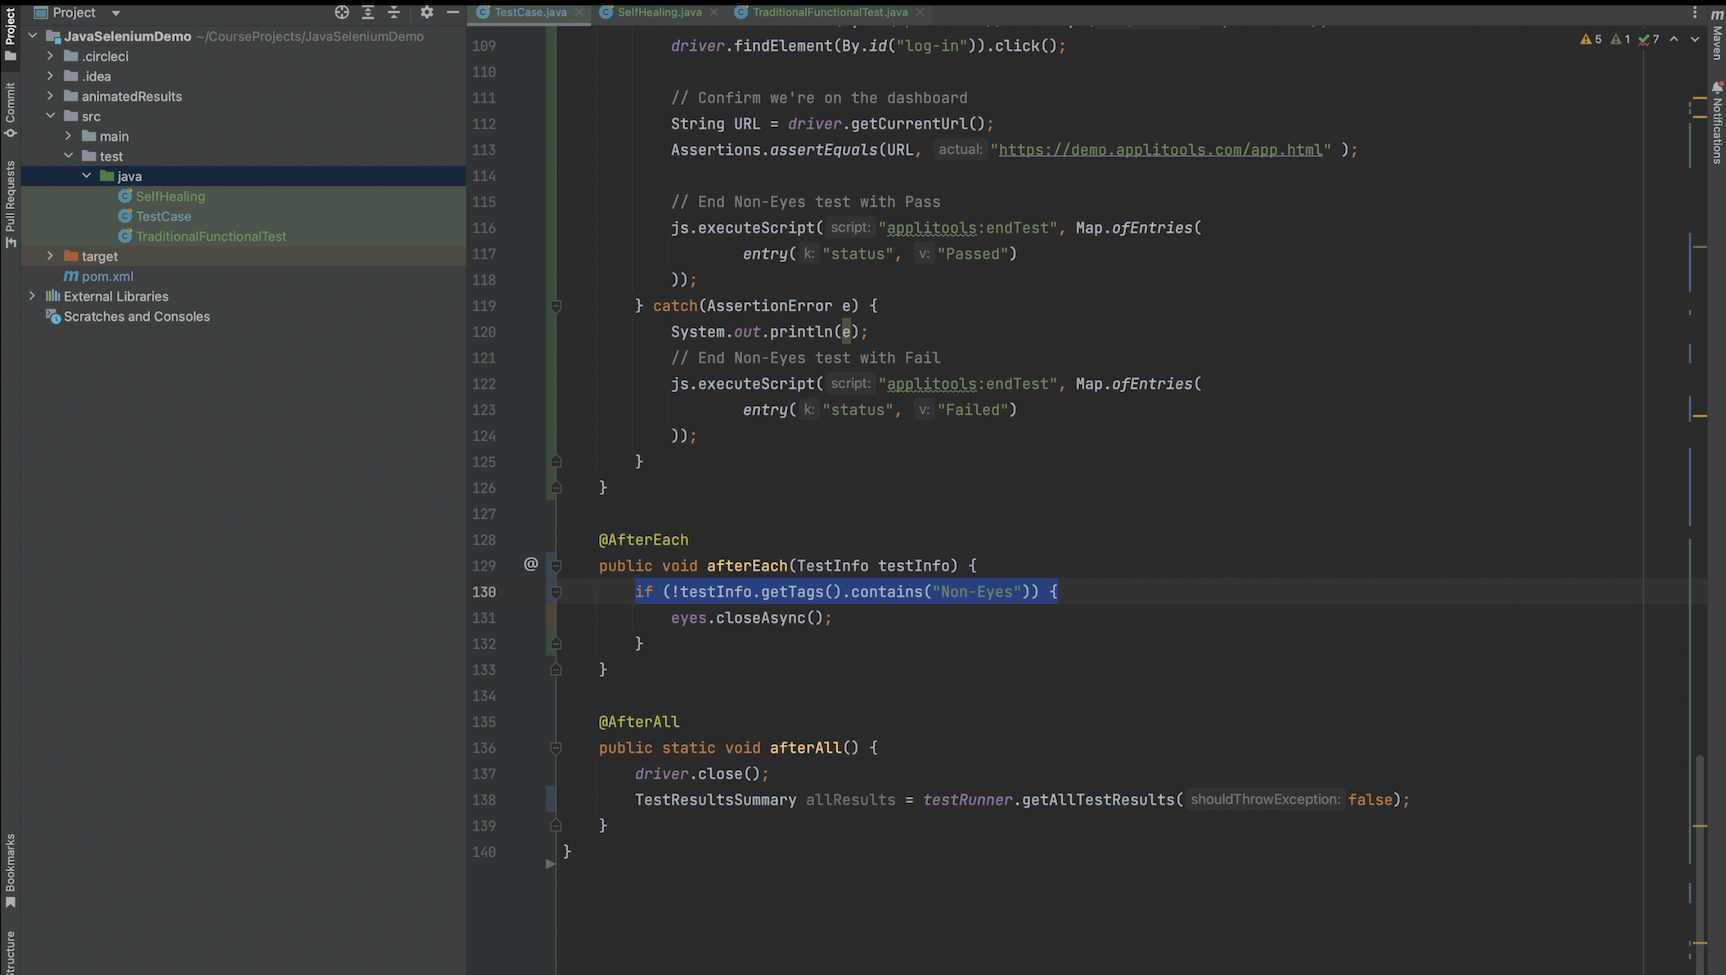
I also added the same check in the afterEach hook.

As an aside, I'd like to call out the comparison between the two tests. Both tests perform the same steps and functionally validate that the login flow works as expected yet the VisualAI test is much more succinct and easier to manage. We also get way more coverage with the VisualAI assertions since they validate all elements on the page and not just the ones we've written assertions for in our traditional test. With that said, let's go ahead and run our tests and then review the results on the Test Manager Dashboard.
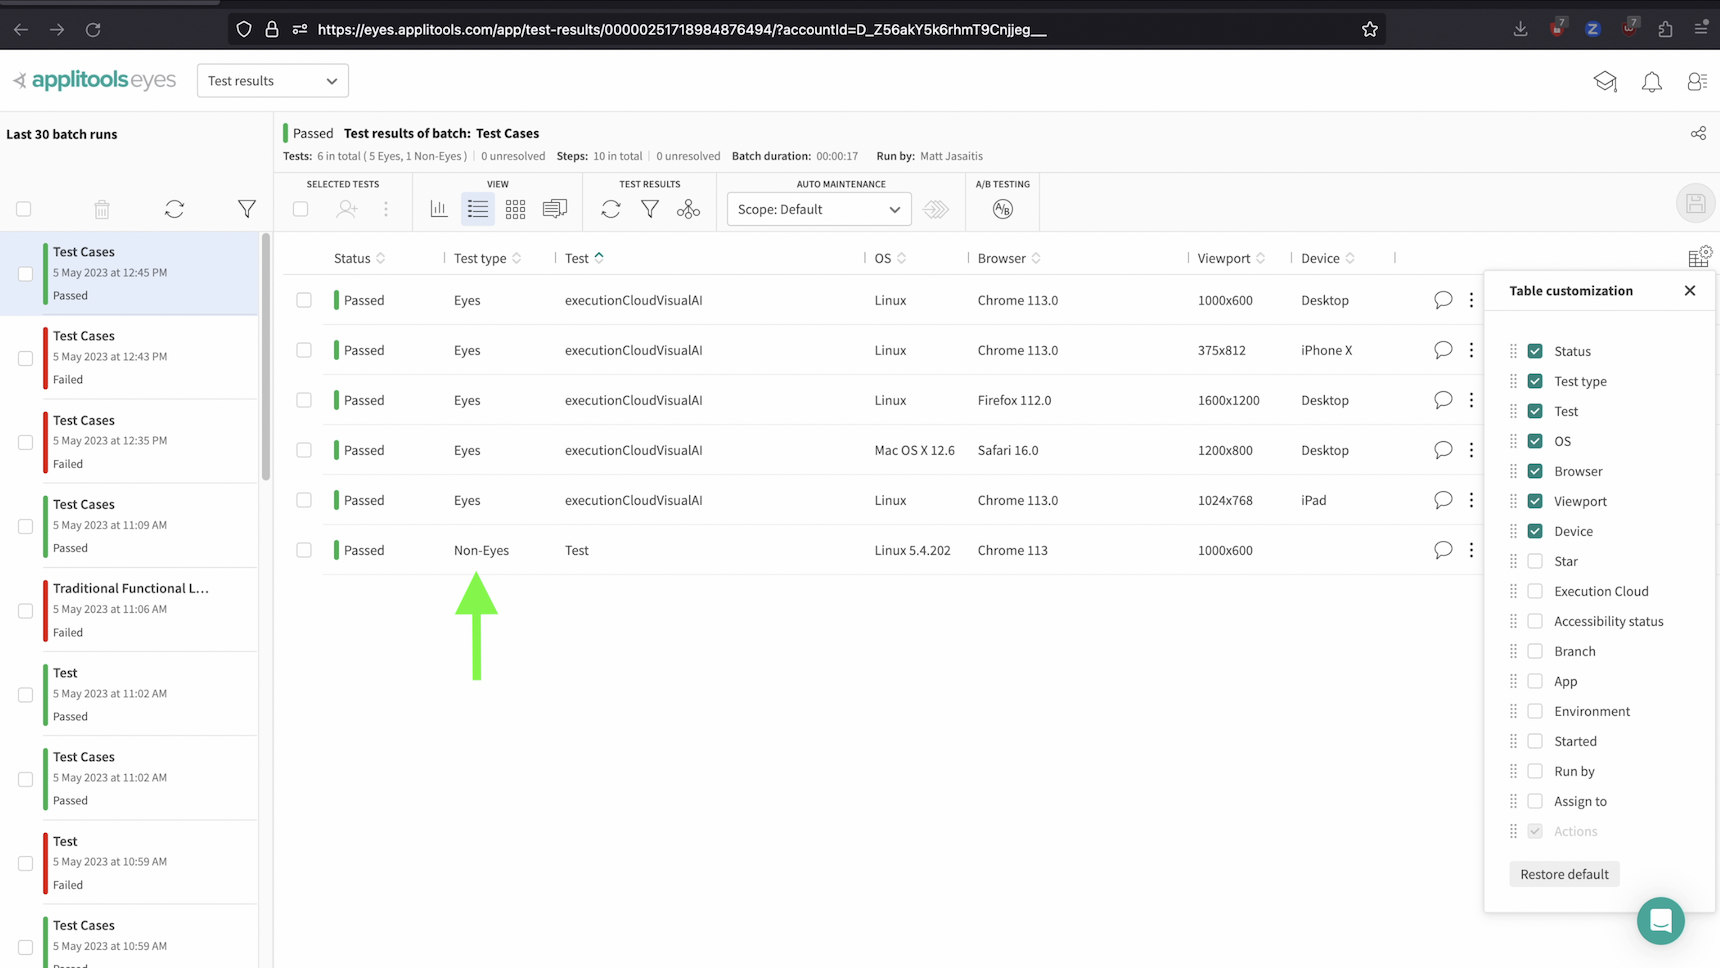
On the Test Manager Dashboard, we see that our batch shows both our VisualAI tests and our Non-Eyes traditional tests. If you don't see this on your end, you can add the test type by selecting it from the table manager view shown here.

We can then review the tests as we normally would, however, when running on the Execution cloud, we also get some extra materials to review. To access these, click on the 3 dots icon at the end of a test row, and then hover over Execution Cloud details. Then, we're able to download a video of our test run, download the webDriver logs as well as the console logs. Feel free to download and review these items on your end.
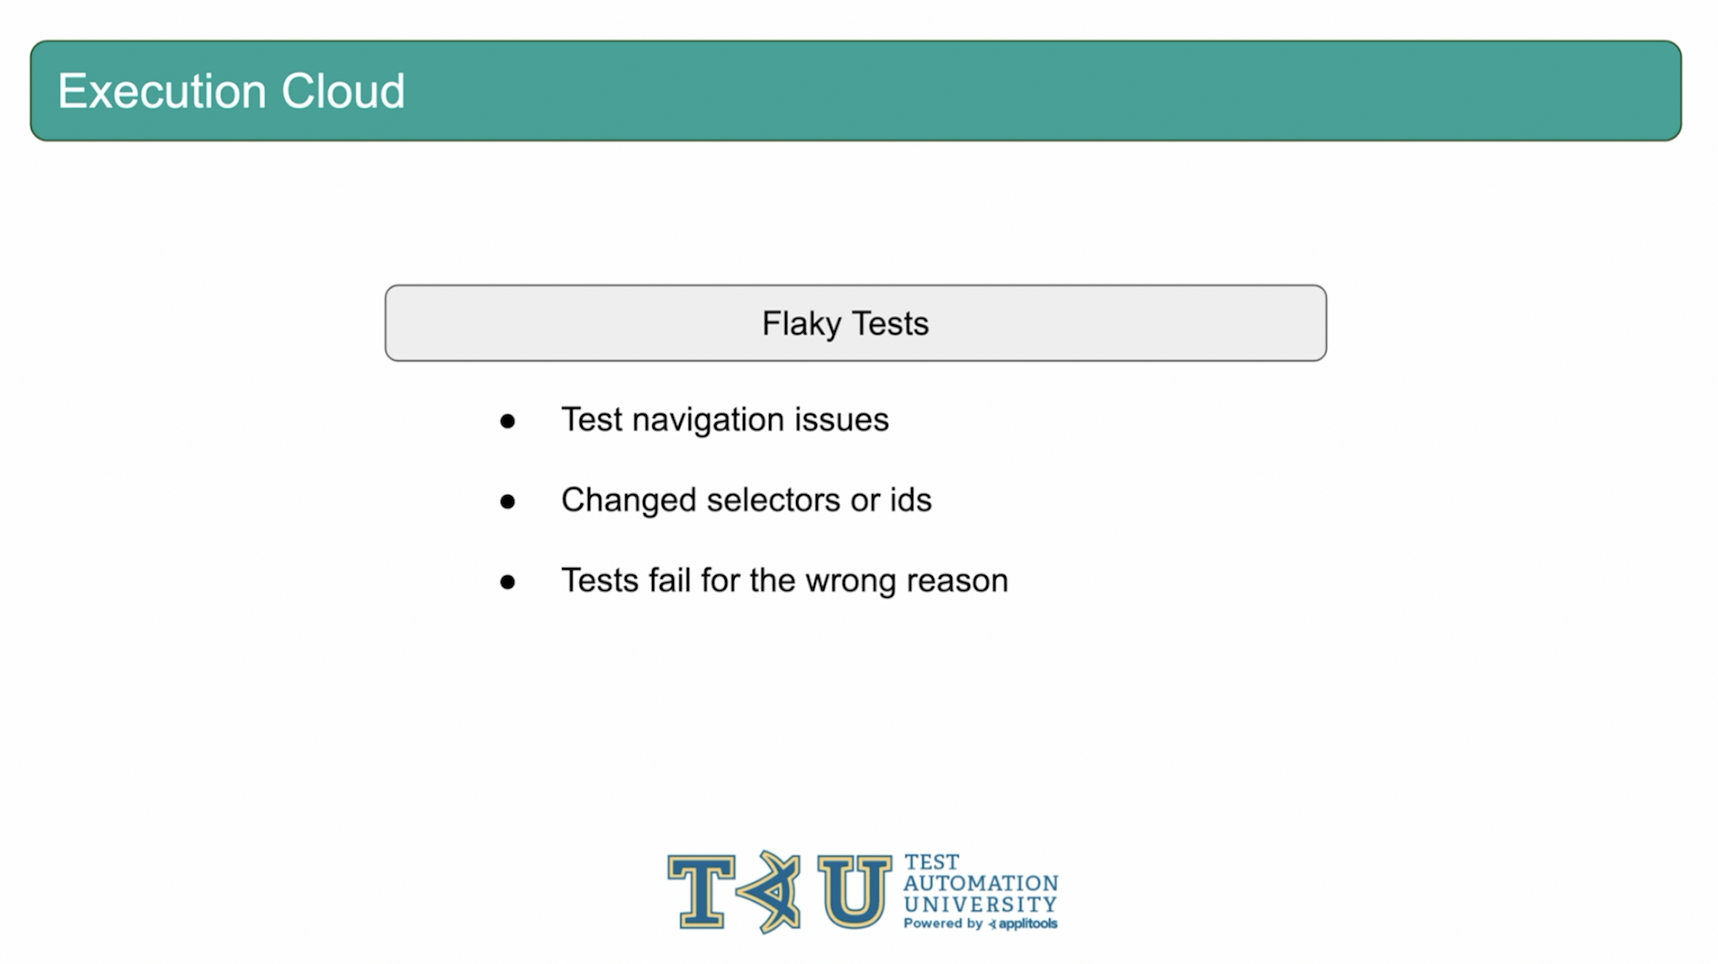
As we discussed earlier, one of the largest pain points of automation testing is dealing with flaky tests. Even when there's nothing wrong with our test code, something unexpected could have changed on the page, like a CSS selector or element id, that would cause our automation test to fail. This can delay releases and waste valuable time focusing on maintenance instead of shipping our code to production.
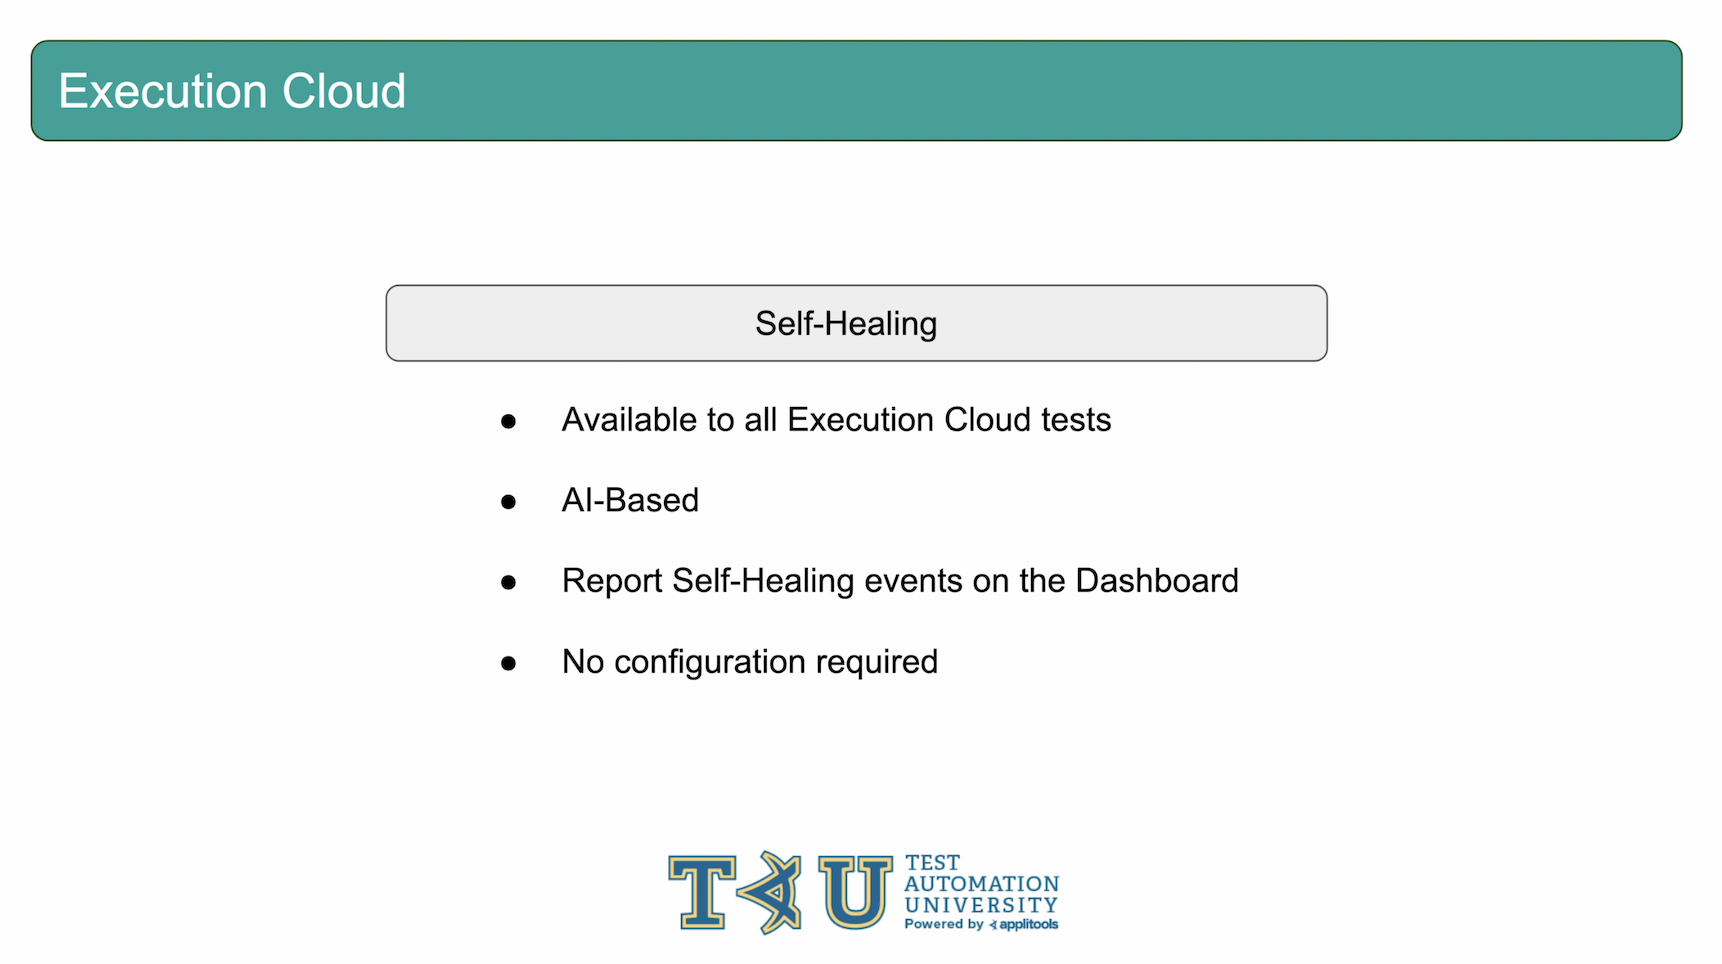
This is where Self-Healing can save the day. When you run tests on the Applitools Execution cloud, every test gets access to the built-in AI based Self-Healing mechanism. As tests are run, the Self-Healing mechanism will store information about the elements that are interacted with using WebDriver findElement commands. Instead of the selector, xPath or ID being a single point of failure, the element as whole will be remembered so that if an ID or selector changes, the Self-Healing mechanism will still be able to understand which element the test was trying to interact with. Instead of failing the test, it will continue and then report any self-healing steps that were performed so that we can make the necessary changes to our test code after the test run.
The self-healing feature is also fully automated and does not require any configuration or setup on our end. Let's head over to our code and run through an example that will show self-healing in action.
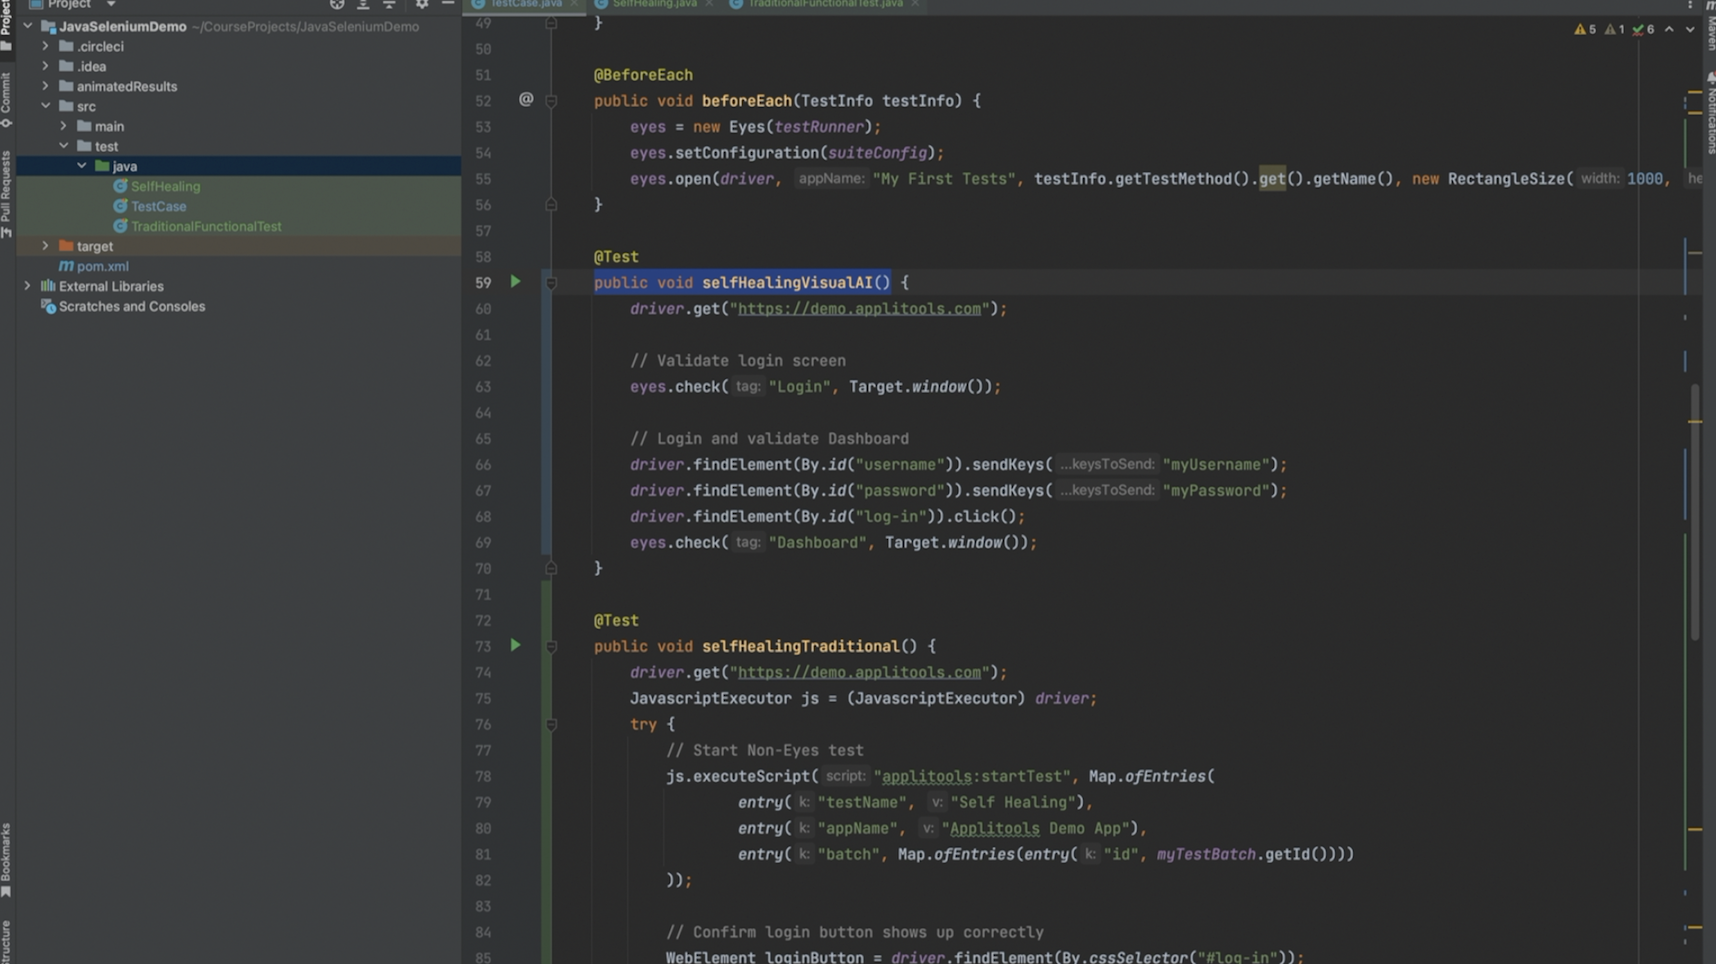
In our code, I've only changed the testName so that we get a fresh baseline for our VisualAI tests. Let's go ahead and run this test to set things up.
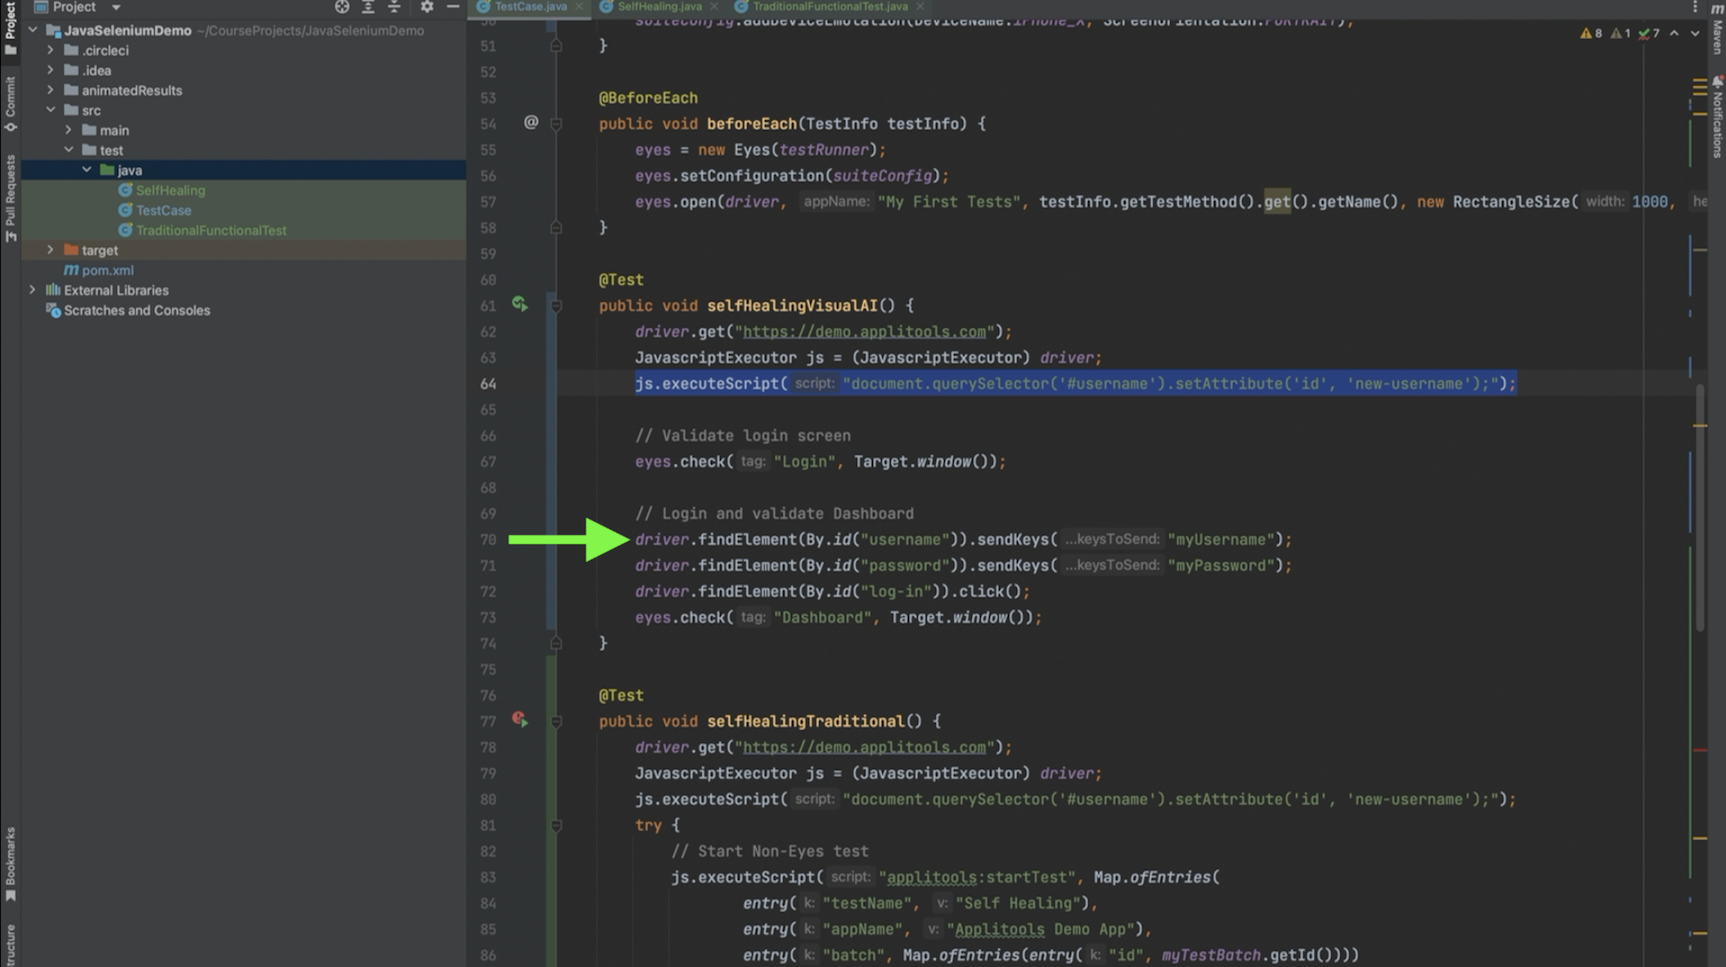
In order to simulate a selector changing on our page, I've introduced a JS injection to both of our test cases that will change the id for the username input. Notice that our SendKeys action on line 70 is still expecting the element to have the original ID. In this case, we would expect this test to fail. Let's run our test again and see what happens.

Even though we expected our tests to fail because of the broken selector, we see that they actually ended up passing. This is because Self-Healing repaired our test when it detected the broken selector and allowed it to complete. A test that has been Self-Healed will have this magic wand icon next to it. Notice how Self-Healing was activated for both our Non-Eyes test and our VisualAI tests. You can also filter batches and tests by their self-healing status using the familiar filter icons. To see the details of the Self-Healing, click one of the wand icons next to a test run.
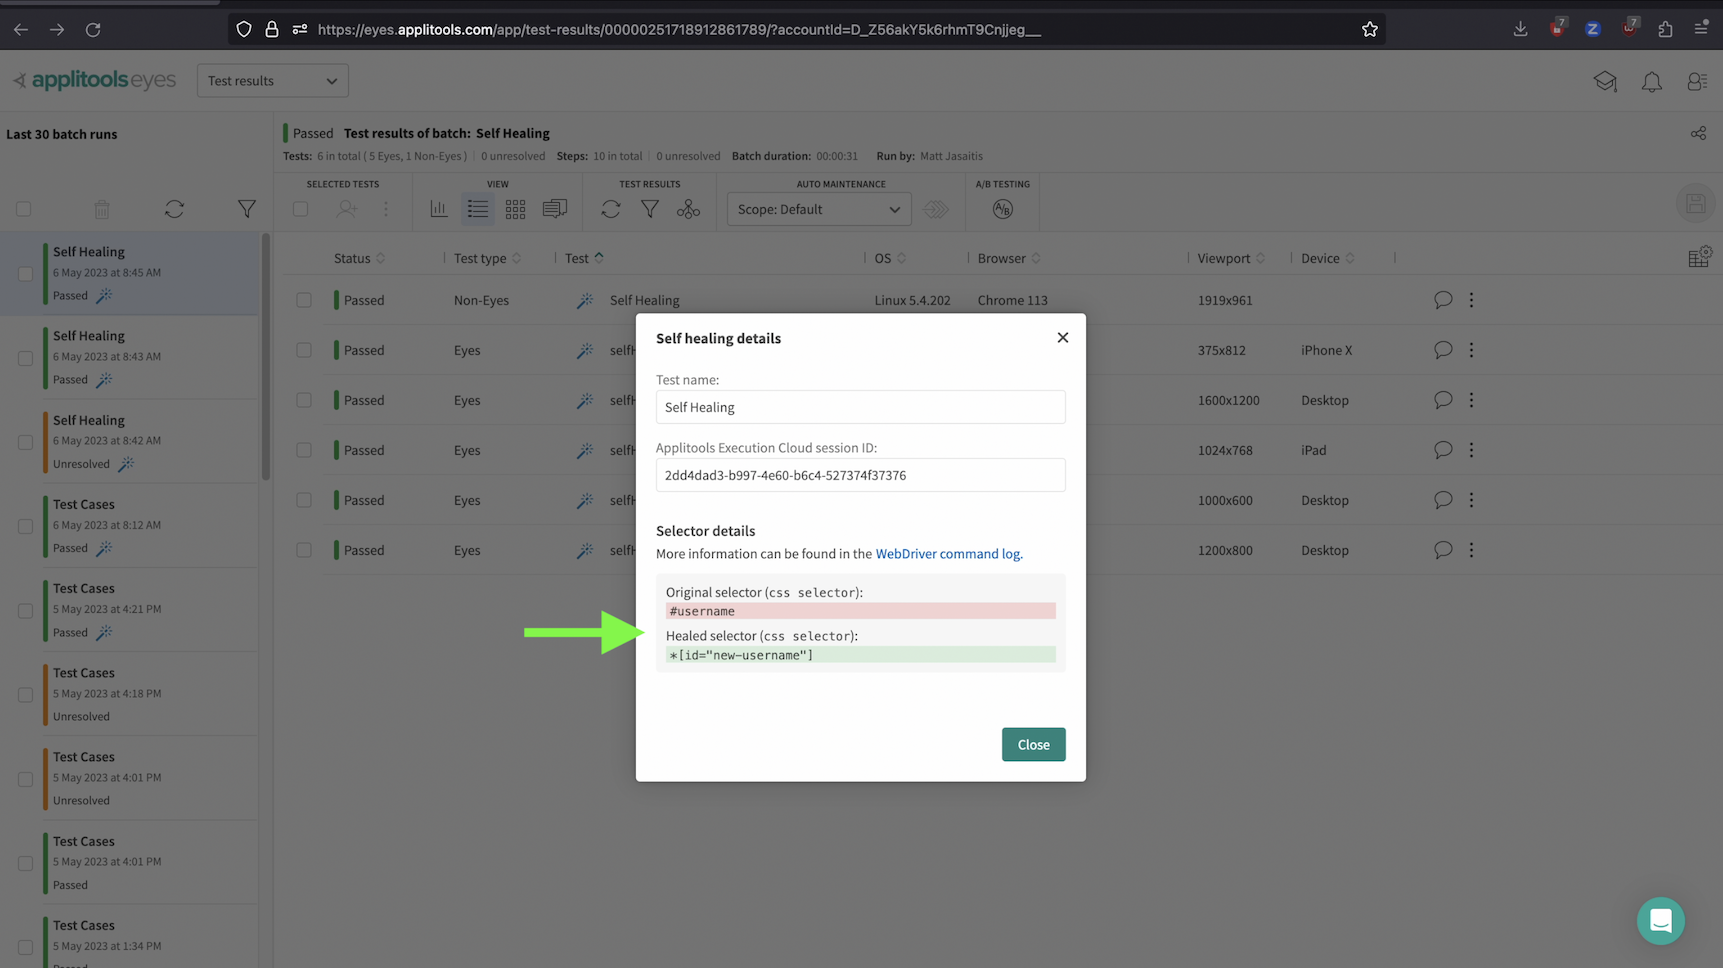
In the popup, you'll see which selectors were broken and what self-healing used to repair the selector. You can then take this information and update your automation code so that the selector is repaired in the code as well. With Self-Healing enabled, you can run your tests with confidence and prevent flaky errors from occurring.

Since the Execution Cloud is running on remote servers, you may think you're unable to run tests against pages that are hosted on your local machine. However, the Execution Cloud supports running against localhost by using a secured Tunnel. Simply by setting a capability in your chrome options, you can let the execution cloud know that you're running against a locally hosted page and it will take it from there.
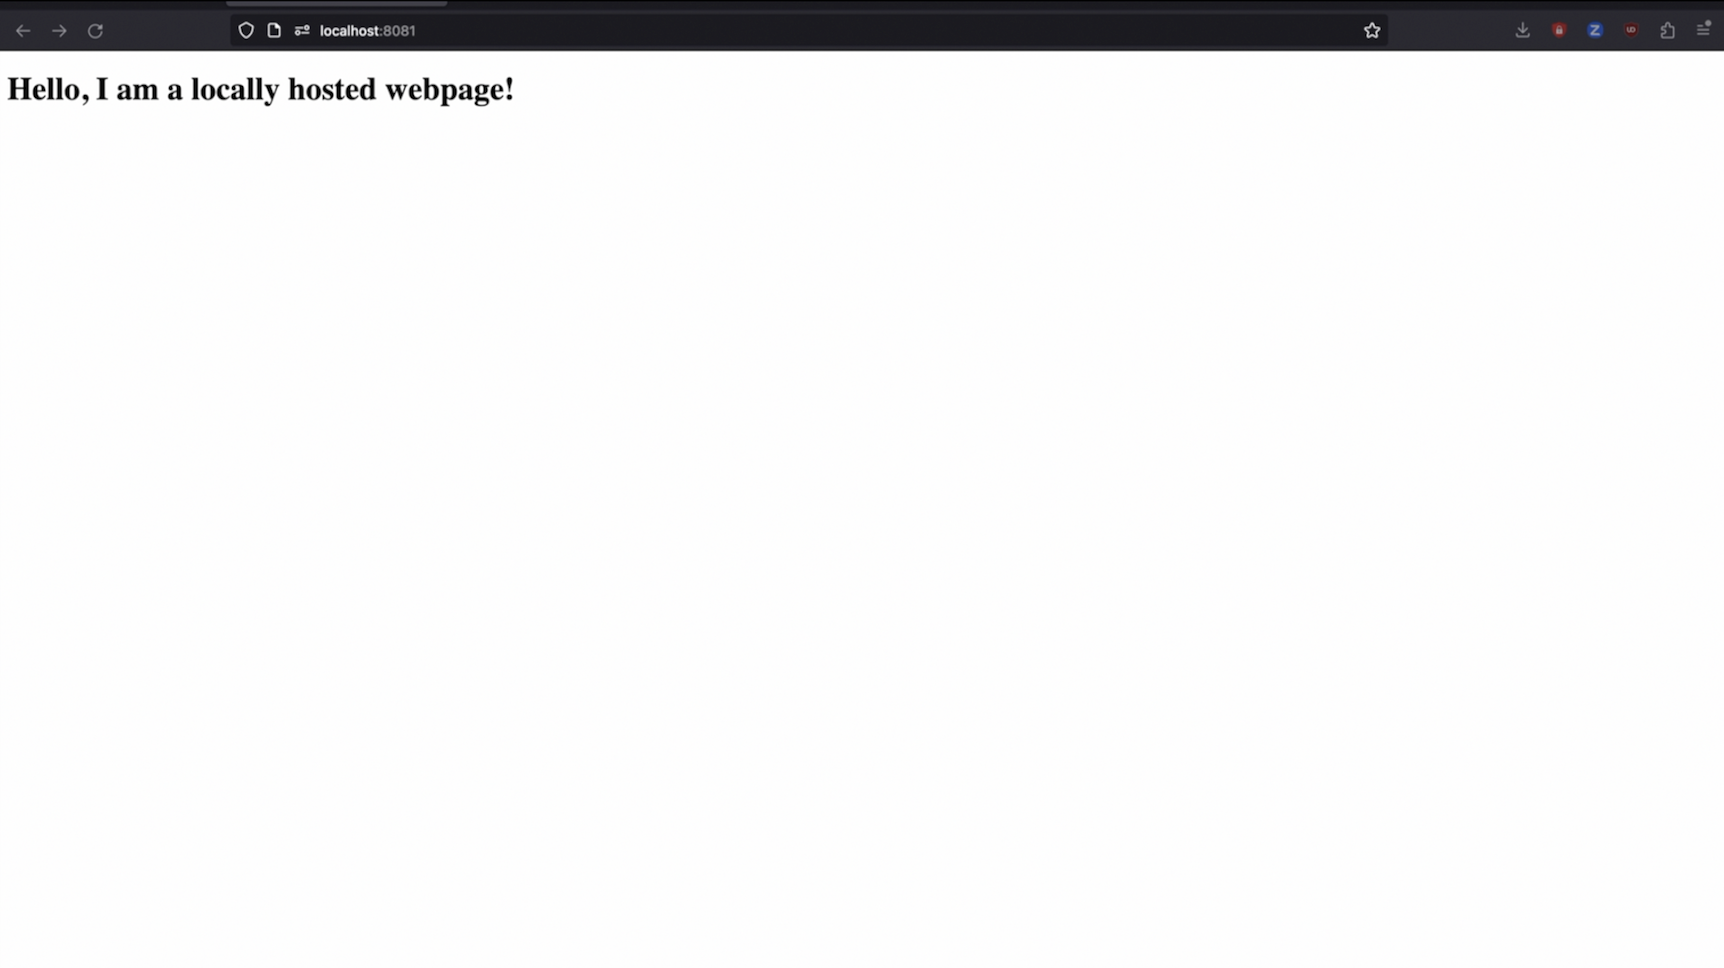
For our example in this section, I've created a simple HTML file and am hosting it locally as we can see from the URL bar. Let's head over to our automation code and run a test against this local page.
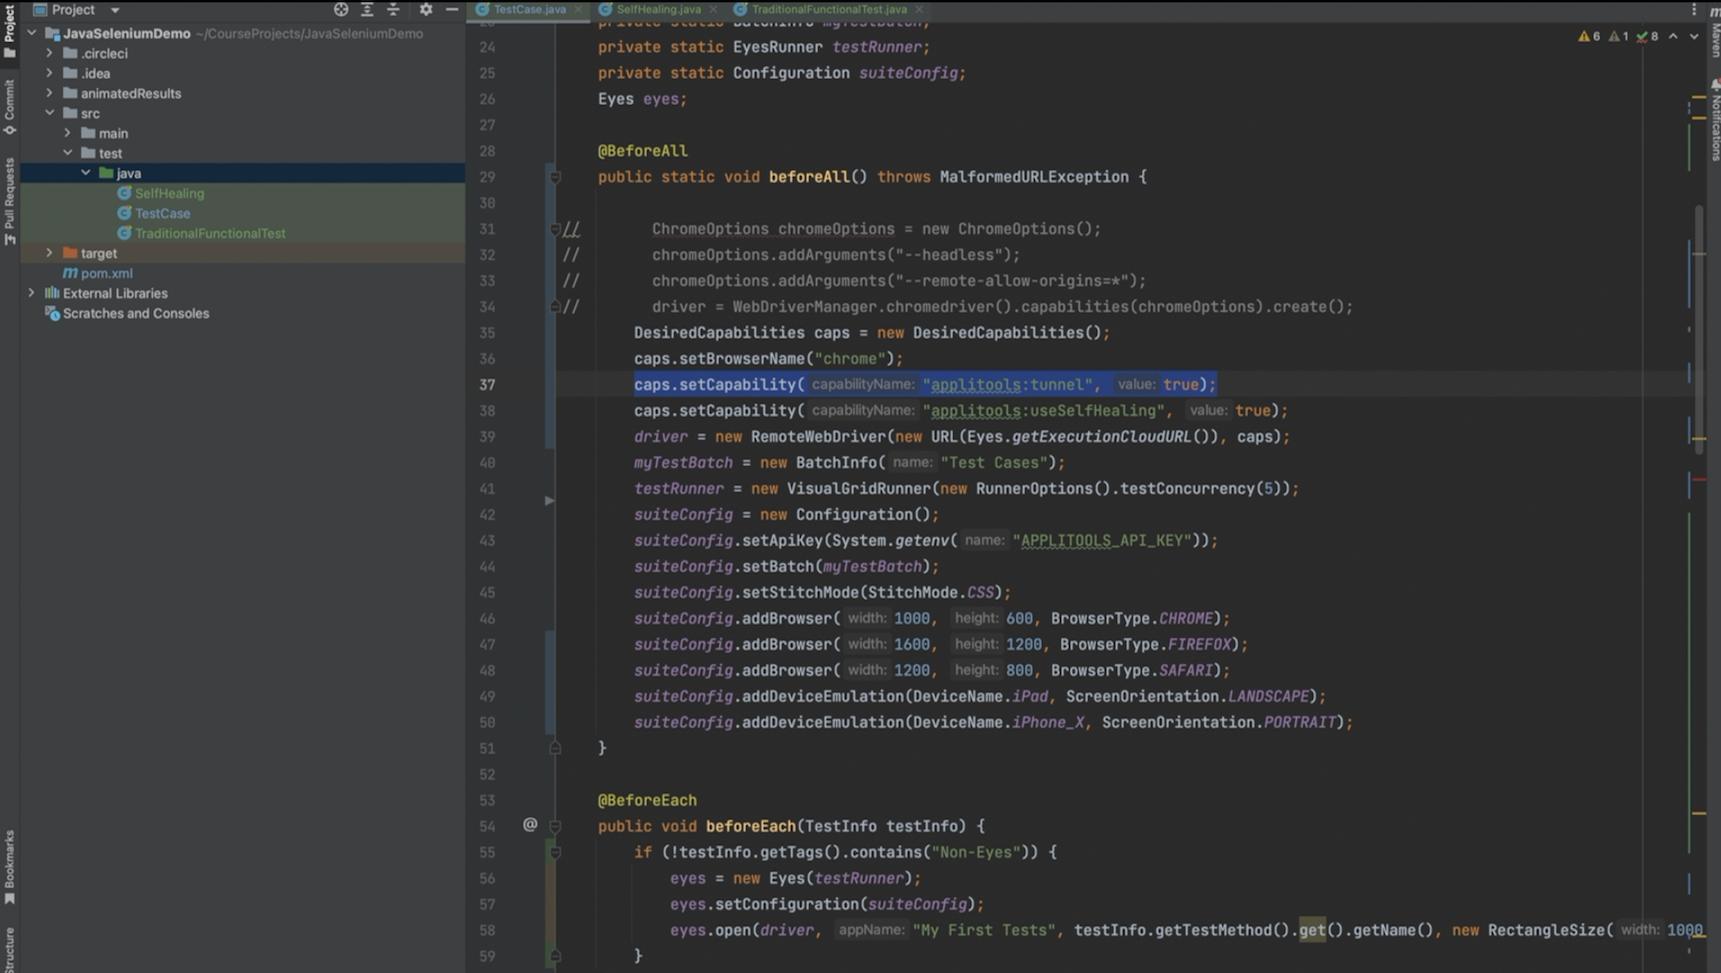
To instruct the Execution Cloud to use the secure tunnel, all we need to do is add the chrome capability applitools:tunnel and set it to true.
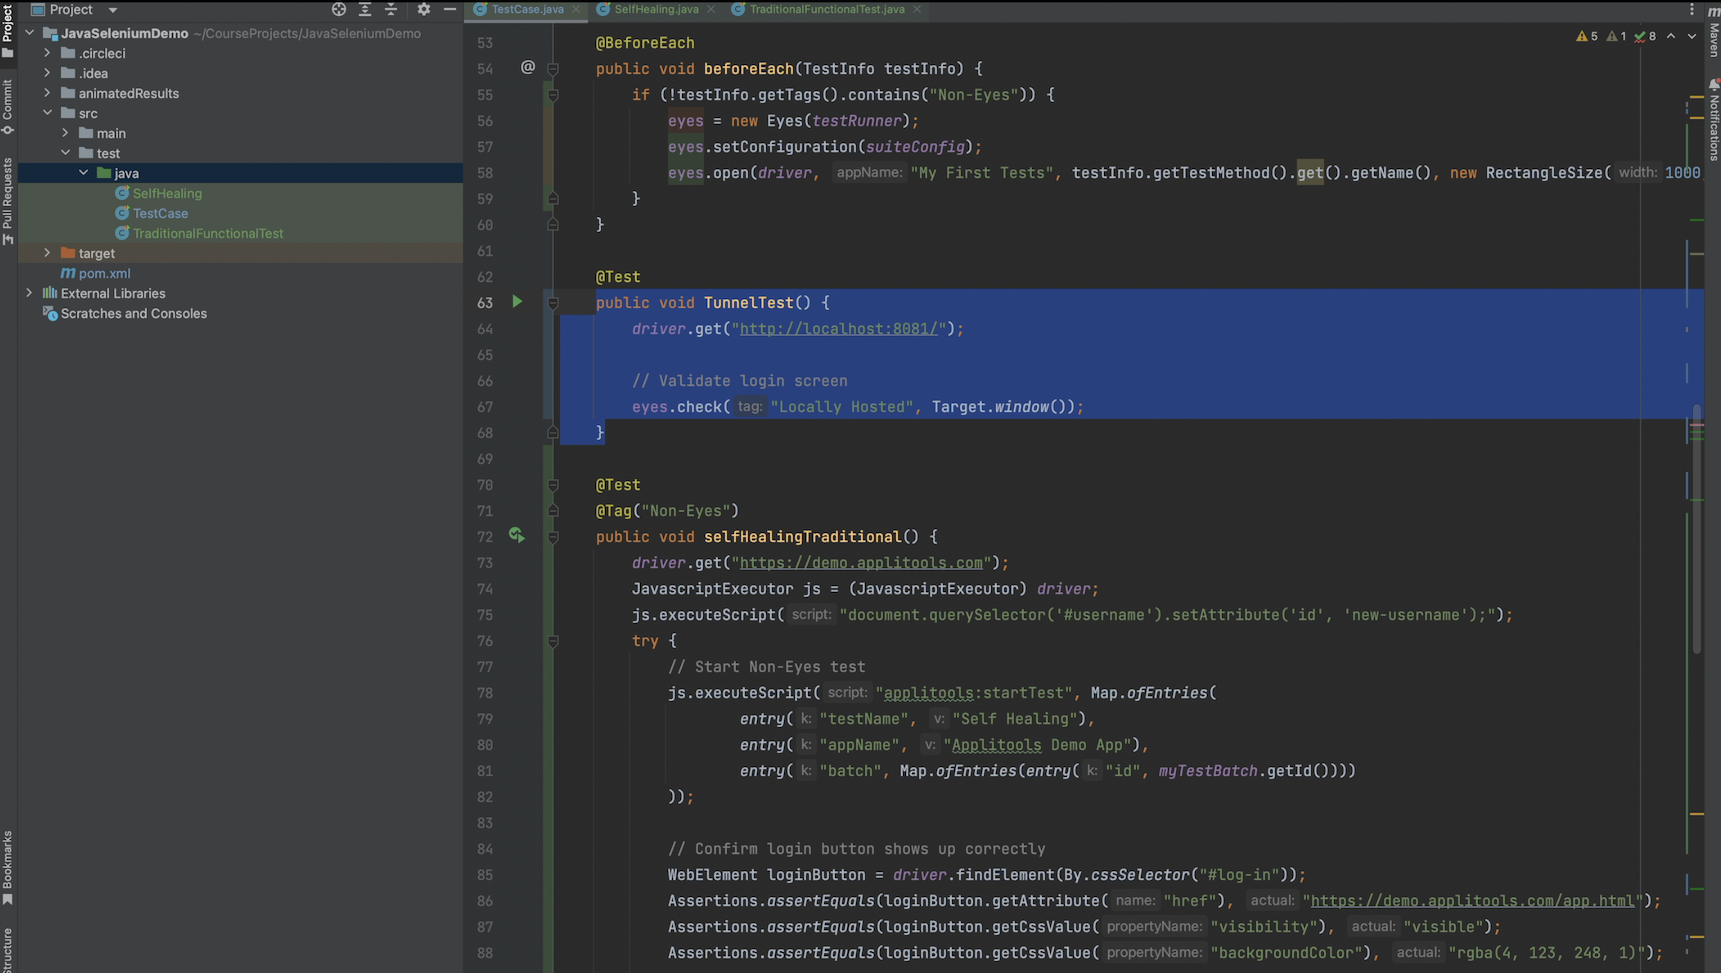
I then modified our VisualAI test to run against the local page and capture a visualAI checkpoint. Let's go ahead and run this test and review the results.

As we can see, we successfully ran our test against a locally hosted page using the Execution Cloud's secure tunnel feature.

In this chapter, we learned about the Applitools Execution Cloud and how it can help streamline and stabilize our tests. We saw how it supports both VisualAI tests and traditional functional tests and reports the results in the same location. We also saw how powerful the Self-Healing feature is and how it helps reduce flakiness in our test runs. Lastly, we ran a test against a locally hosted webpage using the secure tunnel feature. The Applitools Execution Cloud provides an End-to-End solution for automation testing that integrates directly with your favorite automation framework, the Applitools Visual AI and the Applitools Ultrafast Grid for easy Cross Browser Testing.
