

Transcripted Summary
In this chapter, we're going to be talking about HTML and selectors for our tests, acceptance tests with Cypress, and running our first failing test.

At this point, we've got no application code yet, which may seem a bit odd. It'll make sense in a bit.
What's really important when you're writing your code within your React App is to think about HTML Semantics.
# What do we mean by HTML Semantics? Use the appropriate HTML tags.
When you are writing your HTML elements and your components, you should think about how you structure it so that it's accessible to the user, and this allows us to use native elements when we select them.
When we think about the hierarchy of the selectors, we want to have an easy-to-find selector, and one that conforms with accessibility standards.
This will allow us to select the element without having to worry about any duplication of elements, making sure that each element is unique based on the functionality that is on the page, and also it's how the user interacts with the application. That's what we want to consider when we're writing our code.
What's an example of this?
The example we are going to be using within this course is “Todo” with forms.
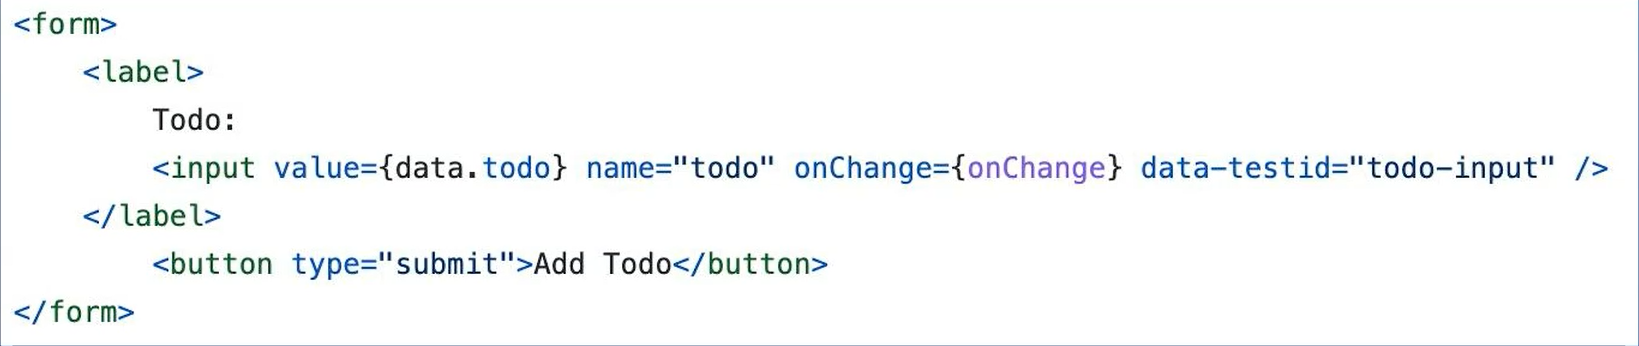
So, you want to make sure that you've got your form element and you've got your button within that, but we need to wrap that in certain elements so that it knows what to do with that interaction, such as submit or input.
We're going to be using some of these elements within our React App, but why are we talking about this now?
Because within our Cypress test, we will be writing the test first. So we need to know that if the code is written in this semantic way, we can assume that elements will have a certain attribute.
Another way to achieve this when that is not possible, for example, you've got a text field or something like that, which obviously there may be multiple text fields, there may be multiple list elements, for example, and we want to select one.
# Test ID’s — data-testid=simples
Data test id’s (data-testid) are a simple way for us to be able to have static element selectors, which we can then use within our tests.
So, if we know they're going to be there, we can chuck them straight into our test, and we can know that the code will also follow this standard.
Simples, just check out the TAU Introduction to Cypress course) to ensure you have a basic understanding of some of the functions.
# Cypress Key Functions
Some of the functions that we're going to be using, obviously, are cy.get. We're going to be typing into a field,
Also, we're going to be using the should assertions, so make sure that you can grab text from an element and assert that they exist on a page.
# Our First Test
We're going to start off with our test.
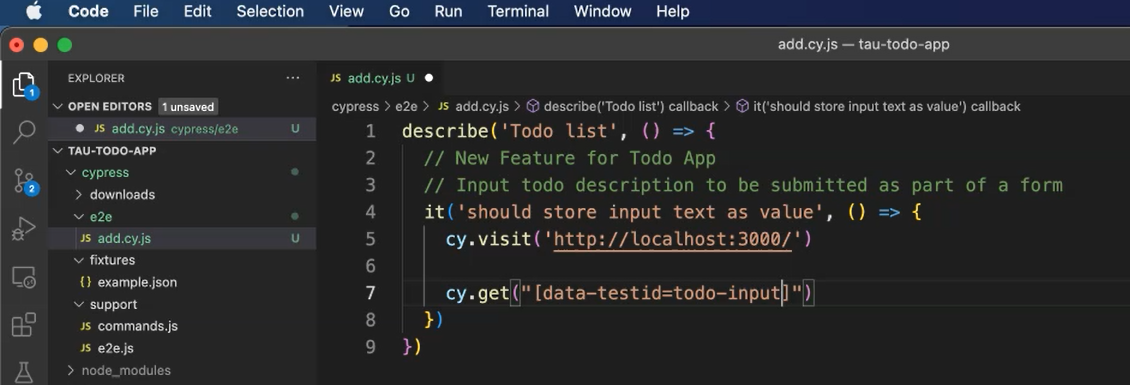
For our “Todo list” we need to implement a new feature within the Todo App.

The input for the app needs to take a description, which will be plain text to be submitted as part of a form.
So, the test that we're going to write now should store the input text as a value within the component.
This test we're going to rename, as this is to do with adding a todo, so we're going to change the name to “add.cy.js”.
And we're going to add in our local host URL, which was Localhost 3000 — cy.visit('http://localhost:3000/'). You can also store this in the cypress.config.js file as the base URL.
We're going to be using the data-testid to the specific element that we're going to choose.
We can then do this within our test, we can say using jQuery, we can say that we want to get the data-testid of the todo-input.
NOTE
If you're doing this within your organization, you need to come up with some standards of what a good data-testid looks like. But if you're doing proper acceptance test driven development, then you'll be writing the test first and collaborating, maybe pairing with the developer, so at that point they can see your code, and they can implement it from their side.
I'm going to swap around the quotes and the input, and we're going to .type("first todo item")
At this point, we now need to check that the element has the value of “first todo item”, so how are we going to do that?
We've got our action. We want to do our assertion on the same element.
The input field should now have a new value, so we can do an assertion within Cypress to check the value which is a native assertion that we have access to.
So, we add in the text from our type element.
describe('Todo list', () => {
  // New Feature for Todo App
  // Input todo description to be submitted as part of a form
  it('should store input text as value', () => {
    cy.visit('http://localhost:3000/')

    cy.get('[data-testid="todo-input"]').type("first todo item")

    cy.get('[data-testid="todo-input"]').should('have.value', "first todo item")
  })
})
So now, we've got a test that should input into the field, and then it should have the value.
Make sure to open up a new window, run npm start, so we've got our application running in the background.
We can now launch Cypress — npm run cy:open — and run our spec file.
Then this test will fail because it can't find the input.

In the next chapter, we'll look at implementing the unit test as part of our acceptance test driven cycle.
Resources
- Git Repo for Course Code
- Git Repo: add.cy.js
- Github: Starting point Chapter 3 Course Code
- Github: Completed Code Chapter 3 Code
- Cypress Selecting Elements
- HTML Semantics
