

Transcripted Summary
The second phase of the textbook BDD process is the Formulation phase.
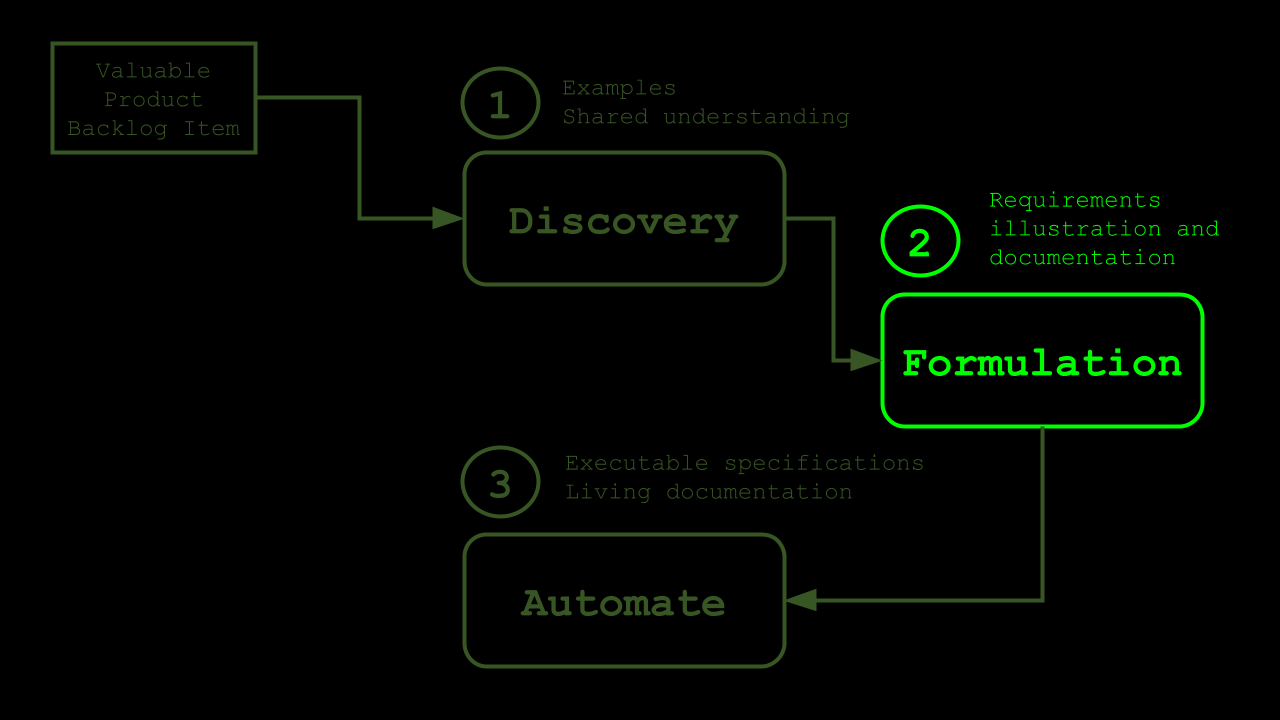
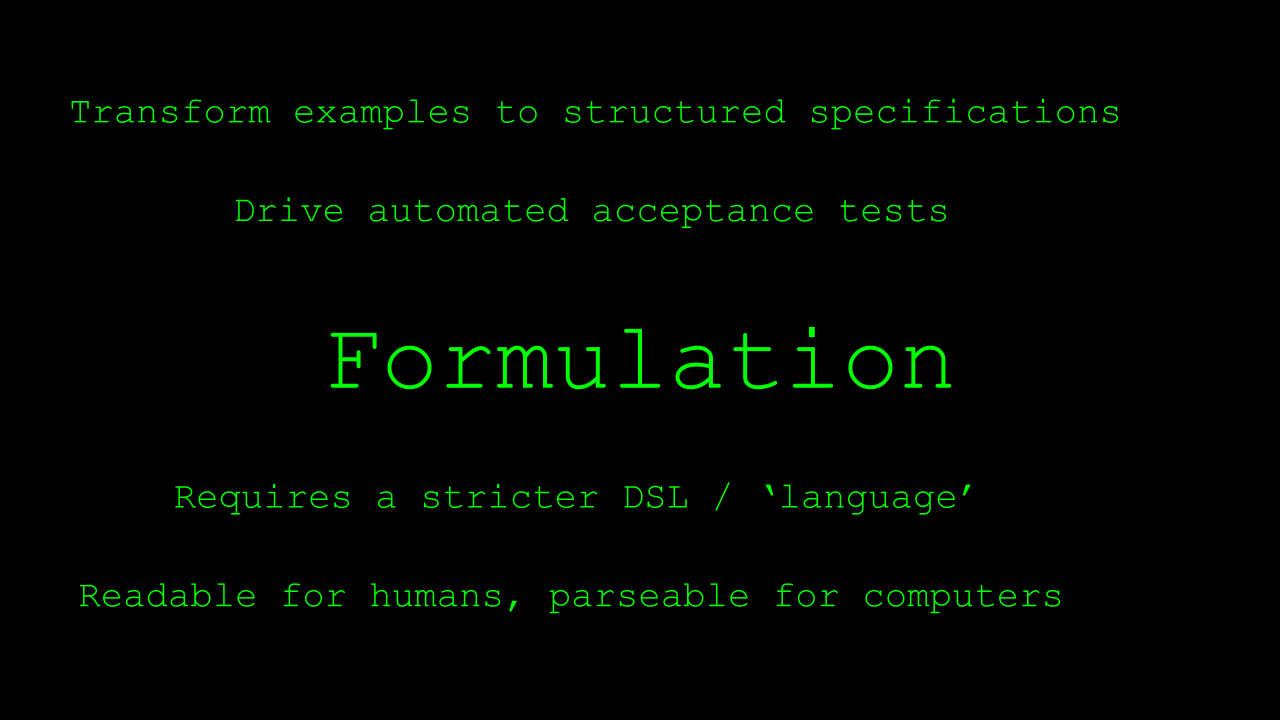
In the Formulation phase, we will convert the examples that we have gathered in the Discovery phase into a format that is readable to human beings but that can also be parsed and interpreted by code.
By doing so, we create a set of requirements that are illustrated by examples and that can serve as documentation of the expected behavior of the system or Feature that we want to build.
These requirements will also serve as input for the automated acceptance tests we will create in the third and final stage of the BDD process.
These specifications typically replace the big design upfront efforts that are common in waterfall-style projects.
More importantly, since these specifications have been created through facilitated discussions using techniques like Example Mapping, as we've discussed in the previous chapter, the risk of misunderstanding and misinterpretation, as well as incomplete or ambiguous specifications, is much lower compared to traditional design and development strategies.
To be able to do this, though, we will need stricter formatting than we used when gathering and discussing our examples.
The examples that have been created and that we have seen on the board in the previous chapter are too loosely formatted to be used as input for our automated acceptance tests or even to serve as illustrated documentation of the behavior of our system.
In other words, we need a DSL, or Domain Specific Language, that is readable for human beings but that can also be parsed by computers.
And that's where Gherkin comes into play.
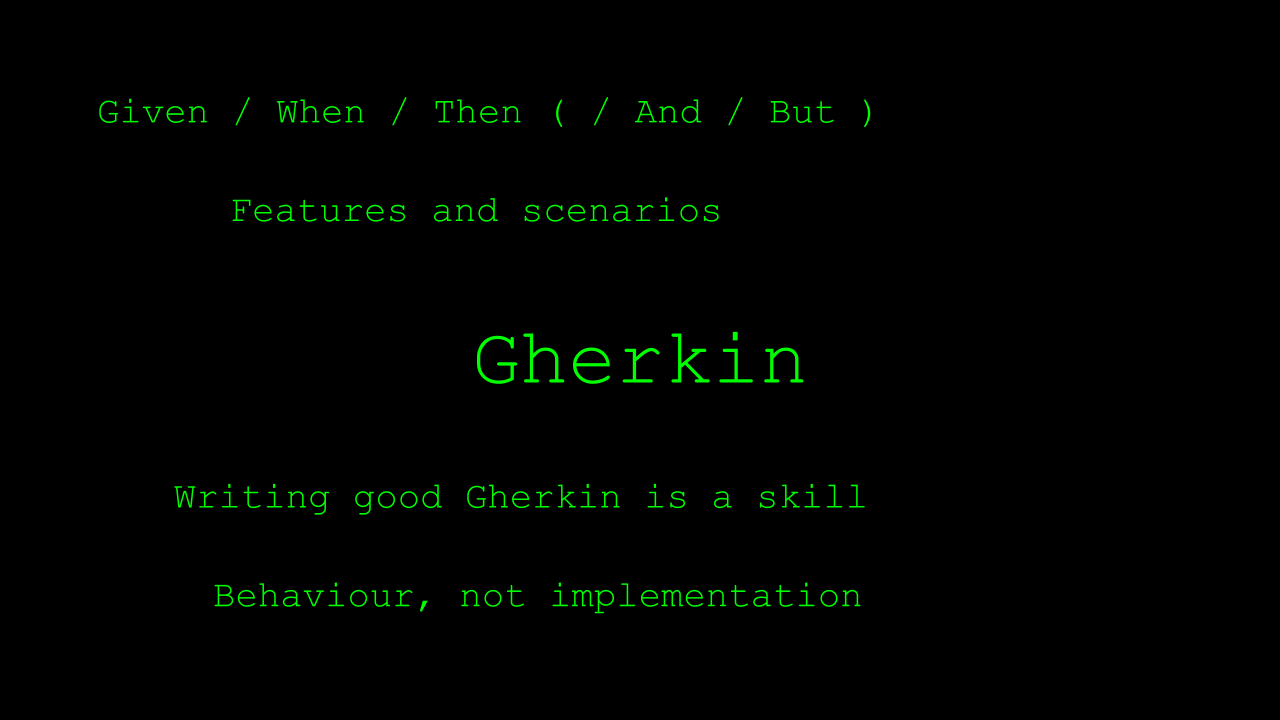
Gherkin is a syntax specifically designed for the purpose of supporting BDD and writing specifications that are readable both for humans and for computers.
It is also commonly referred to as the “Given/When/Then” syntax, after the words that describe the setup or initial state of a Scenario (Given), the action to be performed (When), and the observable and verifiable output (Then).
Gherkin specifications are organized in Features and Scenarios, where a Feature contains one or more Scenarios.
A Scenario typically corresponds to a specific example as it has been gathered in the Discovery phase, and a Feature is a collection of related Scenarios.
This all sounds simple enough, but using Gherkin well and writing good Scenarios is a skill.
I've seen and written many Gherkin specifications over the years that are hard to read, hard to maintain, and simply don't bring a lot of value. One of the key lessons I've learned here is that a good Gherkin Scenario describes the behavior to be implemented but stays away as much as possible from how that behavior is implemented.
Or, in other words, a Scenario describes WHAT a system should do without going into details about HOW the system should do that.
Let's have a look at an example of a Gherkin Scenario as I see it often being written and used in practice.
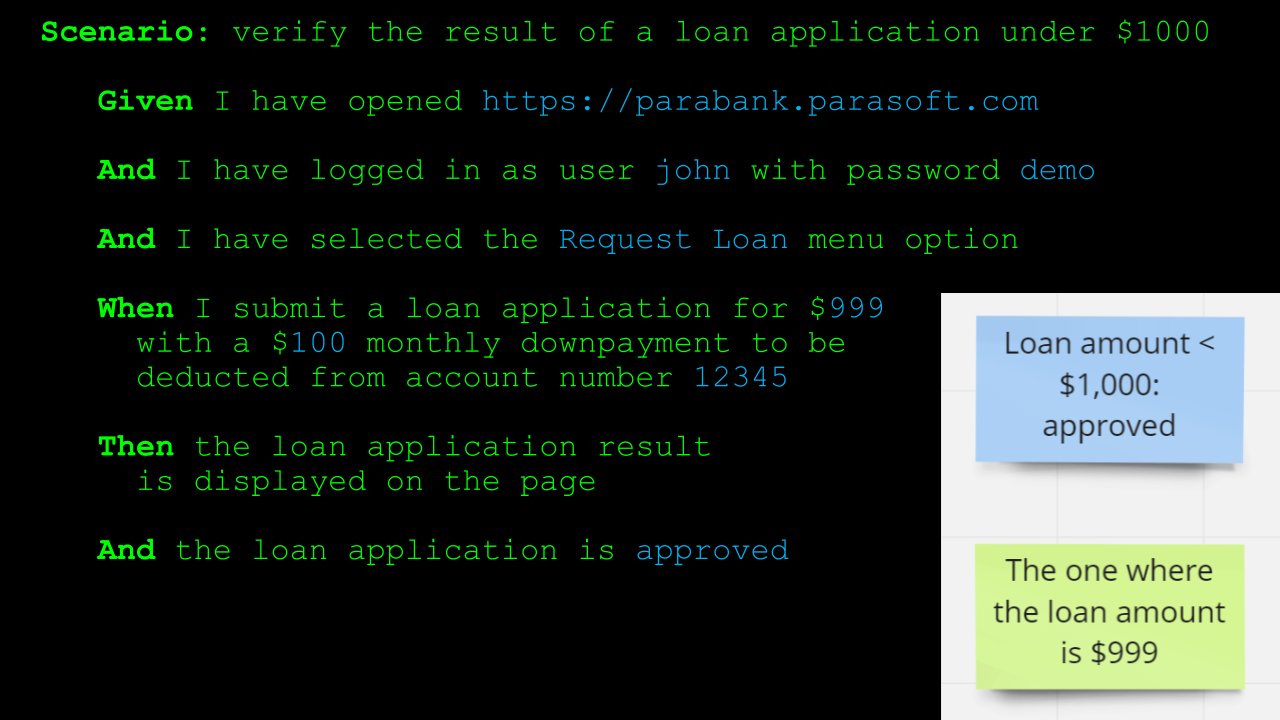
This Scenario describes one of the first examples that we have seen being created in the Discovery phase, more specifically, it's an example describing the behavior of our loan application processor for loans under $1000.
Now, while this Scenario describes what the loan application processor should do — it should approve the loan application — it also describes in detail how the loan application should be submitted and how the end user of our online banking system should navigate through the pages in the application.
This is one of the most common antipatterns of Gherkin Scenarios, and it clearly violates our rule of describing WHAT the system should do, but not HOW it should do that.
The problem with Scenarios like this is that it is too closely tied to the implementation, as it dictates that the verification should happen through the user interface because that's how the behavior is described.
It also describes in detail what the sequence is that the end user needs to follow from one screen and one form to the next.
There's 2 problems here:
- ONE, that Scenarios in this way are very brittle, meaning that they will likely need to be updated every time there's a change in relevant parts of the graphical user interface, even when the overall behavior hasn't changed, and
- TWO, that there's maybe a much more efficient way to verify the behavior in an automated acceptance test. Maybe we can use an API-level test to verify the behavior or even write some tests directly against the code that implements the behavior in a unit test.
Once again, your Scenario should ideally describe what the system does but not how that behavior is implemented.
The approach to verifying this behavior, be it a unit, API, or full-stack test using the graphical user interface, should not be dictated by the way the Scenario is written.
You can see a much more implementation-independent way of documenting the same behavior in this Scenario.
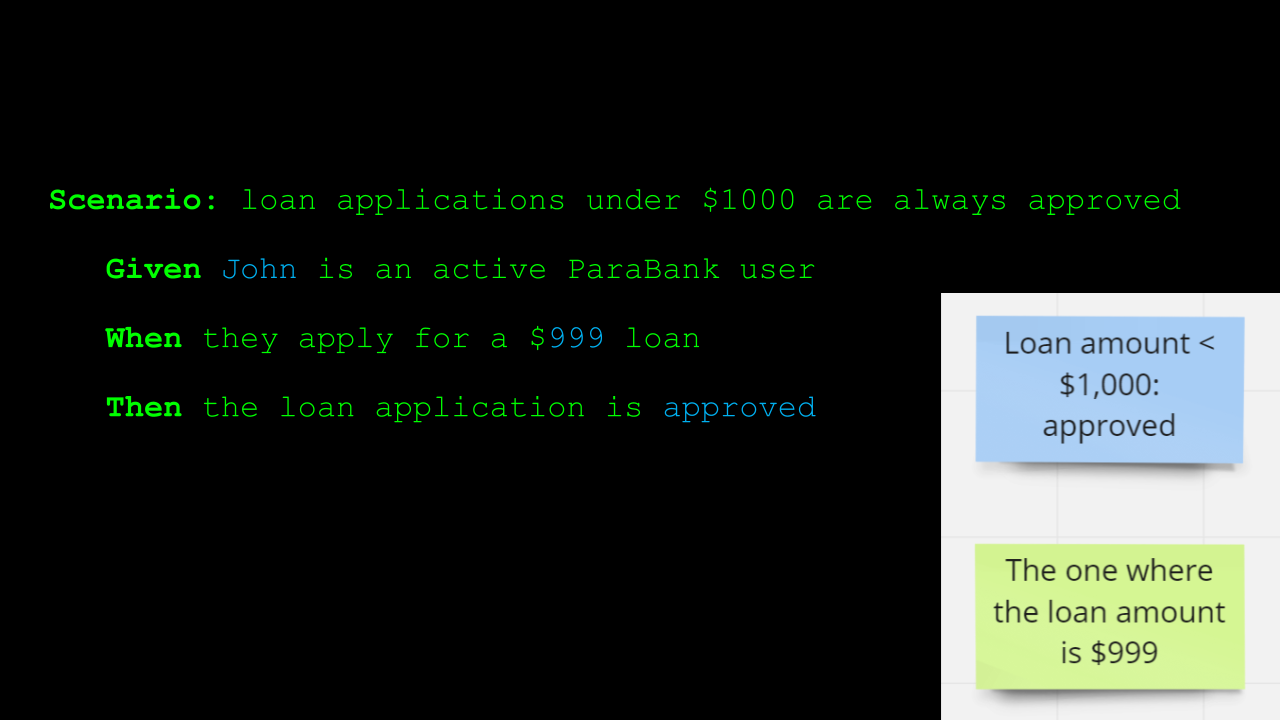
This Scenario still describes the behavior from the example but without referring to any implementation details.
When we turn this Scenario into an automated acceptance test in the next step in the BDD process, it does not matter if that's going to be a full-stack UI test, an API test, or even a unit test against the code itself. The Scenario will remain the same.
So, let's add a Scenario for the second example illustrating the same rule.
The only thing that changes between these 2 examples is the loan amount.
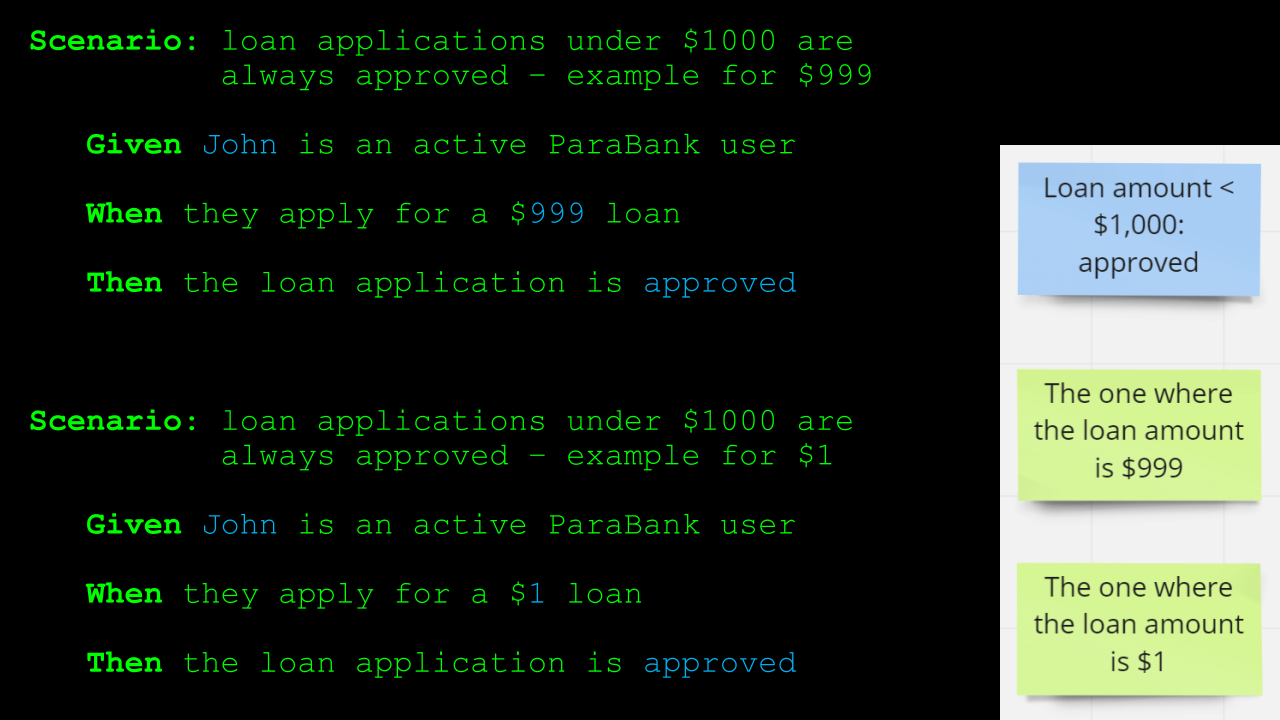
But other than that, they describe the same behavior, namely, a loan application is submitted, and in this case, the same outcome, namely that the loan application is approved.
So, there's a lot of duplication here, and that has a negative impact on the readability.
Also, it is not immediately clear that both Scenarios describe the exact same behavior, just using different examples, even though these Scenarios are still relatively straightforward.
Lucky for us, Gherkin offers a concept called a Scenario Outline to help us out in this exact situation.
A Scenario Outline acts like a template for multiple Scenarios that describe the same behavior but are illustrated with different values.
Or in other words, a Scenario Outline can be used to combine multiple examples describing the same behavior into one.
A Scenario Outline consists of the Scenario description itself, including placeholders for the values that vary from one example to the next, as is the case with the loan amount here.
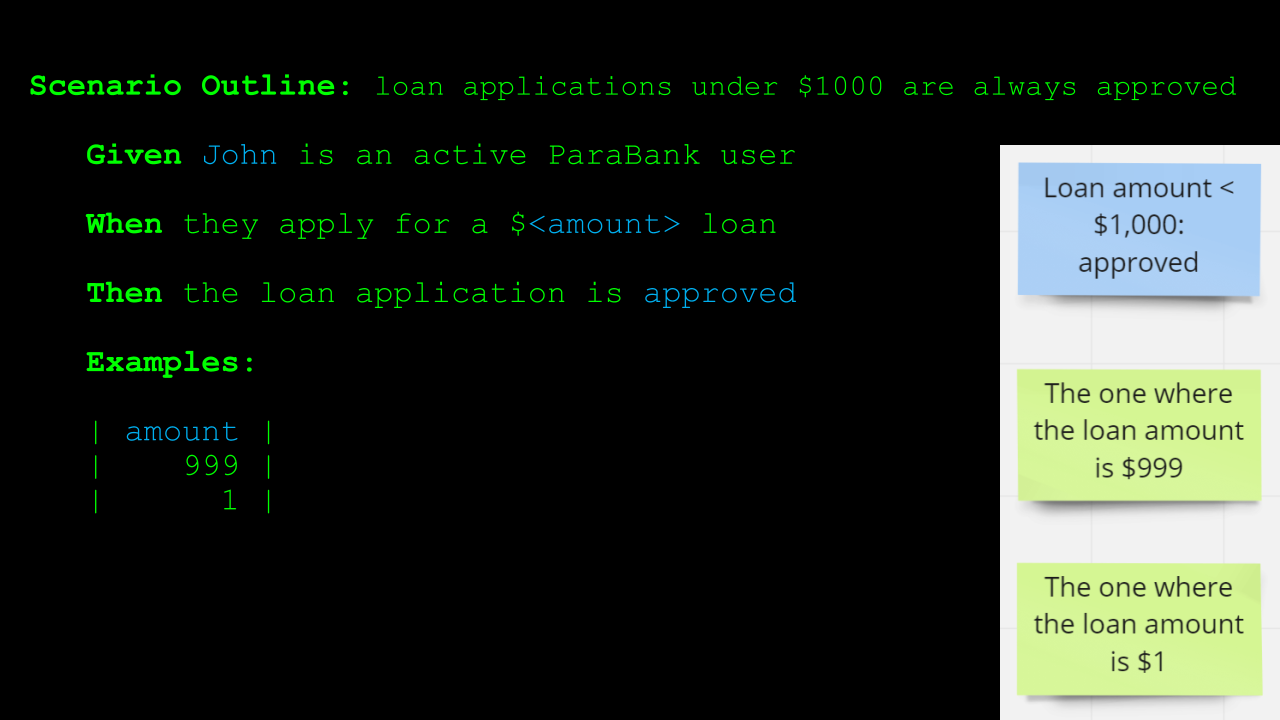
It should also contain an Examples table listing the values for these placeholders that correspond to a specific example.
In this Scenario Outline, we have 2 examples, or in other words, 2 Scenarios, but an Examples table can contain as many rows as you want.
And while the Examples table here only contains a single column, because only a single value changes from one example to the next, there is also no limitation on the number of columns in an Examples table.
Having too many examples in a single Scenario Outline or too many columns in your Examples table might be a smell telling you that your Scenario is probably too complex, and you might want to consider splitting the Scenario up into several smaller ones.
This wraps up our coverage of the Formulation stage of the BDD process.
There are many other good practices, antipatterns, and pitfalls to discover when learning to write good Gherkin.
The **_Given-When-Then with style blog post series _**is an excellent starting point for those of you looking to improve their Gherkin Scenarios.
In the next chapter, we'll discuss the third and final stage of the BDD process, the Automation stage.
This is where we'll also start looking into SpecFlow as a tool to help us in creating and running automated acceptance tests based on the Scenarios.
