

Transcripted Summary
In the previous chapter, we discussed the Automation phase, which is the final of the three phases in the textbook BDD process.
We were also introduced to SpecFlow as a tool that supports the BDD process by converting the business requirements, written in Gherkin, into executable C# code. This means that we can use SpecFlow to drive our automated acceptance tests right from our specifications.
Finally, we saw how to get started with using SpecFlow and create a new SpecFlow project using the Visual Studio SpecFlow extension.
In this chapter, we are going to take the Gherkin specifications for our “LoanApplication.feature” that we created in Chapter 3 on Formulation and convert them into working and running C# code that will ultimately drive our automated acceptance tests for this Feature.
The first step to do this is to add a new Feature File to our project.
This Feature File will contain the specifications for our “LoanApplication.feature”, written in Gherkin.
We do this by right-clicking on the Features folder and choosing to Add > New Item.
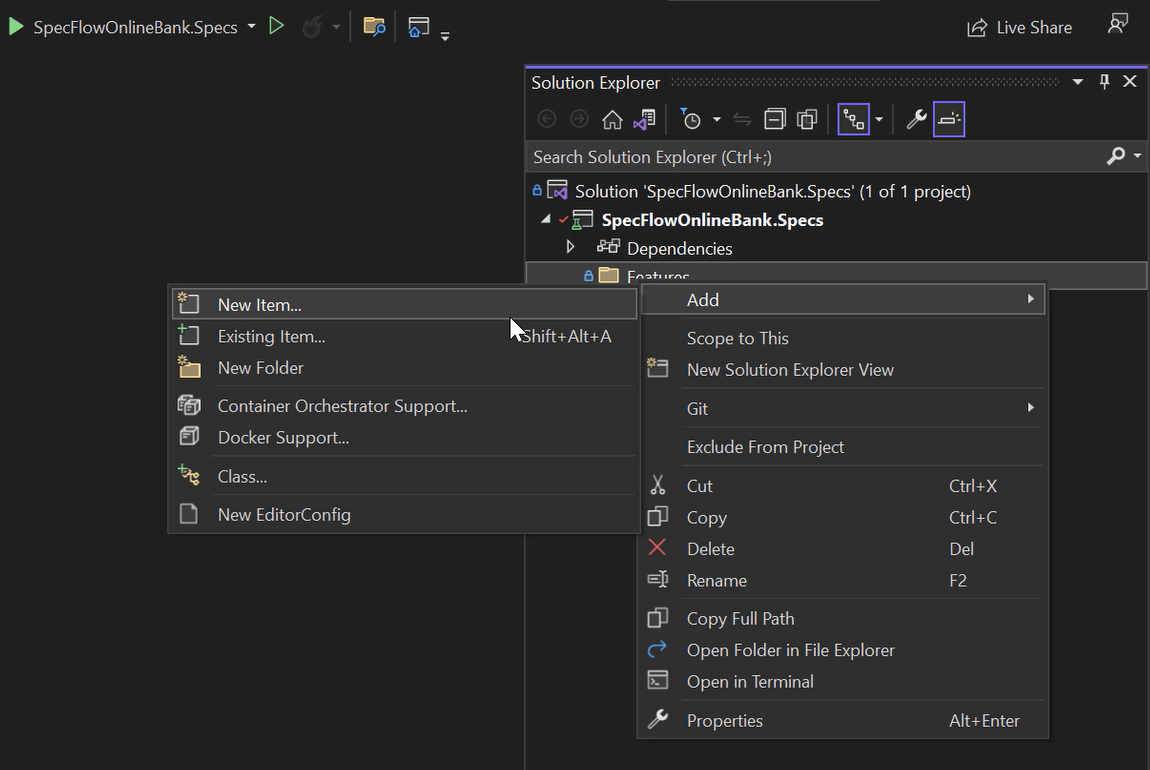
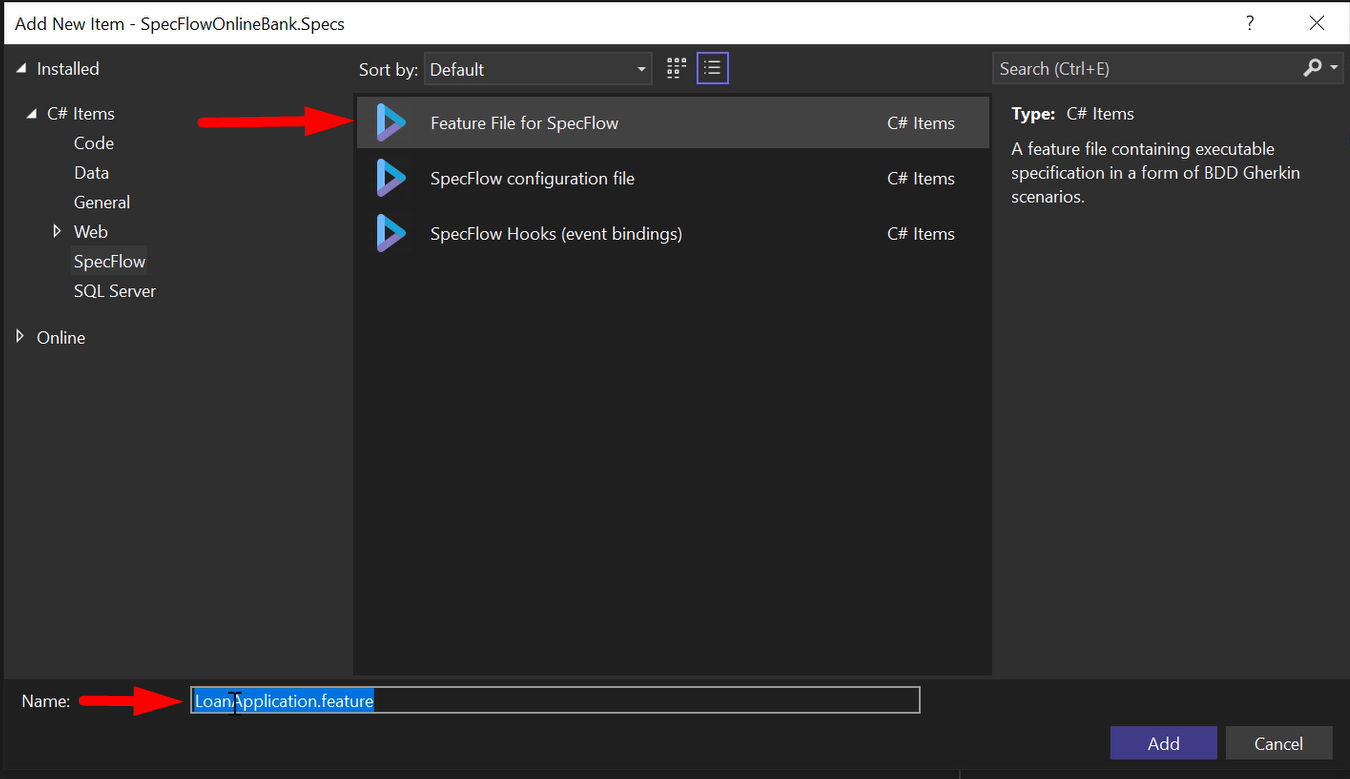
Since we've installed the SpecFlow extension for Visual Studio, Feature Files are a recognized item format, and we can use that.
All we need to do now is give the Feature File a meaningful name, so let's go with “LoanApplication.feature”.
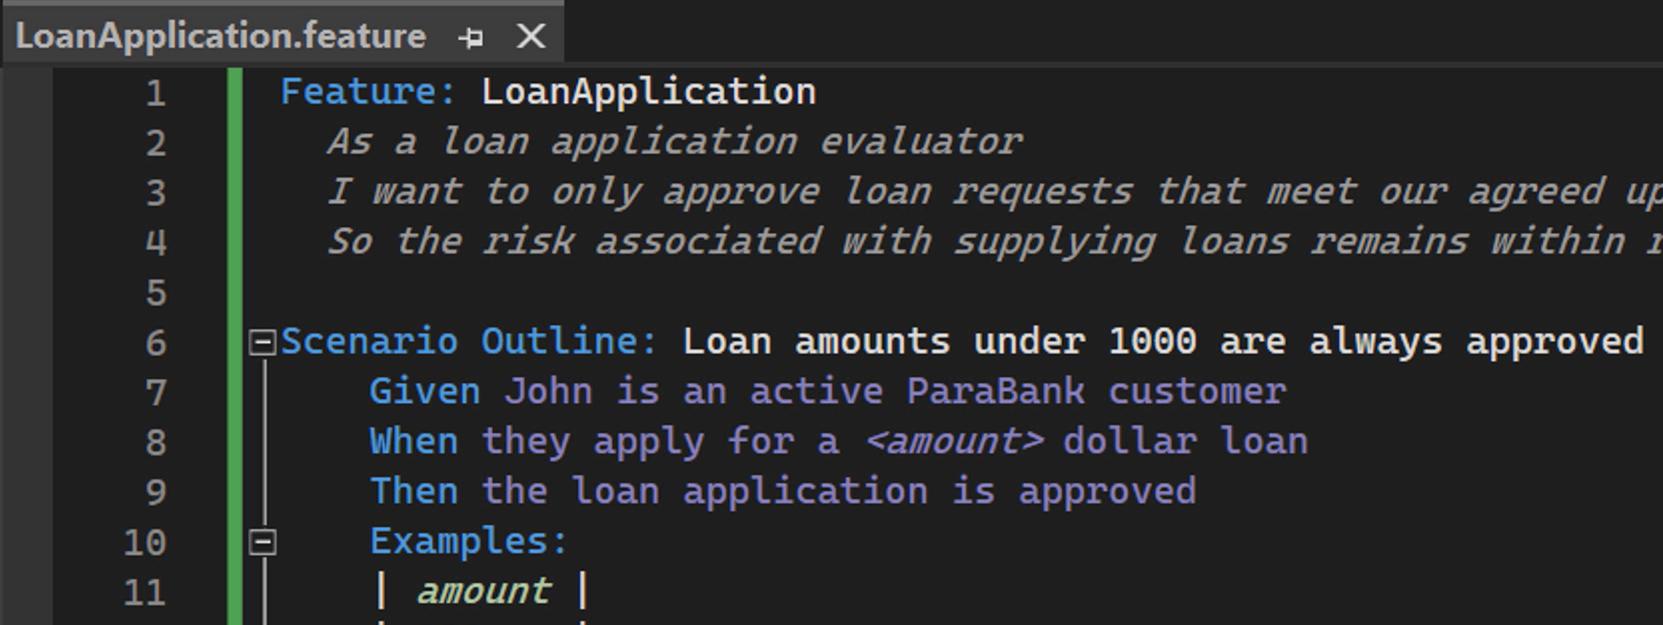
We'll immediately replace the default contents of this new Feature File with our own specifications.
As you can see, the Scenarios and their corresponding examples for all 3 rules that make up the business logic for our loan application service are included.
Feature: LoanApplication
  As a loan application evaluator
  I want to only approve loan requests that meet our agreed upon loan amount rules
  So the risk associated with supplying loans remains within regulatory boundaries

Scenario Outline: Loan amounts under 1000 are always approved
	Given John is an active ParaBank customer
	When they apply for a <amount> dollar loan
	Then the loan application is approved
	Examples:
	| amount |
	| 999    |
	| 1      |

Scenario Outline: Loan amounts greater than or equal to 100000 are always denied
	Given John is an active ParaBank customer
	When they apply for a <amount> dollar loan
	Then the loan application is denied
	Examples:
	| amount |
	| 100000 |
	| 999999 |

Scenario Outline: For loan amounts between 1000 and 100000 the result depends on income
    Given John is an active ParaBank customer
	When they apply for a <amount> dollar loan
	And their monthly income is <income>
	Then the loan application is <result>
	Examples:
	| amount | income | result   |
	| 1000   | 3000   | approved |
	| 50000  | 3000   | approved |
	| 99999  | 3000   | approved |
	| 1000   | 2999   | denied   |
	| 50000  | 2999   | denied   |
	| 99999  | 2999   | denied   |
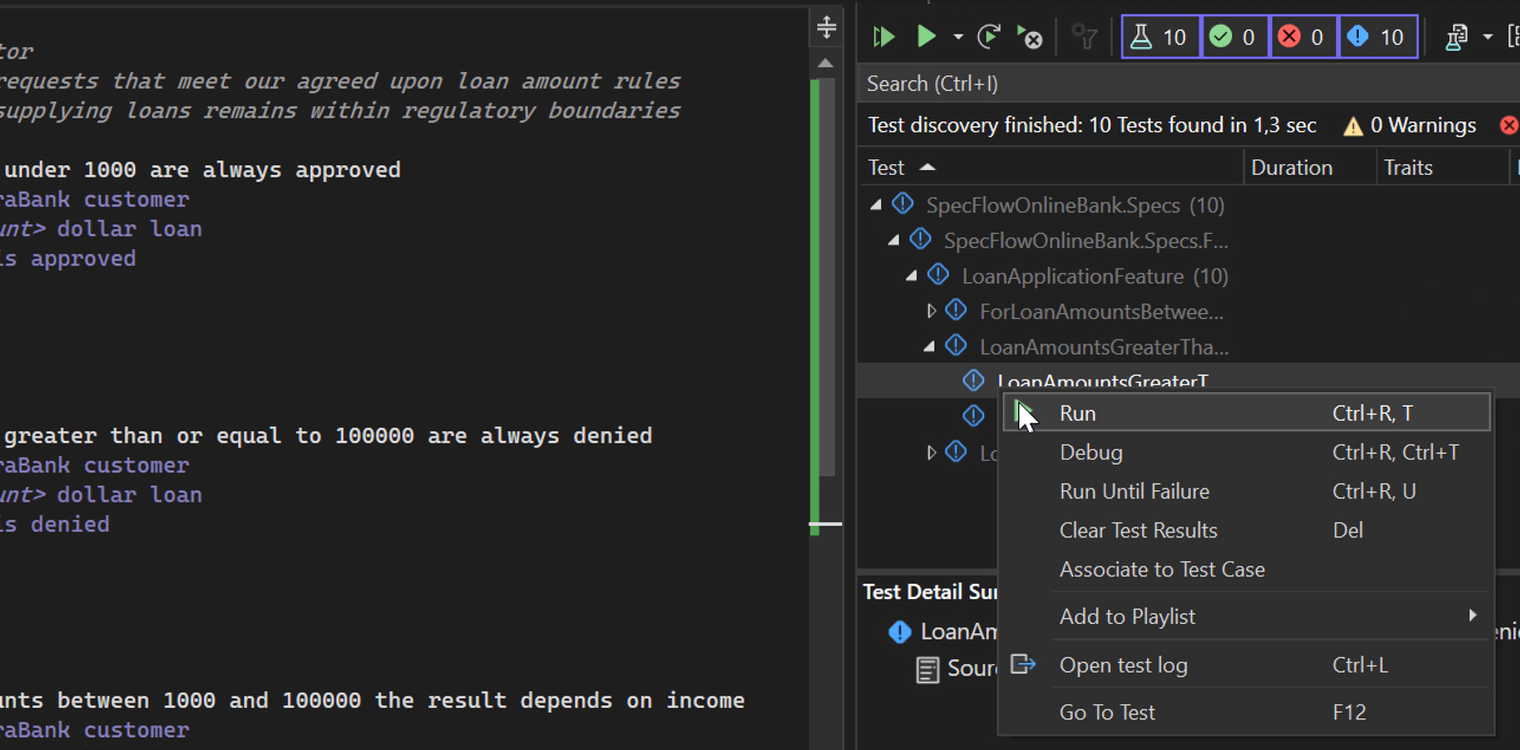
After we have added these Scenarios to our Feature File, let's Build the project and have a look at the Test Explorer.
As you can see, Visual Studio has detected 10 tests in the project already.

This can be easily explained when we look at the number of Scenarios and examples in the Feature File.
Each Scenario Outline is interpreted as a group of tests, and each example is interpreted as a test.
Individual Scenarios, so ones that are not a Scenario Outline with examples, will also be interpreted as a test, but we don't have those in this example.
The SpecFlow extension here in Visual Studio also immediately gives us useful information here.
All the steps in the Scenarios are written in purple.
A step in purple means that SpecFlow cannot determine which code, or in SpecFlow terms, which Step Definition, it should execute when the test runner encounters the step.
This can have one of two reasons:
- No Step Definition can be found that matches the step
- There's more than one Step Definition that matches the step, so we have an ambiguous Step Definition
Right now, we are clearly in the first situation because we haven't created any Step Definitions yet. In both cases, SpecFlow will throw an exception and stop the execution of the test.
Let's see what that looks like by running one of the tests.
As you can see, our test stops executing at the very first step, and the feedback we get is “No matching Step Definition found for one or more steps.”
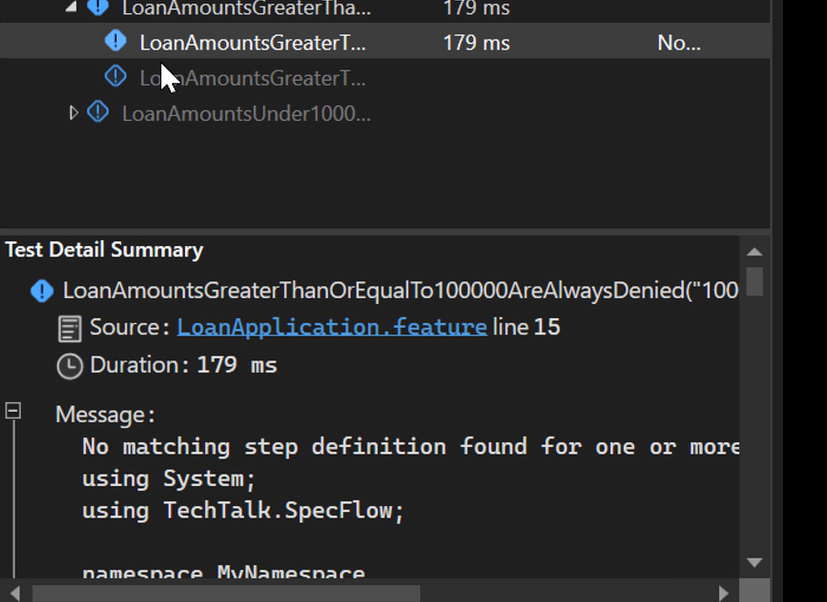
Let's work on improving that.
# But first, what are Step Definitions?
Step Definitions are methods that are run when the SpecFlow runner of your choice encounters a certain step when executing a Scenario.
For each step in your Feature Files, there should be exactly one matching StepDefinition method.
You can write these methods yourself, of course, but the SpecFlow extension for Visual Studio can also generate them for you, which is especially useful when you have a lot of new steps to implement, as we have here.
Right-click on the Feature File and select Define Steps.
This opens a dialog where you can select the steps for which StepDefinition methods will be generated, as well as the name of the class they should be placed in.

The suggested name, “LoanApplicationStepDefinitions,” is fine with me right here.
If we click Create, a new class with the name we specified is added to our project.
Also, the font color for the steps in our Feature File changes from purple to white, indicating that SpecFlow will now know which StepDefinition method to execute when it encounters a step.
Let's run our Scenario again and see if the output has changed.
And it has! SpecFlow still throws an exception, but this time, it's a different one, one stating that “One or more Step Definitions are not implemented yet.”
Let's have a look at the Step Definitions that have been generated.
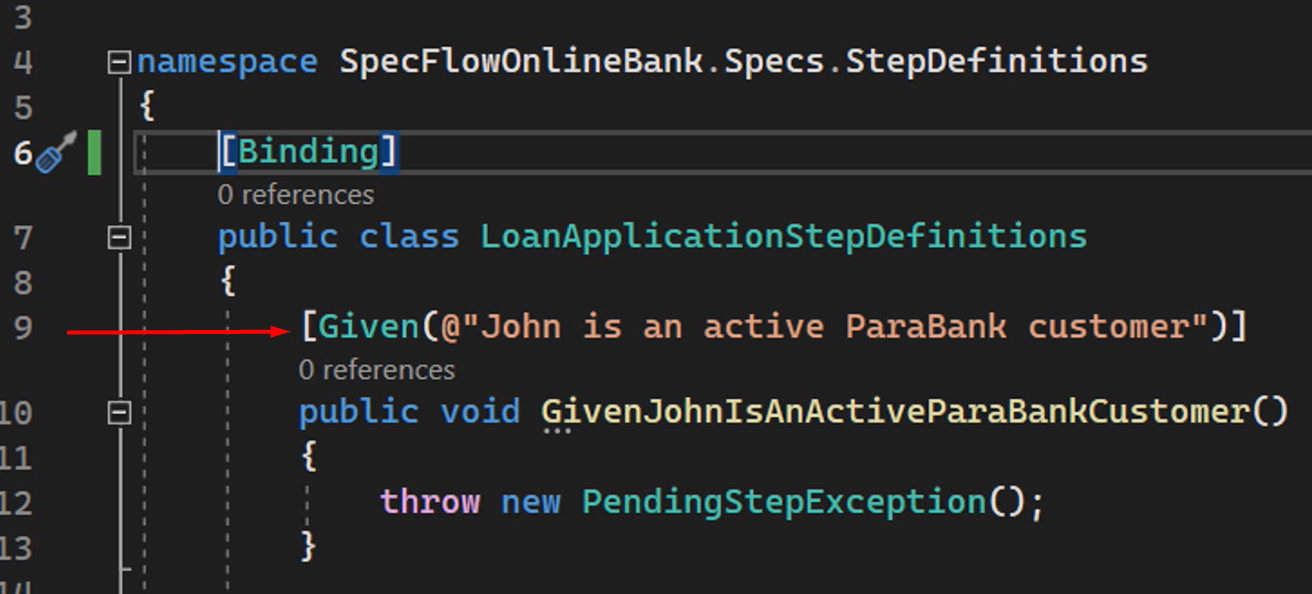
The first thing you should be aware of is the [Binding] attribute that is added to the class containing StepDefinitions.
This attribute notifies SpecFlow that the class contains StepDefinitions. When running Scenarios, SpecFlow will only look in classes with this attribute for StepDefinitions.
To demonstrate this, let's comment out the attribute and recompile our project.
We see that SpecFlow can no longer find the StepDefinitions, as the steps turn purple again.
And once we un-comment the attribute and rebuild the project, the StepDefinitions can be located once more.
So, how does SpecFlow know WHICH of the StepDefinition methods to run when it encounters a specific step in a Scenario?
The StepDefinition method to be executed is determined by both looking at the Given, When, or Then attribute — which should match the Gherkin keyword prefixing the step — and, more importantly, the value of the argument passed to this attribute should match the step description.
So, this StepDefinition method you see right here matches the step “Given John is an active ParaBank customer”, which means that this method is executed every time the SpecFlow runner encounters that exact step.
If we change the attribute to Then, the Step Definition no longer matches the step, as you can see.
If we change the word “customer” to “client”, the Step Definition also doesn't match the step.
Undoing these changes will match the Step Definition with the step once again.
The reason that, even though we have generated Step Definitions for all the steps in our Feature File, SpecFlow still throws an exception, is because, by default, when you ask Visual Studio to generate Step Definitions for you, it puts this line — throw new PendingStepException(); — in the body of the method.
This serves as a reminder that you probably still need to do work to implement the behavior described in the step to really turn your Features and Scenarios into fully functioning automated acceptance tests.
We will look at examples using various different libraries in Chapter 8.
For now, we'll simply remove these statements and end up with StepDefinition methods with an empty method body.
using System;
using TechTalk.SpecFlow;

namespace SpecFlowOnlineBank.Specs.StepDefinitions
{
    [Binding]
    public class LoanApplicationStepDefinitions
    {
        [Given(@"John is an active ParaBank customer")]
        public void GivenJohnIsAnActiveParaBankCustomer()
        {
        }

        [When(@"they apply for a (.*) dollar loan")]
        public void WhenTheyApplyForADollarLoan(int p0)
        {
        }

        [Then(@"the loan application is approved")]
        public void ThenTheLoanApplicationIsApproved()
        {
        }

        [Then(@"the loan application is denied")]
        public void ThenTheLoanApplicationIsDenied()
        {
        }

        [When(@"their monthly income is (.*)")]
        public void WhenTheirMonthlyIncomeIs(int p0)
        {
        }
    }
}
If we compile our project and run our Scenario once more, we see that execution is successful.
All steps in the Scenario have been implemented by Step Definitions, and all StepDefinition method s were executed successfully, without any exceptions being thrown.
In the next chapter, we'll take a look at some of the ways we can make our Step Definitions much more versatile using parameterization and the power of regular expressions.
The current state of this project is available in GitHub, in the Chapter 5 branch of the repository.
