Transcripted Summary
In the previous chapter, we saw how we can use parameterization, combined with either regular expressions or Cucumber Expressions, to make our steps and Step Definitions more versatile.
There are plenty of cases, though, where using those techniques isn't enough to create specifications that are easy to read and understand at a glance.
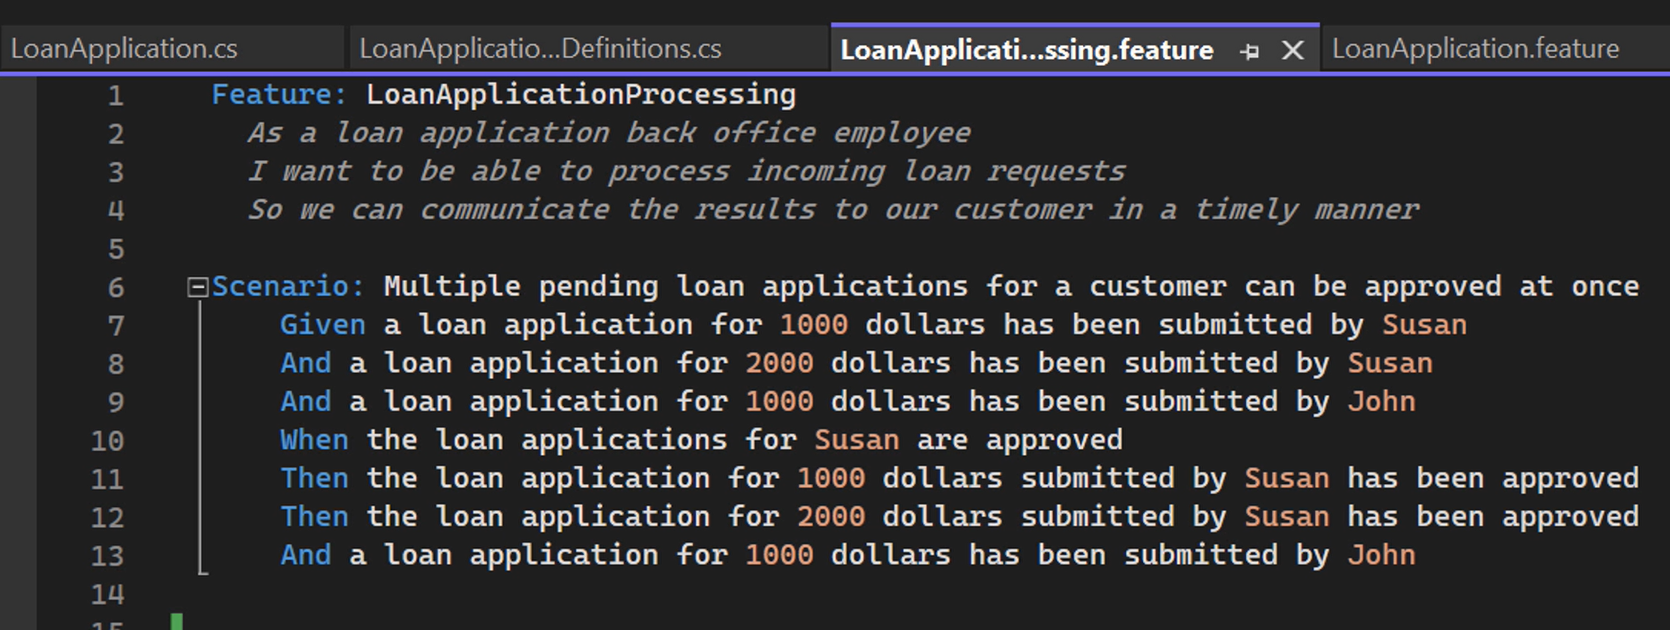
To illustrate this, let's have a look at another Feature File containing a single Scenario describing part of the expected behavior for processing incoming loan applications in our online banking system.
This Scenario describes that all loan applications from a specific Applicant can be approved at once.

First, we specify the initial state for the Scenario in the Given part of our Scenario. Applicant Susan has filed 2 loan applications, and Applicant John has filed 2.
The When section describes the action where we want to approve all loan applications for Susan, maybe because she's a trusted customer or because her credit rating is good enough, that's something our Scenario doesn't tell us.
After doing so, Then both of Susan’s loan applications should have been approved, whereas John is still waiting for his loan application to be processed.
As you can see, both the Given and the When sections of our Scenario are relatively long-winded, with a lot of repetition.
They are not very easy to read and understand, even with this being a relatively straightforward Scenario.
The good news is that there is a better way of specifying this behavior, and that's by using tables as step arguments, which is a feature of the Gherkin language and is supported by all major BDD tools, including SpecFlow.
Feature: LoanApplicationProcessing
  As a loan application back office employee
  I want to be able to process incoming loan requests
  So we can communicate the results to our customer in a timely manner

Scenario: Multiple pending loan applications for a customer can be approved at once
	Given the loan application workload contains the following applications:
	| Applicant | Amount | Status    |
	| Susan     | 1000   | Submitted |
	| Susan     | 2000   | Submitted |
	| John      | 1000   | Submitted |
	When the loan applications for Susan are approved
	Then the loan application workload contains the following applications:
	| Applicant | Amount | Status    |
	| Susan     | 1000   | Approved  |
	| Susan     | 2000   | Approved  |
	| John      | 1000   | Submitted |
With table step arguments, we can specify complex data structures required in our Scenarios as tables, which often makes them much easier to read and understand.
Using tables, we only need to specify a single Given and a single When statement, passing in all loan applications, their initial or expected statuses, and other properties in the table rows and columns.
# But how do we process these tables in our Step Definition code?
When we ask SpecFlow to generate the Step Definitions skeletons for us, it would recognize the Table argument in our steps and pass these as a parameter of type Table to our StepDefinitions methods.
It is then up to us to process the data in these tables inside our Step Definitions.
If we would have to do that by hand, we would need to go through the table row by row and column by column. That sounds like a lot of hard work and a source of potentially pretty complex and brittle code.
Lucky for us, there is a more efficient way to deal with Table arguments.
SpecFlow offers utility classes and helper methods to convert Table argument to objects or, in this case, to a collection of objects.
These classes and their methods can be found in the SpecFlow.Assist namespace.
Let's have a look at what they can do for us.
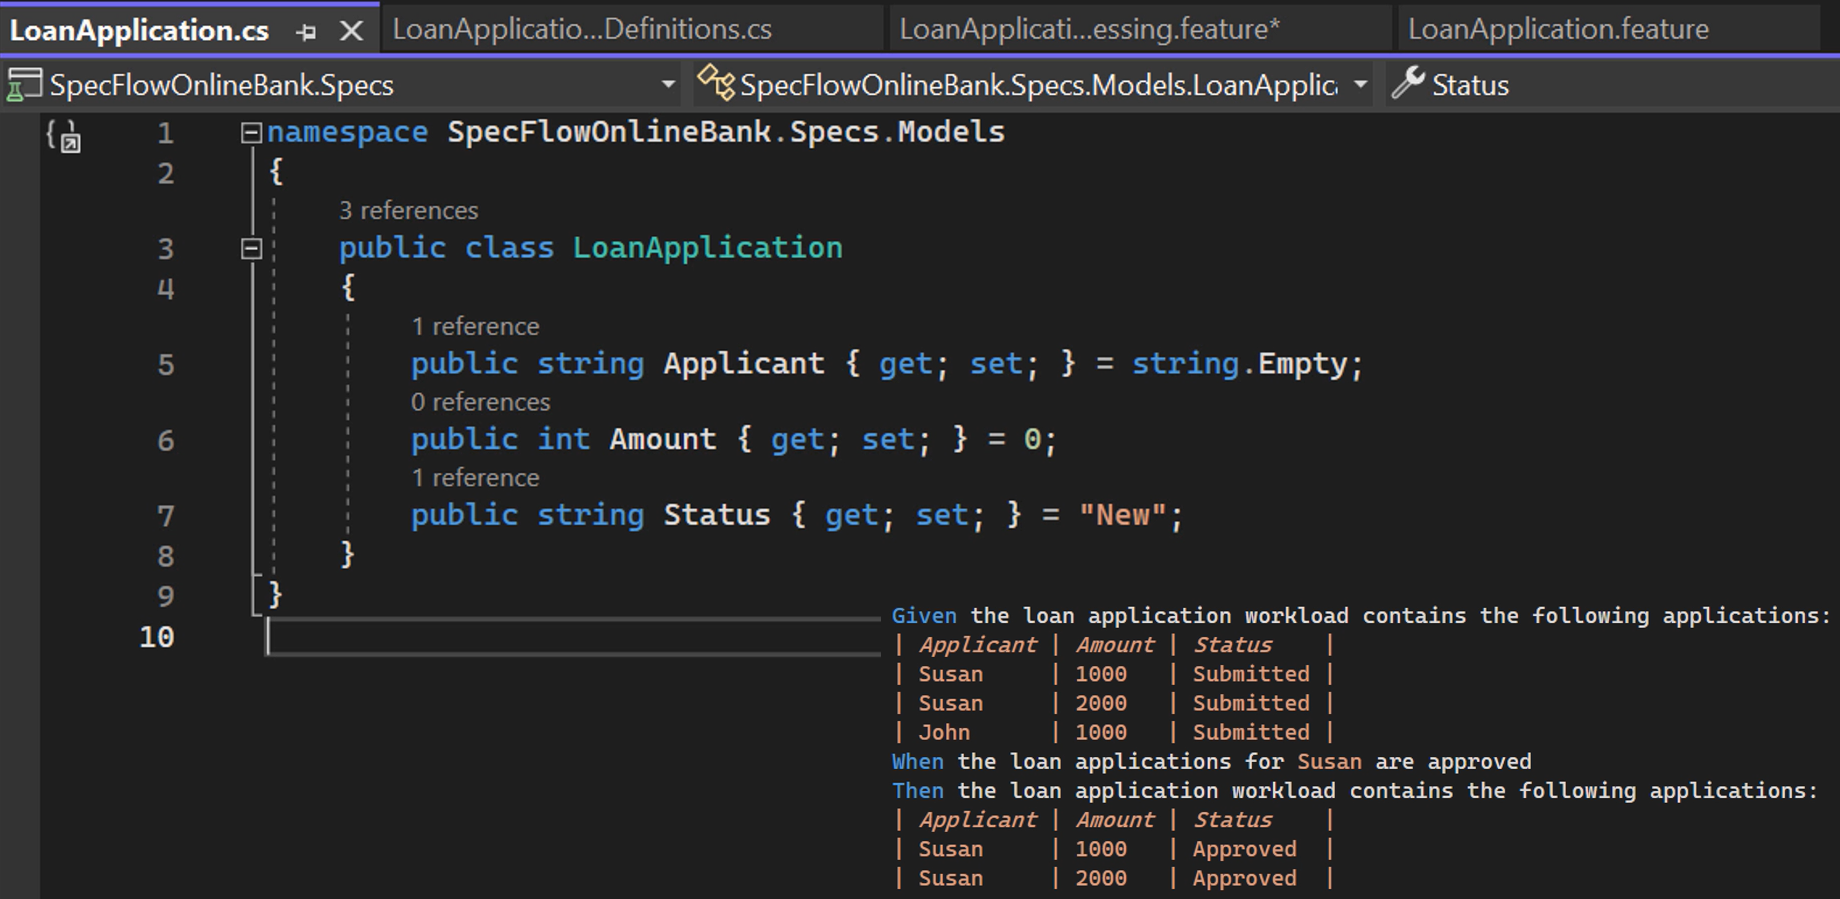
First, we need a class that represents a loan application.
This can be a straightforward C# class called “LoanApplication” with properties “Applicant”, “Amount,” and “Status,” as you can see here.

Note that the names of the properties of the class match the names of the columns in the tables.
This is how SpecFlow knows how to map table values to “LoanApplication” instance properties and vice versa.
In the implementation of our Given step, we can convert the rows in the Table argument to an enumerable set of “LoanApplication” objects using the CreateSet method.

This single line of code creates a “LoanApplication” instance for every row in the table, assigns the values specified in the table columns to the corresponding property, and adds the “LoanApplication” instance to the set.
In our example, this means we will end up with a set containing 3 “LoanApplication” objects — 2 for Susan, 1 for John.
TIP
It's good to know that if your table only has a single row, you can use the CreateInstance method instead to directly create a single instance of the “LoanApplication” object instead of a set with only a single object in it. \
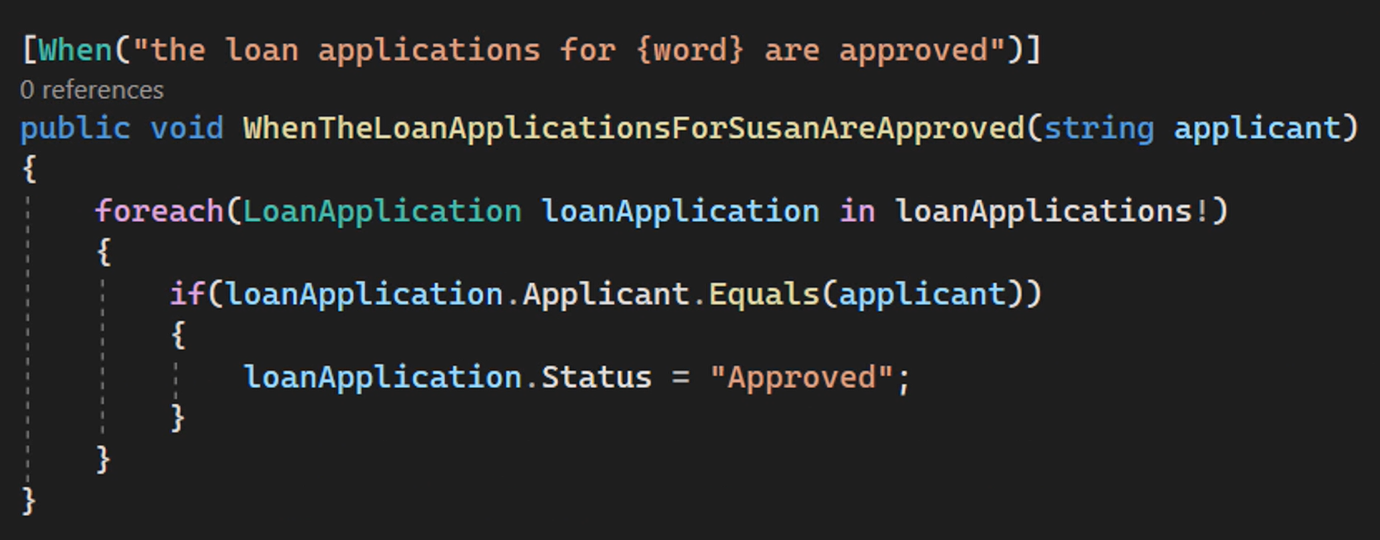
Now that we have created a set of “LoanApplication” objects using SpecFlow.Assist, we can also implement the When step, updating the status of a loan application from “Submitted” to “Approved” for all loan applications where the applicant’s name equals the one specified in the step, in this case, “Susan”.

I'm using a simple statement that directly updates the status to do this.
But in real-life situations, you would probably call a method in your application code base, invoke an API, or perform some kind of action on the user interface for each loan application instead.
Now that we have processed the objects in our set, we probably want to verify the result with our Then block.
Here, too, SpecFlow.Assist is very helpful.
With a single call to CompareToSet, SpecFlow will check for every row in the table whether there is an object in the set whose properties match the values in the row.

If we run this Scenario, you see that it passes, meaning that for every row in the table there's a matching object in the “LoanApplication” set, and vice versa.
This is the power of SpecFlow.Assist and using Table arguments.
But what does SpecFlow do for us exactly when it compares the table and the set of “LoanApplication” objects?
As a first experiment, let's swap around the order of the table rows so that John comes before Susan.
If we run the Scenario again, you see that it is still passing, meaning that the order in which you specify the rows does not have an impact on the result.
That's understandable since the IEnumerable type in C# does not imply or guarantee an order of the items in it.
Next, let's update the expected value of the status for John's application in the table in the Then step to “Approved” as well.
If we run the test again, we see that SpecFlow informs us that it couldn't find a loan application for John with the status “Approved” in the set but that there was a loan application for John with the status “Submitted”.

This is how SpecFlow reports on a table row with a field value that is different from the corresponding property value in an object in the set.
Finally, if we remove the loan application for John from the table altogether, SpecFlow informs us that there's an object in the set entirely without a matching row in the table.
Here, too, it's good to know that, like in the Given step, there's an equivalent method to compare a single table row with a single “LoanApplication” instance, and that method is predictably called CompareToInstance.
As you have seen in this chapter, the SpecFlow.Assist namespace offers some pretty powerful mechanisms to help you convert tables into objects and sets of objects in your Step Definition code, as well as to compare tables to objects and sets of objects.
Now that we have seen how to use SpecFlow to turn our specifications into executable code, it's time to have a look at how to turn this code into proper acceptance tests using some of the most popular UI and API automation libraries available in the C# ecosystem.
We'll do exactly that in the next chapter.
