

Transcripted Summary
In the previous chapters, we wrote some XCUITests. We also managed to set XCUITest framework by separating the base classes XCUI element, steps, and our test. However, we haven't seen the real power of XCUITest API yet.
In this chapter, we will explore what are the options we have dealing with elements, applications, and how we can find elements on the screen.
We can explore XCUITest by running our existing test by putting the breakpoint. We can put the breakpoint on line 15 in this test. If you click on the line number, Xcode will put a breakpoint for this test.
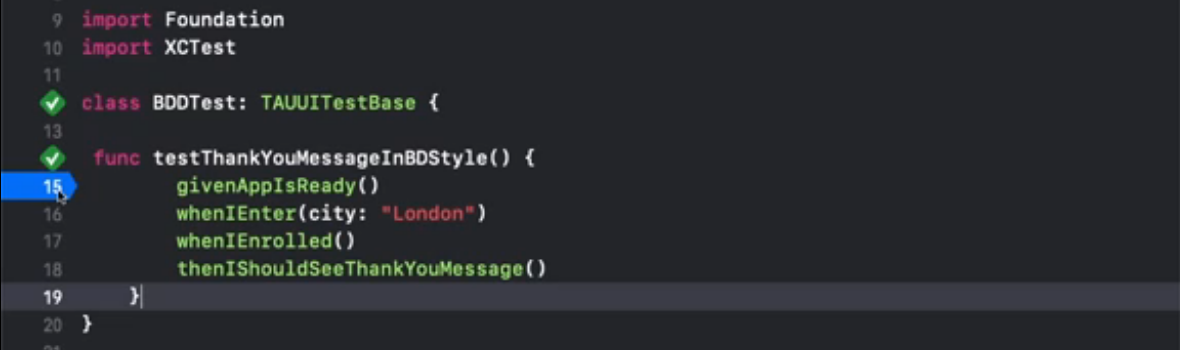
If you run this test, when Xcode reaches to the line 15 then it will stop the execution and open up the debugger area. As normal, it will launch the test, when Xcode reaches this point, then we can see the debug area over here.
We are already on the debug area, so let’s expand this debug area to get more space over here. You can see our app has been stopped at this point. From this point onwards, we can send some commands using XCUITest APIs and those commands can be executed in the debugger.
XCUITest has three main classes
The first one is XCUIApplication.
XCUIApplication is used to launch an application or launch application with specific launch arguments or launch different applications that installed on your iOS simulators.
Debugger commands start with print object (po) and if you type “XCUIApplication then you will see various options.
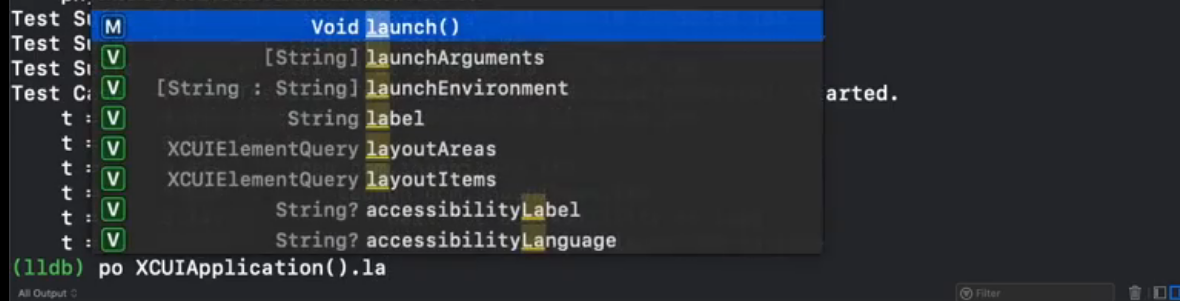
You can launch app. If you type it then in the simulator you can see the app is launching.
po XCUIApplication() .launch()
That will launch your app.
Once you launch your app, then we have other options. Say for example, you want to launch an app with specific arguments you can pass this argument in the array of strings. For example, your developer set some argument such as “UITest” or maybe “Mocks”, you can pass these with XCUIApplication.
po XCUIApplication().launchArguments = [“UITest”, “Mocks”]
A similar thing you can do is with launchEnvironments. Launch environments are basically dictionaries — you have a key value pair.. For example, you can specify your environment url, and environment name. But the set up for launchArgument and the launchEnvironment has to be done in your main app.
Another thing you can do with XCUIApplication is launch a completely a different application.
Let's try to launch Apple's News application by passing the bundleIdentifier of the Apple's News app.
po XCUIApplication(bundleIdentifier: “com.apple.news”).launch()
If you run this command, in the simulator, you can see instead of our app it will launch the Apple's News app.
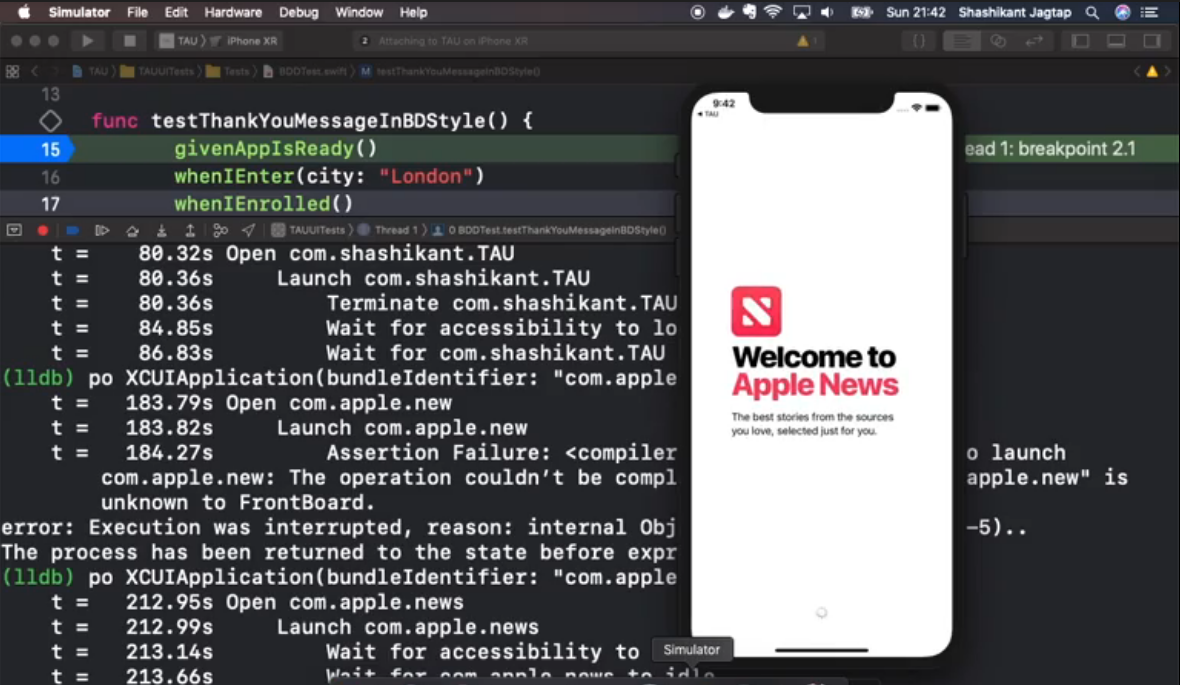
In this way you can launch a different app. Going back to our main app, we can just do — po XCUIApplication() .launch() — and now you can see that our app has been launched again.
Now, we have a second thing called XCUIElementQuery
If you're to say what are the elements of app, so you can print out, say for example, all the buttons in the app you can simply do:
po XCUIApplication().buttons
Then it will print buttons with their identifiers all there.
If you want to print a particular button, then you are to assess that button by the subscript. You can take that identifier ... right there ... now it will return only one button.
po XCUIApplication().buttons[“enrollButton”]
Now, if want to tap on the button, the “enrollButton”, you can simply do tap.
po XCUIApplication() .buttons[“enrollButton”].tap
It will tap here and in the simulator. You can see that it will actually tap it and you can see that “please enter city” message there.
Another thing we can do is, if you want to find all the images, for example, you can print all of the images.
po XCUIApplication().images
At the moment, we have only one image with the identifier “TAUlogo”. You can tap on the element, on that image, or you can assert that the image exists.
Similarly, we can find all the static texts.
StaticTexts are basically labels in the app.
po XCUIApplication().StaticTexts
You can see that there are few StaticTexts of labels in the app. This is basically finding the unique element. XCUItest can only deal with unique element if you want to perform some actions.
Say for example, if you're trying to find buttons and the buttons are returning the two elements.

If you want to tap then XCUITest probably confuses which button you want to tap on. You really should return always unique element in order to perform some actions.
Now, what will you do if you found multiple XCUI elements returning from your query, but you don't have identifier for those elements?
For example, if you have — XCUIApplication().StaticTexts — we have multiple StaticTexts here and we have a label as well.

If you don't have identifier then what you can do is if want to get the first or second StaticText, you can access as an other element.
You can keep this as an array of StaticText. You can access element bound by zero index.
po XCUIApplication().StaticTexts.element(boundBy: 0)
That will return you the first StaticTexts. Then probably you can say, “if it exists”, or you can perform some action on it. In this way you can access the staticTexts or XCUIElement. This is not the great idea because if this changes and it returns more StaticTexts, then your test may break.
It's always good idea to have identifiers for your UI elements.
Let's explore what are the options of a label for bringing some actions on the element. For example, if you get StaticTexts, or maybe, test fields, if you type “testFields” you can see the “enter city”.
po XCUIApplication().textFields
With the test field we can do different things ... typeText, we can type some text (typeText(text:String), we can tap on it, we can doubleTap() on it.
Another thing, if you want to do some actions like — swipeUp, swipeDown, swipeLeft, swipeRight — you can do that as well.
There are options for if you have things like sliders ... you can set some values and it could be it could slide up to certain points. These options are available in the XCUITest API as well.
Let's now go back to our test and carry on the test execution — that will perform normal test execution.
Let's talk about the waiting strategy. How you can add waits in your test.
For example, when people press the enroll button, then we see the thank you message. Imagine the thank you message text takes some time to load. We need to handle that wait in between.
One way we can do it is we can define the variable “isThankMessageExist”, then XCUI API has an element called, we already have a thank you message element in this screen. On that element, we can call waitForExistence and we can specify how much time we can wait for that element. Once we get the results, we can check if thank you message exists, then we can assert that thank you message exists.
func testThankYouMessageInBDDStyle() {
    givenAppIsReady()
    whenIEnter(city: "London")
    whenIEnrolled()

    let isThankMessageExist = TAUScreen.thankYouMessage.element.waitForExistence(timeout:10)

    if isThankMessageExist{
        XTCAssertTrue(TAUScreen.thankYouMessage.element.exists)
            thenIShouldSeeThankYouMessage()
    }
}
In this way we can wait for a particular element to appear on the screen or disappear from the screen. But typing this code every now and then is not a great idea.
What we can do is, we can go into our base class and write some sort of common utility.
For example, XCTAyncAssert, what you are doing is basically the same thing we have done.
func XCTAyncAssert(_ element: XCUIElement) {
    let isElementExist = element.waitForExistence(timeout:10)

    if isElementExist {
        XTCAssertTrue(element.exists)
    }
}
But now we have a function called XCTAyncAssert which is taking the XCUIElement and wait for 10 seconds to load. If it's loaded before 10 seconds, it will carry forward. We can assert that it exists.
Now, in our steps we can use this straight away. Instead of asserting this once, we say that it’s a Async call so we can use our new thinking.
func thenIShouldSeeThankYouMessage() {
    XCTContext.runActivity(named: "Then I Should See Thanks message ") { _ in
        XCTAsyncAssert(TAUScreen.thankYouMessage.element)
    }
}
Here you screen out thank you message element. We pass this element, we don't need to write .exist because we already wrote it in the utility. In this way you can use this utility wherever you made an Async call or you have to wait for some element to appear or disappear.
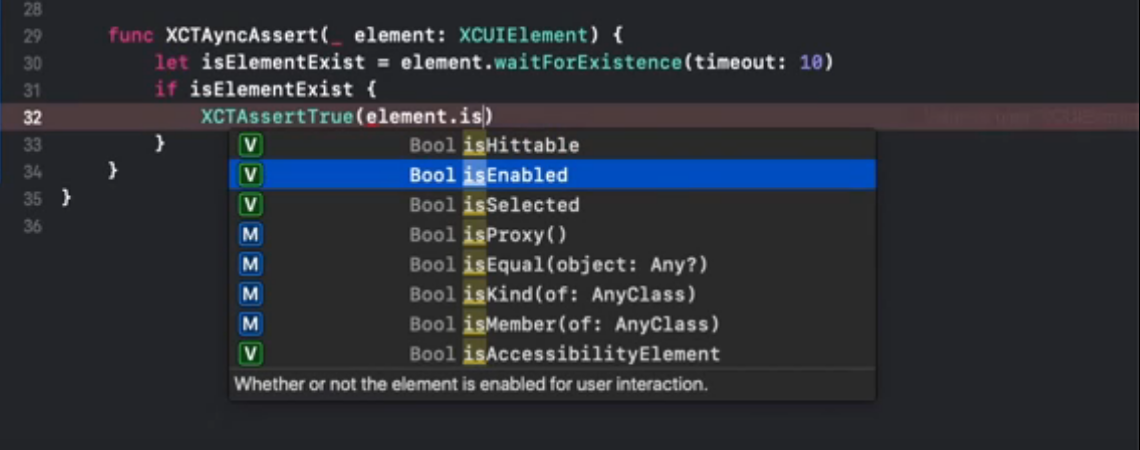
You can do ... for maybe if you want to check if element isHittable, element isEnabled, or isSelected, you can put different conditions for waiting. For now, we can do this for just exists.
For waiting, there are some other techniques like expectations. These are some advanced techniques for waiting in XCUITest. I would refer to the documentation for those kind of techniques in the resources below.
For now, we have the UI element for iPhone.
On iPad if your UI element is different than iPhone, then you can conditionally specify those in the enum.
For example, the logo element is different for iPad and iPhone. I can check in the condition that if UIDevice, which is the current device, if it’s an iPhone or iPad, you can check that by checking userInterfaceIdiom is equal to “.pad” then I want a different element.
case .taulogo:
	if UIDevice.current.userInterfaceIdiom = .pad {
		return XCIUApplication().images[“iPad”]
	} else {
	    return XCIUApplication().images[self.rawValue]
	}
}
I can use this value for iPhone. For example, on iPad our UI element is something like images of iPad ... something like that. Then what XCUITest will do is if the device is am iPad, then it will take this one, otherwise, it will use this one for iPhone.
In this way, you don't need to write different tests for iPads. You can, with the power of enums, we can conditionally specify the elements in the enum itself. XCUITests will use those enums or XCUIElement values in the UI tests, so you can avoid duplications.
Using this approach, you can manage your XCUITests both for iPhone and iPad using the same test suite.
Now let’s move on and talk about parallel testing.
Since Xcode 10, we have parallel testing support embedded within Xcode. In order to enable the parallel testing for your app, what you need to do is you need to click on the scheme here and you have to edit the scheme. Once you edit the scheme, you will see different options. You will have to go into the test, and you will see your target and if you click on options, you can see that there's options to exhibit testing parallel on simulator.
If you do that, that will enable the parallel test for your UI test. If you run the test, all the test in this scheme, that will turn in the different clones of simulator.
Now let’s try running this test. We can run this test by pressing command U. Now you can see the test will start to run. When UI test starts, we will probably see the different clones of simulator.
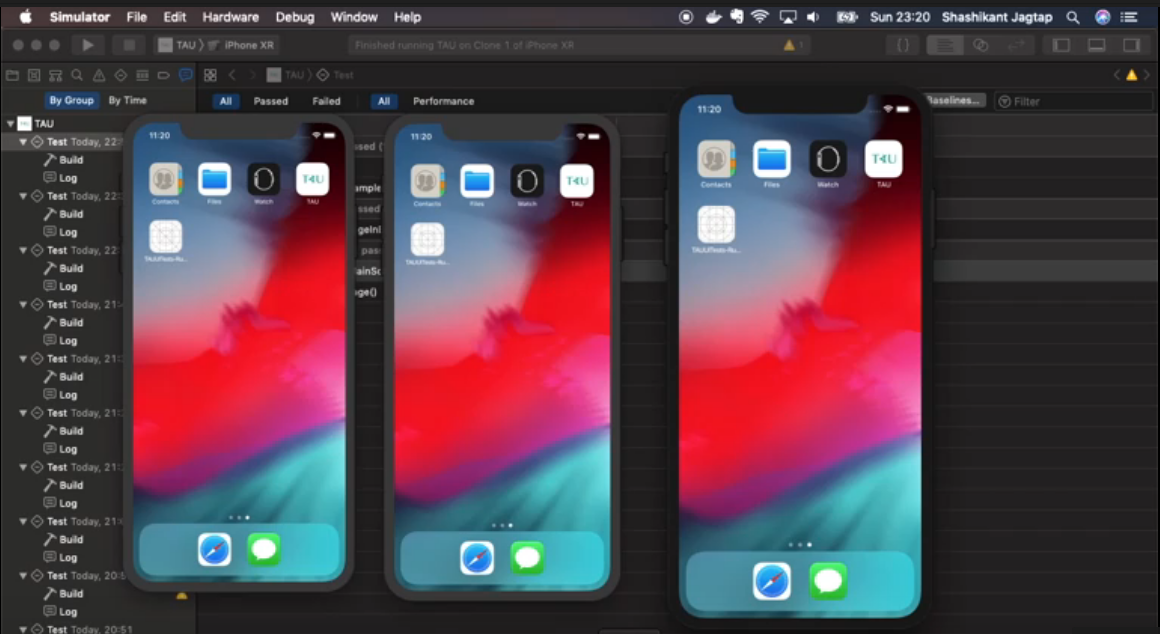
First, our scheme is going to run both Unit test and UI test. First it will start unit test and after that it will start the UI test. It will take some time to perform those tests. Clone one started ... hopefully if your powerful machine then you will see the different clones started at one go. This is how the parallel testing feature works in Xcode 10.
Okay, now we can see another clone. Clone two has been started. It started executing the test now. You can see that your clone simulator has been started in our machine.
After some time, you will see that your test finishes and different clones of simulator has been launched. You can see this is clone one of iPhone 10R. This is clone two and this is our original simulator. You will see the test succeeded and we can run this test parallelly in different clones simulator. The parallel testing feature in Xcode distributes the test as per the test classes on different clones simulator.
It's a good idea to have multiple tests classes and separate your test across multiple tests classes to get most of out the parallel testing feature of Xcode.
You can see the test results in the test navigator, or you can see the results on the last test run. You can see the tests has been passed. So, that's it for the parallel testing feature.
That's it for this chapter. As a recap…
- We have seen the XCUITest APIs.
- We have also seen how to add waiting strategy for our Async UI element.
- We also have seen how to scale the test between iPhone and iPad by updating the enum.
- Finally, we had a look at the parallel testing support feature of Xcode.
In the next chapter, we will see how to write and execute the visual validation test using Applitools
