

Transcripted Summary
In the last chapter, we explored XCUITest API. In this chapter we will be using Applitools Eyes XCUI SDK to add some visual checkpoints test.
In order to get started, you need to have an account with Applitools. You can create an account by going to applitools.com and just start with your email or GitHub account.
I already created an account, and when you create an account you can get your API key for running your tests. If you click on the settings and you will see the “My API Key” tab over here. So, if you click you will get the API Key. Applitools has great documentation, how we can get started with XCUI Swift Tutorial, and how you can add the Applitools Eyes XCUI SKD.

Let's try to add this in our TAU app.
As per the documentation, we need to have a podfile, and this content of the podfile. Let's go back to our app and basically podfile is using a tool called CocoaPods.
CocoaPods is a dependency management system for iOS applications, so that you can use any third-party dependency using CocoaPods.
If using the system Ruby, you can store CocoaPods using
sudo gem install cocoapods
Or if you have any Ruby Version Manager, then you can simply do
gem install cocoapods
and that will install CocoaPods in your system.
Okay, let's create a file called “Podfile” and add a similar content that is shown in the documentation. So, create a podfile and add the content as per our project. We just need to replace the target with our main target and another target for UI tests with our UI test target.
platform :ios, '9.0'

target ‘TAU’ do
	target ‘TAUUITests’ do
		pod 'EyesXCUI'
	end
end
And, once you have that file, we simply need to run command
pod install
So, pod install command will download the EyesXCUI SDK and we can use that SDK in our app.
One important thing we should keep in mind that, once you install the pod and dependencies using CocoaPods, then you should close all your Xcode sessions and open the xcworkspace file instead of the Xcode project file.
Let's open the workspace file (open TAU.xcworkspace), which will open the Xcode, but you can see that now Xcode order structure has been changed. It has added the pods directory and different subdirectory in there. But we still have our tests, step definitions and base classes as we wrote previously.
Now, let's add another test for visual evaluation.
Let's create a new file. Let's create a Swift file and let's call it “TAUEyesTest”.
And now we do import XCTest framework, and we also do import a new link, to download EyesXCUI framework (import EyesXCUI).
Now we can add new class, maybe “TAUUITestBase” which extends from our base class.
import XCTest
import EyesXCUI

class TAUEyeTest: TAUUITestBase {

}
So, in this class we can add the test which, as mentioned in this documentation, we can just simply copy/paste this test. Just give it a meaningful name so, for example, "testTAUWithEyesXCUI."
Now, once you have an account and can replace this bit with your API Key, but we also need to change some bits and pieces in the test.
So, our application name is definitely different, so let's replace it with TAU, and we can rename the test name with "Live Demo of Eyes XCUI SDK."
Now, this is the first checkpoint where we can take a screenshot of the entire screen, so we have a TAU app that's been checked the entire screen, and now we will press the button.
So, in our case we have "enrollButton" and, once we press the enroll button, we can add another checkpoint there, saying "Please Enter City" message.
And once we add visual checkpoints, we can close our test.
import XCTest
import EyesXCUI

class TAUEyeTest: TAUUITestBase {

    func testTAUApplitoolsEye() {

        // Start the test.
        eyes.open(withApplicationName: "TAU", testName: "Live Demo of EyesXCUI SDK")

        // Visual checkpoint #1.
        eyes.check(withTag: "TAU", andSettings: Target.window().timeout(inSeconds: 5))

        // Click the "Click me!" button.
        XCUIApplication().buttons["enrollButton"].tap()

        // Visual checkpoint #2.
        eyes.checkWindow(withTag: "Please Enter City")

        // End the test.
        do {
            try eyes.close()
        } catch {
            eyes.abortIfNotClosed()
        }
    }
}
We already have this kind of setup so what we can do is, basically, we can export this step into our base class.
So, export to base class — expand on the variable called “Eyes” and let's put this API Key over here. And we can get this part in the teardown.
Now, we also need to import EyesXCUI framework in the base class as well. So, just to tidy up, we have just created the API key and teardown in the base class.
import Foundation
import XCTest
import EyesXCUI

class TAUUITestBase: XCTestCase {

    var app = XCUIApplication()

    var eyes = Eyes()


    override func setUp() {
        super.setUp()
        continueAfterFailure = false
        app.launch()

        eyes.apiKey = "MY-API-KEY"
    }

    override func tearDown() {

    }
}
So, in our test now, what we can do is we can run this test. So, let me call this video at my API key over here and let's run the test once I got the API key.
We are running this test in iPhone XL. You can see our test has been started now and hopefully, once we got test, we should see the test element there, in the Applitools Test Manager as well.
It clicked on the enroll button, so it succeeded.
Let's go back to Applitools SDK and refresh it so we can see the live demo we just created has appeared over here.
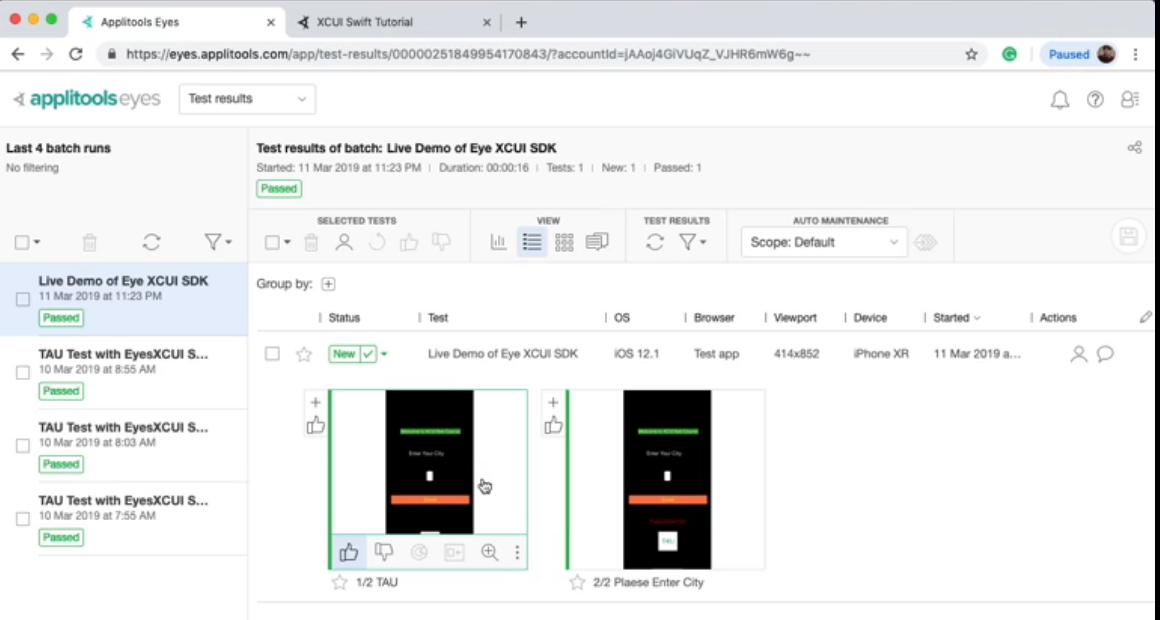
We can see that our screenshot has been added — this is basically the screenshot of our main screen, and this is the second checkpoint where we pressed enroll button. We can accept this as a baseline. You can click here (on the “thumbs up” icon) and accept this screenshot as the baseline.
And if you run this test again, then this test will run against that baseline.
So now we are rerunning the test and we can watch in the live demo. This test is now running. Now we can see that our test has been passed, so from now you can run this test again with the latest changes in the development
Once you do that, you can take this test to your CI server as well. Applitools has documentation on how to set those tests on CI servers, so you can take advantage of that.
That's it for this chapter. As a recap, in this chapter…
- We have added Applitools Eye XCUI SDK,
- Then we added a test to test our TAU app, and
- We got that test running on Applitools Test Manager.
In the next chapter we will add continuous integration system for our TAU app, and we will run those tests on continuous integration. So, see you there.
