

Transcripted Summary
Before we actually go ahead and build our framework, let's understand the API that we'll be using initially to make our HTTP requests.
In this chapter, we are going to make use of people-api, which is a CRUD application developed using Python Flask, SQLAlchemy, and uses SQLite as a database.
Don't worry if you've never heard of this and are quite new to it.
You can go to this people-api repository on GitHub and there is a README, which gives a very brief about what the application is and some of the files that are present.
However, for this chapter, you really don't need to know how it is actually implemented.
You will need to follow the below steps to make sure that this API is up and running on your local server.
Ensure you have pipenv available. Read this blog to understand all about pipenv
Execute
pipenv shellcd to
people-apiExecute
python server.pyTo open swagger navigate to
http://0.0.0.0:5000/api/ui/
Let me show you how that is done.
Here, I've already cloned the people-api repository, and you can see that this has some set of Python and files, as well as a local database.
In a nutshell, what this application does is, you have, basically, a list of people with their first name and last name.
I'm going to show you how it is really when we look into the Postman collection.
The first step that you need to do is make sure that the PIP environment is already set up, just like we did in Chapter 1.
You know that there is a Pipfile already present here, so the only thing you need to do run:
pipenv shell
That's going to make sure that your pipenv is created with all the dependencies that this particular API needs.
If you're using Pycharm, then remember to update the Interpreter so that it uses that.
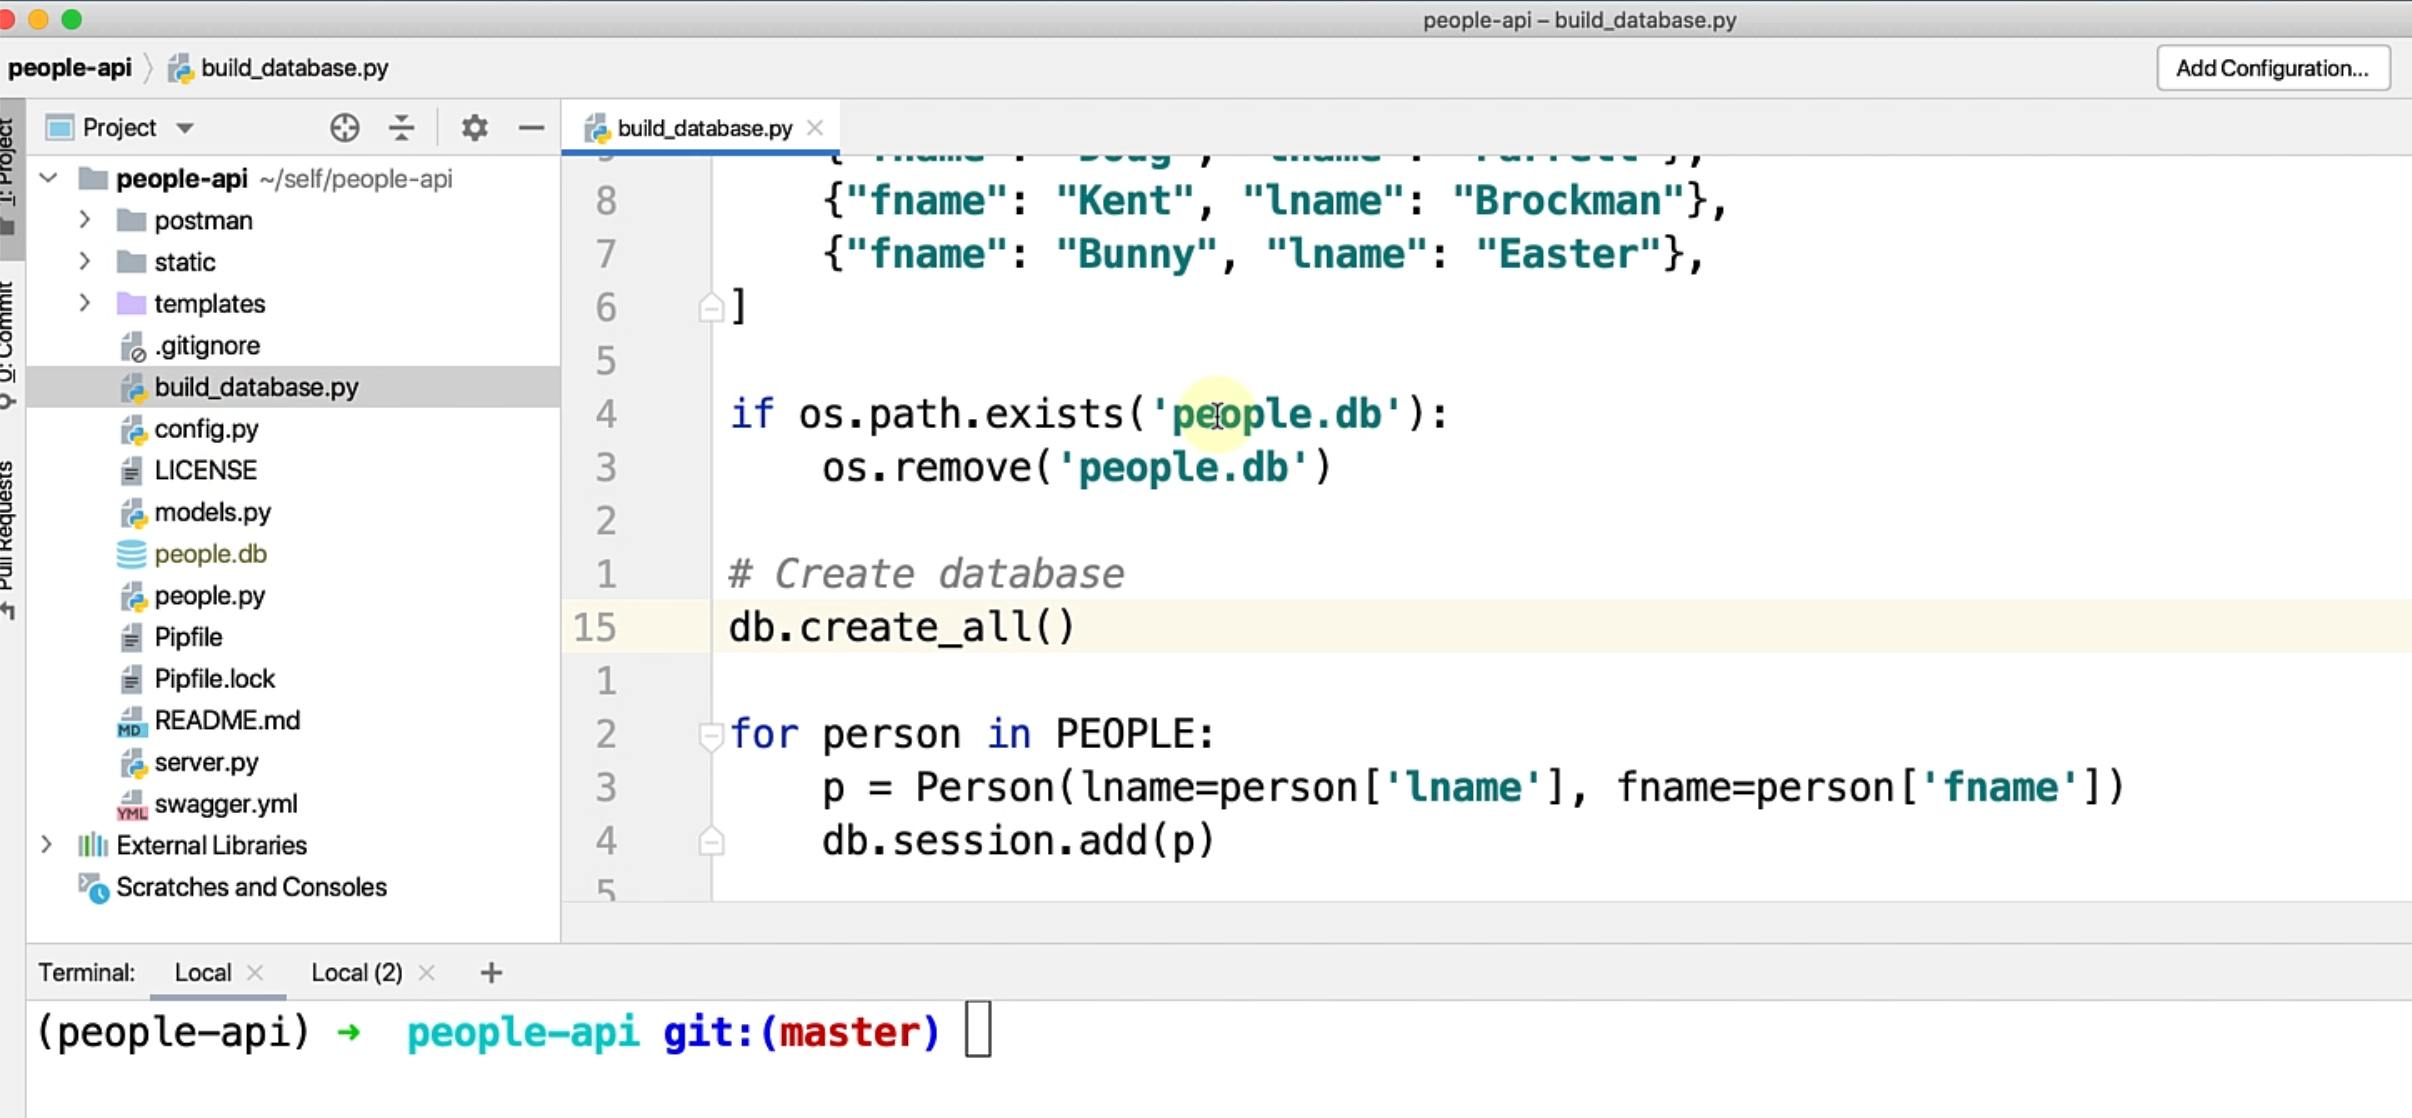
Now, once done, the next step is you need to do is build the local database.
For that, inside the virtual environment, just do
python_build database.py
What this did is actually created our database with a table and inserted some data that we have.
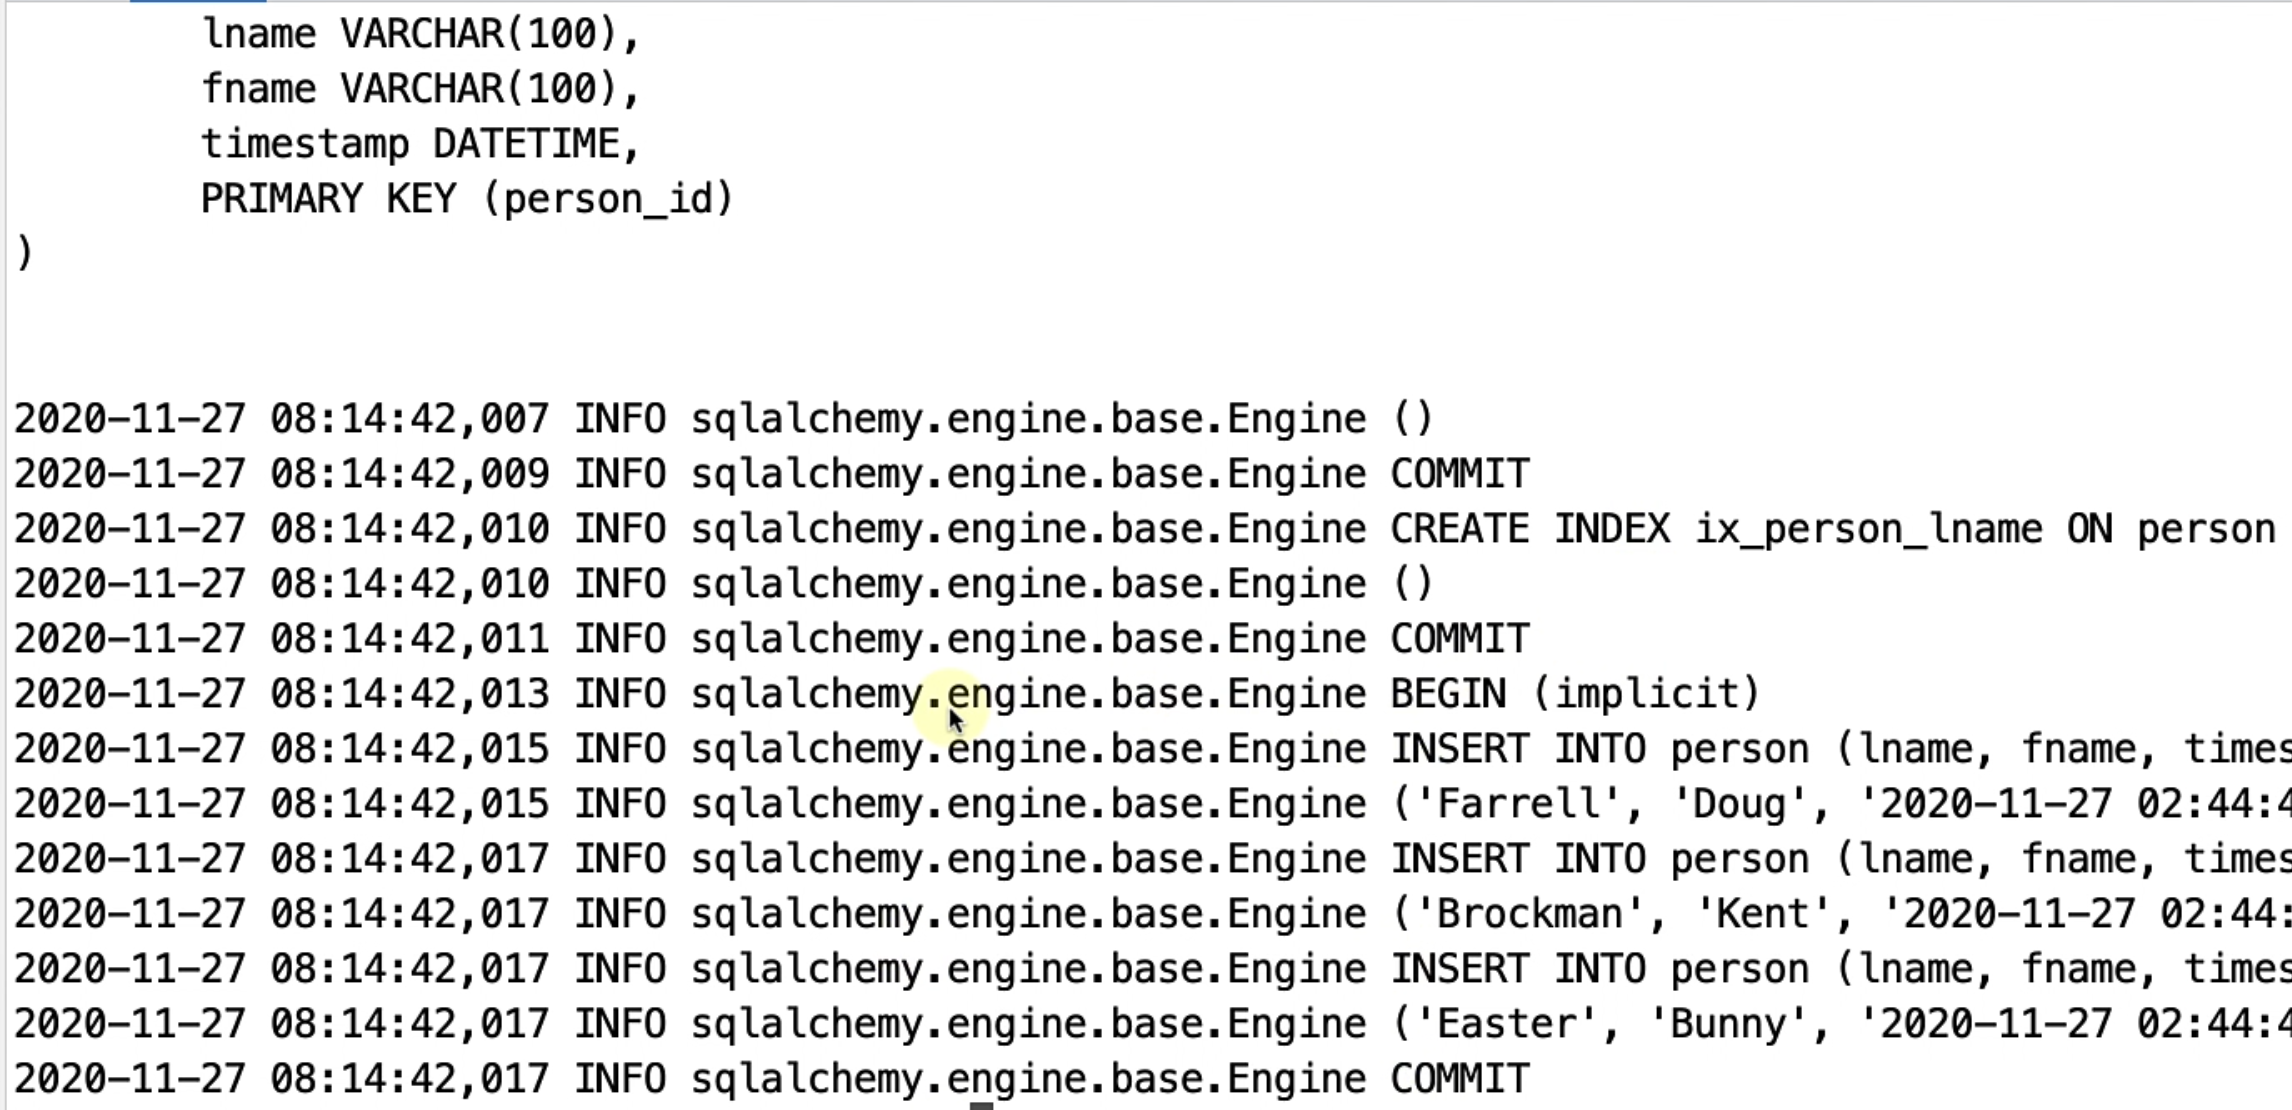
It will start with a couple of dummy rows.
All right, so your database is created now.
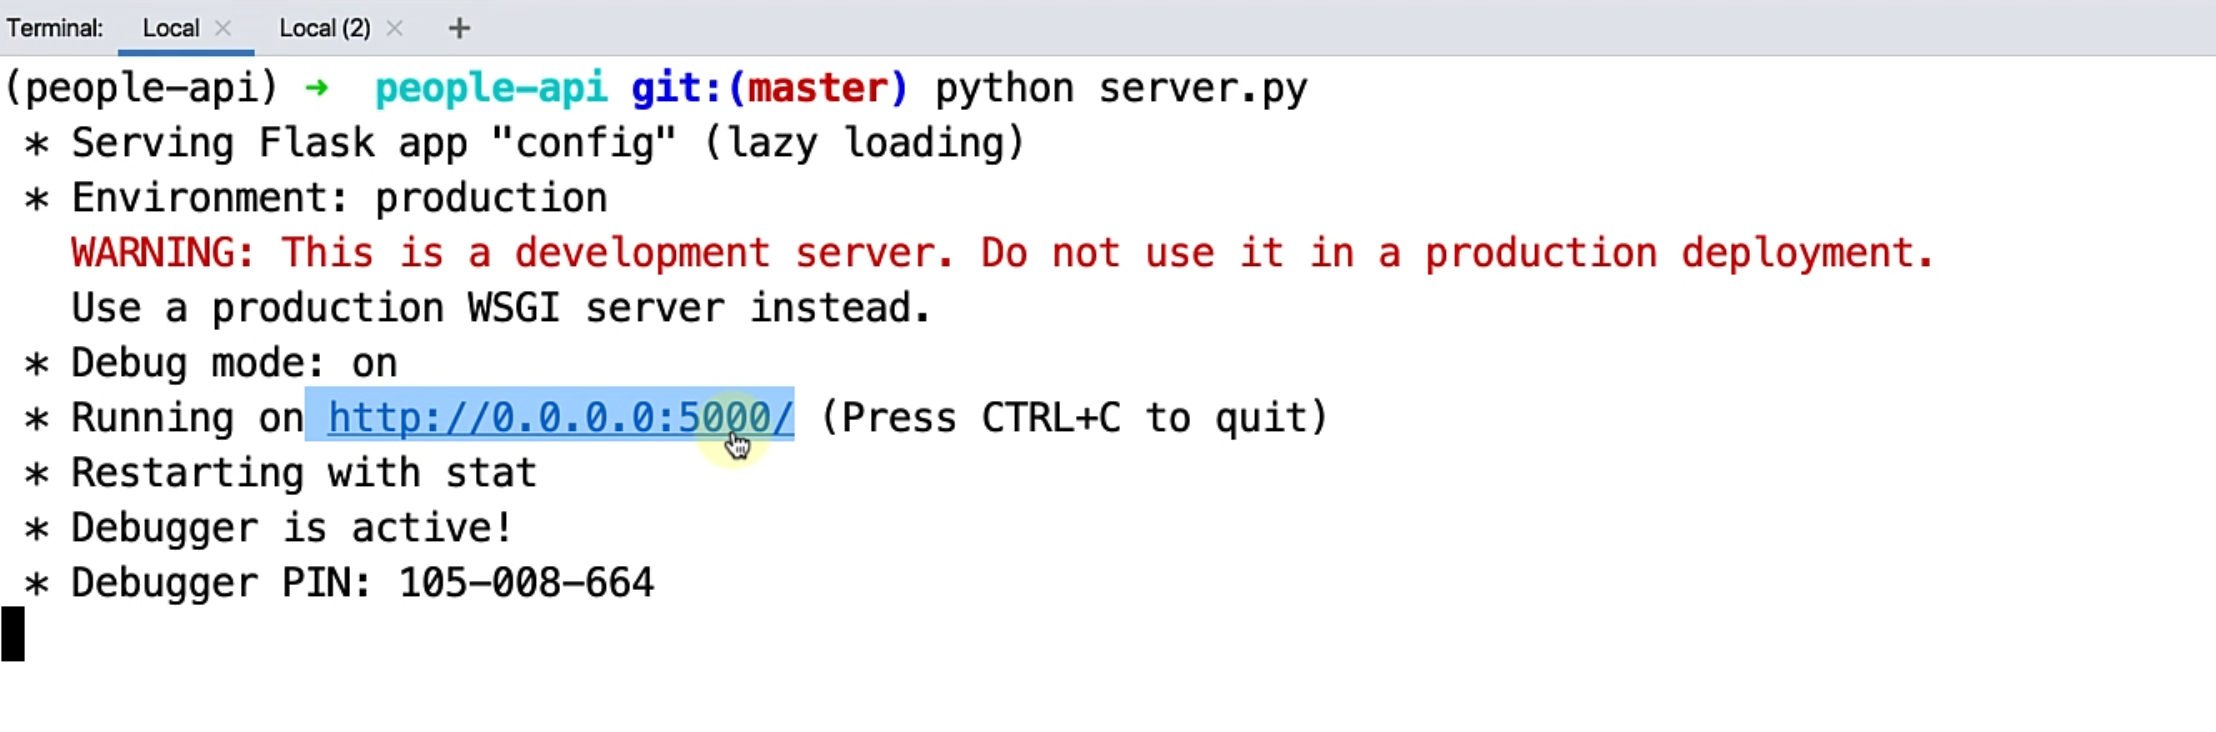
The only thing left is to just start the Flask server.
python server.py
What you can see is this has started our Flask API, and this is running on a localhost, 5000 port.
Important Note
On a windows machine, you may want to replace 0.0.0.0 with 127.0.0.1. Read this post on How-To Geek to understand this is needed
Now, let me show you how this API actually works.
I have included a Postman collection in the repository itself, so if you go to postman, you will see the postman_collection, as well as the postman_environment.
Go ahead and just import that collection as well as import the environment using this.
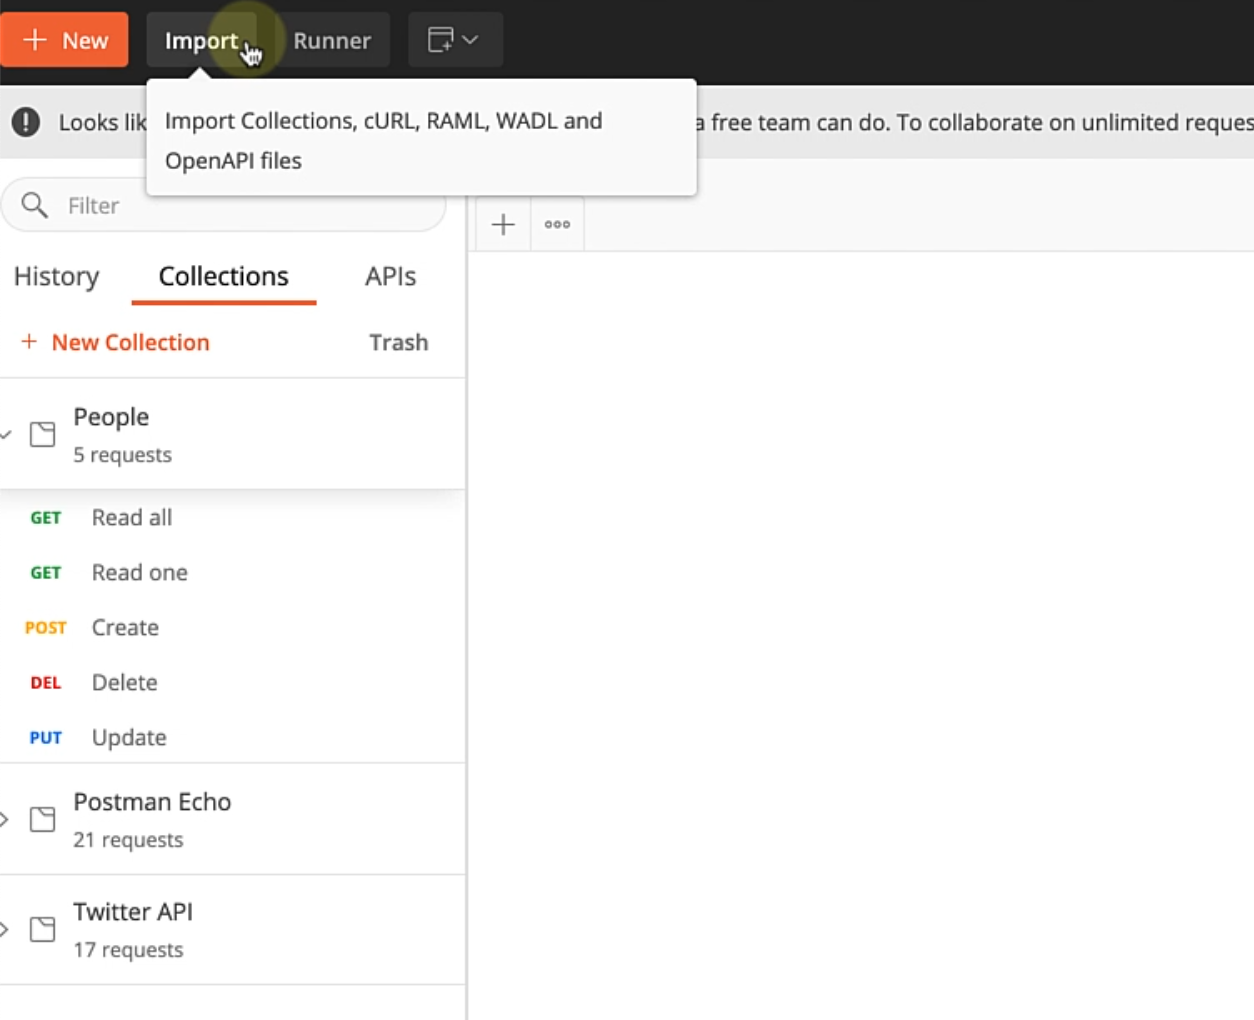
As you can see, I have this set up already and I have my people environment.
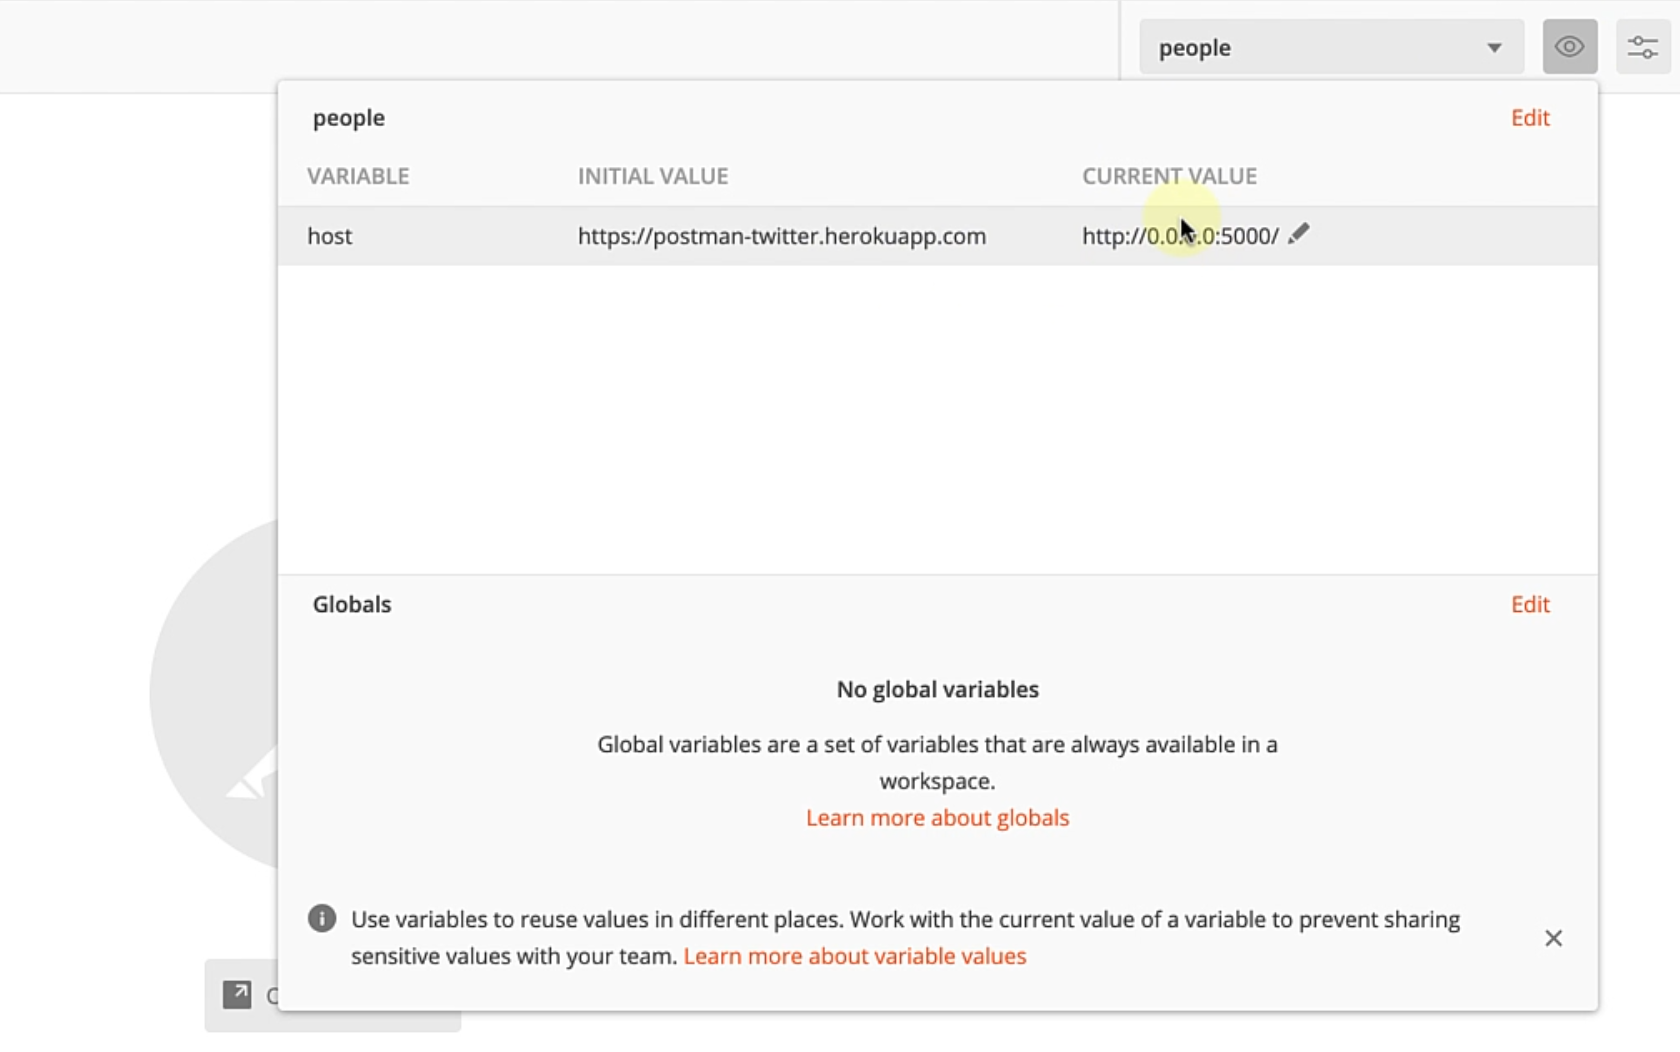
The only thing it has is the default host and port.
There are some basic credit CRUD operations that this API supports.
When I say CRUD, I mean create, read, update, and delete, which typically map to HTTP verbs.
If you are quite new to API testing - don't worry - or new to APIs in general - you can go and check out Test Automation University for a couple of courses that are already done on API - I would highly recommend you to go check them out.
You can see the current API is a "Read all" API wherein I pass (host)/api/people, and I'm passing the basic application/json, and let me just send this.
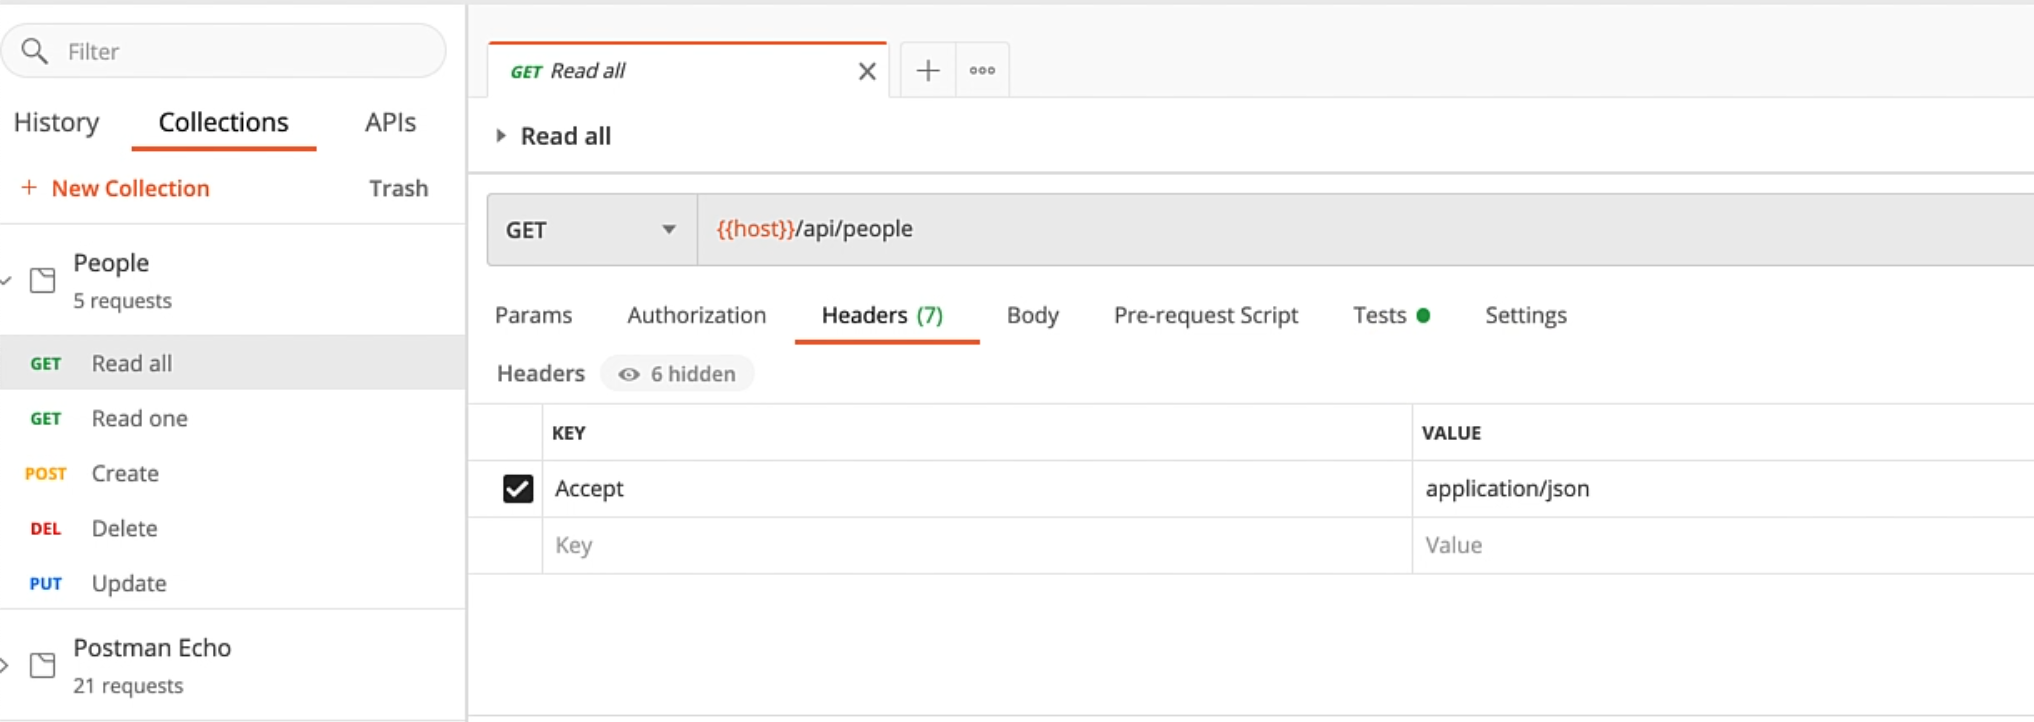
You can see that it returns us a list of people that are already there in our database.
I have "Kent" with the last name "Brockman", and every person has a unique person_id as well as a timestamp related to when that record was already inserted into the DB.
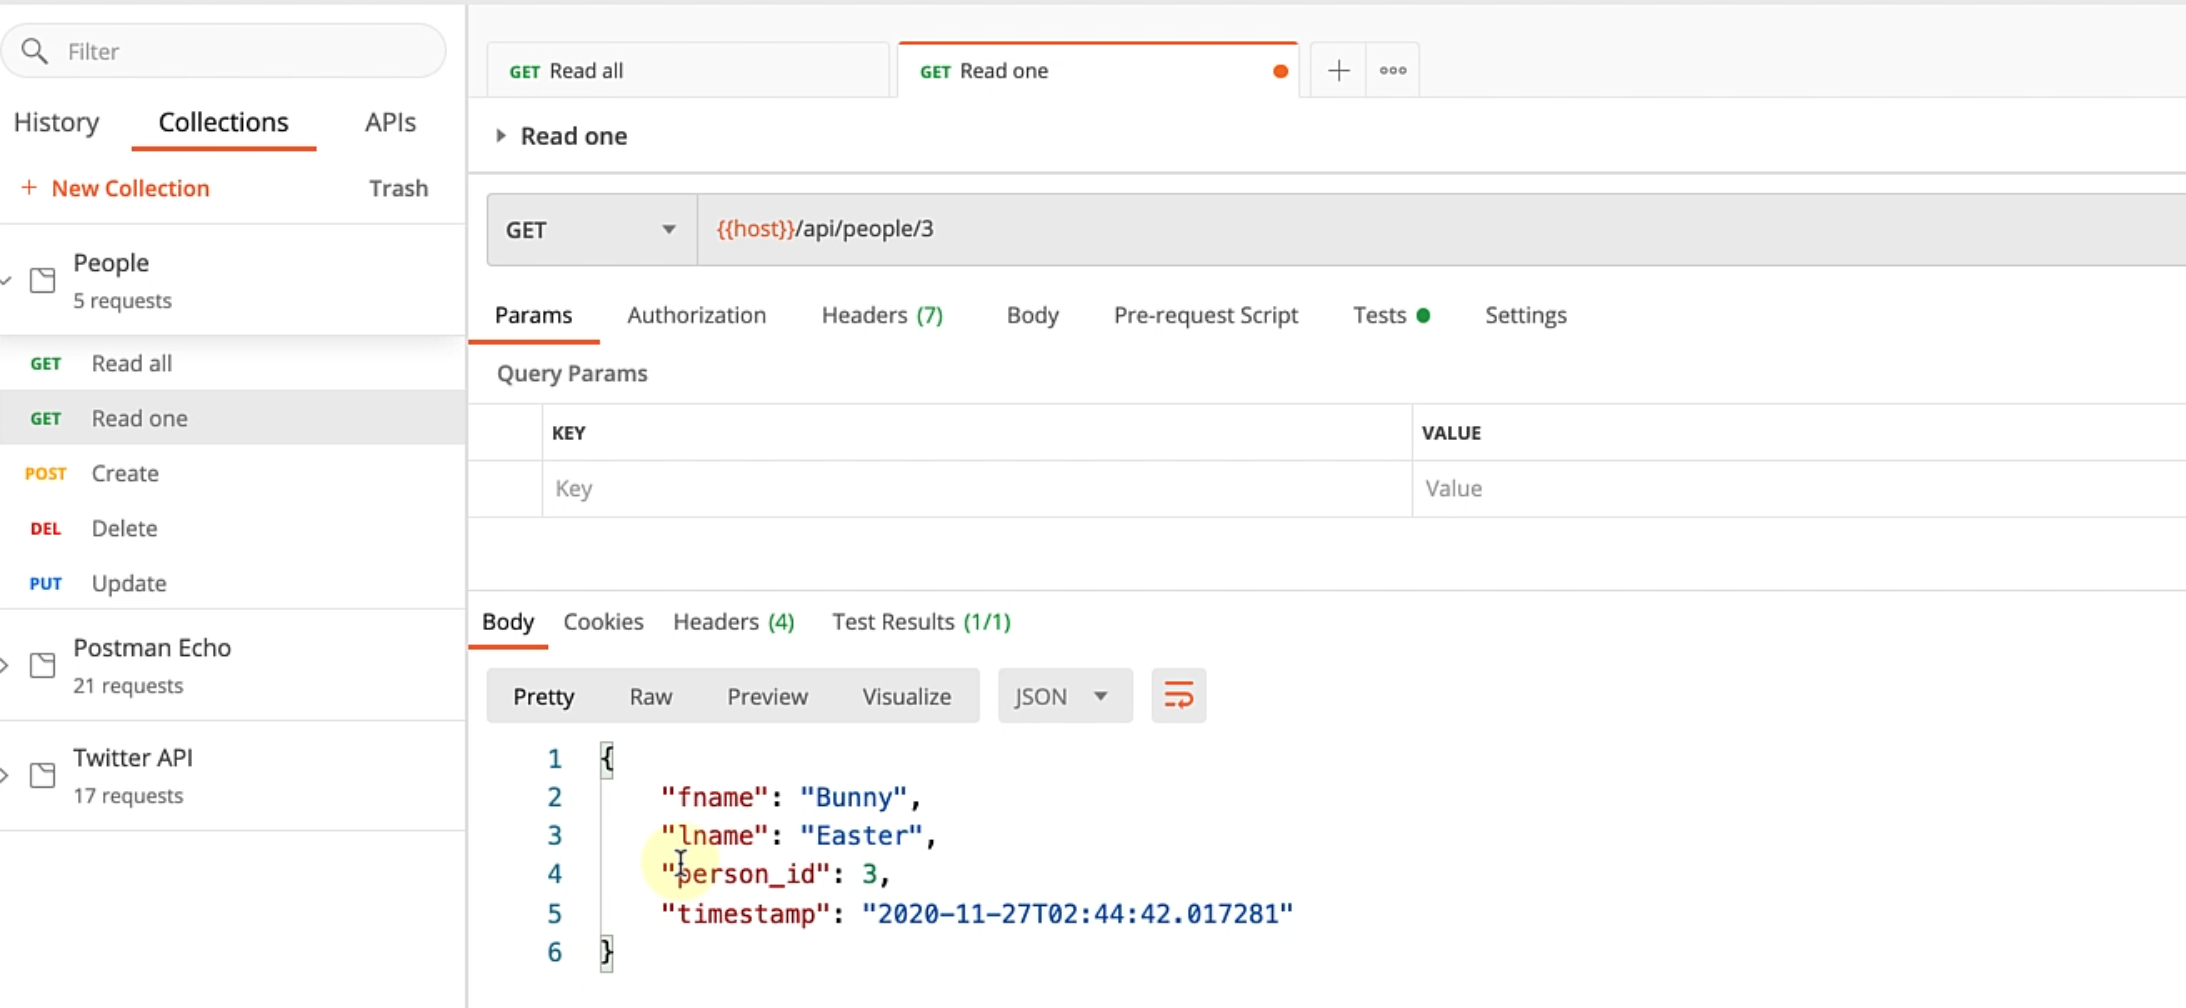
If you want to just read a single person and you know the person's ID - for instance, I want to just read "Bunny Easter" again - then I can just pass 3 here, and this is going to give me the result as a dictionary - basically as a key value pair that you have.
If I want to create a person, I still hit the same host without the person_id and for headers, I pass Content-Type and Accept, as well as in the body, I just specify the first name and the last name.
Let's go ahead and create this "TAU User" and send.

If it's successful, it gives us Status: 204 NO CONTENT.
Let's do a "Read" now.
As you can see, we already have the "TAU User" inserted into our DB.
You can go ahead and update the same way.
If you know the person's ID, you can go ahead and update their details.
Let's say, I just want to go ahead and delete the user that I already created.
Let me just update the person's ID here and send.
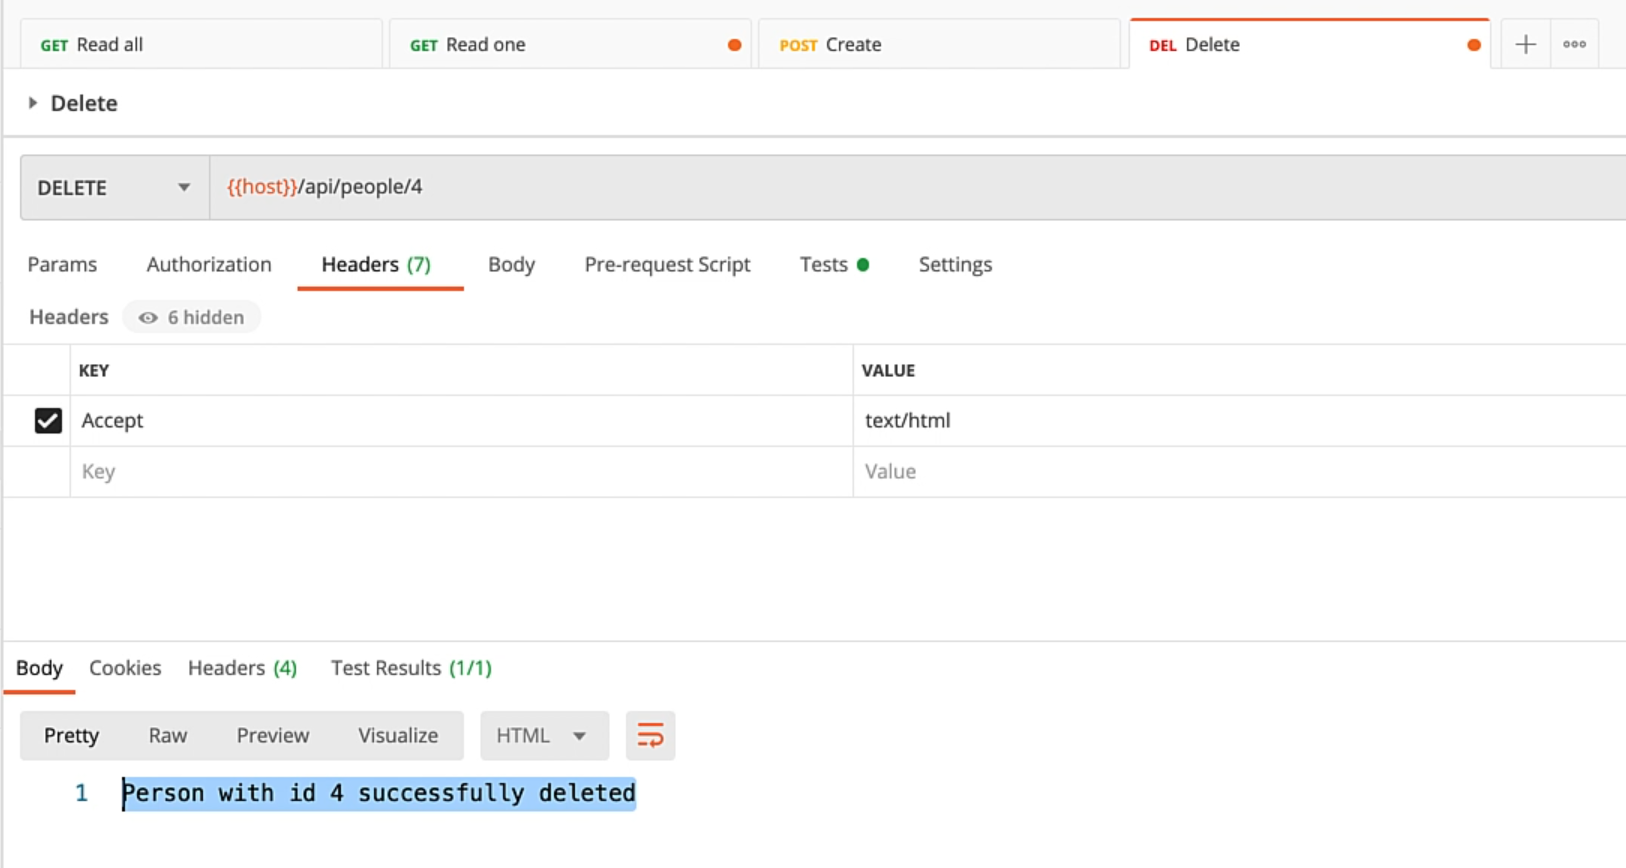
This does indeed return that the user is deleted and gives me a "200 OK".
These are the basic CRUD operations that this API supports.
We are now going to see how you actually go about using Python and requests to automate this.
Before I start all that, I have a very handy tip in terms of Postman.
If you have any API in Postman and want to generate some code out of it, you have a bunch of options here.
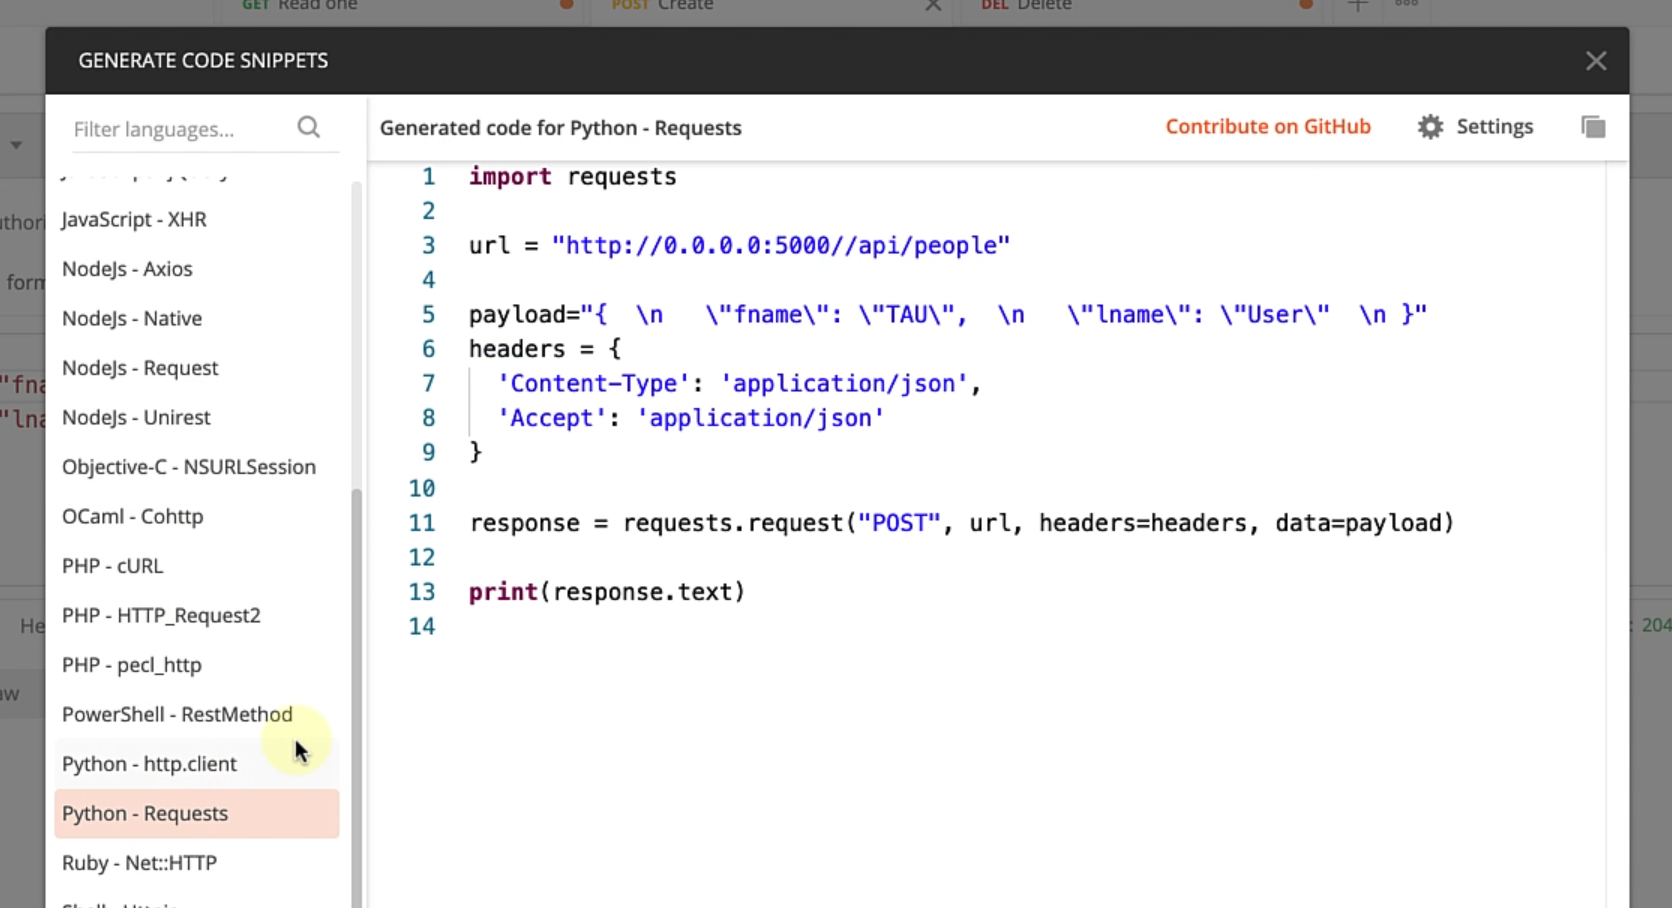
You can generate a cURL if you need to share it with others, but one handy feature is it gives you the Python code to actually make that request.
You can see for this API, it actually generated the URL, the payload, the header, and even the method that requests might actually use in this particular case, which is a very neat feature.
You might want to use this for a very quick script if you want, or if you're building a long-term framework and you are getting confused then you can use this, otherwise, what I would recommend is to actually handcraft your framework because in the long run, it will be very unmanageable if you just go ahead with this approach.
With all that said, let's just go ahead and start writing our tests.
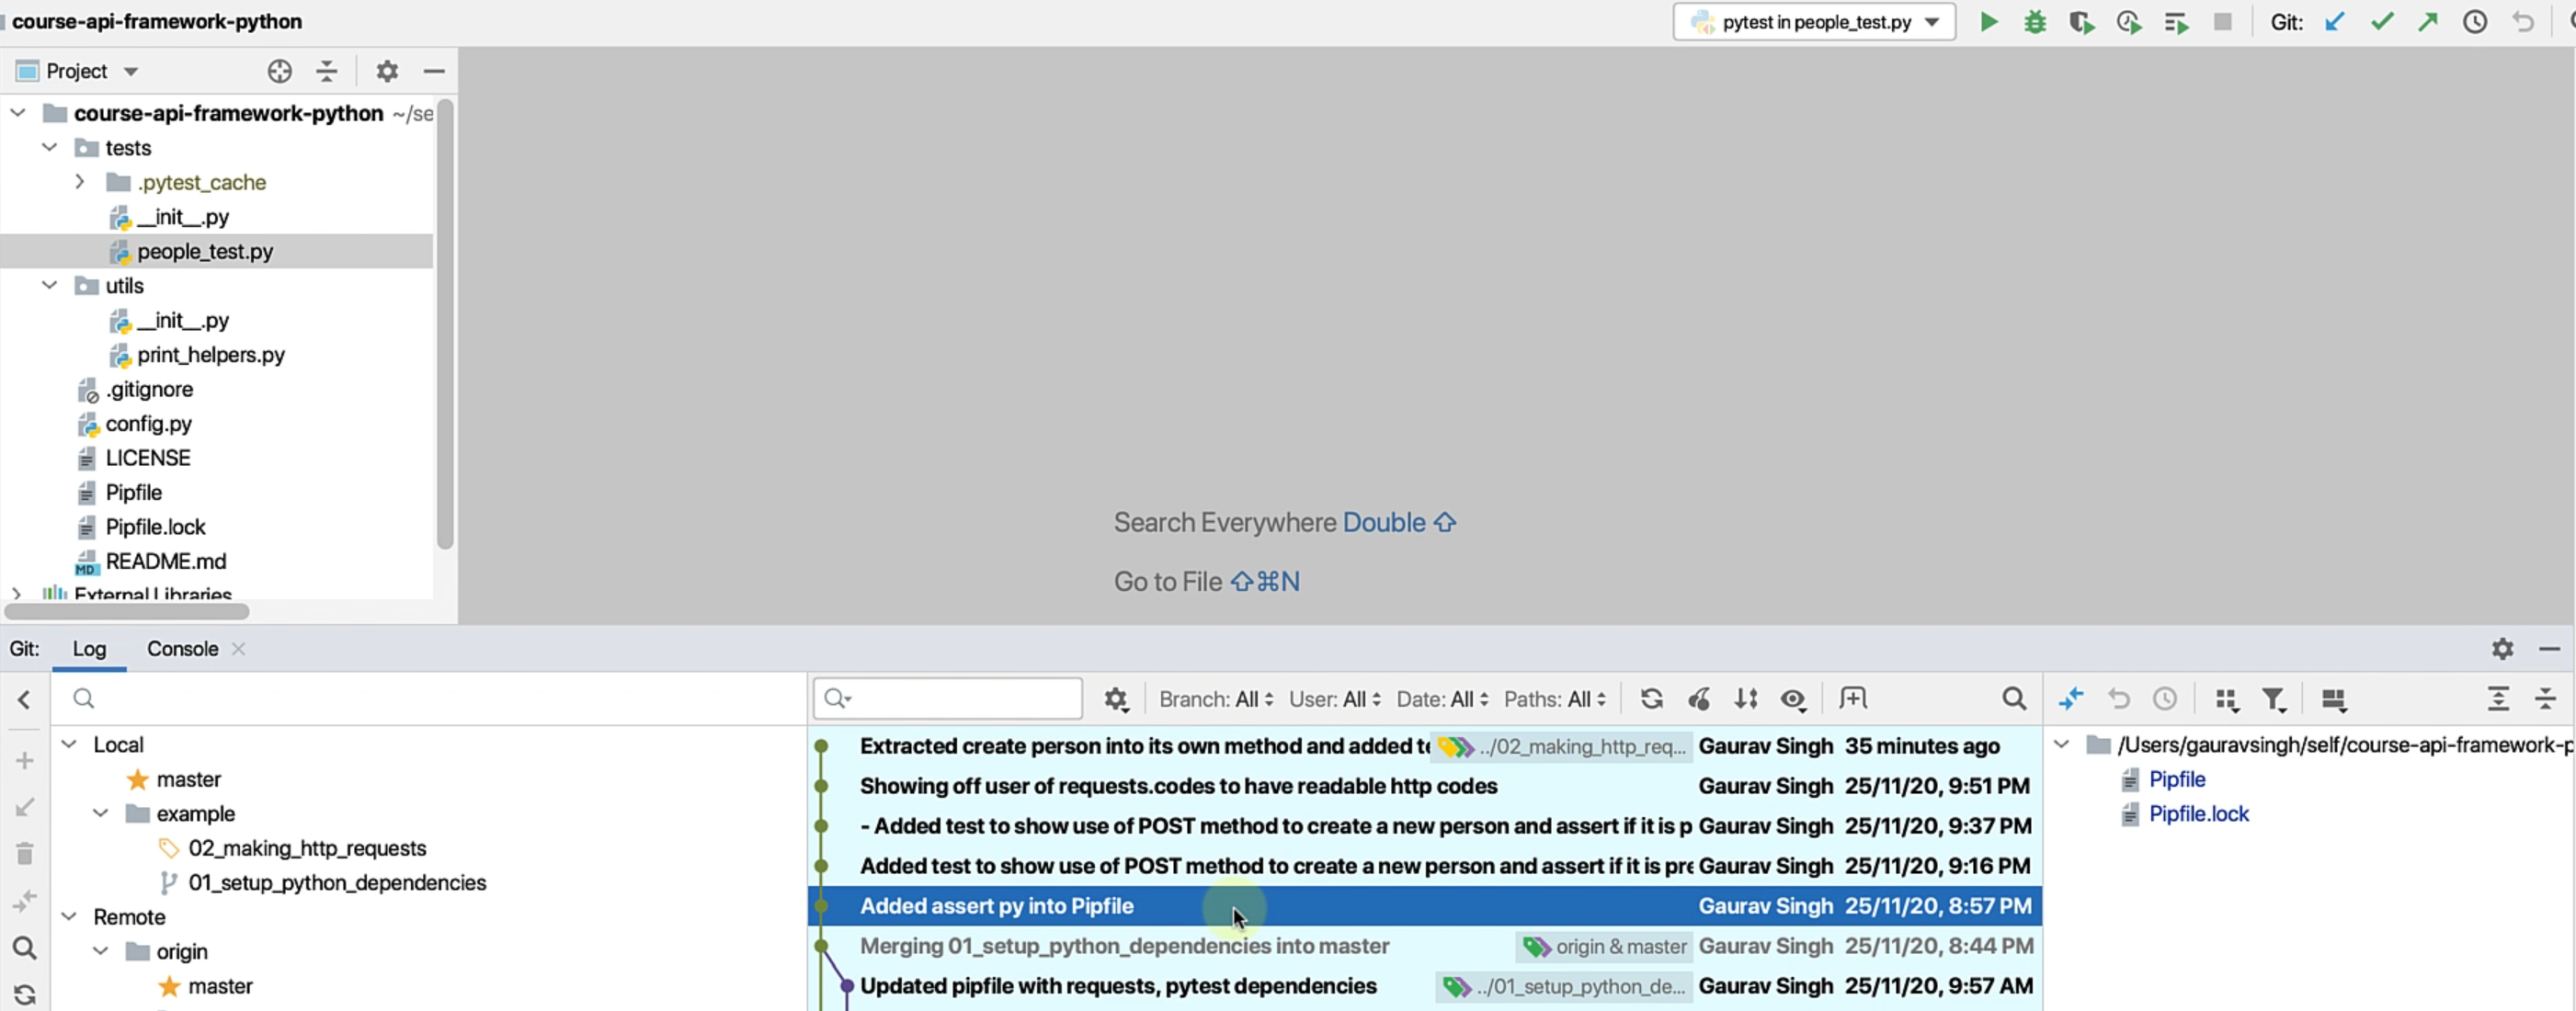
As I already mentioned, every chapter is going to have its own branch.
Right now, you can see that I've already checked out example/02_making_http_requests.
As you can see, in the final version, I have all the tests ready.
Let's go ahead to an older point in time where I just had the basic dependencies set up - this would be a good point - so let me just check out this revision number.
Within our framework project that we have, I have our tests directory, and this is the recommended structure to follow when you're writing pytest tests.
# Using the GET method
I have a simple people_test.py.
Let me just show you what this test is all about.
I have the basic test to read a user from this.
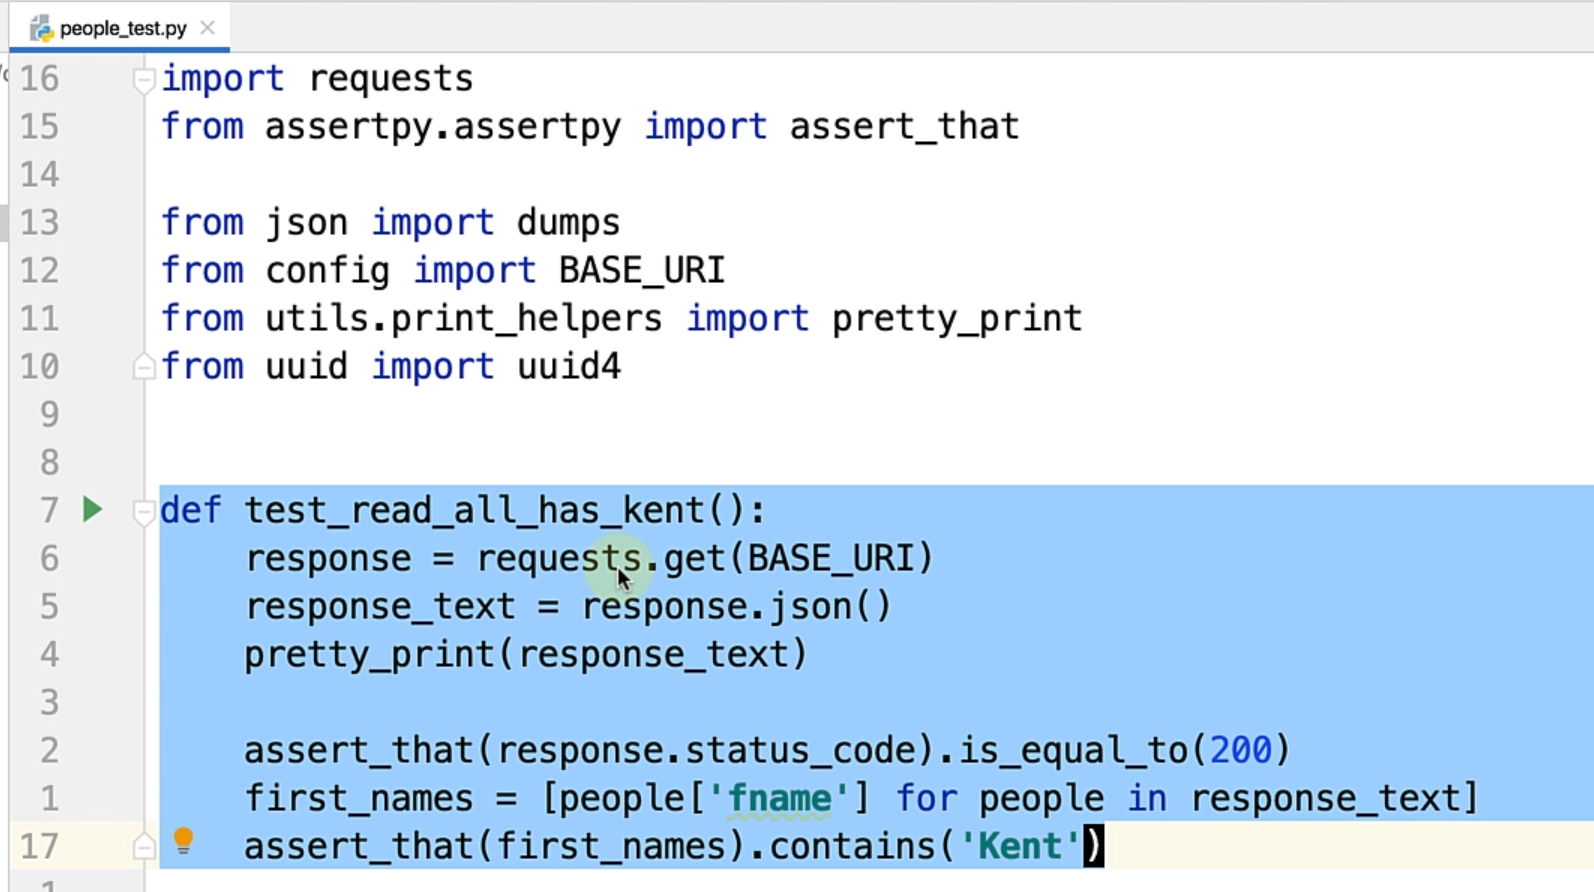
Here, I have written a method called test_read_all_has_kent().
I want to see that when I read from the database, I have at least a user called Kent.
Before starting anything, I'm importing the requests module, and I'm just making a get call and passing a BASE_URI.
If I go to BASE_URI, it just has our application host, port and api/people - the same thing that we saw in Postman, and this is present in our config.py file.

As you can see, this is in the root.
It's always a good idea to make sure your configs are isolated from your actual tests.
Going forward, if this set of configurations starts to increase, then we might see how you can refactor that, but for now, this looks good.
This is the only line that you need to remember to actually make an HTTP request.
response = requests.get(BASE_URI)
This is going to indicate to requests that I want to get and get me the response.
Now, once you get the response, requests actually gives you a bunch of useful properties that you can access.
Here what you see is I have basically converted the response into a dictionary format.
response_text = response.json()
Using the .json method, I can convert a JSON string into a Python dictionary, which I can then assert on and do whatever I want.
Let me just run this test very quickly.
As you can see, in this test, I've made a HTTP request and I'm printing the response.
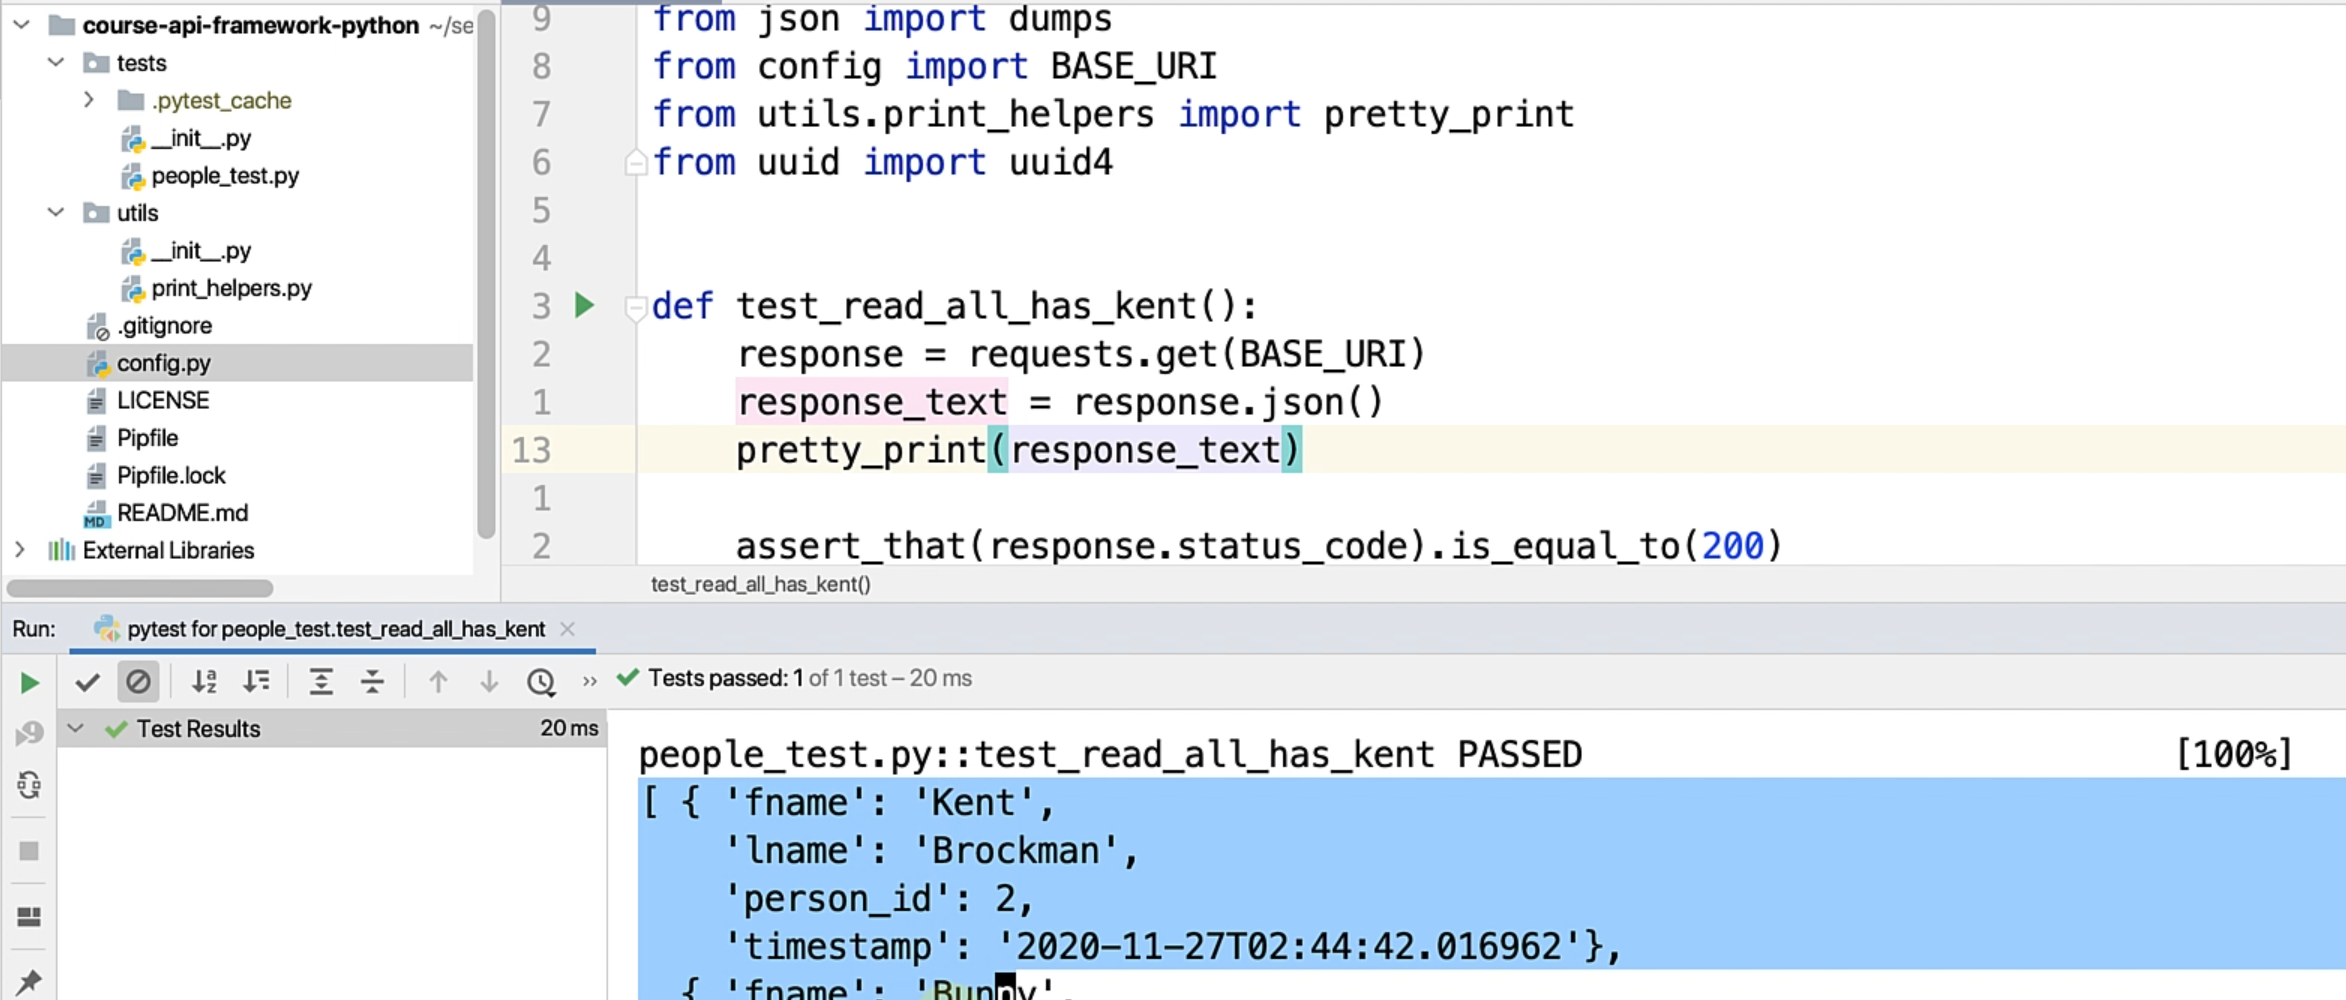
This gives us the same array of people in our database, similar to what Postman gave us.
Then, naturally, after doing any operation, you might want to do an assertion on top.
At this point of time, you can see that what I'm doing is using an assert_that function.
A bit of a quick note on this - assert_that is actually coming from the assertpy module, which is a Fluent library and gives us a bunch of assertions.
So before starting this, you might want to just go ahead and do a pipenv install of assertpy.
As you can see, I've already done that.
What I'm doing here is I want to assert that the response status code is actually equal to 200, which is what I expect.
That is my first assertion and our most common assertion that you might want to do whenever you're testing APIs - whether the status scores are as per what you expect.
Also, what I want to do is make sure that out of the list of users that I have, I have at least one user with the name Kent.
So what I'm doing here is I'm using Python's list comprehension where I'm iterating in the list of people and this is called response_text, but it's actually response.json, so let's fix that and name it peoples.
first_names = [people['fname'] for people in peoples]
It's always a good idea to name your functions as well as your variables something.
So you basically iterate through all the people that you have and for every person, what I'm doing is I'm just getting the first name, since this is basically a list of dictionary objects, and I'm getting fname every time.
This is going to give me a list of first names, and notice that whenever you get a plural value, I have the suffix 's' to indicate that.
These are all small coding practices that you might want to follow to make sure that your tests are very readable.
Lastly, I'm just doing a check that first_names actually contains "Kent".
assert_that(first_names).contains('Kent')
That's our first test with requests and in Python.
Now once you are done, you might want to just remove the pretty_print option.
Why am I using pretty_print and not print?
Let me just show you that quickly.
I'm using the pretty_print module from Python, which actually indents your response JSON in a more readable format - otherwise, you may just get it in a single line.
So I've just written a convenience function in utils/print_helpers.py, where I'm just giving the msg and I'm indenting it with the required indent.
Now that we're done, I don't need this in my test and that's pretty much it.
Now you know how to make a get request, which is pretty simple and probably something that you will use a lot.
# Using the POST method
Let's see how you can actually create a person using the post method.
If you remember from Postman - I'm just giving you a quick highlight - the thing is you need to select POST method, you need to give a payload and you need to have a couple of headers.
Let's see how a test for this will look like.
Here, I have a test function test_new_person_can_be_added, which creates a new person into the system and then checks whether the new person is already present.
Before doing that, notice that I have created a payload, which is the actual body that I want to send.
    payload = dumps({
        'fname': 'New',
        'lname': unique_last_name
    })
Here, I have the actual payload as a Python dictionary.
I'm always keeping the user "New", but I want to make sure that these users are always unique because if I don't follow that - let me just show you that very quickly.
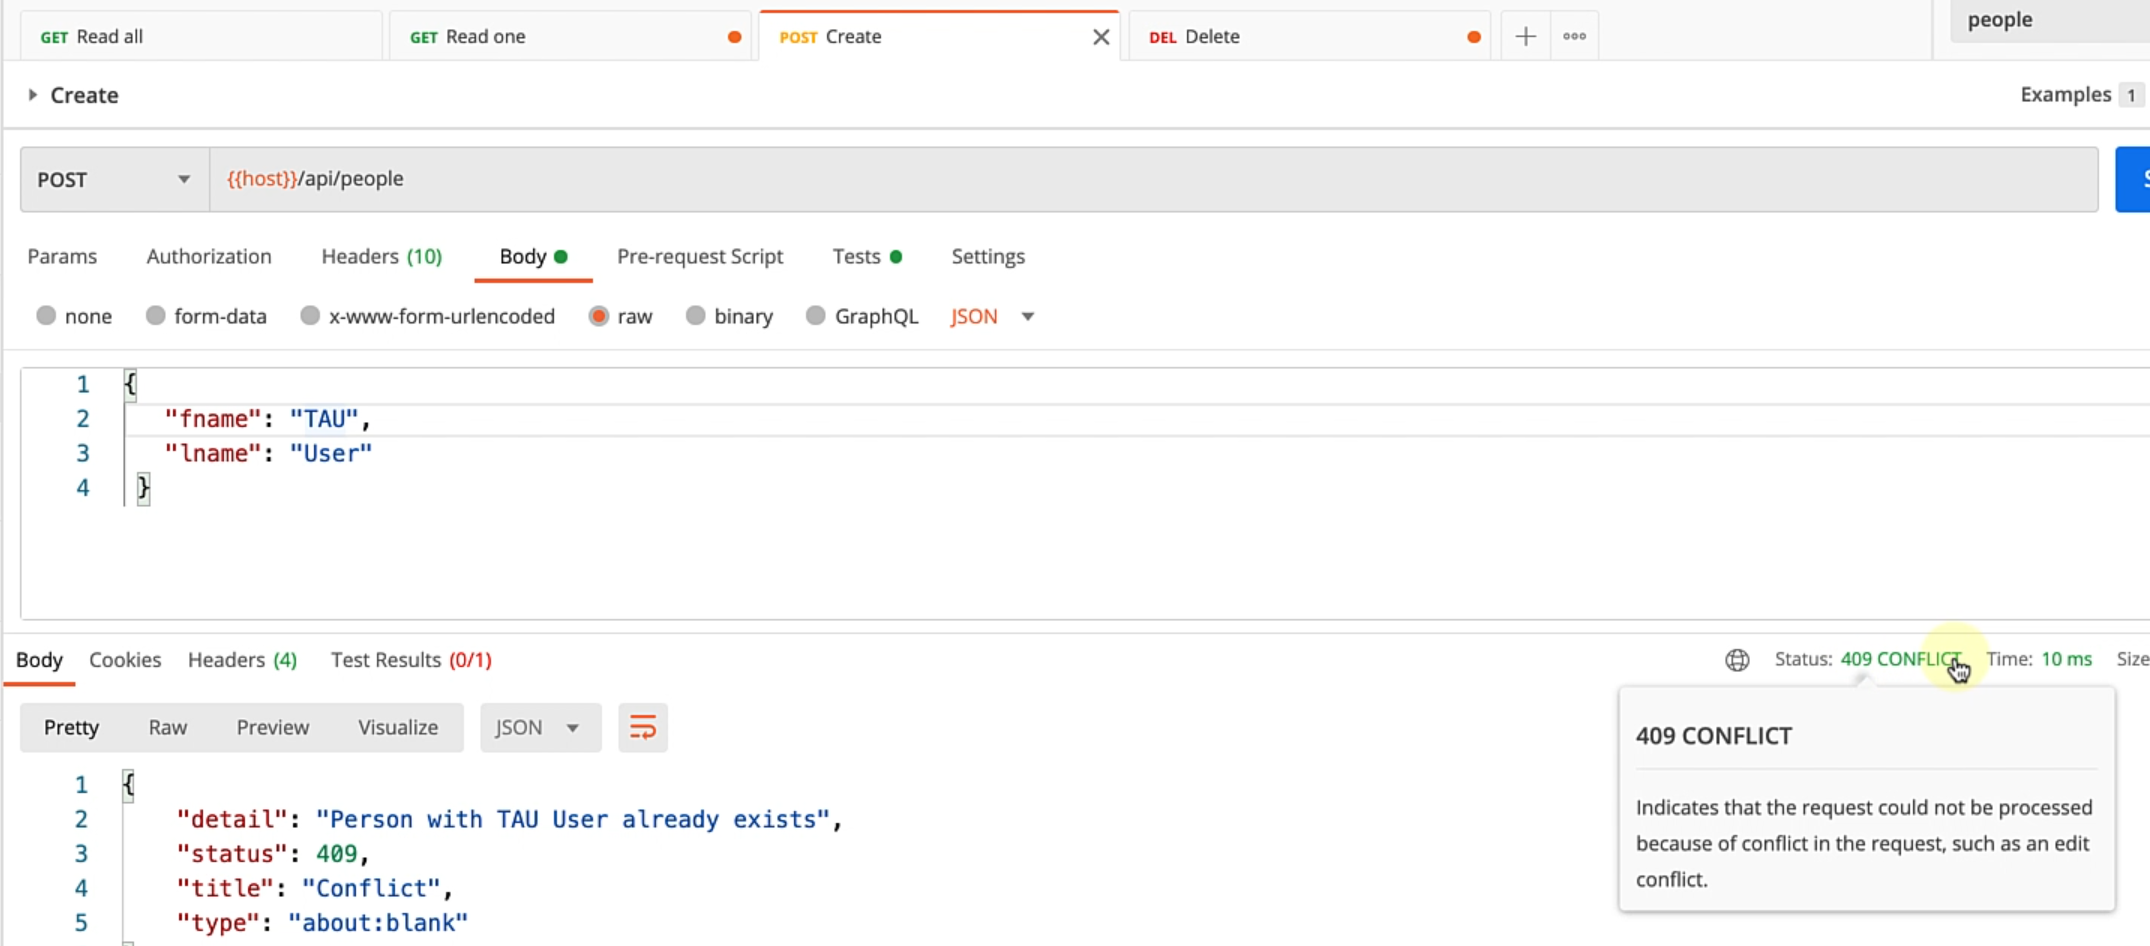
If I have a user "TAU User" already, and I try to create him again, then I get a "409 CONFLICT", so I want to make sure that any new user that I create is always going to be unique.
So, for that, I want to get a unique string.
One way of doing this - you can use timestamps if you want - but one way to get a unique string is to use uuid4, and as you can see, I have from uuid import uuid4 module and I'm just converting it to string.
This syntax f'User is actually the F string syntax in Python, wherein I can just do string interpolation very easily - in essence, just substitute bits of string and make it more readable - much better than the string.format or the more ugly pluses everywhere.
As you can see, I have this unique_last_name already done, and I'm always making sure I get that as a payload that I'll use.
Also, notice that I'm using the dumps method here - you can see I'm importing from json import dumps.
What this does is it takes a Python dictionary and actually converts it into JSON - it does the serialization for you.
Next, I have the headers dictionary where I'm just specifying the Content-Type and the Accept to both application/json, so that my server knows that I'm going to send JSON and expect JSON back.
    headers = {
        'Content-Type': 'application/json',
        'Accept': 'application/json'
    }
If you want to know more about this, I will have a link for this in Resources.
You can go to Mozilla Developer Network and just read about these headers to know more - I always do whenever I get into a pinch and I don't understand something.
Next, this is the main piece of code that's doing all the action.
response = requests.post(url=BASE_URI, data=payload, headers=headers)
As you can see, I am doing requests.post - it's as simple as calling the HTTP method that I want to use and giving the url the BASE_URI.
In this case, I don't need to pass any person_id or whatever.
The key thing to specify is that I want to pass it a payload with the data keyword argument.
I have keyword arguments here - you can skip these if you want - let me just show you very quickly how it is.
If you just pass them in order, you don't need to really give the keyword arguments, but it's a better practice and gives it more readability.
I have payload and I'm passing the headers.
After the request is made, I'm just checking that the response status code is equal to 204 also.
I want to make sure that once a user is created into the system, I actually see it in the list of persons.
Here, I am doing the same thing - I'm doing a get request, I'm converting the response into JSON, and then I'm just filtering for that particular person.
peoples = requests.get(BASE_URI).json()
is_new_user_created = filter(lambda person: person['lname'] == unique_last_name, people)
This is using filter syntax in Python, but if it is slightly ambiguous to you, then you can still go for something like list comprehension.
In fact, on the second thought, let's just do that very quickly.
I want to basically get new_users, and I want to see for every person in peoples, if the person's last name lname matches what we had originally set, then I want that person to be in this list.
peoples = requests.get(BASE_URI).json()
new_users = [person for person in peoples if person['lname'] == unique_last_name]
assert_that(new_users).is_not_empty()
Once this list comprehension is done, I want to make sure that this list is not empty because it should have at least one record with the user that we just created.
This seems to be a bit more readable than the earlier filter and lambda, which might be a bit more scary.
Let's run this test and see what happens.
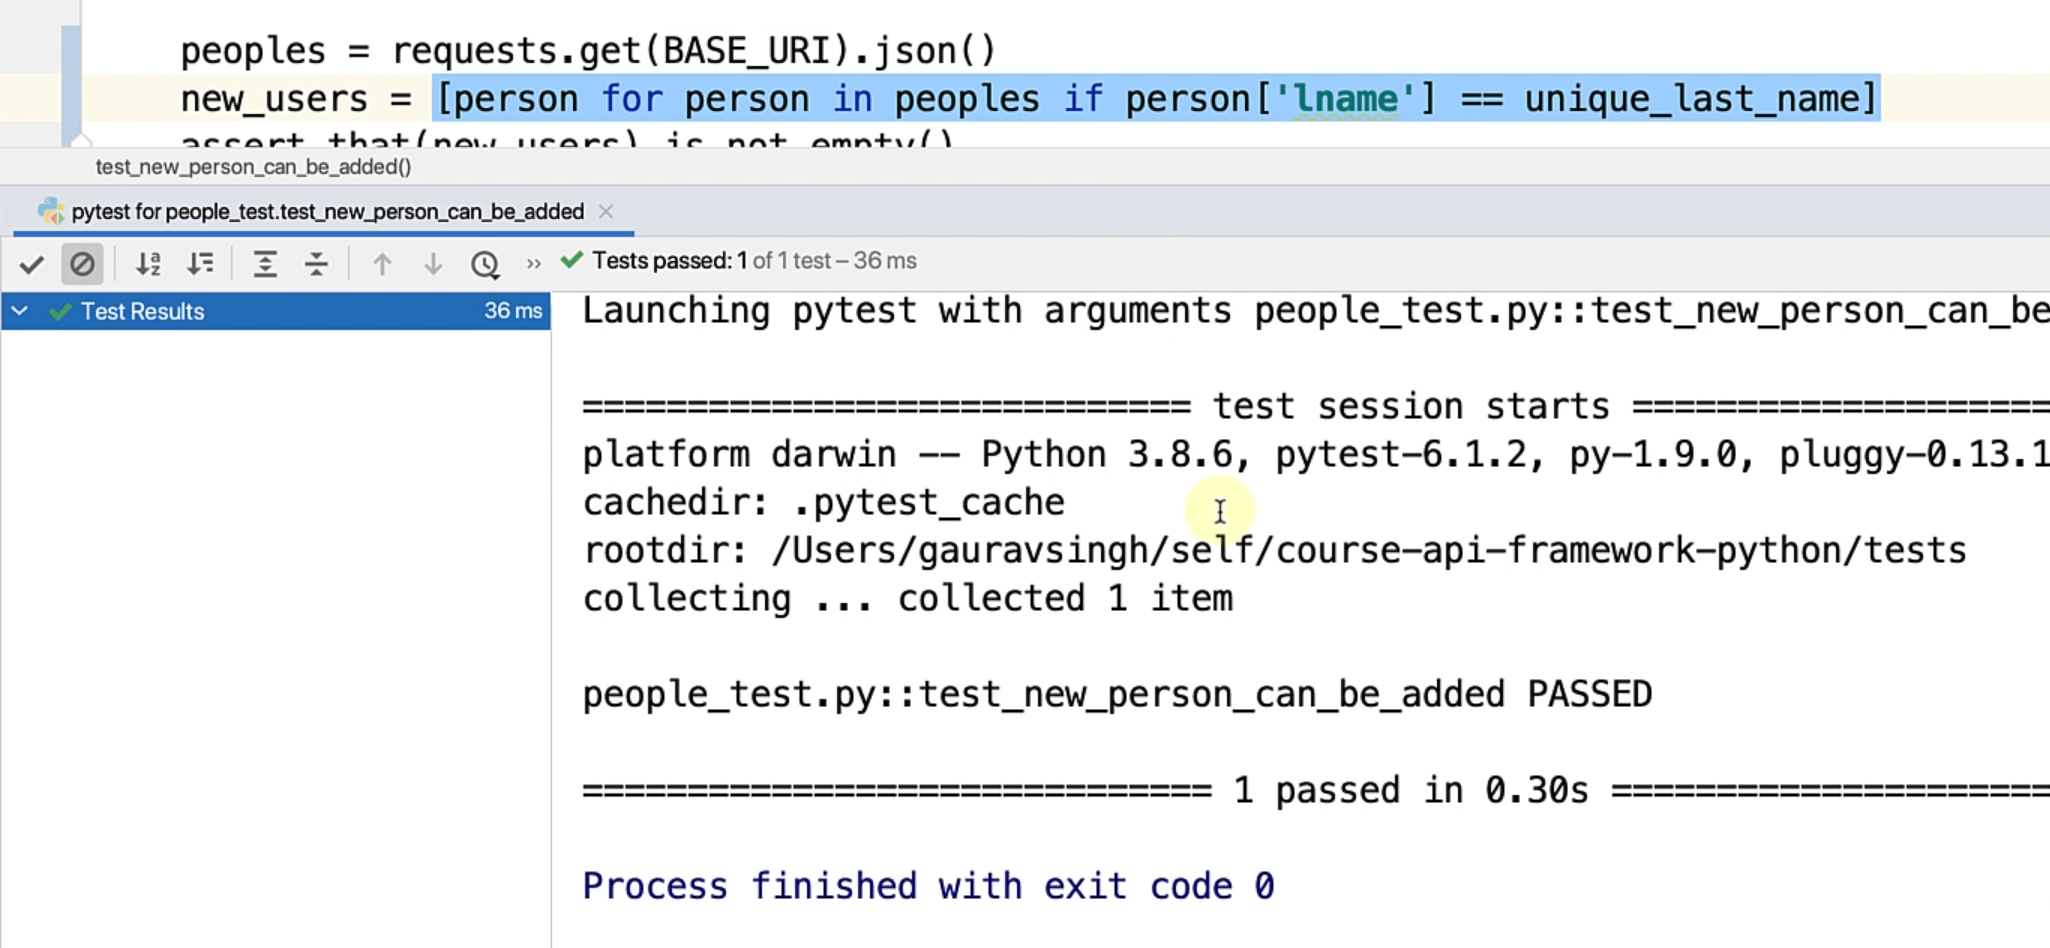
So the test passed and as you can see, it does all the things that we want it to.
# Using the DELETE method
Now you know how to make a GET request and a POST request.
What if I want to delete, as we discussed earlier?
Let's just go ahead and do that quickly.
So what I want is - if I want to delete a user, I obviously want to create my own data and not work on existing data.
This is always a good practice to make sure that your data and your tests are very deterministic.
Let's just do that - create a new user and then be able to delete that.
As you can see, I already have the entire logic to make a POST request and create my user.
Let me just extract this - I'm using Pycharm's Extract Method refactoring.
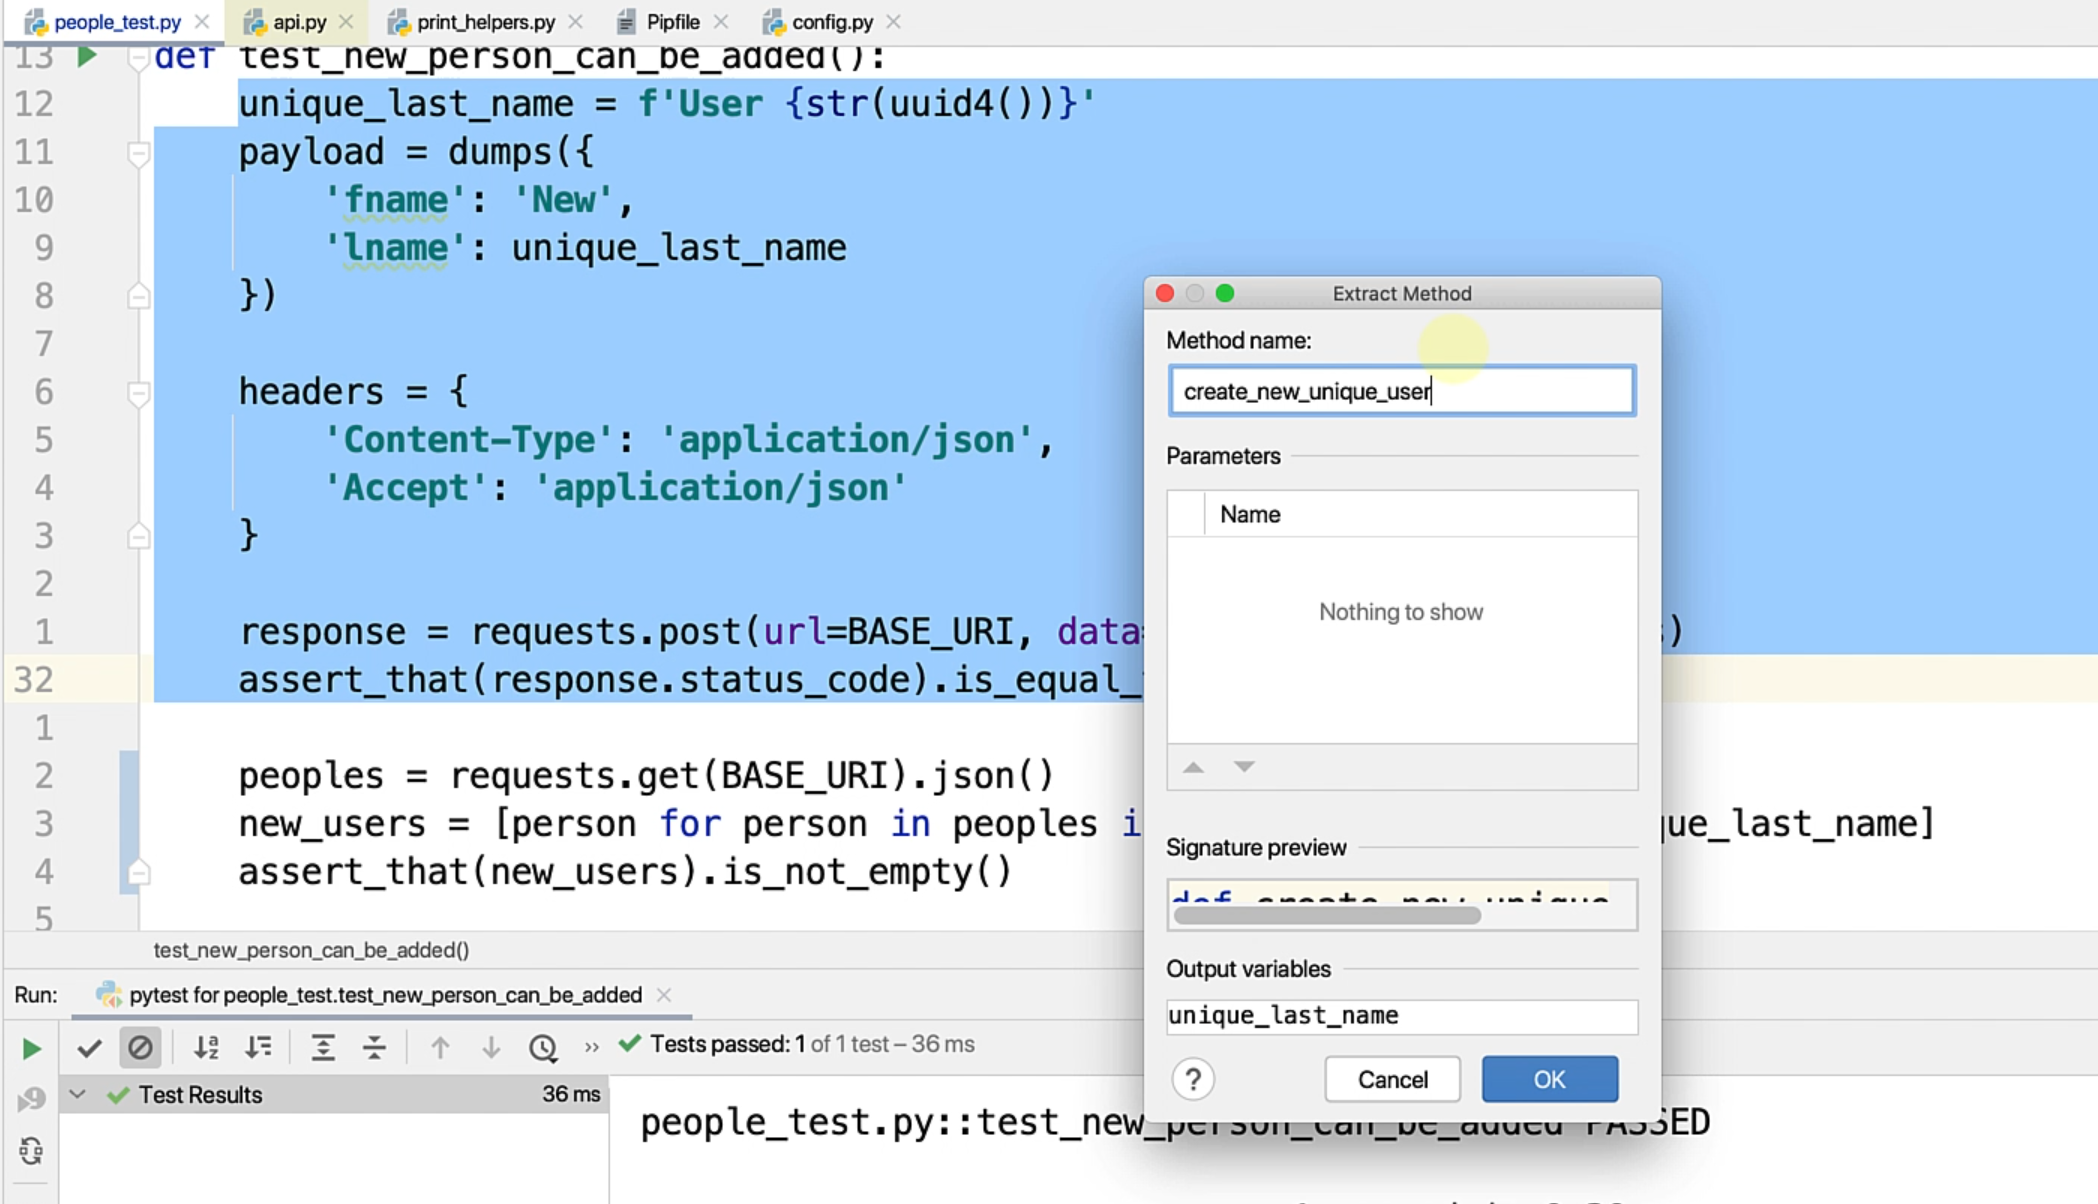
What I'm doing here is - let's just say - I want to create a new unique user.
So this is going to extract the whole piece of code and give me a function create_new_unique_user.
Let's just see that we have not broken anything and run this function again.
It still passes - always a good practice whenever you do any bit of refactoring.
Let's create a new test test_person_can_be_deleted.
I want to make sure that I can create a new user, so let me just call that function.
So I have a new_user created - what I want to do is figure out its ID and then use that to make our delete request.
To do that, you know how to actually get a particular user already from the system.
Let's just say that I want to get all the users - how about we just extract this?
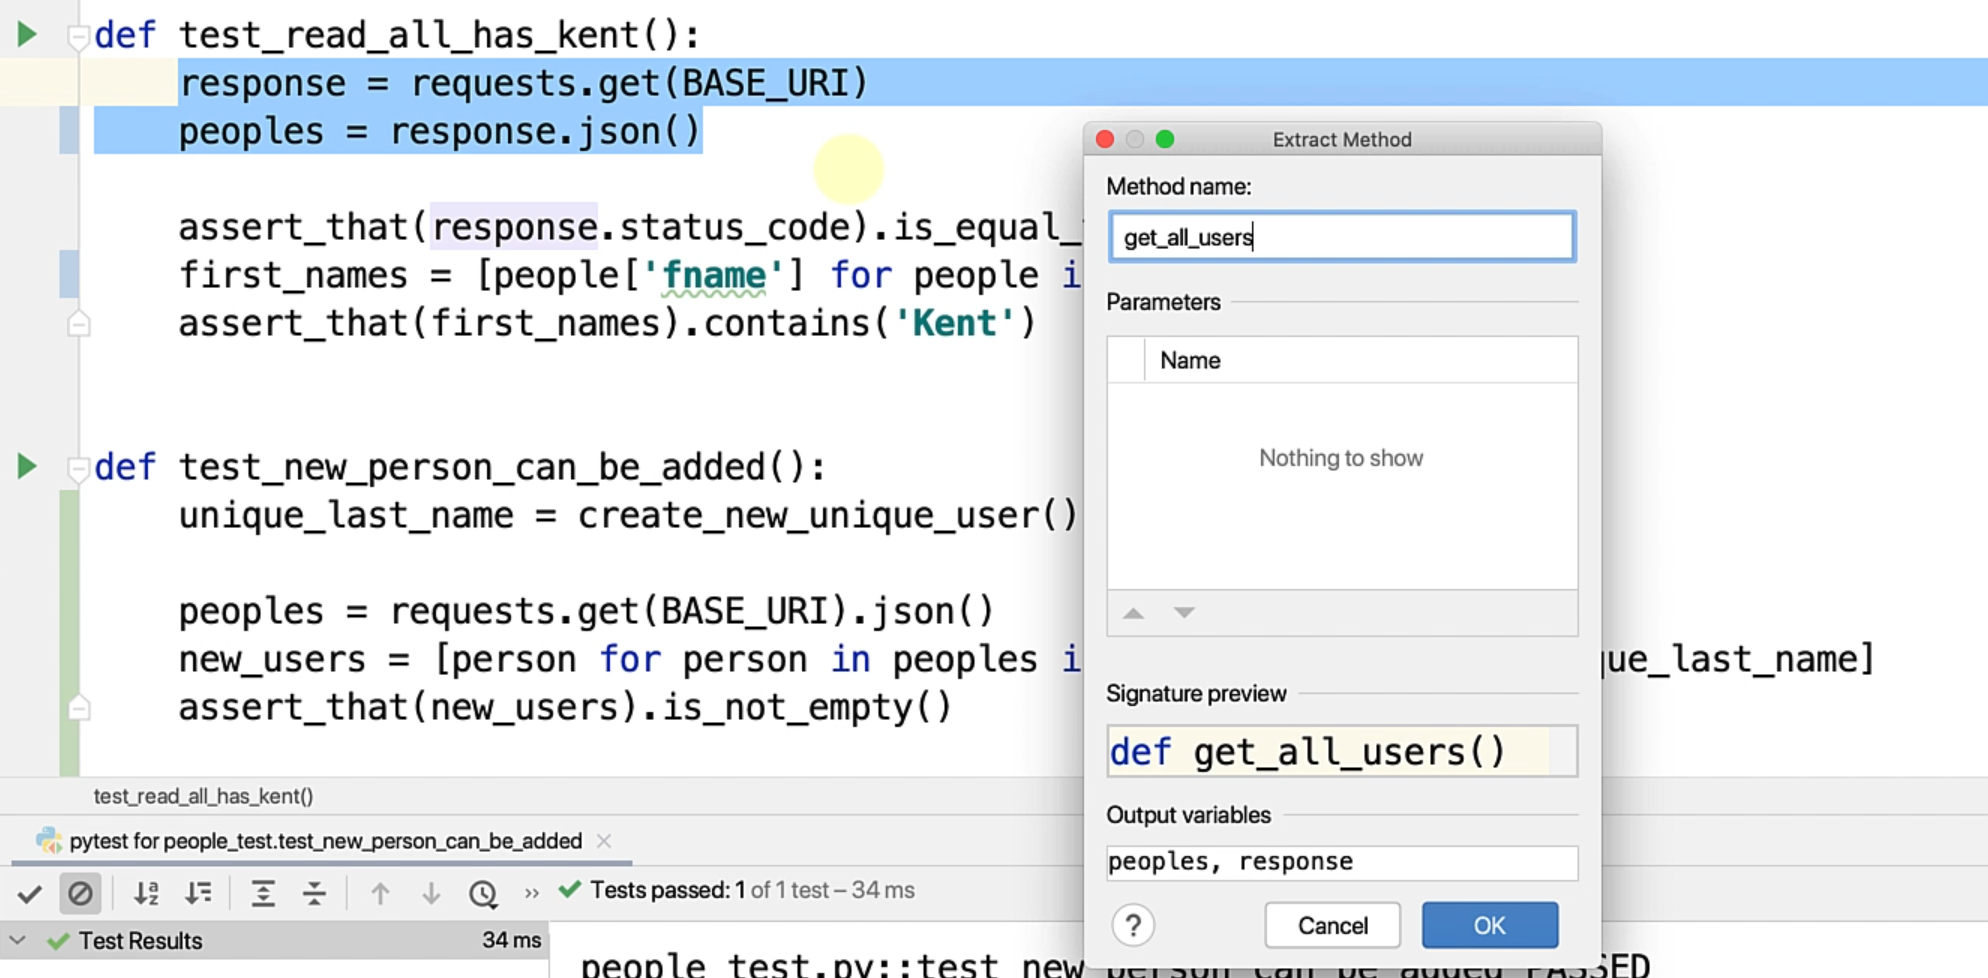
So get_all_users as a function.
Notice that it's returning peoples, as well as a response - we'll just keep this for now - though you might want to refactor this slightly more.
So how about I get all the users and I'll say something like get_all_users, then I don't need the response so I'm just going to give an underscore _, which means that the 2nd variable is not used.
I don't really need the second variable, so Python is just going to ignore this and I don't need to bother creating a variable into the namespace.
def test_person_can_be_deleted():
    new_user = create_new_unique_user()
    all_users, _ = get_all_users()
Now that you have the users and all users, obviously, I want to search for a user based on the last name.
So how do I search?
As you can notice, we already had this as an assertion, where I'm searching whether all the users actually has the one that I'm looking for.
[person for person in peoples if person['lname'] == unique_last_name]
So this is good - let me extract this as search_users_by_last_name.
This accepts a list peoples, accepts the unique_last_name and returns me the filtered list.
Let me call this and give it all_users, as well as the new_user_last_name.
This should give me the new user as a list, so let me just get the first one.
def test_person_can_be_deleted():
    new_user_last_name = create_new_unique_user()
    all_users, _ = get_all_users()
    new_user = search_users_by_last_name(all_users, new_user_last_name)
Before we proceed further, let's just see if we are on the right track and let's run this.
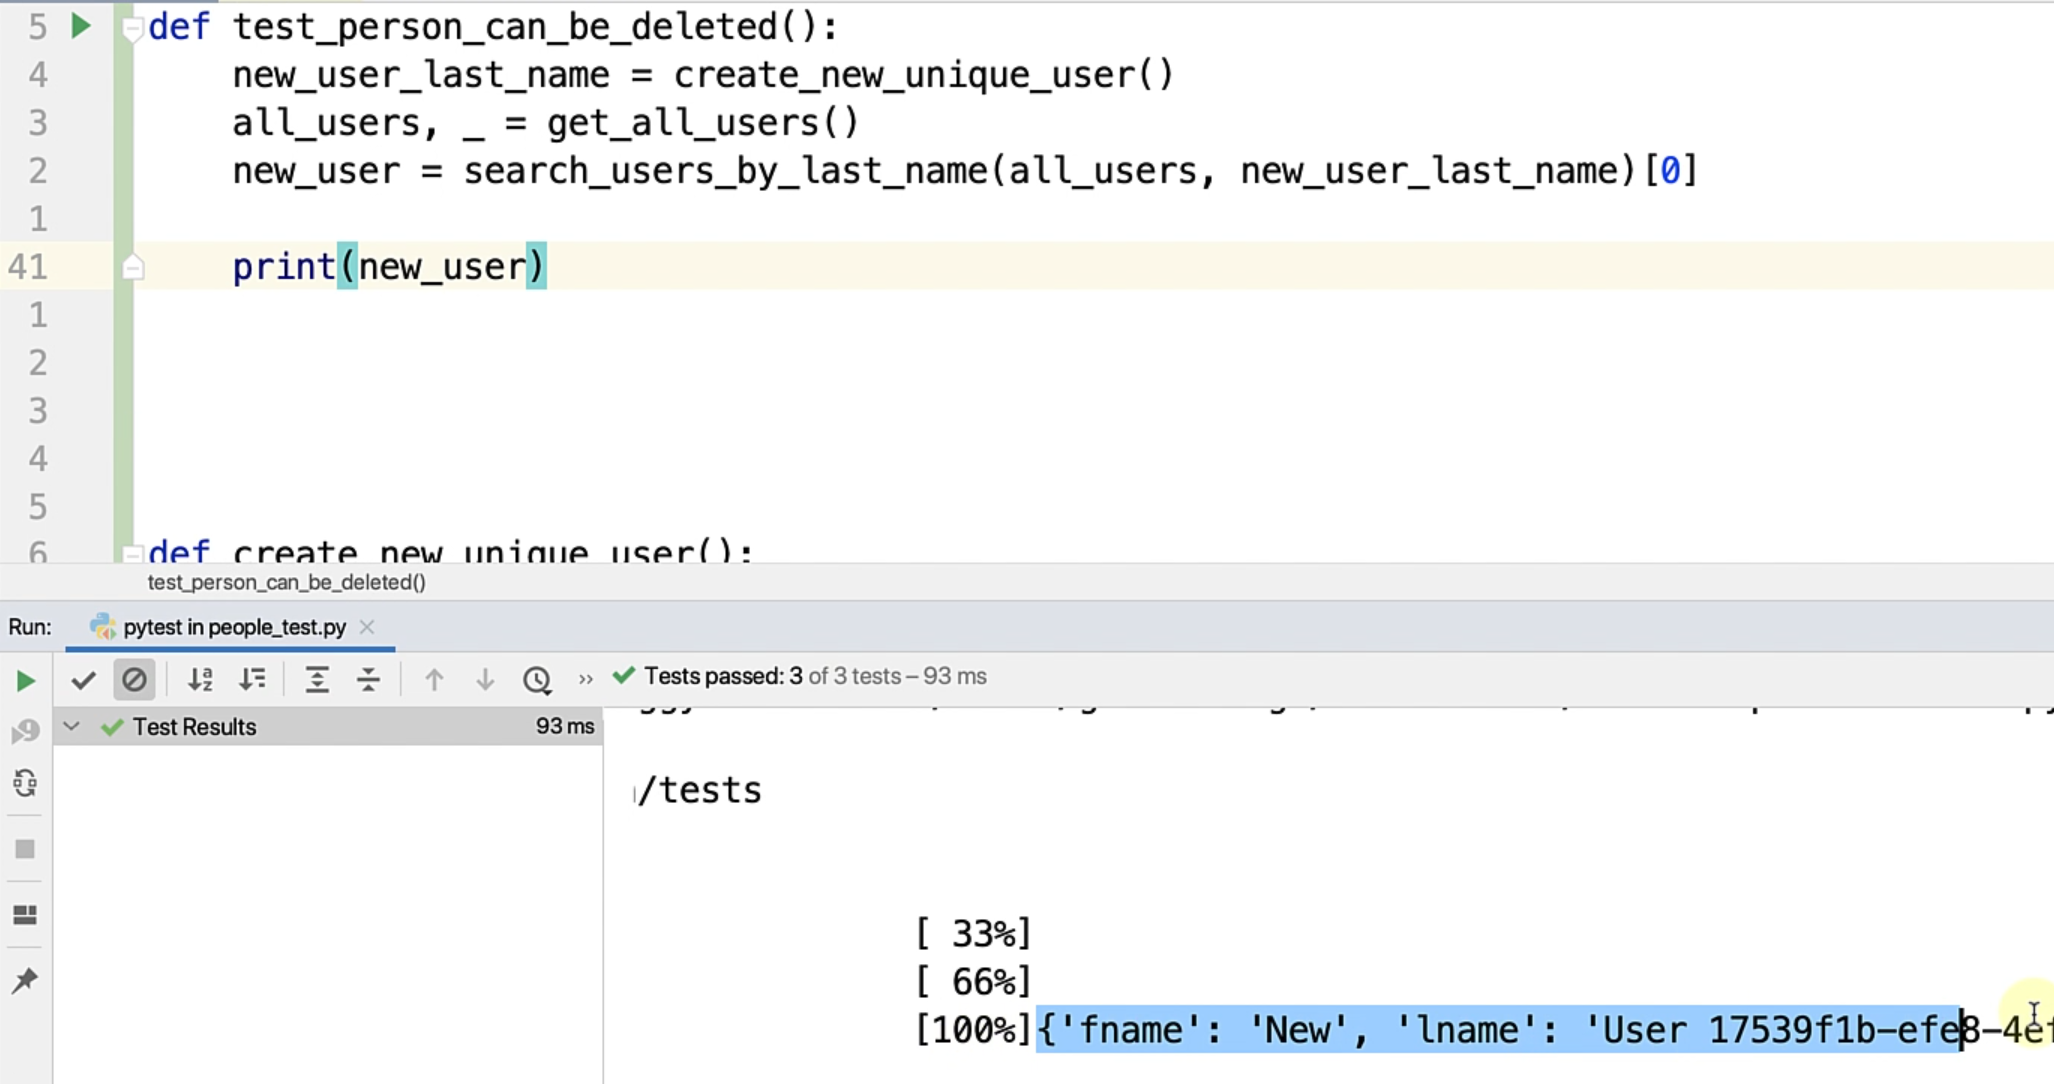
Here, I got the result of the new_user with a unique uuid and person_id 8. Awesome.
We can continue doing this or make sure that we delete the data that we created - so let's do that.
We know that we have new_user as a dictionary, so I can very well just get the person_id out of it.
I need to set person_to_be_deleted and say from new_user, get me the person_id.
def test_person_can_be_deleted():
    new_user_last_name = create_new_unique_user()
    all_users, _ = get_all_users()
    new_user = search_users_by_last_name(all_users, new_user_last_name)
    person_to_be_deleted = new_user['person_id']
Okay, so this is all set up where we have created a new user, we have gotten them from the list of users and now we want to delete.
So how do you actually go about deleting the user?
Again, it's quite simple.
You go to requests.delete and you pass the URL.
In this case, the URL is slightly different as we have to pass the person_id in the path parameters, so how do you do that?
So let's the url to f'{BASE_URI} and I want to also give the person_id, so I'll add person_to_be_deleted.
I'll get the response and then assert that this response.status_code is equal to 200.
def test_person_can_be_deleted():
    new_user_last_name = create_new_unique_user()
    all_users, _ = get_all_users()
    new_user = search_users_by_last_name(all_users, new_user_last_name)
    person_to_be_deleted = new_user['person_id']
    url = f'{BASE_URI}/{person_to_be_deleted}'
    response = requests.delete(url)
    assert_that(response.status_code).is_equal_to(200)
Let's just run that.
Wow, it passed in the first shot - that's always a surprise.
So now, this means that you are able to do a delete.
If you want to be very particular, then you might want to do a GET again and see that the user that you just deleted is not present in the system.
For the purposes of that, I leave that as an exercise to you.
# Using the PUT method
How do you go about doing the PUT operation or the update operation?
It would be very similar to what you have already done in terms of POST and DELETE.
Go ahead and try that as a method - if you want to just create a user and try to update it and try to write that test function.
Obviously this is just the beginning of what requests can do.
This can be used in n number of ways.
You can use a multi-part, if you want, if that's a requirement for you.
Going into all those use cases would be a bit more exhaustive.
What you can do is go to Quickstart — Requests 2.25.1 documentation, and here, Kenneth Reitz, who is the original author of this and has created this wonderful module, has given a lot of documentation about what this library can do, how you can make use of it, and you are welcome to go ahead and read this.
I just wanted to wrap this chapter up with one final goody that requests actually provide.
You have this 201 code, but it's very difficult to always understand what that is.
So, what you can actually do is use requests.codes and requests actually gives you a lookup dictionary of all the codes that are there and a readable message.
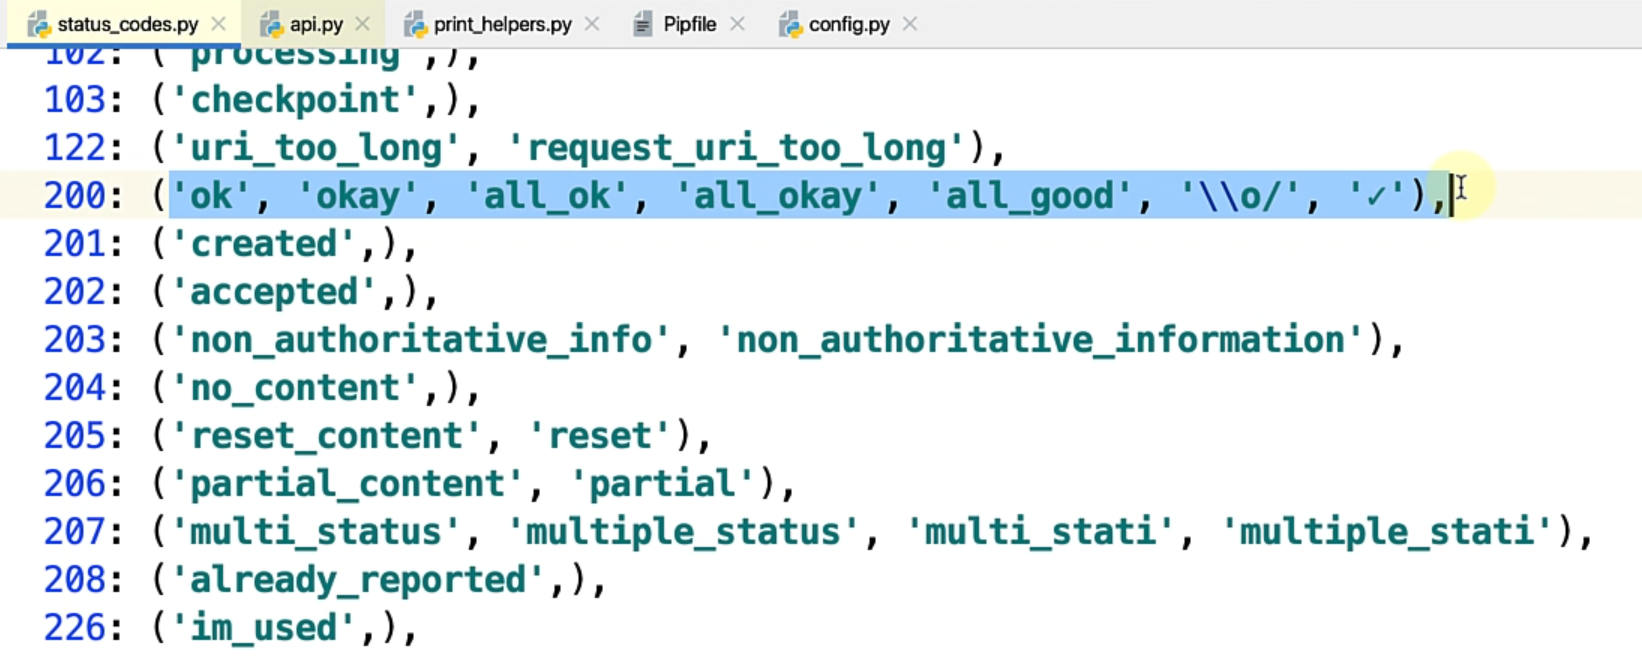
In this case, since it's 200, I just want to assert that my API has returned 200.
I can give any of these codes as a verification - notice that there is even a check mark here.
So, I can just change 200 to requests.codes.ok and just run the test - and it still passes.
This is a very readable way to have your response codes, all through requests magic.
That's about it for this chapter. I hope you had a good idea of how to work with APIs using requests in Python.
Obviously, this is a start. We are going to elaborate more in further the chapters, so I'll see you there.
