

Transcripted Summary
We are now going to set up the base knowledge by looking at the basic Git concepts, initializing and adding. If you know these concepts you will be ready and armed for the upcoming chapters.
Okay, let the fun begin. In this part I'm going to introduce you to the “Bowling Star” story.
What, why a story? Well, that's because there is lots of theoretical stuff to digest in this and the next two chapters. To make life easier for you, we're going to practice the moves we learn by doing some hands-on exercises based on the storyline.
So here is the story.

This is Jessica, Lisa and Ryan. They are all working for a company called Rockmoon Games, one of the biggest game development studios in the world.
Ryan is a game developer and has a brilliant mind. He is skilled in multiple programming languages. In his career he was part of several teams who developed a few blockbuster games for Rockmoon games. He's known for his critical speed in writing code.
Unfortunately, he's also known for that his code is often error-prone and in not writing any test automation code for it.
Lately, he wrote a new potential blockbuster game all by himself named the Bowling Star. The game is written in Java, has no tests and there is also no source control in place for it. How bad is that?
Jessica is a test automation engineer and well-known inside the company for her excellent communication skills. She is knowledgeable in JUnit 5, the next generation framework for test automation on the JVM.
She knows very little about the version control system Git, yet, but is eager to learn it. She has been given the task to get the version control system Git in place and write some test automation code for Ryan's production code.
Lisa is also a test automation engineer in the company, she's an amazing person and gifted with extraordinary collaboration and exploration skills.
She has been given the task to collaborate with Jessica and helping her out in implementing further JUnit tests once Jessica has done the initial setup.
Then, in the dark behind these three sits The Management.
Before the game can be released to the public, the management knows that it needs to be properly tested. They know that in order to do continuous delivery for the customers, they want to have a proper version control system in place.
And of course also some test automation code.
Jessica's task in this part one is to set up a Git repository in the company's repository manager for the game, The Bowling Star.
This project shall control Ryan's production code and the first piece of test automation code which Jessica implemented with JUnit 5.
Our task now is to help her with that, but in order to start helping, we first have to learn the basic concepts in Git.
So, let's give it a go and dive into the basics so that we can help Jessica to get up to speed.
# Fundamental Git Commands
But wait, before that I have to show you 4 fundamental commands which you need to know beforehand in order to work smoothly with Git.
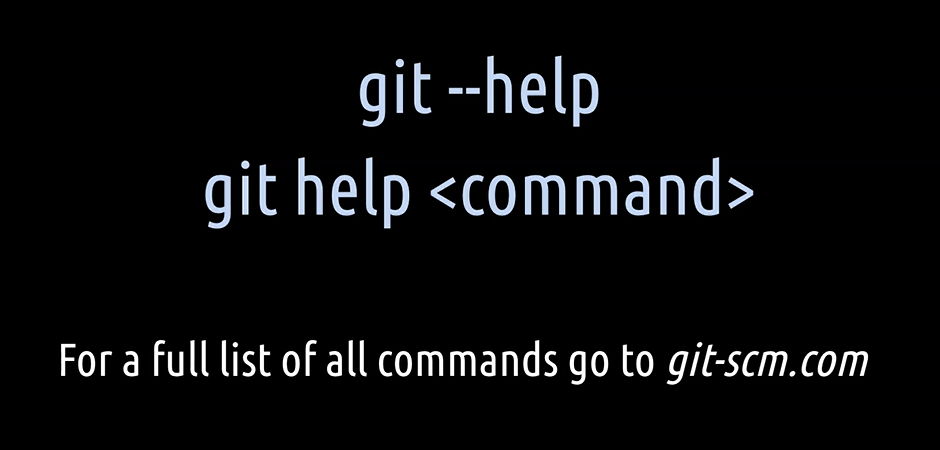
The first one is git –help.
When you hit this command in your terminal, Git will give you a list of its most common commands. git –help followed by a specific command will give you a full detail description of that particular command.
For a full list of all commands, you can go to git-scm.com.
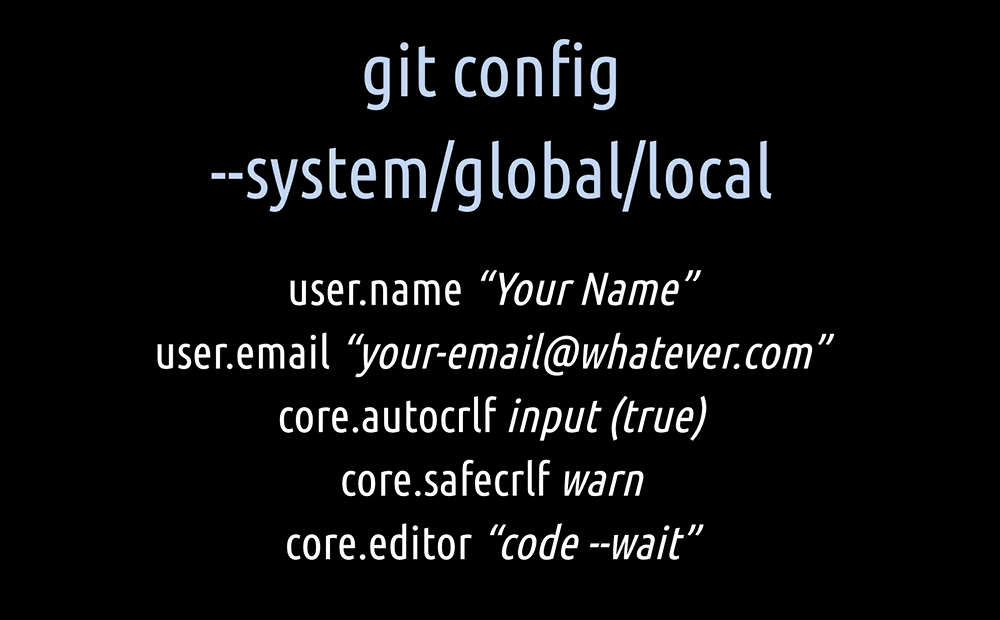
With the second command, git config, you have to first set your user name and your user email address. Git will then associate every single commit with these two things.
Then you have to tell Git how it should handle the line endings, carriage return and line feed on your machine, depending on the operating system you have. This is done with the configuration auto control line feed (autocrlf) and safe control line feed (safecrlf).
Optionally, you can also set your preferred Git text editor you want to use, otherwise it will open up your system’s default text editor. On Mac or Linux, this is in most cases Vim. On Windows, you should have been prompted to choose one during the Git installation procedure.
By amending the option --system, --global or -- local, you tell Git for which scope on your machine you want to set a specific configuration.
System contains configurations for every user on all their repositories on one machine
Global host the configuration for one particular user
Local contains the configurations for a specific repository
If you don't explicitly set an option, Git uses the local scope by default.
Besides user name, user email, core editor, carriage return and line feed, there are also several other configurations you can set with Git config. You will find more information on that in the source section of this chapter.
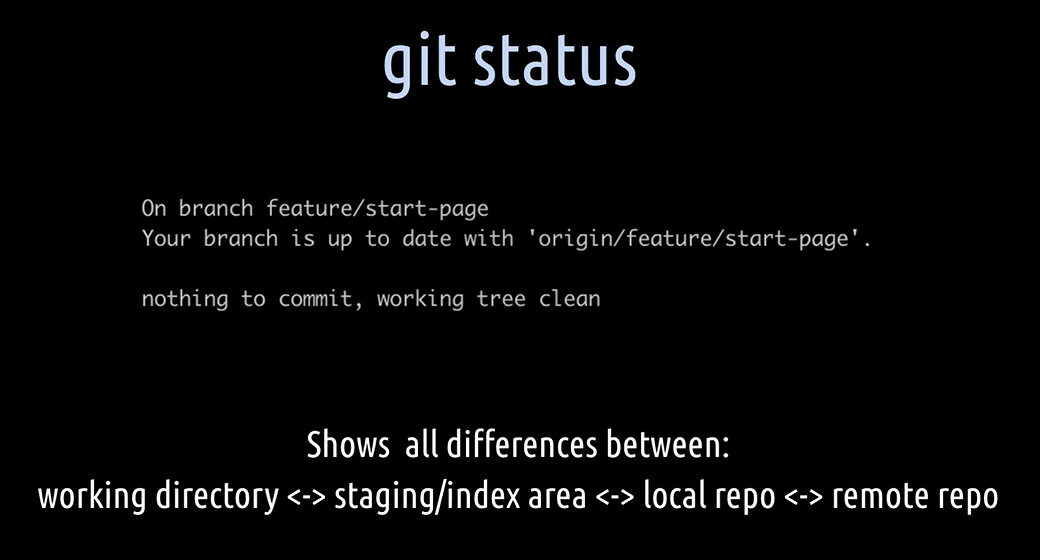
With the third command, git status, you are able to see all the current path differences between working directory, staging index area, local repository and remote repository if you have configured a remote one.
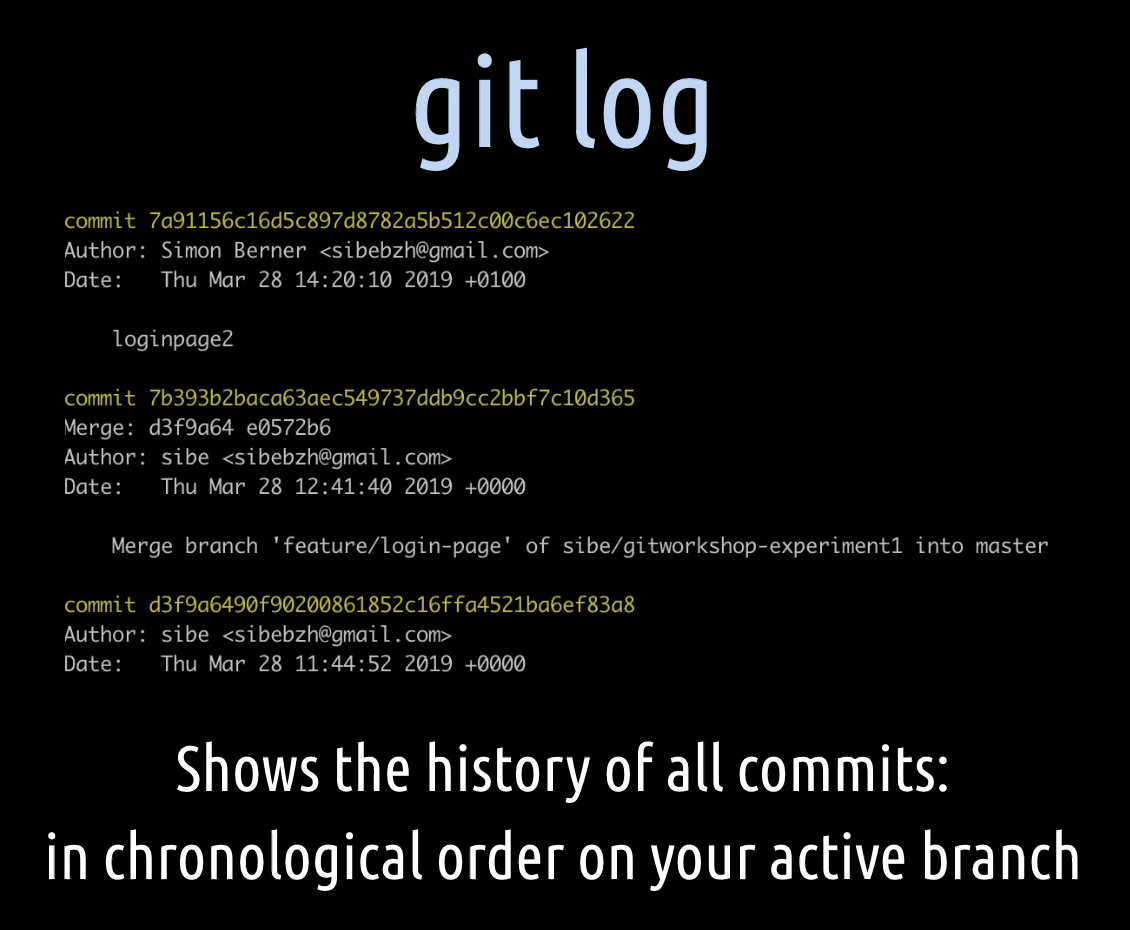
The fourth command is git log.
With git log, you can see all the commits which were created on a branch. It shows you the whole commit history including the hash, the author, and the date of the current active, which means checked-out local branch.
NOTE
At this point, I would like to mention that for each of the commands in Git, there do exist a couple of additional options you can concatenate, but we won't go through them in this course. That's something you can read up on your own in the official online Git documentation.
# Getting Started with Basic Git Concepts
Now the time has come to dive into the basic concepts. The first one we are starting with, is initializing.
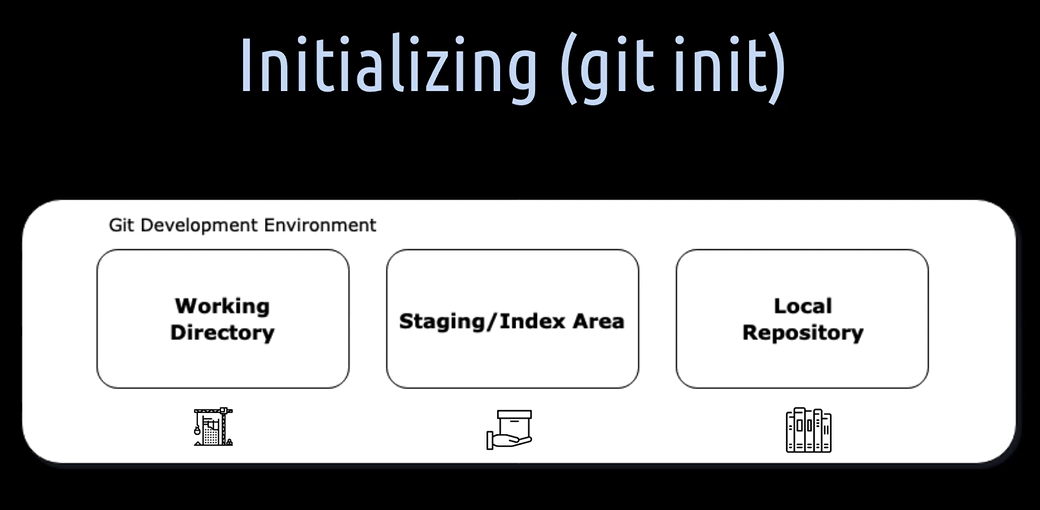
When we initialize a repository locally, we will get these three boxes. They represent the development environment. As we already learned, these boxes are called the three Git trees.
Let's have a closer look at these three Git trees.
The first box is the working directory. That's the construction site or the place where we actually work on our project files.
The second box is the staging or also called index area. That's the place where we package the files for a commit.
The third place is the local repository. That's the place where all the created commits and other objects are stored.
We will see in a minute where all these things exactly are on the local file system.
By initializing a Git repository (using git init) a hidden directory named “.git” is created.
This directory contains the index file, the local repository and all the other information that is necessary for our project. Information about commits, remote repository if available, addresses, a lock which stores the commit history, et cetera.
You can see the “.git” directory is a bit of a magic place where we put our magic show in.
If we want to destroy a local repository, we just have to re-delete this folder. That is why this folder is hidden to omit that we accidentally deleted.
# Okay, let's start helping Jessica.
Jessica has already set up the project locally in her ID and is ready for Git.
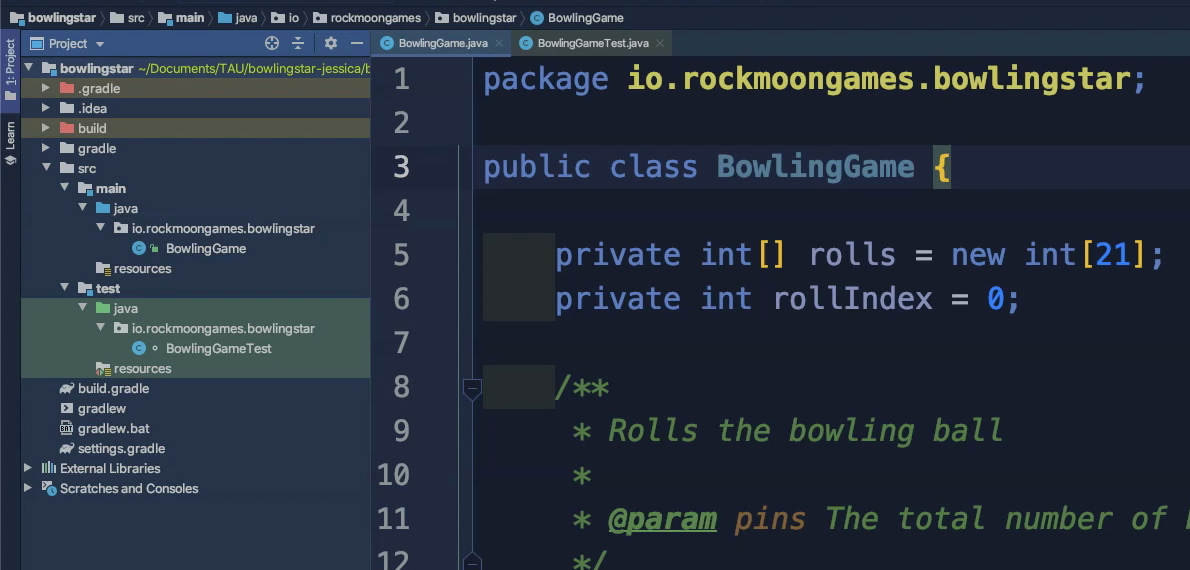
She has received the productive game code of Ryan, this is this BowlingGame class here, and prepared a test class for it. This is this BowlingGameTest class here.
The very first thing we have to do now is to initialize the repository here within our project.
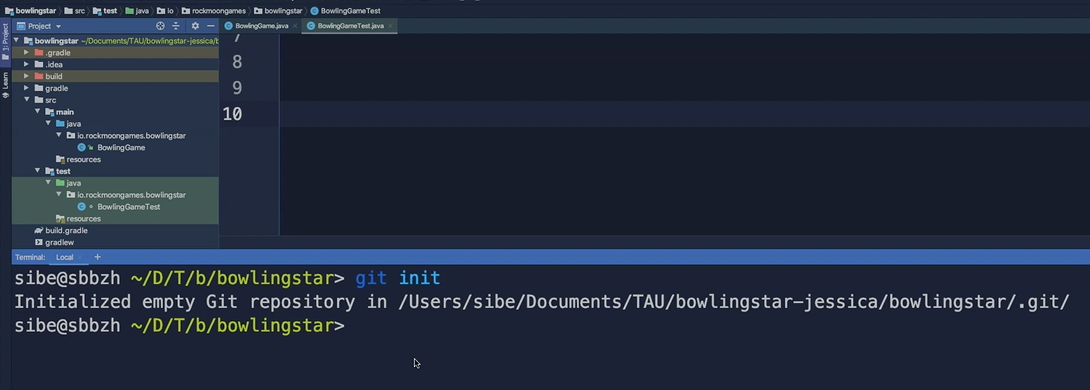
Now as we say that we are going to use Git from the command line, we have to open up a command line of course. And we can do that in IntelliJ by going to the terminal and IntelliJ will open up a terminal for us.
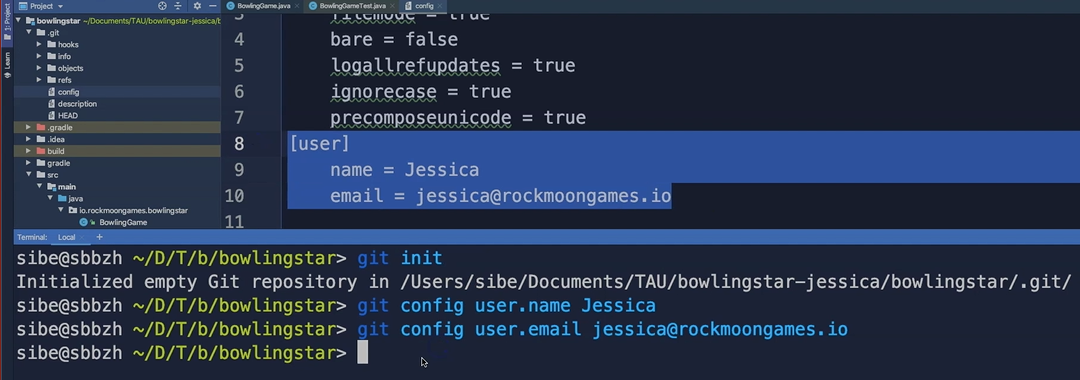
Now we can hit git init and Git will tell us now that it has initialized an empty Git repository in our Bowling Star project by creating this hidden “.git” directory.
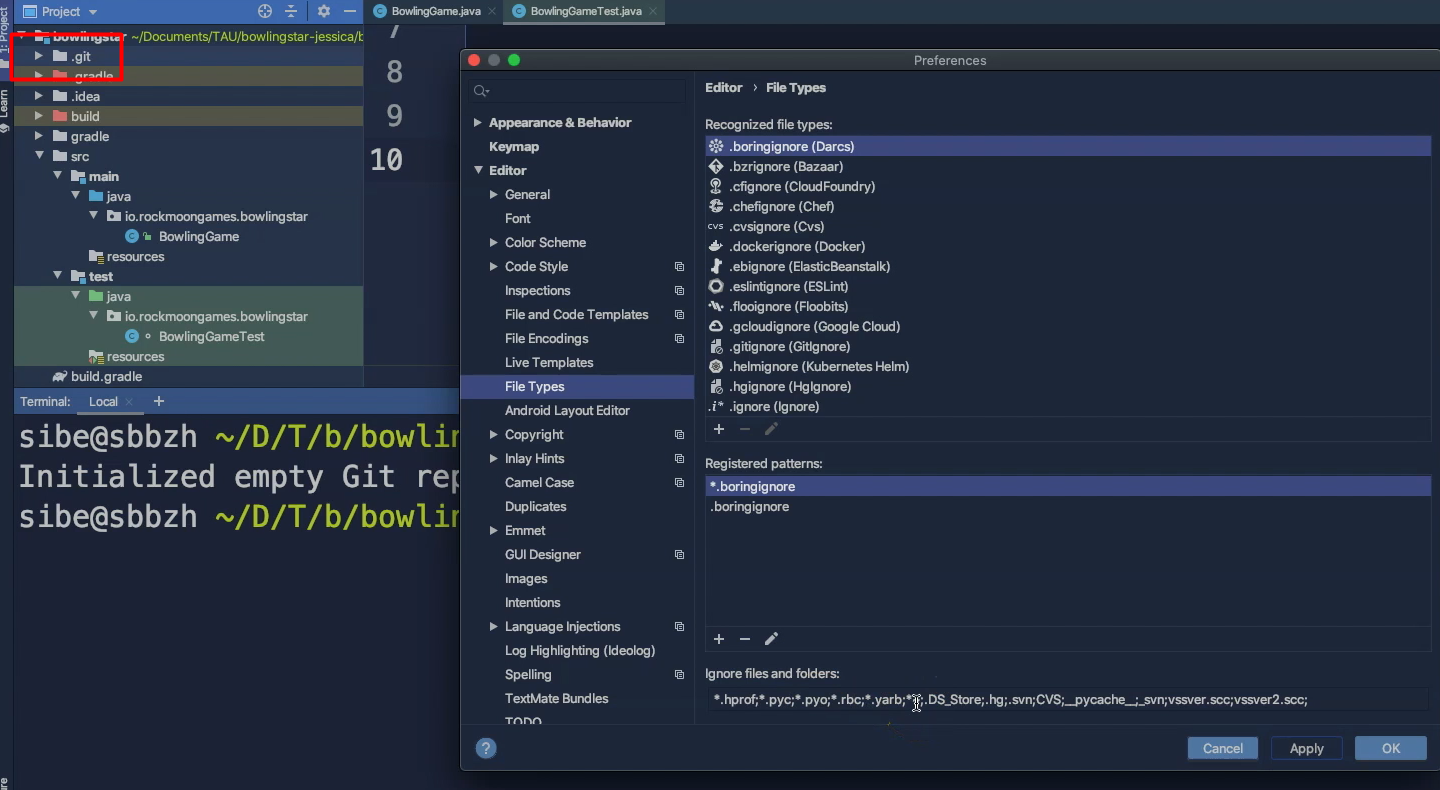
Now we can actually see that hidden “.git” directory IntelliJ but to do that you have to go to Preferences > then to Editor > File Types, and then there is a section called “ignore files and folders”.
Then just delete this “.git” path in there and from then on you will see in the project tree here, that hidden “.git” directory.
We can shortly open that up and have a look at it and there we will find some sub directories.
So, the first one is hooks, that's not important for us, but because we don't use any server-side scripts in this course.
Then we have the info directory, that's also not important for us yet.

Then we have the objects directory, that's a very important one because that is actually the Git local repository, which means all the objects are stored in this sub directory here.
Then we have the reference (refs) directory, that's where all the branches will be stored in the future. Then we have a config directory, that's where all our local configuration is stored in here or set.
Then we have a description file that's not important for us and then we have a HEAD file folder, for the HEAD pointer and we will see that in the next chapter how that is going to work.
So now we will set the user name of Jessica by hitting git config user.name Jessica.
Then we will actually also set the user email address — git config user.email jessica@rockmoongames.io — because as I already mentioned, Git will associate the name and the email address with every commit we are going to do.
Now we can verify if Git has actually set this configuration for our local configuration here. We have 2 ways to do that.
We can actually use the configuration, we'll have a look at the configuration files.
We will see that here, Git has set that.
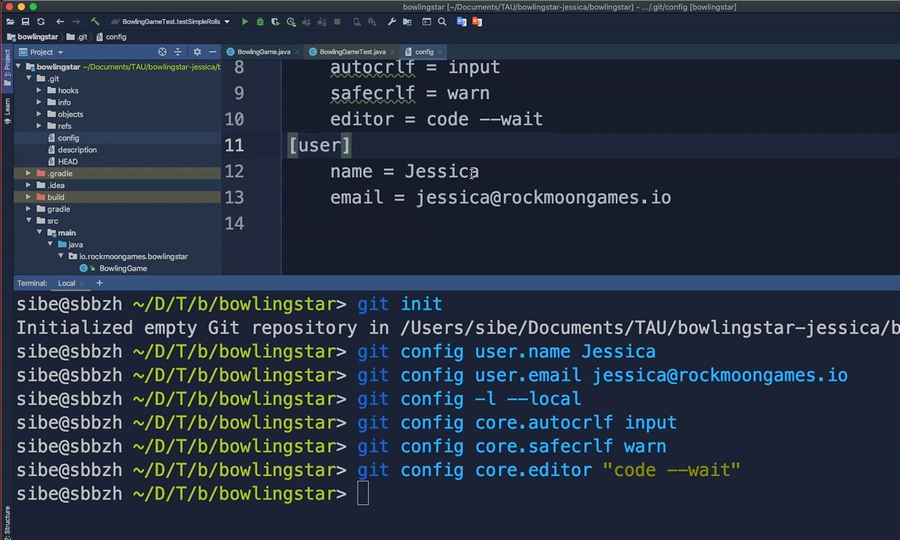
But we can also do the same on the command line by hitting git config -l –local. This will say, "Git now list me all the local configuration," and we will see exactly the same as in the file of course.
Now, next we have to set how Git should handle our carriage return underline feed on our system.
So, as I'm on Mac, I will just use or set it to “input” —
git config core.autocrlf input.On Windows I would set it to “true” —
git config core.autocrlf true.
Now, what does that actually mean?
When we set auto carriage return to “true” — It means that Git will process all the text files and make sure that carriage return line feed is replaced by line feed when writing that file to the object database and turn all line feed back into carriage return line feed when writing out into the working directory.
This is the recommended setting on Windows because it ensures that your repository can be used on other platforms as well while retaining carriage return line feed in your working directory.
When we set auto carriage return to “input”— It means that Git will process all the files, all the text files and make sure that the carriage return line feed is replaced by line feed when writing that file to the object database.
It will not however do the reverse, when you read files back out of the object database and write them into the working directory, they will still have line feed to denote the end of the line.
This setting is generally used on Unix, Linux, USX and of course macOS to prevent carriage return line feed from getting written in to the repository. The idea behind that, if you paste that code from a web browser and accidentally got carriage return line feed into one of your files, Git would make sure they were replaced by line feed when you wrote to the object data base.
Good.
Now we also have to set the core safe carriage return line feed.
We'll do that and we will set that to warn — git config core.safecrlf warn.
Now we have to set it to “warn” because otherwise Git wouldn't allow us to convert carriage return line feed into line feed.
Now at last we also want to set our preferred Git text editor.
Now as I'm a fan of Visual Studio Code, I will set it to Visual Studio Code.
We can do that by hitting — git config core.editor “code --wait”
Now, that it is all set, we can quickly verify that and see all the things which we need now for going further, we have all set that in our local configuration file.
# But what is actually the working directory?
The working directory is just a place where the actual files are. In our case it is everything which is in our project folder.
Now the project folder in IntelliJ here is on the left side, so all the files here, the source file, all the configuration files are in the working directory.
As soon as we have created the new file or modify the file in the working directory, we have to add this file to the staging, also called index area.
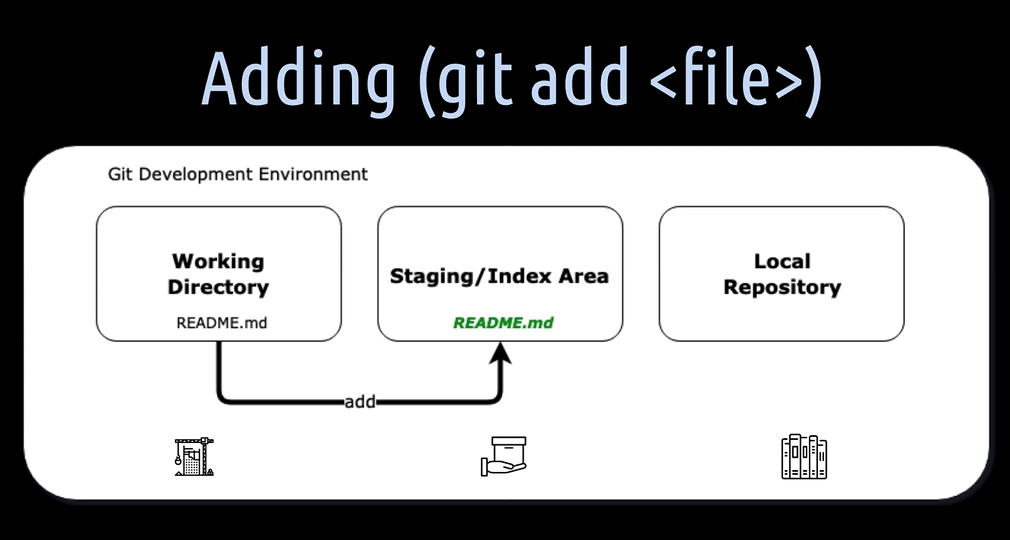
As I already mentioned, the staging index area is the packaging place where we bundle the files for the next commit, or in our case for the very first commit.
Okay, let's help Jessica with adding all the things to the staging area.
First, we hit git status to see what is up in our just created Git project.
What Git tells us now is that we don't have any commits yet and we have some untracked files in the working directory.
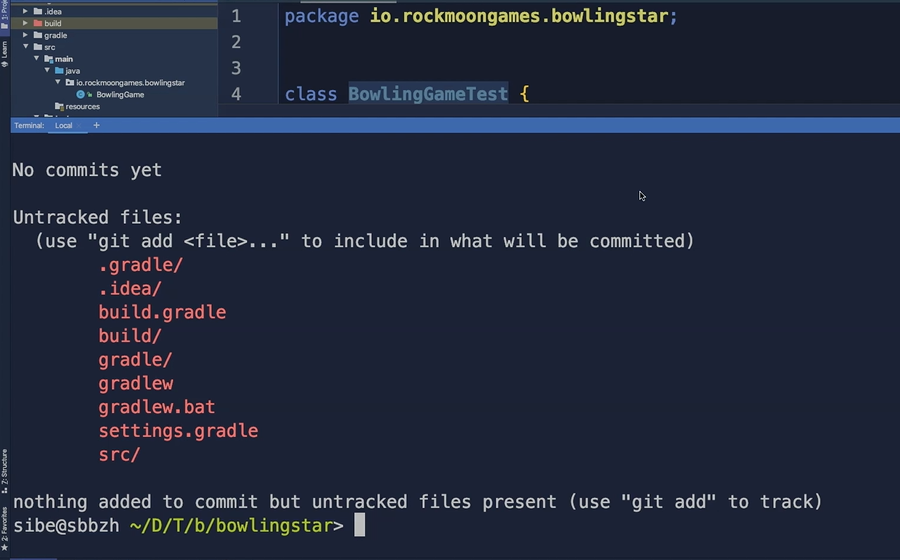
These are all files which aren't tracked by Git yet in Jessica's project.
To track these files, Git tells us that we can use git add to add them to the staging area.
But what about files which Jessica doesn't want to have tracked by Git?
For example, Idea and Build tools specific things. For doing that, we can add a so-called “.gitignore” file. In the “.gitignore” file, we can list all the files and folders for the project which Git shall ignore in the working directory.
So, let's create such a file.
We can go to the project, right click on it, _New > Ignore File _and then add a “.gitignore” file here.
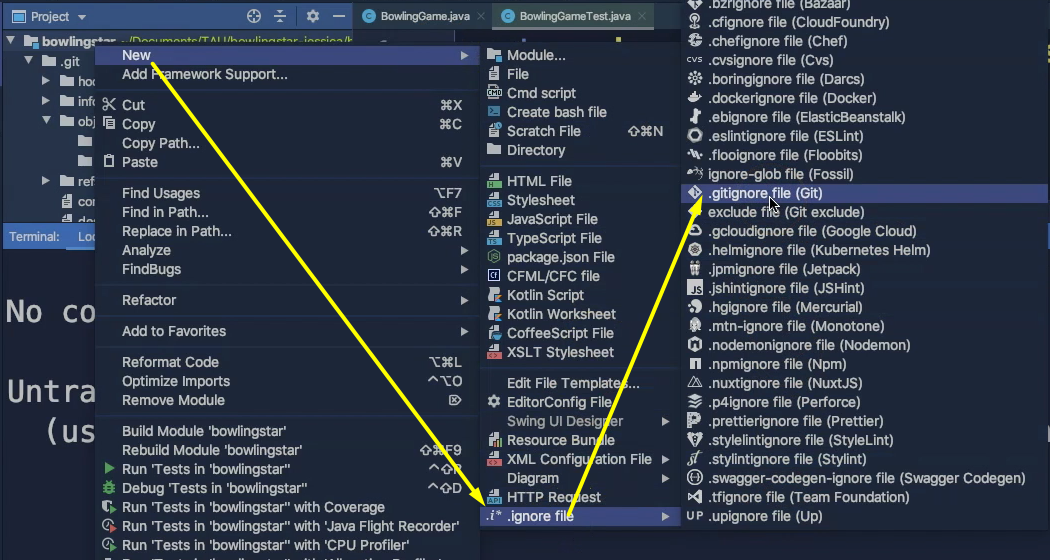
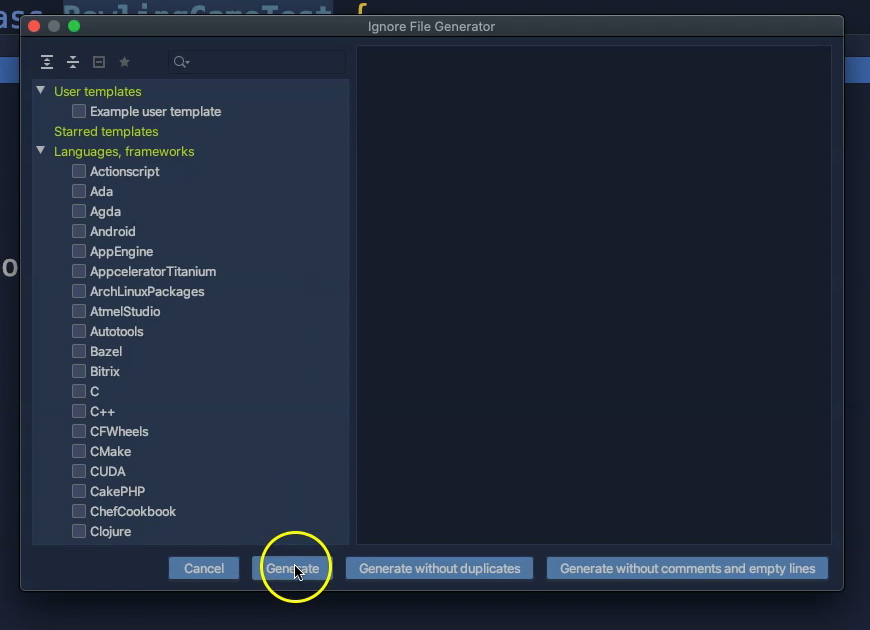
What we get now to see is ignore file, generator where we can choose from some predefined languages, but we will just go with the raw file.
Click Generate here and Git has created a “.gitignore” file for us.
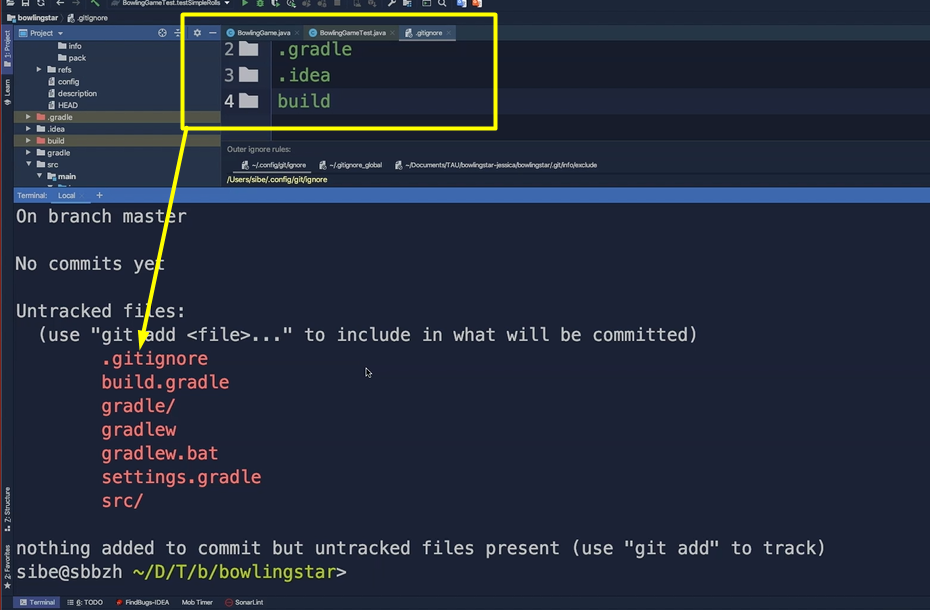
Now we don't want to track all the Gradle specific things in our project. So, I would just add the “.gradle” here. It is not important for us; we don't want to add that to the local repository.
Then IntelliJ specific settings, so “.idea” and all that build specific things like all the clause files and so on.
So that's about it.
Now we can go back to the console, hit git status again and see all the things which we have specified in the “.gitignore” file aren't listed here and are ignored by Git.
Jessica is wondering what would happen when we now type git log.
Well, let's just do this, git log, and what Git tells us now that we are on the current master branch and we don't have any commits yet.
Note that the master branch is always the default branch when you initialize a Git project.
So, now it's time to add everything which is in the working directory to the staging area.
For doing that, we can use git add . — the dot tells Git to add everything, every changed or newly created file now to the staging area. So, we do that.
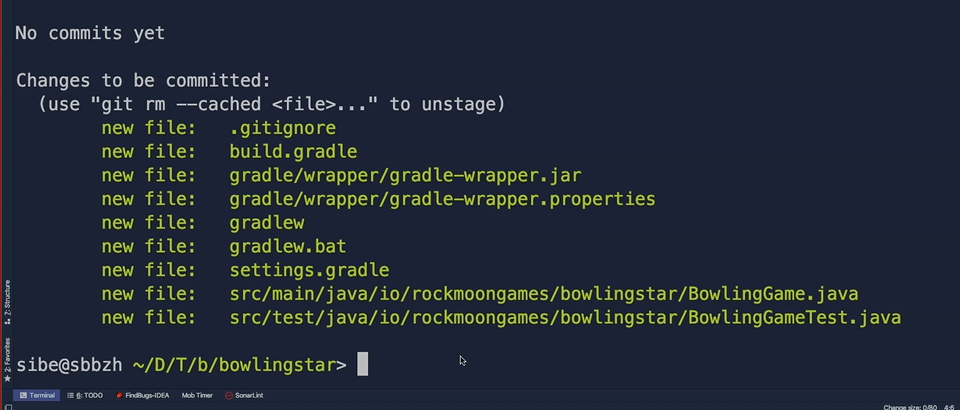
Then we hit git status again, and we can see that everything is in the staging area now packed and ready for committing.
The staging area is just a simple binary file which is located in a “.git” directory.
So, what Git has created now here is an index file.
This is this file here, and when we open that up, we can't see much.
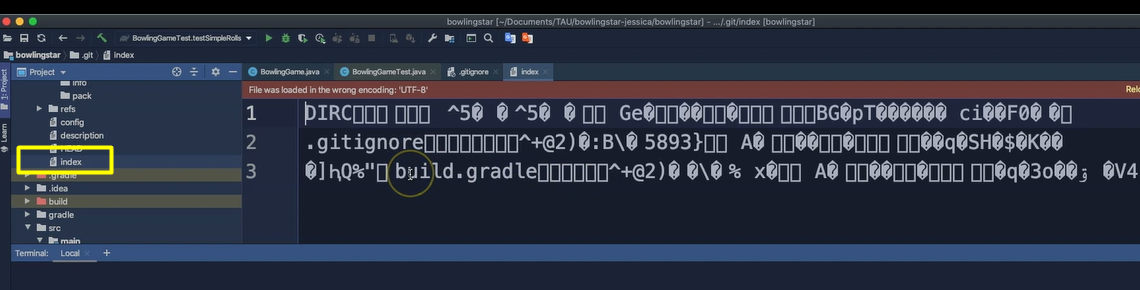
We just see, it added the build gradle file, it added the gradle wrapper char and all the other files are now in the index tree.
But we can also use the console to see what is actually in the index area by hitting git ls-files --stage.
Now we can see that all these files here are currently in the index file, which means in the staging area.
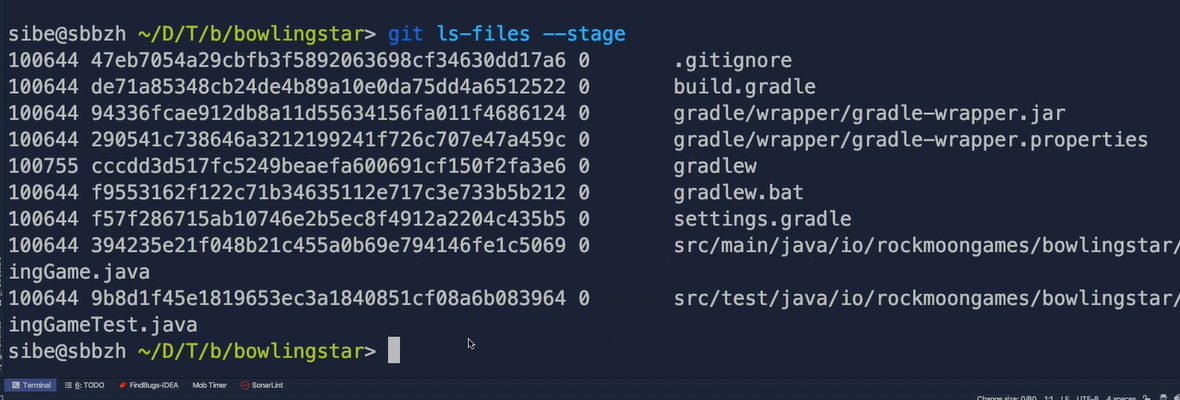
Notice by adding all the files to the staging area, Git copies these files from the working directory, compresses them and stores them already kind of temporarily as a blob up check in the objects folder.
That's what we get to see here. So, all the objects, all the file objects are now ready here in the local repository.
But we can't do anything with these objects yet.
In order to link them into a snapshot for a later reuse, we have to commit them into the local repository. This is important to notice because once you understand how Git handles its objects, it is much easier to see how they're all connected with each other.
Resources
Quiz
The quiz for this chapter can be found in section 3. 3
