

Transcripted Summary
In this chapter, we will learn the next four of the most important basic concepts in Git.
Cloning an already existing remote repository. Fetching changes made on the remote repository to the local repository. Merging changes into the current active local branch. And finally, pulling, which is fetching and merging in one go.
In this part, we are continuing The Bowling Star story, this time with Lisa.
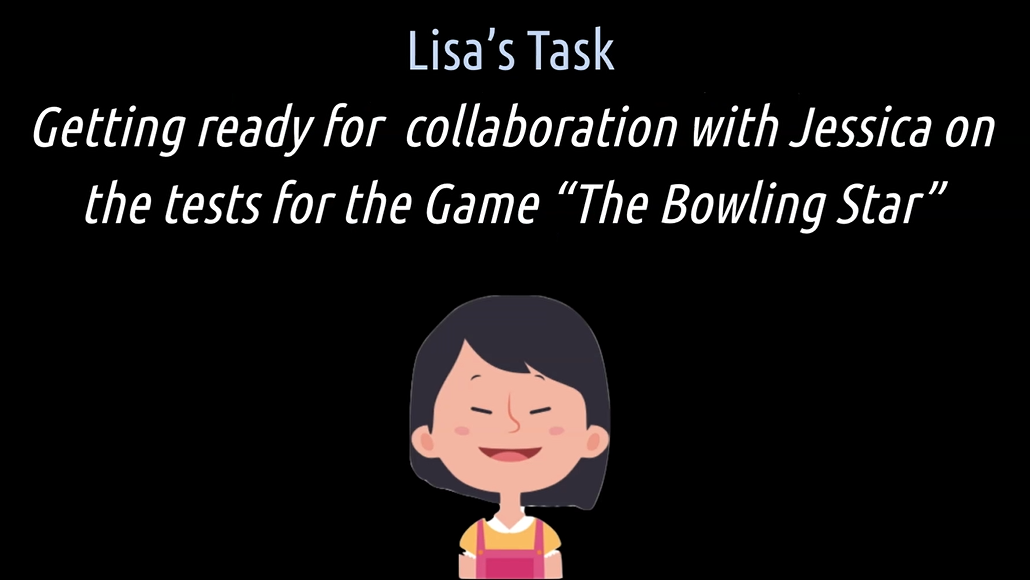
Lisa's task is to get ready for collaborating with Jessica on the tests for the game, The Bowling Star.
For doing so, she first has to clone the Git project from the company's remote repository manager.
After that, she shall watch out for any changes that are additionally added by Jessica on the remote repository.
# Cloning a Repository
Cloning an already existing remote repository is similar to the concept of initializing, for example, from GitHub, Bitbucket or GitLab.
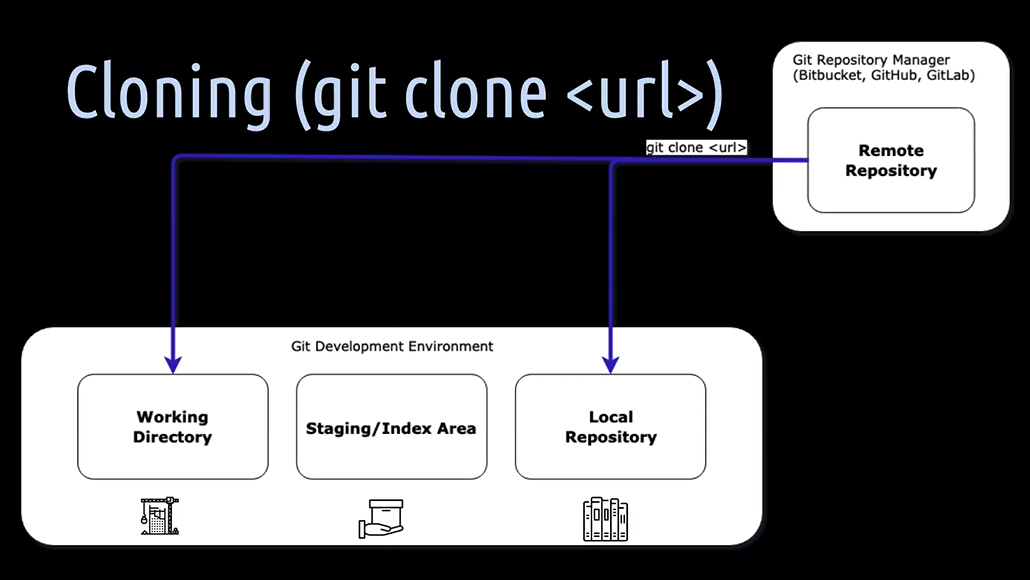
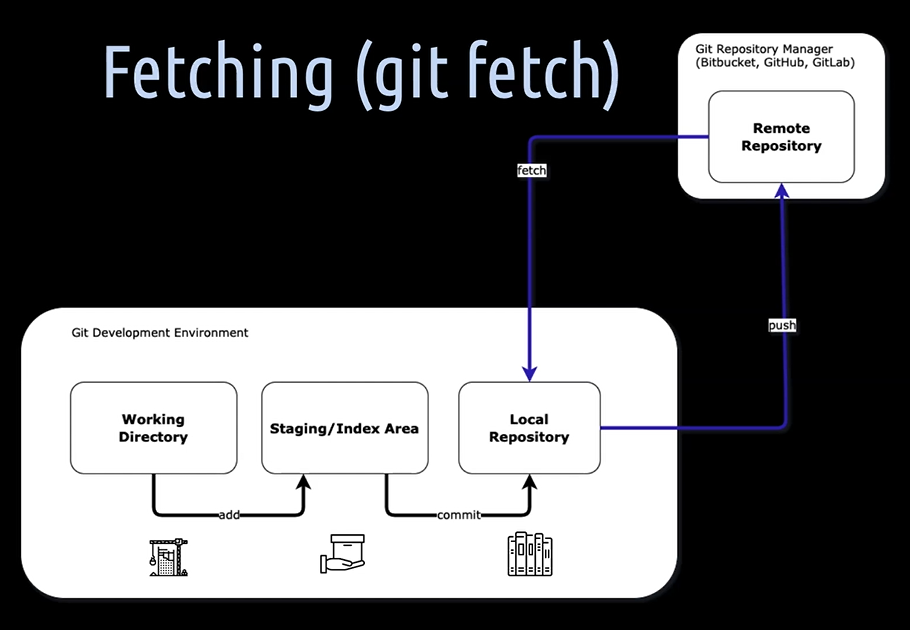
As soon as we have cloned the remote repository, we will also have a development environment as before, with the 3 boxes.
As you can see in the model, git clone clones the remote repository into 2 places — into the working directory and into the local repository.
Now you see how Git is a distributed version control system, which means the local repository is a full-fledged copy of the remote repository and acts just like it.
By cloning an already existing repository, you will get an additional box for the remote repository, which is then automatically connected to your local development environment. You don't have to additionally set the remote as upstream as we did before when helping Jessica pushing her master branch to the remote repository.
Let's now see how we can help Lisa with this.
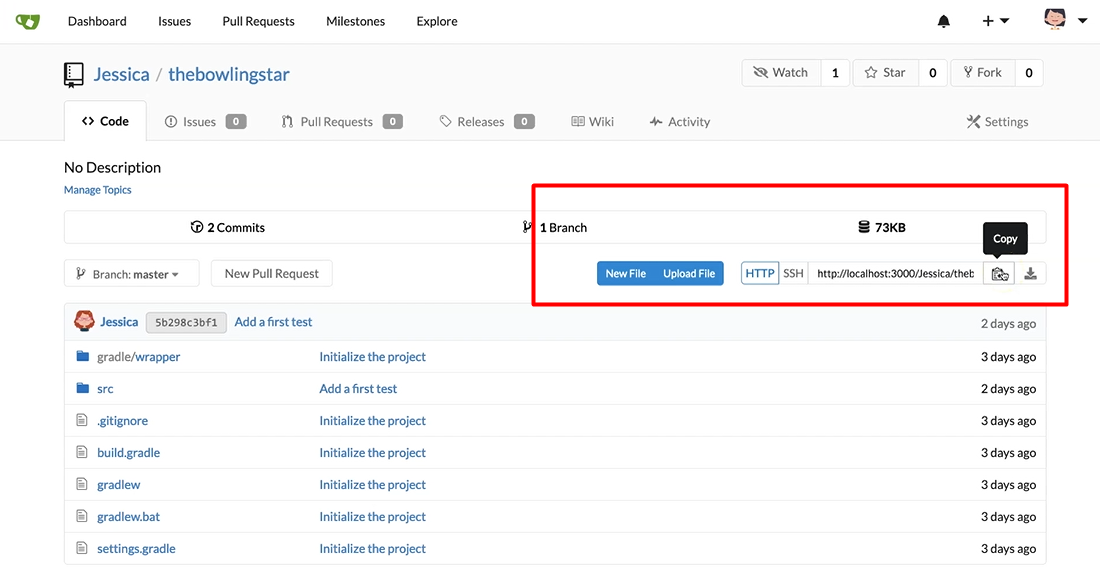
The first thing we have to do is to access with Lisa's account the remote repository to get its URL.
So, we are here already logged in with Lisa's account. We choose “thebowlingstar” Git project here and copy the URL.
Then, of course, we have to select a local project folder where we want to clone the repository into.
So, Lisa has already prepared that for us. We created “bowlingstar-lisa folder”, and all we have to do now is to hit git clone, followed by its URL, and hit enter.

And now Git has successfully cloned the remote repository into the local project folder.
Then we have to navigate into the project folder — cd thebowlingstar/.
And notice here, that when we clone the remote repo, we thereby also checkout the default branch which is given by the remote repository into the working directory. In most cases this is the master branch.
We can check this in 3 different ways.
We can either hit git log, and then we will see the 2 commits on this Git project, and we can see that we are here on the master branch here.
We can also do a git status and we can see it tells us that we are on the master branch, and our branch is up to date with the origin master, which means with the remote master.
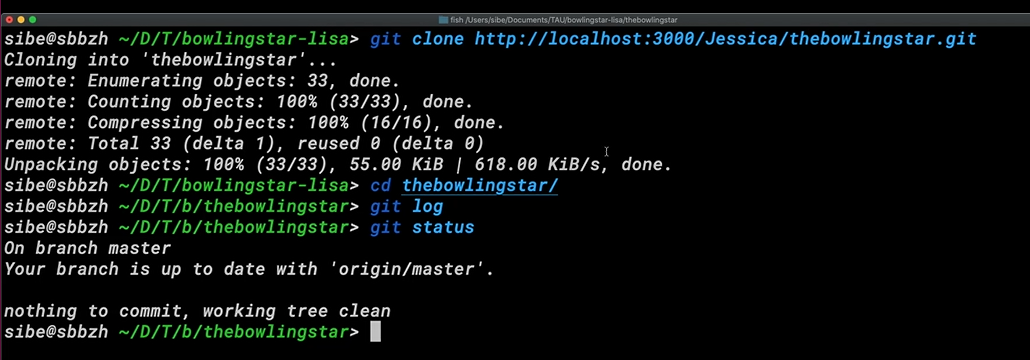
We have nothing to commit, which means the staging area is clean. And also, the working tree is clean, which means we haven't changed anything or added any new files in our working directory.
Now, we also have the option to hit git branch -vv.
And Git shows us now the active master branch, which is in green.
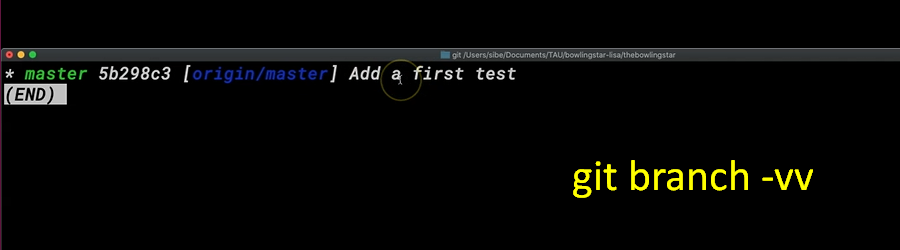
Git tells us also that this master branch is connected to the origin master branch, which means the local master branch is connected to the remote repository master branch,
And on it here, “Add a first test”. This is the latest commit on that branch.
In order that Lisa can now work on this project, she has to import it as a fresh new project into IntelliJ.
So, we open up IntelliJ, and then we open up a new project, by going to Files > New > Project from Existing Sources.
Then we select Lisa's project folder here and import that project.
To quickly check now if everything is in place, which we have cloned and imported it, we can now open up a terminal in IntelliJ and quickly check that with one of our 3 methods.
By hitting
git log. Yes, everything is here. So, our 2 commits which we have.Or we can use
git statusto see what's up in our repository on the master branch. Yes, we are still up to date, nothing to commit.Or we can check by hitting
git branch -vv. Yep, that's correct.
So, we are on the local master branch, which is linked to the origin master to the remote repository master branch. And our latest commit is the “Add a first test”.
# Next up is the concept of fetching.
By fetching, we get all the data — which means all the remote branches and all its objects, commits, snapshots, files — into the local repository.
Luckily, this does not touch, which means merge anything into the local checked out branch, in the working directory; nor the staging area.
To see how fetching works Jessica creates a new commit on the master branch.
Let's pretend we would write now, another awesome test.
So, let's copy this one, the first one here, and add a second one.
class BowlingGameTest {

	@Test
	public void jessicaTestOne() {

	}

	@Test
	public void jessicaTestTwo() {

	}
}
Let's open up the terminal, and hit git status, to see where we are.
So, we are on the master branch, and our branch is up to date with the origin master.
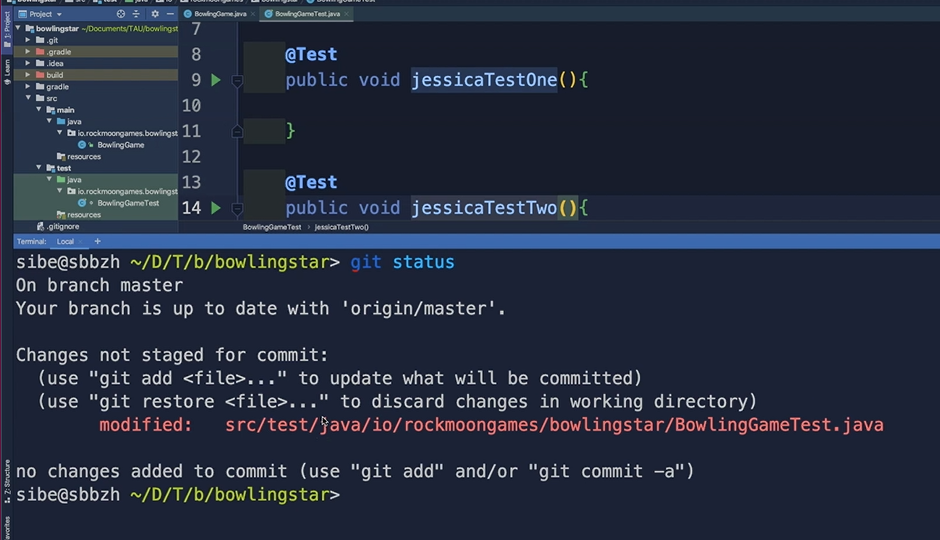
Then, we have some changes which are in the working directory and are not staged yet.
And now we can add and commit them in one go.
So, we can say, git commit -am for adding the changes to the staging area and for adding a commit message.
And we ask ourselves now what will this commit do once it is applied? And this commit, will “Add a second test”.
Perfect. Now we just need to press enter and that's it.
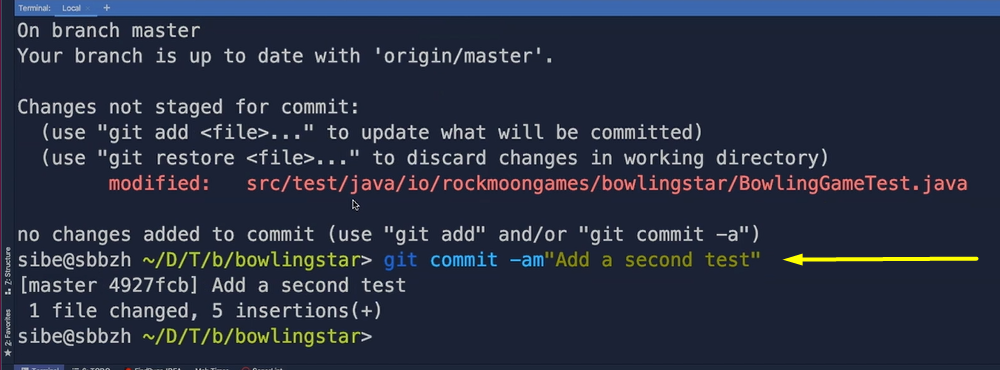
Git created a commit for us.
We can verify that by hitting git log. And, yes, there it is: “Add a second test”.
Then we use git push, to push the commit on the master branch to the remote repository — git push origin — and Git pushed all our objects to the remote repository.
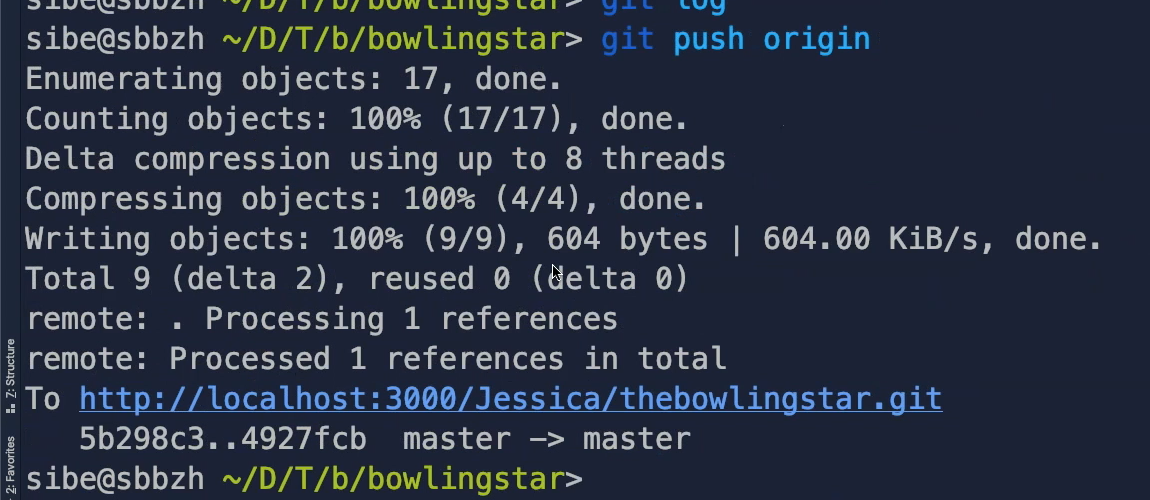
We can verify that by going to the remote repository. Then here we need to refresh the page.
And yes, here it is, “Add a second test,” and it's all on the top here, with the commit hash, of course.
We can have a look at all these commits by clicking on commits.
Then, here, we see all the commits, our “Add a second test,” the latest commit on branch, on the master branch on top of it with the SHA-1 hash here.
We can click on it and then we can see here the differences.
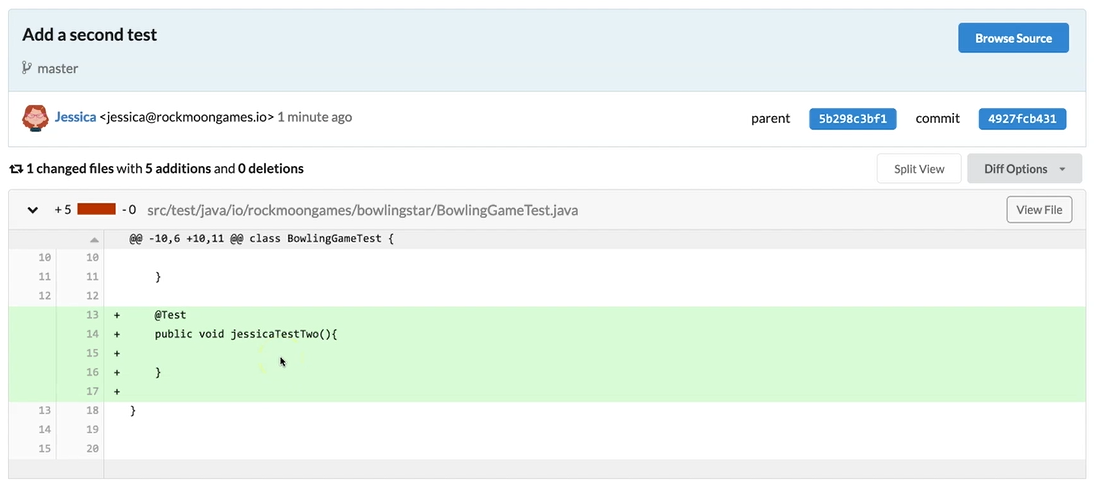
So, we added the new test here.
Now, as Lisa wants to get this commit on the master branch from the remote repository to her local repository, we have to switch to Lisa's IDE.
So, all she has to do now is git fetch.
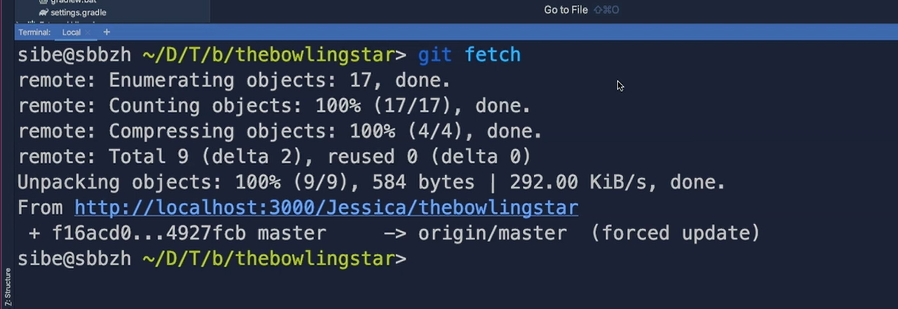
And we see that Git fetched some new objects, which means a new snapshot, new commit objects, and the new file object.
When we hit git branch -l -a (the “l” is for list, and the “a” is for all the branches) we can see now all the branches which are in the local repository.
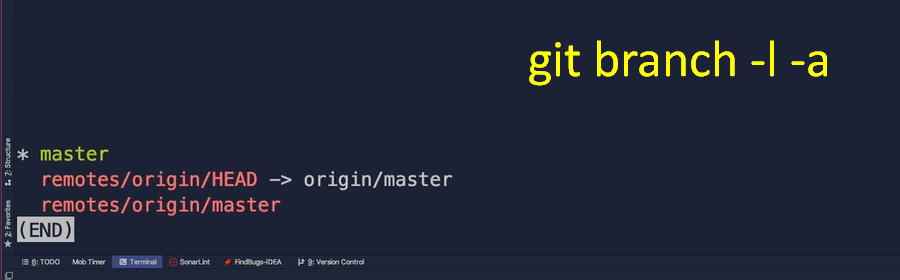
It is important to notice here is that we have the remote master and the local master branch in our local repository, whereas, the local master branch is checked out in the working directory.
But how can we actually see the current checked out branch?
Well, that's pretty easy because Git marks it with an asterisk here.
# Let's move on to merging.
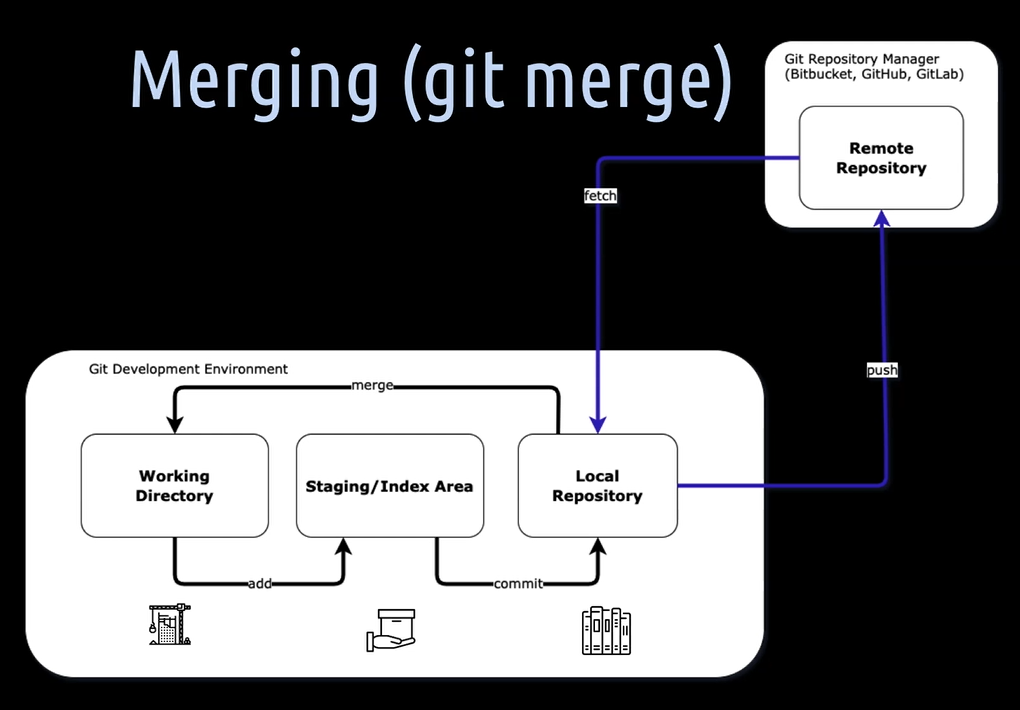
With merging, we can merge the changes which we have fetched into our local repository into the current active branch in the working directory, thereby also the staging area, which means our index file is updated accordingly.
Let's do this.
We head back to Lisa's IDE, and we git status in the terminal.
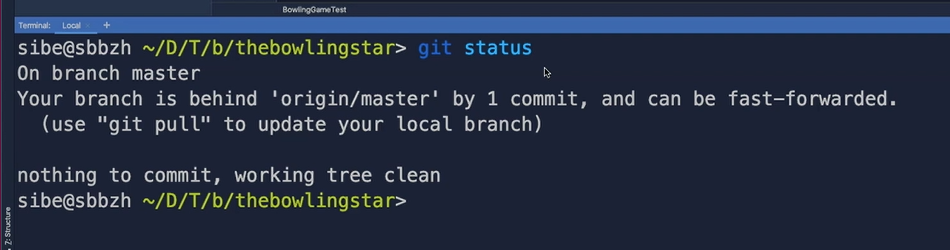
Git tells us now that our checked out local master branch is one commit behind the updated remote one in our local repository.
Yes, that is true, because once we hit git log, we see that there is not yet a commit with a second test on our checked-out master branch in the working directory.
We can also notice that in the BowlingGameTest class itself, there isn't a test call “jessicaTestTwo” in it yet.

To fix that, we can do a git merge, which means merging the remote master branch, which is in our local repository, into our local checked out master branch and thereby get its content into the working directory.
Okay, let's hit git merge.
And we see that Git did a fast-forward merge, and merged now, the second test from Jessica into the local master branch of Lisa.
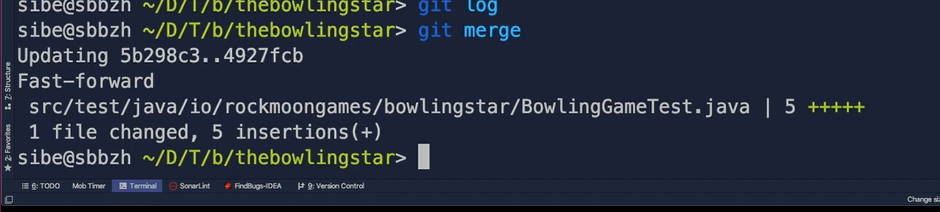
A fast-forward merge is a merge from a branch into another, one where the target branch, in our case that is the local master branch, has not diverged from the source branch.
In our case, that is the remote master branch.
Now, we can also check the BowlingGameTest class. When we click into the class itself, it will be refreshed, and there it is. Yes!
We also want to verify this.
Now, on the console, we can hit git status, and we see we are on the master branch, and our branch is up to date with the “origin/master”, so all clear.
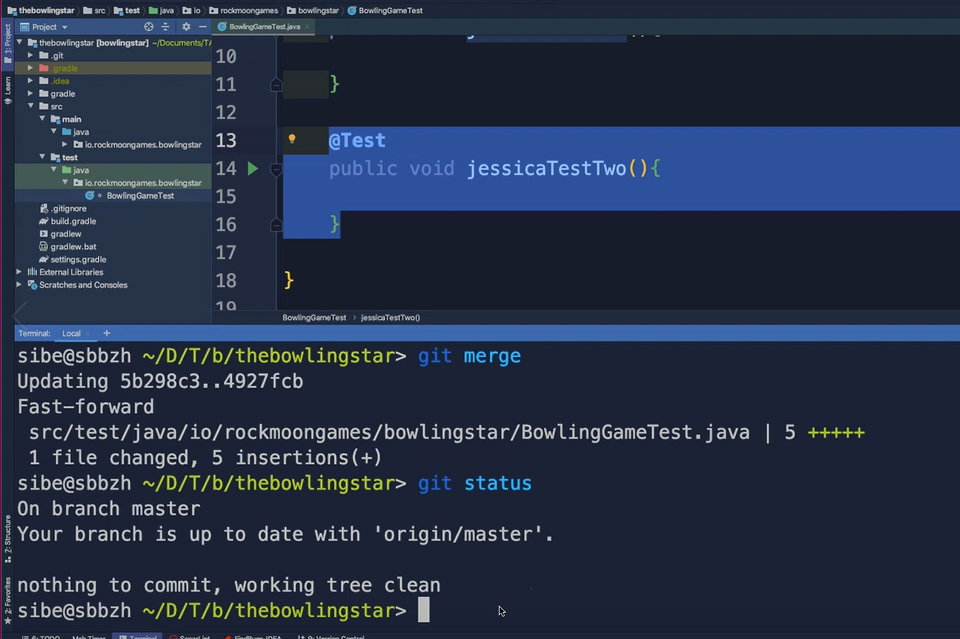
We can also now hit git log. And there it is, the latest commit, “Add a second test” from Jessica.
# In contrast to fetching and merging, there is also the concept of pulling.
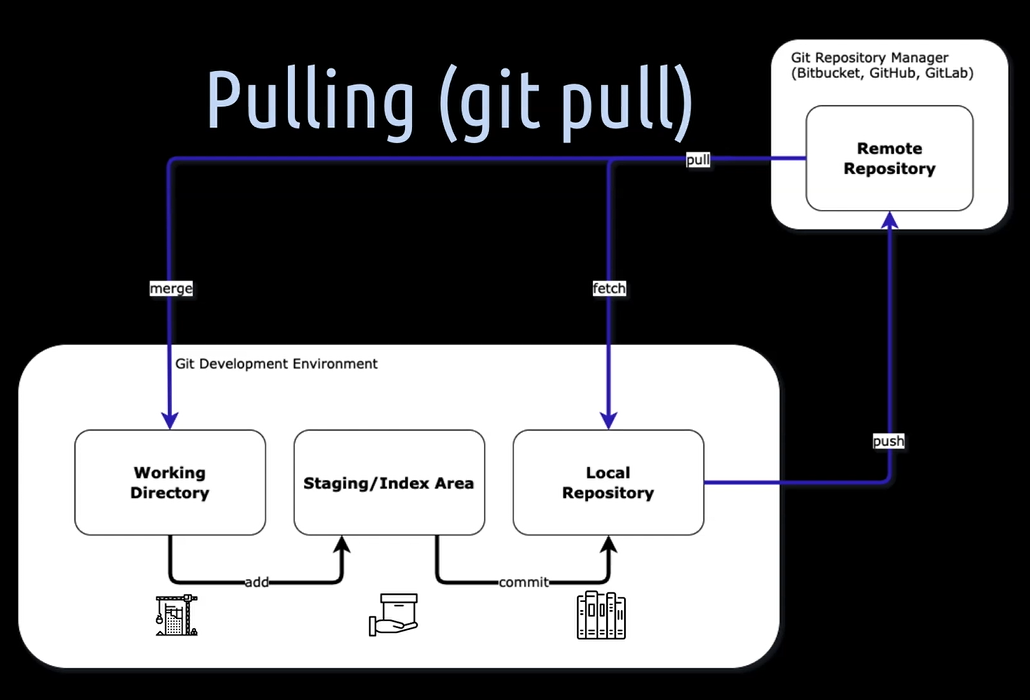
By pulling, we fetch new data from the remote repository into the local repository, and also merge all the new things depending on the current active local branch into the working directory.
The index gets also updated accordingly.
Pulling is the shortcut for fetching and merging — so, the 2 things we did before, but just in one go.
Notice also here, when the current active branch is the local master branch in the working directory, we only merge new things coming from the remote master into the local master branch.
Other branches in the local repository won't be touched.
NOTE
As a remark here, we cannot pull any changes as long as there are modified files in the working directory which would be changed by the commits we are pulling and trying to merge of course. To get the modified files away from the working directory, we can either commit them to the local repository of that branch. Or, if we don't want to commit them yet, we can put them with stashing in a stash in the working directory.
We won't practice the concept of pulling right now. We will see later on how it is applied.
# Stashing
Let's take this opportunity and have a quick look at stashing.
When we want to save the current state of changes in the working directory and the index, we can use git stash.
This command saves our local modifications away and reverts the working directory back to a clean state to match the HEAD, which means latest commit of the active checked out branch.
So, let's say we create a first test for Lisa.
We can quickly check the current state of the working directory. So, we are all clean here.
Then we create our very first test for Lisa, and let's call that test “lisaTestOne”.
@Test
public void lisaTestOne() {

}
Then hit git status again.
And we can see, yes, we have now some changes in the working directory.
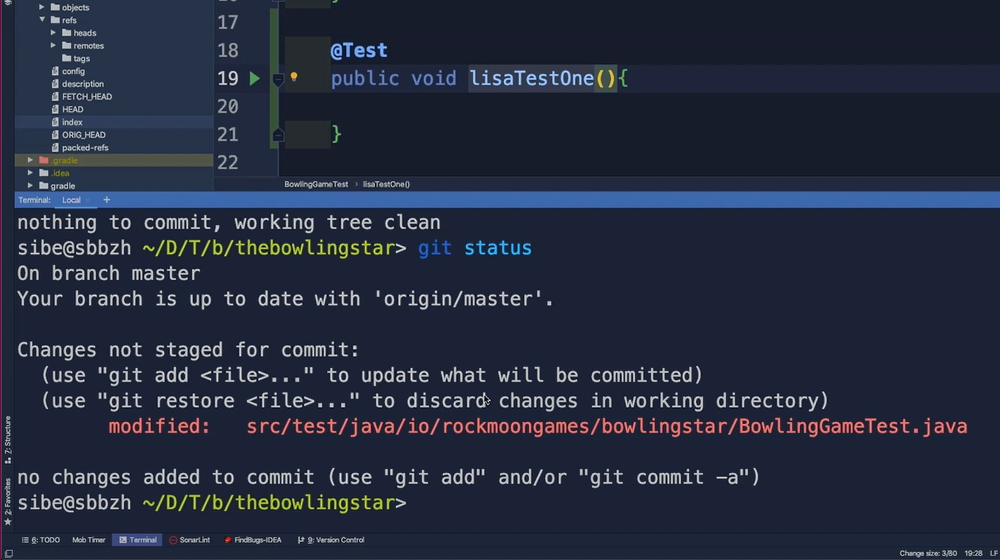
So yes, we have adapted the BowlingGameTest class.
Now we want to save these changes which we have made now for later reuse. And for doing that we can use git stash here in the console.

Git tells us now that it has saved the working directory and the index state, and called it work in progress (WIP) on the master branch.
We can check that stash by hitting git stash list and Git we'll show us a list of all its stashes it has created.
So, we have now a first stash with the zero index here, which is called WIP on the master branch.

That is correct, because we created the stash on the master branch here.
Now we go back and hit git status to see where we are in the working directory and we are all clean.
So, we are on the master branch, that's important. Note this, we're still up to date with the remote origin master and we have nothing to commit.
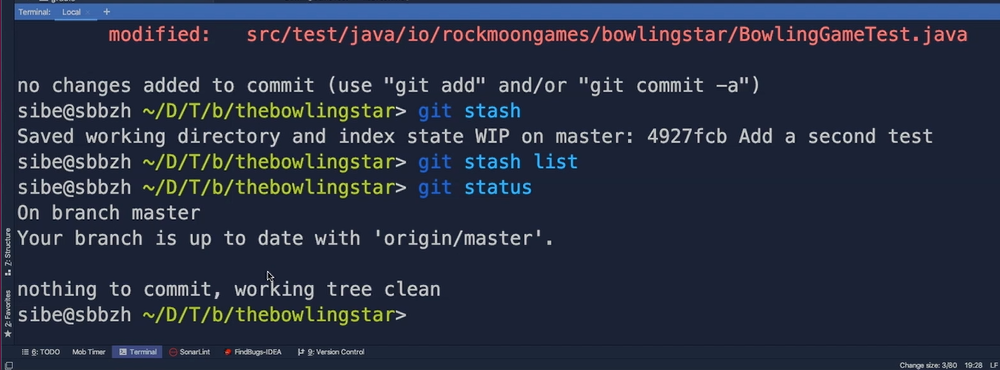
The working directory is clear, so our stash which we have created has worked.
To apply this stash to the working directory now, we can use:
Either
git stash pop— which means this would apply the stash and delete it from the list.Or we can also use
git stash apply— this applies the stash but does not delete it from the list.
So, let's go with git stash pop.
Git now applied this stash to the working directory again, and it also dropped the stash from its list.
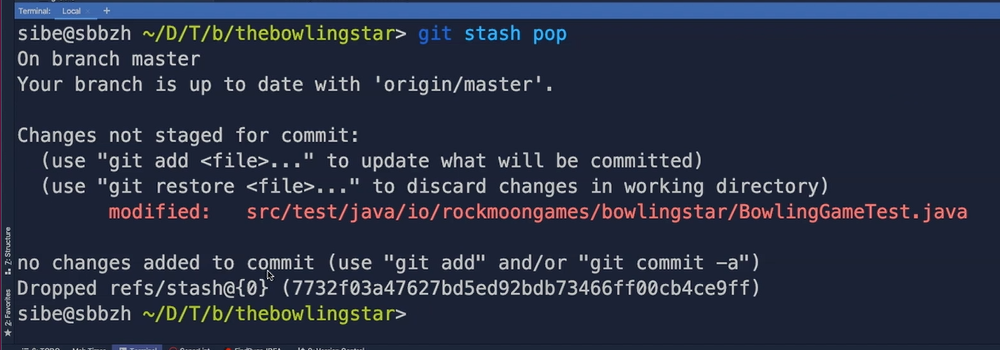
We can verify that by typing again git stash list, and see our stashing list is empty.
NOTE
Note here that the stashes acts as a first in, last out process. This means that the latest stash is always on the top of the list.
# Git Reference Log

To finish this chapter, we are going to have a look at another handy command in Git.
The command git reflog is especially helpful after some occasions when returning to work and don't exactly remembering what we have done in the repository before we left. Or if we just want to find a certain commit in the local Git history.
Git reference log, short “reflog”, records and shows all the tips, HEADs, and the references which were updated on all the commits in the local repository, on all the branches, in the order in which we have referenced them last.
Let's see how Lisa can show off with that.
We hit git reflog in the terminal and hit enter.
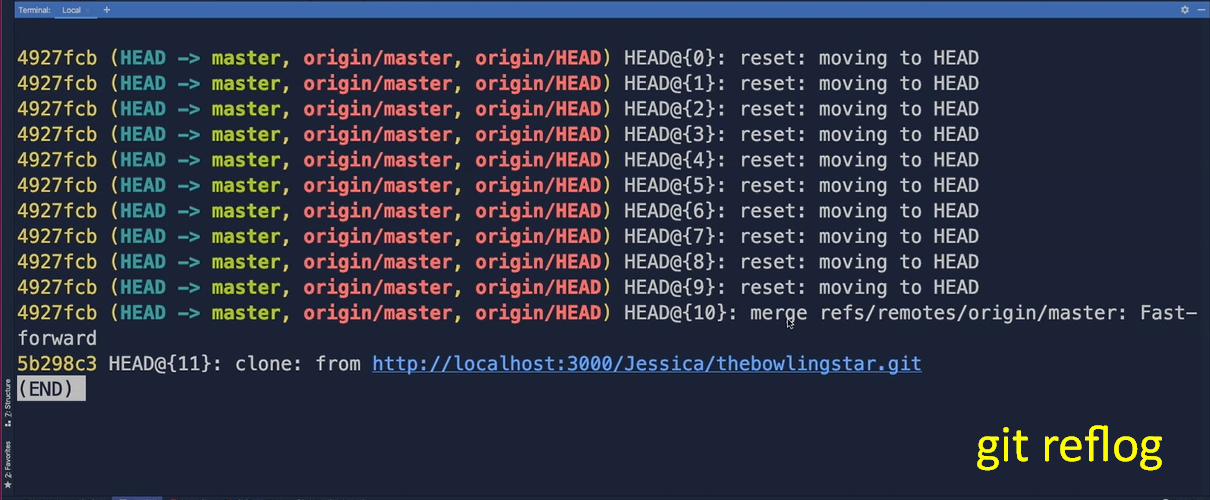
The first thing which we can notice here is that we have cloned here, as first, the remote repository for Lisa.
Then we did a fast-forward merge here by merging the remote master branch into the local master branch.
And last, here, we did some stashing and moved the working directory back to the latest commit on the local master branch.
This isn't all too funny now, but in the future when you have several branches with lots of comments on them, it might become handy for you one day.
# Setting Lisa’s Configurations
To finish our task for this chapter, we need to complete the initial set up steps like we did for Jessica.
We have to set Lisa's username —
git config user.name Lisa.We have to set her email address —
git config user.email [lisa@rockmoongames.io](mailto:lisa@rockmoongames.io).Then we also have to set how carriage return line feed is handled —
git config core.autocrlf input— as we are on Mac here.And we do also the second one — git config core.safecrlf warn`.
That's it.
We can also quickly verify that it’s all correctly set by Git using git config -l --local.
So, we list all the local configurations.
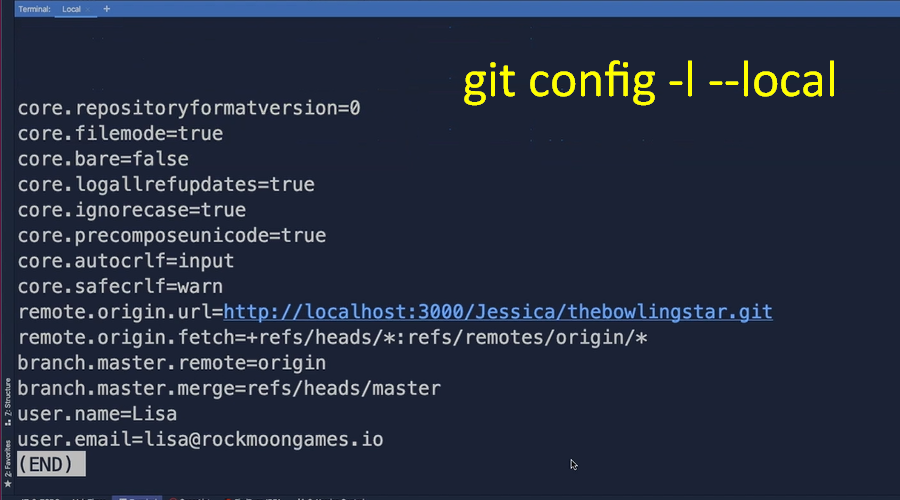
And yes, the username is Lisa; and the user email is lisa@rockmoongames.io.
Then we have the auto carriage return line feed to “input”, and this safe carriage return line feed to “warn”.
Lisa is super happy now.
She has mastered her first task in using Git successfully. She's already looking forward for collaborating with Jessica.
