

Transcripted Summary
In this chapter we are diving deep into some more advanced concepts in Git.
We will look at how we can resolve conflicts while merging and rebasing.
What about when we make changes in the same file in two separate commits on two different branches which then interfere with each other?
What happens when there are such conflicts while merging or rebasing?
Let's have a look.
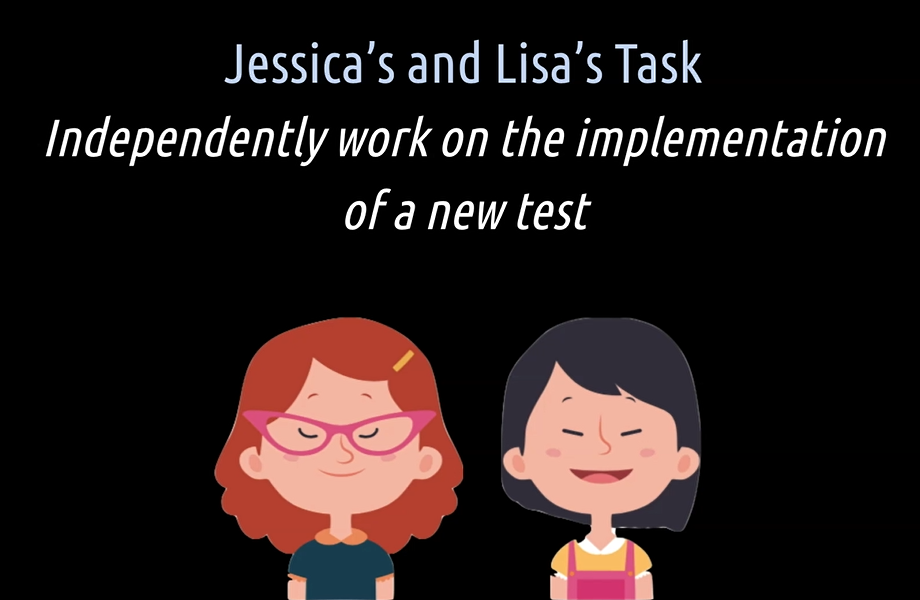
Jessica's and Lisa's task in this part 1 is to independently work on the implementation of a new test in the same class file. Jessica works directly on the master branch and Lisa creates her own feature branch for that.
After that, Lisa shall create a new pull request for a peer review, and then of course the pull request shall be merged into the master branch.
# Resolving Conflicts While Merging
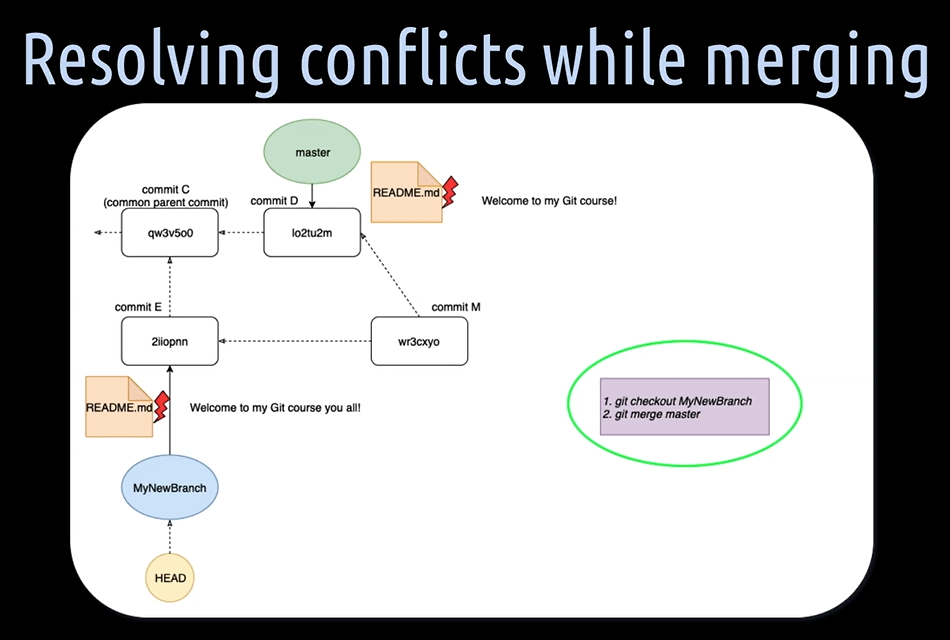
Let's first have a look at an example where we want to merge the master branch into the “MyNewBranch”.
This means we want to combine commit D from the master and commit E from the “MyNewBranch” into a new additional merge commit on the “MyNewBranch”.
Now, let's pretend we have a README file which is causing some conflicts.
When we tried to do git merge master with this conflict in README file, Git can't handle this by its own, and will show us a message like this one here, "Git isn't able to automatically merge the things together."
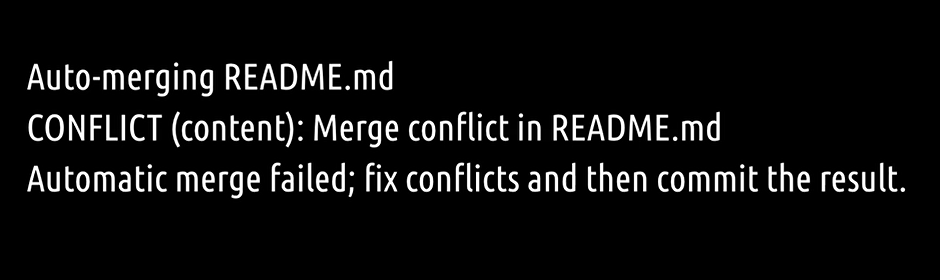
Instead, Git tells us that we have to fix the conflicts locally on our machine, and then commit that fix.
When we open up the conflict in README file in active “MyNewBranch”, we get something like this here.

On top, we see the current changes of the “MyNewBranch” where the head is pointing to, and below the incoming changes from the commit on the master branch.
For resolving such an easy conflict like this one using our favorite text editor will do the job just fine.
We only need to make sure that we end up with some reasonable content and without the special arrows and equal lines Git has introduced in the file.
So, we go ahead and change the file to something like this.

For merging large files with lots of changes a more powerful tool will make your life much easier.
Most IDEs, like IntelliJ or Visual Studio Code, already come with out-of-the-box Git tools which make resolving complex conflicts pretty easy.
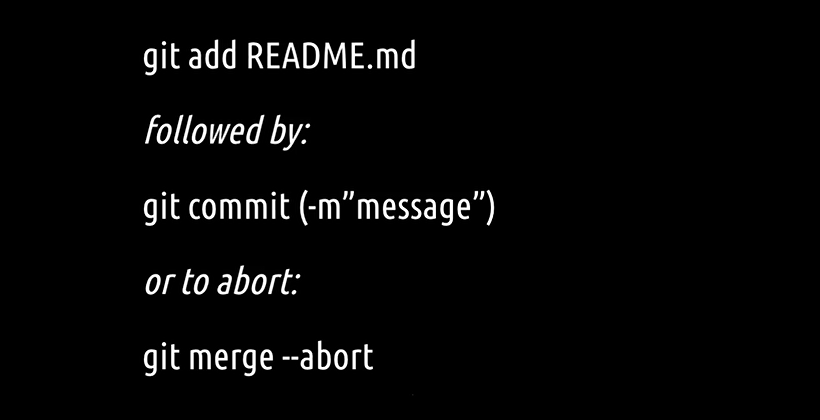
Once we have resolved the conflict in the README file, we have to stage and commit the file again.
By committing, Git will finish the merging procedure by creating an additional merge commit in the active “MyNewBranch”.
Should we ever realize in the middle of resolving conflicts that we don't want to go ahead with the merge, we can just abort it by running git merge –abort.
# Let's see how we can resolve a merge conflict.
First, we will have Jessica to create a new test, commit a test on the master branch and then push it to the remote repository.
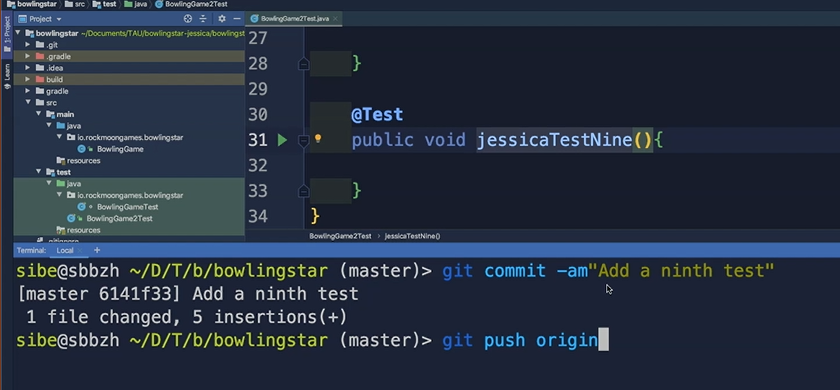
Here we are with Jessica on the master branch, and now we'll add a new test for Jessica and let's call that test “jessicaTestEight”. Great.
Now, we will add and commit in one go by hitting — git commit -am“Add an eighth test" — with a commit message.
So, this commit will add an eighth test. Great.
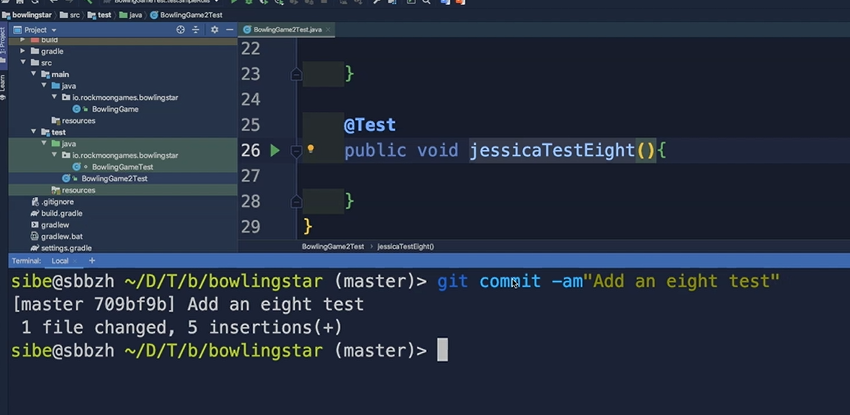
Then let's hit, git log. Yes, there it is, "Add an eighth test." Great.
Now we will push that new commit to the remote repository by hitting, git push origin. Great.
That's basically it. So, Jessica has done her task now.
Let's switch over to Lisa.
Lisa has now to update her local repository.
But first before we do that, we create a new branch from the master branch — git checkout -b feature/test9-lisa.
And then what we will do on this branch, we will add a ninth test for Lisa in the same BowlingGame2Test class so that we can actually produce a merge conflict. So, let's call this test “lisaTestNine”
Then we will add and commit in one go — git commit -am“Add a ninth test". Great.
Now, we have to fetch the new commit from the remote repository master branch into Lisa's local remote repository master branch by hitting first, git fetch we get the new commit.
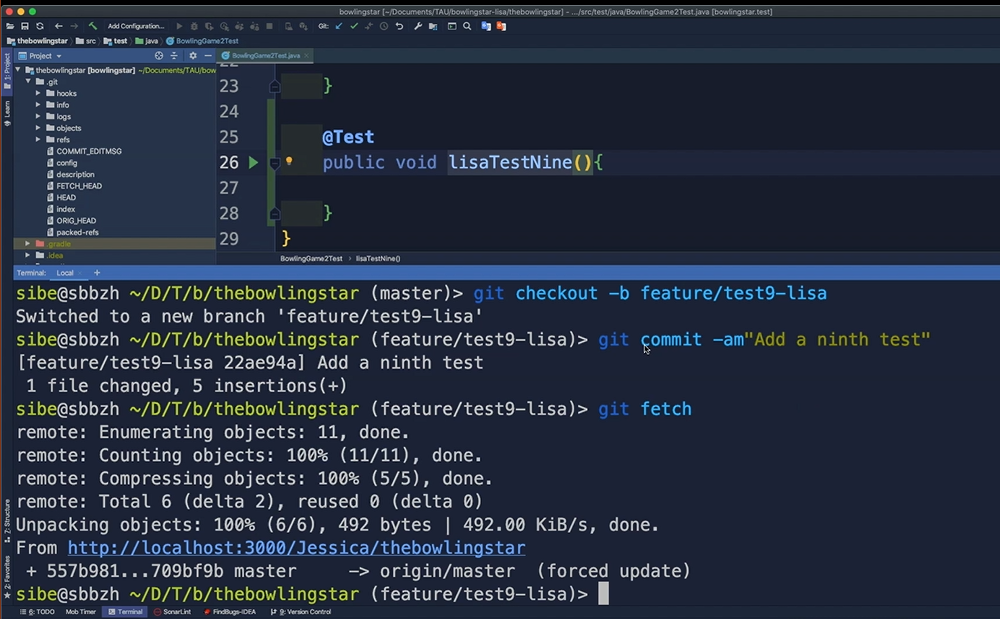
See, here we are, master to origin master.
Then what we will do, we will now, git checkout master so that we can actually now merge the changes, the new commit from the remote repository master into our local checked-out master branch.
And Git already says, "Your branch is behind 1 commit and can be fast forwarded." So, we just have to hit git merge.
Great.
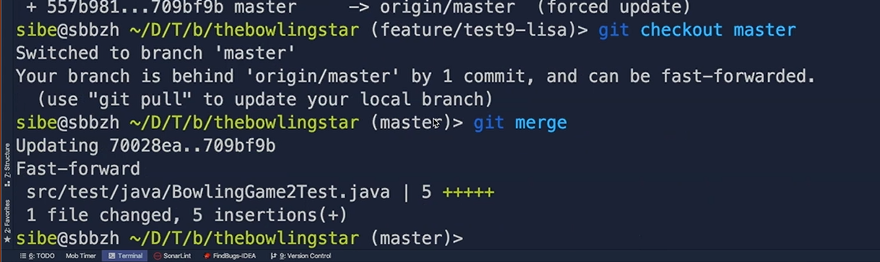
Now our local checked out master branch from Lisa is up to date.
We go back and git checkout feature/test9-lisa from before.
And now what we want to do is actually to merge the changes, the new commit, which is on the master branch into our local “feature/test9-lisa” to see how a merge conflict looks like, because Jessica and Lisa changed the same file.
For that we just need to hit git merge master and now, there it is, "Automatic merge failed, fix conflicts and then commit the result."
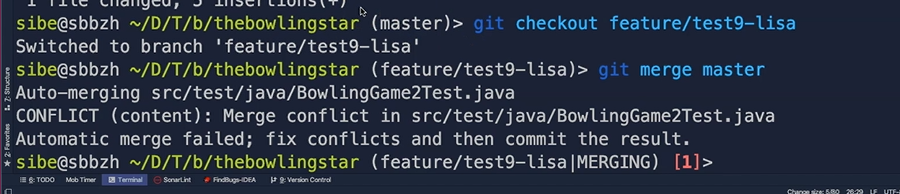
So yes, we will do that.
When we open up here the BowlingGame2Test Class, and we can see a HEAD pointer is pointing to the current active local feature/test9-lisa branch, here.
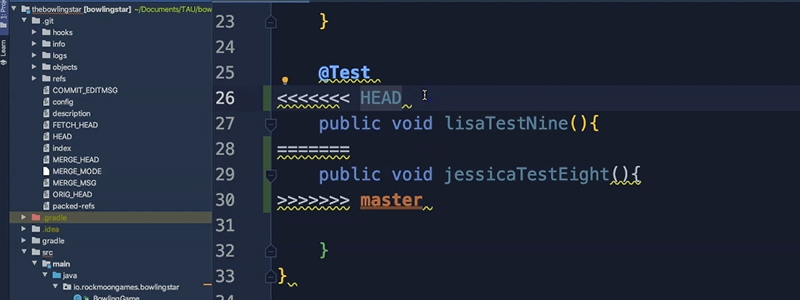
These are the changes from Lisa, “lisaTestNine”, and “public void jessicaTestEight”, that's the change which Jessica pushed to the remote master branch here.
So, we remove these extra lines, here.
Let's say Lisa's Test Nine is the correct one, and we don't want to have Jessica's Test Eight. So, let's remove that one here. Great.
And say, just for fun, "This is the awesome implementation of Jessica." Great.
So, we hit git status to see. Well actually what we actually have to do now.

What Git tells us now is you have unmerged paths. Fix conflicts and run Git commit." So, we have already fixed our conflicts.
We could also choose git merge –abort when we want to abort now, and don't continue with that.
As we have now a modified file, we first have to hit git add " that file — this time we won't use the dots here, we will use the class name, because usually what the dot does is it will add everything.
So, if we have several changed files here, it will add all the files to a staging area, and if we want to have a specific file only added to a staging area, we have to specify the name of that file.
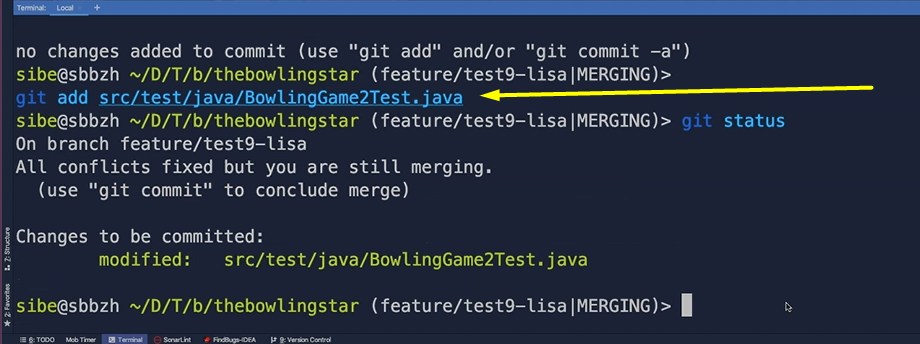
Then we git status again, and yes, we have now staged the changes.
We have to git commit again.
Now Git will open up our default text editor with a merge commit message, so "Merge branch ‘master’ into feature/test0-lisa”.
That's correct. Let's close that.
Now we can verify that, git log, and there it is.
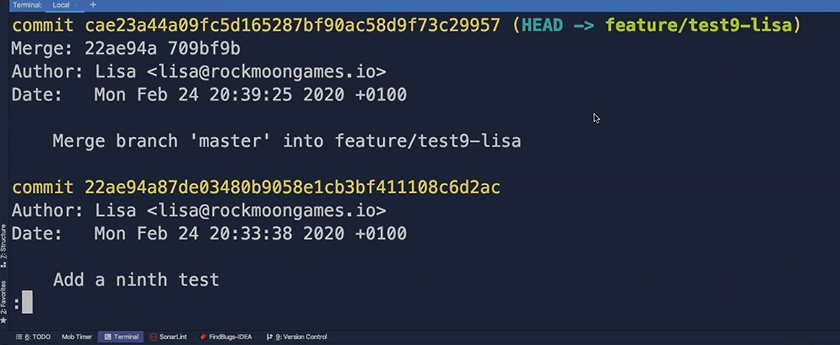
So, what we see now here is that we have now 2 new commits on our feature branch.
That's the "Add an eight test" from Jessica's master branch. Then we have the “Add a ninth test” from Lisa's feature branch.
And as we have merged them together and resolved conflict, we have now an additional merge commit here.
So we have mastered successfully our first merge conflict.
# Resolving Conflicts While Rebasing
Resolving conflicts while rebasing looks a bit different as we don't want to combine through a merge commit 2 commits together, but instead rebase a commit or several commits on to another one.
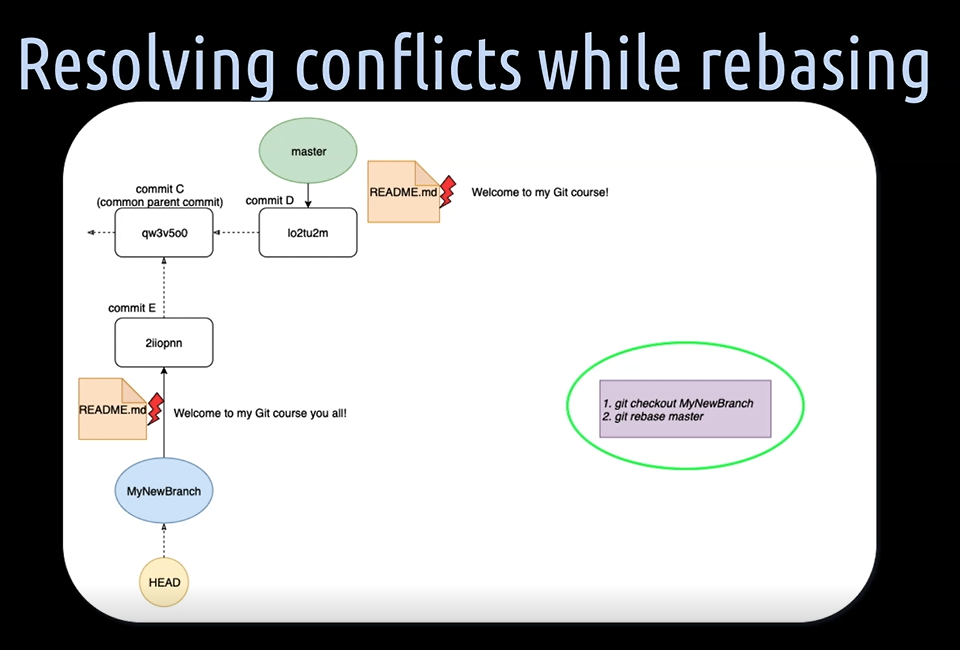
Let's pretend our active branch is again the “MyNewBranch”, and we want to rebase it onto the state of the master branch — which means onto commit E, but we have a conflicting README file.
The end result should look like this.
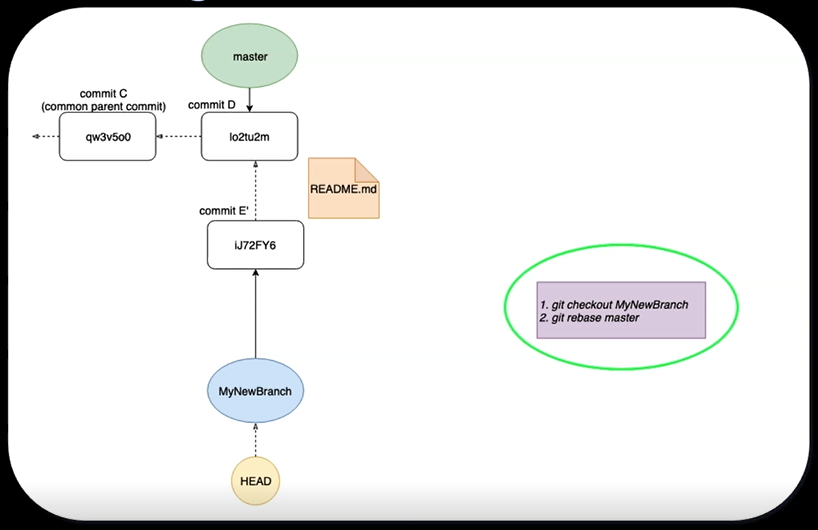
Changing the parent commit C of commit E to commit D.
When we try to do a git rebase master, Git can't handle this conflict by its own and will show us a message like this one here, "Git isn't able to automatically merge the 2 changed README files together and therefore complete the rebase."
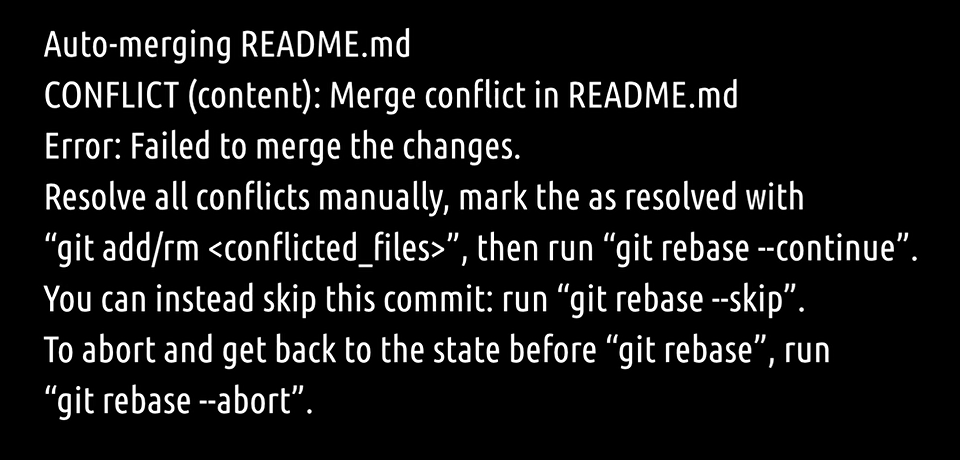
Instead, tells us that we have to fix the conflict locally on our machine and then continue to rebase.
When we open up the conflicting README file in the active “MyNewBranch”, we get something like this here.
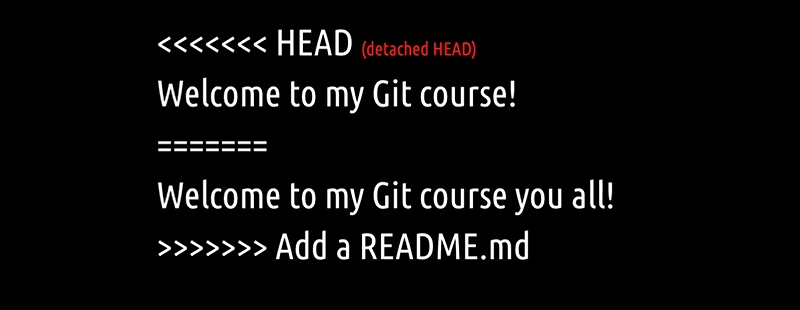
What you see here is the inverted version, as you saw before, when merging.
This time we have on top the current changes on commit D on the master branch, and below the incoming change from commit E of the active “MyNewBranch”.
But why is it inverted now?
Well, that is because while rebasing Git puts the HEAD pointed in a so-called detached state. The HEAD is then not anymore pointing to the “MyNewBranch”, but instead to the commit we want to rebase on.
This is almost the only time when Git by itself moves the HEAD pointer in a detached state, instead pointing to a branch pointer.
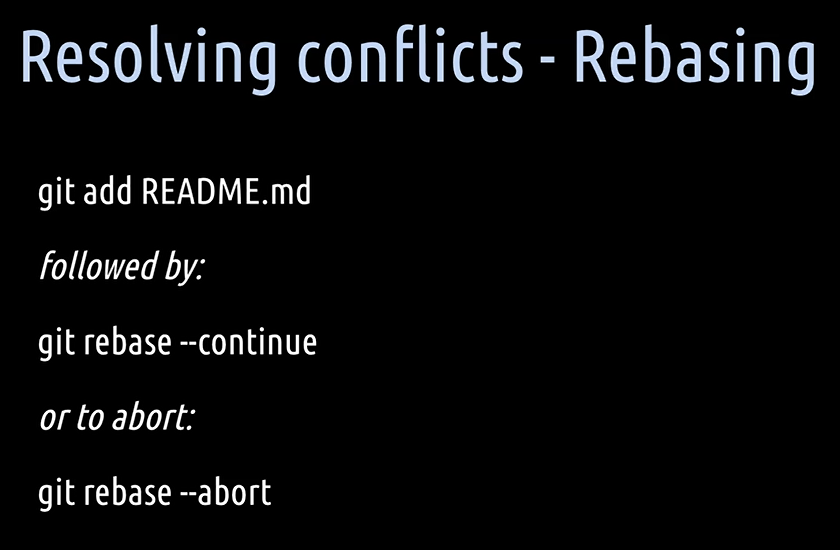
Once we are done resolving the conflicts while rebasing, we then have to add these changes to the staging area and after that to a git rebase --continue.
There is no need to commit as rebasing does not introduce a merge commit. The conflict will be resolved in the new commit E', created by rebasing.
Also, here, should we ever want to abort, we can stop and drop everything by hitting git rebase --abort.
# Let's help Jessica and Lisa to resolve the conflict while rebasing.
As before, we will first create a new test and commit that test on the master branch for Lisa. Then we will push that branch to the remote repository.
Once done with it we will switch over to Lisa and create a new feature branch from the unchanged master branch. On that feature branch we will, in the same file, create a new test.
Once done with it, we will checkout the master branch, fetch the changes from the remote repository and merge the commit from Jessica into the local master branch.
Then we will rebase the feature branch from Lisa on to the state of the new master branch, and then resolve the merged conflict.
So, let's start with Jessica.
We will first create a new test as Jessica, call that test “jessicaTestNine”.
And we will add and commit in one go — git commit -am“Add a ninth test”
Once done with it, we will push that to the remote repository using git push origin.
Now, we will switch over to Lisa.
We will now create a new feature branch for Lisa — git commit -b feature/test10-Lisa.
Once done with it, we will create a new test in the same BowlingGame2Test class as Jessica made her changes.
Now we will add and commit onto the feature branch in one go — git commit -am“Add a tenth test”.
And then it's time to switch over to the master branch (git checkout master) to fetch and merge the new commit from Jessica.
Now we will switch back to the just-created feature branch — git checkout feature/test10-Lisa.
Then rebase the active feature branch onto the state of the master branch — git rebase master.
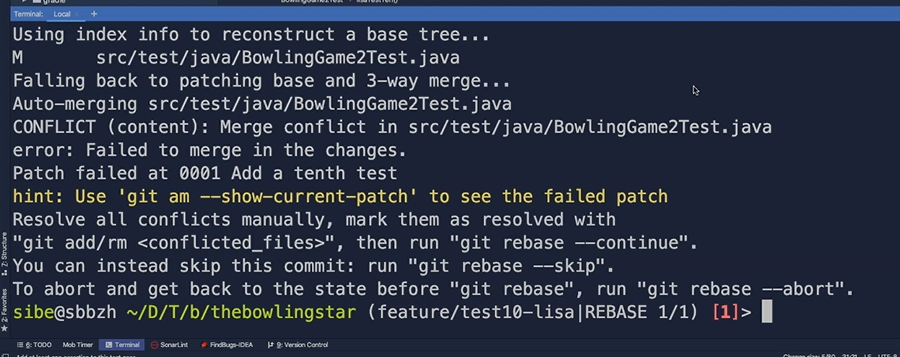
Now we have a merge conflict, and to resolve that we have to do that manually in the BowlingGame2Test class.
So, we go ahead, and now what we see here is that the HEAD pointer is in a so-called detached state.
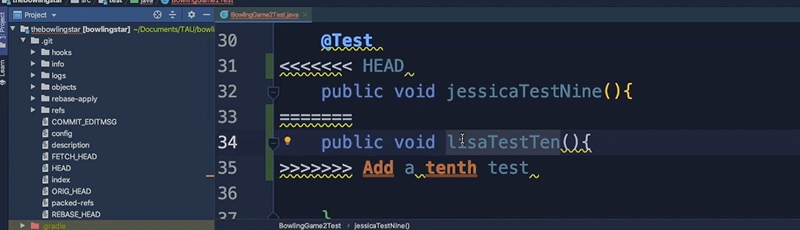
This means the head is pointing now onto the commit from the master branch where Jessica added the “jessicaTestNine” test, and below we see the changes from the commit, "Add a tenth test” by Lisa.
Let's say, we want to keep Lisa's tenth test, and get rid of Jessica's Test Nine. What we have to do is to clean up that file.
So, we head back to the terminal and hit git status.
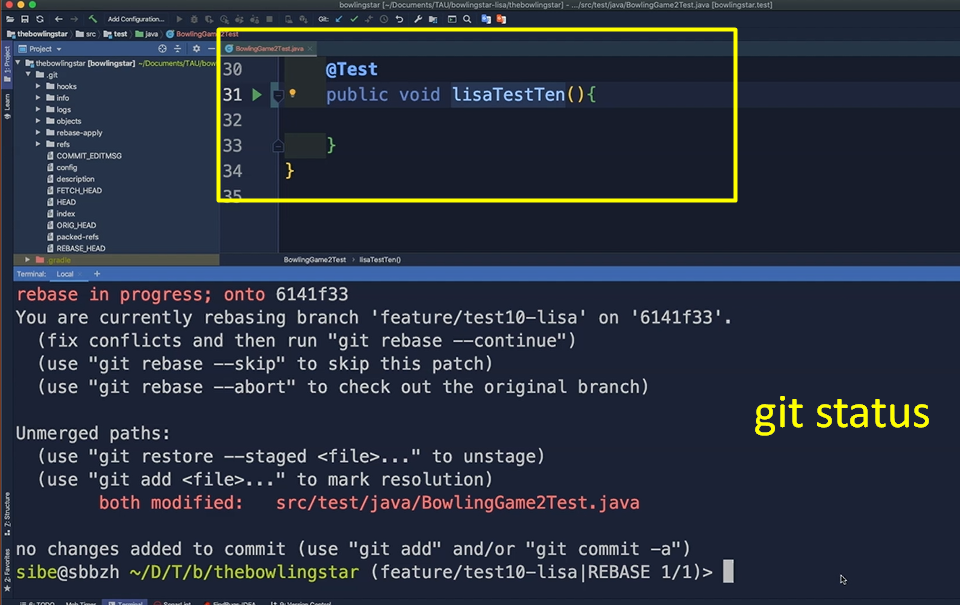
Now, what we have to do is to add the modified BowlingGame2Test class to the staging area using git add with the class location.
Then we hit git status again to see where we are.
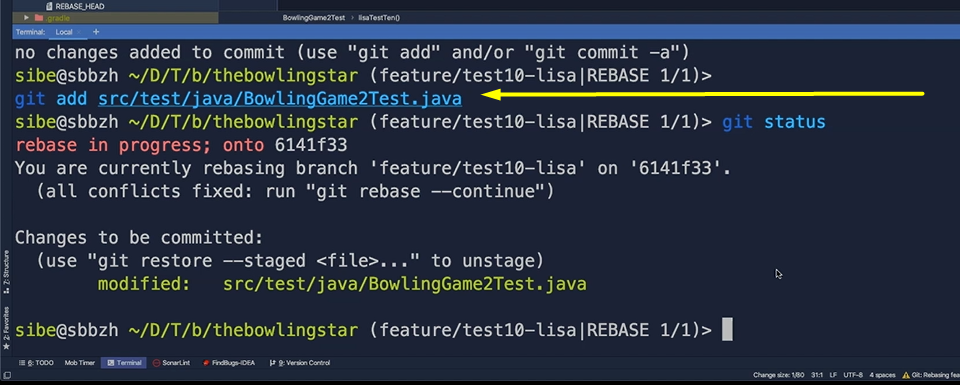
As we have now fixed all the conflicts, we just need to run, git rebase –continue. Great.
Now we can verify that hitting git log, and we did it. We rebased the "Add 10th test" from Lisa onto the commit from Jessica "Add a ninth test," and all this without any additional merge commit.
Strike, Jessica and Lisa are happy. They again learned a lot and are eager to learn even more in the next and last hands-on part of this course.
Resources
Quiz
The quiz for this chapter can be found in section 5.2
