

Transcripted Summary
In this chapter we're going back to the future and change the history of a branch.
Are you ready? Let's fly.
Lisa's first task in this part is to create a new branch, add a new test and then create a commit.
Next up, she shall fix the test because she introduced a bug in the first run and amend the fix to the previous commit.
# Rewriting History
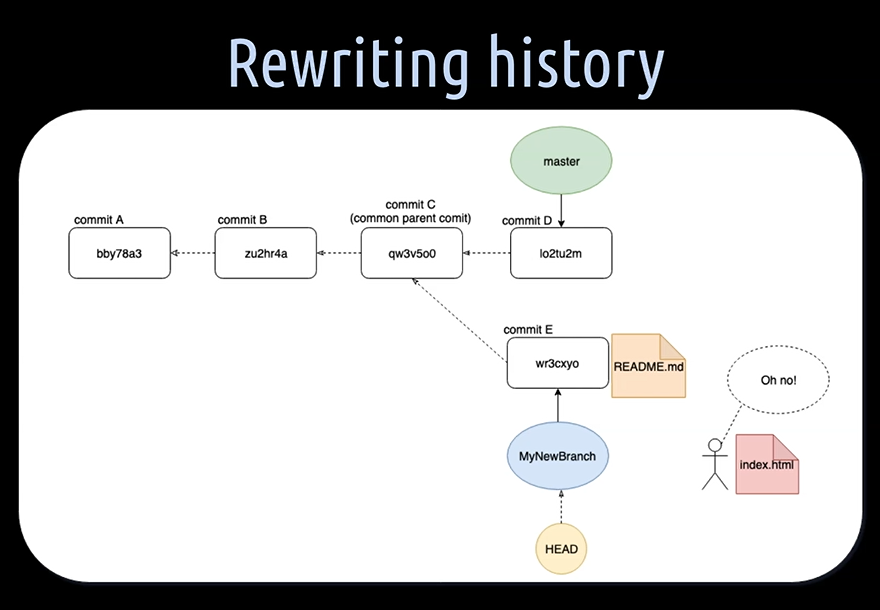
As you know by now, a commit points to a snapshot of files in the repository and contains a message, a hash, a timestamp of the creation and the author email address.
The history of a branch is made up by its commits and is called the commit history.
Let's say we have just made a commit E, with a README file in it on our “MyNewBranch” and notice that we have forgotten to add the index HTML file to it. I know we just could simply add a new commit, but we don't want to.
How can we still add this file to the commit E?
Actually, we can’t; but rewriting the commit history of the “MyNewBranch” is possible in order to have the index HTML file in the same commit as the README file.
# Rewriting History with Amend
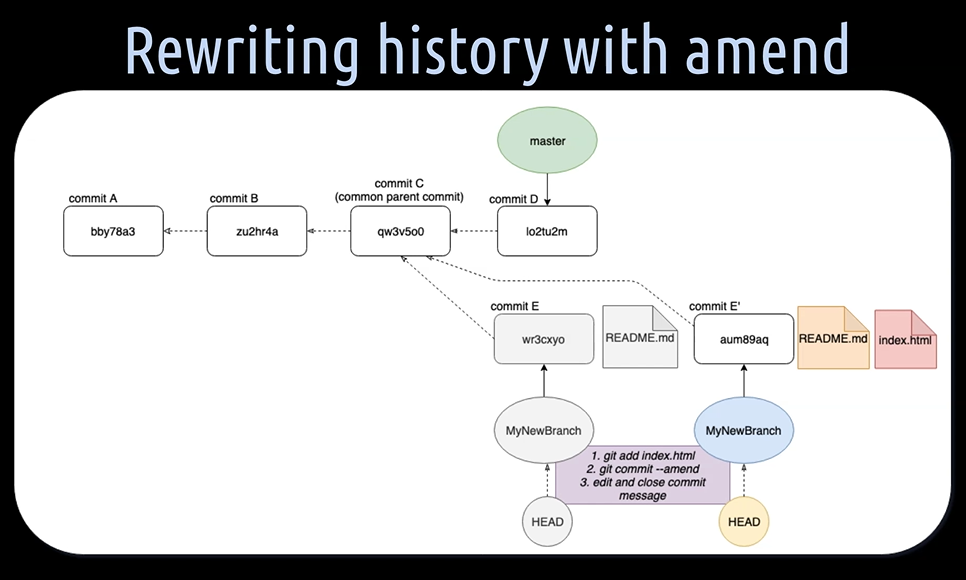
One way of doing that is to amend the index.html file to commit E.
First, we have to add the index HTML file to the staging area and then commit with ``git commit–amend
With that, the existing commit E is unrolled and our Git default text editor with the previous commit message of commit E is opened.
Once we have edited, saved and closed this commit message, the index.html file from the staging area and the README file from commit E, are added to a new commit E'.
But why do we have a commit E with an apostrophe and not a completely new commit, F for example?
Well this is because the only thing which has changed in this commit is its hash value and the commit message. The timestamp of creation and the author stay the same.
NOTE
It is important to notice here that when we use --amend, we rewrite the git history of a branch. Most commonly we do this on our own private feature or bug fix branches and not on the main master branch where everyone else is working on or taking their own branches off.
Let's help Lisa with her first task of this chapter.
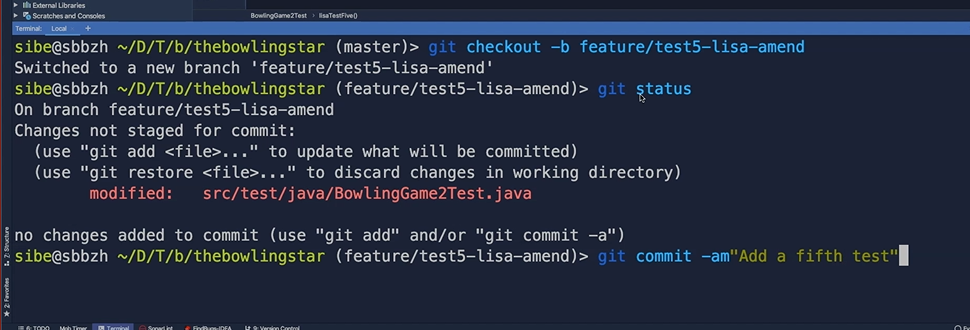
We will create a new branch — git checkout -b feature/test5-lisa-amend.
Now on this feature branch here, we will create a fifth test in the BowlingGame2Test class and we name that test, “lisaTestFive”.
And now we pretend that we actually implement a test here, but with a bug in it, let's say “bug”.
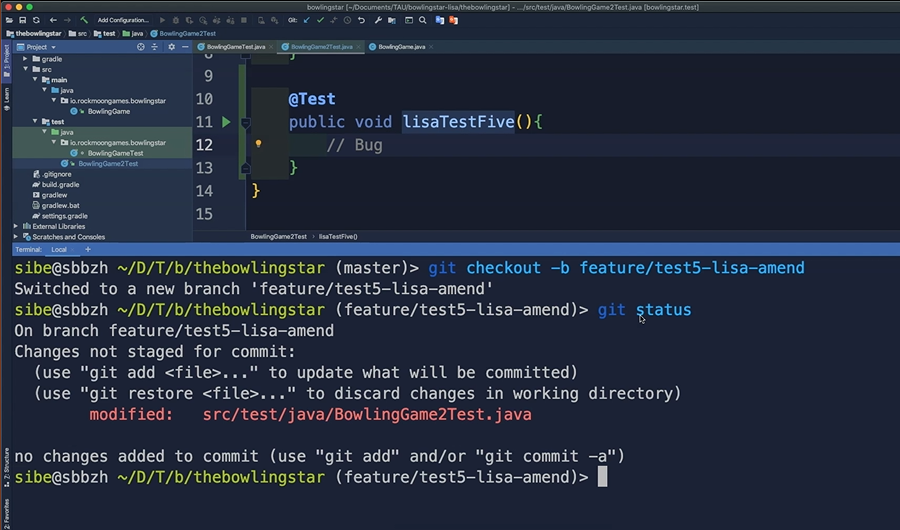
Great. Then we git status to see where we are.
Yes, we have some modified changes in the working directory which have to be staged and then we want to create a commit.
Let's do that in one go. git commit -am“Add a fifth test”.
What will this commit do? This commit will add a fifth test. Great.
Then quickly check that with git log and yes, “Add a fifth test” is the latest commit.
Perfect.
Now we are in the situation where we actually want to fix that “lisaTestFive”, but we don't want to create a new commit.
Now we want to amend just our new changes. Let's say we fix that bug here (remove the comment), good.
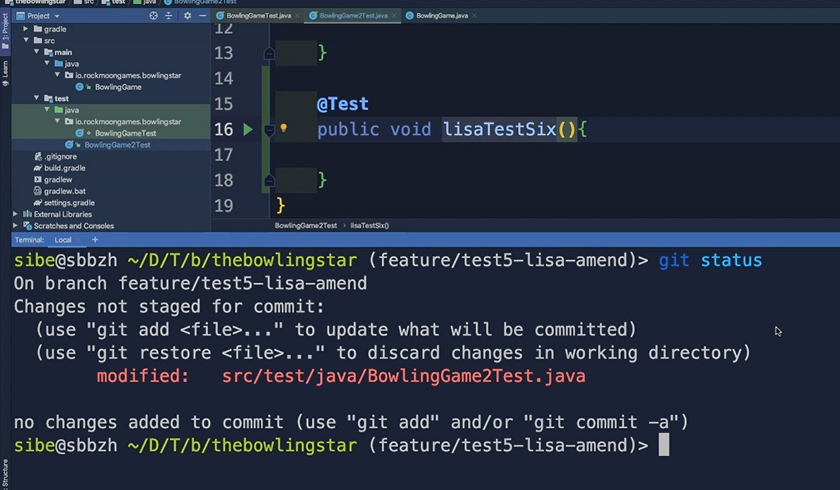
We hit git status.
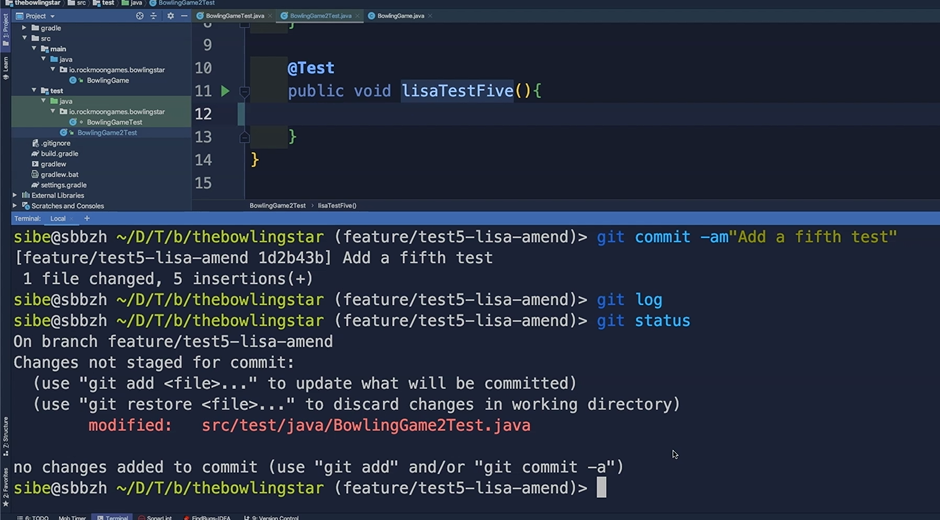
And we have modified the BowlingGame2Test class and now we have to add these changes to the staging area.
We use git add . with the dot. Perfect.
Then git status again to see where we are.
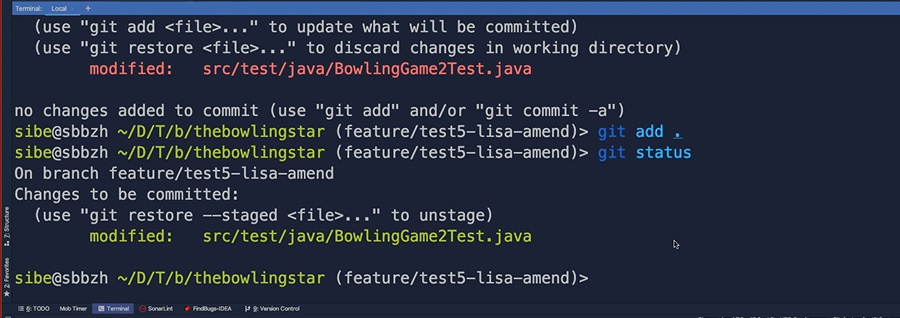
Now we will do a git commit –amend and Git will open up now our default text editor.
In our case it's still Visual Studio Code and we will use just the same commit message as before.
We can close that one.
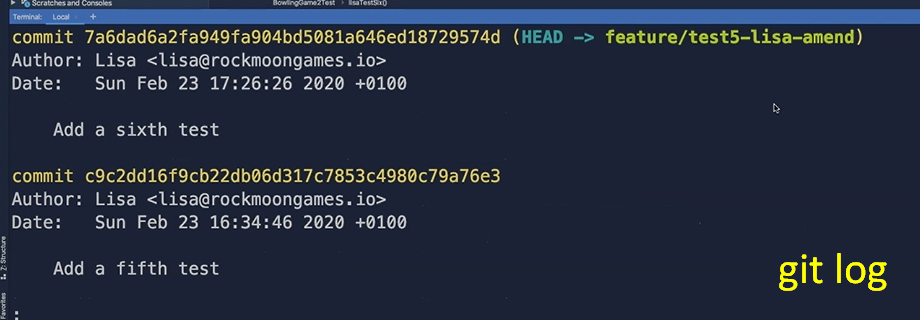
And now when we check with git log…
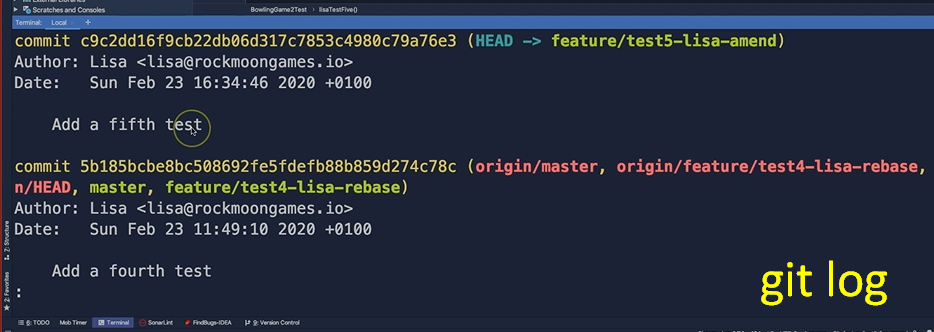
We can see that we still have this one single new commit on this branch but now with the fix already done in this “lisaTestFive”.
We have amended the bug fix which we did — we removed the comment in this “lisaTestFive” and amended it to the previous commit, “Add a fifth test”.
Lisa's second task in this chapter is to create 2 additional tests on the same branch from before, and each of these tests in a separate commit.
Then she shall clean up the branch by squashing all the commits into a single one.
But first some theory.
# Rewriting History with Interactive
Another way of changing the history of a branch is by using the interactive mode of rebase.
Other Git commands also know an interactive mode, but the one of rebase is something you will probably using more often in the future as it offers to change the history of a branch as much as you like.
Let's take the example from before and expand it a bit.
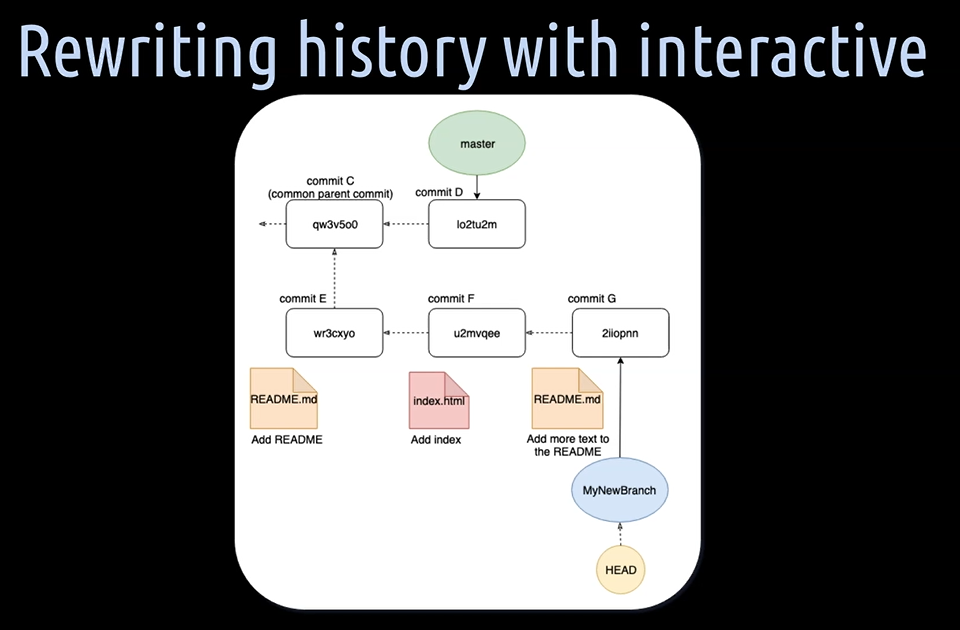
Let's say we have added a README file with commit E and an index file with commit F.
We suddenly notice that we have forgotten to add some important documentation to our README file and add an extra commit G for that.
When we now have a look at the commit history of the “MyNewBranch”, it looks like this.
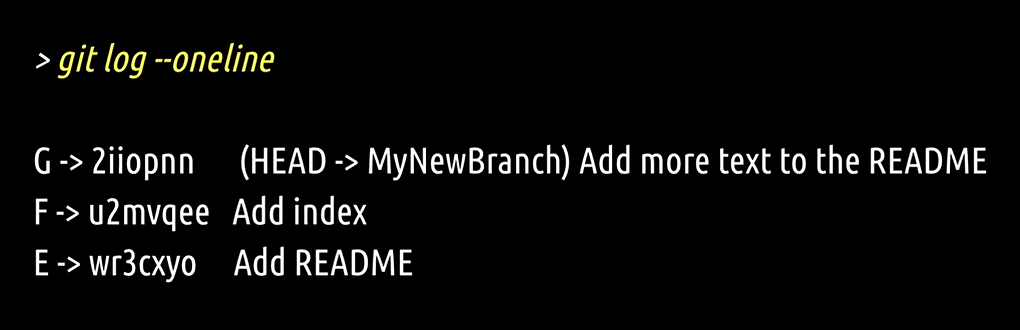
The latest commit is on top here. It doesn't look super clean, does it?
The one thing we want to fix about these three commits is to meld the “Add more text to the README” commit G, into the “Add README” commit E.
With that, we will have then 2 proper commits on the “MyNewBranch”, which results in a nice and shiny commit history.
Let's give it a try.
To change the three commits on the “MyNewBranch” we want to rebase them onto the parent commit C — that is the commit just before all these three.
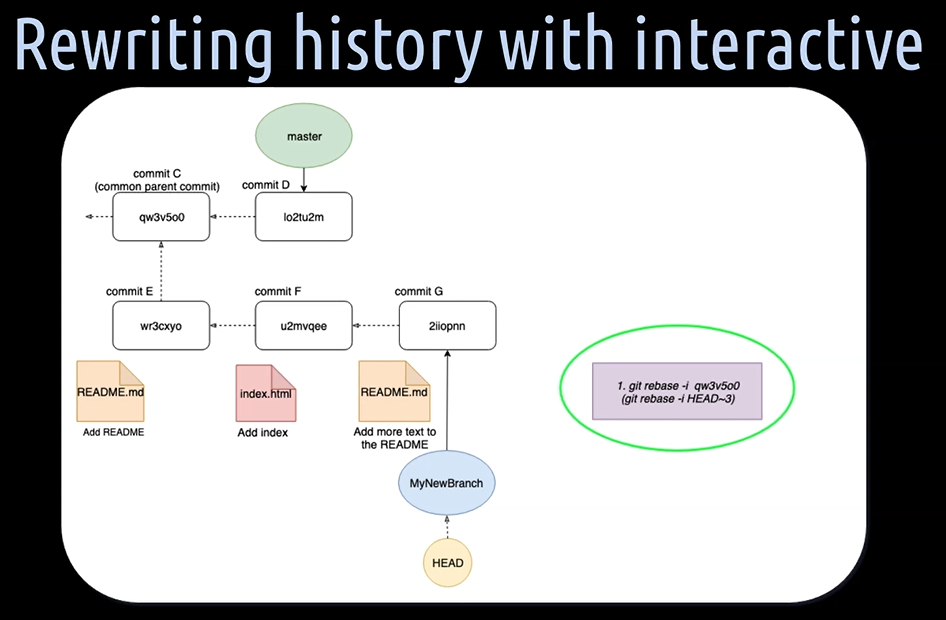
We can reference commit C either:
Directly by its commit hash by writing,
git rebase -iand then followed by the hash valueBy writing
git rebase -i HEAD~3— HEAD~3 means the third commit from the commit where the head is pointing to
Once we execute that command, what we then get in a text editor is something like this here.
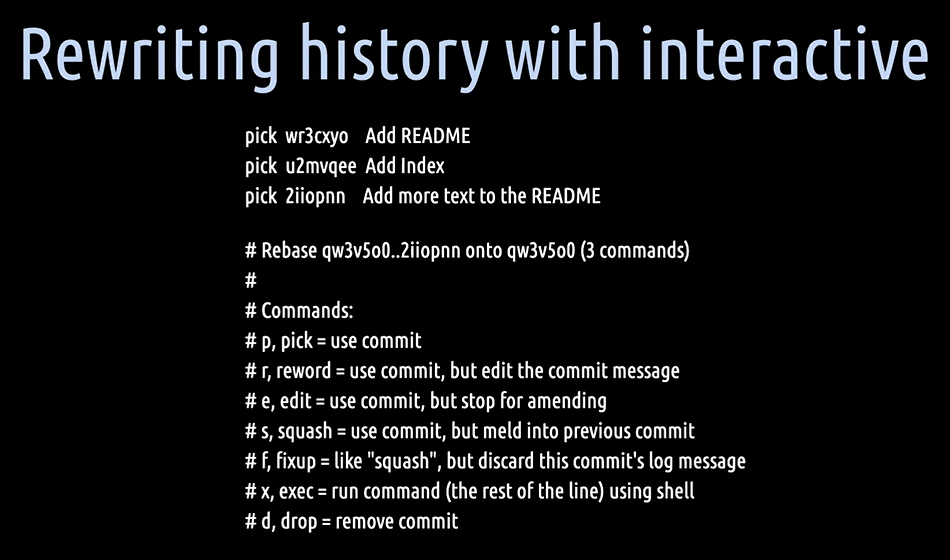
As usual, Git explains quite nicely what we can do now.
The commands which you will probably be using the most in the future from here are pick, reword, squash, and fixup.
Now pause the video for a moment and think what we have to do in order to get the commit history we want.
And did you find what we are looking for?
Obviously, we want to have something like this here.

We want to fixup the “Add more text to the README”.
But wait, are we done yet? Not exactly.
We missed something because fixup in this constellation will meld the “Add more text to the README” into the commit with the “Add index” commit. That's not exactly what we want.
Another powerful move we can do with the interactive mode here is to change the order of the commits.
We can actually reorder these lines here. Well then let's do this.

This will do the magic trick for us.
It will meld the “Add more text to the README” commit with the “Add README” commit and thereby discard the commit message “Add more texts to the README”.
We now can close the text editor and Git will do the rest for us.
When we hit git log-- oneline again, Git shows us the new commit history with two new commits on the “MyNewBranch”.
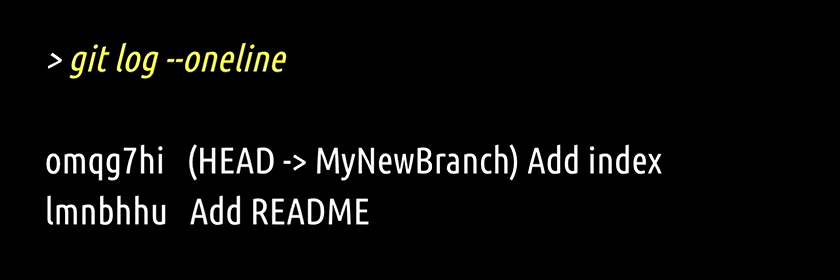
In our model, it looks like this with commit E' and commit F' — we haven't rewritten and rebased the commit history of the “MyNewBranch” onto commit C.

We now have a clean commit history on our branch.
You might ask yourself what happened to commits E, F, and G?
Well, these commits still exist. They just aren't referenced by any branch point anymore.
Git doesn't delete any commit, only in some very rare cases. For example, dangling commits which aren't referenced by any other commits.
With rebase interactive, you can change the history much more substantially than compared to amending.
NOTE
One important thing to notice when rewriting the history with amending and rebase interactive is that in both cases, new commits with new hashes are created, but the timestamp of creation and the author are taken from the original commits. That is why I have marked these commits with an apostrophe.
Okay, let's help Lisa with her second task.
We are on the “feature/test5-lisa-amend” branch and now we will just add a sixth test. We will call the test “lisaTestSix”.
Then we will quickly check that again with git status.
That's kind of always good to check that.
Then we will add and commit again in one go — git commit -am “Add a sixth test”.
Exactly. Perfect.
Let's verify that with git log.
Yes, there we are; the fifth test and add a sixth test.
Now we do a third commit on this branch by adding a seventh test to it, “lisaTestSeven”. Very good.
And then we will do a git commit -am“Add at seventh test”. Perfect.
Check that one. git log. Yeah, there we are. To add a fifth, add a sixth and a seventh test.
Now what we want to do is actually to squash these three commits into a single commit so that it looks a little bit nicer and shiny, our commit history on that branch.
Let's do a git rebase -I HEAD~3 for interactive and then use the HEAD pointer here and the ~3 to actually squash these three commits together.
Then the Git will open up our git default text editor, Visual Studio Code
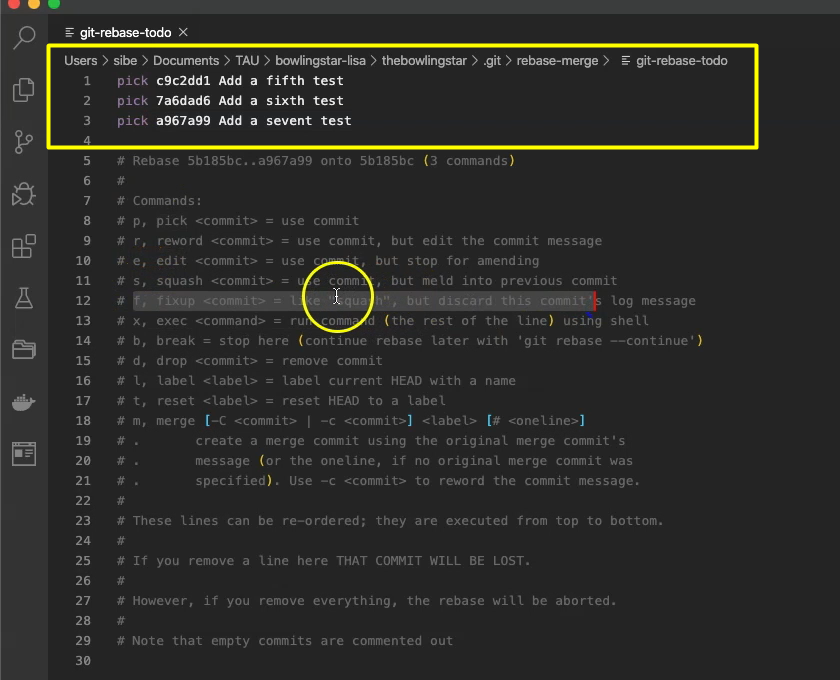
What we now want to do, we want to squash the “Add a seventh test” and to “Add a sixth test” into the “Add a fifth test” — combine all these 3 in just one.
And for that, we will use git fixup — it's like a squash but discards this commit’s log message.
So “f” and “f” (for fixup). Perfect.
Then what we also going to do is to reword our commit message of the first commit here. We put an “r” in front of it.

And then save that; close that.
Now Git will open up our Git text editor again because we said we want to reword the commit message off the first, very first commit.
And now we will write and change it to “Add a fifth, a sixth and a seventh test”. Perfect.
Let's close that.
Git has now squashed or kind of fixed up all these 3 commits into a single one.
We can verify that by hitting git log and there it is.
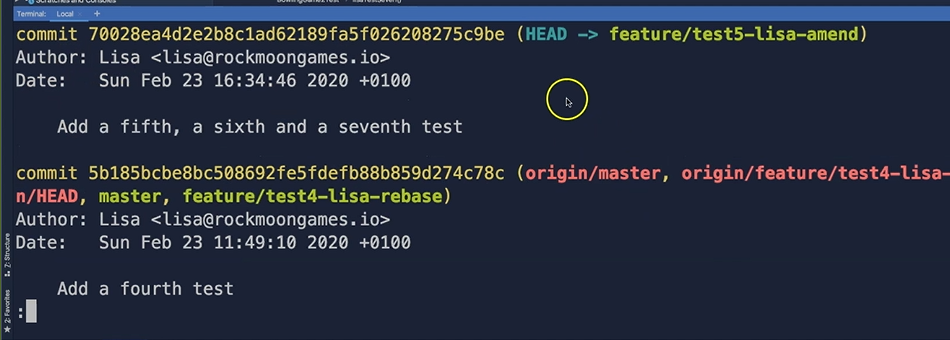
The commit which we took off here, add a fourth test and here is our all new commit, add a fifth, a sixth and a seventh test.
The next thing we can do is to create a pull request again on the remote repository.
For that we will push that branch, git push.
And as we already know, we have to set the upstream origin feature branch for that — git push –set-upstream origin feature/test5-lisa-amend — with the name of the remote repository and the branch we want to pull. Exactly.
We push that to the remote repository and now we will switch over to the remote repository.
Here we are with Lisa on the remote repository manager. We do a refresh.
We have here a third branch now, a new branch. This is this “feature/test5-lisa-amend”, which we have just pushed.
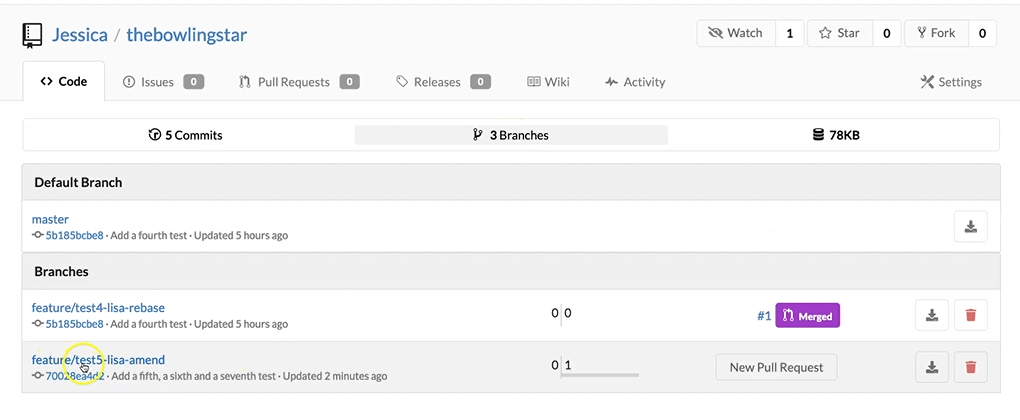
We select that one. We create a New Pull Request.
What we want to do is to pull, that's why it actually is named pull. We want to pull the “feature/test5-lisa-amend” branch into the master branch.
We create a New Pull Request. Here we choose again, Jessica as reviewer, and we leave the rest as it is and we create a new pull request.
Now we switch over to Jessica's account.
As Jessica, we do a refresh. We get notified that we have a new task which is assigned to us. This is this “feature/test5-lisa-amend” branch, which we have to review now. One file has changed.
We can see here Lisa has added a new test5, test6 and test7.
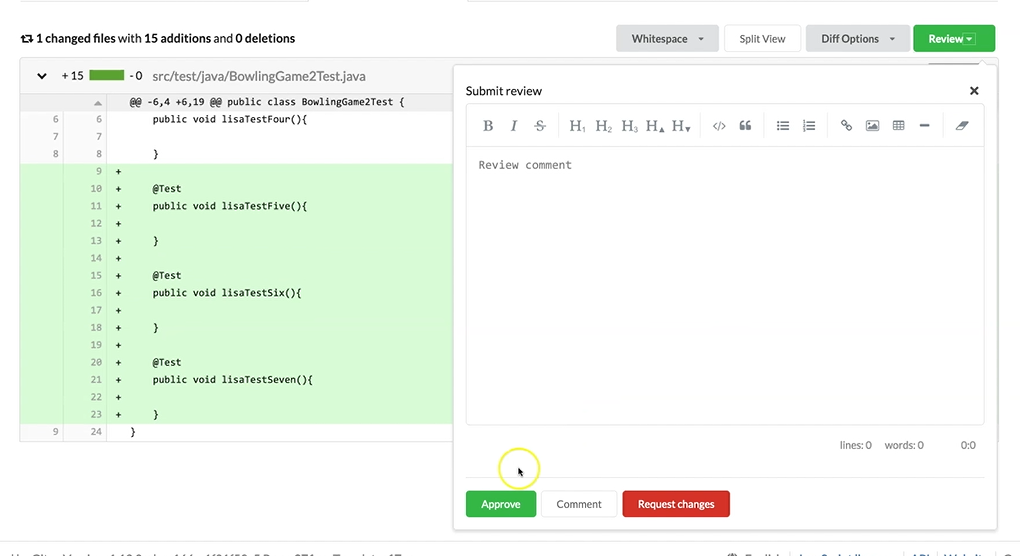
This looks pretty good to us so we will approve that.
Once it is approved, Lisa can now merge that into the main master branch.
We head over to Lisa, refresh the page here and we can see, oh yes. Cool. Jessica just approved our pull request and now we can do a Rebase and Merge that into the main master branch.
Perfect. Done.
Now we can verify that by going to the project and now we are on the master branch.
We are checking the commits. Here we are.
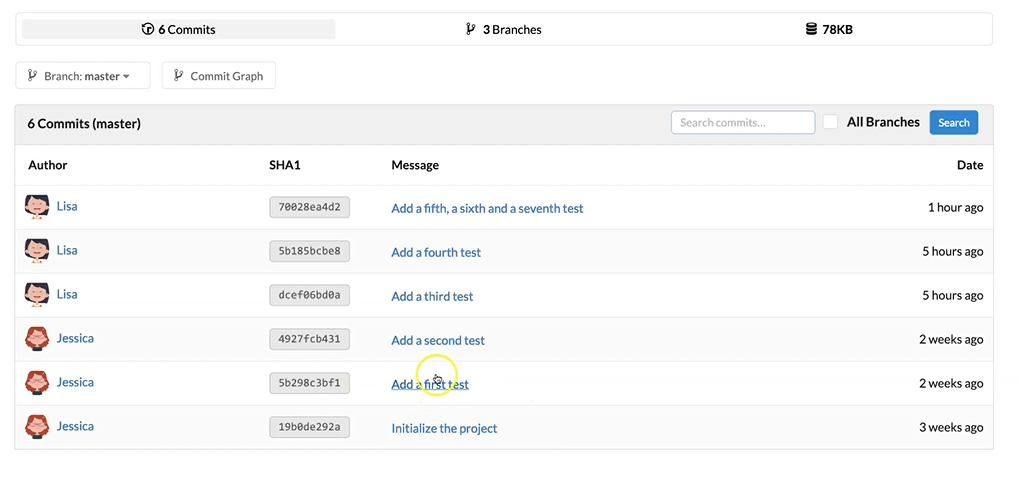
All the commits on the master branch and there it is, our add a fifth, a sixth and seventh test commit which we have just added.
We can quickly verify the Commit Graph. That's the visual representation of our commit history on the master branch.
And there we are.
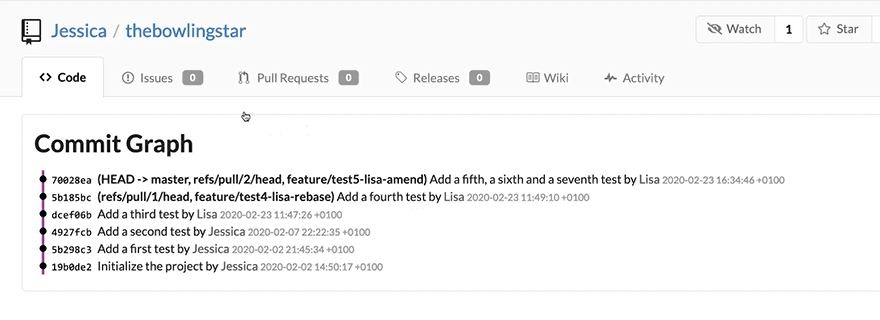
All the commits in a nice and shiny order.
Now as we have changed the master branch on the remote repository, we have again to fetch and merge the changes to the local repositories from Jessica and Lisa.
Let's do this.
First, we will update the master branch from Lisa. So, here we do a git fetch,
Then we switch over to the master branch with git checkout master.
Now we can already see, your branch is behind the remote repository master branch by 1 commit and can be fast forwarded.
Which means we just have to hit git merge.
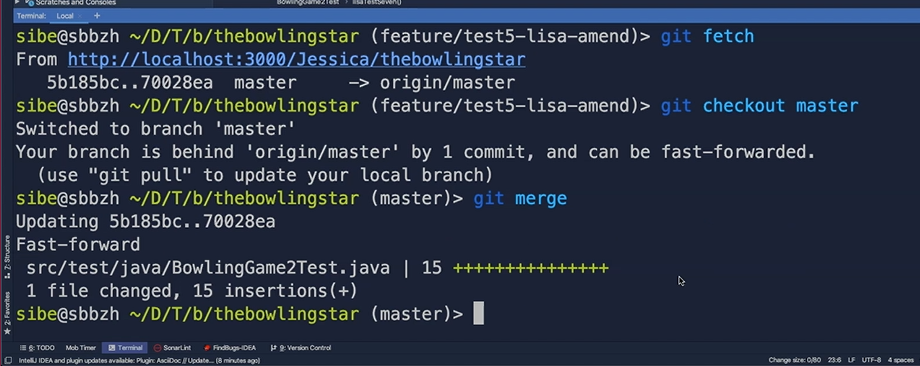
And now we merge the changes from the remote repository master branch into our checked out local master branch.
Now we had over two Jessica's local repository to do the same there.
As Jessica, we have to do a git fetch — we'll fetch all the new data from the remote repository.
Then do a git status here because we are already on the master branch and we can see your branches behind the origin master by 1 commit.
Also, here all we have to do is do a git merge.
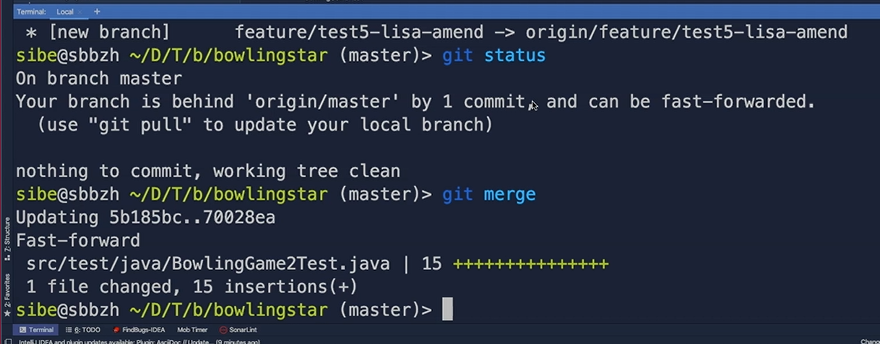
And now also Jessica is up to date with her local master branch.
# Golden Rule of Rewriting History
Be careful and thoughtful when you intend to go back to the future for rewriting history either by amending or rebasing interactive on a public shared branch on a remote repository where other people are working on.
It might be a good idea to check with the others first what your intention of such a move is.
The general advice is don't rewrite the history of the master branch of an open source project. And of course, don't rewrite the history of your company's release branch.
In most cases, the master branch or main branch of a project is anyway protected against rewriting its history.
For example, GitHub offers a number of tools to achieve frictionless collaboration and help you keep your repositories in good shape without littering your development workflow with unnecessary obstructions.
Lisa can be proud of herself. She tackled the two tasks with bravery and learned a lot thereby.
