

Transcripted Summary
In this chapter we will start looking at the first three of the most important advanced concepts in Git. Those are branching, merging one branch into another branch, and rebasing a branch onto the state of another branch.
It's time for travel.
Jessica went on vacation for one week. While Jessica is away, Lisa shall implement some tests.
Lisa's task in this chapter is to create some new local branches with tests and practice the concepts of branching, merging and rebasing.
At the end of the day, she then shall push one final branch with all the tests in it to the remote repository, create a pull request, and assign it to Jessica for review.
Once Jessica is back from her vacation, her task in this chapter is to review the assigned pull request and then merge it into the main master branch in the remote repository.
# Branching
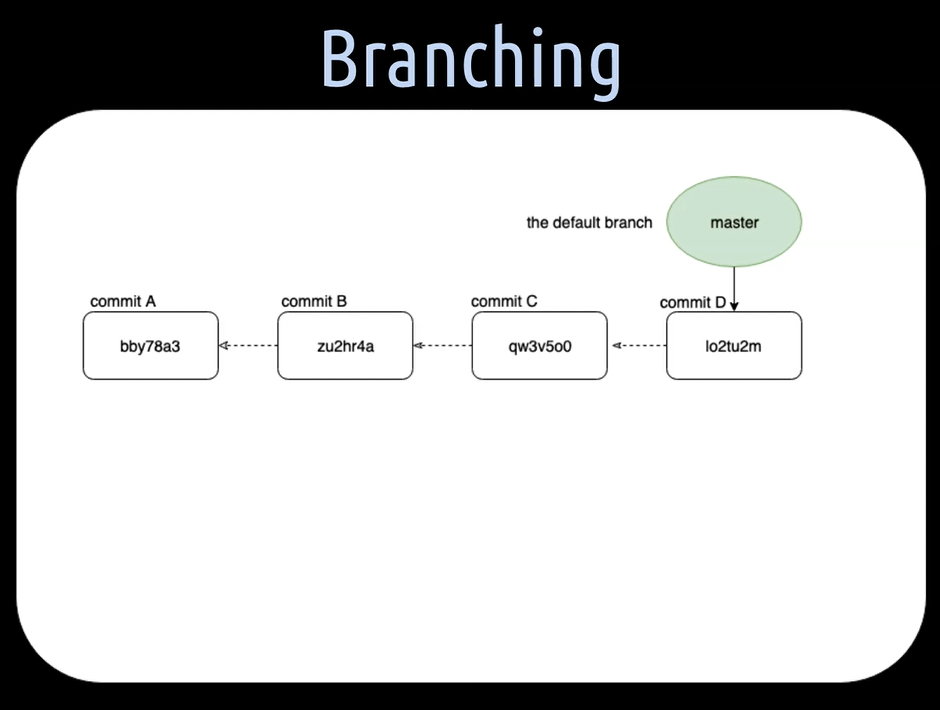
So far, we have only worked with the master branch, because the master branch is the default branch created when you initialize a repository.
NOTE
You are actually free to change the default working branch name, but I haven't seen anyone doing that in a project so far, so we will also stay with the name “master” as the name for the default branch in this course.
The master branch is the so-called main branch of a repository and the place where the final version or the production code is stored.
Often when we work on the implementation of a new test in a team’s automation framework, we create a separate new branch for it.
Separate branches gives us the possibility to run our experiments through a CI/CD pipeline without disturbing the main master branch.
Once done with it and someone else reviewed our branch, or you have done pair programming or more programming, we then merge the branch into the master branch.
Of course, there are also other forms of collaboration possible on a project. We will have a look at this in Chapter 6.
What is actually a branch in Git? A branch is nothing other than a simple pointer which is pointing to the latest commit of a series of commits.
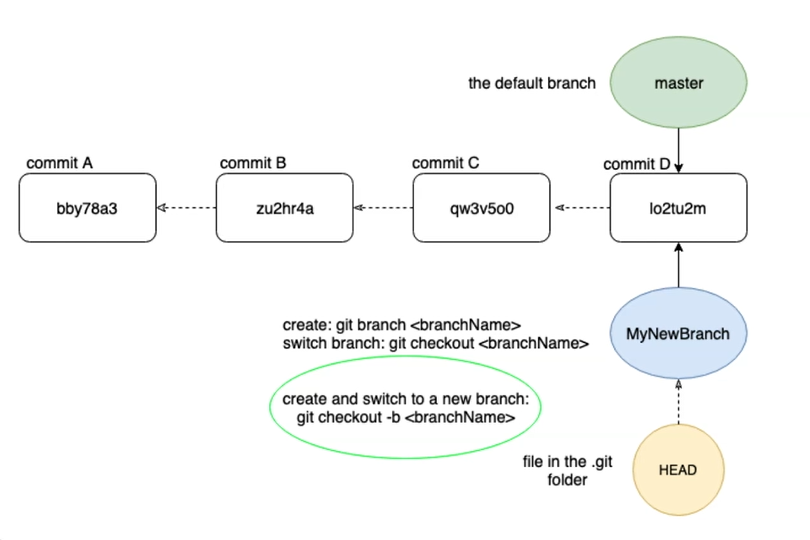
When we create a new branch with git branch followed by its name, we are actually creating a new pointer — this pointer is then pointing to the latest commit of this new branch.
Switching branches is possible with git checkout followed by the branch name. The checked-out branch is then the so-called active local branch and is the branch we are currently working on in the working directory.
How does Git know which branch is the active checked out one? Well, for that purpose, Git knows another pointer called the HEAD.
The HEAD is a simple file in the .git directory which points to the active branch and thereby to the latest commit of that branch.
When we do a git checkout of a branch, we simply move the HEAD pointer to that specific branch. If one wants to create a branch and switch to it right away, one can take a shortcut and use git checkout -b for branch and then the name of the new branch.
Let's see in Lisa's repository where the HEAD is located and pointing to.
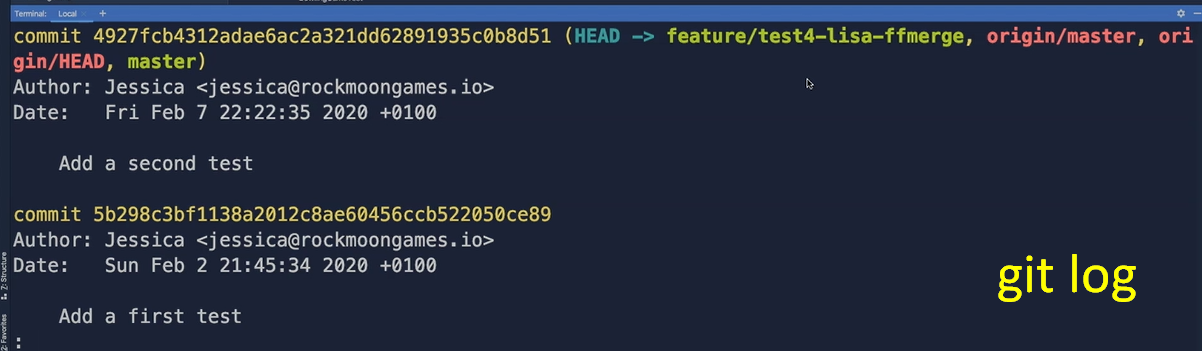
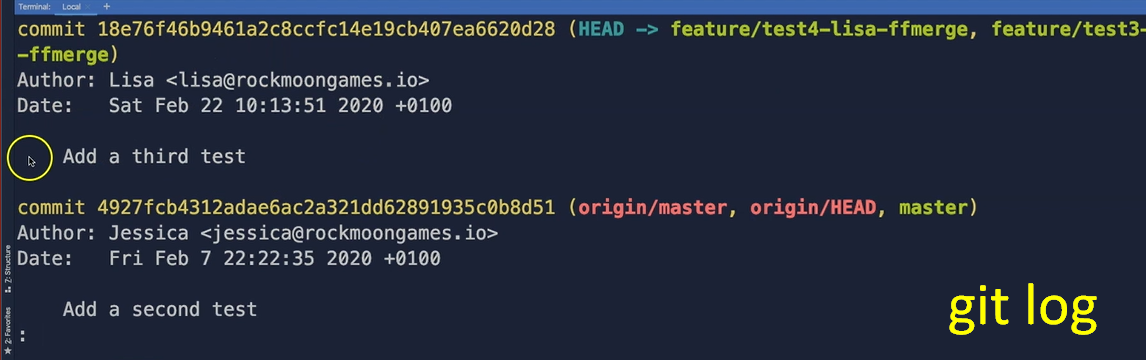
First, we hit git log in the console.
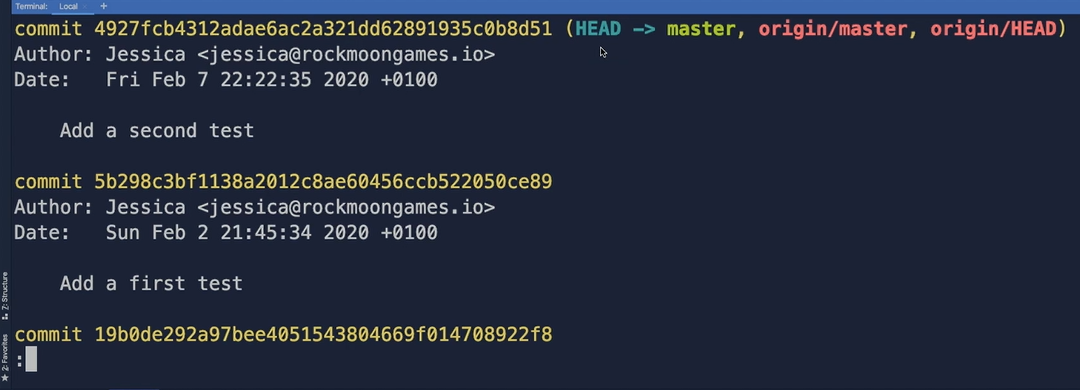
We get a list of all the commits on our master branch, but why on the master branch?
Because as the local HEAD here is pointing to the local master branch, we know that this is the current checked out branch in the working directory.
The local master branch, in turn, is pointing to the latest commit here, to the “Add a second test” commit to this hash value.
Then the remote origin HEAD here and the remote origin master here, so these 2 pointers, are also pointing to the latest — to the same commit hash, to the same commit — because as you remember, we did push these commits, for Jessica, to the remote repository.
Now let's check out where these file pointers are in the hidden .git directory.
The local HEAD file here is pointing to the master branch reference pointer, which is located under refs here, then heads, and here is the master file pointer.
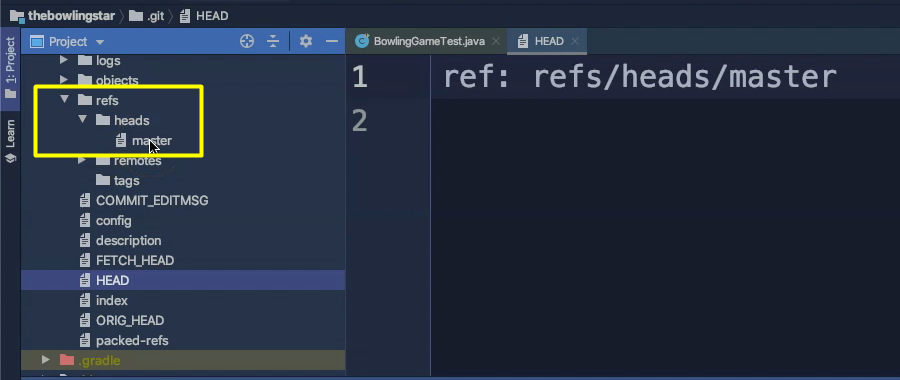
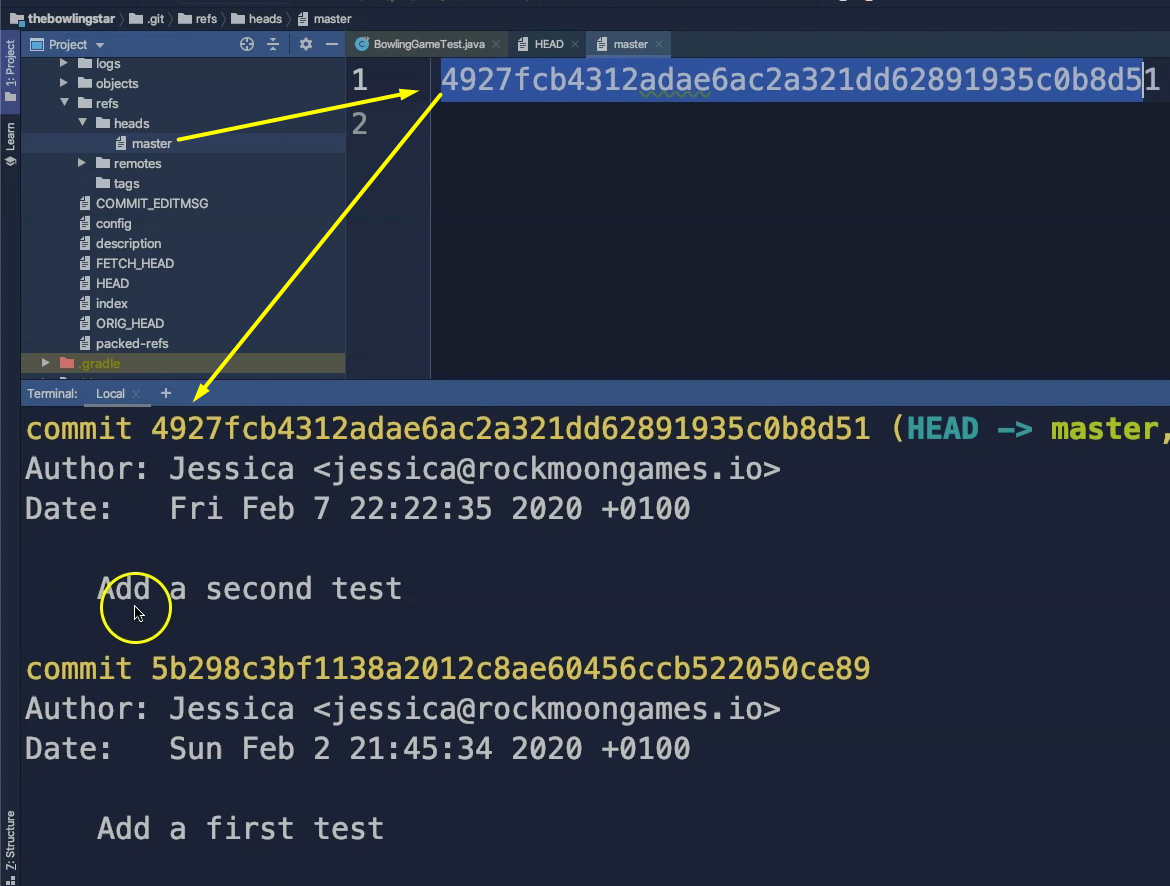
The master file pointer, when we open that file, is pointing to the latest commit hash.
That's correct, because 4927 is our “Add a second test” commit, so the latest one on the master branch.
Then we have the same thing for the remote repository in the remotes/origin folder.
Here we also have a HEAD file, and this HEAD file is pointing to the remotes origin master pointer, which is here.
When we open up that file, we can see the origin master branch pointer is also pointing to the latest commit on the master branch to the add a second test commit. Also, that is absolutely correct.
There are also two other strange files in the hidden .git directory.
The first one is this “FETCH_HEAD” file — this file is a short-lived pointer to keep track of what has just been fetched from the remote repository.
Then we have “ORIG_HEAD” pointer file — which saves that previous state of the remote HEAD pointer.
# Let's now help Lisa with creating 2 branches so that we can see how a fast-forward merge works.
First, we create a new branch from the master branch with a new test for it.
For doing that, we hit git checkout -b feature/test3-lisa-ffmerge — and call that new branch Test 3, Lisa fast forward merge branch.
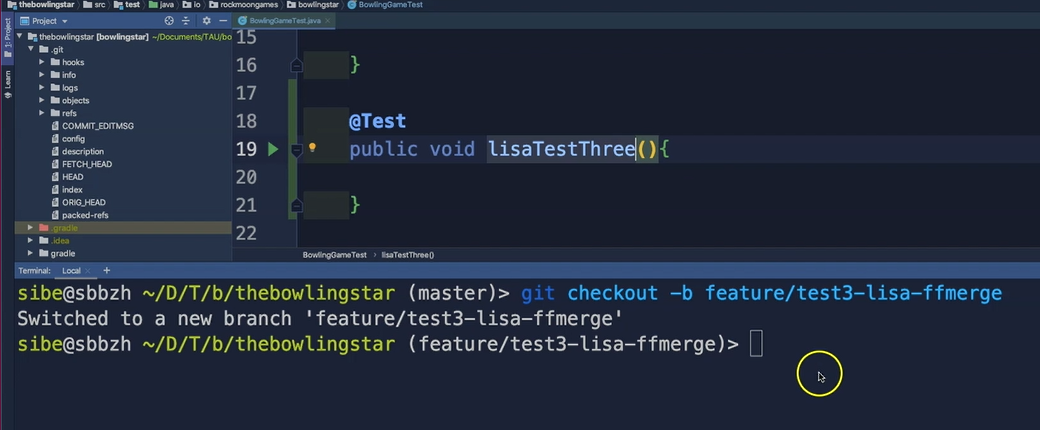
That's good. Perfect.
Then we create on that new branch a third test. Let's call that test “LisaTestThree”.
@test
public void lisaTestThree() {

}
Very good.
Then we hit git status and we see, yes, we have some modified files in the working directory.
We add these changes to the staging area by hitting git add . with the dot. Perfect.
Then we hit git status again to see where we are.
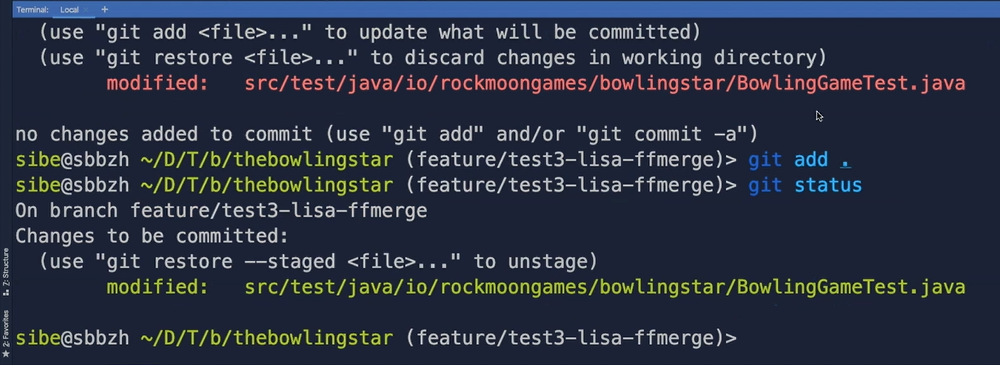
And yes, we have now staged these changes and we have some changes which need to be committed.
Let's create a new commit by hitting git commit and then add a commit message here.
Let's ask ourselves, what will this commit do?
This commit will aAdd a third test — git commit -am“Add a third test”. — very good.
Now we can hit git log to see how many commits we have now on this new feature branch.
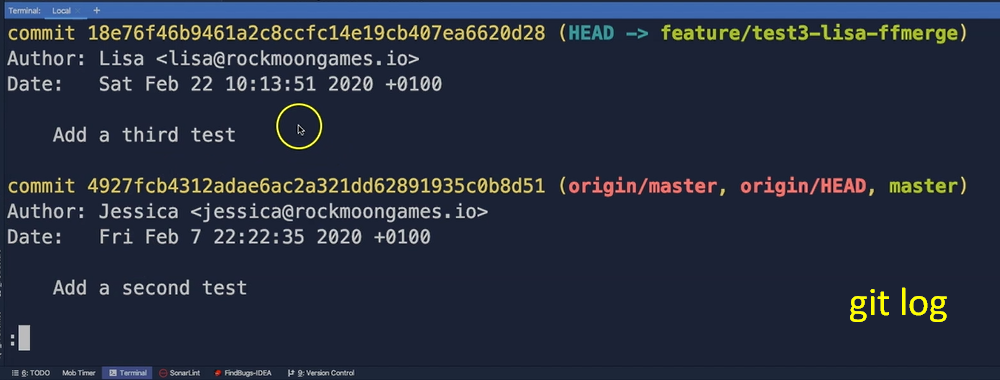
Yes, of course we have all the other commits, all the commits from the master, so the “Add a first test”, the “Add a second test”, and also our newest commit here, “Add a third test”, by Lisa here.
We can see here the HEAD is pointing to the “feature/test3-lisa-ffmerge” branch. This means this is now our active local branch here.
Now let's create a second branch by going back to the master branch — git checkout master — because we want to create a second branch from the master branch.
Then we hit git checkout -b and then name for the second branch — git checkout -b feature/test4-lisa-ffmerge.
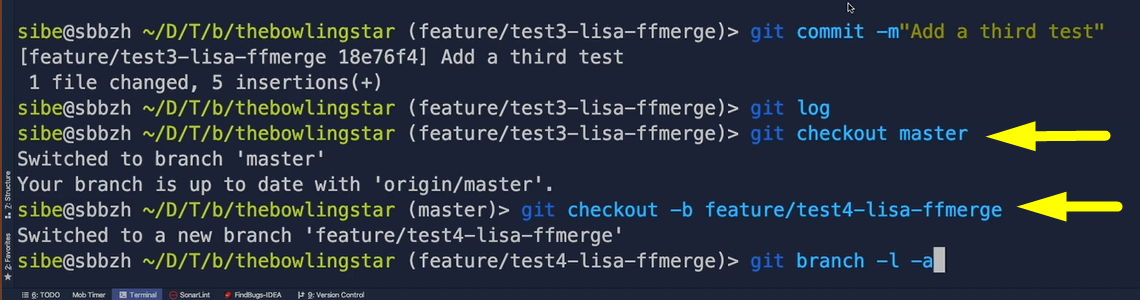
Now we can verify all the branches which we currently have by hitting git branch -l -a for listing all the branches we currently have here.
We can see, yes, so we have now the 2 new branches which we just created here, the feature branches.
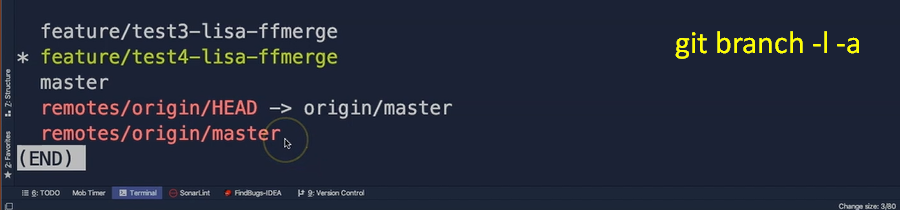
Then we have the local master branch. And also, still the remote branches here.
Perfect.
# Now we are ready for merging.
There is a point in the lifetime of a branch where we want that branch to be merged into another one, most commonly into the main master branch.
Note that you always merge another branch into the one you have currently set as active, which means checked out branch.
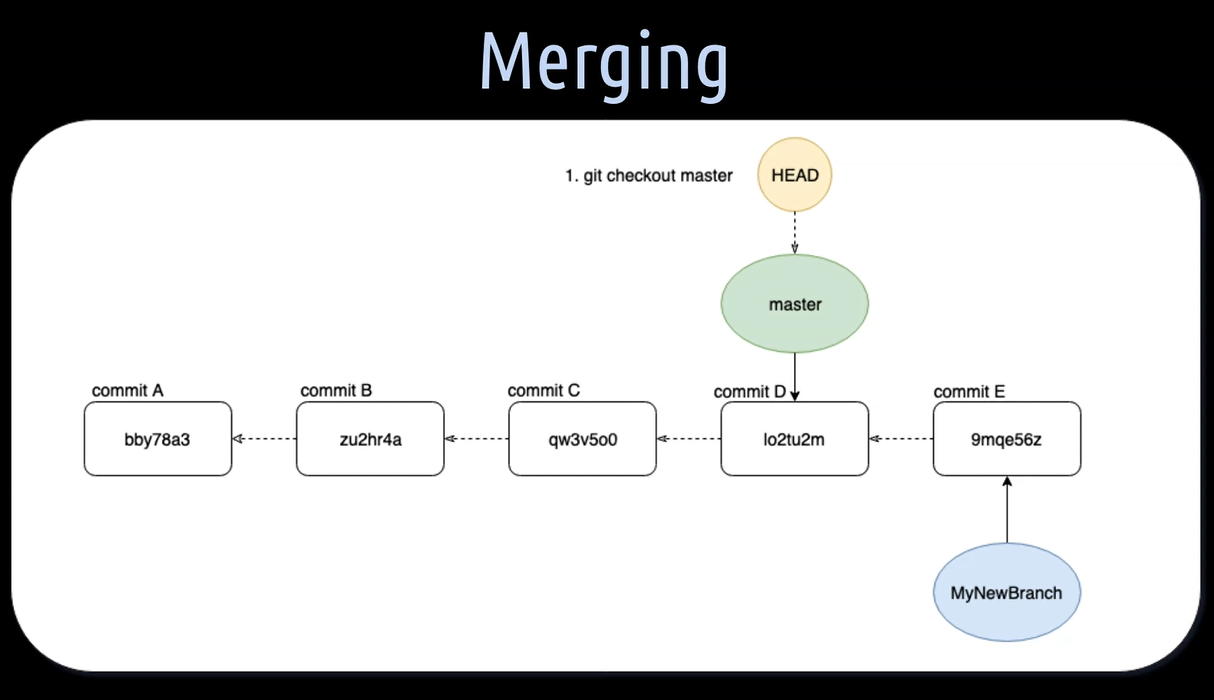
In this model here, we have an active master branch because the HEAD is pointing to it. And the HEAD is pointing to its latest commit of that branch.
Then we have a “MyNewBranch”, which is pointing to its very first “commit E”.
This “commit E” of the “MyNewBranch”, is referring back to the latest “commit D” of the master branch, because we created the “MyNewBranch” from it.
On the master branch we haven't added a new commit since the “MyNewBranch” was created.
When we now merge the “MyNewBranch”, this is the source branch, into the master branch, which in this case is the target branch, we are doing a so-called fast-forward merge.
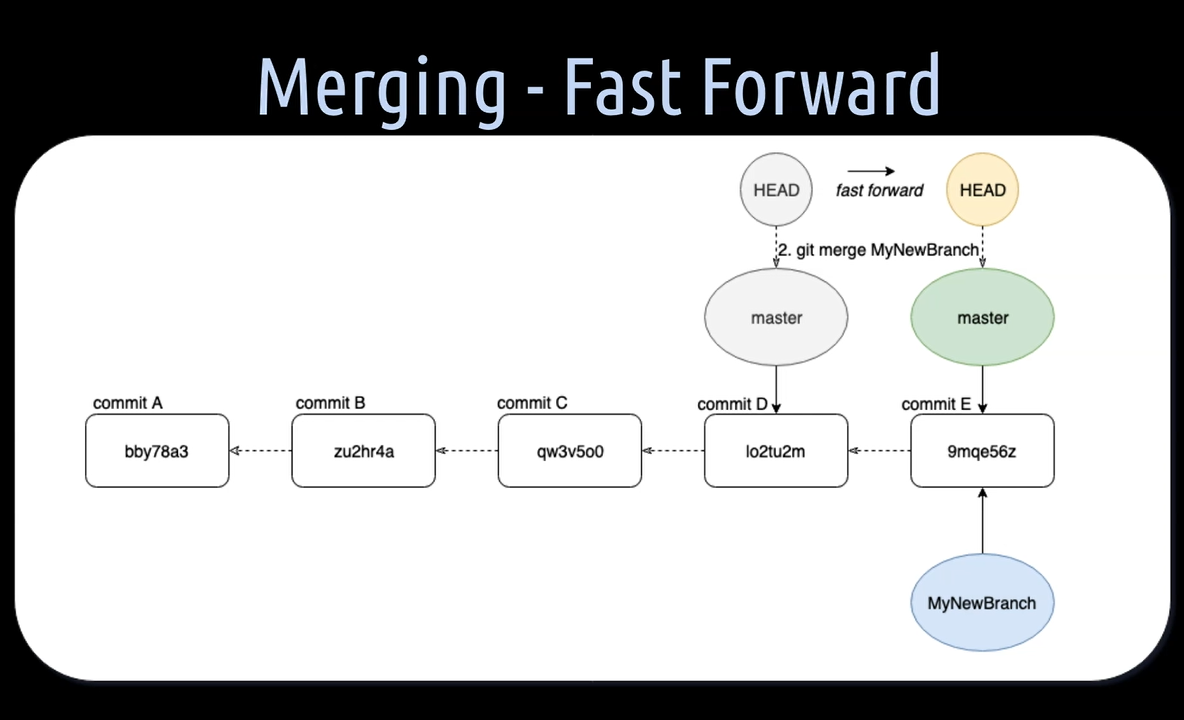
A fast-forward merge means that the master branch pointer HEAD can simply be moved forward to the commit where the “MyNewBranch” is pointing to. All this, because the master branch hasn't diverged through other commits on it from the “MyNewBranch”.
Let's help Lisa to merge the “test3” branch, which has a new additional commit on it, into the current checked out “test4-lisa-ffmerge” branch where we haven't added a new additional commit.
Let's first do a git branch -l -a to list all the branches we currently have. That's where we see that the “test4” branch is our active one.
Then we hit git log to check how the commit history of this branch looks like and the latest commit on it is this “Add a second test” as we have branched of the master branch and haven’t added a new commit on this particular branch here.
And now all we need to do to merge now the “test3-lisa-ffmerge” into this one here.
We just have to hit git merge feature/test3-lisa-ffmerge and then hit enter.
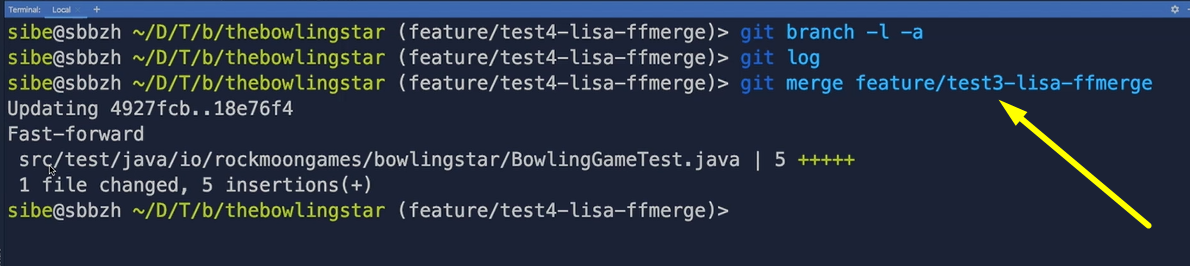
And now we can see that Git tells us it has done a fast-forward merge.
Now we can check that if we have this new commit on this branch by hitting git log.
See? There it is, the “Add a third test” commit from Lisa.
Now we can delete the old branch because we have merged that — the “test3” branch, we don't need that branch anymore.
For deleting that particular branch, we can hit git branch -d feature/test3-lisa-ffmerge with the name of the branch we want to delete, and then hit enter.
Git deleted now this particular branch.
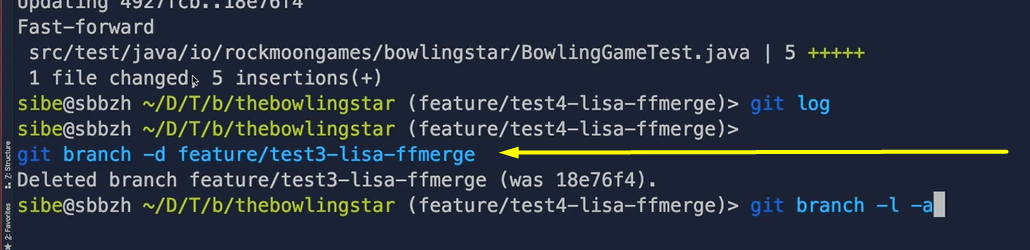
We can check that again, git branch -l -a by listing all the branches and this “test3” branch is gone.
# Merging Diverged Branches
Let's try something a bit more advanced.
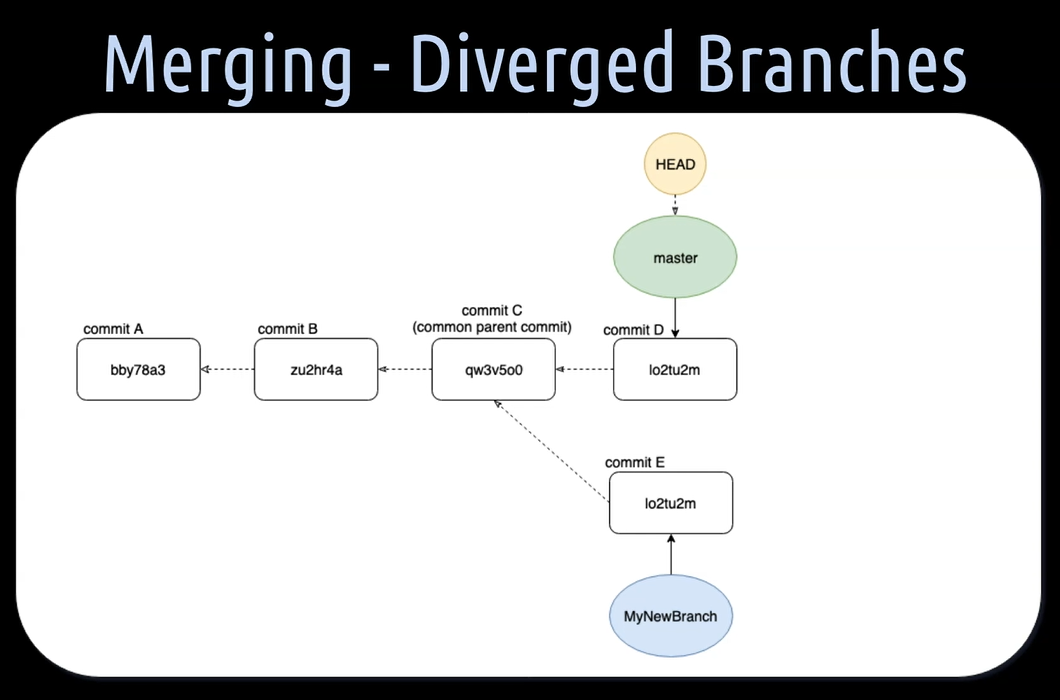
Let's say we have a master branch and a “MyNewBranch”, which originated from a common parent commit, C.
Now in the meantime, the master got an additional commit, D, and the “MyNewBranch” a commit, E.
This means that in this constellation, the branches have diverged from each other.
If we now merge the “MyNewBranch” into the master branch, Git will create an additional so-called merge commit, because the 2 branches have diverged from each other since they were created.
This new commit, M, introduces the changes made on the “MyNewBranch” into the master branch.
The merge commit M has then commit D and commit E as its parents. The parents are also called the ancestors.
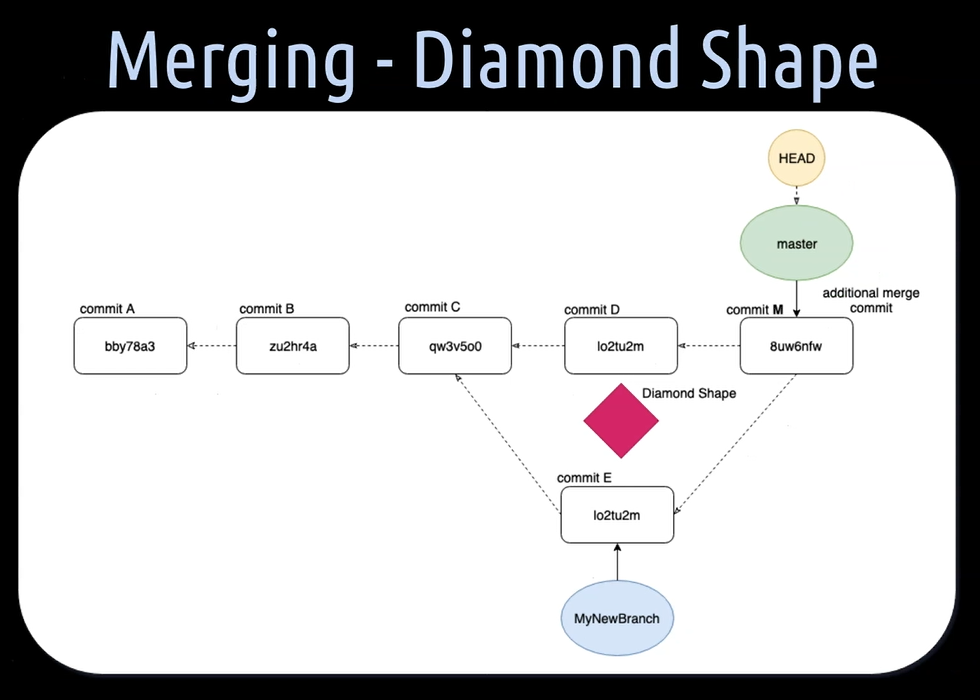
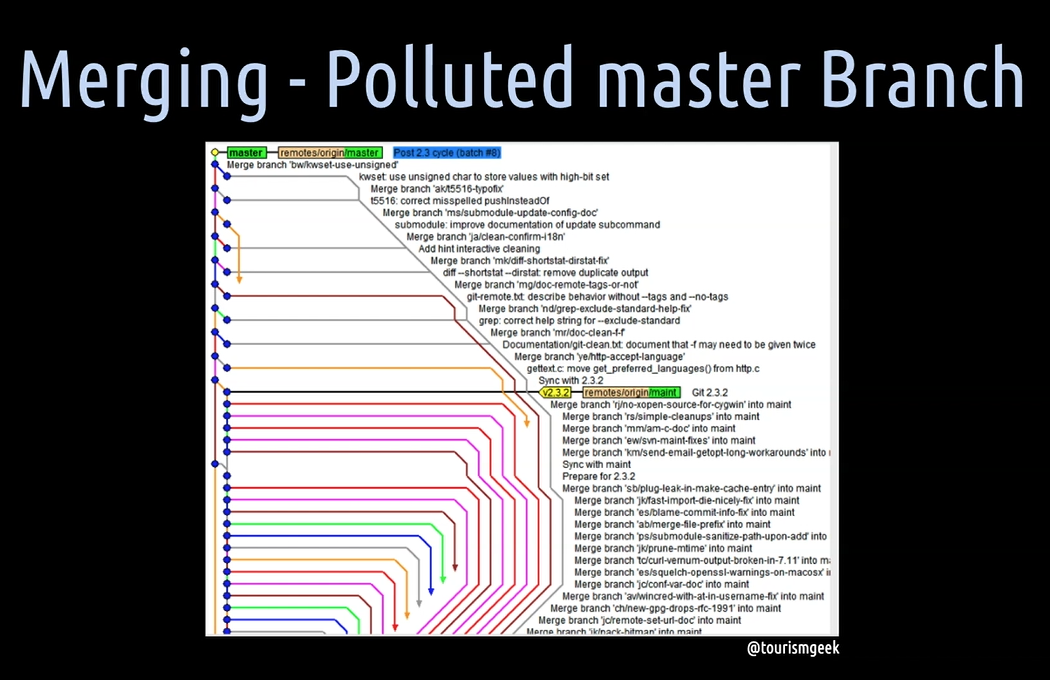
This additional merge commit creates a so-called diamond shape in the history of the master branch.
If the master is very active and a lot of branches are merged into it, this can pollute the history of the master branch.
Which of course, like in this case here, doesn't look super nice at all.
# Okay, let's learn with Lisa how such a merge commit works and looks like in reality.
We will create 2 branches from the master branch and add to both of them a new commit each. With that, we achieve that we have 2 branches which are diverged from each other.
Then we will merge 2 branches to see how a merge commit will be created.
Okay, let's again create a new branch from the master branch — git checkout -b feature/test3-lisa-diverged — so that we can practice the concept of creating a merge commit in Git.
Then let's add a corresponding test to that commit and call the test “lisaTestThree” again, because that's the third test in this BowlingGameTest class here.
Then we hit git status to see where we are.
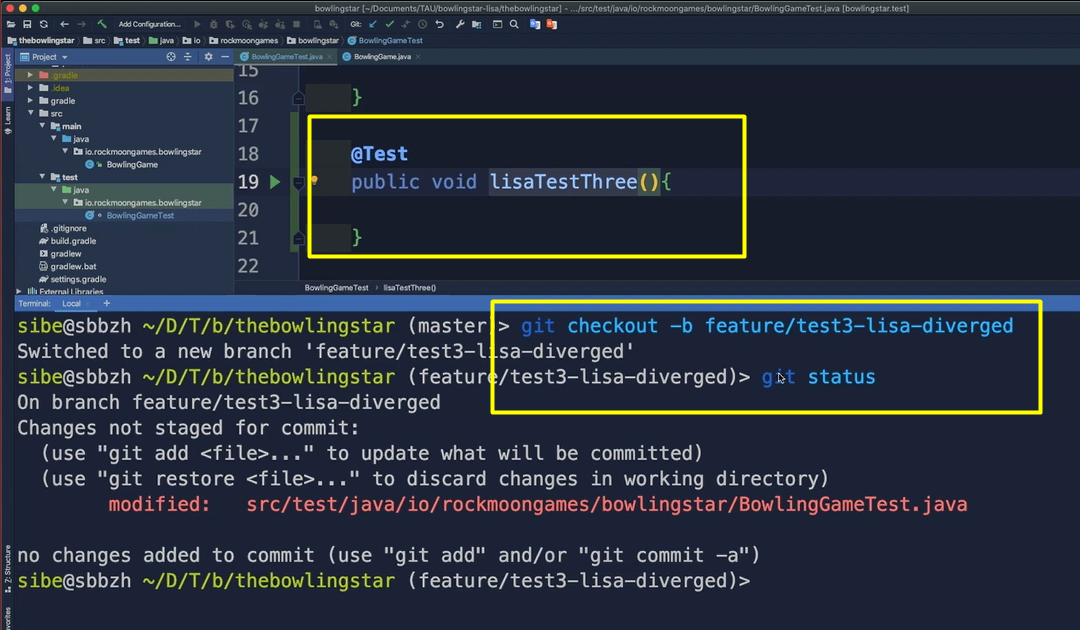
Yes, we have some modified files in the working directory.
Now let's add and commit in one go by hitting git commit -am“Add a third test”.
What will this commit do? This commit will add a third test. Perfect. Then hit enter.
Good. Let's see where we are with git status.
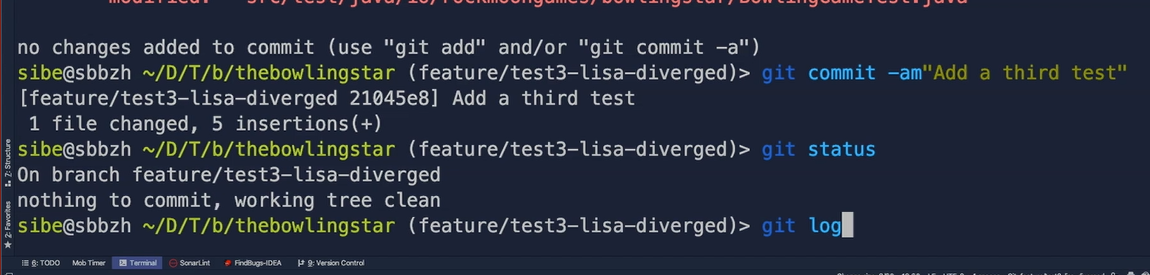
All clear, very good.
Then we can git log to check if we have actually created a new commit on that branch, and yes, here it is, “Add a third test”. Good.
Now let's create a second branch from the master branch.
We first have to go back to the master branch with git checkout master. Yes, we are on the master again.
Let's say in this branch, and let's name this branch — git checkout -b feature/new-test-class — let's add a new test class in this feature branch here which we'll create.
Now let's add a new class called BowlingGame2Test in our project. Very good.
Hit git status to see where we are.
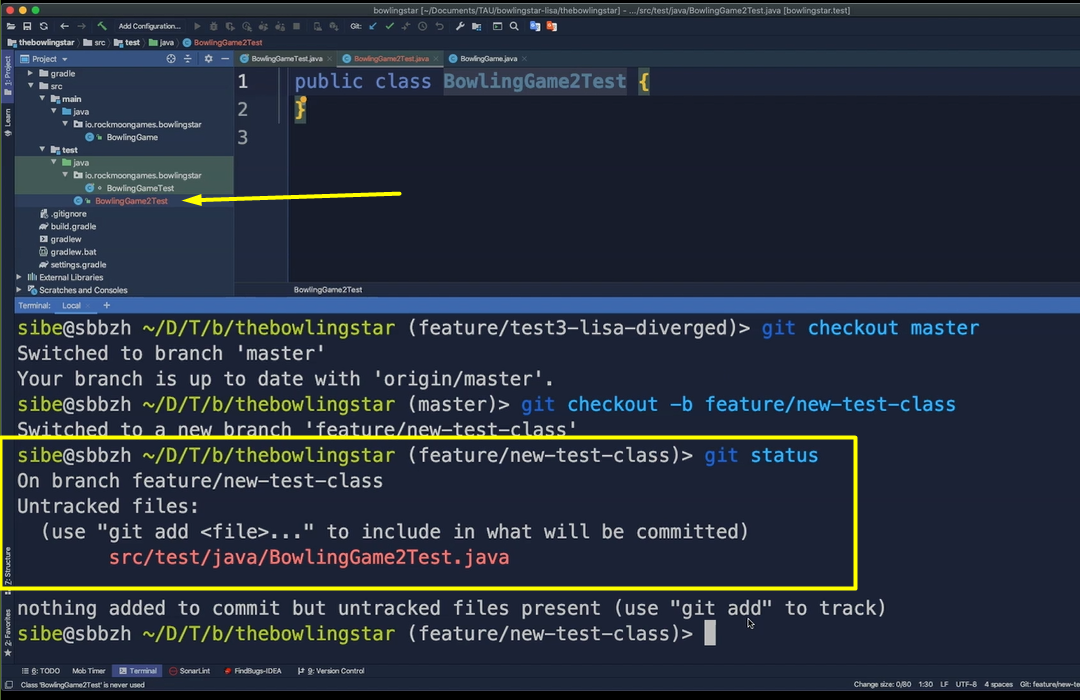
Now we have a new untracked file.
Let's add this file to the staging area — git add . and then hit git status again to see where we are.
Yes, we have some changes now in the staging area which are uncommitted.

So, let's commit them by adding them with a commit message — git commit -m“Add a new test class” — this commit will add a new test class. Very good.
Now use git log to see if Git has actually created a commit on this branch. Yes, here it is, “Add a new test class”.
Now let's merge the branch from before, so the test3 branch where we added the new test into this branch here.
We will use git merge feature/lisa-test3-diverged with the name of the branch we want to merge.
Now that Git default editor will open up if we hit that. Then we can give it a corresponding commit message or just leave that as it is for the moment. Close that again.
Now we have merged the feature branch “test3” with the new test into our new “feature/new-test-class” branch.
Let's check that quickly, by hitting git log to check the commit messages.

Here it is, this additional new merge commit here — Merge branch “feature/lisa-test3-diverged” into our “feature/new-test-class” and all the other 2 commits.
The other two commits are here:
The “Add a third test” is here on this branch now.
We have the “Add a new test class” commit here.
And as explained before, the new additional merge commit here on the top now.
# Rebasing
There is another way we can merge two branches.
With the concept of rebasing, we get a shiny, clean, and straight forward branch history without Git creating an additional merge commit.
Let's recall — a branch is always based on another one.
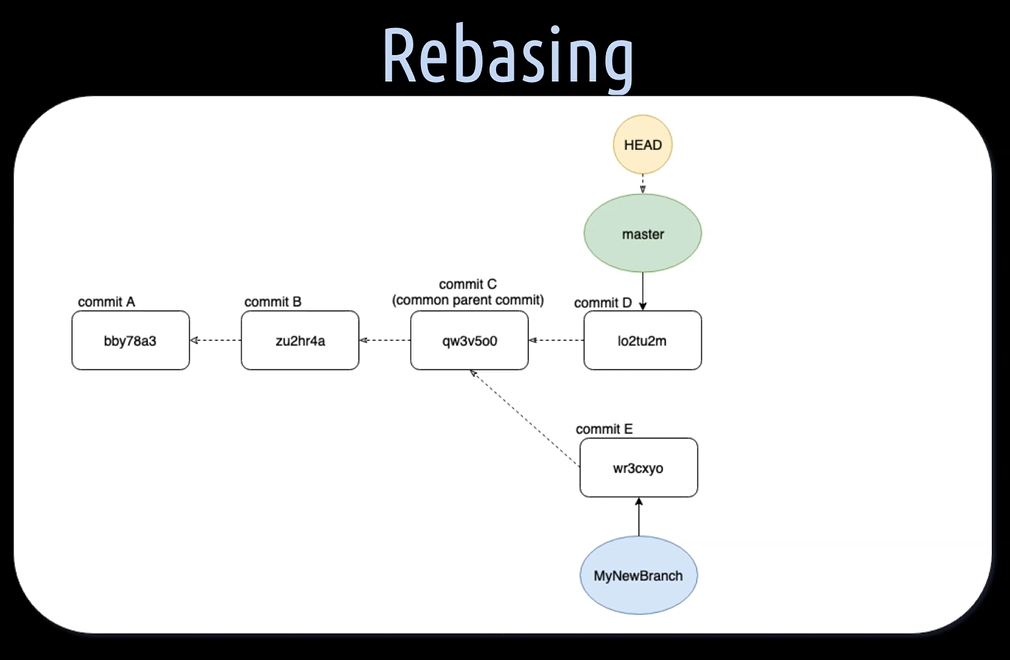
When we create a new branch, in our case here, the “MyNewBranch”, we branch away from another branch, in our case here, the master branch. The common parent commit C is the base of commit E of the “MyNewBranch”.
- By applying the concept of rebasing, we can change the base of the commit E.
- By applying the concept of rebasing, we can change this base commit C of the commit E.
Let's checkout the “MyNewBranch” to get with rebasing the latest changes which were made on the master branch, this is commit D, into our “MyNewBranch”.
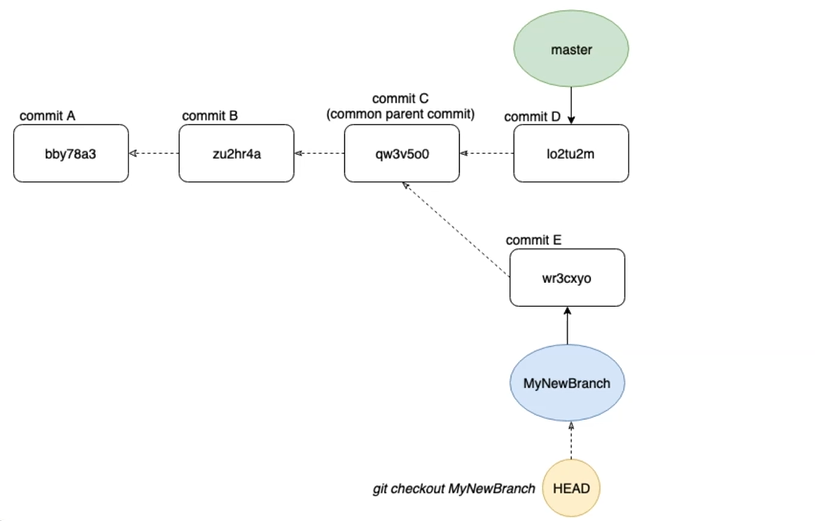
Let's remember when we're checking out a new branch, we just move the HEAD pointer accordingly.
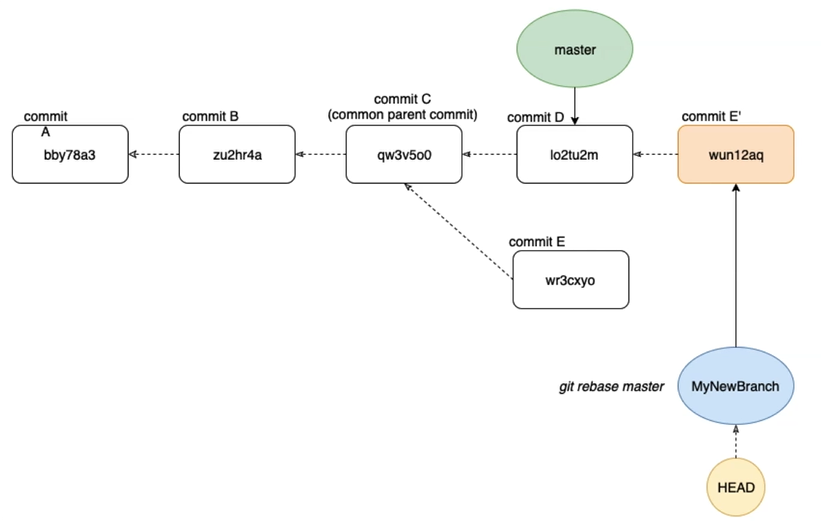
When we now hit git rebase master, we rebase our active “MyNewBranch” onto the current state of the master branch.
NOTE
It is important to notice here that we rebase onto the current state of the master branch and not into the master branch itself.
When rebasing, Git will take everything which was in commit E, apply that into a commit E', and then puts E' on the top of the latest commit D, from the master branch.
In other words, we have just rebased the pointer “MyNewBranch” from commit E to a new commit E', which in turn is now referencing the latest commit D, of the master branch.
With using rebase, we can make sure that we frequently integrate the changes which are made on the master branch into our own feature branch. With that, we can keep a clean, linear, shiny history that allows us finally doing a fast-forward merge when it's time to get our feature or bug fix branch into the common master branch.
Keeping a clean, linear commit history makes reading it much more pleasant, useful, and finally traceable, than having a history which is cluttered with merge commits.
Let's help Lisa to practice the concept of rebasing, then pushing a final branch to the remote repository, creating a pull request, and assign that pull request to Jessica for review.
After a successful review, Lisa shall then merge that branch into the remote master branch.
Let's create a new branch from the master branch and call that branch git checkout -b feature/test3-lisa-rebase. Great.
We will add a third test to the BowlingGameTest class and call that test “lisaTestThree.
Then we hit git status.
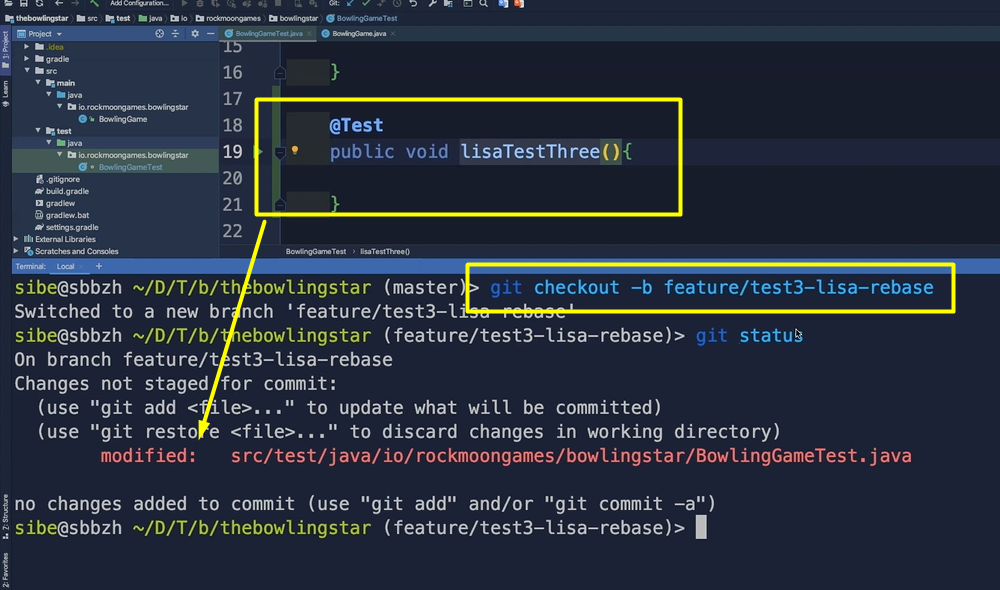
Yes, we have some modified files in the working directory.
Let's now add this and commit that directly by hitting git commit -am“Add a third test” with the commit message.
Very good. Let's quickly check that with git log.

Yes, there it is. Perfect.
Now we will create a second branch from the master branch.
In order to do that, we have to check out the master branch again — git checkout master.
And then let's create a second branch — git checkout -b feature/test4-lisa-rebase. Good.
This time we will create a new test class with a fourth test in it.
We call that class BowlingGame2Test. Very good.
Now let's add in here a fourth test and call that test “lisaTestFour”, because that's the fourth test of the whole automation framework here. Good.
Then we hit git status to see where we are.
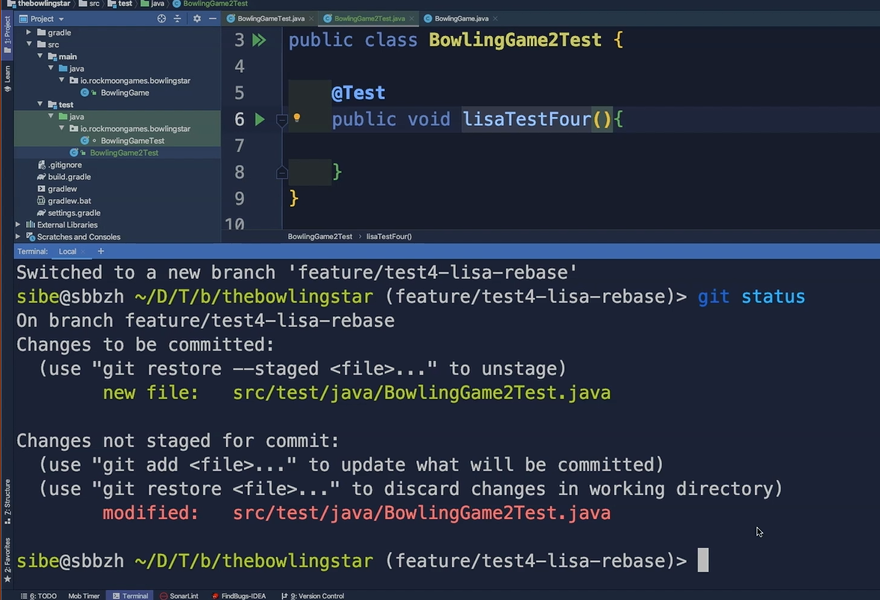
Yes, we have modified a file, which means we actually have a new file.
We created a new file, so these changes are not yet staged for a commit.
Let's do that in one go by hitting git commit -am“Add a fourth test” with a commit message. This commit will add a fourth test. Great.

Let's quickly verify that again, git log, and yes, we created a fourth test on this branch.
Now let's rebase our active branch onto the state of the test3 branch, which means we actually get the test three into our active branch.
We can do that by using git rebase feature/test3-lisa-rebase and now we hit enter.
And yes, we check that if everything is clear by hitting git log again.
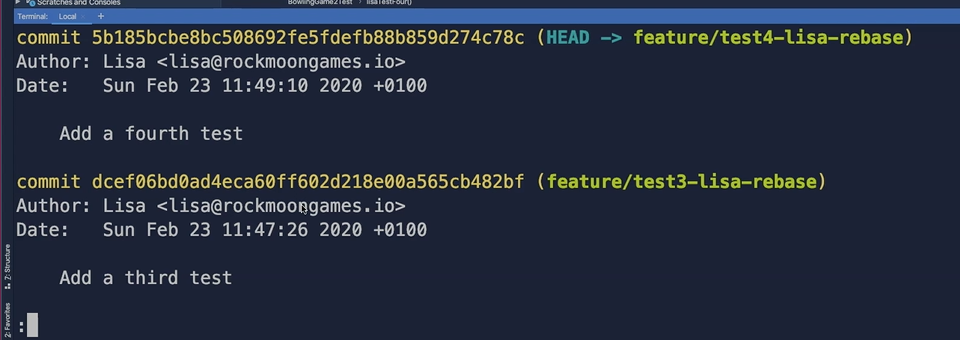
We can see we have now on the top our “Add a fourth test” commit.
Then we have the add a third test commit from the other branch, and that's basically it.
Wonderful. This has worked now, so we have now a clean, straight forward commit history on our active test4 branch.
Now we push that branch to the remote repository by hitting git push origin.
Let's see what happens.

Git tells us to push the current branch and set the remote as upstream.
To do this, we use git push –set-upstream origin feature/test4-lisa-rebase and push that branch. Cool.
We have now just pushed that new branch to the remote repository.
Let's go to the remote repository and see what it looks like there.
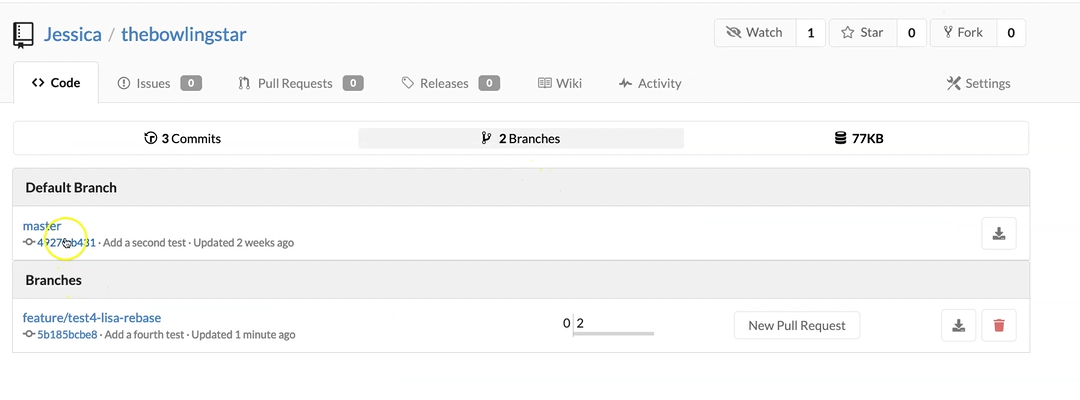
On the remote repository, we do a refresh and we can see now that we have 2 branches here.
- We have the master branch (the remote master branch), and
- We have the remote feature/test4-lisa-rebase branch.
Let's click that branch here and see we have currently 5 commits on that branch.
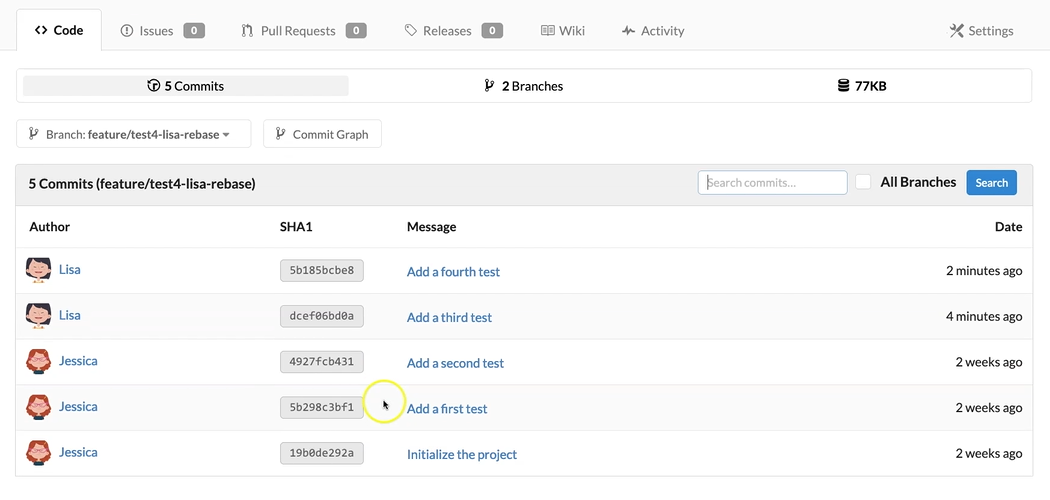
So, all the things from before — initialize, add a first test, add a second test, add a third test, and add a fourth test.
# Now let's create a pull request.
For that we go to Pull Request (at the top) and we create a New Pull Request.
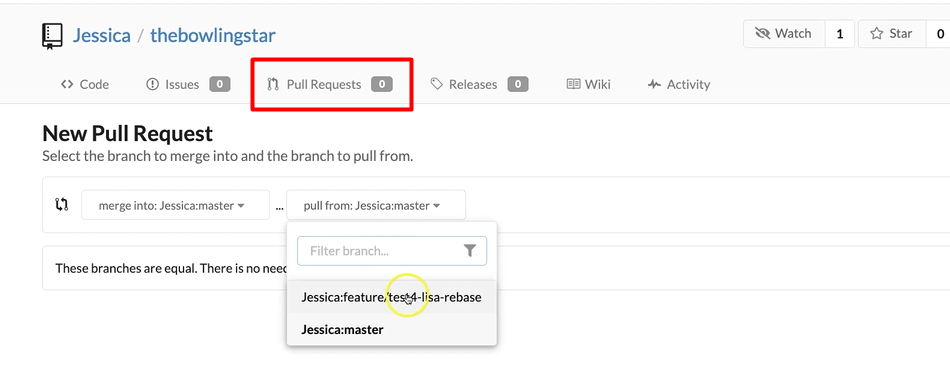
What we actually want to do is to merge the test4-lisa-rebase branch into the master branch.
Let's create a new pull request and assign that pull request to Jessica for review.
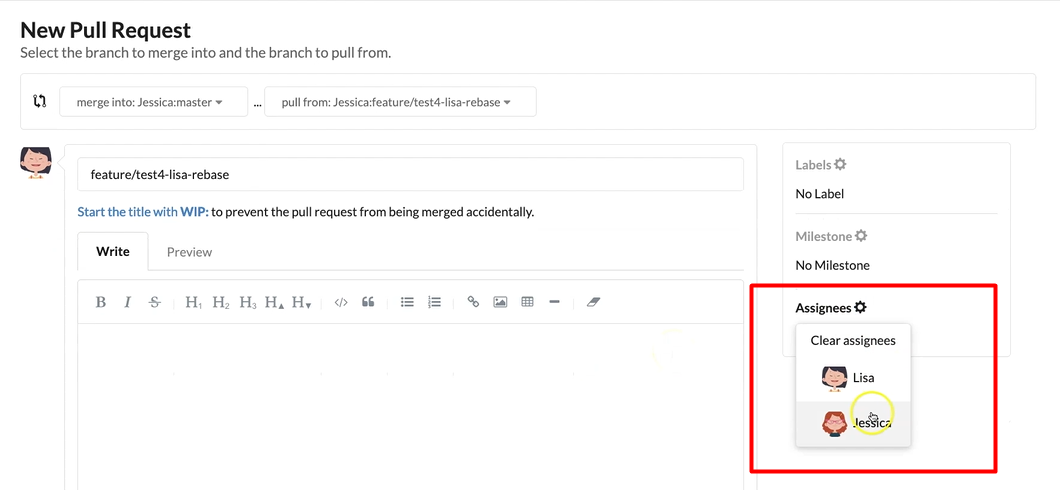
We just leave the description empty and hit Create Pull Request at the bottom.
And cool, we have now created a pull request and assigned that pull request to Jessica.
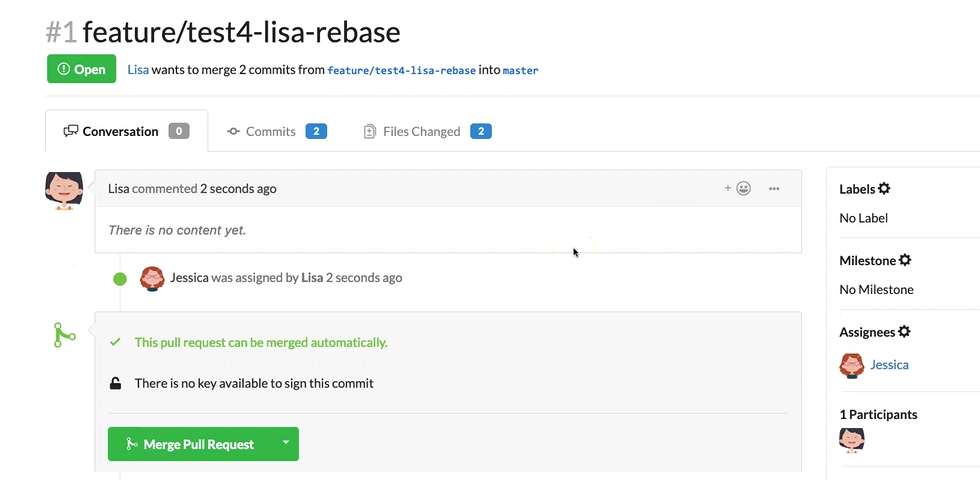
Now let's head over to the remote repository account of Jessica.
Here we are, logged in as Jessica. We do a page refresh here and we get notified that Jessica has received a pull request for review.
We open that pull request.
We can check the 2 commits here, which were on the “Add third test” and the “Add a fourth” test.
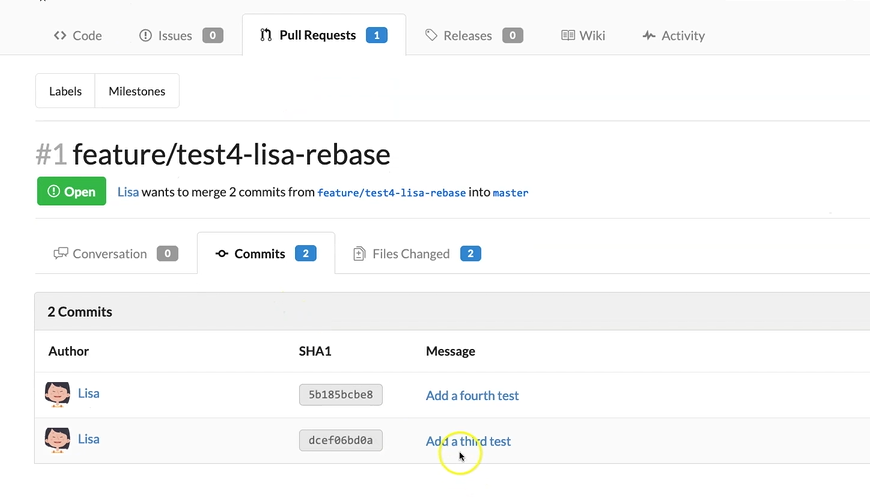
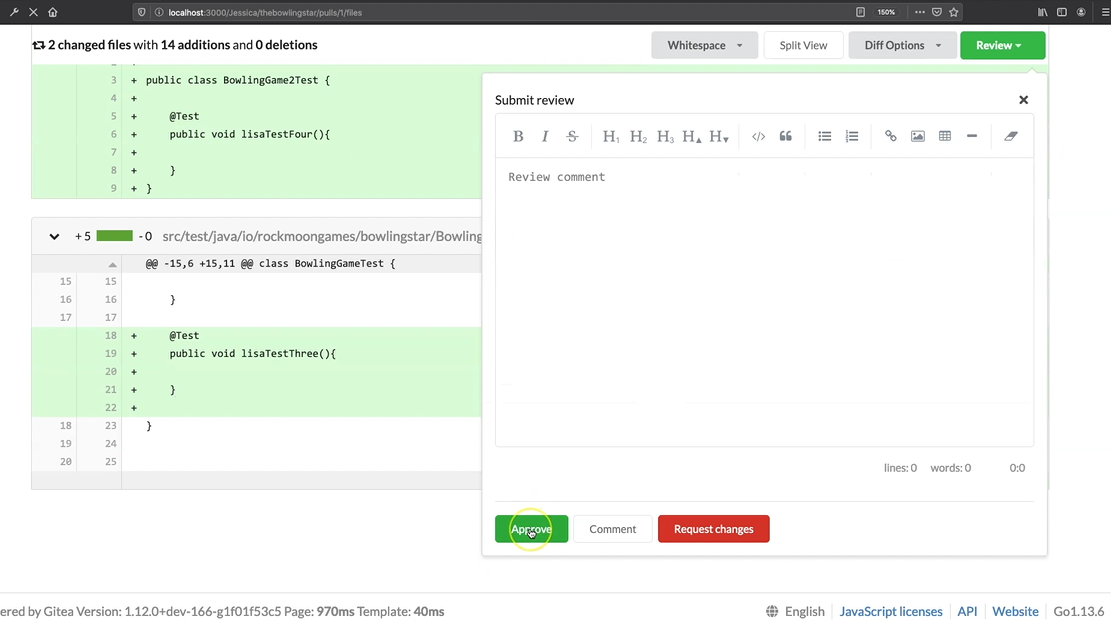
Let's review the changes made by Lisa.
Let's have a look at the “lisaTestFour”. That looks good.
The “lisaTestThree” looks also good.
So, we can go to Review and Approve these changes.
Now the pull request can be merged automatically.
Let's go back to the remote repository account of Lisa.
As Lisa, we do a page refresh here and we can see that Jessica has approved our pull request here.
Now we can merge the pull request into the master branch.
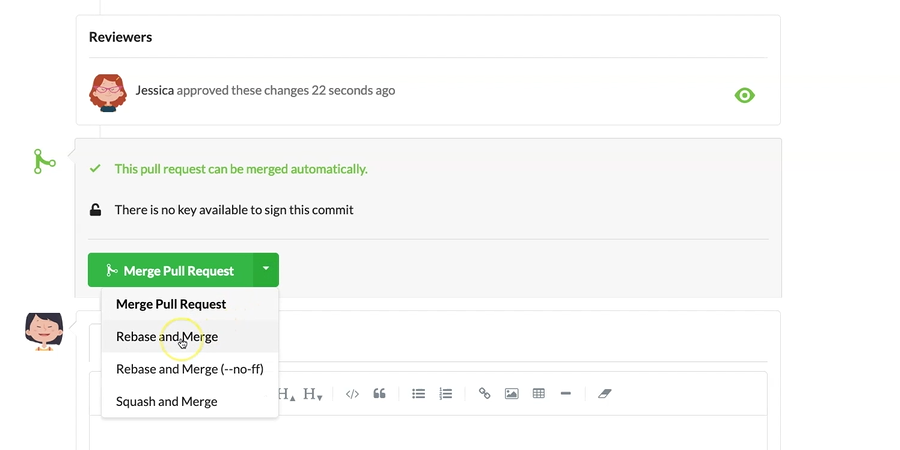
There's a merge strategy we use here, Rebase and Merge.
Now we have merged the test4-lisa-rebase feature branch into our master branch.
We can verify that by going to “thebowlingstar” project, then onto the master branch here. And see we have 5 commits.
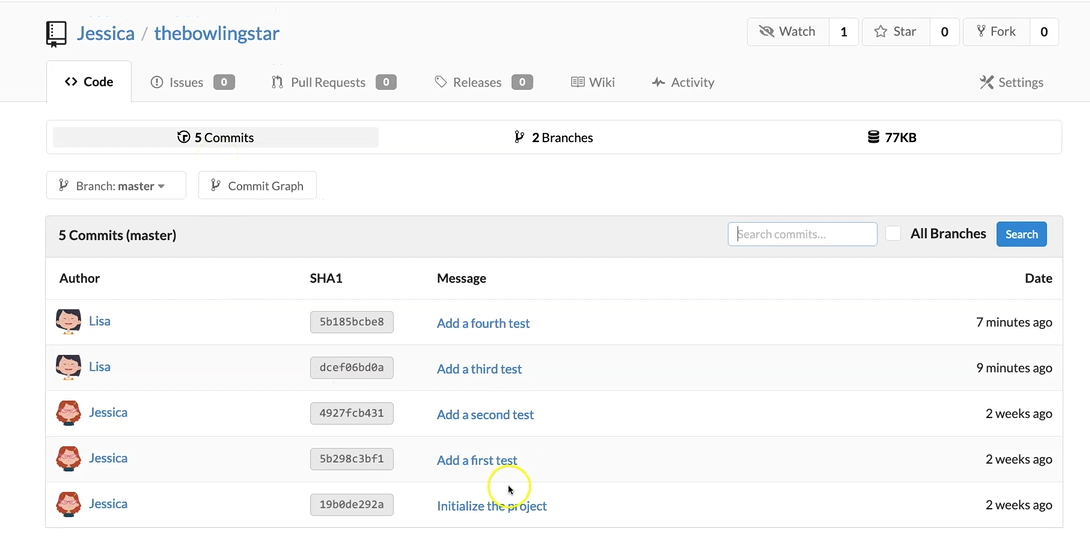
Now all the commits are in our master branch.
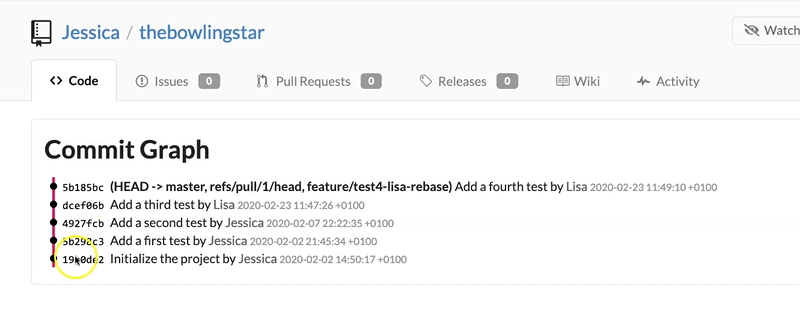
We can also have a look at the Commit Graph by going to Commit and then showing the Commit Graph.
And see on the master branch we have now a straightforward, clean commit history.
Now as we have made some changes on the remote repository master, we have to get these changes to our local repositories from Jessica and Lisa.
For doing so, we have to first fetch the changes from the remote repository and then merge them to the local master branch.
Here we are in the local project of Lisa, and here what we can do now is git fetch. So, we fetch all the new changes which were made on the remote repository master into our local repository master.
Then we check out the local master branch — git checkout master.
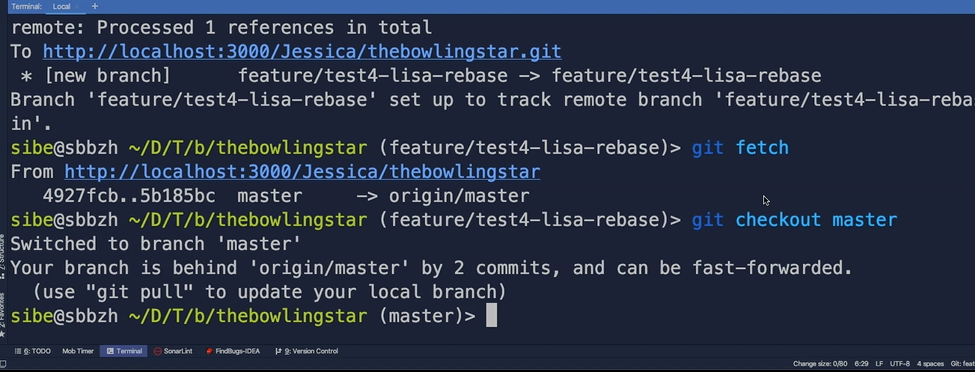
We hit git status and Git tells us now that our branch is behind the remote repository master by two commits and can be fast forwarded.
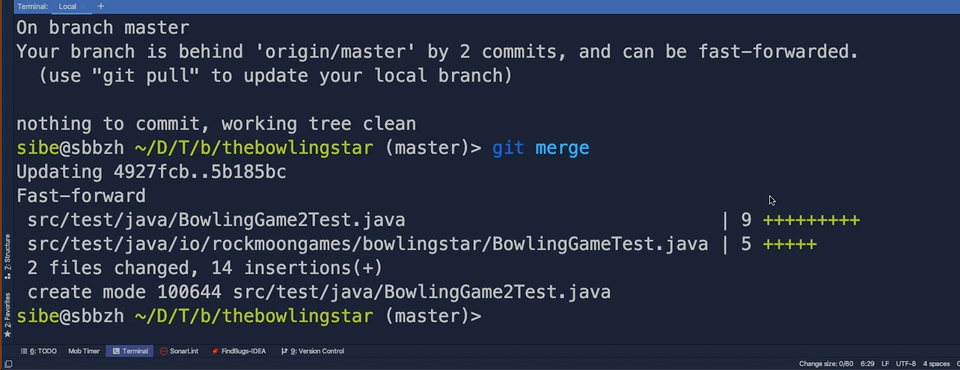
We now just have to hit git merge and Git merged the changes from the local remote repository master into our local checked out master branch.
Now let's do the same also for Jessica in her project.
Here we are in Jessica's project.
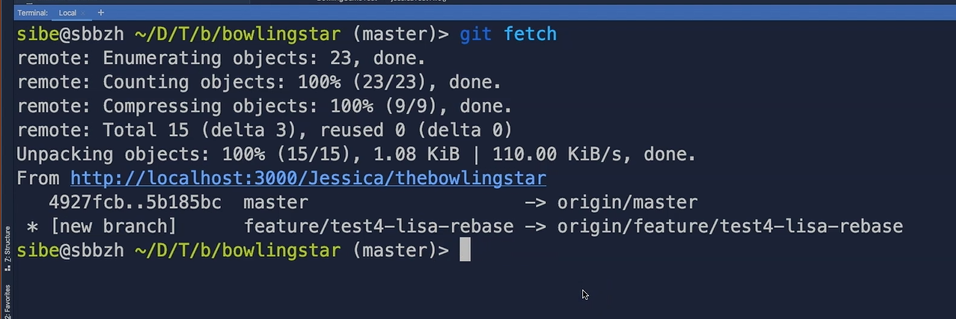
Here we are already on the master branch, so let's just hit git fetch to fetch the new changes which were made on the master branch into our local repository.
We also got a new feature branch from Lisa.
Let's hit git status.
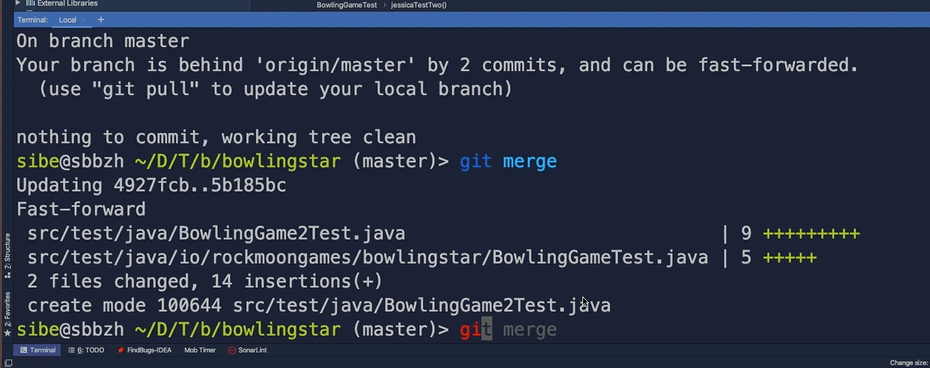
Also, here, Git tells us that Jessica's branch, the local master branch, is behind the remote origin master and can be fast forwarded.
We just need to hit here git merge and that's done.
We can verify that by hitting git log.
And we see we have the third test commit and now also the add fourth tests. So, both of the commits in our local checked out master branch.
Both Lisa and Jessica are now up to date with their local repositories.
Lisa and Jessica are super happy now. They have mastered their first task of collaboration in Git successfully.
See you in the next part of this chapter.
Resources
Quiz
The quiz for this chapter can be found in section 4.2
