

Transcripted Summary
We finished the continuous integration part, and we finished the CD part, the continuous delivery part.
Now we want to test it.
Here we are at the Test Automation University and of course, testing is the focus, and having an end-to-end pipeline means we have integrated end-to-end tests also.
# CI/CD Pipeline: Testing
What we need to do now…

We have our repository where we have developed our tests. We need to build these tests so we can execute them.
We need to deploy them on an environment, and we need to run the tests.
And of course, these tests produce reports, and we need to upload them because maybe otherwise these reports are lost. We need to care about storing them and uploading them. And we will upload it to our workflow.
Let's go to GitHub.
First, let's go to our repository where we developed our tests. We have here our “tau-digital-bank-e2e-tests” repository.
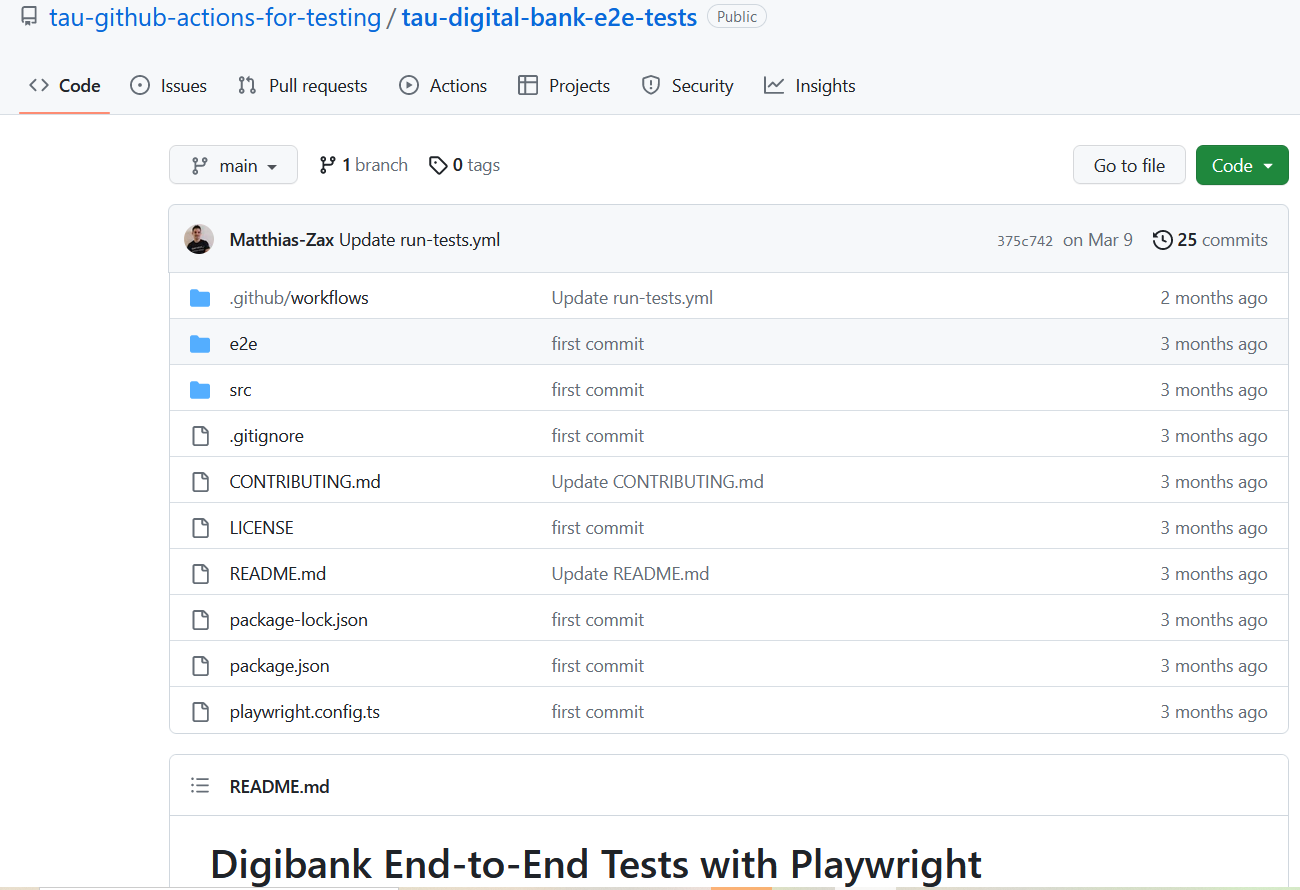
This is a very simple repository where we have written or where we've written end-to-end tests with Playwright.
And as I mentioned, it's not in the focus that we have now, sophisticated tests.
It's a very simple test where we just validated that the title is right.
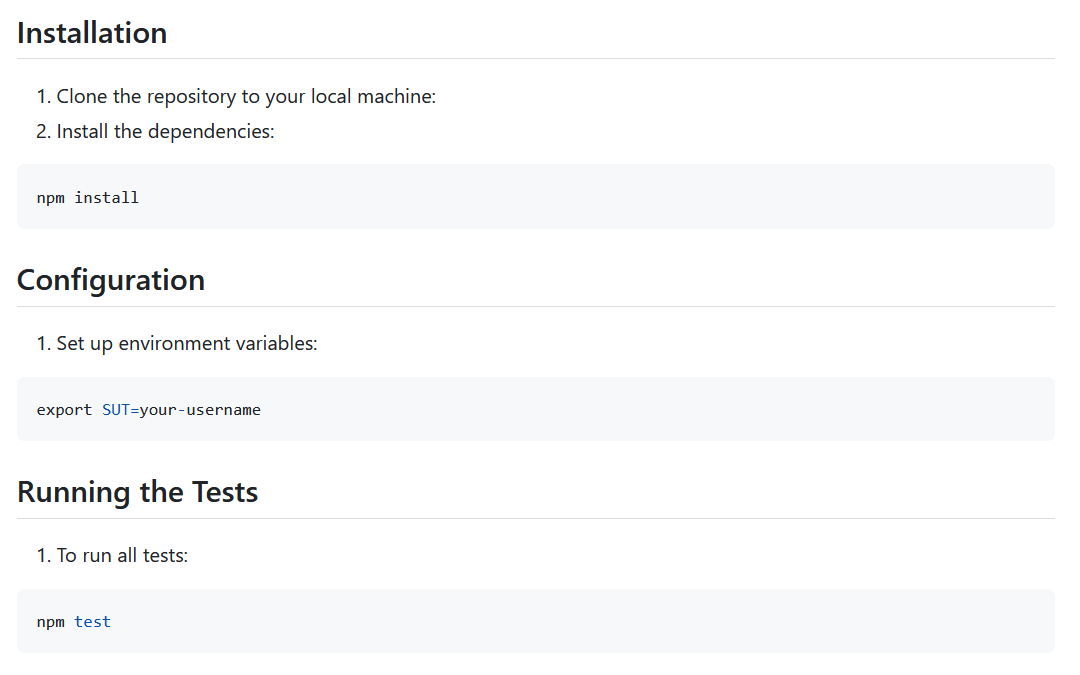
We can set our system under test (SUT) and then you can run it.
Let's go to the workflow (workflows/run-tests.yml).
How does the workflow look?
We have here written a workflow which is using the repository_dispatch event. And you remember? This is for APIs.
name: Build and Run e2e tests
run-name: Deploy to ${{ github.event.client_payload.sut }} trigger via >${{ github.event_name }}< by @${{ github.actor }}

on:
  repository_dispatch:
    types: [trigger-tests]

jobs:
  e2e-tests:
    name: "Run end-2-end tests for the ip ${{ github.event.client_payload.sut }}"
    runs-on: ubuntu-latest


    steps:
      - uses: actions/checkout@v3


      - name: Check IP
        run: echo "${{ github.event.client_payload.sut }}"

      - uses: actions/setup-node@v3
        with:
          node-version: 16
          cache: 'npm'

      - name: Install dependencies and run tests
        run: npm install

      - name: Install Playwright Dependencies
        run: npx playwright install

      - name: run the tests
        run: SUT="http://${{ github.event.client_payload.sut }}:8080/digibank/login" npx playwright test


      - if: always()
        uses: actions/upload-artifact@master
        with:
          name: test-report.html
          path: ./playwright-report/index.html
Here in the API, in the payload, we need to trigger-tests event. We will have to use this then in our main project. This is important, so remember that one.
What kind of jobs I have written?
We have one job, which is the end-to-end test job (“e2e-tests”) which will "Run end-2-end tests”. And even here, we put out the system under test (sut).
You can also see here a beautiful run-name so that we deploy to this IP address, and it's triggered by this event_name and by this actor.

You will see afterwards what it looks like in the execution.
# Job Steps
So, we need to checkout.
Then we “Check IP” with run: echo. This is just for debug. I put out the system under test (sut) parameter, which is part of the client_payload.
Then I setup-node, it's Playwright with Node.js.
Then I install all the dependencies. I install Playwright,
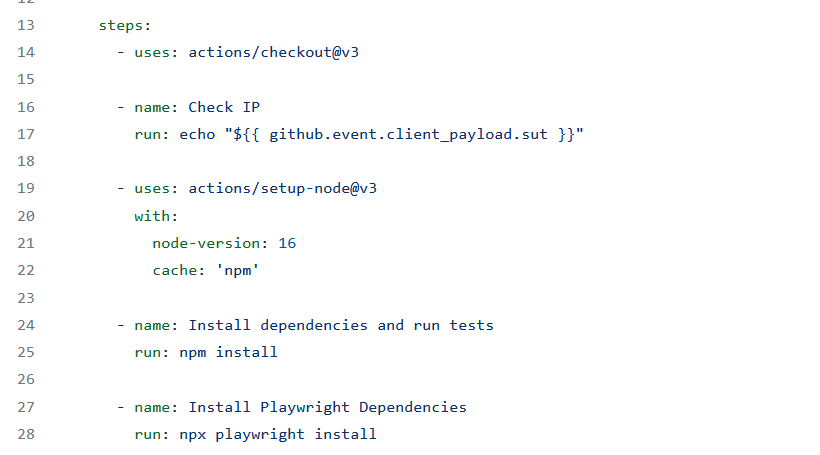
And then I run the test directly here on the runner.
Of course, you can also deploy the artifact to test execution server and run it there.
Here I run it directly on the runner. Why not? It has access to our system under test.
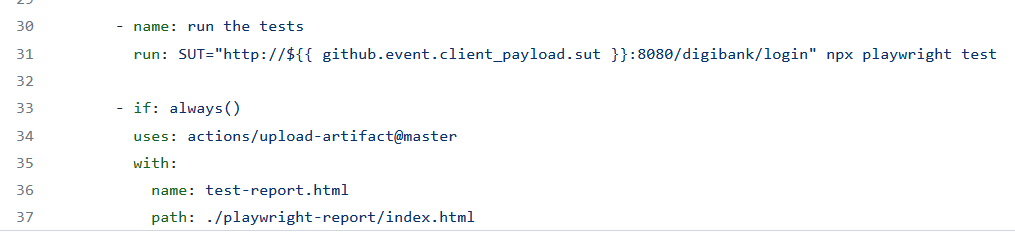
So, I set here a system under test (sut) parameter to our client_payload with the endpoint here, and then I run the npx execute “playwright test”.
This condition, if: always() is important because if the test fails, this step prior will fail, and this one would never be executed.
But of course, we want to upload our test reports.
So, we use here our upload_artifact action, and this should be executed always. And we upload here our test, our “test-report.html” file, from the “playwright-report” folder.
Yeah, that's it. That's the action.
Now let's go back to our project because now we need to extend our end-to-end pipeline with the test execution.
Let's go down here. And after installation, we have to execute our tests now.
So let me put here the “e2e-tests” job and the steps. So, this is our end-to-end test.
  e2e-tests:
    needs: [install]
    runs-on: ubuntu-latest
    environment: UAT
    name: Trigger E2E Tests on UAT Environment

    steps:
      - name: Trigger Workflow from e2e tests with Playwright
        run: |
          curl -X POST \
          -H "Authorization: Bearer ${{ secrets.PAT_TOKEN }}" \
          -H "Accept: application/vnd.github.v3+json" \
          https://api.github.com/repos/tau-github-actions-for-testing/tau-digital-bank-e2e-tests/dispatches \
          -d  '{"event_type": "trigger-tests", "client_payload" : { "sut" : "${{ vars.UAT_IP }}" } }'
This step depends on the install job.
We need to have an up-and-running application and the same environment.
And we trigger here just a multi-line script.
And here in the steps we do a simple curl.
What I'm doing?
First, for authentication, I have set up here a personal access token (PAT_TOKEN) in GitHub that I can access the other repository.
I sent a post request to this endpoint, “api.github.com”.
You can see here that this is the organization (“repos/tau-github-actions-for-testing”), this is the repository (“tau-digital-bank-e2e-tests”), and /dispatches here can fire the events too.
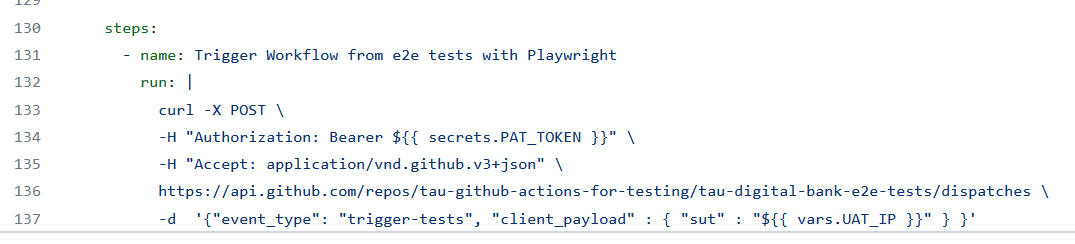
And here, you can see the event_type is "trigger-tests" This was the event_type which we defined in the “e2e-tests” repository.
And remember it, this is this event here — "trigger-tests"” — the event_type
And the client_payload. Here I hand over the IP address. If I test another environment, I can then have kind of a switch. So here I hand over the IP addresses of the variables.
Good, let's Commit the changes and run it.
Let's go here to a pipeline, and let's trigger our run.

So, it's got triggered, now it's cashed and now it's executed.
In the meanwhile, this personal access token, as we all remember, we have our secrets. You can also have secrets on repository level or on organization level.
And here I created an organizational-level secret, which is this token, which I need to have API access.
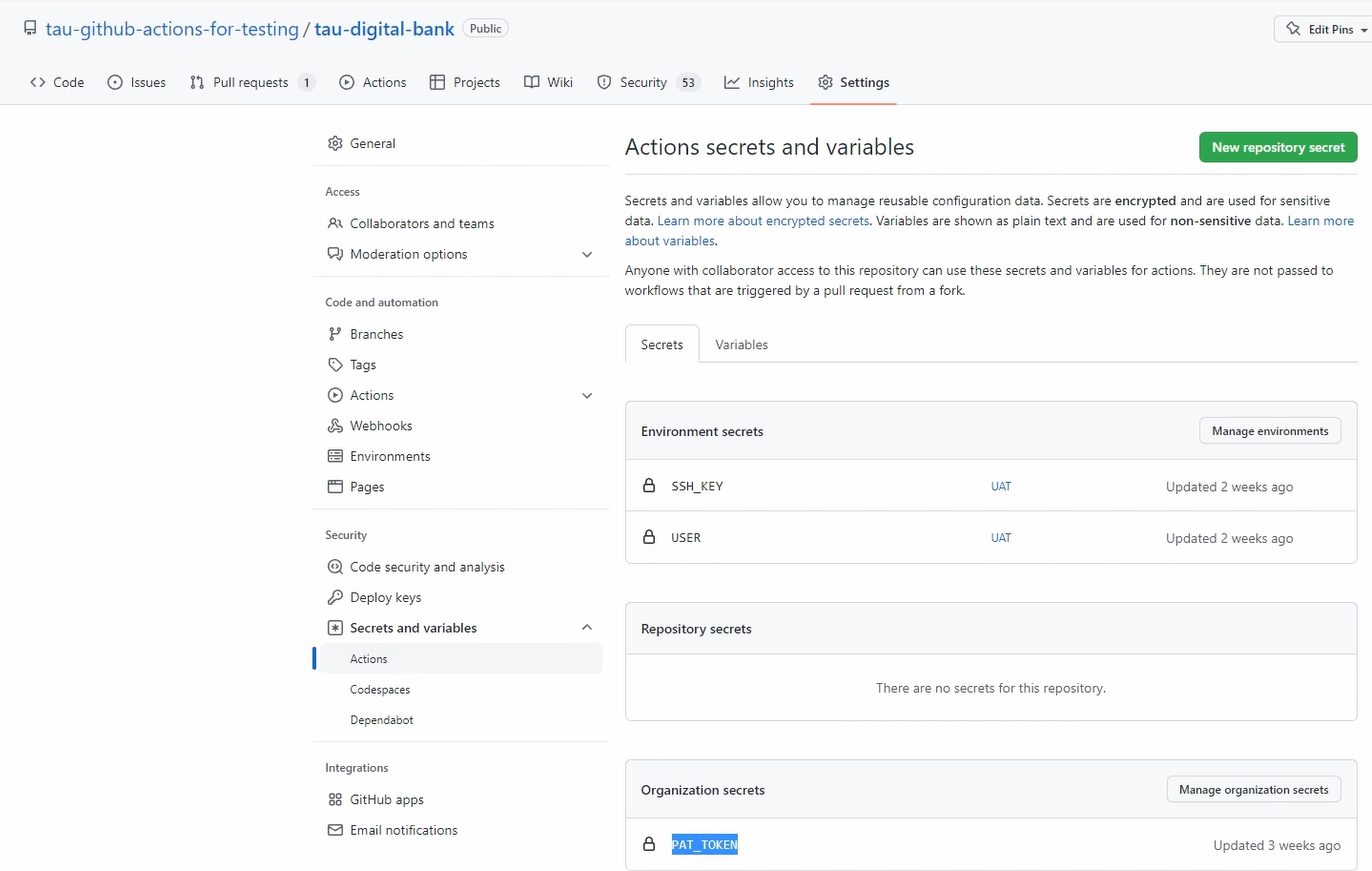
And this is then inherited to all repositories in this organization. Good.
Let's go back to our execution and let's see. Let's wait until it gets triggered.
You can see the build finished, cleanup finished, deploy finished, installation finished.
Also, one of our jobs is finished. And now the trigger end-to-end test is finished.
What did it do?
You can see here that it did Run curl and this one went through.
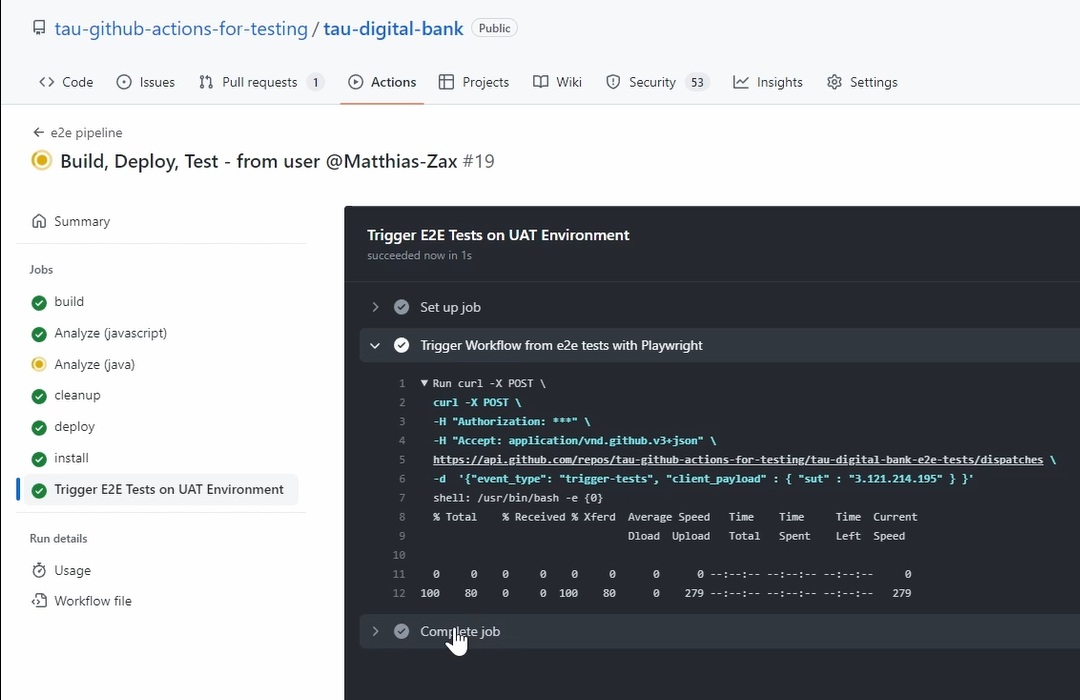
So now we should see it here, in our workflows. And you can see it's already triggered.
And this Run Name…
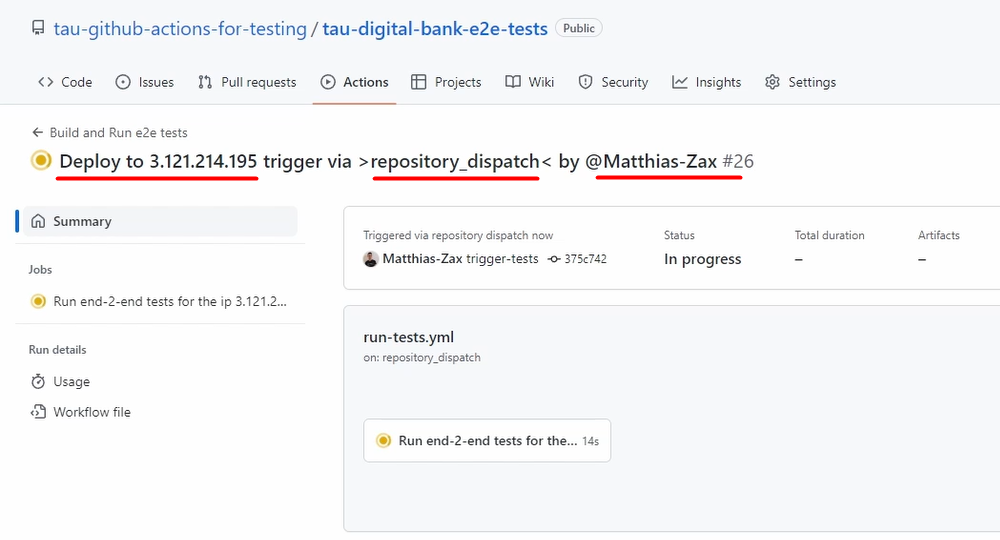
It's deployed to this — “3.121.214.195” — so it's got here deployed.
It got triggered by the “repository_dispatch” event by “Mathias-Zax” so my name.
And yeah, now this job runs.
So, you can see here this is how you can connect to repositories.
Through these API calls, of course, if you have now “api-test”, this is another repository, it's another API call.
And then you can also call back the main repository where you have maybe a workflow then for deploying to production. This depends on you.
Yeah. Good.
Let's see what happened here.
Yeah, we have set up everything.
Let's check the IP address to see if this worked.
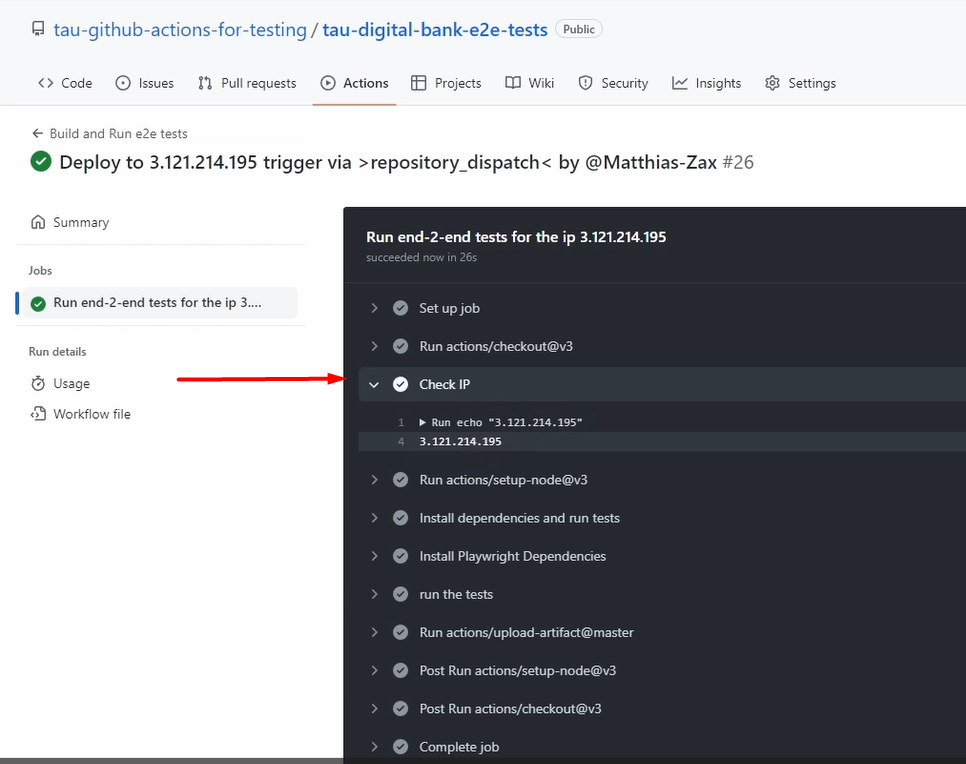
You can see yes, this worked. This coming from the payload of the API request.
Yeah, we run our Playwright test, we set up the environment.
And you can see we also uploaded the test report.
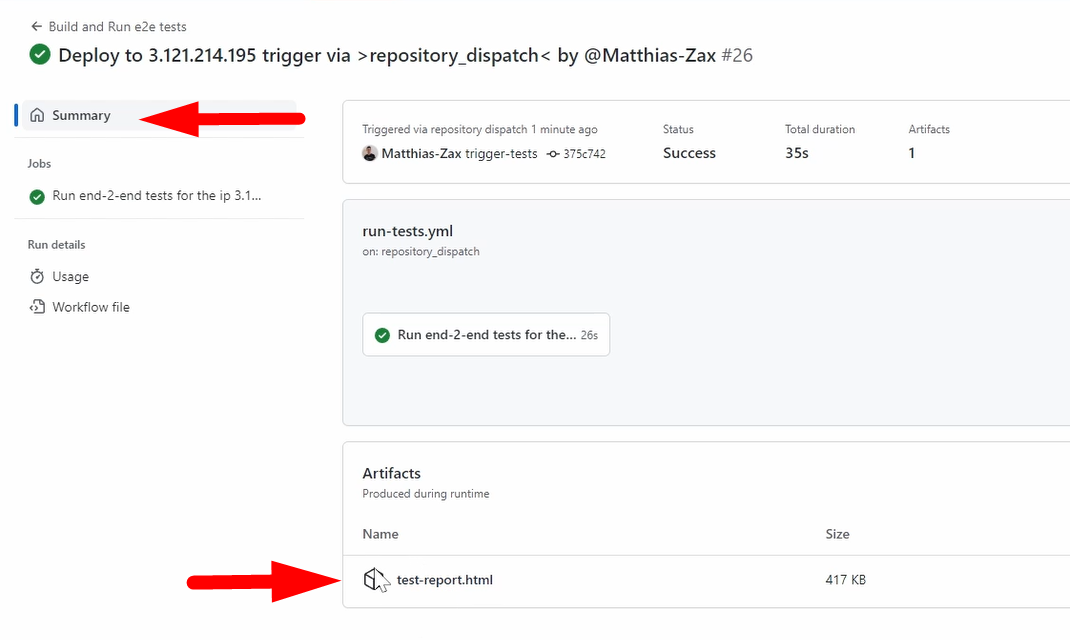
And of course, we need to check that one.
It's the HTML, it's just a basic test.
You can see there's some steps and that we go here to the base URL, you can see this worked. And the page title equals our title. So, everything is right here. Nice.
Good. So, we have now integrated our tests into the pipeline.
One step is missing, and this is production.
# CI/CD Pipeline: Production (Deploy)
We have finished the build, we have finished the deployment, and we have finished the test execution.
What is missing is the production or the production management in GitHub.
We will not actually deploy to a production environment, so that I don't have so many up and running environments. But I guess you already got the point.
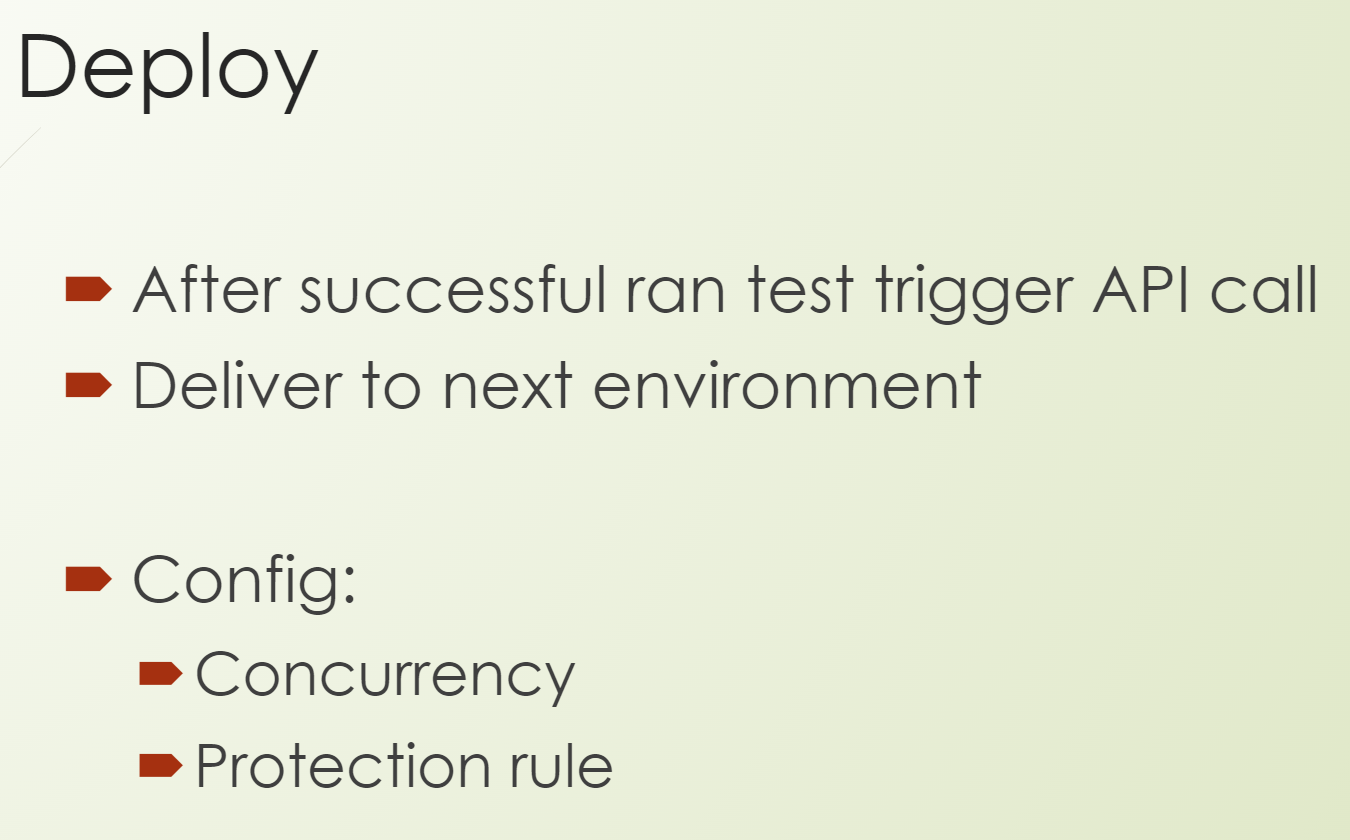
But what you can do is, for example after successful run tests, you could trigger an API to trigger a deployment to production.
# Configuration for Deployment to Production
What is important here is what you need to do. So, what kinds of changes you can make, or can we make, to our workflow for a production-like environment?
And here, two things are important.
First, is a parameter called concurrency.
This ensures that only a single job or workflow is using the same concurrency group, and that it will run at the same time.
In the end, this means that only one can start or do something against this environment.
This is important because you don't want to have multiple deployments to a production environment. There should be only one.
The second is the protection rule, so that you have, for example, mandatory reviewers.
This we will do now, so I will show you how to do this. And then you get kind of a feeling of how a production-like environment looks like.
Let's go back to our digital bank.
Let's go to Settings, to Environments, and let's create here a New Environment, which is now called “production”.
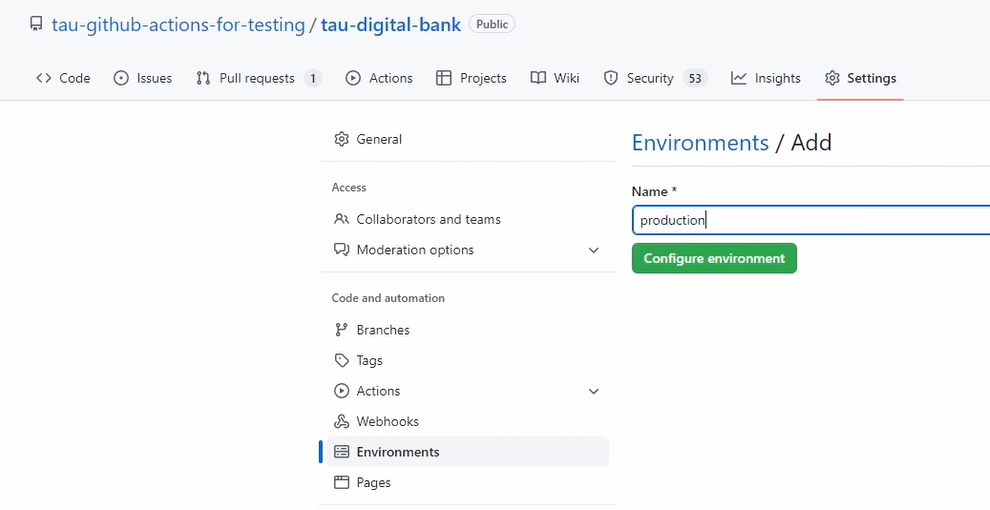
Let's create this environment (Configure environment).
Here you can see we have already Required reviewers.
For example, I think you know my name, and I will add it. So, now I always have to review if someone wants to deploy to this environment.

Let's Save production rules.
What I also can do is that I can select some branches.
For example, that you can say you only want to add branches which have the name “release” (release/*).
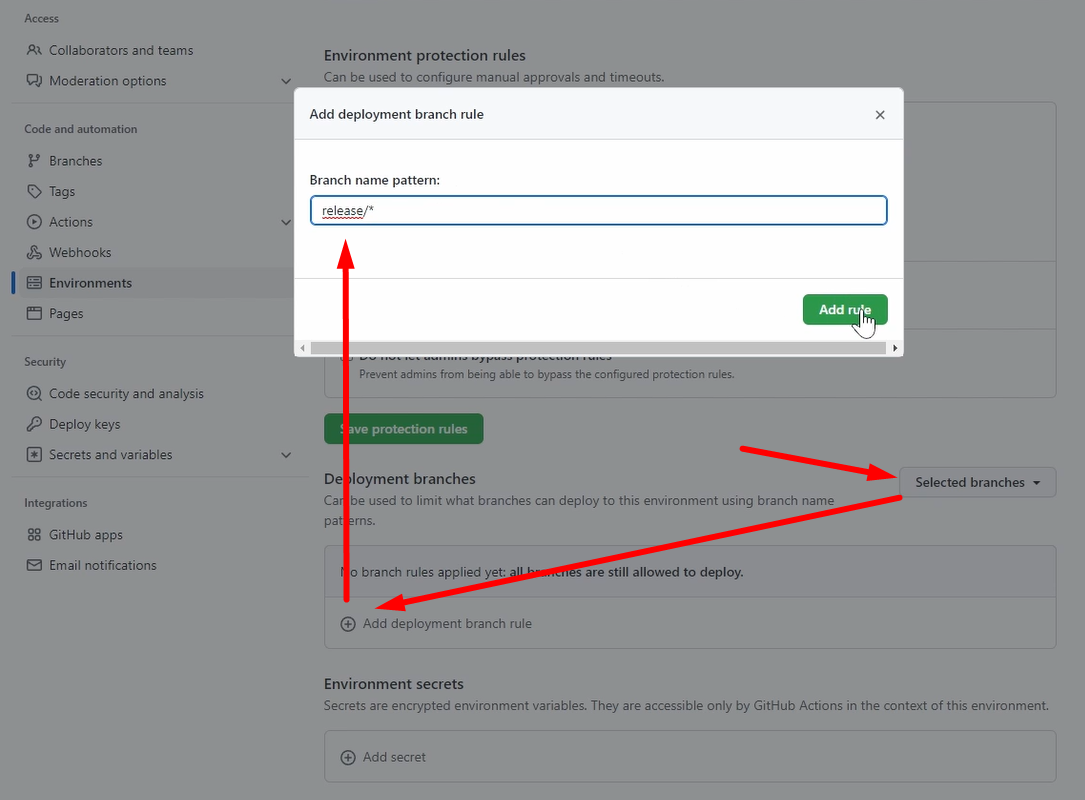
So, from now on, you only can have deployment which our base is coming from the release branch, which is a quite common thing.
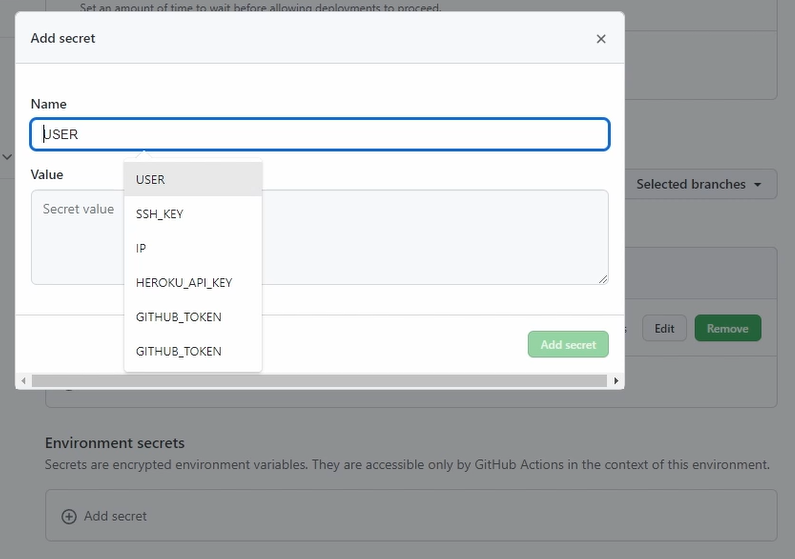
You can also add your secrets, as I mentioned, like the SSH or the user.
We will make a user, “ec2-user”.
**So, you can see this is how you add the secrets and also variables like our IP address. **
Great.
In the workflow — because I also mentioned the parameter concurrency — in our deployment pipeline, if you go here, you can then set on the steps, for example, we have this deploy step, which is now deployed to UAT.
And here, you can also use the parameter concurrency.
  deploy:
    needs: [cleanup]
    runs-on: ubuntu-latest
    environment: UAT
    concurrency: production
This is the concurrency group “production”, and this can only now run at the same time.
Good, this is how you can set it up.
I will not save these changes now because this is not part of it, it was just an example. You got the point now how you can integrate your test to the pipeline.
At the end, you can do this with your API call.
# Recap
You saw how you set up a build process, you integrate a link, or you integrate settings or security checks.
Then you execute your unit test. You upload your artifact to our directory or to the workflow in this case.
Then you prepare the environment. You clean it up, you copy your files there, and you do the installation.
Afterward, you trigger your test. So, you trigger the pipeline, you trigger the API call.
Then you build your test. You run your Playwright test against this new environment because you got the IP address from the payload.
And afterward, of course, you can then deploy to the next stage, go to the next environment — deploy to production. Here you can say that you have protection rules. And you can do some restrictions around it so that you have here a streamlined process, which you can align with your team.
So how cool is that?
In the next chapter, in our last chapter, Chapter 5, we will build our own Action so that you can see also how this works and see the potential of it.
See you there.
Resources
- GitHub Documentation: Events that trigger workflows
- Git Repo Course Code: workflows
- Git Repo Course Code: Chapter 4 End-to-End Pipeline
- Git Repo Course Code: Digibank End-to-End Tests with Playwright
