

Transcripted Summary
We briefly touched on assertions earlier in this course when we talked about the components of the test.
In this chapter, we're going to go into more detail about assertions, how NUnit handles assertions and the types of assertions that the NUnit framework provides and supports.
# What Is an Assertion?
But first, let's talk a bit about what assertions are.
Assertion is defined as a confident and forceful statement of fact or belief.
Beyond the technical, at a more philosophical level, what this means is that without assertions, test are just aimlessly wandering through execution without a true purpose or direction. They lack conviction and don't stand for anything.
And we can't have any real trust in our test suite without assertions that validate and confirm that the actions and behaviors we're invoking in our tests, are behaving the way we expect them to.
# Controlling Test Flow
Like many test frameworks, when an NUnit test is executed, all the code inside that test will be run unless an exception is thrown during the test execution. And that exception, it can be your test code throwing an unhandled exception or it could be the result of an assertion.
At that point, the test stops and the results are recorded. Notice that I didn't say the test is automatically failed.
An interesting implementation detail in NUnit is that even assertions that you might use to make a test to be marked as passing, like Assert.Pass, still raise an exception and will hold your test wherever they're placed inside your test.
And this is one reason why having multiple assertions inside a test or peppering assertions throughout your test execution flow, can sometimes get you into trouble and lead to incomplete tests execution.
# Assertion Models with NUnit
NUnit provides two different models for how to use assertions inside of your tests. And these are referred to as the classic model and the constraint model.
The classic model is the original format for assertions, and it continues to be supported in NUnit 3. But it doesn't really have new features being added in that style.
In many cases, the functionality of the two models are equivalent though. In fact, since NUnit 3 was a major rewrite of the framework, many, if not all, of the classic model assertions, actually use the constraint model under the hood.
The biggest difference comes in style and its expressiveness and readability.
What you actually use may come down to what you or your team is currently using or whatever feels most comfortable or familiar to you.
# Classic Model Assertions — Assertion Syntax
Let's start by taking a look at the classic model.
The majority of assertions in the classic model are all static methods on the assert class. There are a handful of exceptions that help with specialized cases, but we'll take a look at those later in the chapter.
We're going to start with what is generally the most common assertion you'll find in tests — that's an assertion of equality.
These help us explicitly and specifically answer the question, do the results of our actions match our expectations?
While we are looking at equality examples, we'll also see the common pattern that applies to all assertions in the classic model.
To see this in action, I created a new TextFixture called "EqualityAssertions".
I'll be using some contrived examples here as we start getting a feel for classic model assertions. The examples though are intentionally simple so that we can focus on the assertions and not have other code adding more complexity or distraction.
Later in the course, we'll be using more real-world examples so you can get a sense for how to use NUnit in your context to solve or address your testing needs.
With that said, we'll start by adding a new test and let's call it "AreEqual".
To compare quality using NUnit, we'll enter Assert.AreEqual and the first parameter to this function is the expected value. The second is the actual value.
I'll enter "expected" for the expected value; and "actual" for the actual value.
namespace TestAutomationU.Tests
{
[TestFixture]
public class EqualityAssertions
{
[Test]
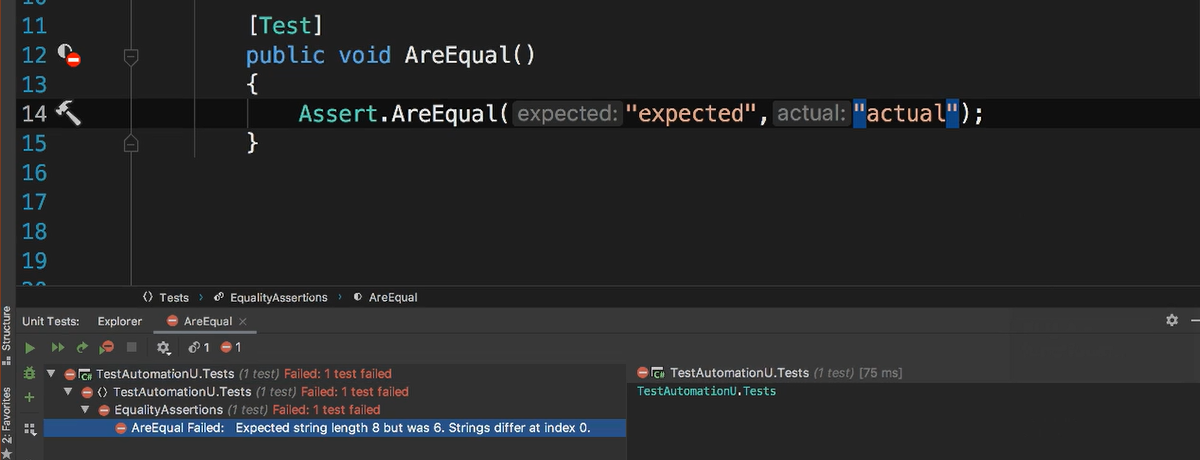
public void AreEqual()
{
Assert.AreEqual("expected ", "actual");
}
}
}
And with those value set, let's run the test.
As you probably expected, the test fails.
But with assertions, it's not just important that they are functional and pass or fail tests. Much of the importance and power of assertions is how they surface information.
It's not enough to know that a test passes or fails, because when a test fails, we need to know not just that it failed, but we need to know why it failed.
This is part of why choosing the right assertions for your test is so important.
We want assertions to be intention revealing — both when someone is reading your test code and when someone is investigating the test failures. In terms of the life cycle of your test project, tests are going to be read, and the results investigated, much more than there'll be written.
So, to set the project up for long-term success and maintainability, we want to prioritize readability over raw functionality or developer convenience.
When we look at the test output, we see it gives some details in terms of how the Strings are different — the expected String length and the index of where the difference starts to begin.

It also has the expected and actual values.
And while this may not be awe inspiring, this information becomes really useful when the values have hidden characters or spaces not necessarily visible in your UI.
To see this, we'll change the expected value to expected and append a trailing space ("expected") and then run the test again.
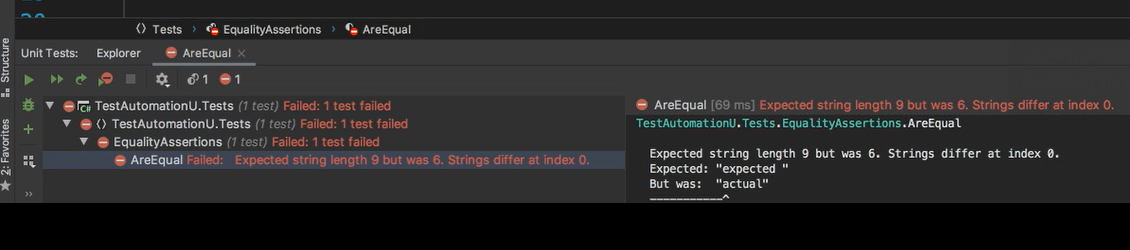
So now with this result you can see how the information in the test output can be useful in spotting a problem in test without having to start at the bugging session and inspecting values.
Assertions in the classic model also have an optional description parameter.
To use it, let's create another test and we'll call it "AreEqualWithDescription".
Inside the test, we're going to enter Assert.AreEqual and we'll pass the same values as before, "expected" and "actual".
And then for the final parameter we're going to add our description.
[Test]
public void AreEqualWithDescription()
{
    Assert.AreEqual("expected", "actual", "what does this even mean");
}
When we look at the test results, we can see that our description is now included in the test output.
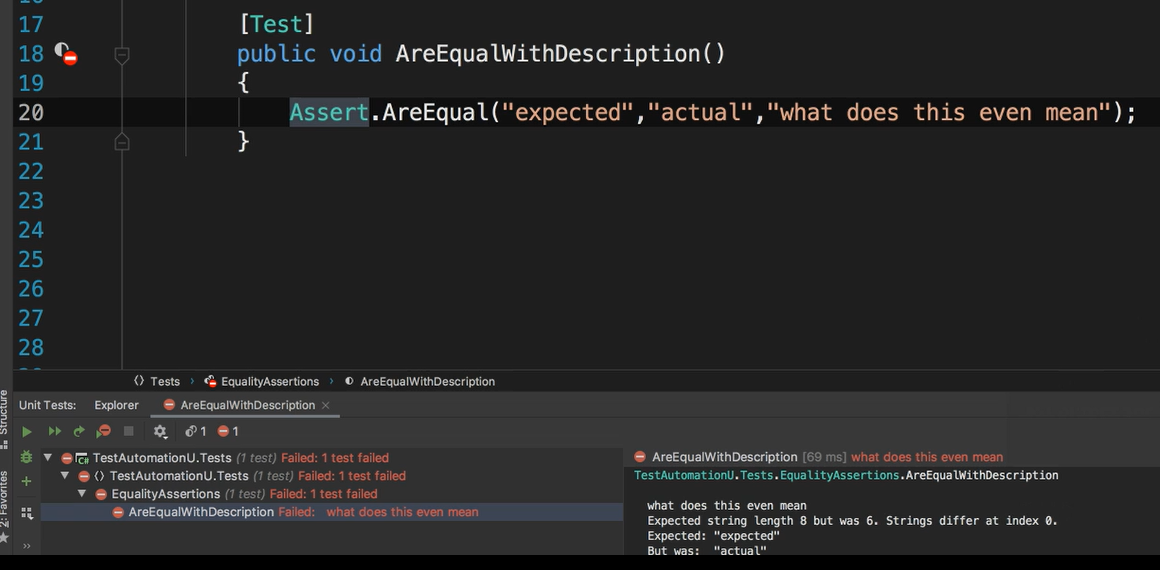
And in practice, this could provide more context or insight into what is being evaluated inside of the assertion.
The description can also be a template String, and any additional parameters that we add after the description will be interpolated into that String.
We'll create another test and call it "AreEqualWithDynamicDescription", using Assert.AreEqual and the same expected and actual values.
We'll update the description text to "what does ‘blank’ mean to ‘blank’", with a question mark at the end.
And we'll include 2 additional string parameters, "testing" and "you".
[Test]
public void AreEqualWithDynamicDescription()
{
    Assert.AreEqual("expected", "actual", "what does{0} mean to{1}?", "testing", "you");
}
Then we'll run the test again.

And we can see the interpolated description as visible inside of our test output.
This is really just a convenience, so you don't have to use String. format in line in the assertion or somewhere else inside of your test.
Descriptions can be a very useful tool for your test assertions. But before you get too excited and want to describe all the things, a word of caution.
Descriptions start off well intentioned, but over time they end up kind of like code comments.
If a test starts failing or when code gets copied and pasted, the expected and actual parameters are going to get updated, but the description might not. And so, it falls out of date or the intention of that description starts to drift from what's actually coded.
What was once intended to help can actually end up causing more confusion — so just use your best judgment.
# Assertion Syntax —Numeric Types
So far, we've only been comparing Strings.
But AreEqual has multiple overloads and this means we don't need different assertions syntax for different types.
To see this, we'll start by taking a look at using are equal for numeric types.
Start by creating a new test and naming it "AreEqualNumbers".
And then inside the test we'll enter Assert.AreEqual, and we'll use "1" and "2" for our expected and actual values.
[Test]
public void AreEqualNumbers()
{
    Assert.AreEqual(1, 2);
}
When we go in and run the test, you can see that the test failure message is very similar to what you saw with Strings.
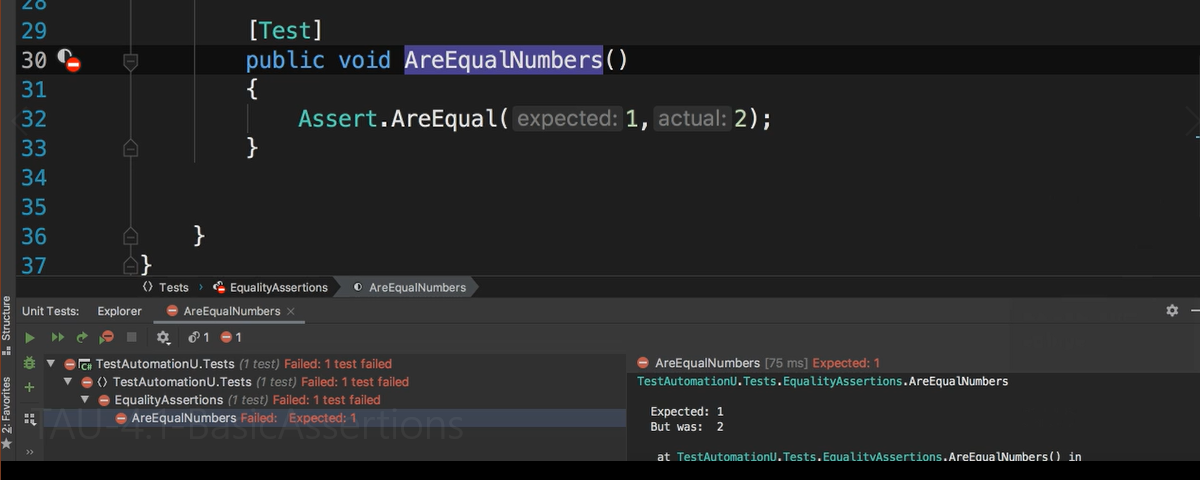
We happen to use two integers for this test, but in reality, any numeric type will also work.
In fact, NUnit also supports comparing different numeric types.
This can be useful for cases when the input might be an integer, but when you go to retrieve that value from the database or from some other method, it's been converted to a decimal or a floating-point number.
To see this, will create a test and name it "AreEqualNumbersWithADifferentType".
And we'll enter Assert.AreEqual with a "2" as an integer for the expected value and "2d" as a double for the actual value.
[Test]
public void AreEqualNumbersWithADifferentType()
{
    Assert.AreEqual(2, 2d);
}
Then when we run the test, you can see that it still passes.
For numeric types, AreEqual also has an optional parameter for the acceptable tolerance, or the Delta amount, between the two numbers.
Tthis can be very useful when rounding is involved or that the presentation or the input of a value is different from how it's stored.
To see this, will create a test and name it "AreEqualNumbersWithinTolerance".
And enter Assert.AreEqual and then enter "2" for the expected value and "2.1" for the actual value.
Finally, we'll add ".5" for the acceptable difference amount.
[Test]
public void AreEqualNumbersWithinTolerance()
{
    Assert.AreEqual(2, 23, .5);
}
And when we run this test, you'll see that it still passes because the actual number is within the acceptable range.
Now if we go and I update the test and change the actual value to something outside of the tolerance ("23") and then rerun the test.
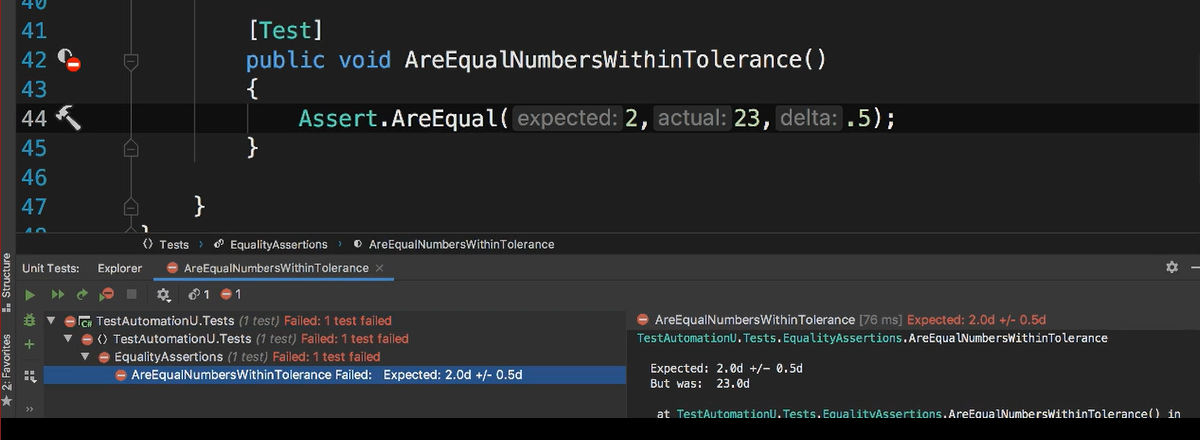
You'll see that the failure message actually includes a value, in addition to the plus or minus amount of the tolerance.
And again, we use double here in the example, but this tolerance option is available for all numeric types.
# Assertion Syntax —Arrays, Collections, IEnumerables & More
In addition to strings and numeric types, the AreEqual assertion can be used to compare arrays including nested or multidimensional arrays. You can also compare collections, IEnumerables and even dictionaries.
For arrays, collections or IEnumerables to be equal, they need to have the same dimensions and equal values.
We'll create a test called "AreEqualArrays".
Inside the test, we'll use a simple array of numbers. For our expected array, we'll use 1, 2 and 3.
And then for our actual array, we'll use 1, 3 and 2.
Then we can add Assert.AreEqual and we'll pass the expected and actual arrays.
[Test]
public void AreEqualArrays ()
{
    var expected = new int[] {1, 2, 3};
    var actual = new int[] {1, 3, 2};
    Assert.AreEqual(expected, actual);
}
And then run the test.
You can see that the test fails and that the output shows the index of the first value that's not equal.
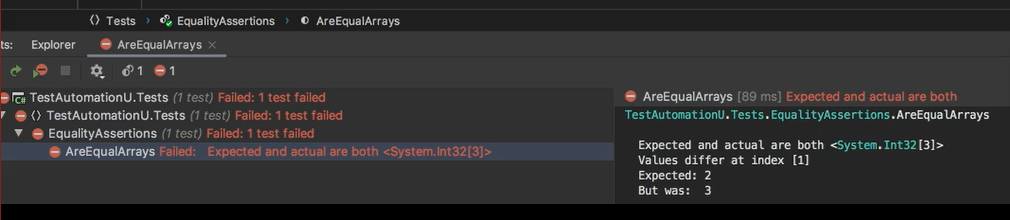
Also, be aware of a few things when comparing arrays, collections or IEnumerables.
As you can see in this example, the order of elements matters.
So, you may need to consider sorting your array before asserting using Array.Sort(actual);.
The next thing to consider is that the evaluation stops at the first value that's not equal.
And this means that the failure message does not necessarily give you full insight into the scope of the failure. There may be other elements in the array that are also not equal.
And we can see this if we update the actual array in our test to be 1, 3 and 4 and then rerun the test.

When you look at the test output, you can see that the failure message is the same as before, only showing one inequality.
When comparing dictionaries, it works similarly — all values associated with each key must be equal.
However, since the actual dictionary type in .NET doesn't guarantee key order, dictionaries are considered equal regardless of the order of the keys.
Outside of value types and the special handling for the other types that we've discussed so far, when it comes to asserting equality, NUnit is going to fall back to using the equal's method on the object.
This means that for reference types, even when all properties of an object are the same, they'll not be recognized as equals because unless it's been overwritten, the equals method does not use value equality, it uses reference equality.
If you're interested in learning more about reference equality versus value equality, I've included links in the resources.
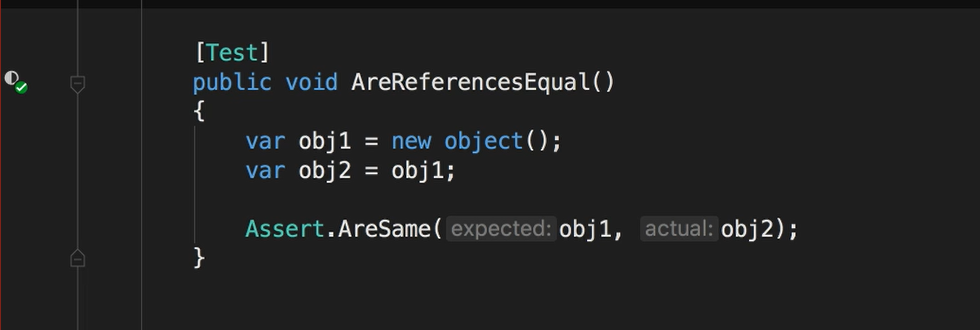
If you do need to assert on reference equality, it's best to use the AreSame assertion — this way when people are looking at your code, they can better understand what your intentions are.
This all works fine when we want to verify that one thing somehow matches something else.
But for cases when you want the exact opposite and assert things do not match NUnit has a pretty intuitive solution.
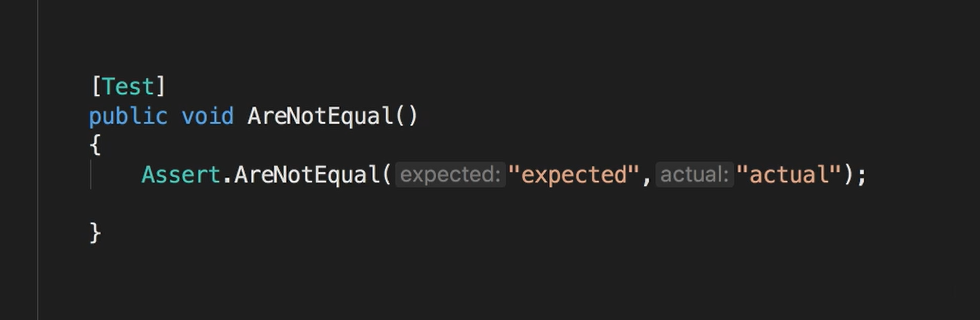
Each assertion has a corresponding method that has the word "Not" in it.
So, AreEqual is paired with AreNotEqual and this pattern is carried out across the classic model.
Now that you're familiar with the general pattern of the classic model, you should be able to start using the other assertion methods without any problem.
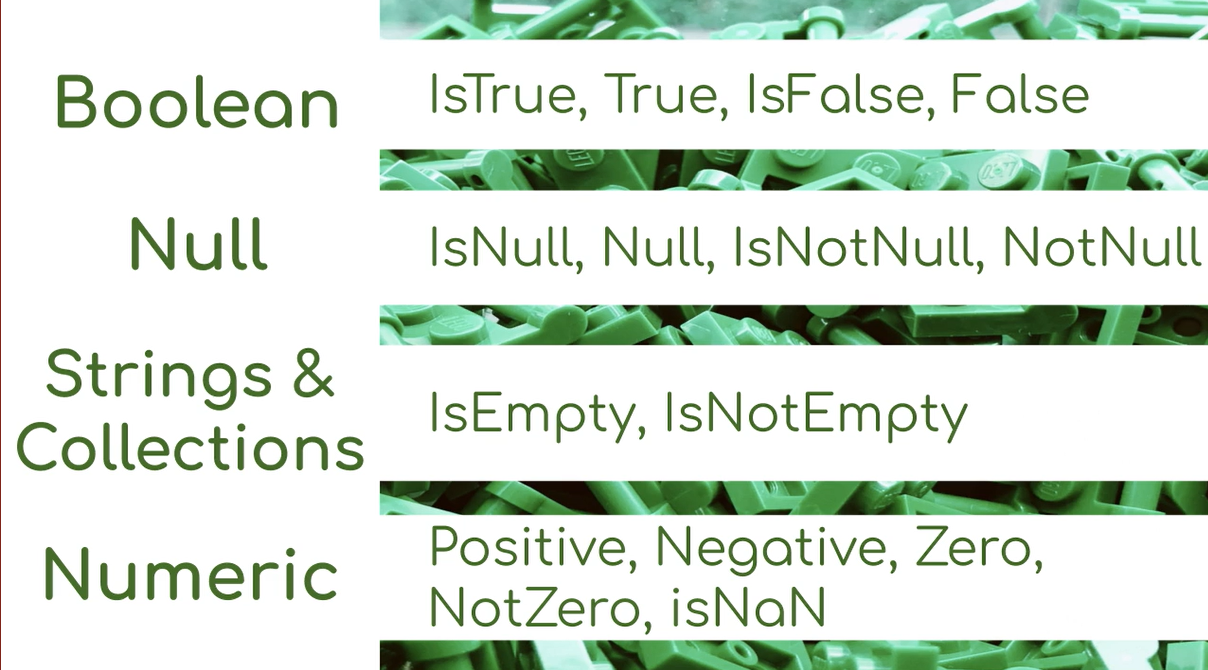
For asserting on a specific condition like if a Boolean value is a "true" or that the check of a value is "null", for these conditions, you only need to pass the actual value as the first argument to the assertion, since the inspected value is implied in the methods name.
[Test]
public void IsStringEmpty ()
{
    var myString = "";
    Assert.IsEmpty(myString);
}
When you need to compare two numbers or classes that implement Icomparable, you can use the following assertions and pass in the two values.
[Test]
public void ComparingRelativeValues ()
{
    Assert.GreaterOrEqual(2, 3);
}
What's different about these comparison assertions is that we're not passing the expected and actual value.
What they really represent is the mathematical order. Or maybe an easier way to describe it is the order in which the expression would be spoken, like where the first value is less or equal to the second value.
# Special Cases
So far, all of our assertions have been tied to the Assert class.
There are four sets of assertions in the classic model that are not part of the assert class.
They are StringAssert, CollectionAssert, FileAssert and DirectoryAssert. Each of these classes offer specialized assertions to help you deal with cases that are unique to those types.
The StringAssert class has methods like Contains, StartsWith, and EndsWith to help you more easily handle common cases for Strings.
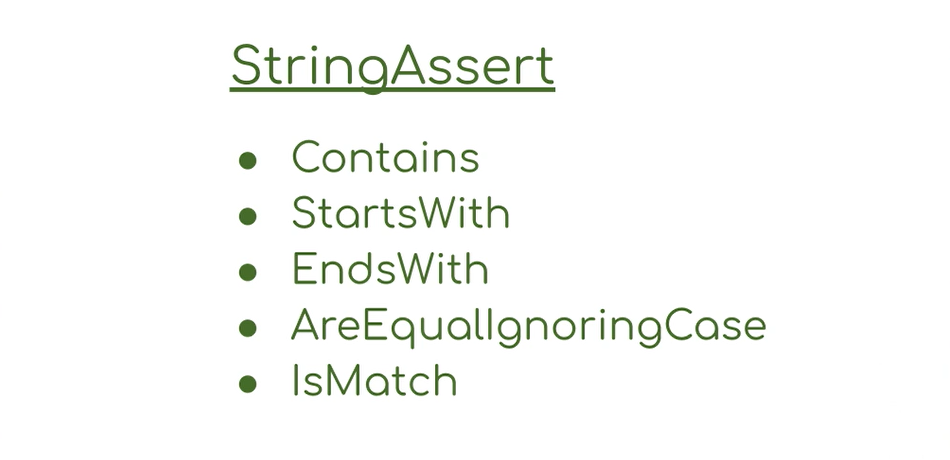
There's even IsMatch, which is kind of interesting because instead of passing an expected value, you can pass a regular expression pattern.
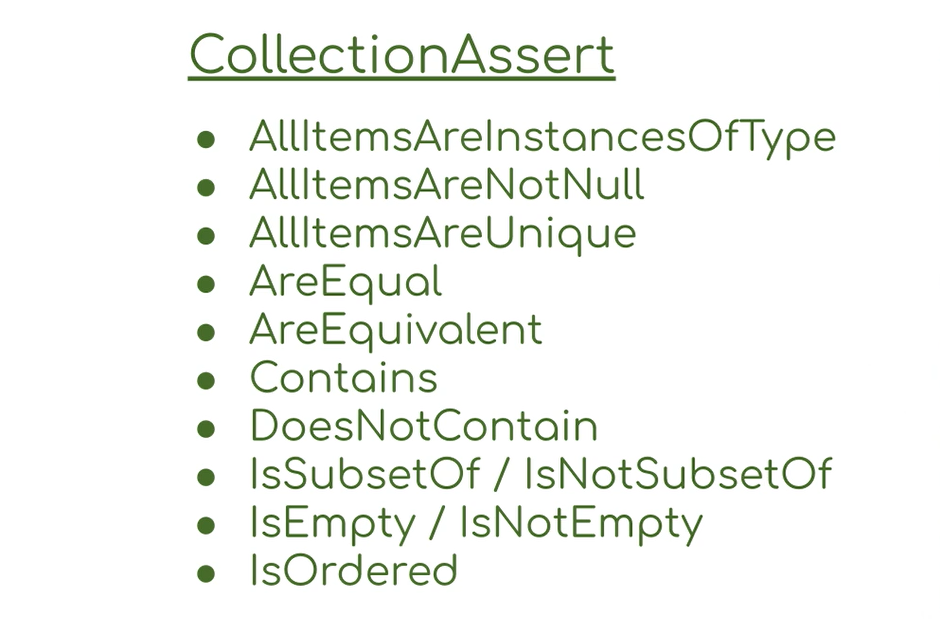
CollectionAssert provides specialized assertions that can be used with any objects that may implement IEnumerable.
FileAssert is for comparing files and each method can accept a file info instance, a stream or the path to the file.
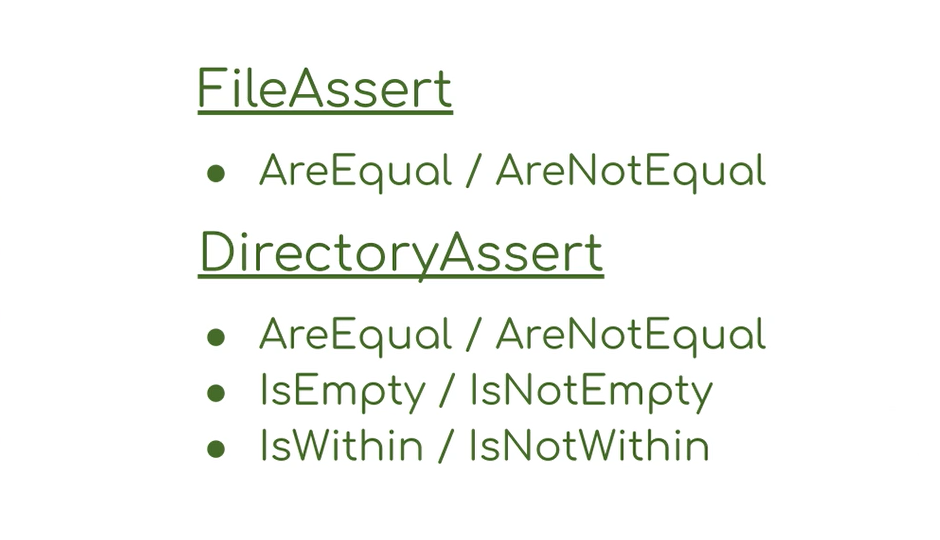
DirectoryAssert is used for comparing directories on the file system. Instances of directory info or paths to the directory can be used.
But there are some specific rules for these cases, so if it's something you think you could benefit from, I have a link to the specifics in the resources.
