

Transcripted Summary
We're going to focus on creating a TestBase class that shares the test setup and teardowns, since both of our test suites start and end the same way.
We'll then see what we can do about handling a passing test versus a failing test.
We're just going to be logging the result to the log file, but this can be used for many scenarios like sending an email or Slack message on failure.
Let's dive in.
# TestBase
The first thing we're going to do is inside of our Royale.Tests, we're going to make a “Base” folder. Then inside of here we're going to make a “TestBase.cs” file.
Now, TestBase is going to be an abstract class, because we don't want to make new instances of TestBase.
TestBase is going to be inherited by test classes.
In our CardTest, we're going to grab all of the [OneTimeSetUp], [SetUp]and all of the [TearDown].
We're just going to cut this out. So, I'm going to do Command X, cut it all out. Clean this up a tiny bit.
Then we're just going to paste it right here [back in TestBase] where we're at, just paste it inside of here.
We're going to get tons and tons of red “squigglies”. We'll take care of it real soon.
Let's start bringing in all those “using” statements.
Perfect. That's all taken care of.
Last thing we'll do in here for each one of these methods is to add the virtual keyword.
using Framework;
using Framework.Selenium;
using NUnit.Framework;
using NUnit.Framework.Interfaces;
using Royale.Pages;
namespace Tests.Base
{
public abstract class TestBase
{
[OneTimeSetUp]
public virtual void BeforeAll()
{
FW.SetConfig();
FW.CreateTestResultsDirectory();
}
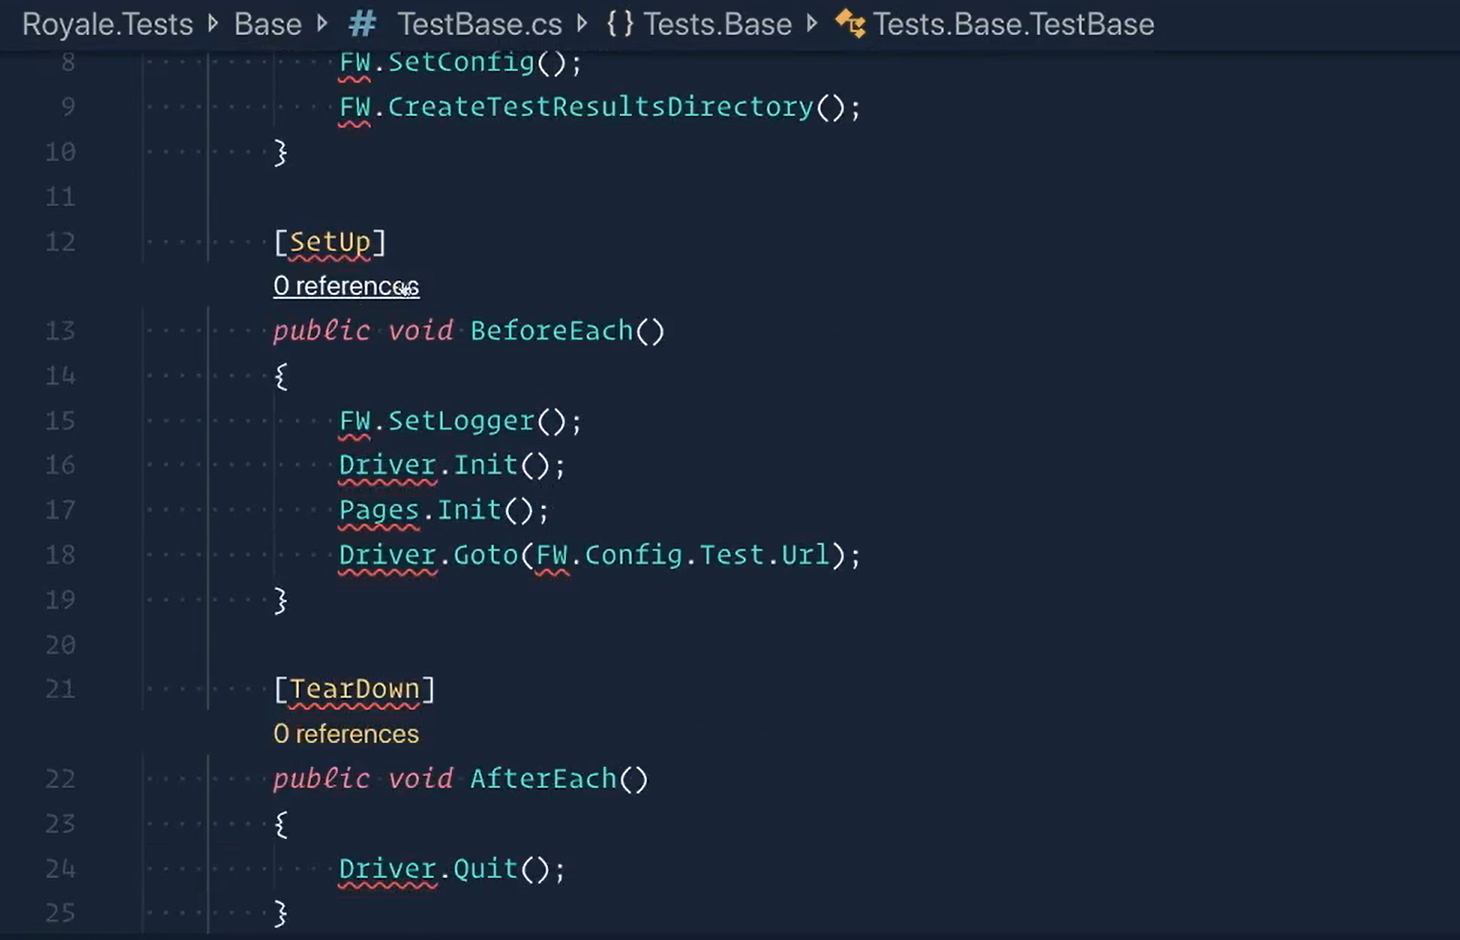
[SetUp]
public virtual void BeforeEach()
{
FW.SetLogger();
Driver.Init();
Pages.Init();
Driver.Goto(FW.Config.Test.Url);
}
[TearDown]
public virtual void AfterEach()
{
Driver.Quit();
}
}
}
If you remember, virtual means that this can be overridden, which is very much the case that we want — because this will be the Base case for things, but it may be that for certain test classes we actually want to override them.
For example, we may not want every test class to start inside of the home page.
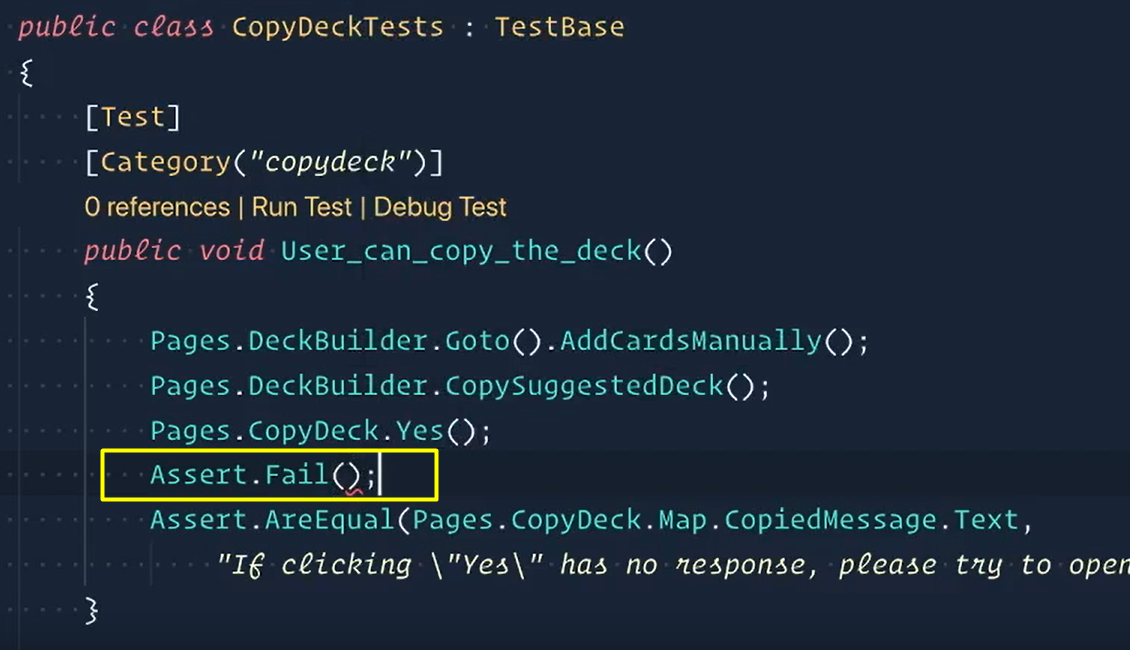
In CopyDeckTests…
Let's just delete all this [setup and teardown stuff] because we don't need it anymore.
And, now with that out of the way, we can simply inherit to TestBase.
public class CopyDeckTests : TestBase
And let's not forget to bring in the “using Tests.Base` statement either .
There we go.
Let's switch back over to CardTests and inherit this as well.
public class CardTests : TestBase
Now, if you were to run the tests, I'm just going to use the CopyDeck suite here.
You're going to see that nothing changed.
It's going to pass just as it was before, because we really didn't change anything.
Because CardTest is inheriting from TestBase, it still has all of the setup and the tear down just like it did before.
# Test Outcome
Now, in TestBase, instead of our AfterEach, after the test is done running, we now want to handle the outcome whether it passed or failed or whatnot.
So, let's get ahold of our outcome.
This is going to be using the TestContext from NUnit — TestContext.CurrentContext.Result.Outcome.Status.
It's a mouthful, but this is going to tell us whether or not it passed or failed.
We're going to use TestStatus here and bring in the “using” statement.
iftheTestStatusis passed, for now, we're just going to log that it passed, and we'll just say the outcome passed.else iftheoutcomefailed, then we're going to just log this as well and instead of outcome passed of course, we'll say outcome failed. It failed. Tears, we’re sad.elseit's anything inconclusive or skipped or something like that, let's log a warning for this one. It was something that we weren't really expecting. And, we'll just put in whatever the outcome was. This will handle any one of those weird cases.
[TearDown]
public virtual void AfterEach()
{
    var outcome = TestContext.CurrentContext.Result.Outcome.Status;

    if (outcome == TestStatus.Passed)
    {
        FW.Log.Info("Outcome: Passed");
    }
    else if (outcome == TestStatus.Failed)
    {
        FW.Log.Info("Outcome: Failed");
    }
    else
    {
        FW.Log.Warning("Outcome: " + outcome);
    }

    Driver.Quit();
}
And there we go.
# Screenshot on Failure
But, now that we have this, we actually want to take a screenshot on failure, so we'll need to go to our Framework.Selenium.Driver class.
Let's make a method to take a screenshot.
And, we're going to put it right here and to make things easy, we'll just call it “TakeScreenshot”.
So, public static void TakeScreenshot and let's just pass in the imageName so we can call it whatever we'd like.
Step 1 is to take the screenshot.
I'll just say “ss” for screenshot. I'll use the ITakesScreenshot Interface then Current for the driver. And, now we can say GetScreenshot.
Next, we have to specify exactly the location we'd like it to go to.
And, that will be the CurrentTestDirectory; the FullName would give us the full path and then we'll append it with the imageName.
And, now we save the file.
The first argument is where you want to save it with the extension. So, this is our “ssFileName” and then we'll say .Png, which means that the image format is going to be a .Png as well.
public static void TakeScreenshot(string imageName)
{
    var ss = ((ITakesScreenshot)Current).GetScreenshot();
    var ssFileName = Path.Combine(FW.CurrentTestDirectory.FullName, imageName);
    ss.SaveAsFile($"{ssFileName}.png", ScreenshotImageFormat.Png);
}
Yay we're taking the screenshot easy as that.
Now inside of our failed piece, we can take a screenshot.
We’ll say Driver.TakeScreenshot and let's just call the image "test_failed".
Driver.TakeScreenshot("test_failed");
Now that we have that, we need to make the test fail in order for us to see it.
So [over in CopyDeckTests we’ll add] Assert.Fail which will force the failure.
And then we can just run the single test.
So, we should be expecting the log file with the new outcome and then a screenshot as well.
Let's take a look to see what we got. Sure enough, we have a log file.
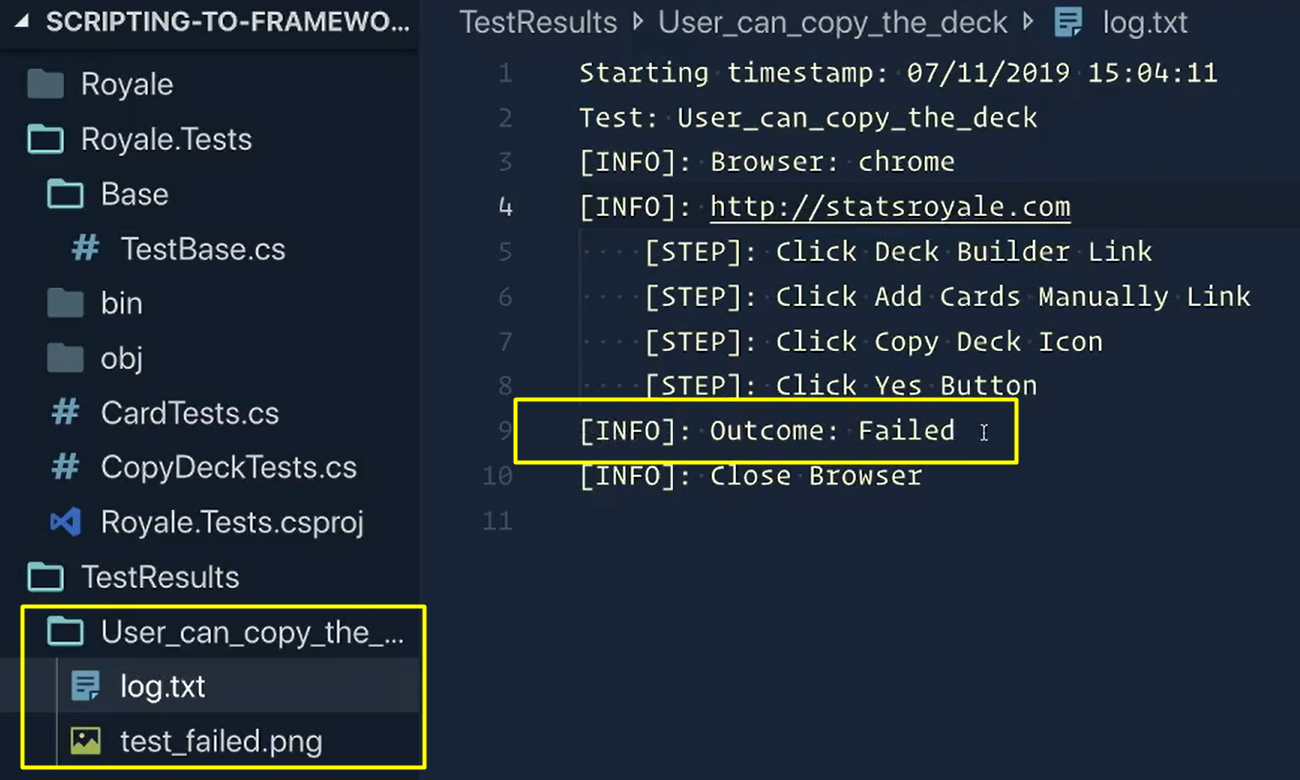
There it is, line 9, the outcome failed.
And then we have our screenshot as well for when that Assert.Fail happened.
And, it's that easy to handle the outcome and take a screenshot.
# Maximizing Window Example
Bonus time.
I bet you guys weren't ready for this because I didn't tell you about it, I'm a sneaky ninja that way. I'm actually going to go over maximizing the window.
Back in chapter 2 you had the challenge to maximize the window.
For Windows machines, it's pretty straightforward.
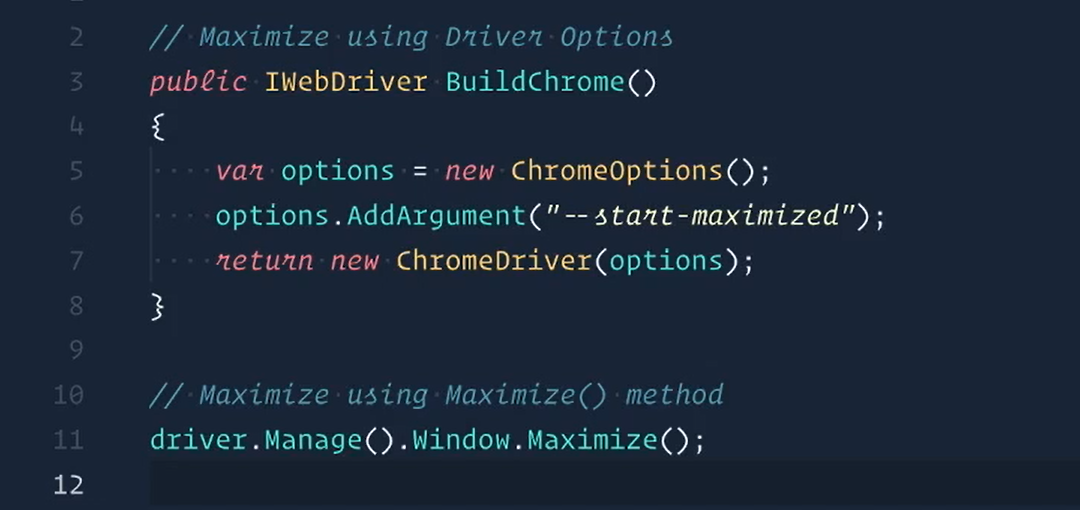
You could either pass in a --start-maximized argument to the Driver Options or even call Driver.Manage().Window.Maximize().
The issue is that those methods may not work for Mac or Linux, so I wanted to share one of the solutions that works for any platform and any browser.
Let's check it out.
I started by making a Window.cs class with a CurrentWindows property that this SwitchTo() method could use.
It's just an example of the kinds of things you may want to put in this class.
using System;
using System.Collections.ObjectModel;
using System.Drawing;
using OpenQA.Selenium;

namespace Framework.Selenium
{
    public class Window
    {
        public ReadOnlyCollection<string> CurrentWindows => Driver.Current.WindowHandles;

        public void SwitchTo(int windowIndex)
        {
            Driver.Current.SwitchTo().Window(CurrentWindows[windowIndex]);
        }
    }
}
For maximizing the window, the first step is to get the screen size that we're going to be working with.
We can dynamically get this value by executing some JavaScript to get the dimensions by width and by height.
We then can get the X property out of it and the Y property and convert them to integers.
public Size ScreenSize
{
    get
    {
        var js = "return [window.screen.availWidth, window.screen.availHeight];";
        var jse = (IJavaScriptExecutor)Driver.Current;

        dynamic dimensions = jse.ExecuteScript(js, null);

        var x = Convert.ToInt32(dimensions[0]);
        var y = Convert.ToInt32(dimensions[1]);

        return new Size(x, y);
    }
}
Then return the size with the X and Y to get that size object back.
Once we have that size, we can then position the window at the top-left corner and then set its size to the screen size we received.
public void Maximize()
{
    Driver.Current.Manage().Window.Position = new Point(0, 0);
    Driver.Current.Manage().Window.Size = ScreenSize;
}
Voila!
You can now maximize your browser dynamically for any browser and platform.
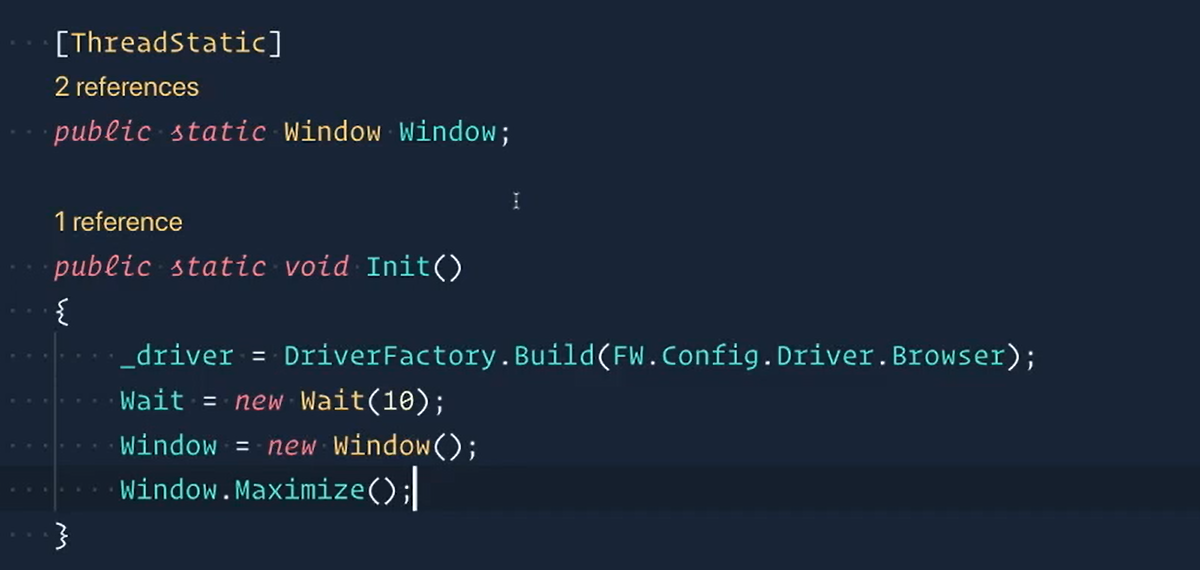
The last thing to do is to use it in our Driver class.
Just like our Wait class, we'll make a [ThreadStatic] field and instantiate it in the Init() method.
Simply call Window.Maximize() after that and you're done!
See you in the last chapter.
