

Transcripted Summary
You made it to the last chapter in this course. Seriously, well done, cyber high fives, cyber hugs. I hope you can feel the love through this video.
In this chapter, we're going to explore Expected Conditions and how to make our own custom Wait Conditions as well.
We have waits in our CopyDeck and DeckBuilder pages.

But we used Lambdas to make the Wait conditions on the fly. In C#, Lambdas are used so often that it's just a part of our toolkit as dotnet developers.
However, for others that are starting out, Lambdas can be a little cryptic and difficult to grasp.
We can solve this by making our own library of WaitConditions or by using the WaitHelpers package that has the familiar ExpectedConditions class.
# WaitHelpers.ExpectedCondtions
I'll start by showing how to use the WaitHelpers package from DotNetSeleniumExtras.
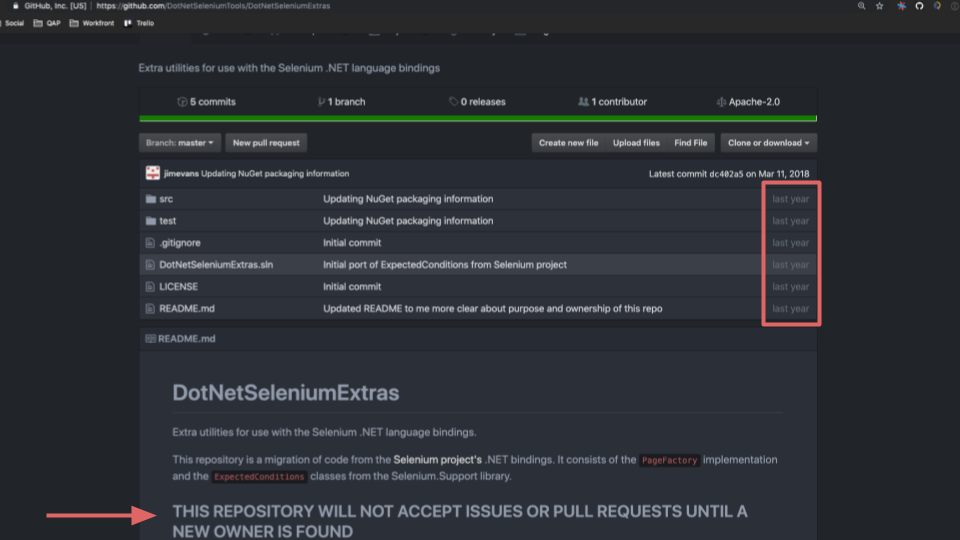
Note
It's easy to set up, but this project is not being maintained. So just be aware and use it at your own risk.
We'll start inside the CopyDeck page class.
On line 25, we have this Lambda to wait for the OtherStoresButton to be displayed.
Let's use the WaitHelpers from DotNetSeleniumExtras. to simplify this just a bit.
We're going to start by using Pack Sharp > Add Package. We're going to add it to our Framework and let's search for “Selenium Extras”.
If we go down here, we'll see that there's one that says “DotNetSeleniumExtras.WaitHelpers”.
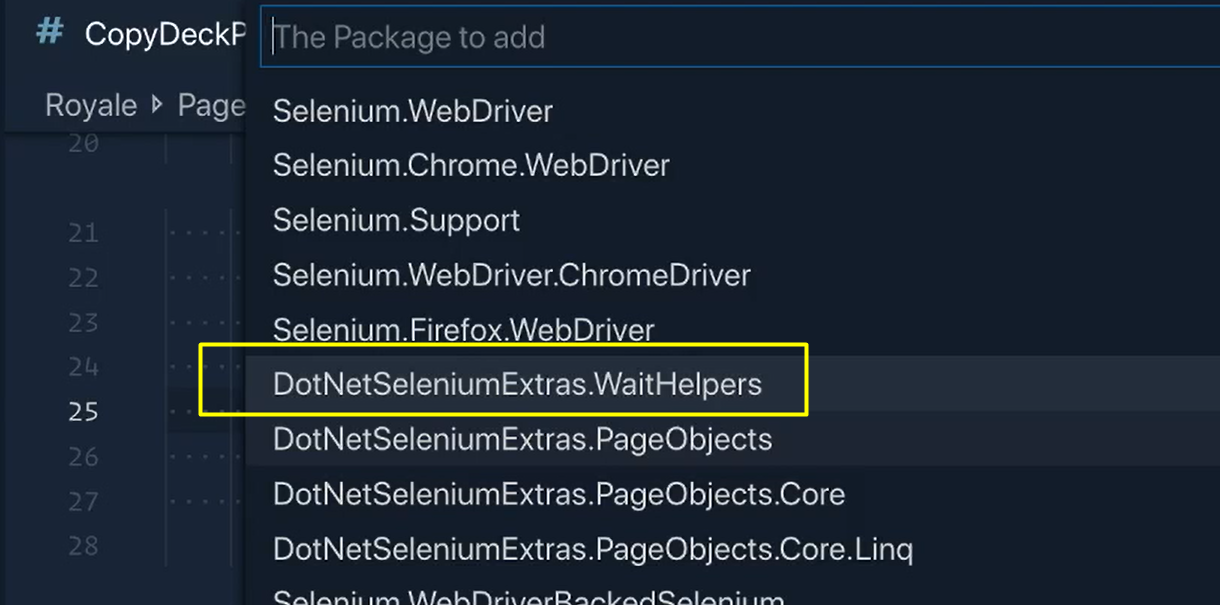
And we're going to add that one.
Let's then do a dotnet build, and then let's do this “Restore” to make sure we are bringing everything in correctly.
With the restore complete, we can now give this a try.
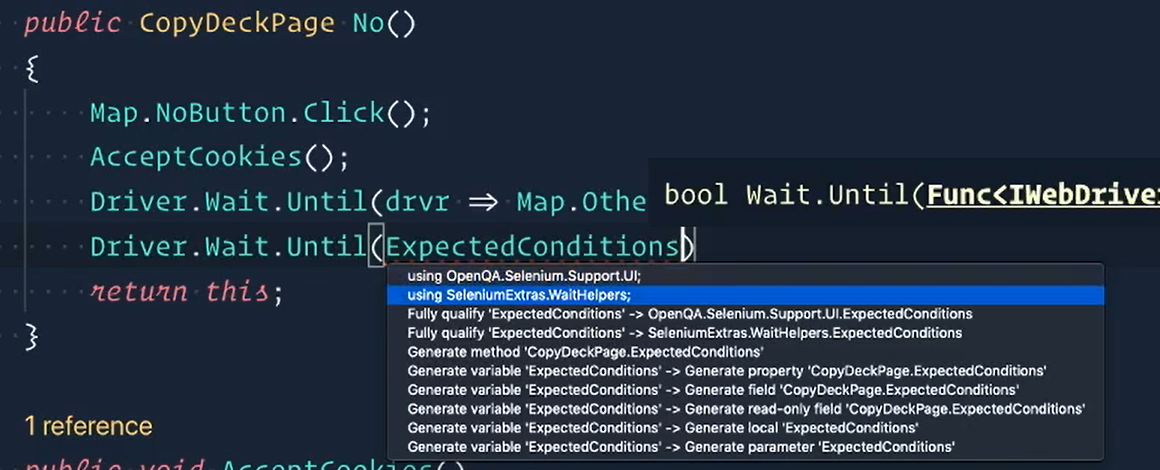
Driver.Wait.Until, and then we're going to type in ExpectedConditions and then let's see if we can bring this in.
Deprecated
Now, one thing I want to point out is the first option it's giving us is “using OpenQA.Selenium.Support.UI”. Do not use that one because the ExpectedConditions in that package is deprecated and no longer used.
Make sure you select the second one here, which is “SeleniumExtras.WaitHelpers”.
Now we'll say ., and the one that we want is .ElementIsVisible() — now notice how what this wants is actually a By locator`.
So, in order for us to grab this, we're going to say Map.OtherStoresButton.FoundBy.
public CopyDeckPage No()
{
    Map.NoButton.Click();

    AcceptCookies();

    Driver.Wait.Until(ExpectedConditions.ElementIsVisible(Map.OtherStoresButton.FoundBy));

    return this;
}
Now we're receiving an error because this ElementIsVisible actually returns an IWebElement and our current implementation of Wait.Until only returns a Boolean.
So, we do need to make one change inside of our Wait class.
Let's go there real quick (this a Framework.Selenium.Wait).
And right here we need to make another function that looks very similar to this but returns an IWebElement.
public IWebElement Until and we're going to pass it in IWebDriver, but instead of a Boolean, we were returning an IWebElement. We'll call this “condition” as well.
And then the return is identical to the one above.
public IWebElement Until(Func<IWebDriver, IWebElement> condition)
{
    return _wait.Until(condition);
}
Save it. And there we go.
We can close this and go back to our CopyPage and you'll see everything is now passing.
Let's delete this line here (our old Wait). Save and now we're waiting using ExpectedConditions.
And you can see it's a lot more readable — ExpectedConditions.ElementIsVisible using the By locator from our OtherStoresButton.
# Custom Wait Conditions – Element Displayed
Hopefully the WaitHelpers package will work for you.
But because it's not being maintained, I would rather have my own custom Wait Conditions since I almost always end up writing custom ones anyway.
Now let's make our WaitConditions class, and with this being Selenium, it's going to be in Framework. - you guessed it - Selenium.
Let's do right click > New File and call it “WaitConditions.cs”.
We're going to make this a sealed class and just call it WaitConditions.
If you remember, our Wait.Until method took a function that had an IWebDriver and then returned a Boolean or an IWebElement.
With the majority of our Waits being Element.Displayed, we're going to make a function called “ElementDisplayed”.
public static Func, we have an IWebDriver, and for now we're going to return a Boolean. Let's call this ElementDisplayed.
We need to pass in an IWebElement, and then bring in the “using” statements.
Now, we need to define our function and make sure that it returns a Boolean.
bool condition and remember we need to pass in a driver first.
And then from there just return the Boolean we want, which is the element displayed.
Then because this method is expecting a function back, we just need to return our function. Our function is that condition.
using System;
using OpenQA.Selenium;

namespace Framework.Selenium
{
    public sealed class WaitConditions
    {
        public static Func<IWebDriver, bool> ElementDisplayed(IWebElement element)
        {
            bool condition(IWebDriver driver)
            {
                return element.Displayed;
            }
            return condition;
        }
}
There we go.
Let's go to our DeckBuilderPage and use these now.
Driver.Wait.Until(WaitConditions.ElementDisplayed()), and now we can pass in that Add Cards Manually link.
Same thing for the next one, and that was our copy deck icon.
Let's clean this up.
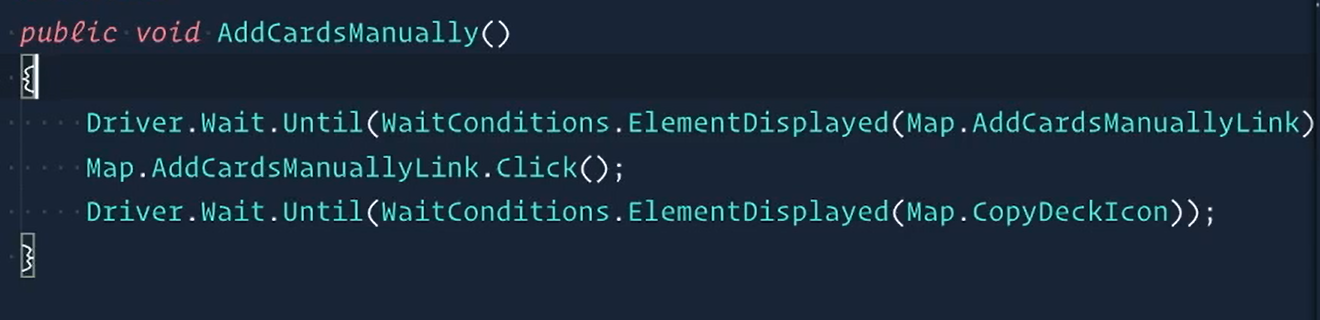
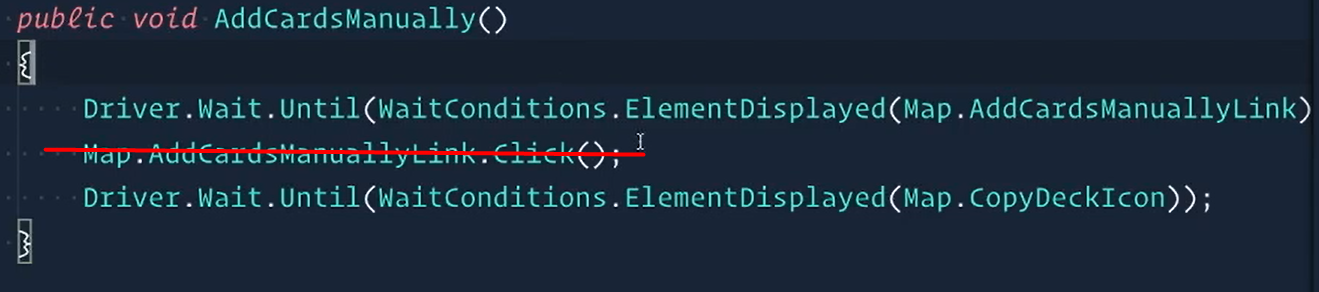
public void AddCardsManually()
{
    Driver.Wait.Until(WaitConditions.ElementDisplayed(Map.AddCardsManuallyLink));

    Map.AddCardsManuallyLink.Click();

    Driver.Wait.Until(WaitConditions.ElementDisplayed(Map.CopyDeckIcon));
}
And there we go. See that wasn't too bad, right?
# Custom Wait Conditions – Element Not Displayed
The next condition that we need to write for is actually for the CopyDeckPage. Inside of our AcceptCookies method, we actually have this “not displayed”.
So, let's make sure we include a Wait Condition just for that.
Back in our WaitConditions class, we're now going to make a new method that's going to be called “ElementNotDisplayed”.
This is still a Boolean we're getting back, and then ElementNotDisplayed — we're passing in an IWebElement called “element”.
This condition is going to be a little more complicated than the first one just because ElementNotDisplayed behaves a little funky.
If the element is there, it can check to see if it's displayed or not. But if it's not there, it will usually throw some sort of exception.
So, in this case, we're actually going to use a try catch block to catch those exceptions.
We'll start by defining our function. Remember we're passing in our driver, and now we'll start with the first try.
In here, we simply want to check that the element is not displayed. That's the easy part. However, this will throw a StaleElementReferenceException. The thing is if it does throw that exception, we actually want to return true.
Why do you think that is?
If you think about it, if we want the element to not be displayed, it's going to keep checking if it is displayed or not.
If it is displayed, it's going to return false, which we'll make Until poll the HTML again.
But if it throws a StaleElementReferenceException that means the element used to be there but is no longer there, which is exactly what we're checking for. So, if it throws that stale element, that means it's no longer displayed, AKA return true, it's not displayed anymore.
Last thing we need to do now is just return the function, which is our condition.
public static Func<IWebDriver, bool> ElementNotDisplayed(IWebElement element)
{
    bool condition(IWebDriver driver)
    {
        try
        {
            return !element.Displayed;
        }

        catch (StaleElementReferenceException)
        {
            return true;
        }
    }
    return condition;
}
And we now have an ElementNotDisplayed Wait Condition.
Let's check it out in our CopyDeckPage.
Driver.Wait.Until, then have our new wait condition, which is not displayed, and this is our Map.AcceptCookiesButton.
Let's clean this up.
public void AcceptCookies()
{
    Map.AcceptCookiesButton.Click();

    Driver.Wait.Until(WaitConditions.ElementNotDisplayed(Map.AcceptCookiesButton));
}
And we’re done.
# Custom Wait Conditions - Elements Wait Condition
To show just how much you can do with your own Wait Conditions, we're now going to create one that we don't necessarily need in our tests right now, but that I think is pretty cool to have.
So, a little bit different, we're going to sayIWebDriver and then we're going to return Elements back.
This one is going to be called “ElementsNotEmpty”.
I want this condition to check for a list of elements to be more than empty. This could be for a lot of things.
Maybe we're waiting for the cards to load, so we could say once one card loads, continue…
Once multiple things are added to the cart, continue…
Once, whatever it is, continue…
And that's what this wait condition is going to be for.
We start with the return type of the function, which is Elements condition (we keep passing in that driver, we’ll do this every time).
The first thing in our function is to check the elements.
We're going to poll the DOM, so Driver.FindElements
And the cool thing is that this wants a By locator and our elements already have one called FoundBy because we're storing it in our custom implementation of a list of elements, if you remember.
For our return statement, we're going to check if our _elements are empty.
If it is, return null, which will cause it to go back into the
Until.However, if it's not empty, then just return the list of elements back.
Then we return the condition.
public static Func<IWebDriver, Elements> ElementsNotEmpty(Elements elements)
{
    Elements condition(IWebDriver driver)
    {
        Elements _elements = Driver.FindElements(elements.FoundBy);

        return _elements.IsEmpty ? null : _elements;
    }
    return condition;
}
And this Wait Condition is now complete.
# Custom Wait Conditions
The last Wait Condition we're going to add is going to solve a small issue that we're facing in our AddCardsManually method.
On line 24, we're waiting until the AddCardsManuallyLink is displayed.
Immediately after that on line 25, we're then finding it again to Click on it.
Our new Wait Condition is going to condense that into 1 line — wait for the AddCardsManuallyLink to be displayed and then click on it immediately afterward.
So, let's go back to our WaitConditions class, and underneath our ElementDisplayed we're going to make another one called ElementIsDisplayed.
Note
Now again, this is just an example, so don't get too crazy about the naming here. I just want to show you that there are 2 different ways for us to return a Boolean with “element displayed”. Or just return the element back and use it right after the Wait is complete.
Just like our “elements” Wait Condition, we're going to make a function that has our IWebDriver that we're passing in, but instead of a Boolean we're going to return a single IWebElement. We'll call this one ElementIsDisplayed and let's pass in our element that we want to find.
Scroll this into view and start by defining our function.
Now I'm going to handle this one a little bit differently than the first ElementDisplayed function just so you can see how complex you can actually get with these Wait Conditions and the functionality and customizations you can do with them.
So, in our try, we're going to return element.Displayed.
- If it is displayed, just return the element right back.
- If it's not, return null so that way it gets the polling to happen again.
We're then going to do a catch and let's catch the NoSuchElementException.
If it catches that, we'll just return null to make it poll again.
We can do another catch and we'll say the ElementNotVisibleException.
If it's not visible, we'll return null, try again.
Then we could add one more if we wanted to — just like we could say like if it's Stale then also return null, but we're not going to do that.
I think these two catches are enough, so let's just return our condition at this point.
public static Func<IWebDriver, IWebElement> ElementIsDisplayed(IWebElement element)
{
    IWebElement condition(IWebDriver driver)
    {
        try
        {
            return element.Displayed ? element : null;
        }

        catch (NoSuchElementException)
        {
            return null;
        }

        catch (ElementNotVisibleException)
        {
            return null;
        }
    }
    return condition;
}
So, it's a little more complex but really not too bad.
Hopefully you can see that within these catches I could really do whatever I wanted. We're just returning null right now to tell Until to just poll again until we finally gets the element back.
And now for the moment we've all been waiting for, it's time to use it.
Let's get rid of this line here.
We're not going to need it anymore.
Let's changeElementDisplayed to ElementIsDisplayed.
Then let's put a space right here, just so we can fit everything on one view.
And now, we can just Click it.
public void AddCardsManually()
{
    Driver.Wait.Until(
        WaitConditions.ElementIsDisplayed(Map.AddCardsManuallyLink))
        .Click();

    Driver.Wait.Until(WaitConditions.ElementDisplayed(Map.CopyDeckIcon));
}
It's more user friendly now and more clearly represents the intent that we want to be doing as well.
Feel free to add Wait Wonditions to the rest of the pages.
Save it one last time and one more test run to make sure everything's working as expected.
# And with that, that is it.
As you can see, there is tons to do and this really is just the tip of the iceberg.
For example, we haven't done anything with secrets or key management, databases, reporting, and a slew of other things.
But I hope this course has been helpful. What I love is that we didn't write many test methods, but the tests we did write are pretty darn powerful.
Get creative and innovative with this. That's what makes programming so much fun.
Also, please, please, please reach out to me with any questions or feedback.
I would love to help you on your journey to becoming a test automation superstar.
Until next time, peace.
Challenges
I didn't run the test just so we could do this challenge 😃
When working with web elements, we usually only work with elements that we expect to be present on the DOM. At least, that's what our users do. Because of this, it makes sense for us to "wait" for elements to at least be present in the DOM before returning it.
In this challenge, you need to add a "Wait" to our Driver.FindElement() method so every time we "find" an element, we wait until it exists before returning it.
HINTS:
Give it a try, but you can look at the
Chapter 12 - Challenge (solution)commit to see how this is done.Your tests will most likely fail on the
AddCardsManually()step because when we callMap.AddCardsManuallyButton, we are having the Driver find the element at that time instead of within a Wait. Solving this challenge will also solve that issue.
