

Transcripted Summary
In this chapter, we'll be using statsroyale.com as our application under test.
Let's go to the website real quick so we can familiarize ourselves.

In a tab here I'm going to go to statsroyale.com and this is a very popular game.
I think it's a mobile game called Clash Royale. I don't play myself, but I know it's pretty popular and this entire website is around the stats rankings and all that good stuff around the cards, players, games, tournaments, and all the like.
For us, we'll be focusing on a couple of these pages, but the main one right now is the Cards page.
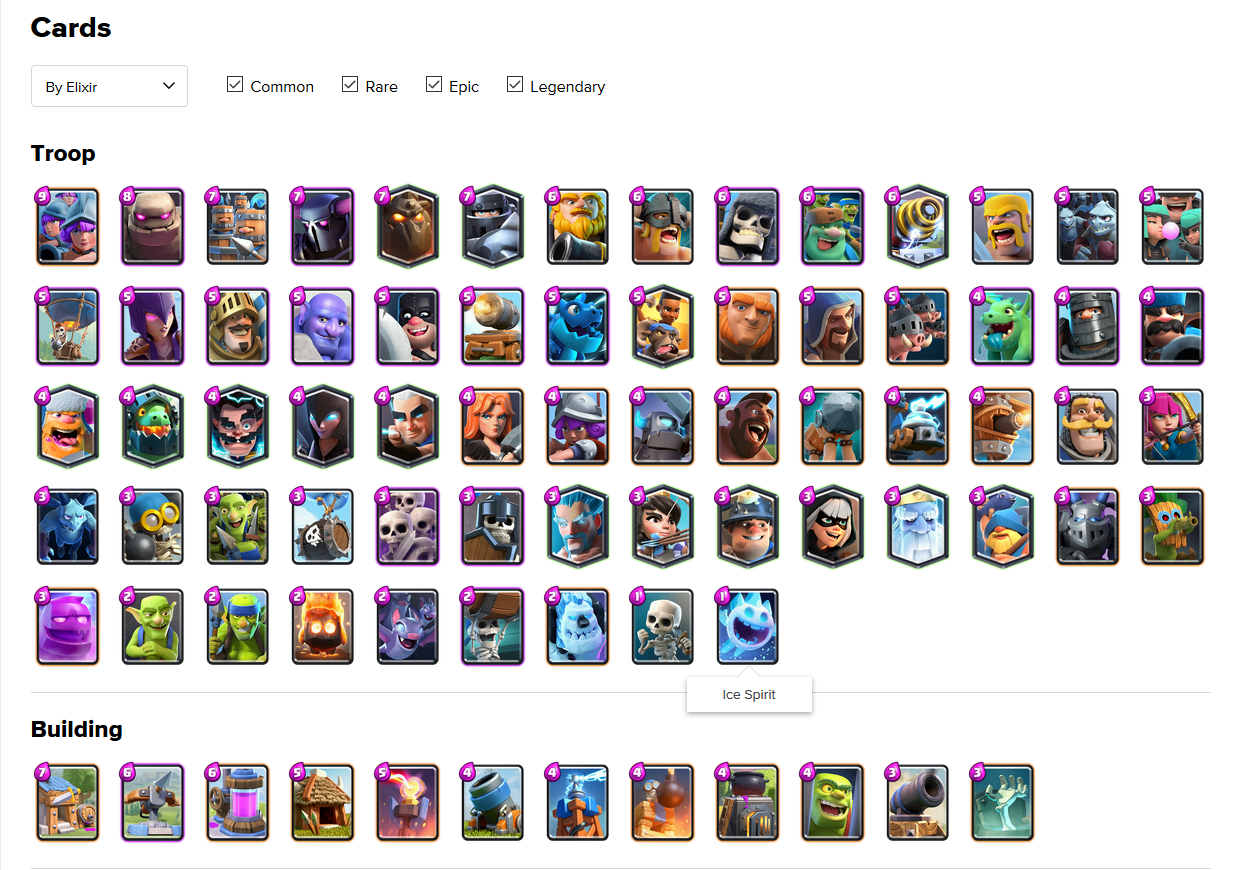
You'll see that the basic unit of the entire game are these cards. There's quite a few of them.
You'll see they all have a name like this guards guy that costs 3 elixir.
This Ice Spirit that costs 1 elixir.
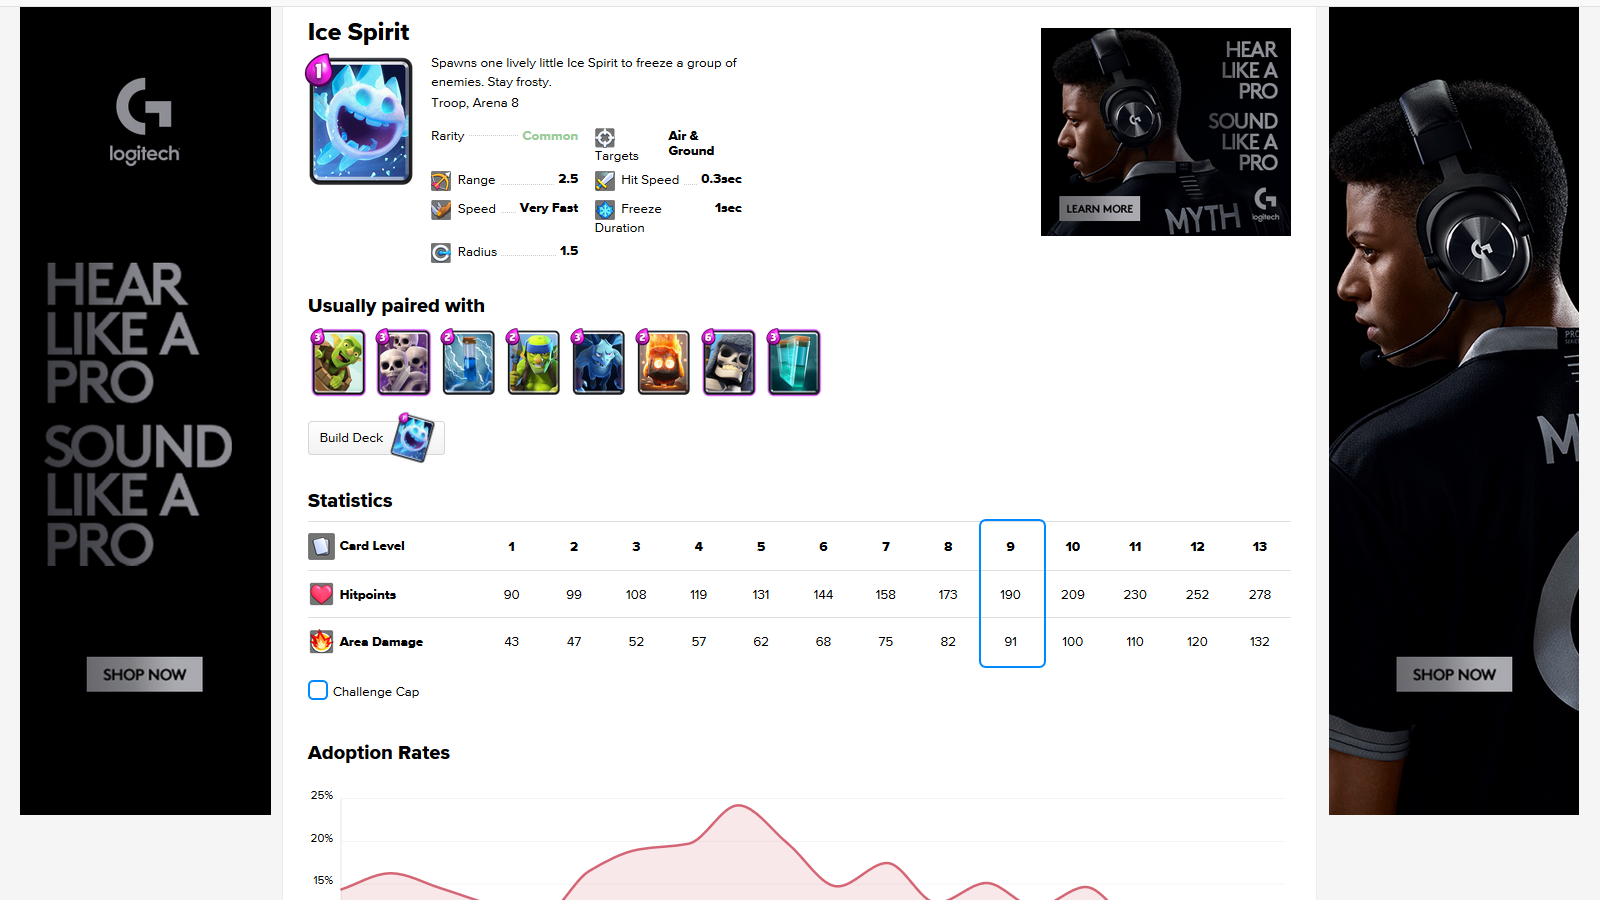
We'll click on this guy and inside of here we'll then see that there's more information about them, some base stats, even other cards, lots of information.
And, this is essentially the gist of the app as well as being able to build decks or copy decks to try things out in the game.
So, this is what we're going to be working on
Now we're going to be writing two tests.
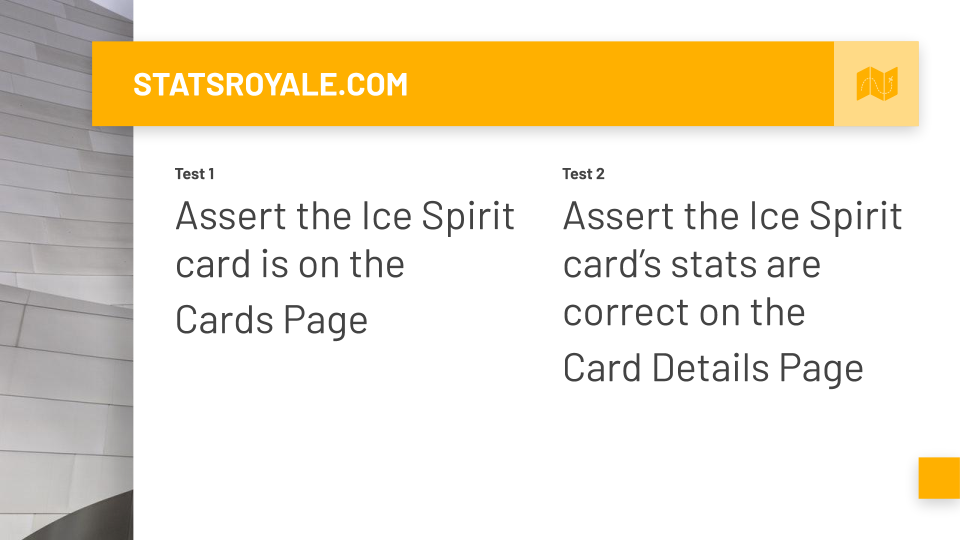
The first test is to assert that the Ice Spirit card is on the Cards Page.
The second test is to assert the Ice Spirit card’s stats are correct on its Details Page.
With that, let's dive into code and write these tests.
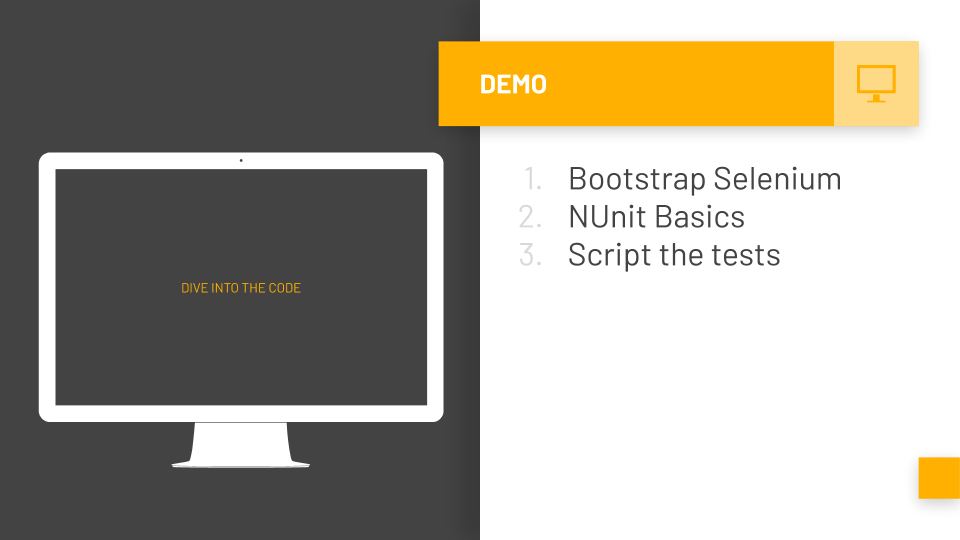
# Setting up Selenium
The first thing I'll do is change the name of the test class and test method just so they make a little more sense.
So, I'm going to change it to say CardTests [public class CardTests] and then I'll also make sure to change my file name to “CardTests” as well [“CardTests.cs”].
There we go.
And, then my test method, instead of calling it Test1(), I'm going to call it Ice_Spirit_is_on_Cards_Page().
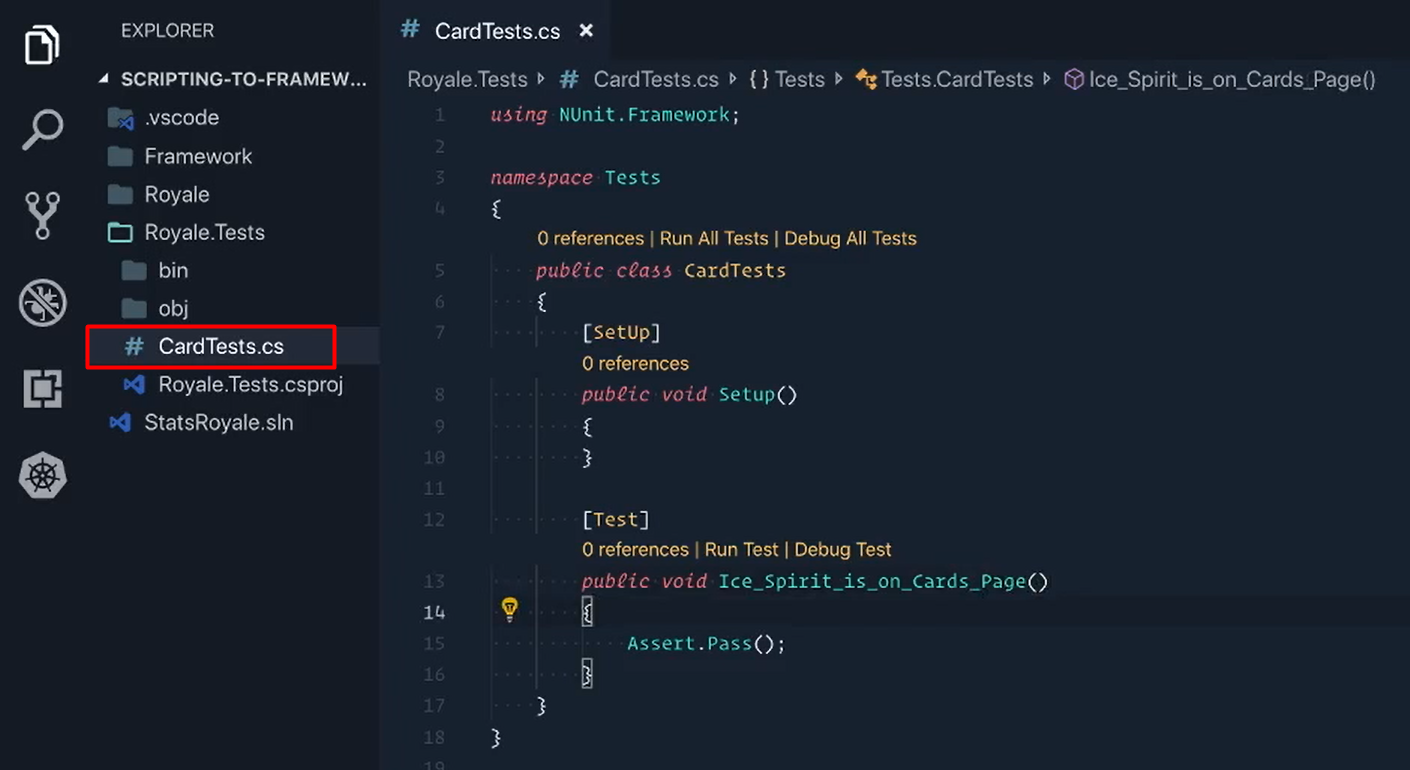
Perfect.
Next we're going to add Selenium to our test project so we can start using it.
PackSharp makes this very, very simple.
We'll open up the Command Palette and we'll say a “packsharp” and go into “Bootstrap Selenium”.
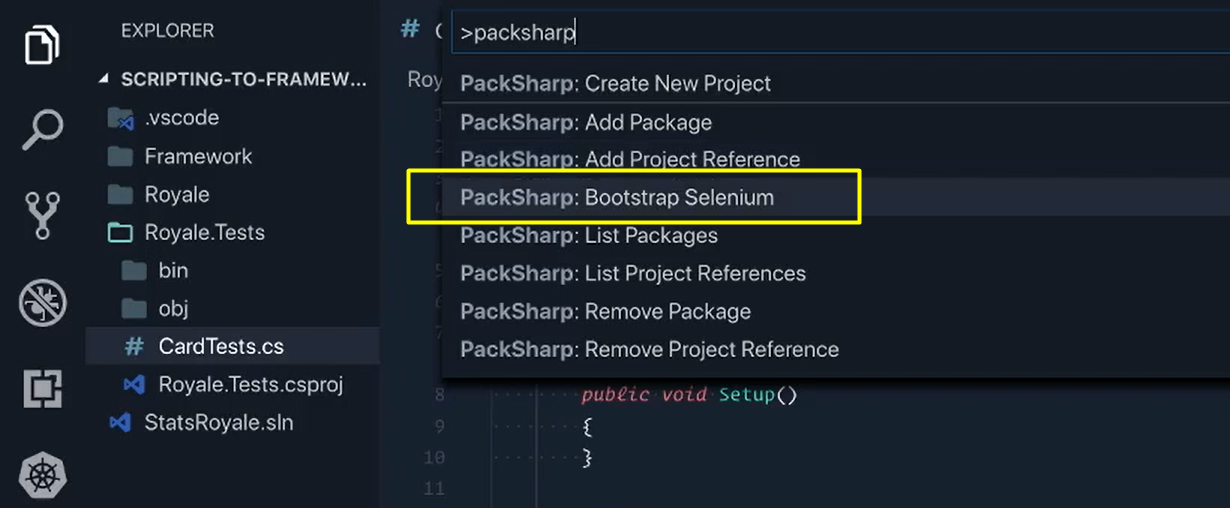
We'll select this option, it'll ask you, which project you want to add it to.
We want to add it to our test project. We'll enter and then we'll actually see a few things happen.
Number 1 is that we'll actually get a Drivers directory.
This directory will now have your ChromeDriver and it should work for Windows or Mac. I'm just going to close these real quick.
The next thing is that if we open up this project file in our “Royale.Tests.csproj”…
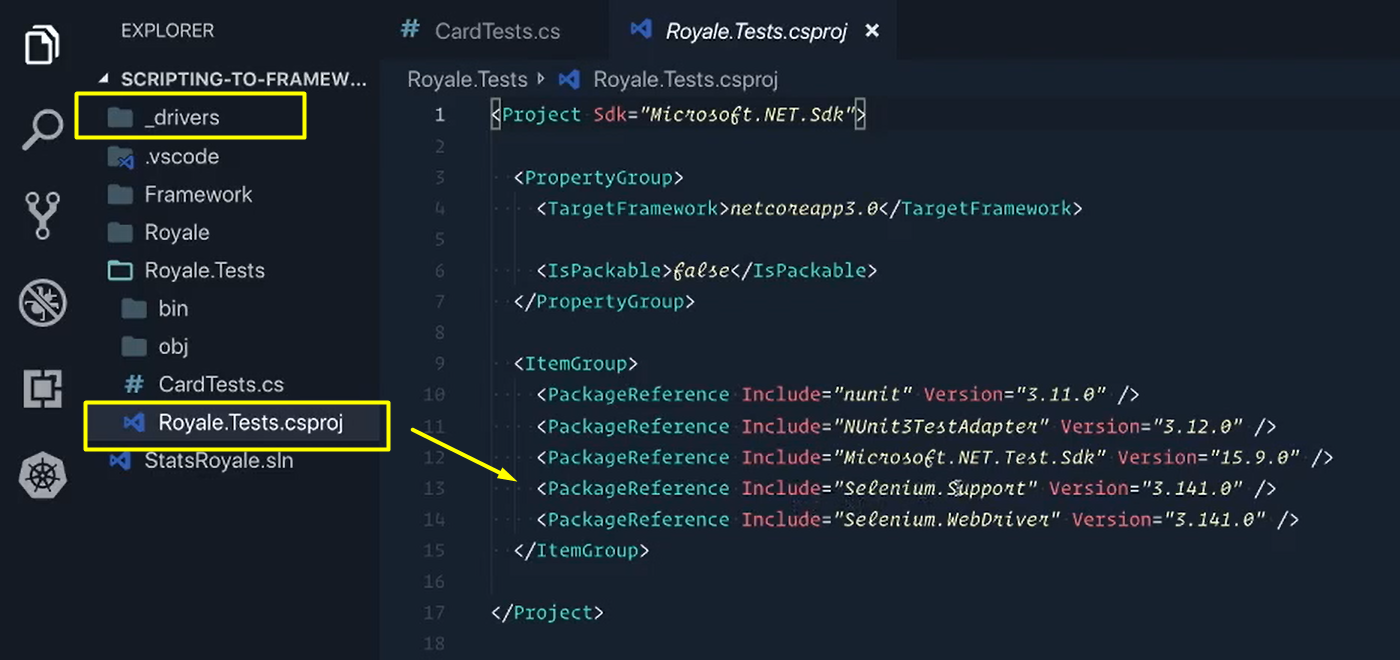
We'll open this up and you'll actually see us “Selenium.Support” and “Selenium.WebDriver” have now been added to the “Royale.Test” project and are ready to be used.
So, with that, I mean Selenium is now installed.
We can go back to our “CardTests.cs” and inside of here, let's give it a try.
I'm going to say:
IWebDriver driver;
I'm going to declare it here.
It's saying, "Hey, I don't know what this is." Fortunately you have this little bulb over here.
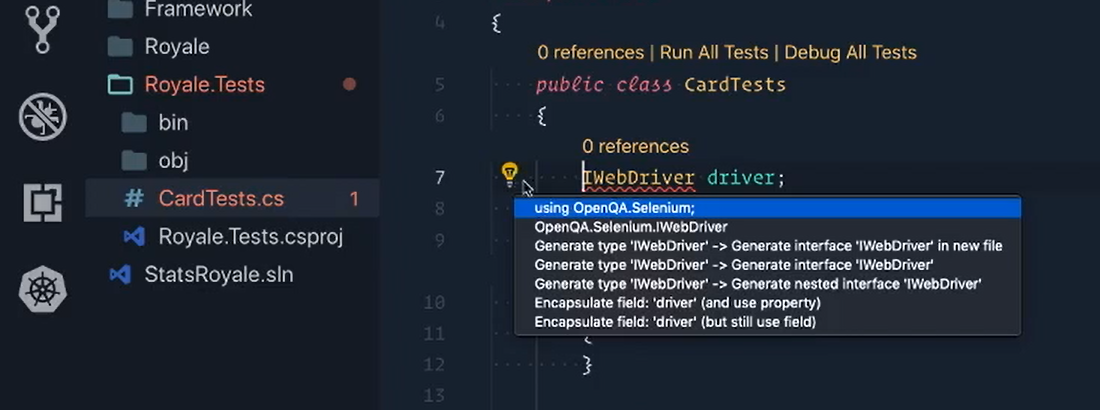
We'll click on this and C# will say, "Hey, this is what I think you need."
So, I'll click on this guy, it'll import it in for me automatically and solve the error. Awesome stuff.
# Rundown of NUnit Basics – SetUp and TearDown
Our [Setup] method is essentially the BeforeEach test method.
So, I'm going to change from SetUp, I'm going to say BeforeEach, so that way it's a little more clear.
And then we'll make another one, [TearDown].
And, we're going to say this method is AfterEach because this is what's run after each test.
- So, after each test, I want to close the driver —
driver.Quit(); - Before each test I need to give driver a value —
driver = new Chromedriver();
It's going to be, "Hey man, I don’t know what this is." We'll open up our little helper here.
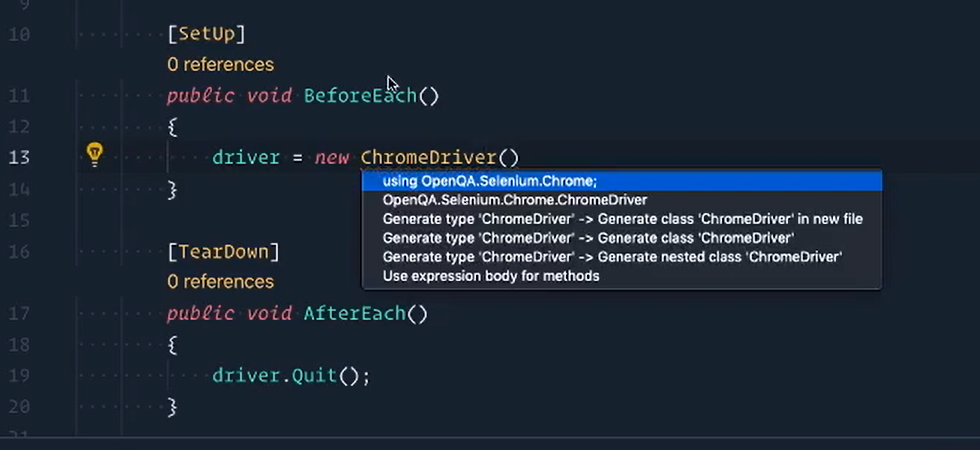
It says, "I think you need OpenQA.Selenium.Chrome."
We'll enter that one. It imports for us automatically.
And, the last thing we need to do is just tell our ChromeDriver where our ChromeDriver file is.
And, we know it's inside of this drivers directory.
And, so here we're going to be using driver = new Chromedriver(Path.GetFullPath())
It's not going to know what that path is. So, we'll come over here [to our helper lightbulb] — same thing, it knows that I need System.IO.
Bring that in and right here we'll have @ and we need to go back 4 directories and then into our _drivers directory because that's where it's at.
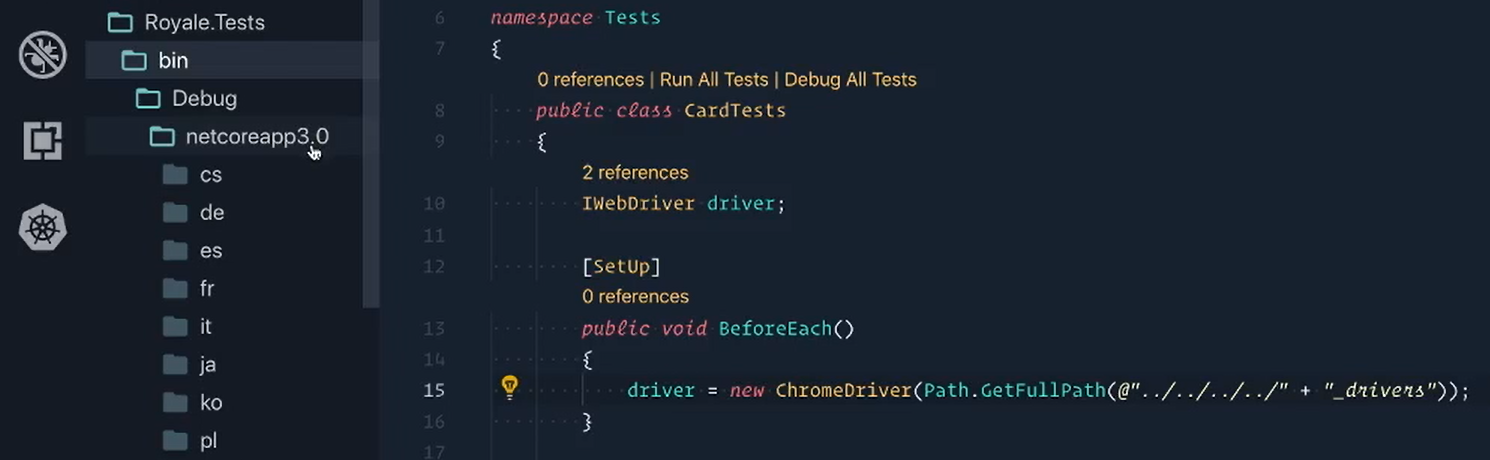
So we have to go back 4 directories because when the tests actually run, they start inside of this: Bin > Debug > netcoreapp.
Yours will probably say 2.2 or 2.3 but this is where everything starts.
And, so we need to go back 1, 2, 3, 4 levels out here. And, then from there we say “inside of drivers”.
[SetUp]
public void BeforeEach()
{
    driver = new ChromeDriver(Path.GetFullPath(@"../../../../" + "_drivers"));
}
So, that's what this piece is doing here.
And the nice thing about this is that it'll work for everyone that is collaborating with you and your repo.
So, if they pull it down, they don't need to do any sort of installation or anything. The driver's already there. The executable's are they already and their path with it being relative will work on their machine and your machine and anyone else's machine.
And, with that we actually have Selenium now running and the driver will open a ChromeDriver.
# Scripting the Tests – Test 1
The first test is pretty straight forward.
Let's write out the steps, that way we know kind of what we need to do.
- Step 1 - We need to go to statsroyale.com.
- Step 2 - We need to click on that cards link in the header nav.
- Step 3 - Assert Ice Spirit is displayed.
So, let's start with step 1 — we need to go to statsroyale.
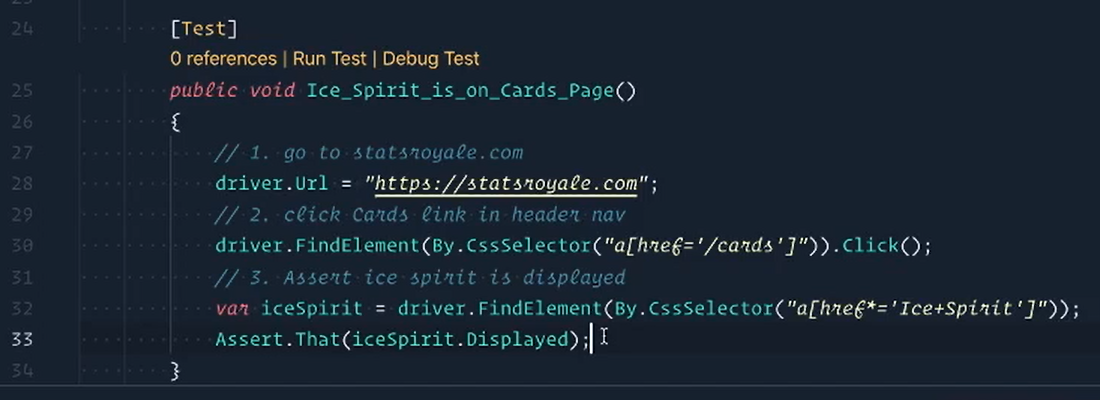
public void Ice_Spirit_is_on_Cards_Page()
{
    // 1. go to statsroyale.com
    driver.Url = "https://statsroyale.com";
}
So, statsroyale.com, there we go.
Then we need to click on the header nav.
Let's switch back over to the website. We can figure this out, right click and inspect.
Locating Elements
If you are not familiar with strategies to inspect and find elements, I recommend checking out the Test Automation U course Web Element Locator Strategies by Andrew Knight.
Okay, and over here we have, it looks like just this “/cards”. So, I'll use this since it's pretty clear.
So, let's switch back over to our test. And, I'm going to say driver.FindElement(By), and I'll use a CSS selector here. We had an a element with the href that equals “/cards”.
And, we just need to Click on this guy.
// 2. click Cards link in header nav
driver.FindElement(By.CssSelector("a[href='/cards']")).Click();
The very last thing is to assert the Ice Spirit is displayed so we need to find him.
So, we'll click on Cards to get to this page. Here we are and let's give this guy an inspect here.
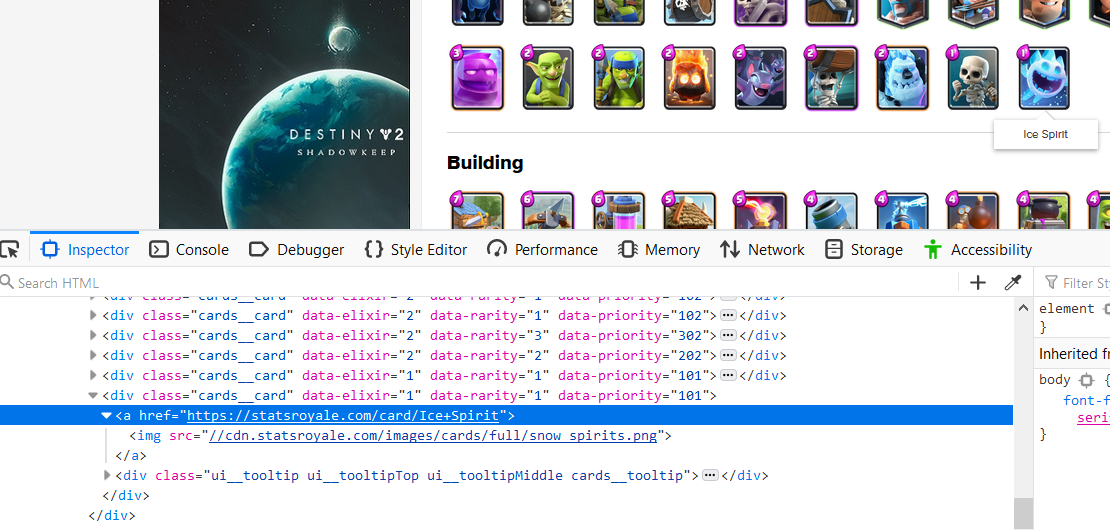
And, I'm seeing right off the bat that we have something unique here, this “Ice + Spirit”.
I'll be using this, but I do want to try it inside of the console. So, let me switch over to console here and minimize this and let's see if we can find it.
So, I want to find, it's an a element that has the href that contains and we'll put “Ice + Spirit”. There he is.
So, we found him and then if we click on this, it takes us to that. Perfect.
That's the element that we want to use, so I'm going to go over here and grab this string, which is the locator.
We'll copy that switch back over to our code. And, then let's hold “iceSpirit” inside of variable.
So, driver.FindElement(By.CssSelector()) — I already have my string and then we can assert that Ice Spirit is displayed.
// 3. Assert ice spirit is displayed
var iceSpirit = driver.FindElement(By.CssSelector("a[href*='Ice+Spirit']"));

Assert.That(iceSpirit.Displayed);
# Scripting the Tests – Test 2
The second test jumps in complexity pretty quickly, especially when we consider that each of these cards are different from each other. There are tons of properties that each card has, but for this test we'll just focus on a few of them for now.
We'll start by copying the first test because the steps are pretty similar at the beginning.
Then we'll change the name from “Ice_Spirit_is_on_Cards_Page” to “Ice_Spirit_headers_are_correct_on_Cards_Details_Page”
Now, we already have step 1; there's step 2 and 3.
We don't need to hold this Ice Spirit anymore though because we just need to click on it.
So, here we can then do our . click and that'll get us there.
Now we have step 4 (and this one [step 3 is now] really is just go to Ice Spirit) and we'll say “Assert basic header stats”.
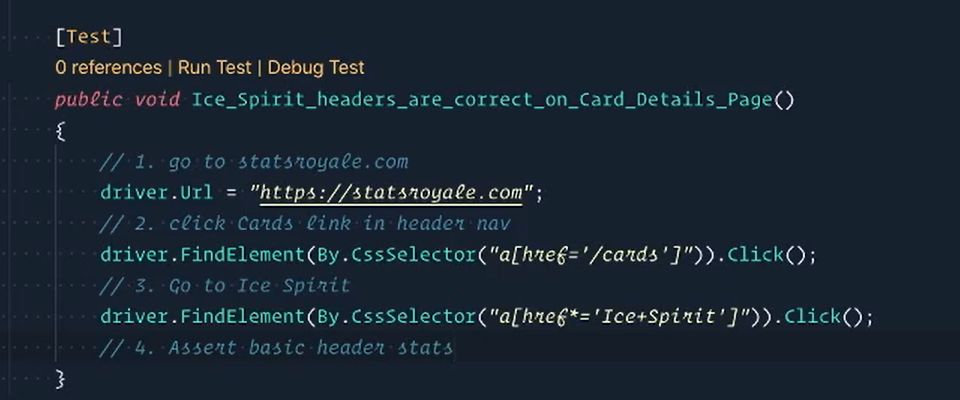
Now, when I'm talking about these basic header stats, what I'm talking about here are:
- The Name - which is Ice Spirit,
- The Type - which is Troop,
- The Arena - which is Arena 8, and
- The Rarity - which is Common.
Just those 4 things we're going to care about.
The first one is to find the names.
We'll right click on this and inspect it (let’s see if I can make this a little bit bigger. There you go, that's better).
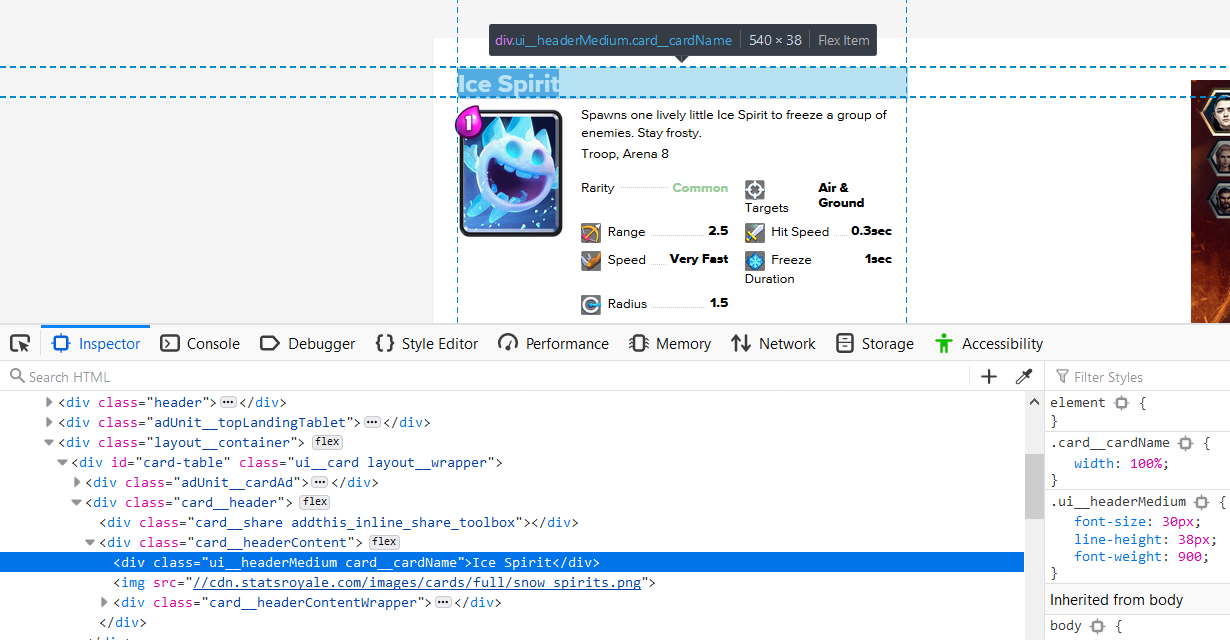
And, here I'm really seeing that we have this nice “cardName” right here.
I'm going to give that one a try, it's that within the class. I'm going to use CSS. And, here is the class that contains “cardName”.
So, there's our element, we found it.
And, what we can do here is to make sure that we have the right stuff. We're going to say “innerText” and we get Ice Spirit.
So, this is the one that we want to use.
Let's go over here and copy the selector back in our code.
We say:
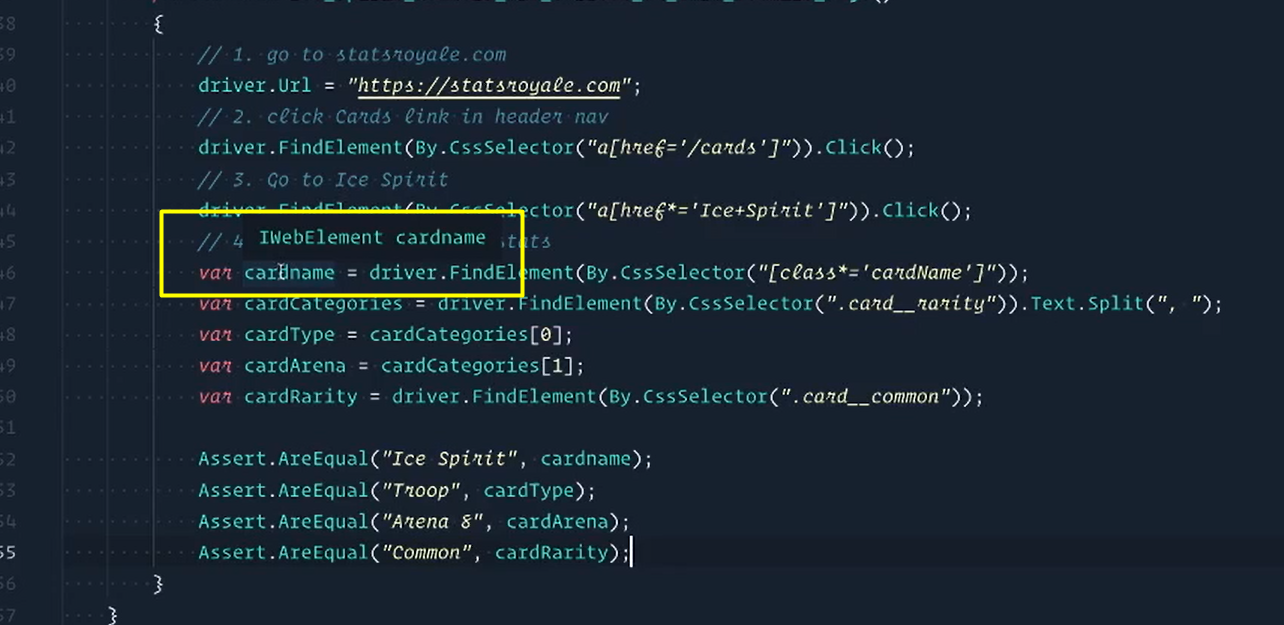
// 4. Assert basic header stats
var cardName = driver.FindElement(By.CssSelector("[class*='cardName']"));
There we go.
The next one we want is the type of the card, which is this Troop and then the Arena.
So, right click on this and inspect it. And, from the look of it, we actually see that there is, I would call this a small bug.
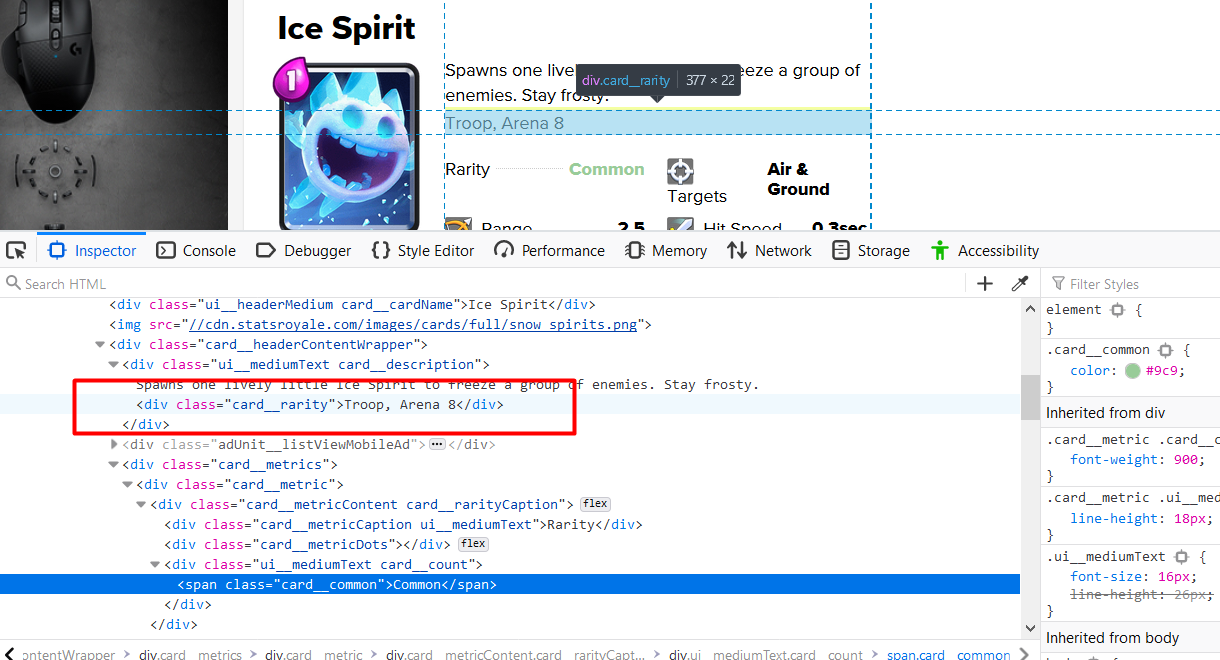
They're calling this rarity when it has nothing to do with rarity at all.
But at least we see that it has “Troop, Arena 8”. It's actually the same text within the same element. So, we'll have to do something to split this up.
So, back in here, I'll be using CSS again. And, this time we can say that we need the “.card__rarity”.
If we go here [in the inspect console], there we go we found it. And, getting the “innerText”, we did that. We have both of them now.
And, like I said, we'll have to do something to split that up because we want to actually hold the Troop and hold Arena 8 — so I will have to figure that out.
But, this is the locator that I want [“.card__rarity”] so I'll copy this.
Switch back over to code and right now I'm just going to say “cardCategories” just because we have multiple things inside of this, so driver.FindElement(By.CssSelector()), paste this in there we go.
var cardCategories = driver.FindElement(By.CssSelector(".card__rarity"));
Now, we want to split this and if you remember it is a whole String that is text or “Troop, Arena 8”.
So, what I'm going to do is I'm actually going to grab the text out of the element and then I'm going to split it.
And we're going to split it by that comma space that was there.
var cardCategories = driver.FindElement(By.CssSelector(".card__rarity")).Text.Split(", ");

var cardType = cardCategories[0];

var cardArena = cardCategories[1];
Now, I can say that the cardType is cardCategories as the first one — which would be troop.
Then we have our cardArena would be the categories and it's a second one — which we know would be the arena itself.
The very last thing we need to find is now their rarity, which is this one here.
You think that card rarity would be the rarity. These guys and their namings.
This one is actually just “card_common”.
And I'm going to assume that if it's rare it's probably going to say “card_rare” and if it's Epic it's going to say “card_epic”, but we'll just find this for now.
Let's get this. It's going to say “card_common”, so right here, let me copy this and again we can check this inside of our console and we can say ".card__common".
We found it and lastly the .innerText we found is “Common” as well.
So, we'll copy this here, switch back over to code, say var cardRarity, use our driver.FindElement with a CSS selector, and then paste this in.
var cardRarity = driver.FindElement(By.CssSelector(".card__common"));
There we go.
Finally, we can assert some stuff.
So, we're going to say that some things are going to be equal here.
The left side is expected and so we want “Ice Spirit”, so this is what we expect. The right side is what we actually got, which is “cardName”.
Assert.AreEqualagain.The left side here, the type should be “Troop” and let's compare it with “cardType”.
Next one is the Arena. I don't remember the arena, go back here. It was arena number 8, right on.
So, “Arena 8” and this one is “cardArena”.
I think you're getting the idea.
And, then assert lastly the card rarity, which we are going to assume as common
That's what we want it to be and we'll pass in the rarity.
Assert.AreEqual("Ice Spirit", cardName);
Assert.AreEqual("Troop", cardType);
Assert.AreEqual("Arena 8", cardArena);
Assert.AreEqual("Common", cardRarity);
Now, if we left these the way that they were right now, this test would fail.
And, it's because right now we're comparing Strings to different objects.
So, Ice Spirits right now, this cardName, this card, if I hover over it is actually an IWebElement, it's not text.
So, the first assertion would fail, all we got to do here is pull the text out of it. So, we'll say text that'll solve that problem.
var cardName = driver.FindElement(By.CssSelector("[class*='cardName']")).Text;
And, if you guys already saw it, we had to do this one as well.
var cardRarity = driver.FindElement(By.CssSelector(".card__common")).Text;
But, with that the test is now complete.
# The Scripting Problem
We were able to write these 2 tests relatively quickly, but hopefully you can spot some of the problems with this type of automated test.
To name a few…
There was a lot of repetition.
I have both tasks going to the same starting URL and then going to the Cards Page. I mean I literally copied and pasted the first test.
What about maintenance?
The same elements are used in both tests. If I change how I find them or anything else changes, I would have to make that change in every test that uses that element.
Imagine having over 100 tests that use that element. You'd have to pray to the “gods of find and replace” to make sure you replace the right stuff. No thanks.
There's no readability.
I did my best to make the test as readable as possible, but it is still complex and requires the reader to really walk through bit by bit rather than reading like a natural flow.
There's no reusability or extensibility.
The code that gets the Ice Spirit card would only work for finding Ice Spirits.
But there are many more cards on the page and I'm sure I'd be testing those too. It would be better to have a single function that could get me the card I wanted.
# This is what the concept of the framework is looking to solve.
There are many more issues with what we've currently implemented, but it's time to start refactoring and optimizing our code to solve the scripting problems.
Let's bring on the Page Object Model.
Challenge
If you are on a Windows machine, your tests are most likely failing because of the browser window size.
If the webpage isn't big enough for statsroyale.com, the header navigation links are wrapped into a hamburger menu which causes the initial "/cards" link to not be found.
The challenge is to open the browser in a maximized state to solve that error.
HINT:
- There are a few ways to accomplish this. Use the one that works for you.
- If you are on a Mac or Linux machine, you may need to find a more unique way to do this, but it's not mandatory.
Good luck!
