

Transcripted Summary
In this chapter, we'll see how to create a multi-stage YAML pipeline.
So far in this course, we have created a YAML build pipeline and we created the release pipeline using the classic editor.
I had intentionally created the release pipeline using classic editor, so that it's easier to follow.
However, you may need to create both your build and release pipelines using YAML.
Creating pipelines using YAML has advantages over creating pipelines using classic editor.
The one that stands out to me is the fact that YAML is code, and so you get all the benefits of code - it can be stored along with your project, it's easier to share and modify and so on.
All right, so let's see how we can create, build and release pipelines using YAML.
I have duplicated the project we have been working with.
I fixed the issue with the book images.
Here, I have a local copy of this project.
Now, this is an azure-pipelines.yml file.
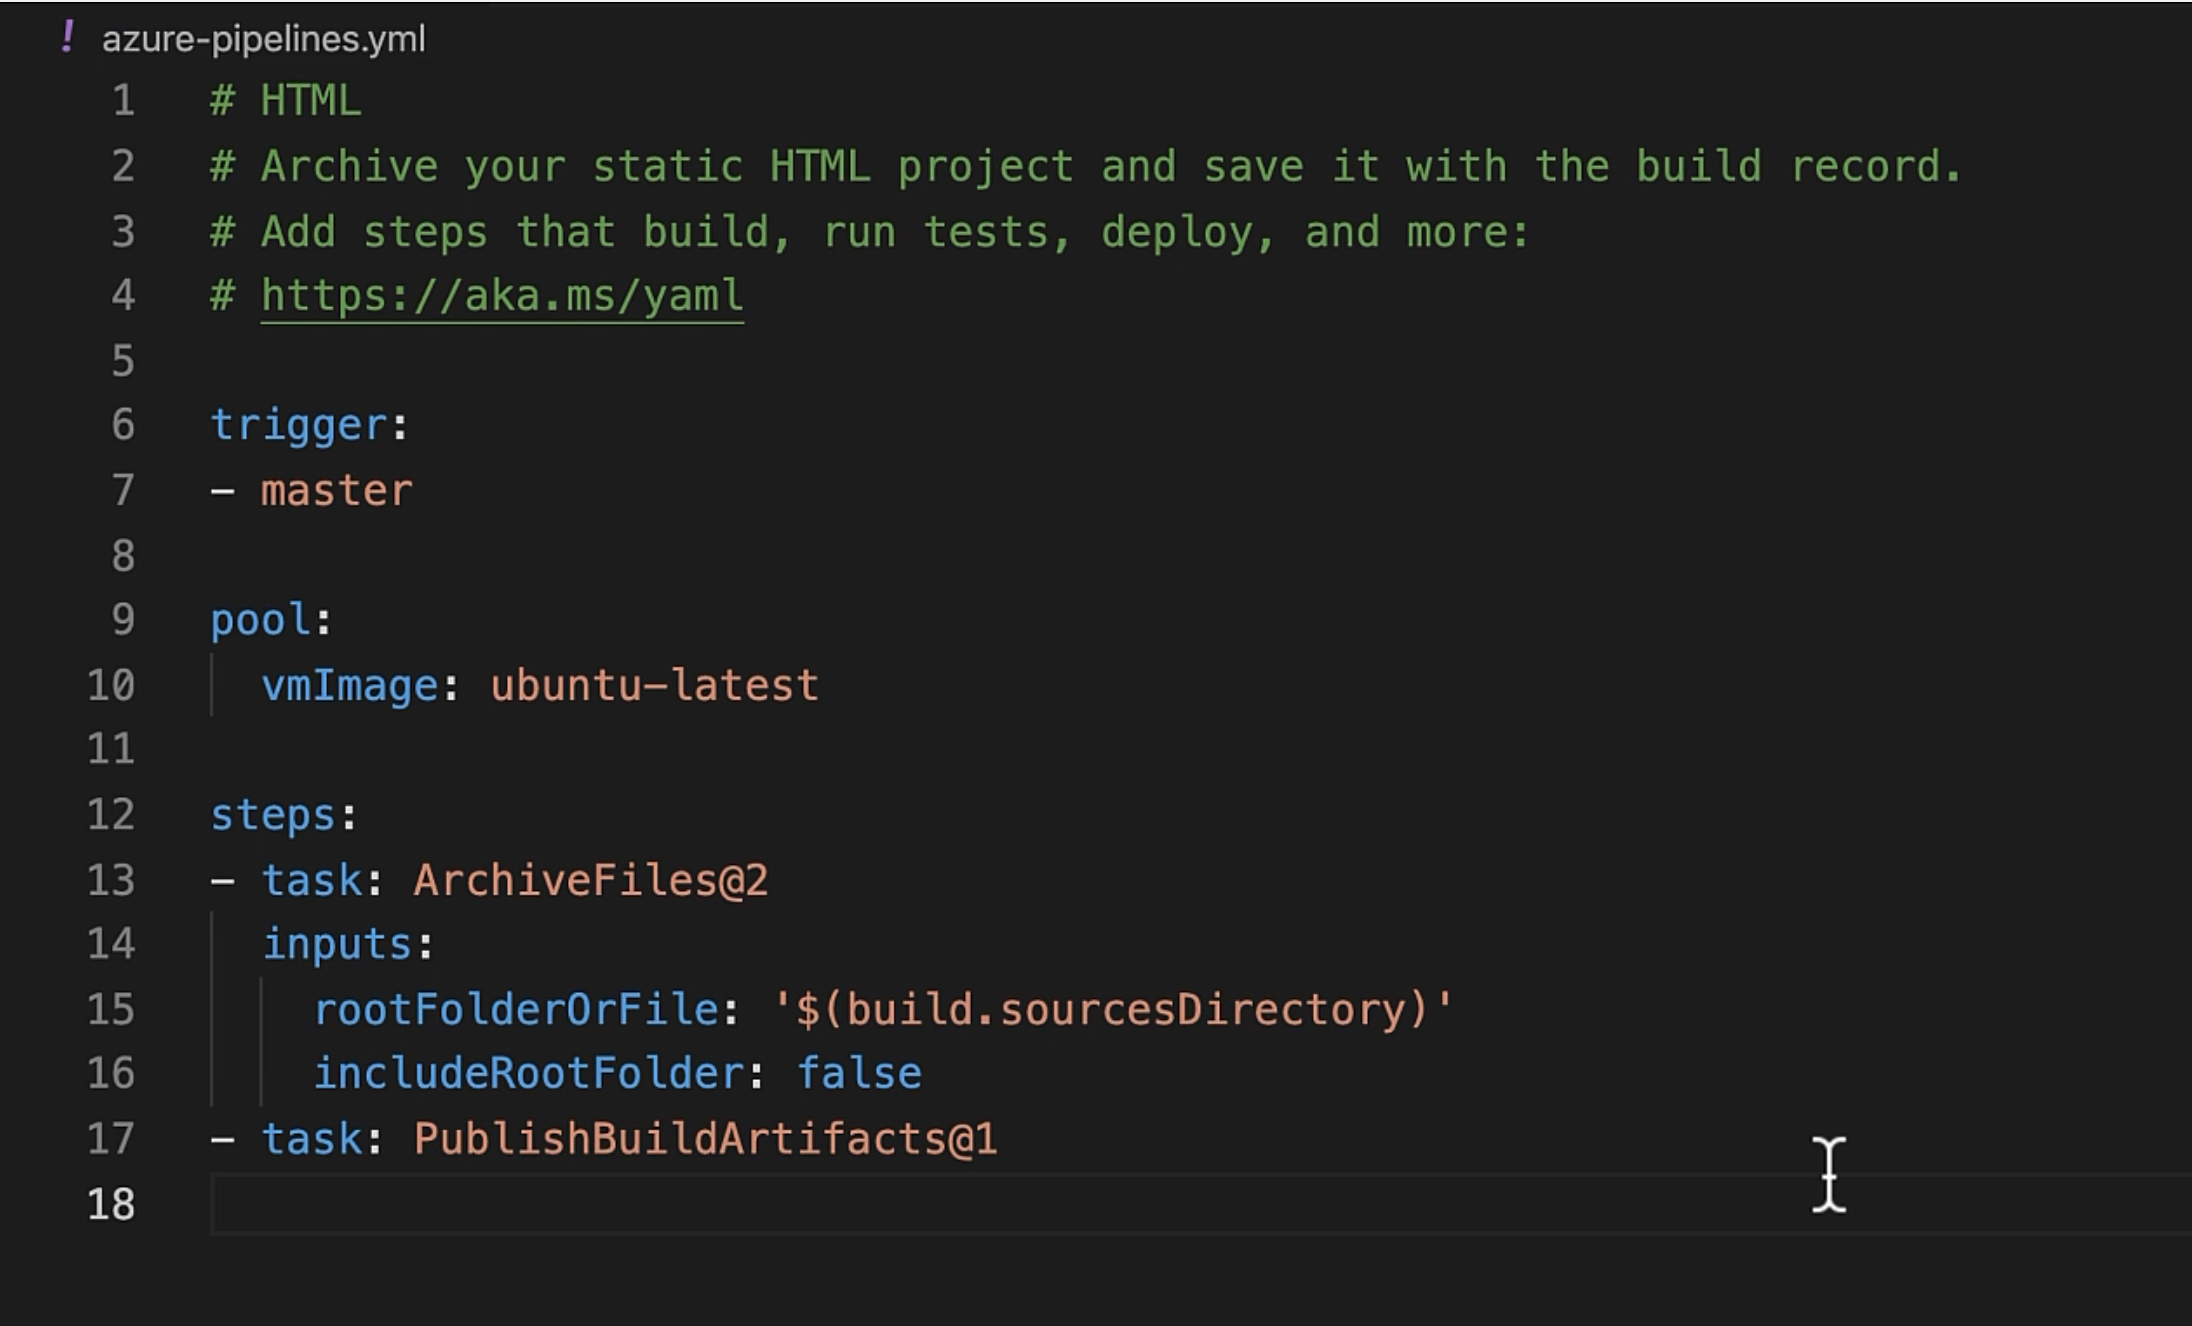
This file is for the build pipeline that we created in the previous project.
Now, we need to add steps for the release phase as well.
Build and release code reside in a single YAML file, and hence it's called a multi-stage YAML pipeline.
Let's quickly revise the pipeline structure.

The pipeline can have one or more stages, a stage can have one or more jobs, and a job can have one or more steps.
A step could be a task or a script or a template.
But in this file, we do not have a stage or job keyword specified.
So if we have a single stage, we can omit the stages keyword and directly specify the jobs keyword.
And if we have a single stage and a single job, we can omit both stages and jobs keywords, and directly specify the steps keyword.
So because here, we have only a single stage and a single job, it wasn't necessary to write stages and jobs keywords.
But now, because this file will have multiple stages, we need to specify them.
# HTML
# Archive your static HTML project and save it with the build record.
# Add steps that build, run tests, deploy, and more:
# https://aka.ms/yaml

trigger:
- master

stages:
  - stage: Build
    jobs:
      - job: BuildWebApp
        pool:
          vmImage: ubuntu-latest
        steps:
        - task: ArchiveFiles@2
          inputs:
            rootFolderOrFile: '$(build.sourcesDirectory)'
            includeRootFolder: false
        - task: PublishBuildArtifacts@1
So, this is our Build stage.
Now, let's create another stage for releasing to Dev.
  - stage: Dev
    jobs:
      - job: Deploy
        pool:
          vmImage: ubuntu-latest
        steps:
        - task: DownloadBuildArtifacts@0
          inputs:
            buildType: 'current'
            downloadType: 'single'
            artifactName: 'drop'
            downloadPath: '$(System.DefaultWorkingDirectory)'
        - task: AzureRmWebAppDeployment@4
          inputs:
            ConnectionType: 'AzureRM'
            azureSubscription: 'Azure subscription 1(1)(124b3a17-ac42-457f-98bd-1697d6bde1bf)'
            appType: 'webApp'
            WebAppName: 'abookstore'
            packageForLinux: '$(System.DefaultWorkingDirectory)/**/*.zip'
This stage will have two jobs, the first for deployment (Deploy) and the other for testing.
So, we'll first download the build artifact and then deploy the web app.
Now we'll add a job for testing (Test) our app.
      - job: Test
        dependsOn: Deploy
        pool:
          vmImage: ubuntu-latest
        steps:
        - task: DownloadBuildArtifacts@0
          inputs:
            buildType: 'current'
            downloadType: 'single'
            artifactName: 'drop'
            downloadPath: '$(System.DefaultWorkingDirectory)'
        - task: ExtractFiles@1
          displayName: 'Extract files '
          inputs:
            destinationFolder: '$(System.DefaultWorkingDirectory)/abs'
        - task: NodeTool@0
          displayName: 'Use Node 12.x'
          inputs:
            versionSpec: 12.x
        - task: Npm@1
          displayName: 'Install Dependencies'
          inputs:
            command: ci
            workingDir: '$(System.DefaultWorkingDirectory)/abs/e2e'
            verbose: false
        - task: file-creator@6
          displayName: 'Update Configurations'
          inputs:
            filepath: '$(System.DefaultWorkingDirectory)/abs/e2e/cypress.json'
            filecontent: |
              {
                              "baseUrl":"https://abookstore.azurewebsites.net",
                              "reporter": "junit",
                              "reporterOptions": {
                                  "mochaFile": "results/TEST-[hash].xml"
                              }
                          }
            fileoverwrite: true
        - script: 'npm run test -- --browser $(Browser) --headless'
          workingDirectory: '$(System.DefaultWorkingDirectory)/abs/e2e'
          displayName: 'Run Tests'
          env:
            APPLITOOLS_API_KEY: $(Applitools_API_Key)
        - task: PublishTestResults@2
          displayName: 'Publish Test Results'
          inputs:
            searchFolder: '$(System.DefaultWorkingDirectory)/abs/e2e/results'
            failTaskOnFailedTests: true
            testRunTitle: 'End-To-End Tests - $(Browser)'
          condition: succeededOrFailed()
        - task: PowerShell@2
          displayName: 'Download Artifacts'
          inputs:
            targetType: 'inline'
            script: |
              # Videos
              Compress-Archive -Path "$(System.DefaultWorkingDirectory)/abs/e2e/cypress/videos" -DestinationPath "$(System.DefaultWorkingDirectory)/abs/e2e/cypress/videos" -Force

              Write-Host "##vso[task.uploadfile]$(System.DefaultWorkingDirectory)/abs/e2e/cypress/videos.zip"
          condition: succeededOrFailed()
All right, so we have all our testing tasks added here.
Let's go through them quickly.
So we'll first download the build artifact (DownloadBuildArtifacts@0), then we'll extract the files (ExtractFiles@1) - basically unzip the project.
We'll set the Node version to be used as 12 (NodeTool@0).
Then we need to install the project dependencies like Cypress and eyes-cypress (Npm@1).
We are then creating a config file here (file-creator@6).
Finally, we are running our test (npm run test -- --browser $(Browser) --headless).
Then we are publishing the results (PublishTestResults@2) and downloading the test artifacts (PowerShell@2) .
Our Test job depends on Deploy job, so only when the Deploy job completes successfully will our Test job start.
Now, let's see how we can configure our Test job to run in parallel for Chrome and Firefox browsers.
      - job: Test
        dependsOn: Deploy
        strategy:
          matrix:
            Chrome:
              Browser: chrome
            Firefox:
              Browser: firefox
          maxParallel: 2
We are using matrix strategy, so matrix generates copies of a job, each with different input.
In our case, different inputs are browsers, Chrome and Firefox.
And maxParallel defines the maximum number of matrix jobs to run simultaneously.
We need two agents to run in parallel because we want Test to run in parallel in Chrome and Firefox.
All right, so this looks good.
Now, like we were using Task Groups in the classic pipeline to share the common sequence of tasks, in the YAML pipeline, we can use Templates.
Basically, we can export reusable sections of the pipeline to a separate file.
These separate files are known as templates.
Templates could either be for a stage, job, step or variable.
We can define a set of stages or a set of jobs or set of steps or a set of variables in a file, and use it multiple times in other files.
So, we have a set of tasks that we can define in a file, and that can be used later by multiple files.
Creating a template is very, very simple.
We'll take all our steps within our Test job, remove them from here and move them to a new file.
We'll create a new file steps_test.yml, and we'll place our Test steps here.
In our azure-pipelines.yml file, we'll add:
        steps:
          - template: steps_test.yml
So, instead of the task or script, we have added a template and we have provided the name of our template.
Now, we can also have parameters in the template whose values we pass from the script that uses the template.
So here, baseUrl is a good candidate for it because the value for baseUrl might differ based on which stage we are using this template in.
So, at the top of our template, we'll have:
parameters:
- name: url
We could also specify the data type, the default value and the list of values, but for now, let's just have the name.
Now we'll replace our hard-coded baseUrl with this parameter.
"baseUrl":"${{ parameters.url }}",
That's the syntax for using the parameter - ${{}} and within it, parameters., then the parameter name.
All right, so our template is ready.
But, we need to pass the parameters value from our azure-pipelines.yml, where we are calling this template.
So, we'll simply have parameters, and under it the name of the parameter and its value.
        steps:
          - template: steps_test.yml
            parameters:
                url: 'https://abookstore.azurewebsites.net'
All right, let's now push this code to GitHub.
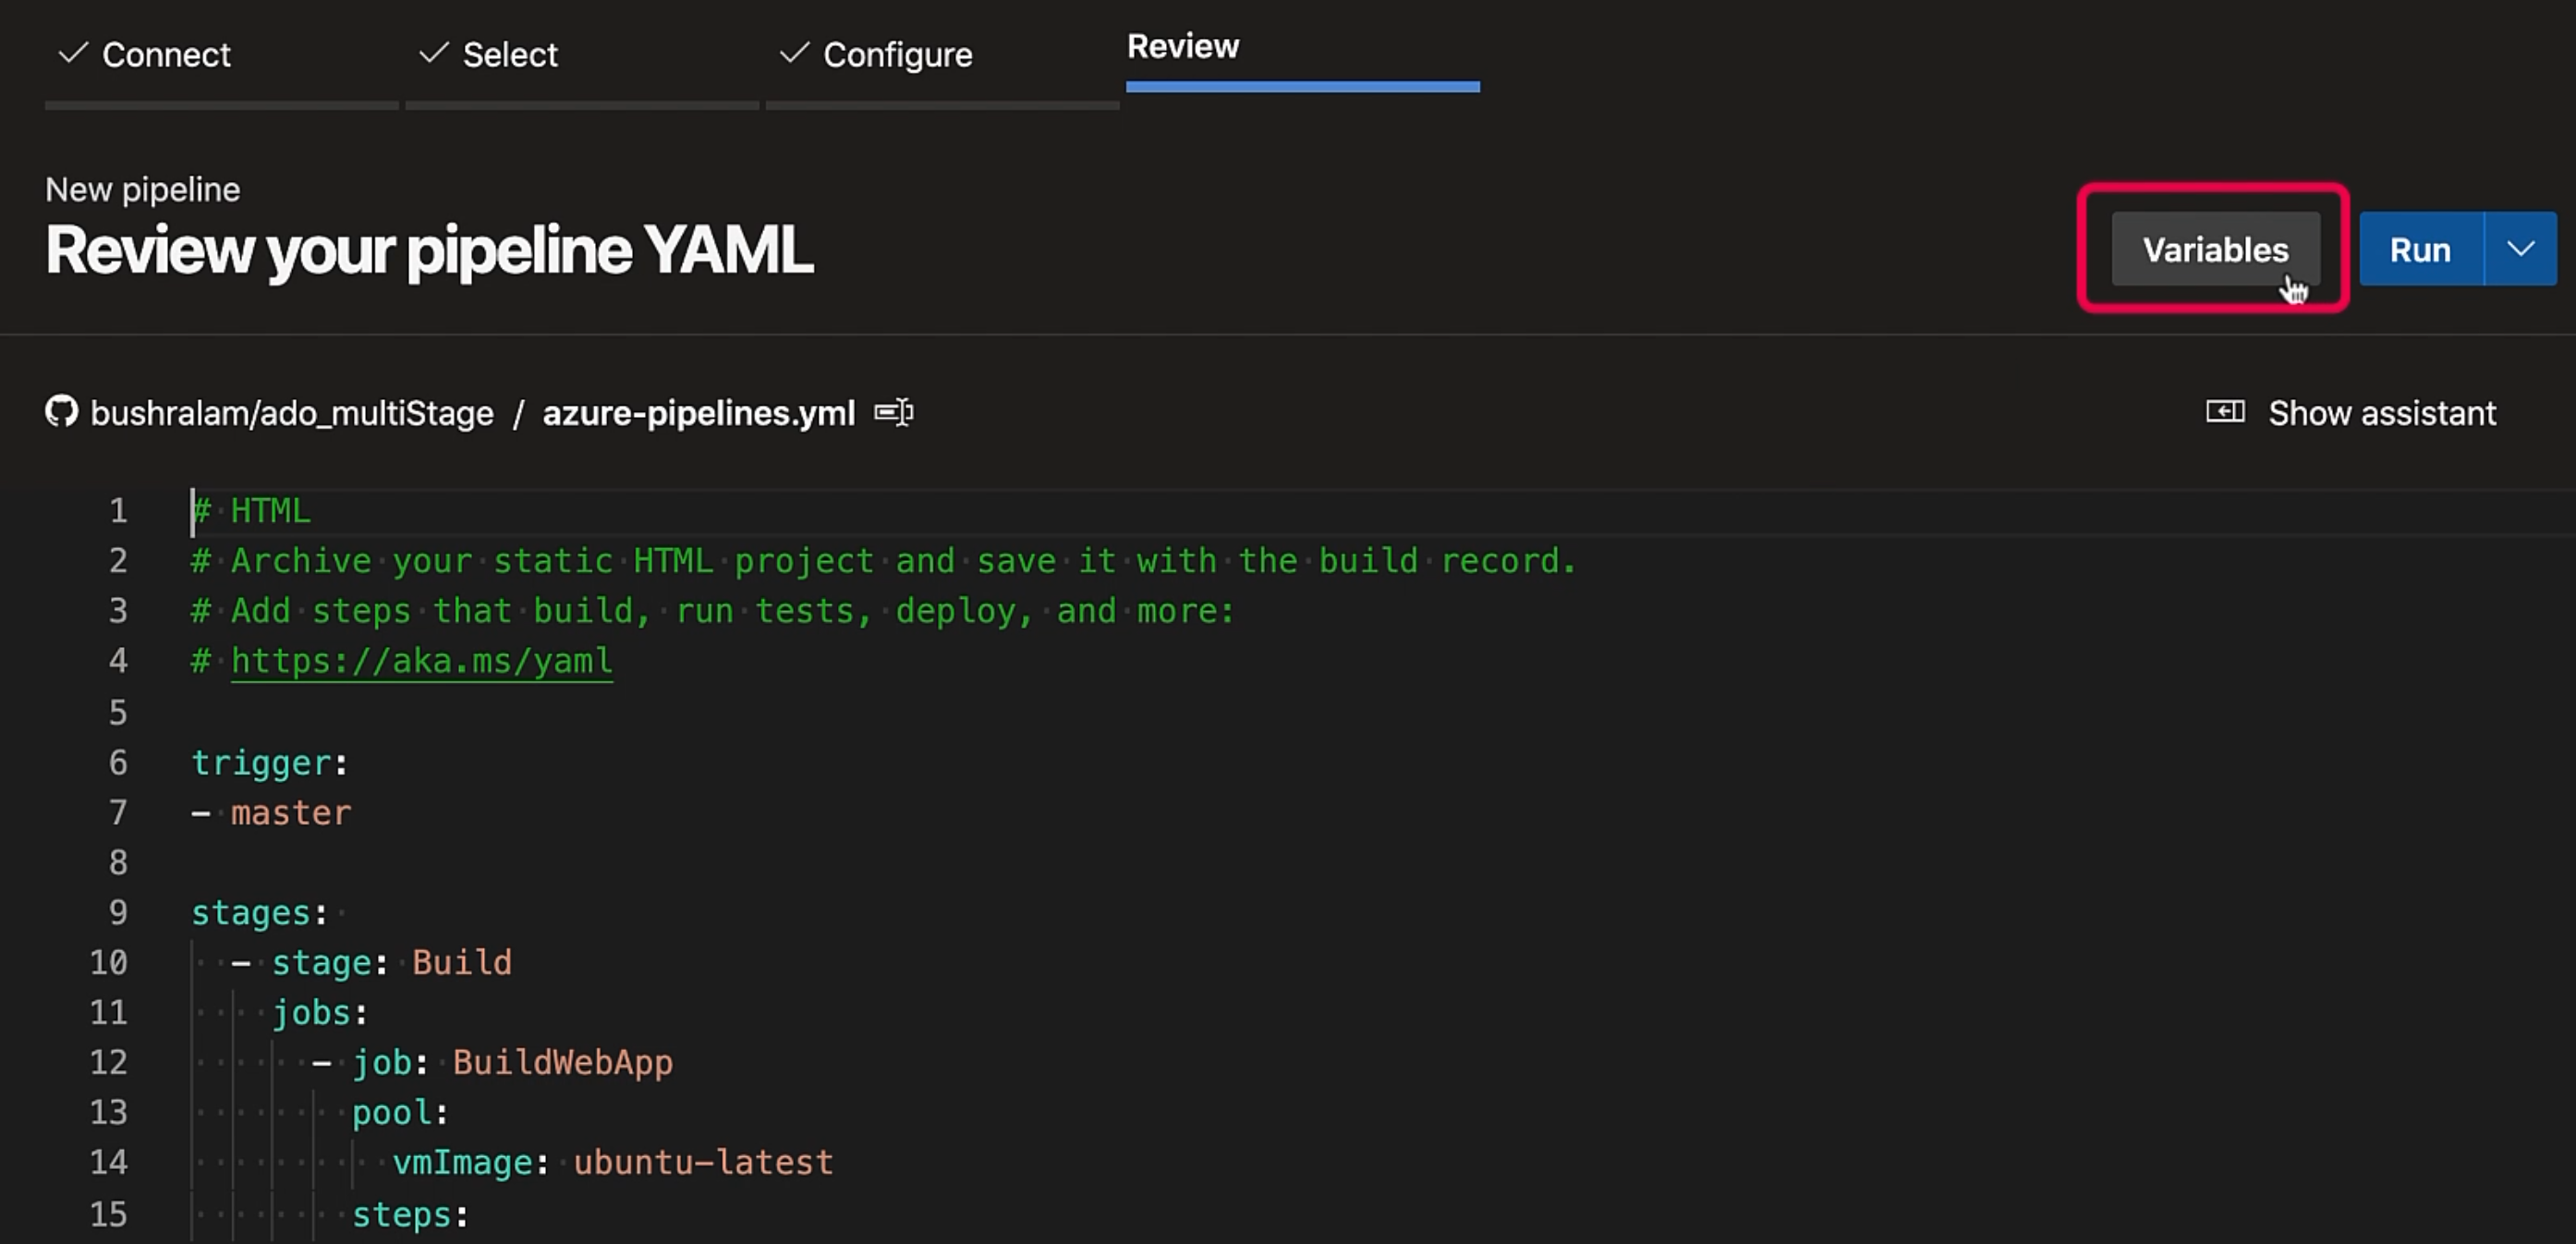
Now, let's go ahead and create a new Azure DevOps project.
It has picked our azure-pipelines.yml file.
Okay, now, if you remember, we need to set the Applitools_API_Key, otherwise our visual test won't run.
So we'll create a variable using this "Variables" button.
We'll create a "New variable".
We'll set it as a secret.
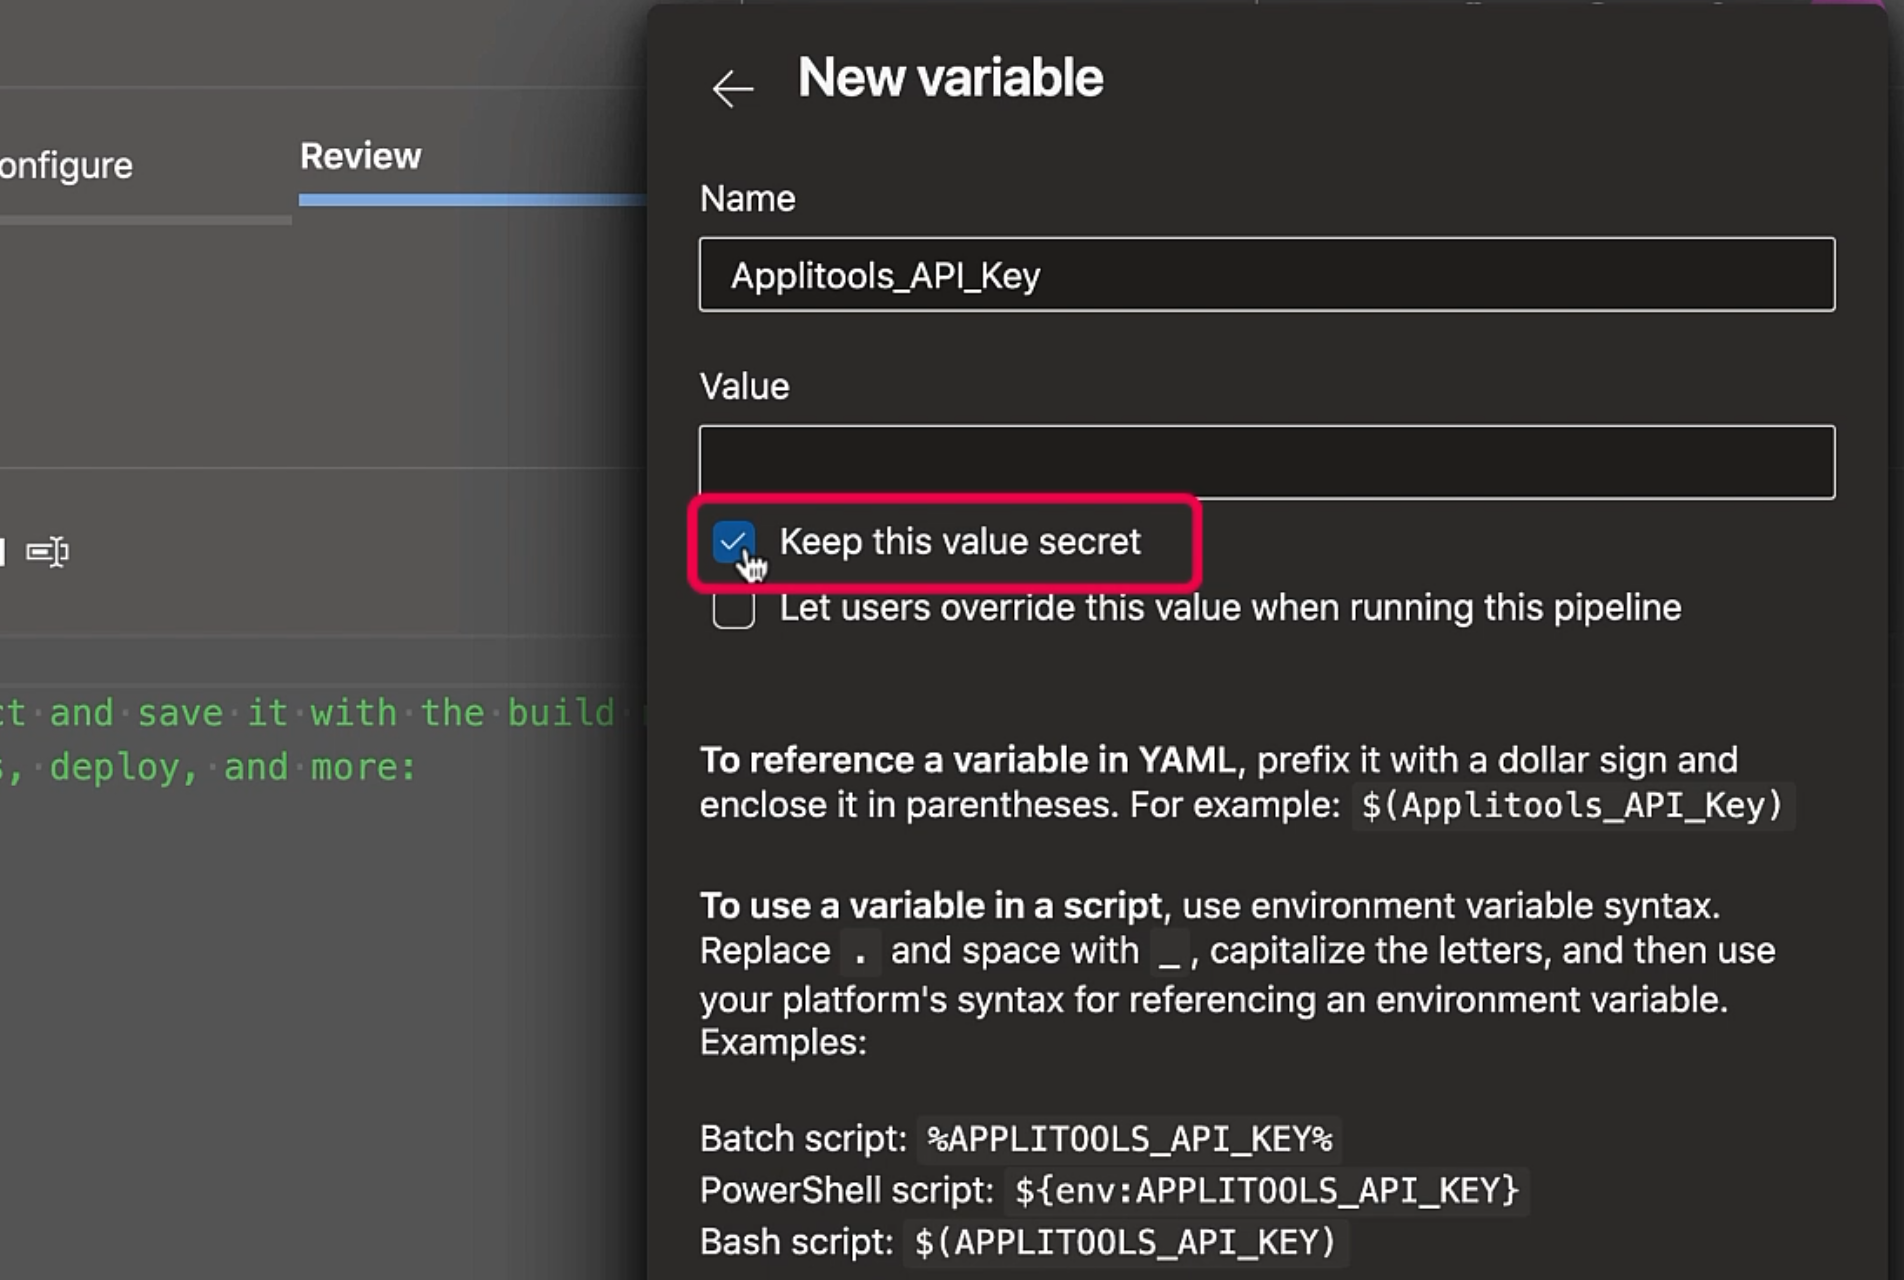
Okay, so we have our variable.
Now we'll run a pipeline.
Excellent.
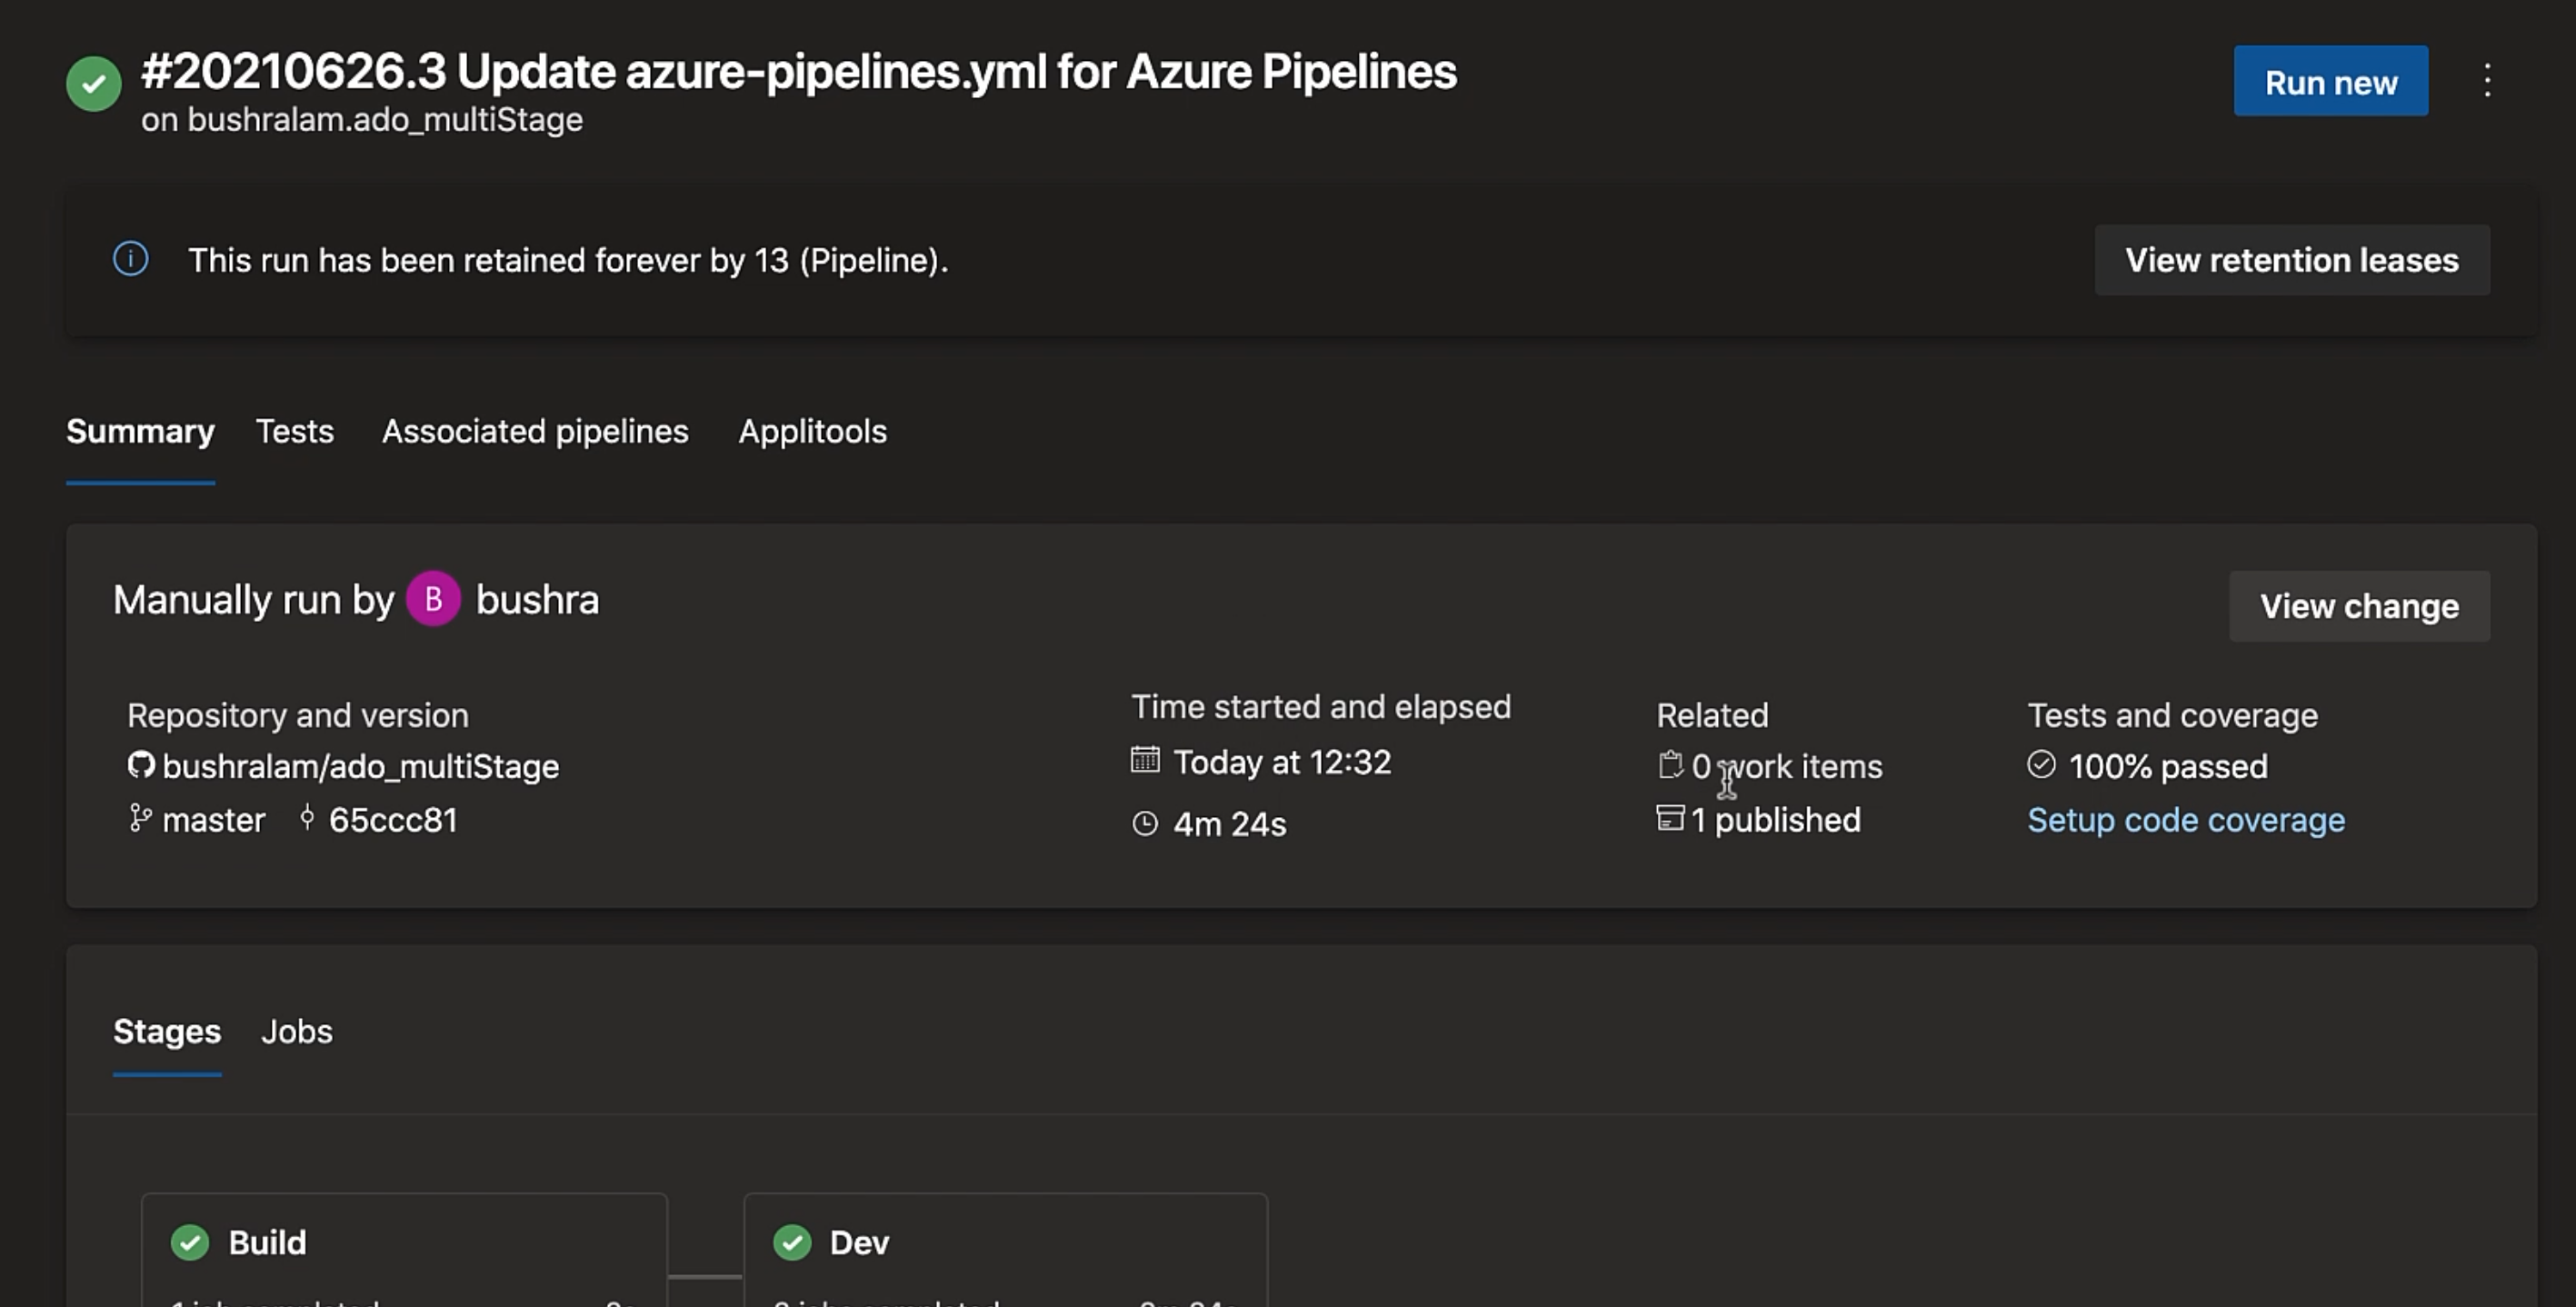
So, we created and ran a multi-stage pipeline successfully.
I truly hope you enjoyed this course and it helps you in Continuous Testing with Azure DevOps.
