

Transcripted Summary
Sometimes we need the option to disable the tests that we created.
Maybe it's because the test should not run on a specific day, because maybe during that day, there is an environment refresh, or maybe we simply don't want to run the tests on certain operating systems, or maybe on certain browsers.
In order to disable these tests, we have several options in JUnit. We actually have quite a few.
Let's take a look at what these are.
In order for us to see the different possibilities we have for disabling and enabling some tests, I will create a brand new test class, and there we will have several test methods.
We will disable and enable some of them using the options that we have available.
I will name the new test class DisabledEnabledTest.
I will create five test methods here.
I will just name them firstTest and I will do a System.out again instead of real code.
Of course, in your tests, this is where you will have all your test code.
So this is the first method.
And then similarly, I will create void secondTest.
And again, I will say, "This is the second test method" and so on.
I will just copy, paste this and just replace them with a new numbering.
package junit5tests;

import org.junit.jupiter.api.Test;

public class DisabledEnabledTest {

    @Test
    void firstTest() {
        System.out.println("This is the first test method");
    }

    @Test
    void secondTest() {
        System.out.println("This is the second test method");
    }

    @Test
    void thirdTest() {
        System.out.println("This is the third test method");
    }

    @Test
    void fourthTest() {
        System.out.println("This is the fourth test method");
    }

    @Test
    void fifthTest() {
        System.out.println("This is the fifth test method");
    }
}
We have a lot of options for disabling our tests.
I will take each one of them and I will apply a different type of disabling on each of them.
Okay, so at this point I have five test methods.
Of course, these are all annotated with @Test, but you can use other test annotations.
For example, you can have some parameterized tests that you can enable or disable.
In my example, it is just easier to show the test with an @Test annotation.
So what options do we have?
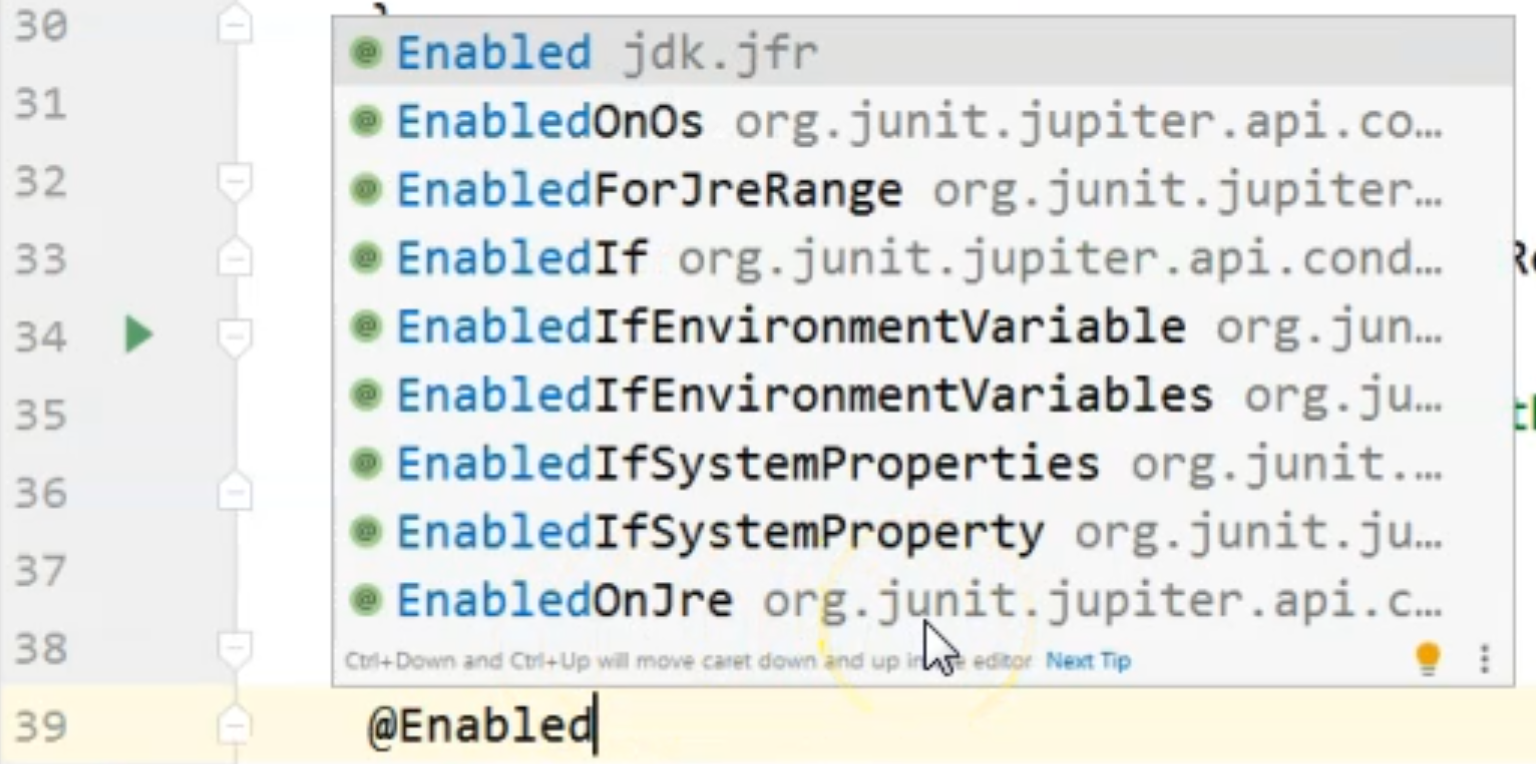
For example, I will go to the first method and I will just say @Disabled.
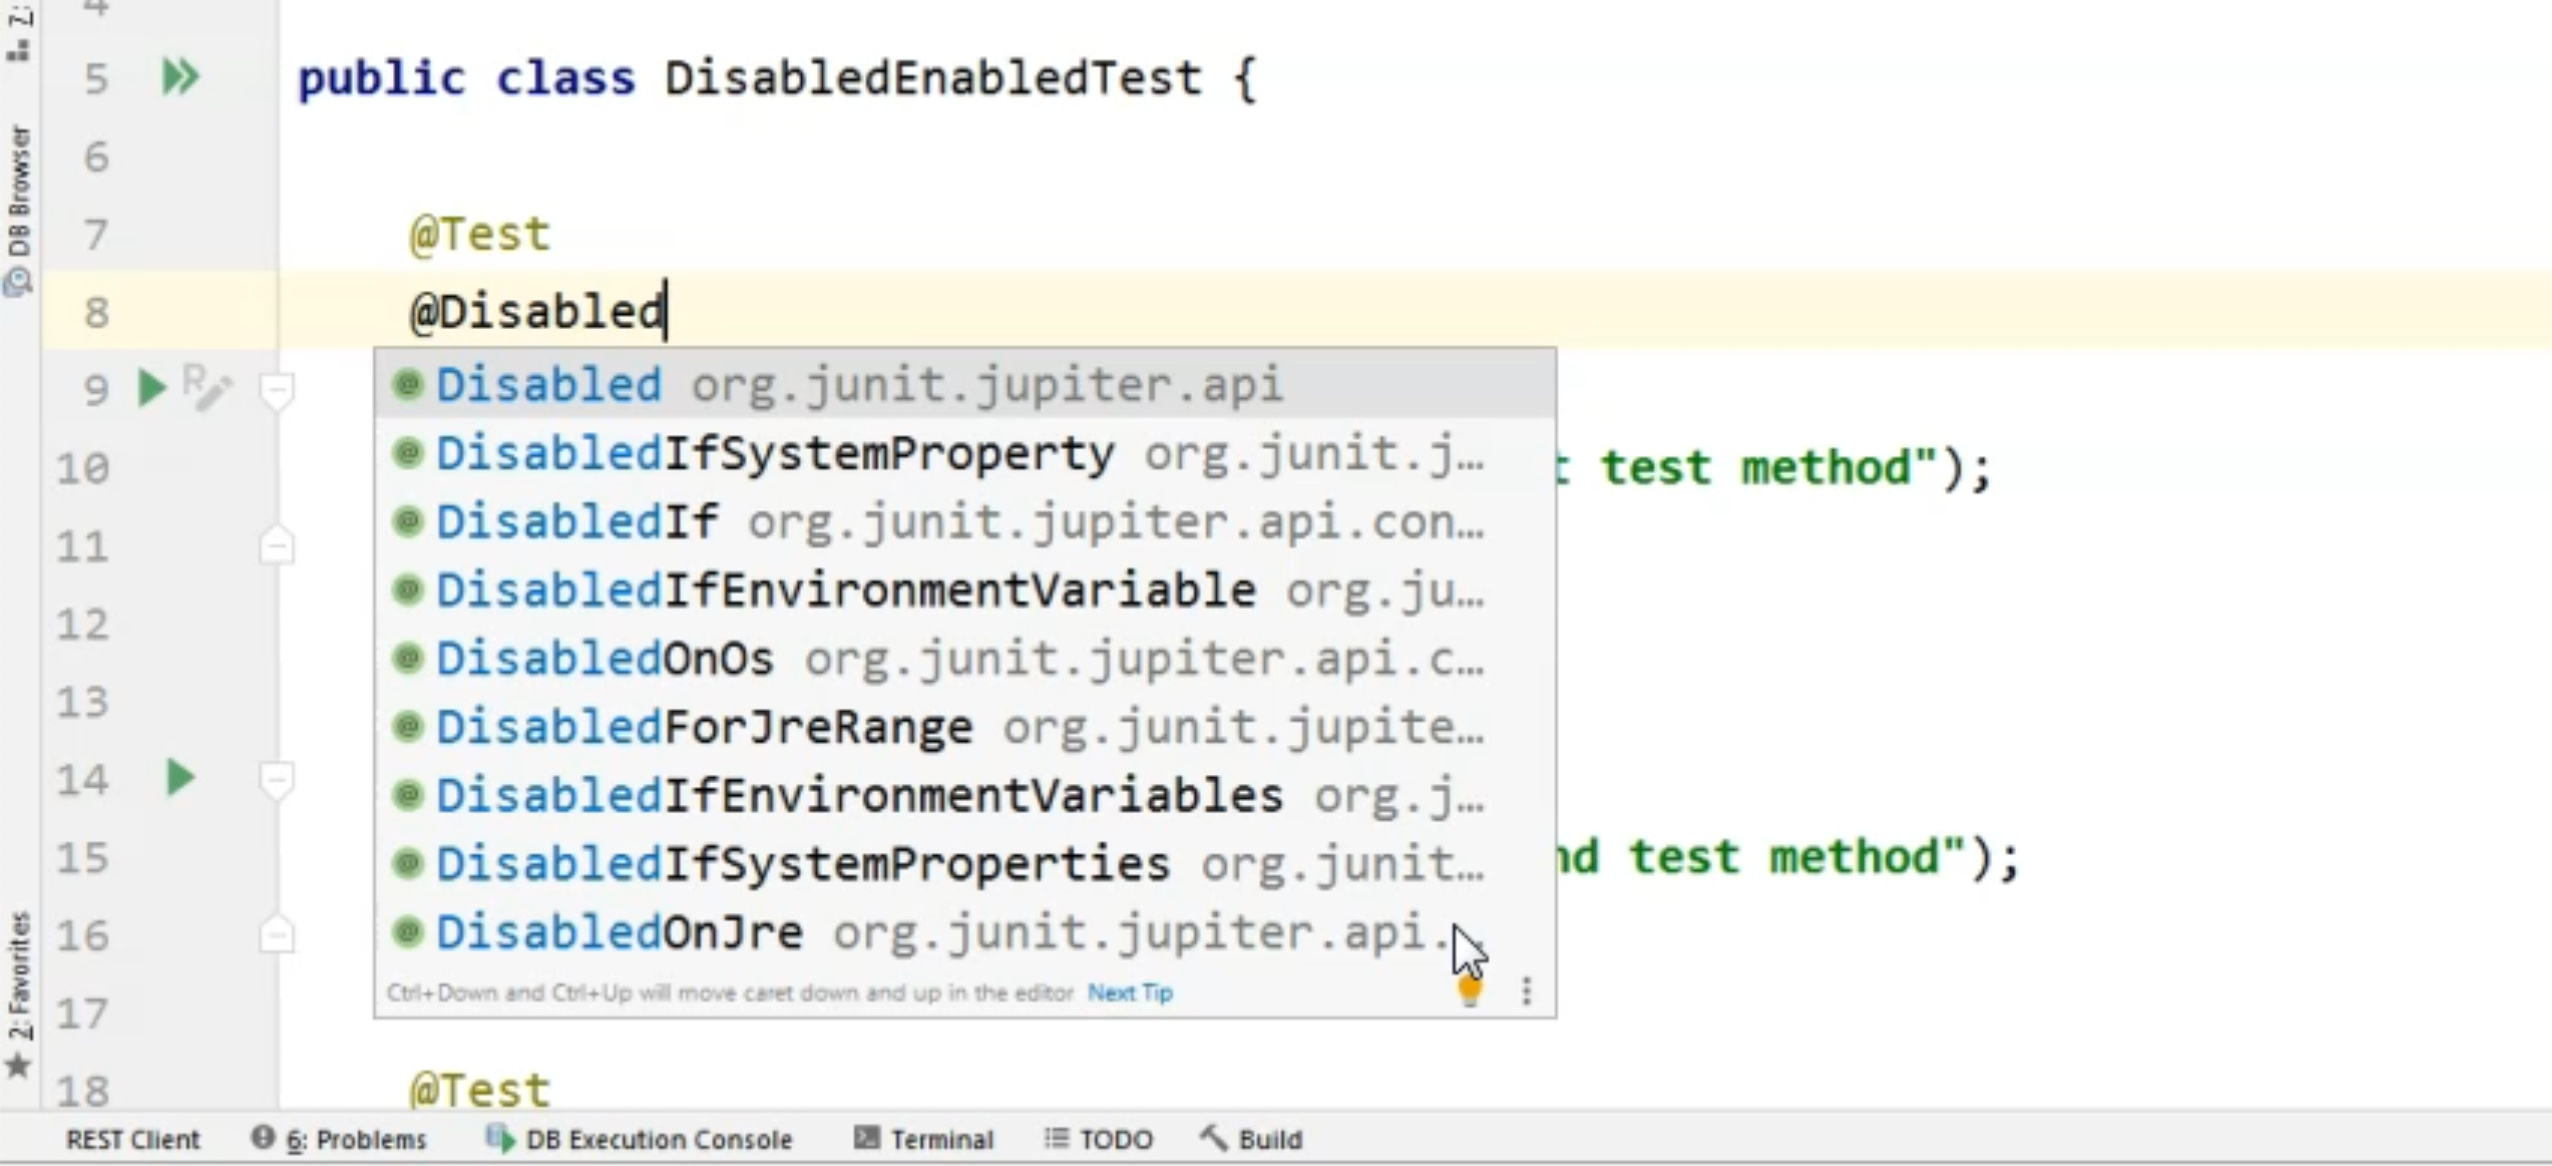
Now, as you can see, we have several options that start with disabled.
# Disable a test
The first one is the easiest one. Here, we can disable the test method without any further explanation or without setting any condition.
If we annotate a method or even a class with @Disabled, that means that method or class will not run at all.
One thing to take into consideration is that - let's say we have this test method which we annotated with @Disabled.
Now, if I run the entire test class, what you will see is that this test was skipped.
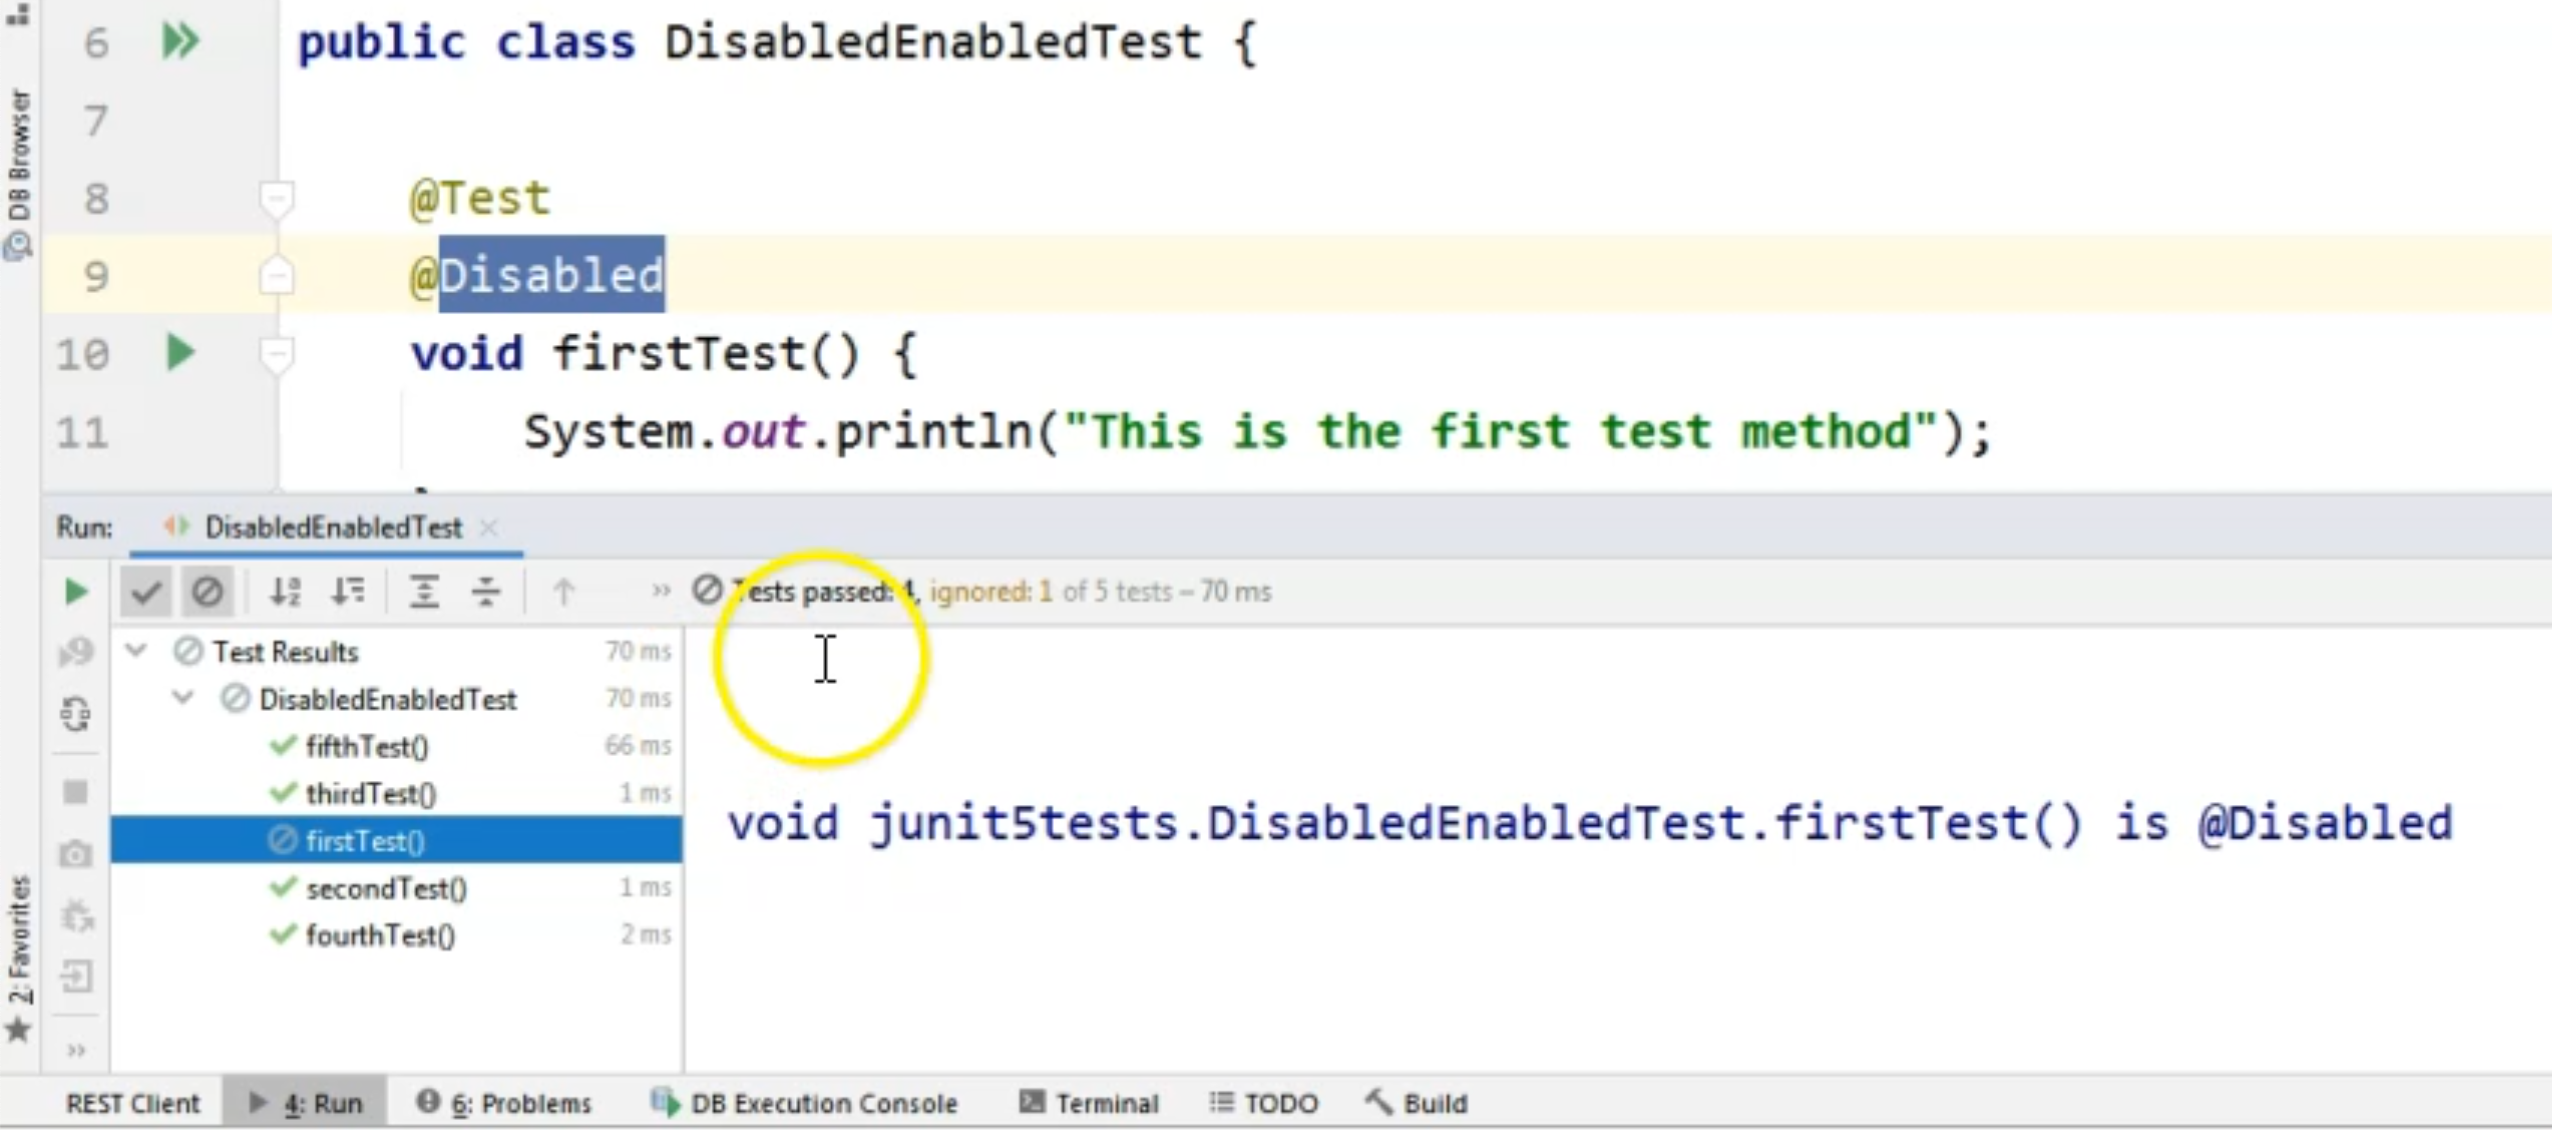
So the test run started, but it was skipped entirely.
You can see that we have four tests passed and one ignored.
The reason is that the first test method is annotated with @Disabled.
However, if I go from IntelliJ and click the icon right next to the test method, this will actually run the test method.
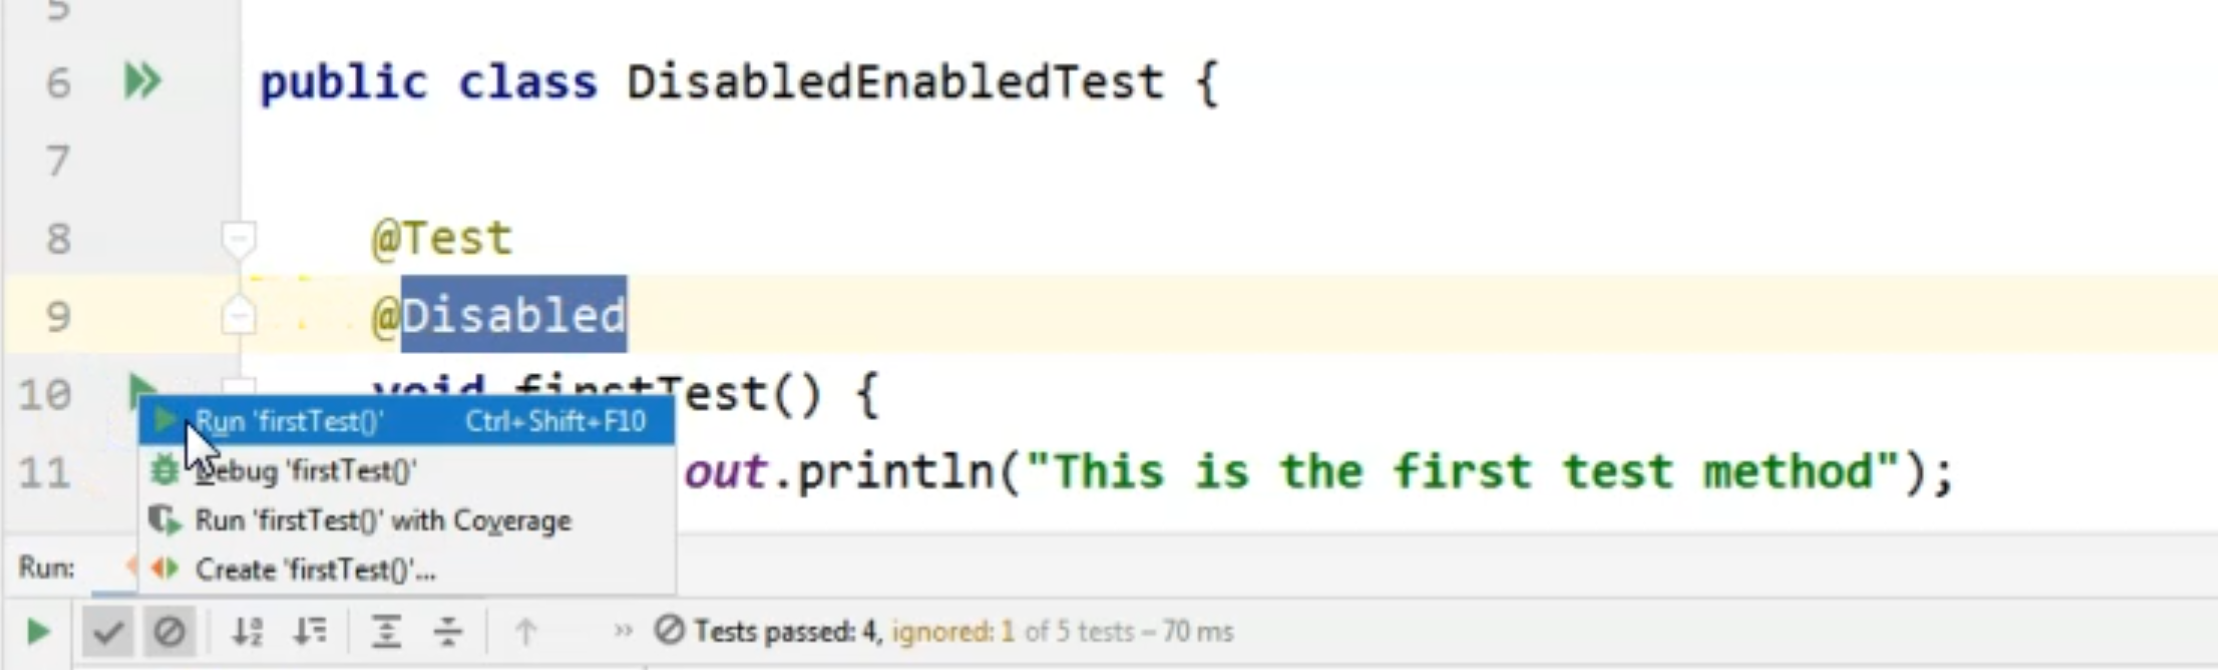
So keep in mind that from the IDE, we can still run the test, even if it's annotated with @Disabled.
That is why I'm not going to even show the possibility to use the @Disabled annotation on a class level.
But as we have seen, if we run the entire class, then yes, we will have our first disabled method.
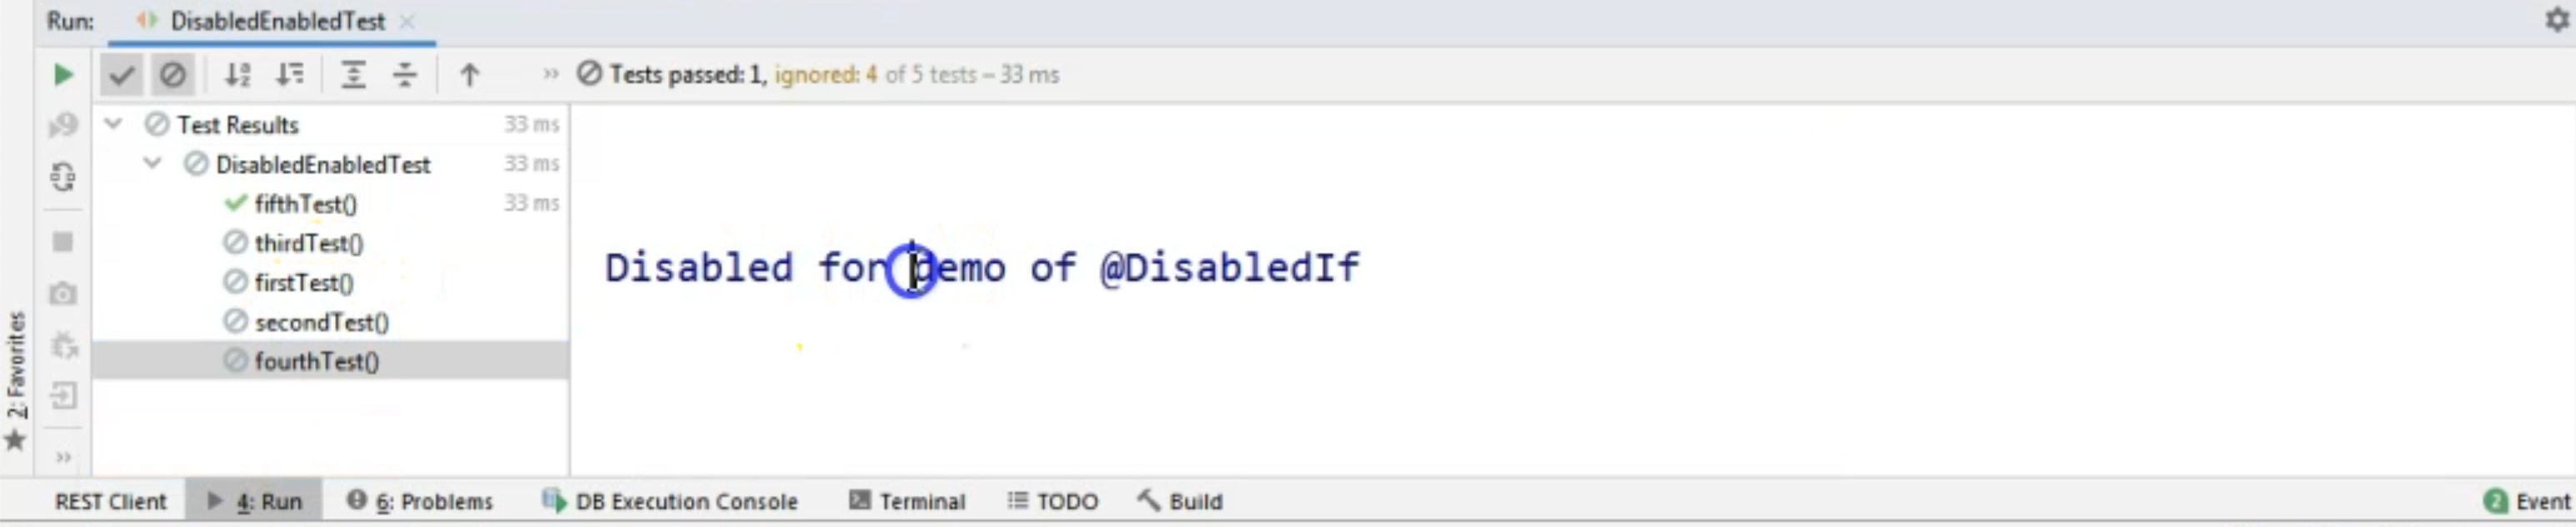
In this case, the disabled method didn't provide a specific message to the console, but whenever we want to disable something, we should probably give a proper message to the person who will be seeing that the test was skipped.
We can say something like, "Disabled for demo of @Disabled," for example.
    @Test
    @Disabled(value = "Disabled for demo of @Disabled")
    void firstTest() {
        System.out.println("This is the first test method");
    }
I will run the same test again and we will see that the display at the console now will change.
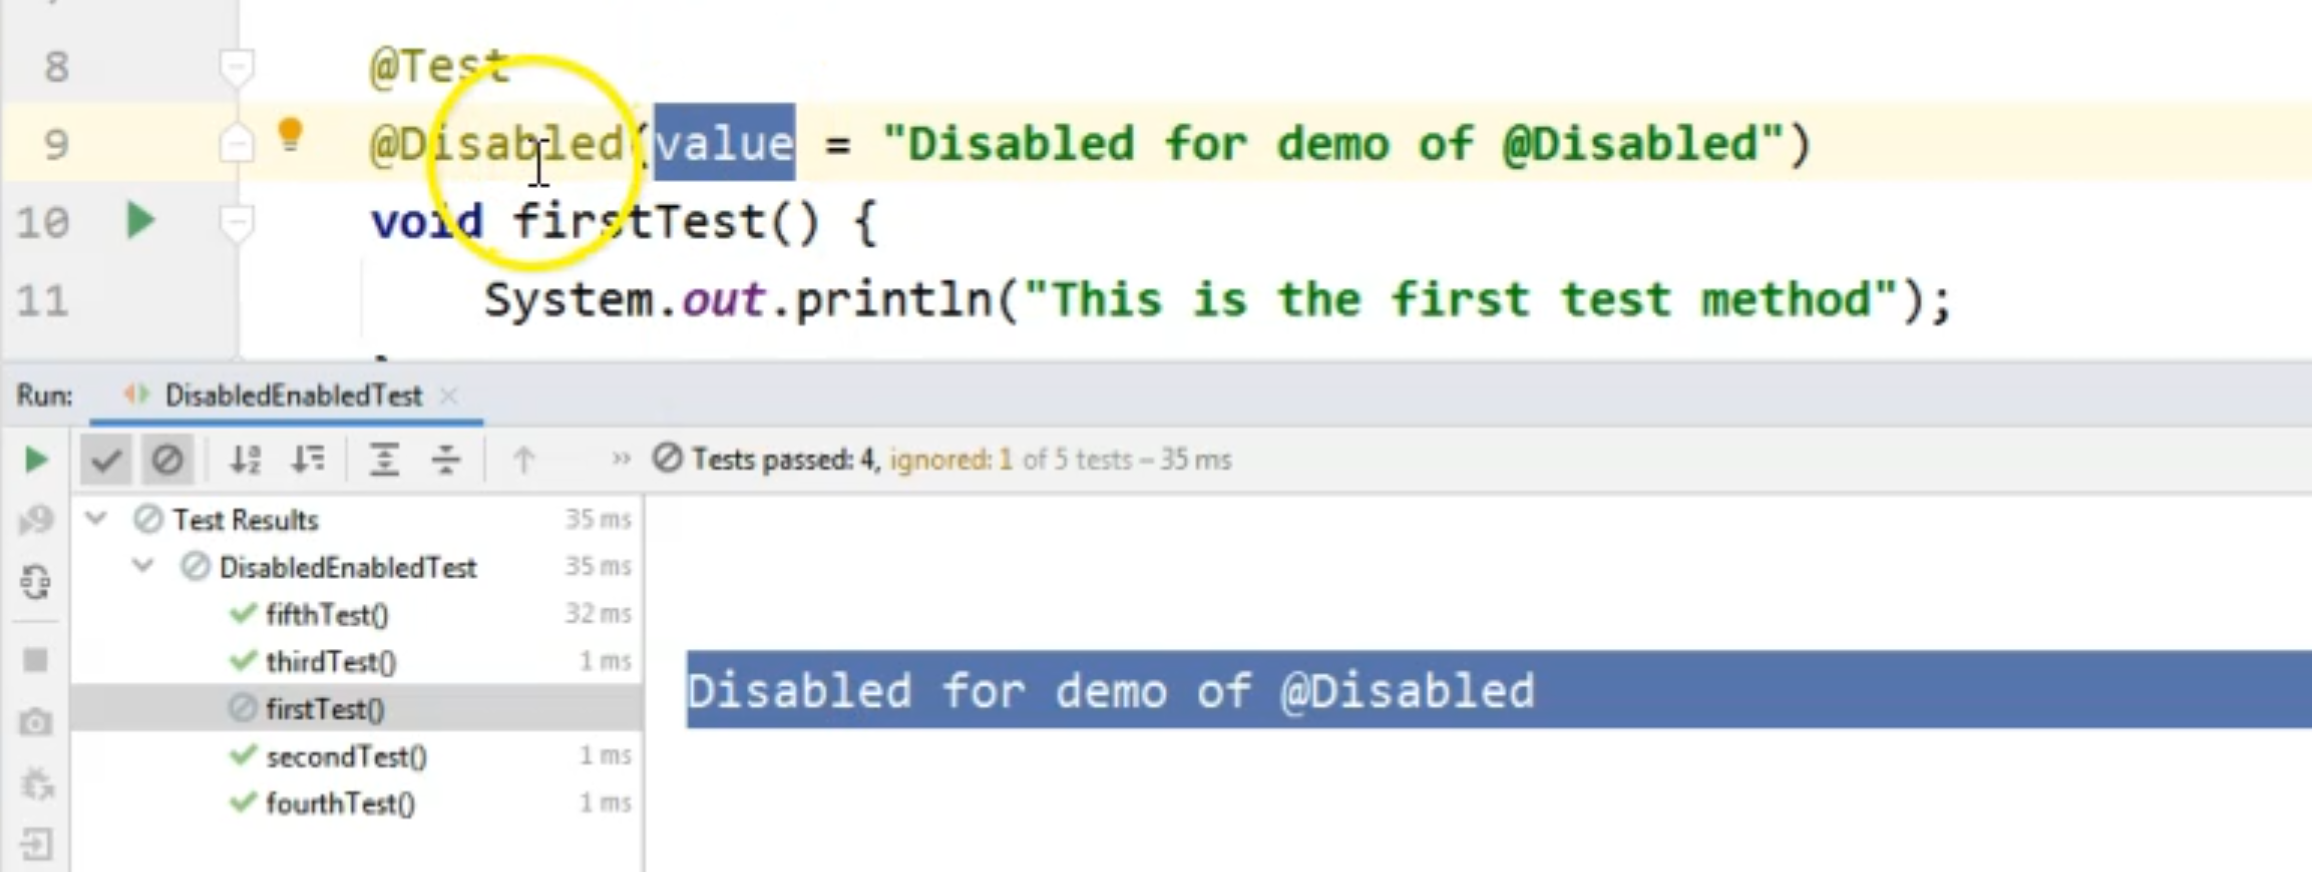
We will see a message - basically the message that we provided in the @Disabled annotation in the value attribute.
So this is how we will change that default disabled message in the console.
Now, this is the simplest way of disabling the test. We were not interested in any conditions.
We just want it to be disabled until we enable it in the future.
How about if we want to enable or disable the test based on some conditions?
# Disable a test on a specific operating system
One of the possibly frequent uses for disabling the test would be that we want to disable it on an operating system.
So, we don't want the test to run on an operating system because we know that our software doesn't run there.
Even if we wanted to run the test, the software would not work anyway, so there's no point in running the test there considering, for example, that you are running the test from a CI machine.
What you can do is to use @DisabledOnOs annotation, and you will need to provide what is the OS or what are the OS's where you don't want this test to run.
In our case, let's just specify one, and because right now I am running the test on a Windows machine, I would demo how to disable it on Windows so that we see the output in the console.
I'm going to say that the value is, and I'll say, OS in upper case.
Then I will pick from the available options.
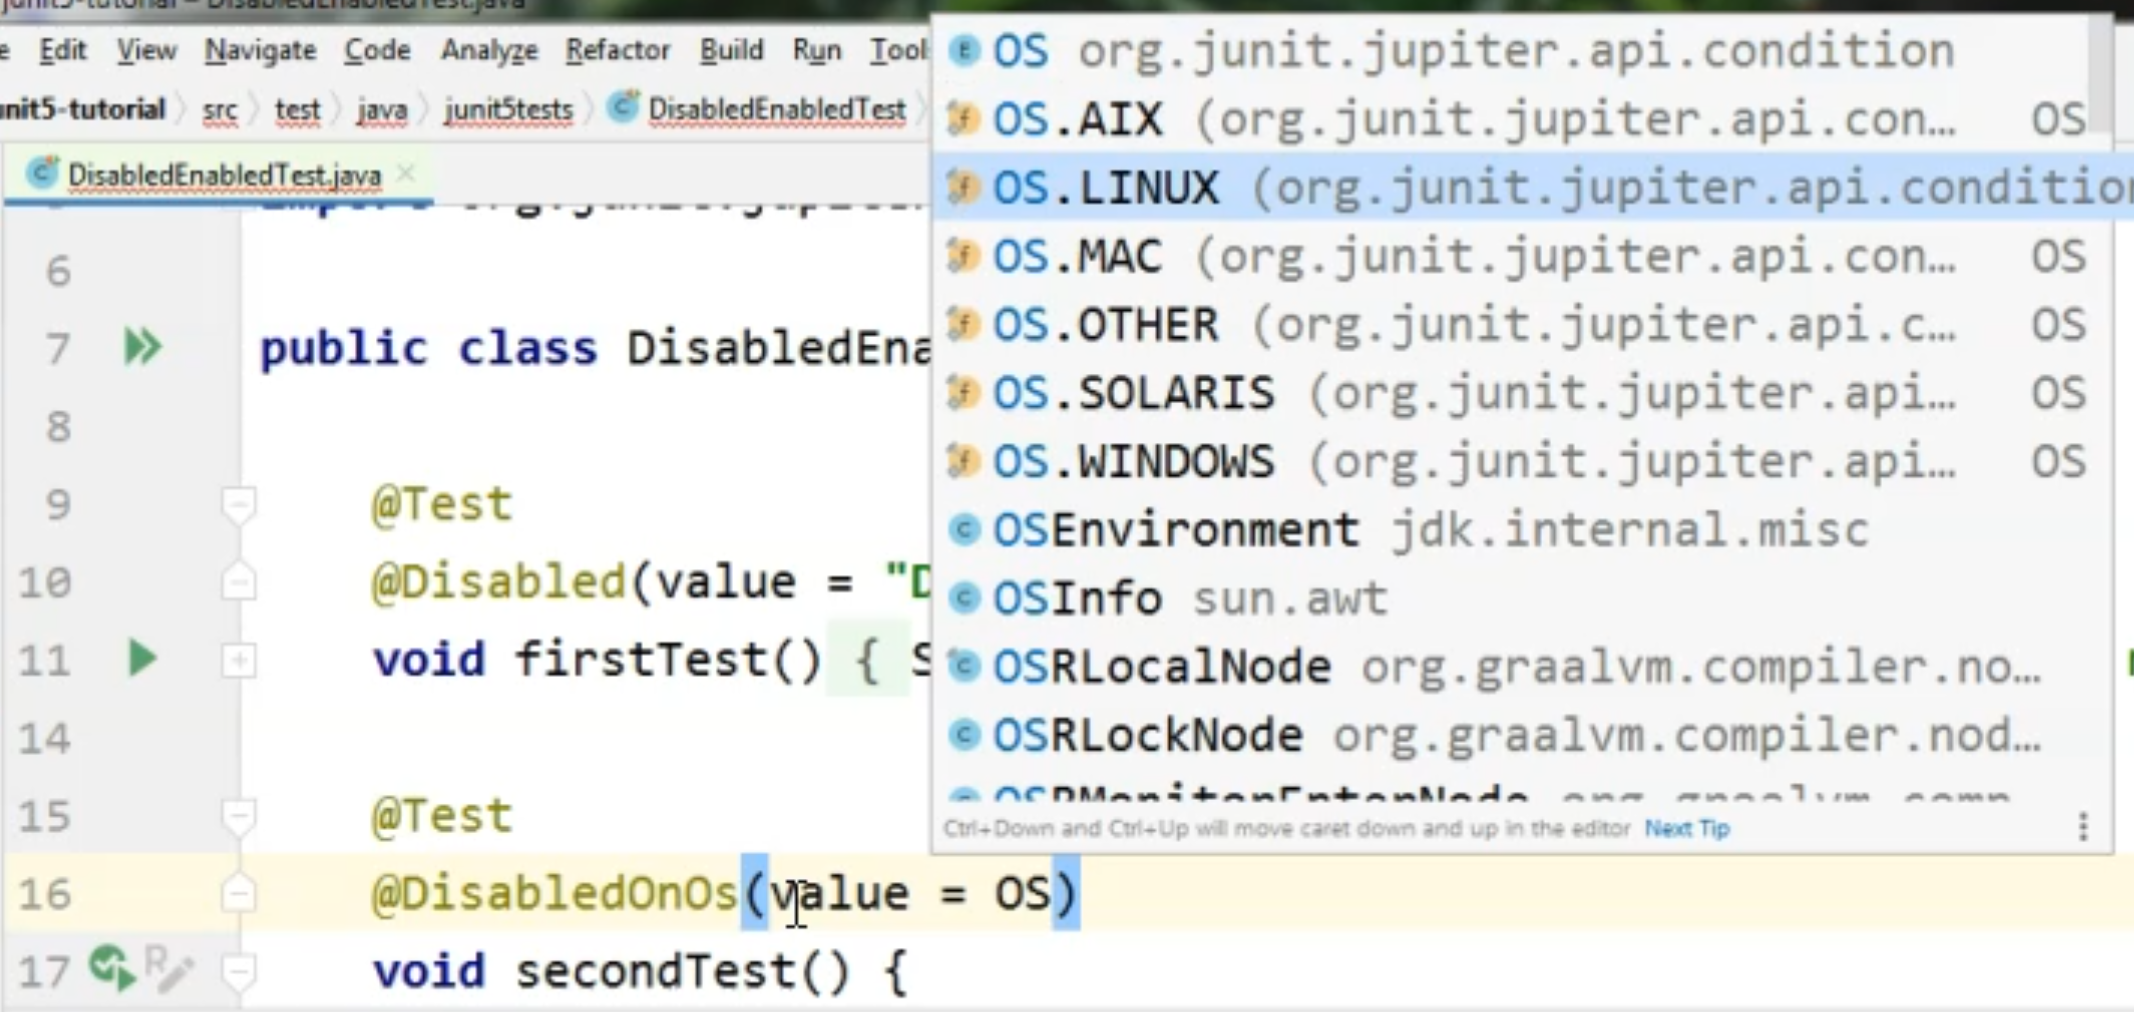
As you can see, we have several options which come from org.junit.jupiter.api.
We have a predefined list of OS's and we can just pick the one that we are interested in.
In this case, let's just pick the OS.WINDOWS one.
We can also specify a disabledReason, so we can, again, as in the previous example, say that we disabled these because we wanted to demo the @DisabledOnOs annotation.
    @Test
    @DisabledOnOs(value = OS.WINDOWS, disabledReason = "Disabled for demo of " +
            "@DisabledOnOs")
    void secondTest() {
        System.out.println("This is the second test method");
    }
Let's run the test class again, and let's see how many disabled tests we have at this moment.
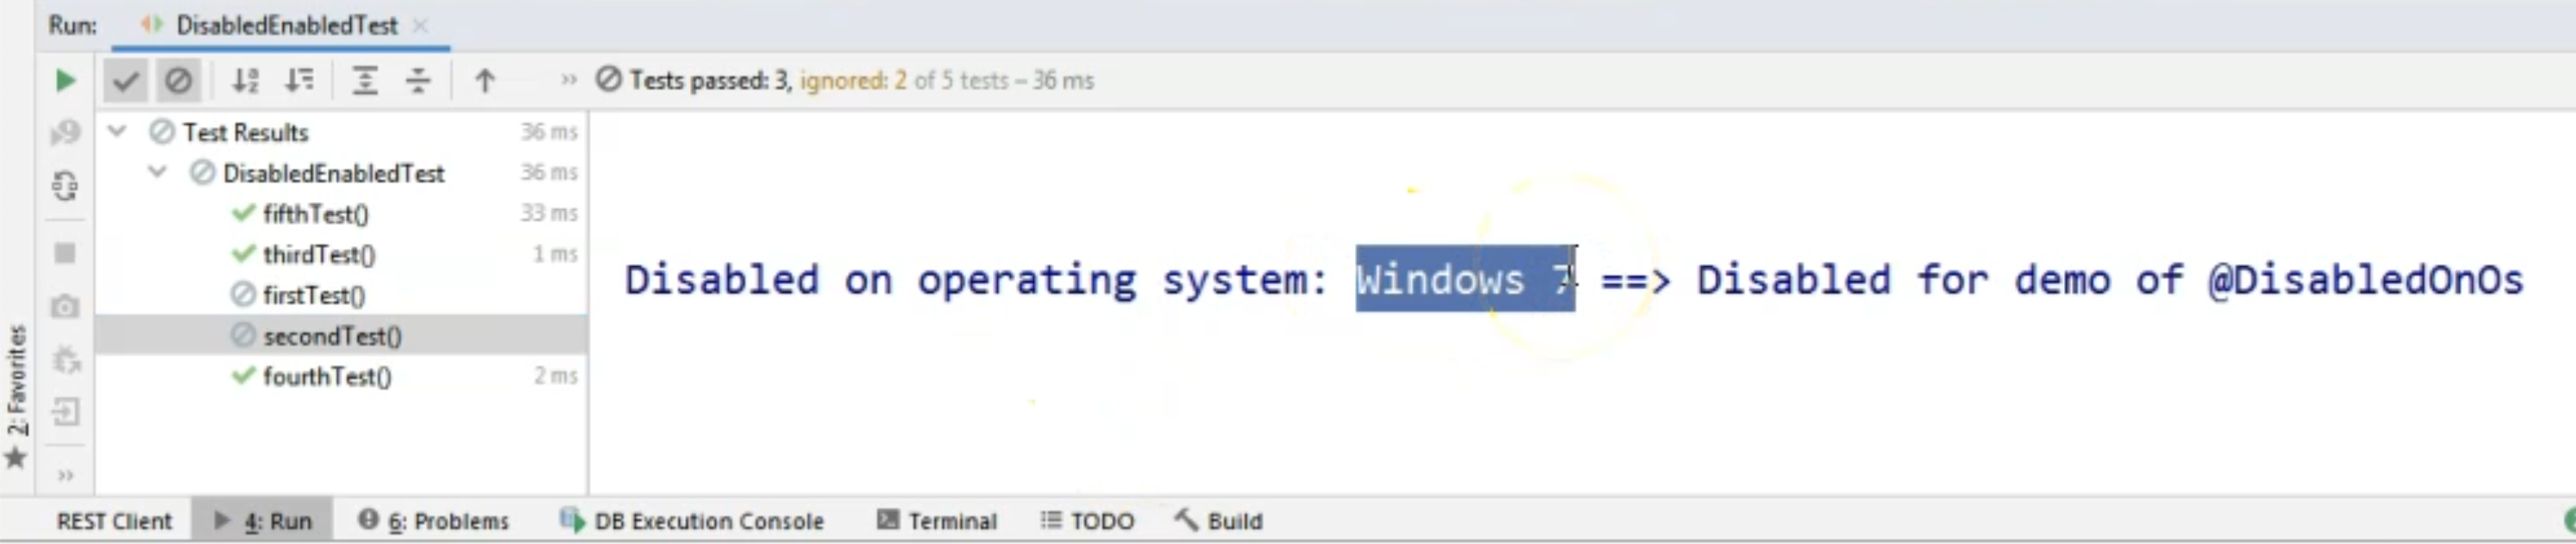
Of course, we will have two.
The first one, which was disabled by default, without any conditions specified, and the second one where the Windows 7 OS matched the fact that we want the tests to be disabled on a Windows OS.
This is the way to disable a test on an OS.
Let's just, for example, see what happens if I say OS.MAC here.
I will rerun the test just to see that, in this case, the test ran. So, the disabled annotation works properly.
Let's just do a quick turnaround and let's say @EnabledOnOs.
And again, this is OS.Windows so here, the test will run because my machine is using Windows.
Again, let's see what happens if for @EnabledOnOs I change the OS value to OS.MAC.
I will rerun the test from the Run pane.
As you can see right now the test was not running because we are on Windows 7.
So I will change it back to @DisabledOnOs, because I want this to match with the message that we provided for the test being disabled.
# Disable a test based on a system property
Okay, let's take a look at a third way of us disabling our tests.
This will be based on a system property.
We have two annotations here. @DisabledIfSystemProperty and @DisabledIfSystemSystemPproperties.
I will take the first one, because we will only deal with one system property right now.
For us, a system property - because we are running the test from IntelliJ - can be set from the "Edit Configuration" section.
In order to do that, I will delete the two entries I have in my run configurations for JUnit.
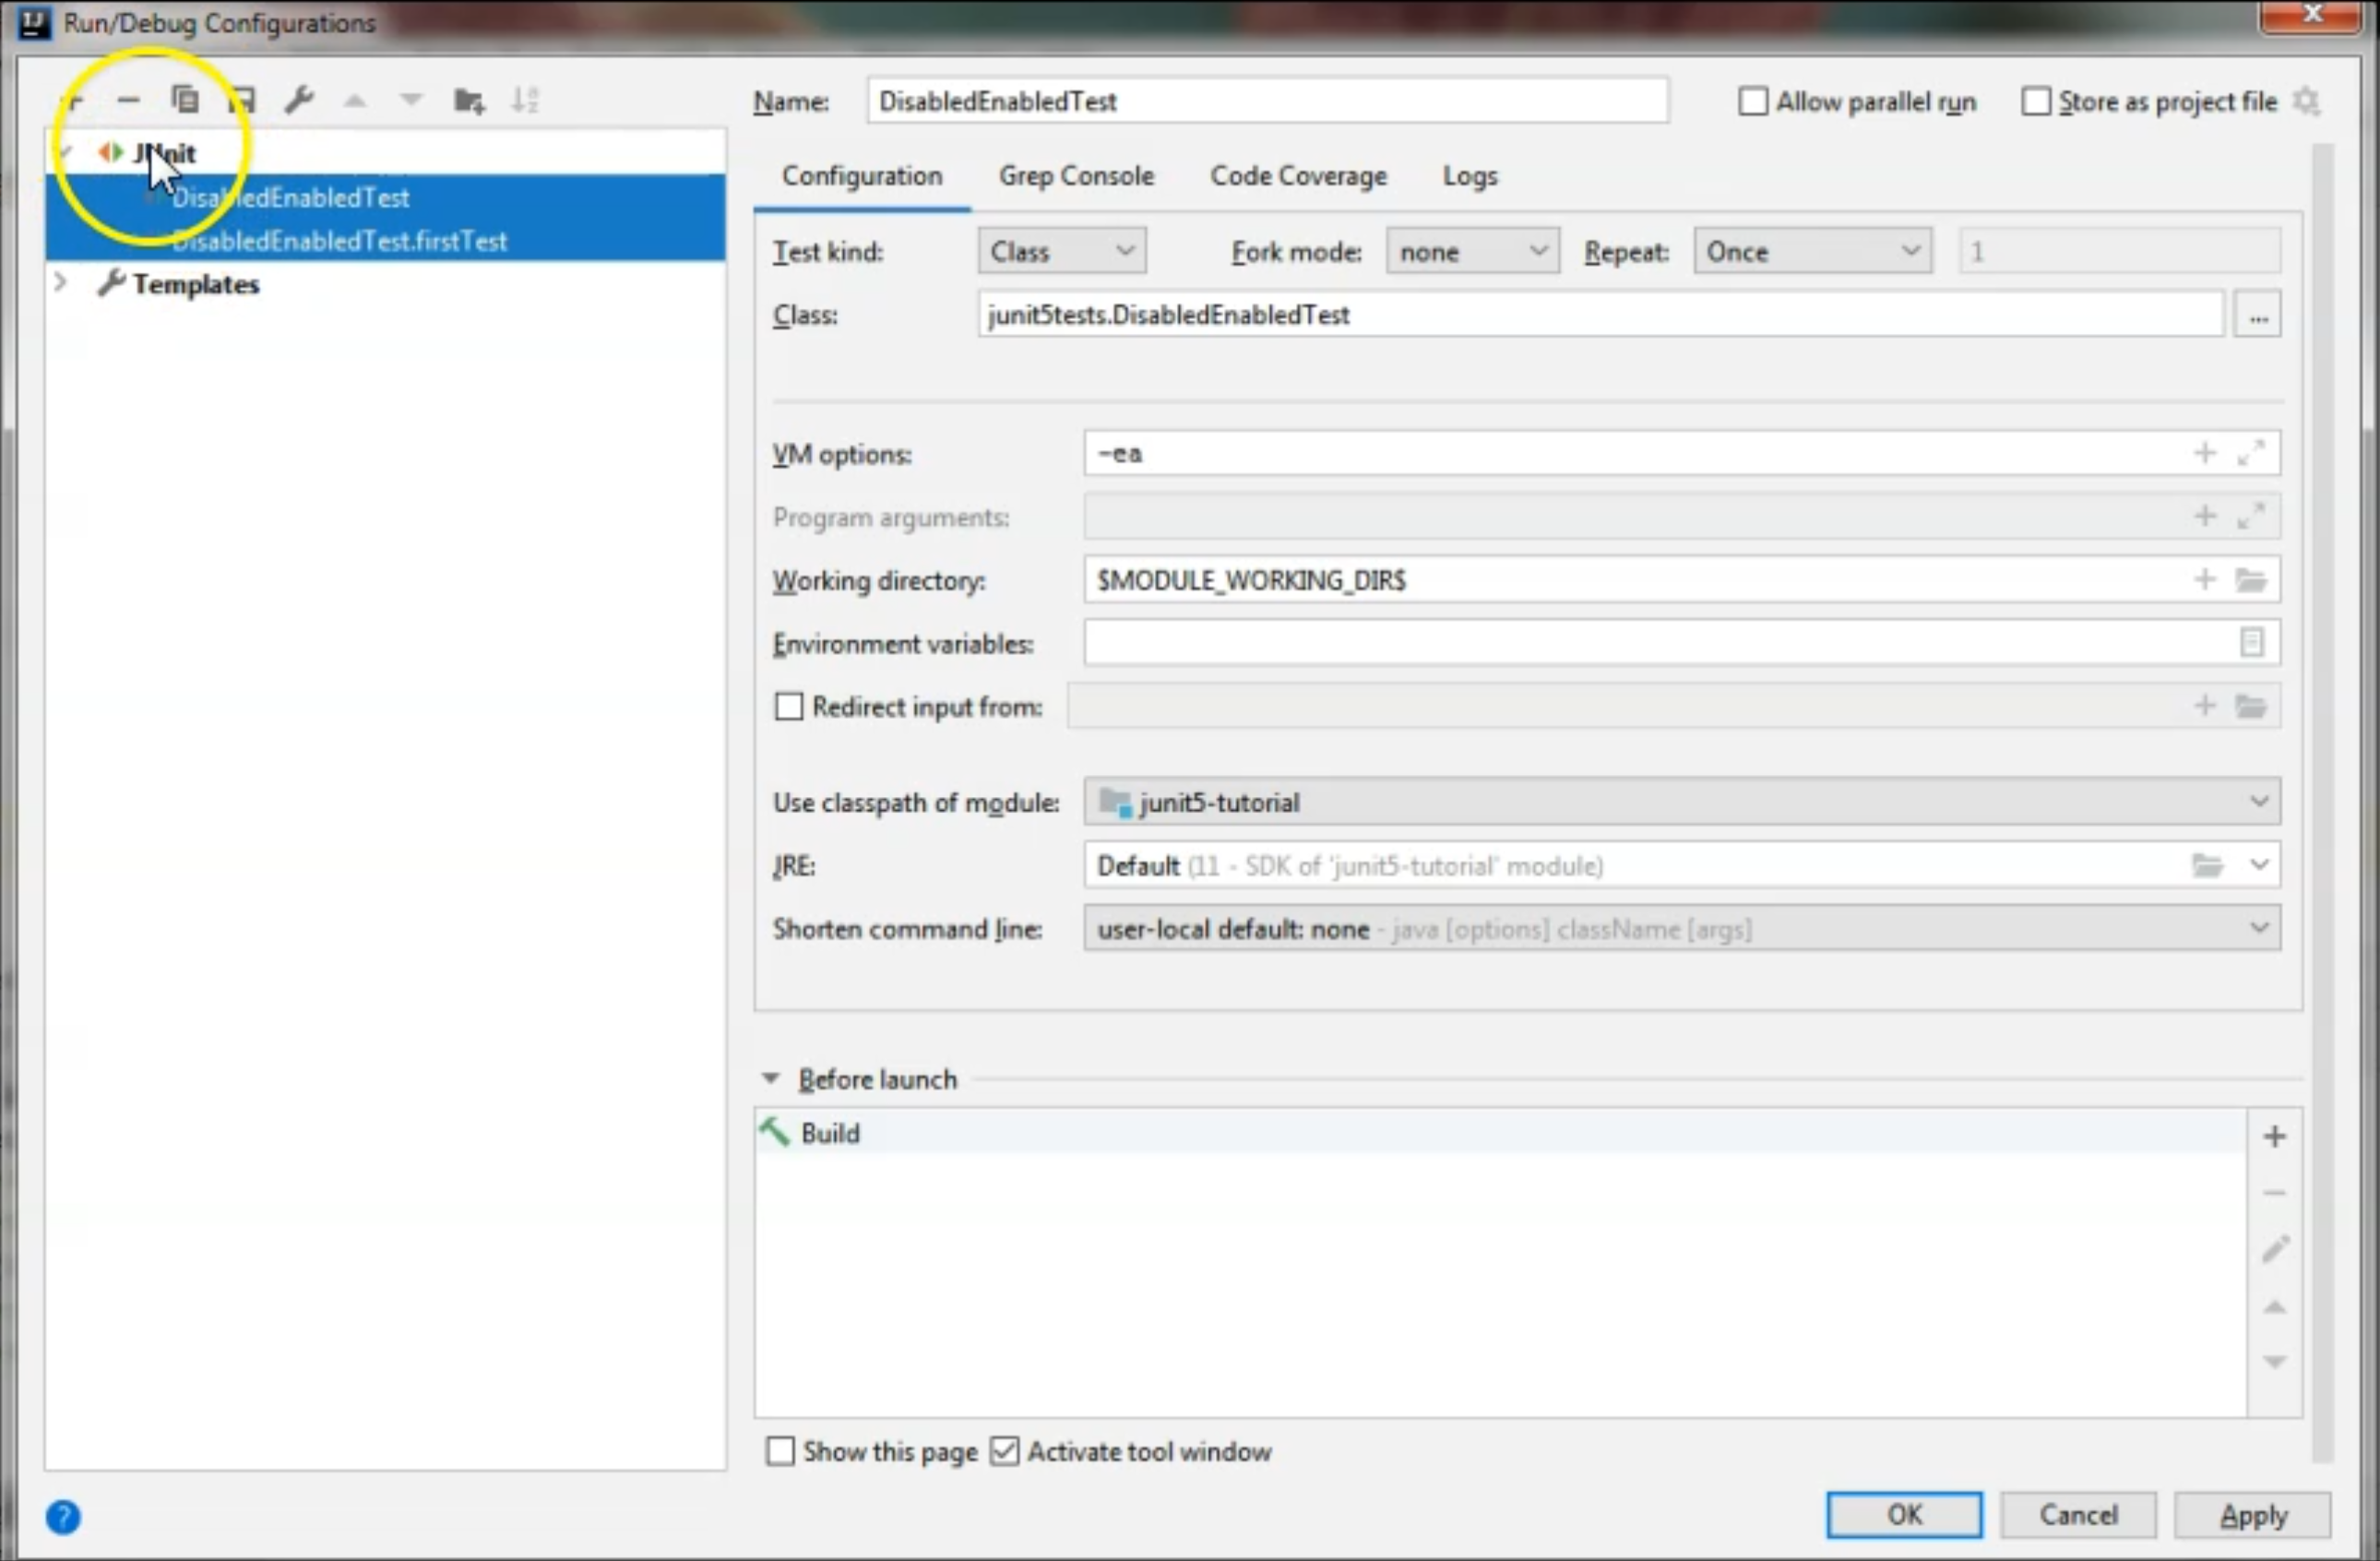
Then, I will set a default configuration here.
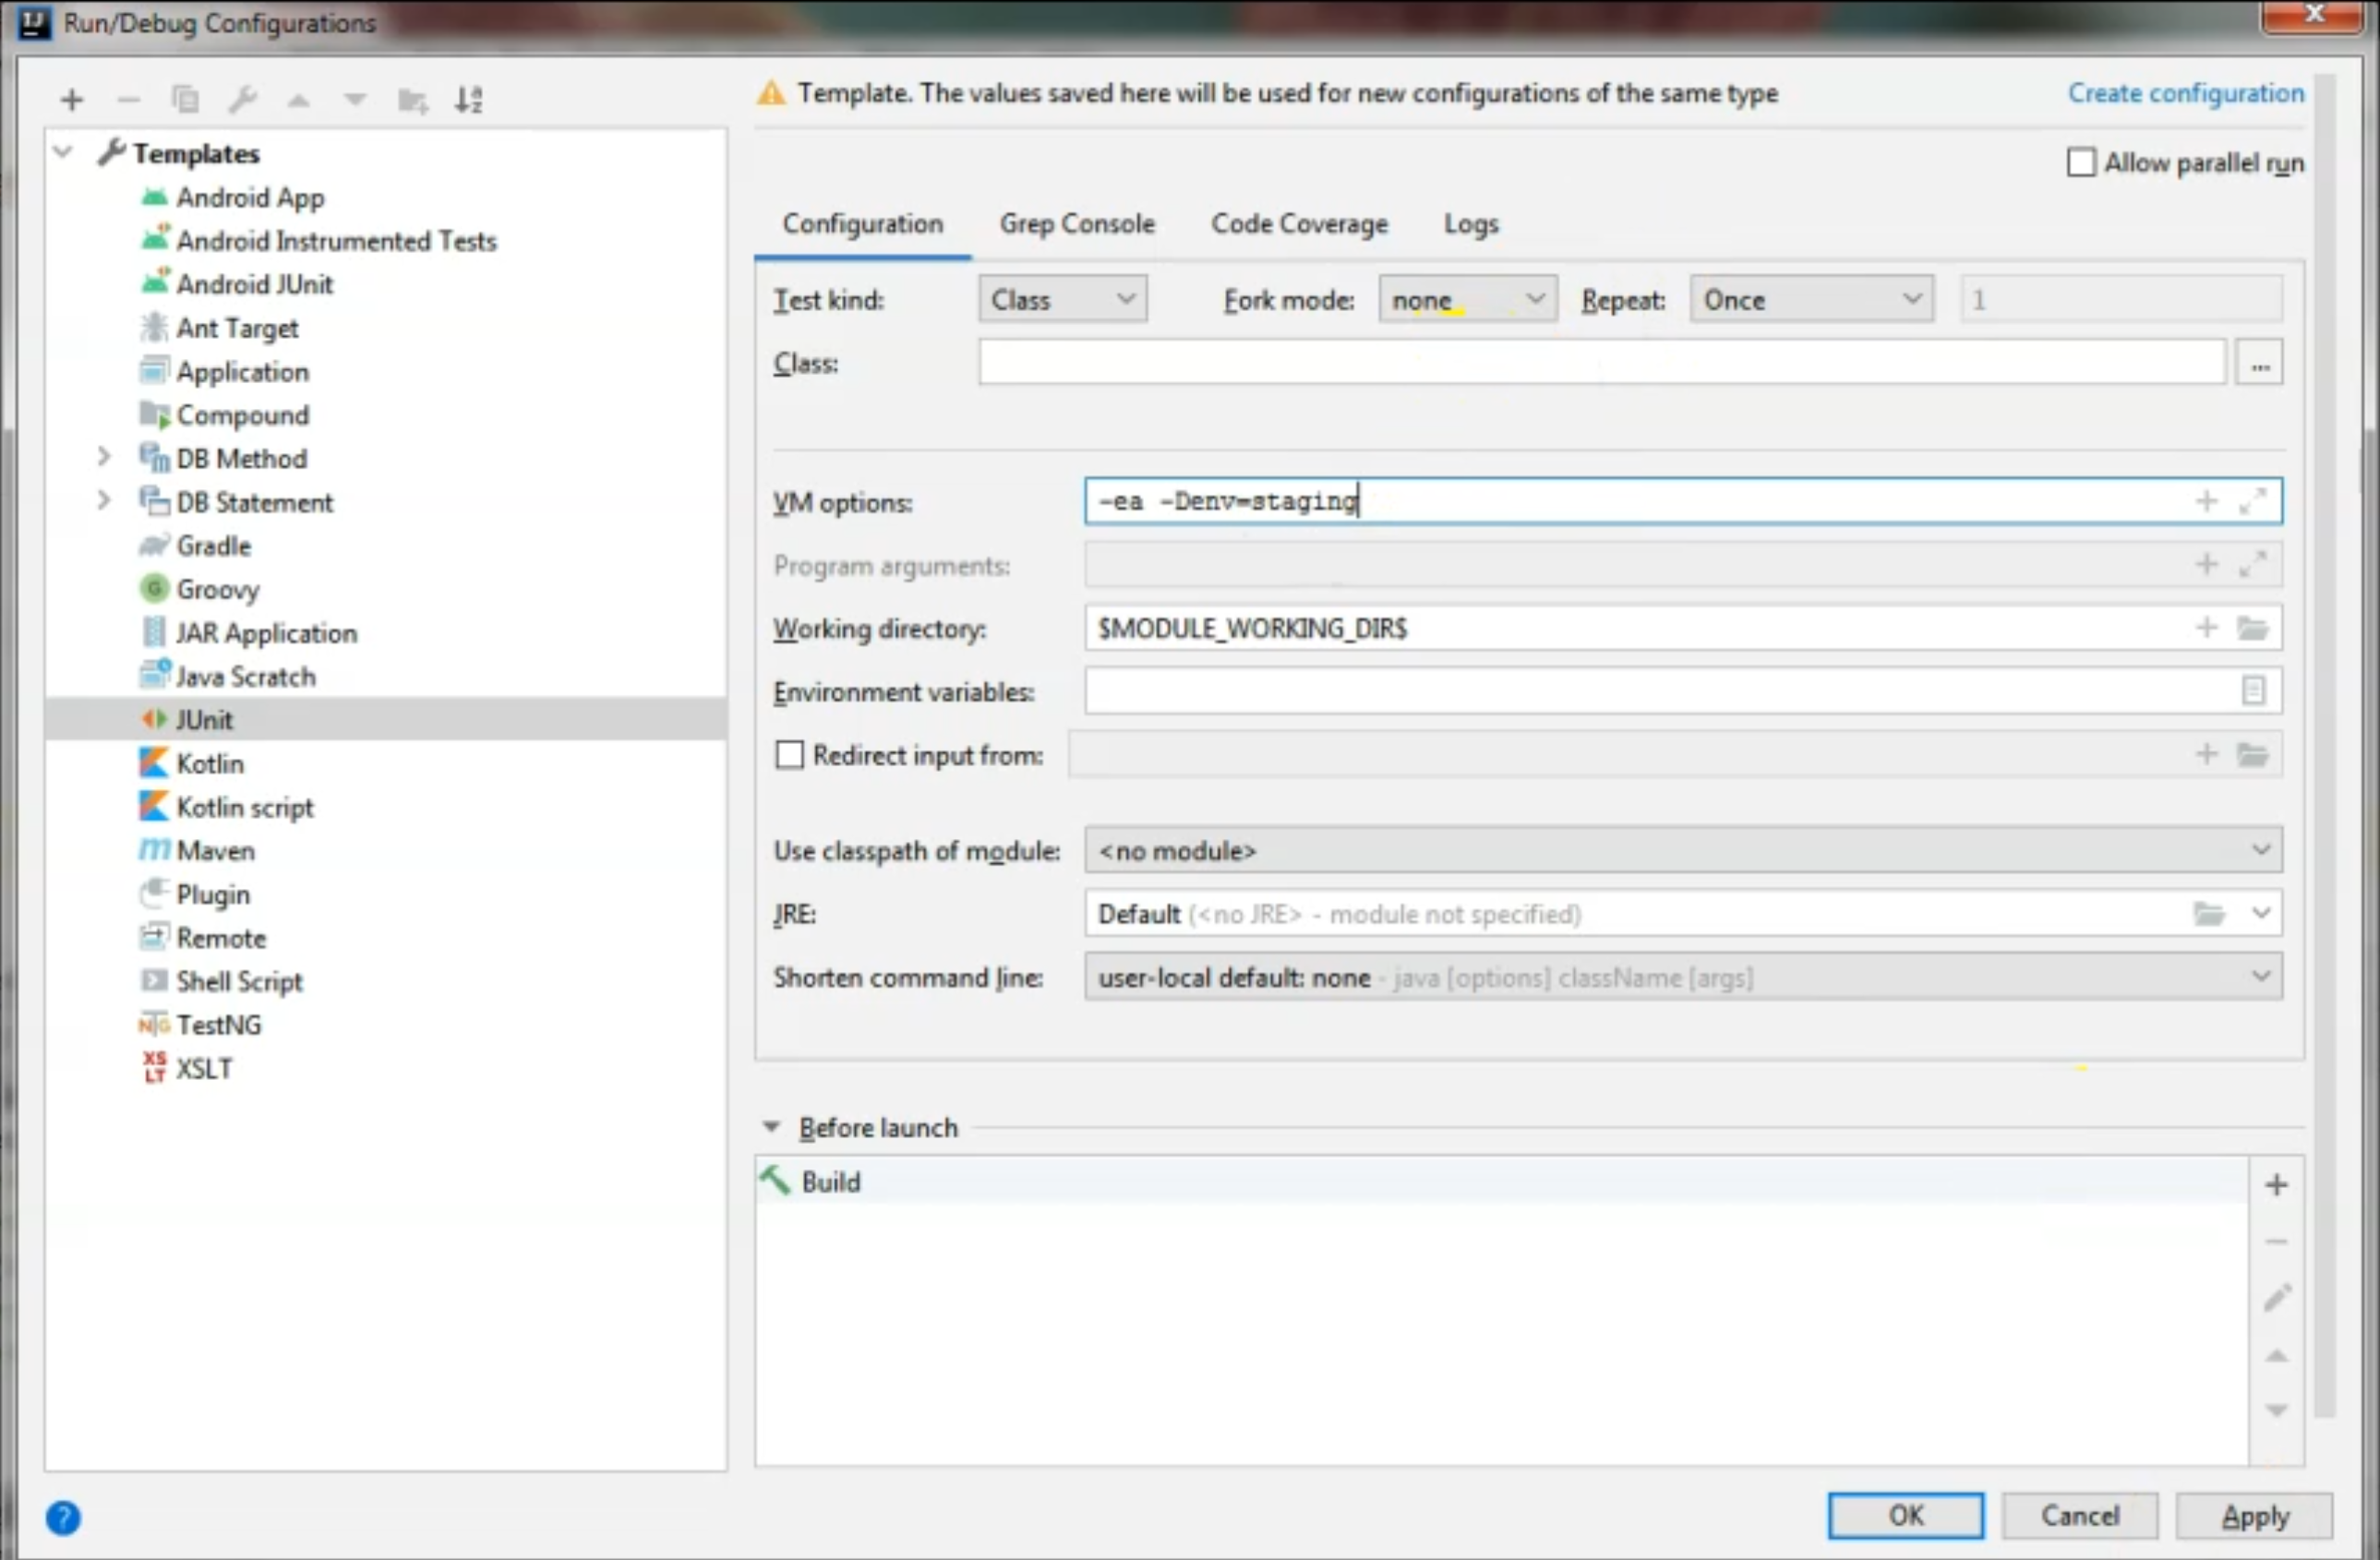
Here, we can specify whatever system properties we want.
For example, environment (-Denv) or browser (-Dbrowser), if that's what we want, or locale or whatever you are using in your test.
I want, for the purpose of example, to say that we want to run the test on the staging environment.
This is just the property that for now is not used anywhere.
I will apply this setting and every time we run the test in the future, until we change it, that is the system property we will have set for the environment.
Now, what we want in our annotation is for the system property named "env" to match "staging".
Here we need to specify a regex.
I will not use a regex right now, but instead I will just say that I want the system property named "env" to match "staging".
As you've seen in the configuration, that's what I set.
So in my case, this test needs to be disabled.
Additionally, we can also specify the disabling reason.
For example, "Disabled for demo of @DisabledIfSystemProperty".
    @Test
    @DisabledIfSystemProperty(named = "env", matches = "staging",
            disabledReason = "Disabled for demo of @DisabledIfSystemProperty")
    void thirdTest() {
        System.out.println("This is the third test method");
    }
If we run the test right now, we will have three disabled tests.
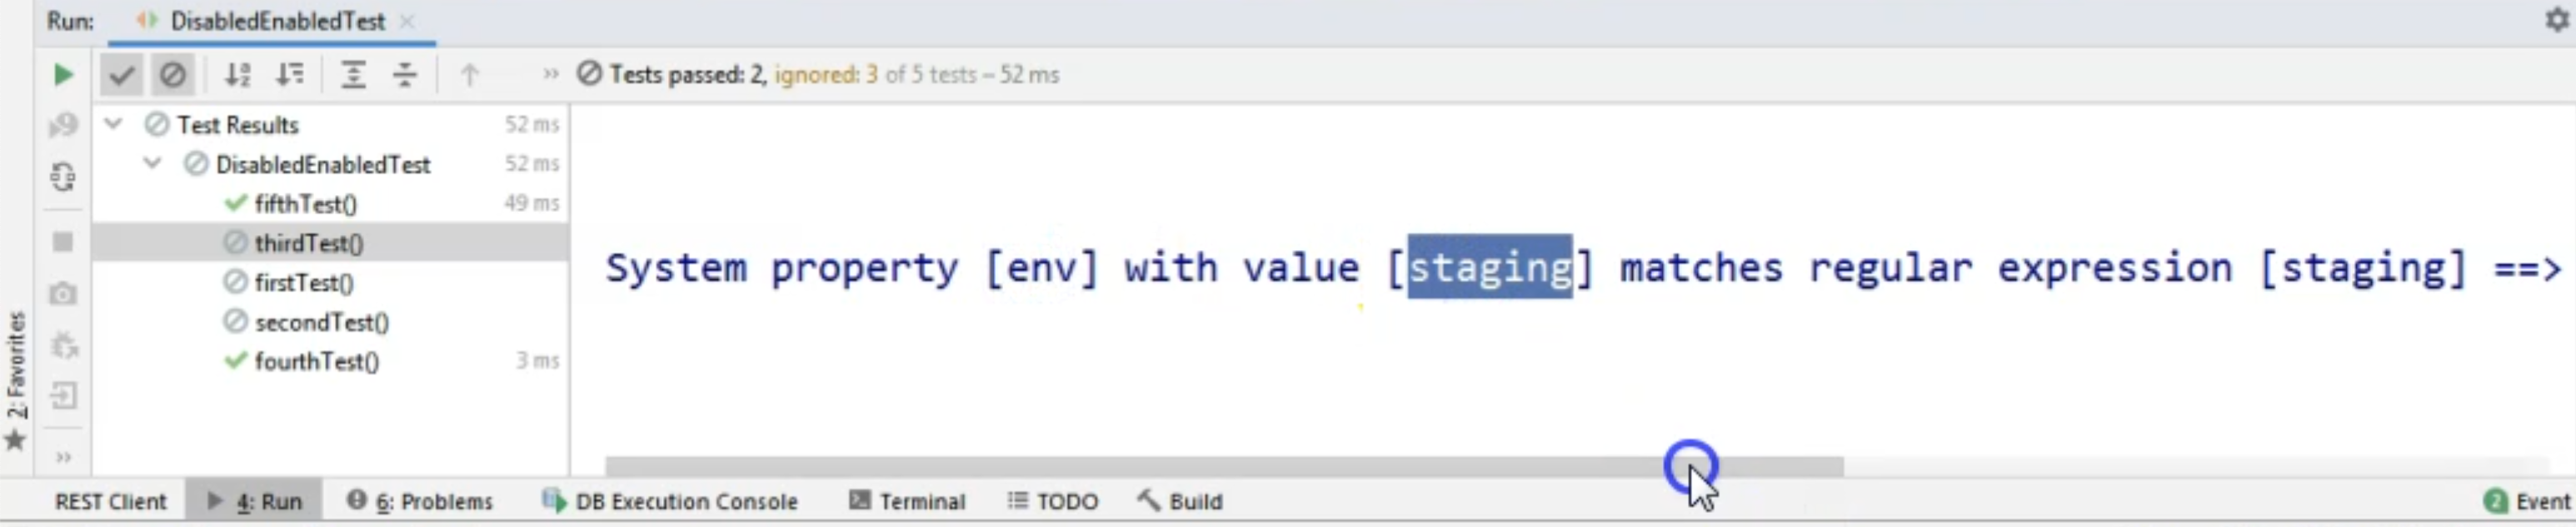
For the third one, we will have the reason stated that the "System property [env] with value [staging] matches the regular expression [staging]" that we provided in the matches attribute.
Therefore, the test method is disabled.
# Disable a test based on a boolean condition
Now, the last option that we will look at will be the @DisabledIf.
@DisabledIf allows us to create a method which returns a boolean value and based on the result of the boolean value, the test will either be enabled or disabled.
So let's say that the value, which is the name of the method, is provider.
So we will create a new method that returns a boolean.
Let's say that we also want the disabled reason to be the "Disabled for demo of @DisabledIf".
Let's create our provider method as the last thing in our class.
Let's say boolean provider(), and I will just say return - and here I will return a value that is true if today's DayOfWeek equals DayOfWeek.WEDNESDAY.
In the case today is Wednesday, this will evaluate to true.
In the case today is not Wednesday, it will evaluate to false and based on the results of this evaluation, the test will be enabled or disabled.
Now, because today is Wednesday, this test will now be disabled.
    @Test
    @DisabledIf(value = "provider", disabledReason = "Disabled for demo of @DisabledIf")
    void fourthTest() {
        System.out.println("This is the fourth test method");
    }

    boolean provider() {
        return LocalDateTime.now().getDayOfWeek().equals(DayOfWeek.WEDNESDAY);
    }
But let's run it and see that that is exactly the case.
As you can see, at this point, the fourth test was also disabled, because we have done the demo for it and because today, indeed, was Wednesday.
So these are some of the most useful ways of disabling our tests.
As you saw, we did have one test that ran, and this was the test without any disabled annotation.
Again, we don't only have the disabled options, but we also have the enabled ones.
They match the disabled ones.
There are some others also like environment variables and GRE, but I think the ones that we've looked at today are the most suitable for your tests.
