

Transcripted Summary
We are now at the miscellaneous chapter. In this chapter, I will briefly go over three features that we can use from JUnit 5.
These will be setting a timeout on a test, creating nested tests, and also creating our own custom annotation.
# Setting a timeout
As usual, I will create a new test class to put the tests for this chapter, and I will just create a class called, MiscTest.
Here, I will create a first test method - it will be a simple method, and here, we will demonstrate the timeout feature.
What we want with the timeout is in case a test runs way too long, we want to fail it.
We will set the maximum duration allowed for a test with a new annotation called @Timeout() and for this annotation, we can either provide directly a value - for example, 5, which means we want the timeout to be of 5 seconds - or we can also specify what time unit we want to use.
For example, if we want to use minutes instead of seconds, we can just choose to say TimeUnit. and we can pick from these available options.
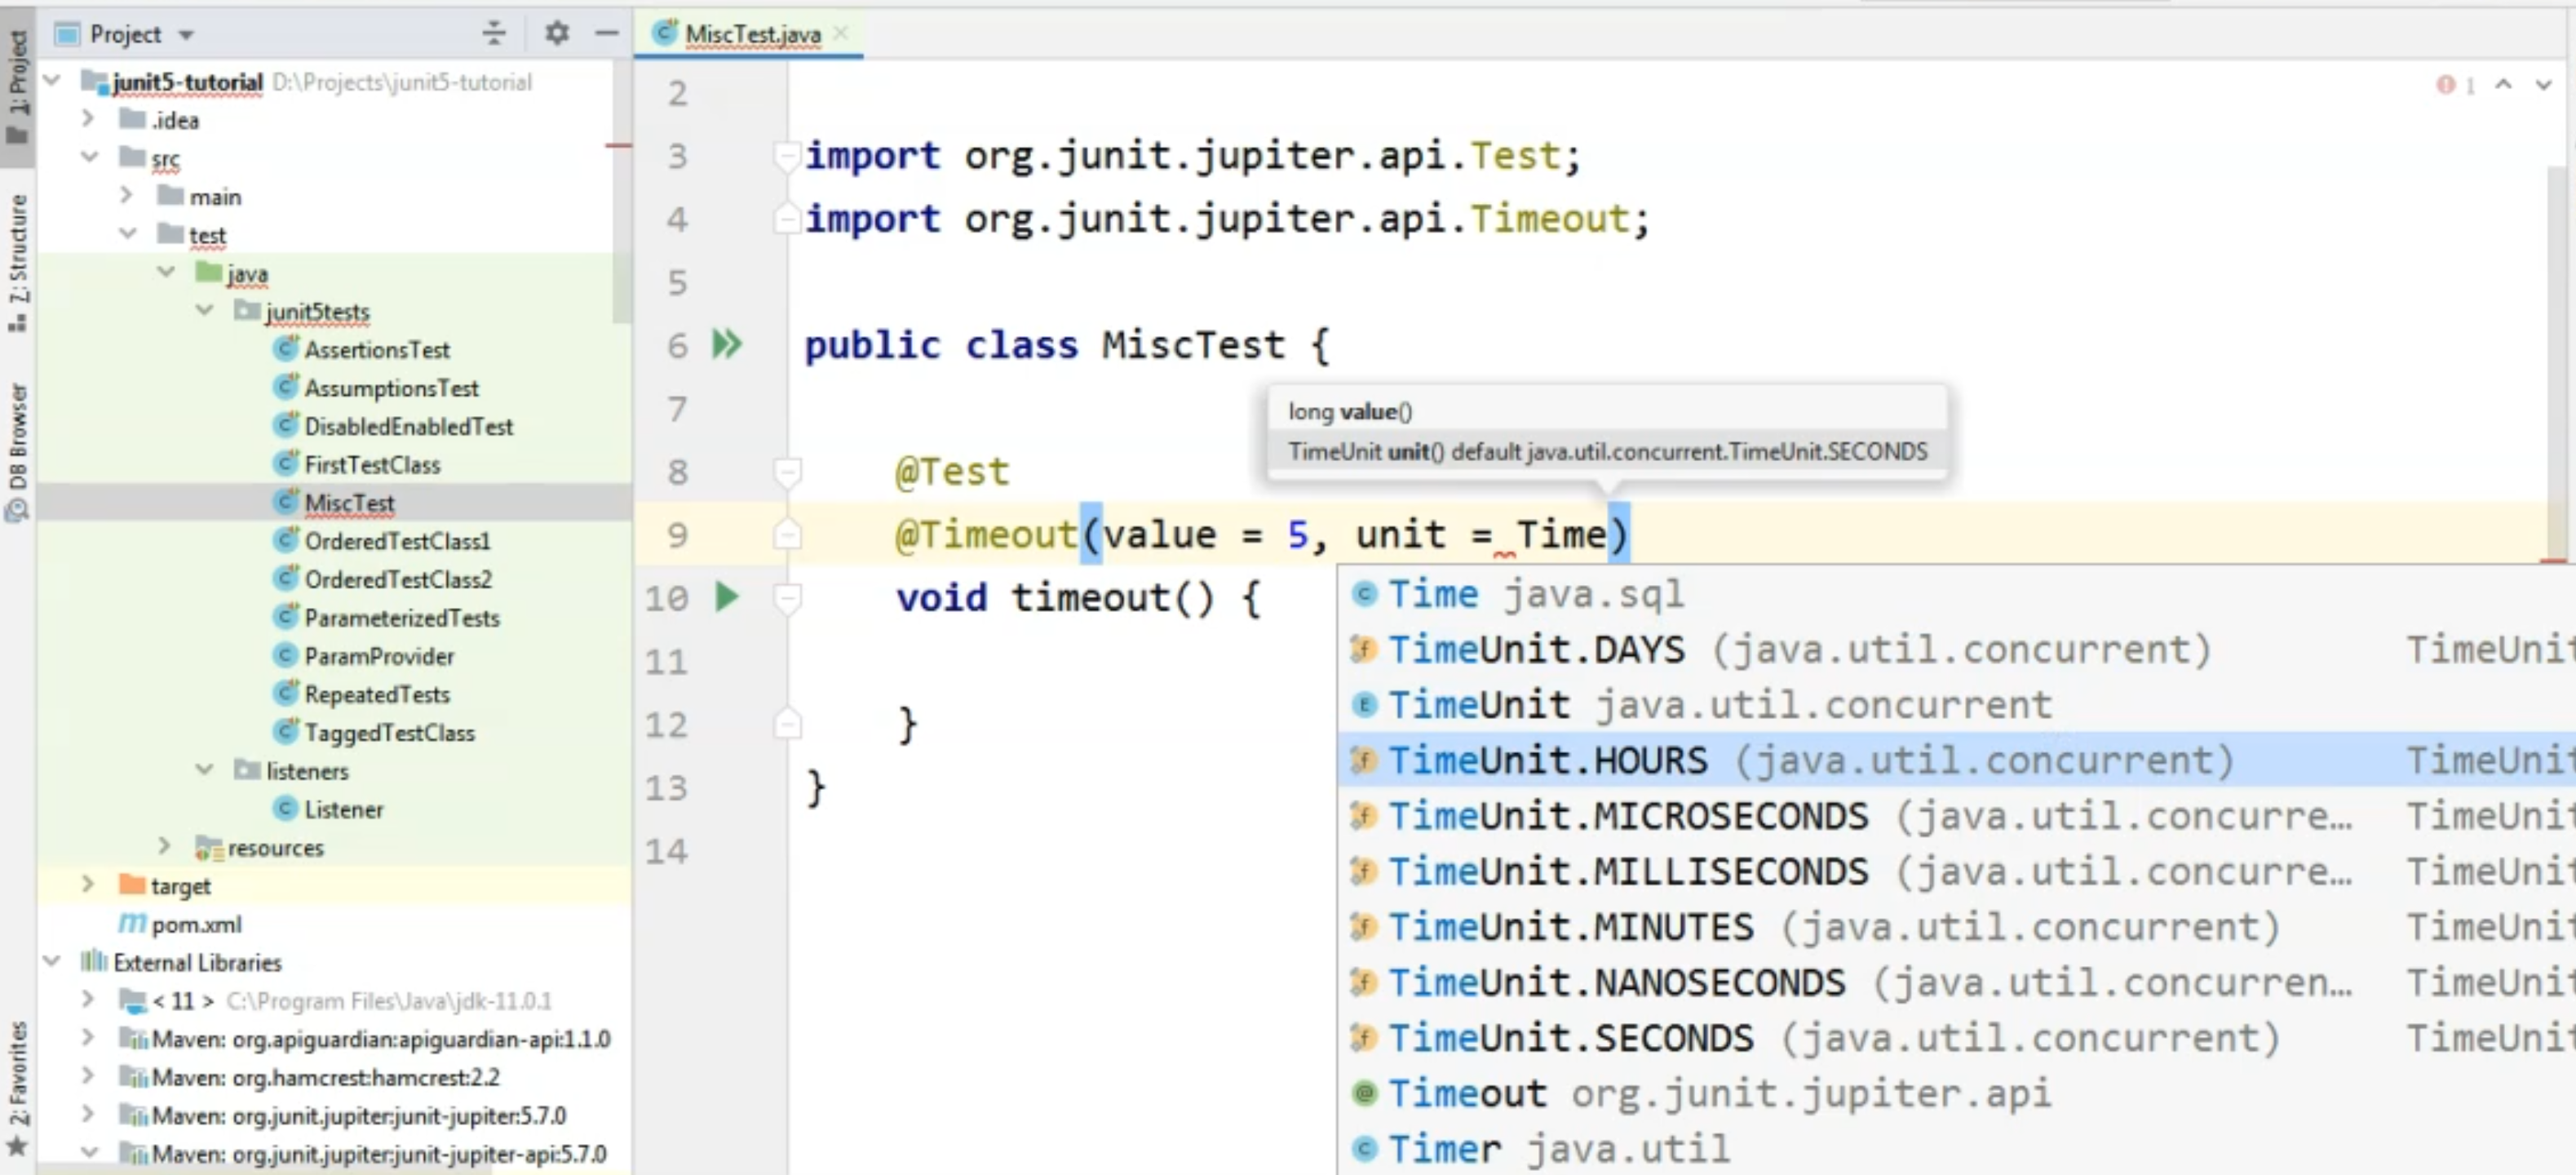
As you can see, we could specify hours, milliseconds, and so on, but we could also say, minutes here.
However, for this example, I don't want to create a test that runs for minutes just so we can see how this feature works.
Instead, I will remove the time unit value from the "Timeout" annotation, and I will just say that I want my test to run no longer than 5 seconds.
In case 5 seconds are exceeded, we will see a failure.
In order to have a test here that will pass or fail - first of all, I will create a System.out which says, "This is the test with the timeout."
package junit5tests;

import org.junit.jupiter.api.*;

import java.util.concurrent.TimeUnit;

public class MiscTest {

    @Test
    @Timeout(5)
    void timeout() throws InterruptedException {
        System.out.println("This is the test with the timeout");
    }

}
First, I will run this test with the current setting, just to see how the test runs when it doesn't take more than 5 seconds as we have set in our timeout.
So this test was really, really fast - it ran in 81 milliseconds, so the test managed to pass successfully.
However, if we want to see what happens when the timeout is exceeded, I will just add a Thread.sleep(6000) here, which will tell the test to sleep for 6 seconds, which is, of course, more than 5.
So in this case, our test will have to fail because it will run for more than the five seconds that we allocated for this test to run.
package junit5tests;

import org.junit.jupiter.api.*;

import java.util.concurrent.TimeUnit;

public class MiscTest {

    @Test
    @Timeout(5)
    void timeout() throws InterruptedException {
        System.out.println("This is the test with the timeout");
        Thread.sleep(6000);
    }
}
So if we run the test, we will easily see that there is an error and that the test has failed and the message in the console will be that the timeout was exceeded.
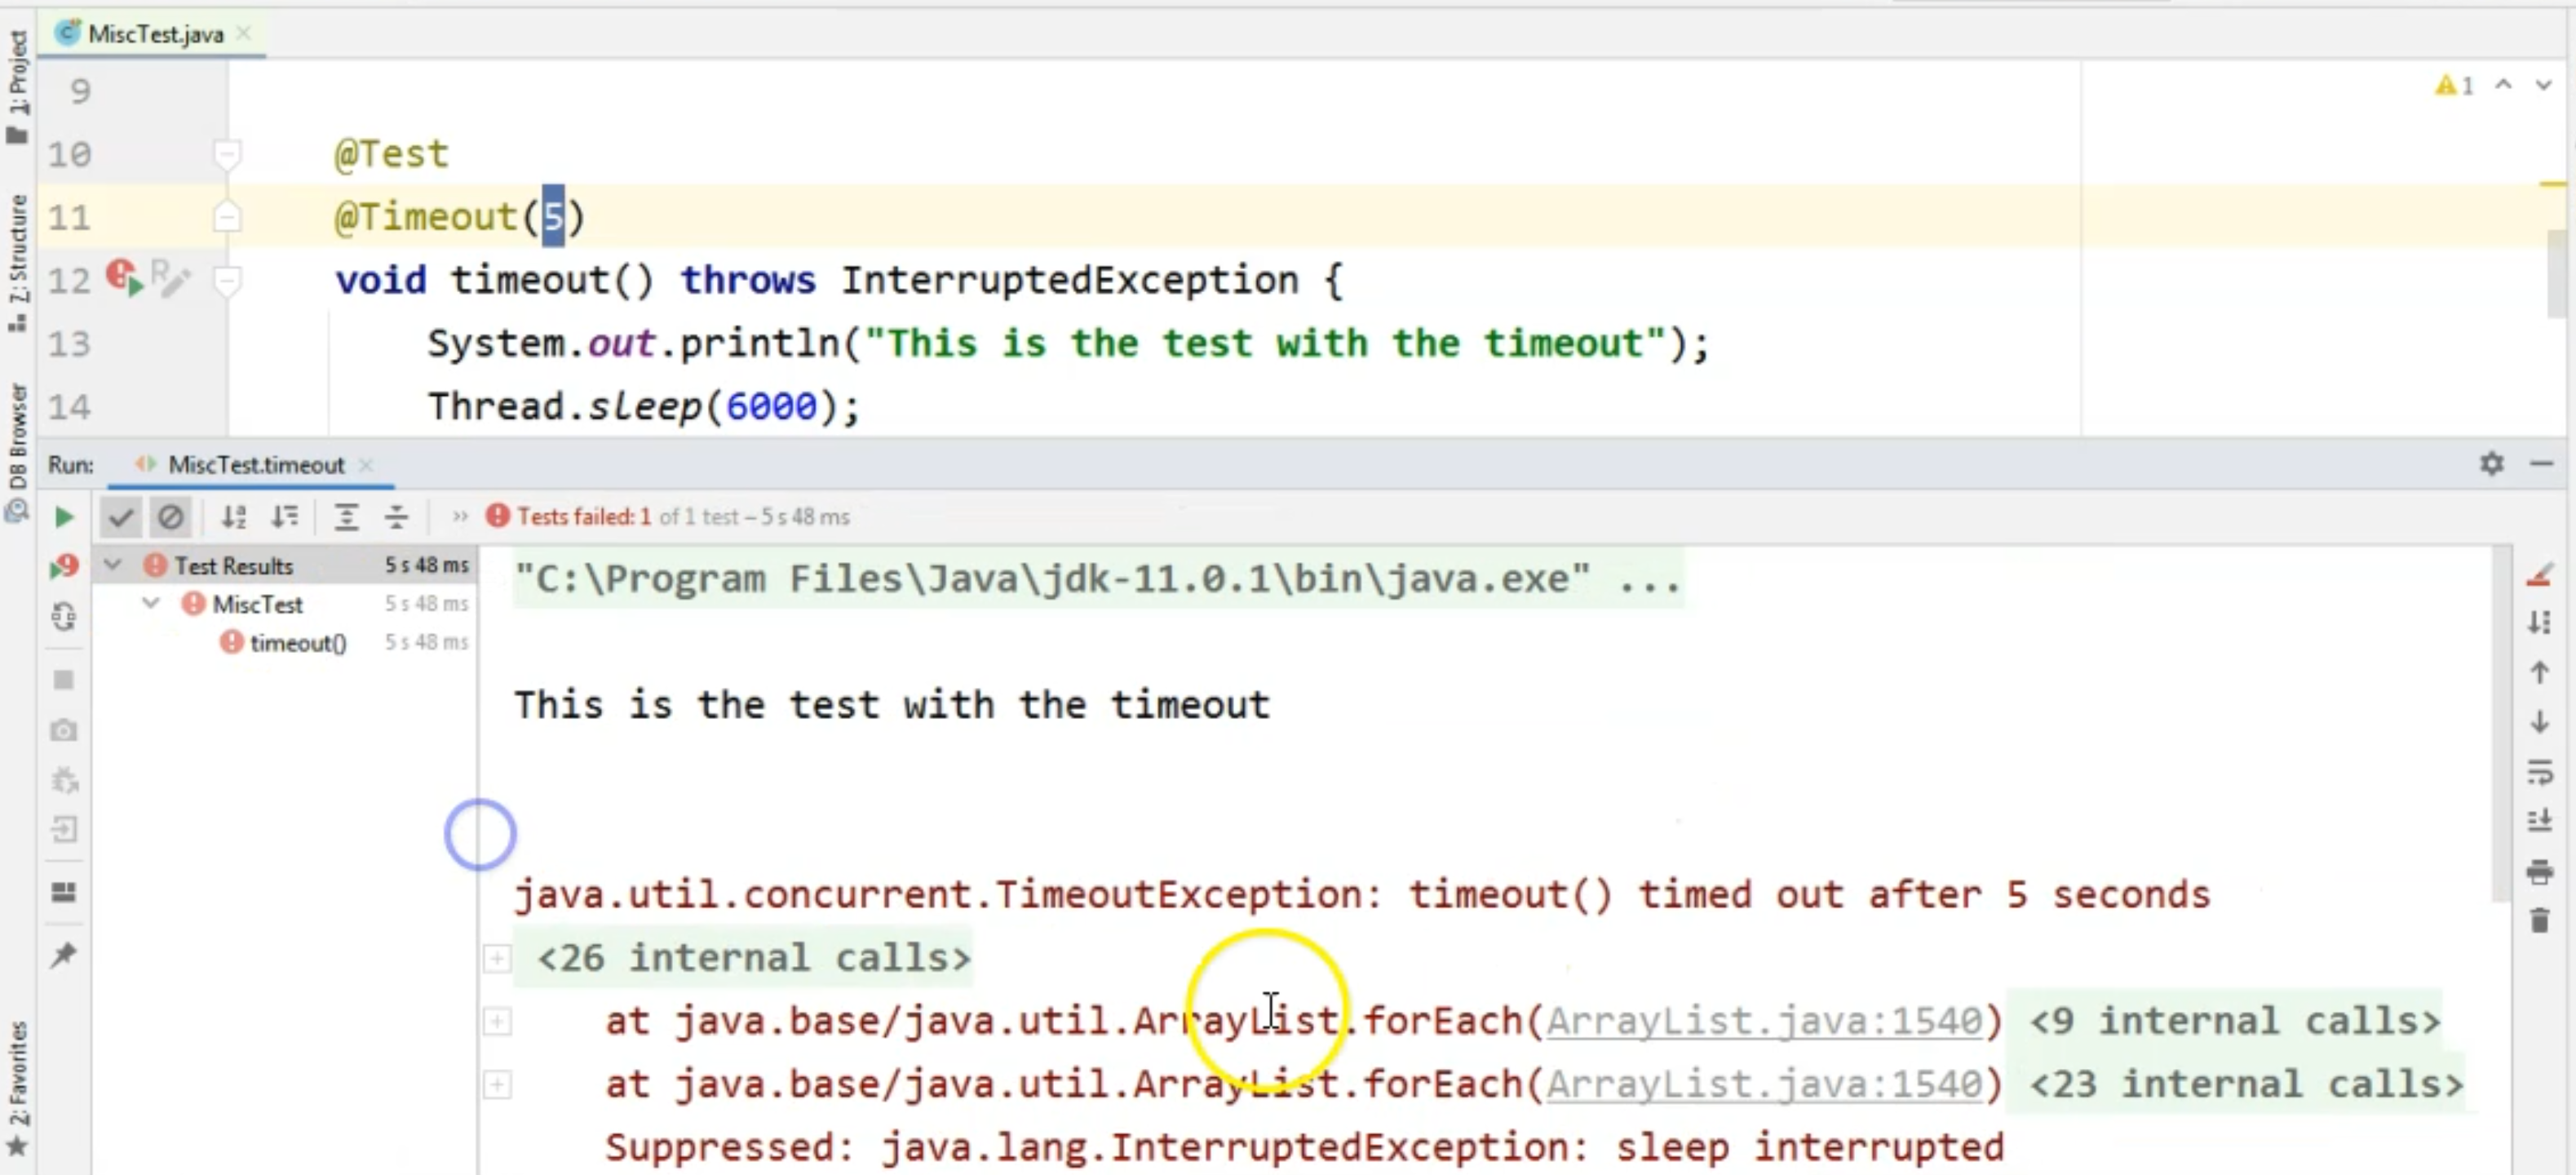
As you can see, the test timed out after five seconds, so this is how timeout works.
In case you need it, just keep in mind that in the current version, this feature is still experimental.
# Creating nested tests
The next thing we will look at is creating inner tests.
In JUnit 5, we have the option to create an inner class within our test class, and inside that class, create any methods that we would normally create in any test class - for example, lifecycle methods, or just plain test methods.
I will show how to do this by adding the @Nested annotation inside the initial test class that we have here, which is the MiscTest, and I will just create a class here called, NestedTest and within this class, I will create a @BeforeAll annotation, and a method called beforeAll().
Here I will just do a System.out, which states that we are the "Before All in nested test" method.
Then I will create a very simple test method.
I will just call it nestedTestMethod and here I will just do the System.out that says that this is the "Nested test method".
Again, because we are using a lifecycle method, I will annotate the class, the nested class, with the @TestInstance(TestInstance.Lifecycle.PER_CLASS) annotation here so that we don't need to add static to our beforeAll method here.
    @TestInstance(TestInstance.Lifecycle.PER_CLASS)
    @Nested
    class NestedTest {

        @BeforeAll
        void beforeAll() {
            System.out.println("Before All in nested test");
        }

        @Test
        void nestedTestMethod() {
            System.out.println("Nested test method");
        }
    }
So in this case, when we are going to run the entire class - namely, the MiscTest class, we will be running both the tests which are directly inside the class, but also everything that is inside the NestedTest class, as you can see in the console on the left-hand side.
So we started with the timeout method, which failed, of course, because of the timeout that we set initially, and then we continued with the NestedTest class, which you can see again, on the left-hand side.
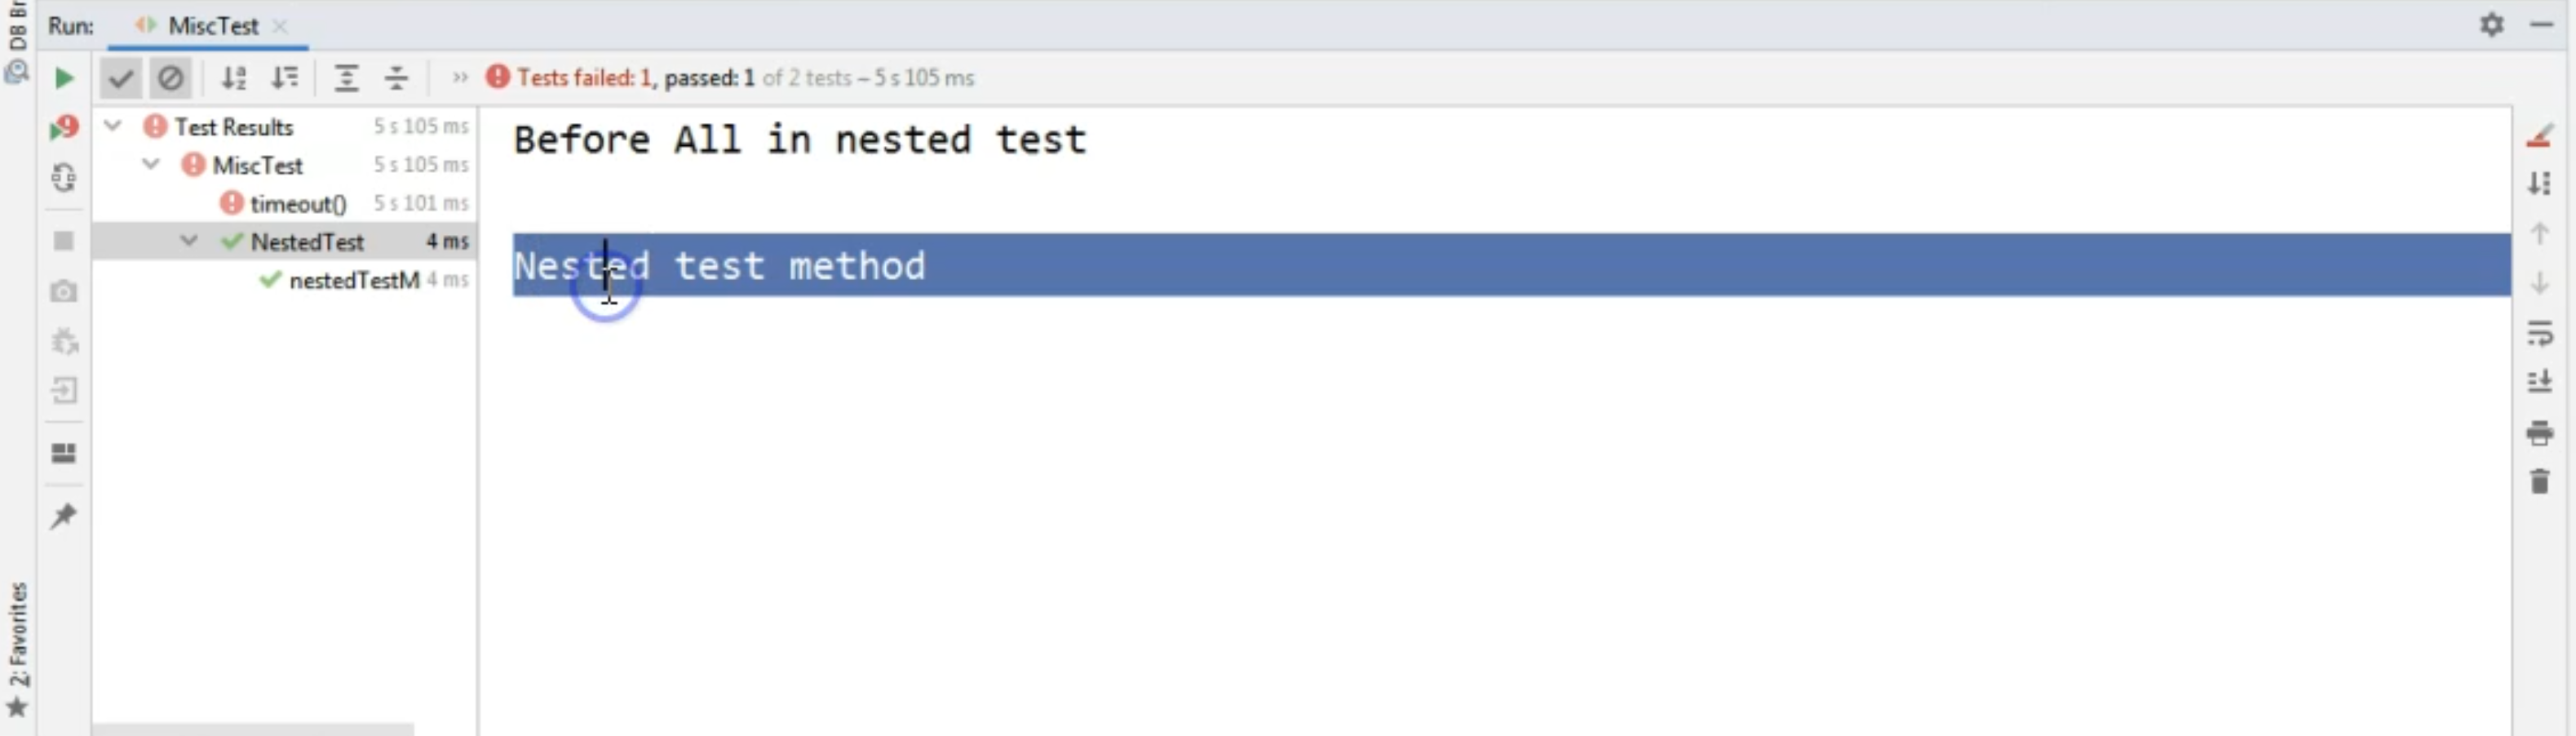
For this test class, we ran the "Before all," and we also ran the test method.
The test method can also be seen in the left-hand side here in the "Run" pane.
So this is how you create an inner test class in case you need it.
Of course, you can add any other lifecycle methods, any parameterized tests and so on in here in case you need it.
# Creating a custom annotation
Now, as you have seen in many of our tests, we have a lot of annotations that we need to assign to the same test method.
For example, I will create a brand new one here and I will add a @Test annotation.
I will then add it a @Timeout annotation, and I will say 90 here, because let's say I want the timeout to be 90 seconds.
Then I will add a @DisplayName, and I will say, "This is the nice method".
Then I will add another annotation here, and I will say, @Tag and I will add "theTag" value here.
Then I will create the method and I'm going to say void annotatedMethod1() and here, I will just do a System.out saying, 'This is the annotated method".
    @Test
    @Timeout(90)
    @DisplayName("This is the nice method")
    @Tag("theTag")
    void annotatedMethod1() {
        System.out.println("This is the annotated method");
    }
What I wanted to prove here is that in case we want to add a complex behavior to our test, we will have a lot of lines of code which represent only the annotations.
In order to make these tests shorter, we can actually create our own custom annotation.
Instead of having these lines of code, we can replace them with only the one.
In order to do that, we will need to create an interface.
So I'm going to go back to the junit5tests package, and I'm going to create a new interface, and I'm going to provide a name for the interface, which will equal to what I want the annotation name to be.
In my case, I want this to be, MyAnnotation and what we will have to do in order to use these as a tag - we will need to add the @ before the interface word.
Then here, we will have to start @Target, and here we need to say, ElementType.METHOD.
Then we need to add a @Retention annotation, and here we need to say, RetentionPolicy.RUNTIME.
Next, we need to add the annotations that we want to replace.
So in my case, I'm going to go back to this annotatedMethod1 method, I will copy all of these annotations and I will put them inside my interface here.
package junit5tests;

import org.junit.jupiter.api.DisplayName;
import org.junit.jupiter.api.Tag;
import org.junit.jupiter.api.Test;
import org.junit.jupiter.api.Timeout;

import java.lang.annotation.ElementType;
import java.lang.annotation.Retention;
import java.lang.annotation.RetentionPolicy;
import java.lang.annotation.Target;

@Target(ElementType.METHOD)
@Retention(RetentionPolicy.RUNTIME)
@Test
@Timeout(90)
@DisplayName("This is the nice method")
@Tag("theTag")
public @interface MyAnnotation {
}
Now, what I'm going to do is I'm going to create another test method here, and I'm going to call it, annotatedMethod2 and I'm going to say, "This is the custom annotated method".
    @MyAnnotation
    void annotatedMethod2() throws InterruptedException {
        System.out.println("This is the custom annotated method");
    }
Instead of adding all of those tags that we had before, like @Test, @Timeout, and so on, I will just add the @MyAnnotation annotation.
So this is the one that I created earlier.
By navigating to it with "Ctrl" and click, we can see what the annotation is all about, so we can see what are all the annotations that it will replace.
To confirm that the behavior is going to be exactly the same, I will run the test again, and we will see that the test ran successfully.
Now, let's say I'm changing the Timeout to 1, and I want to add a Thread.sleep() here, just so we see that the annotation really works fine.
So I'm going to say I want to sleep for 3 seconds, but my test will only allow for 1 second to be the maximum time for running.
If I'm going to run this test again, the one with the custom annotation attached to it, we will see that this method will now fail because one of the assigned annotations to this test doesn't allow the test to run more than 1 second, and our Thread.sleep actually made the test run with a higher duration than that.
So this is how we can prove that indeed, this annotation, this composed custom annotation, works properly.
This is how you can create your own custom annotation in case you have too many annotations you want to add to your test method.
You can just create your own interface, give it a proper name that reflects what these annotations are all about, and then assign this annotation to your test, just like for the annotatedMethod2 in this example.
