

Transcripted Summary
When we are running the tests from the command line, because we are using the Maven Surefire Plugin, we will get some reports which are generated by this plugin.
However, in most situations we want some custom reports, some HTML reports probably, maybe we want something with colors and so on.
So, we want to be able to create our own reports.
In order to have access to the information about the test run, we are going to use the TestWatcher Interface.
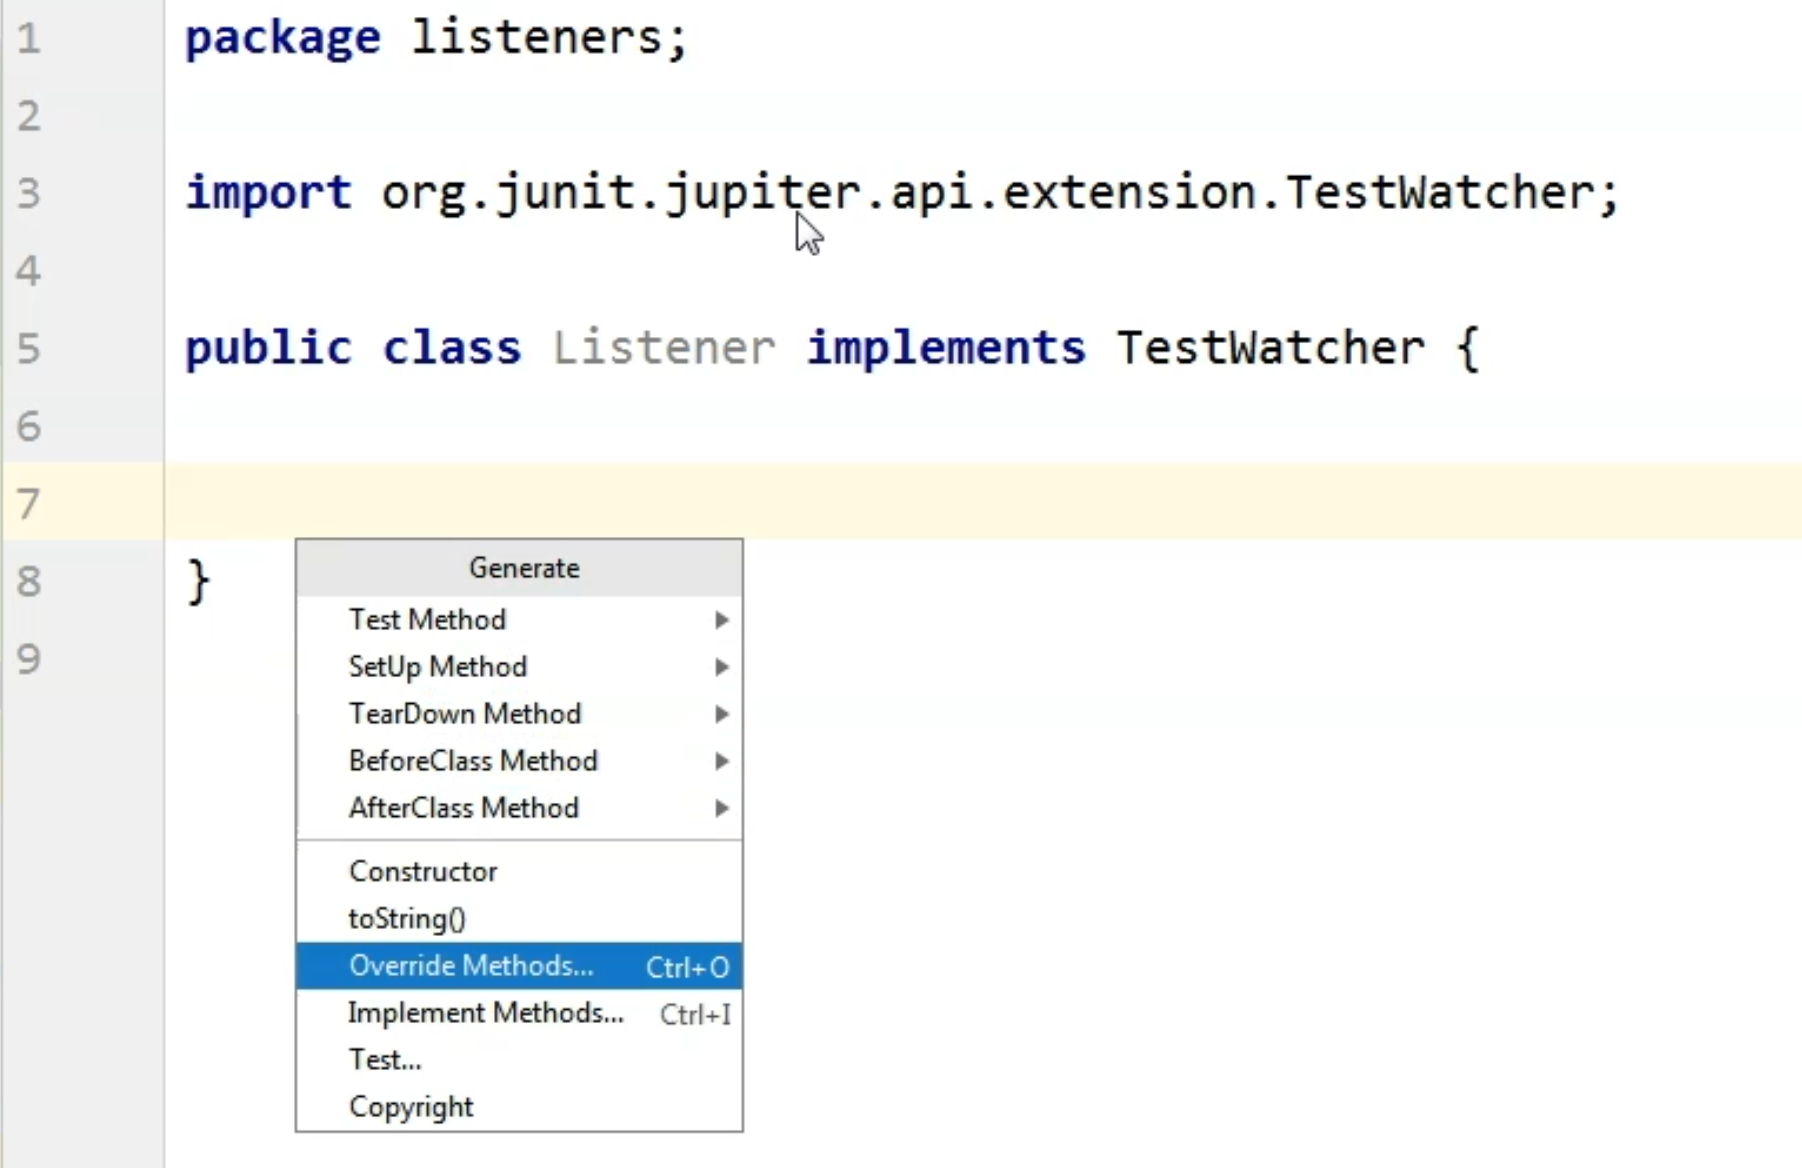
For that, I will go back to the project and I will create a new package where I will store the implementation of the TestWatcher Interface.
I'm going to call this package listeners.
Here, I will create a brand new class, and I'm just going to call it Listener.
A listener basically will be assigned to a test so that whenever the test executes, this class will listen to the events happening during the test run.
This listener needs to implement the TestWatcher Interface.
This interface is JUnit specific, and in order for us to work with the TestWatcher, we will need to use the "Alt+Insert" shortcut and choose the "Override Methods" option.
Here in the first section, we will see what are the methods that we can override from TestWatcher - so what are the methods available in the TestWatcher interface?
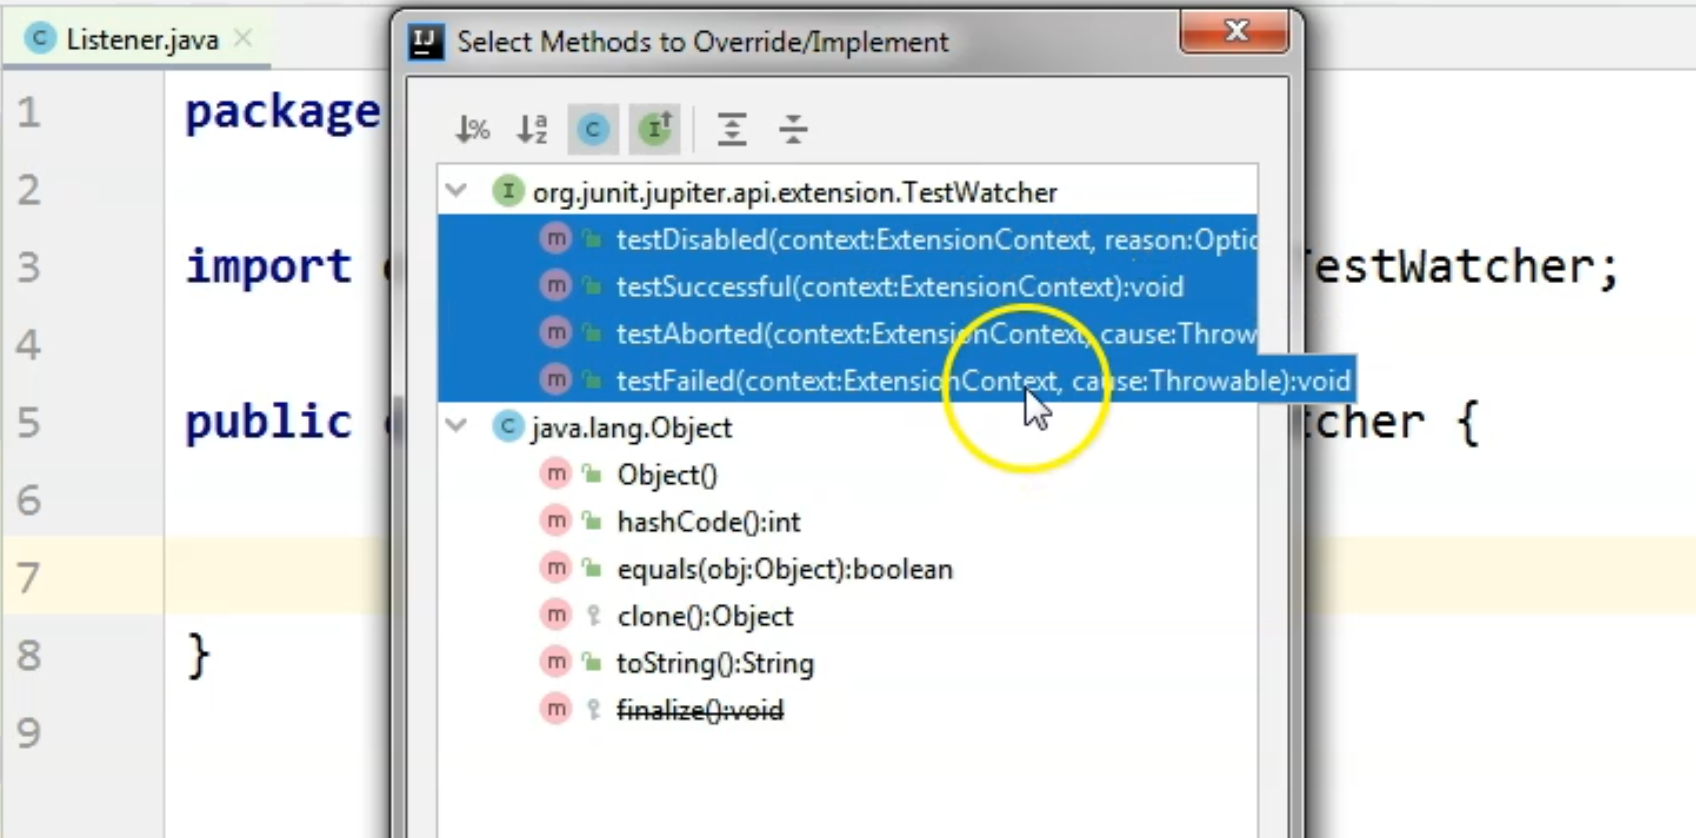
I will select all of them and we will now write some custom code in each of these methods.
package listeners;

import org.junit.jupiter.api.extension.ExtensionContext;
import org.junit.jupiter.api.extension.TestWatcher;

import java.util.Optional;

public class Listener implements TestWatcher {

    @Override
    public void testDisabled(ExtensionContext context, Optional<String> reason) {
    }

    @Override
    public void testSuccessful(ExtensionContext context) {
    }

    @Override
    public void testAborted(ExtensionContext context, Throwable cause) {
    }

    @Override
    public void testFailed(ExtensionContext context, Throwable cause) {
    }
}
What we want is that whenever a test was disabled, has finished successfully, was aborted or failed, to store this information and some test run related information somewhere, probably in a file.
So, we want to generate an HTML report probably, but in my case, I would just do a System.out in the console because I won't create any new files during this tutorial.
Let's say that we have the situation where the test was disabled. What we want to do in this case is to just say, "This test was disabled."
    @Override
    public void testDisabled(ExtensionContext context, Optional<String> reason) {
        System.out.println("This test was disabled");
    }
Of course, whenever you will be creating your own listener here, you will add the custom code you need to run whenever the test was disabled.
So, here we will probably write these results to the HTML report file.
You can also add some information regarding the test run.
As you can see in the test disabled method signature, you have access to a context and a reason. Here we can provide some context, like context.getTestMethod().
This will print the name of the test method together with the class that it belongs to in the console so that we know which test was disabled.
We can additionally say "with reason" and here we will be able to provide the reason we have available as part of this method's signature.
For us to better see this message after the test run because we have a lot of System.outs, I will just do a System.out of a lot of dashes - this is just a separator for us to better see where this information will pop up in the console output.
    @Override
    public void testDisabled(ExtensionContext context, Optional<String> reason) {
        System.out.println("--------------------------");
        System.out.println("This test was disabled: " + context.getTestMethod()
                + " - with reason: " + reason);
    }
I will use this in each of these methods that I will implement here and let's see the testSuccessful message.
Here, let's just say that we want to print the message that, "This test was successful: " and maybe again, we want to provide the test method name.
    @Override
    public void testSuccessful(ExtensionContext context) {
        System.out.println("--------------------------");
        System.out.println("This test was successful: " + context.getTestMethod());
    }
For testAborted, again, we can choose to do a System.out which says, "This test was aborted: " and we can specify the reason for the abortion by printing out the cause.getMessage().
    @Override
    public void testAborted(ExtensionContext context, Throwable cause) {
        System.out.println("--------------------------");
        System.out.println("This test was aborted: " + cause.getMessage());
    }
Similarly for the testFailed, we want to say, "This test was failed: " and here, we also want to display the reason for failure in case the test failed, so we are going to use the cause.getMessage() method code.
    @Override
    public void testFailed(ExtensionContext context, Throwable cause) {
        System.out.println("--------------------------");
        System.out.println("This test was failed: " + cause.getMessage());
    }
Now we have overridden the methods from the TestWatcher Interface, and it's time to actually apply this listener to a test.
So, I'm going to the project to one of the tests that we've created - namely, the AssertionsTest.
In order for this test to run with the listener class, I'm going to, on a class level, add the @ExtendWith annotation, and here I'm going to say that I want to extend this with the Listener.class.
I will run the test so we can see the output.
So in this case, we are going to see what happens whenever these test methods are passing or are failing because we have such tests in this class.
We have 3 passed tests and 7 failed ones.
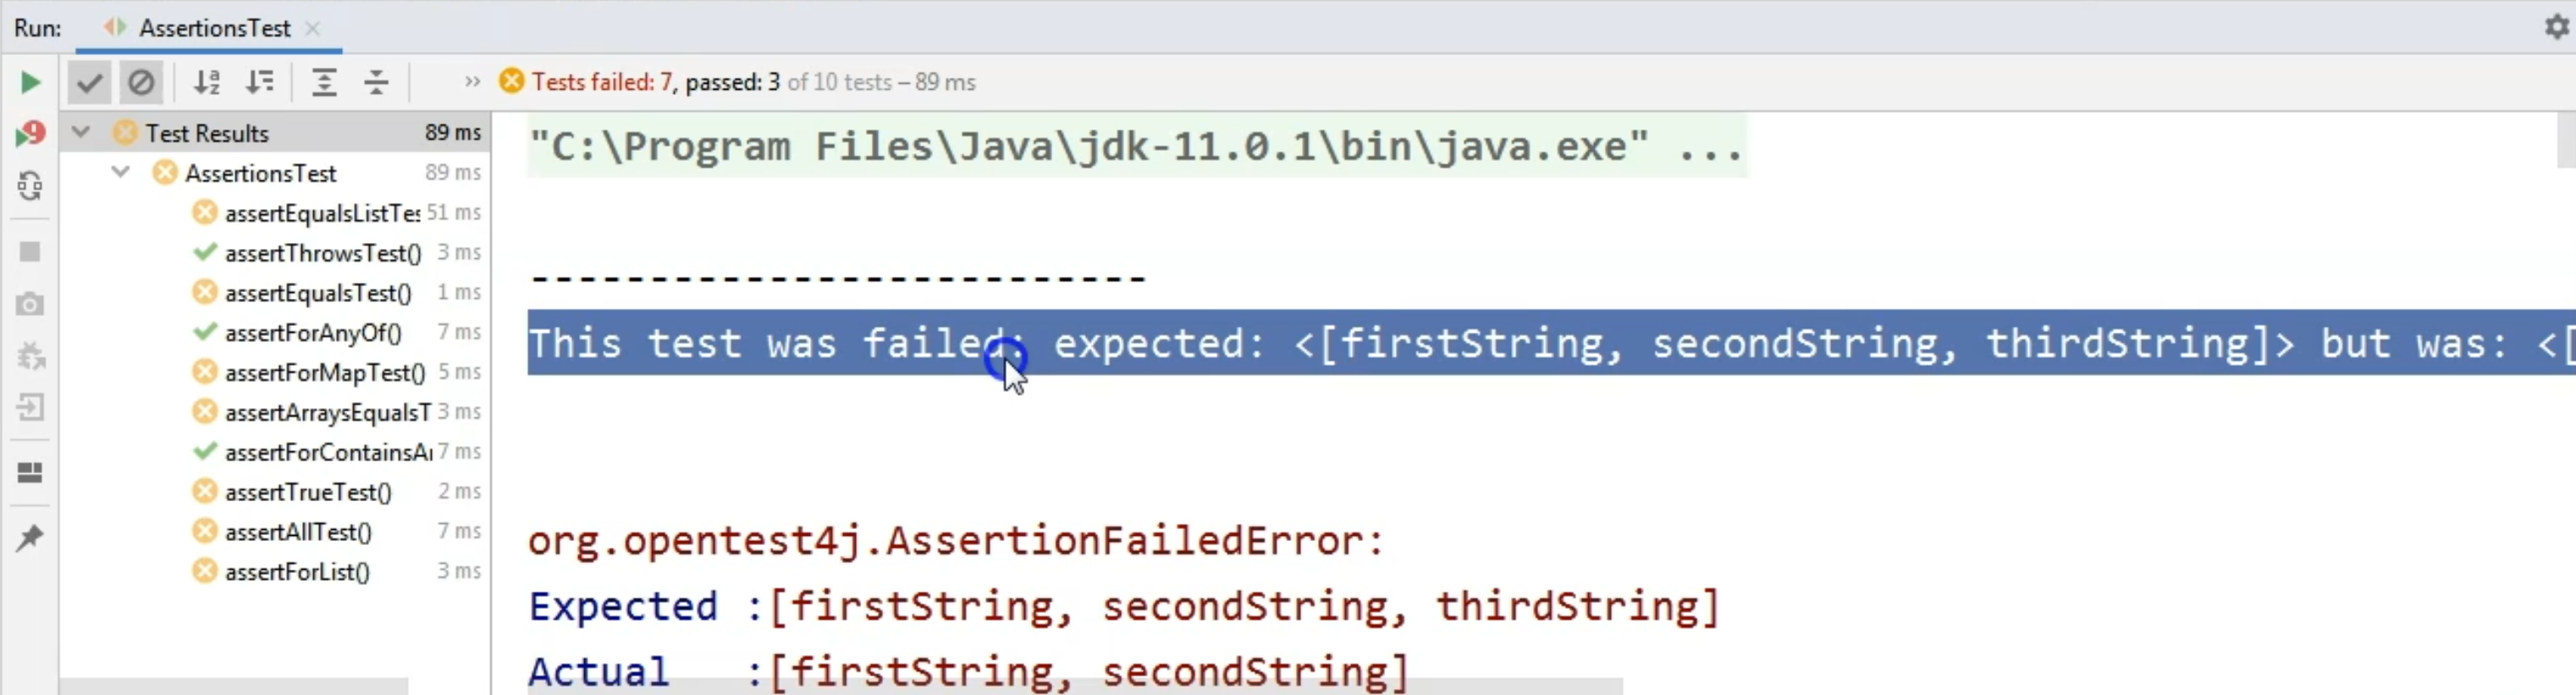
If we are looking on the right-hand side, we will see the reason for failure.
So for these tests, we can see that the test was failed because the expected was something, but the result was actually different.
So, this is the line that we added from the listener class.
This is something we would have been able to write in our report file.
By scrolling down, we will see the message for the successful run also.
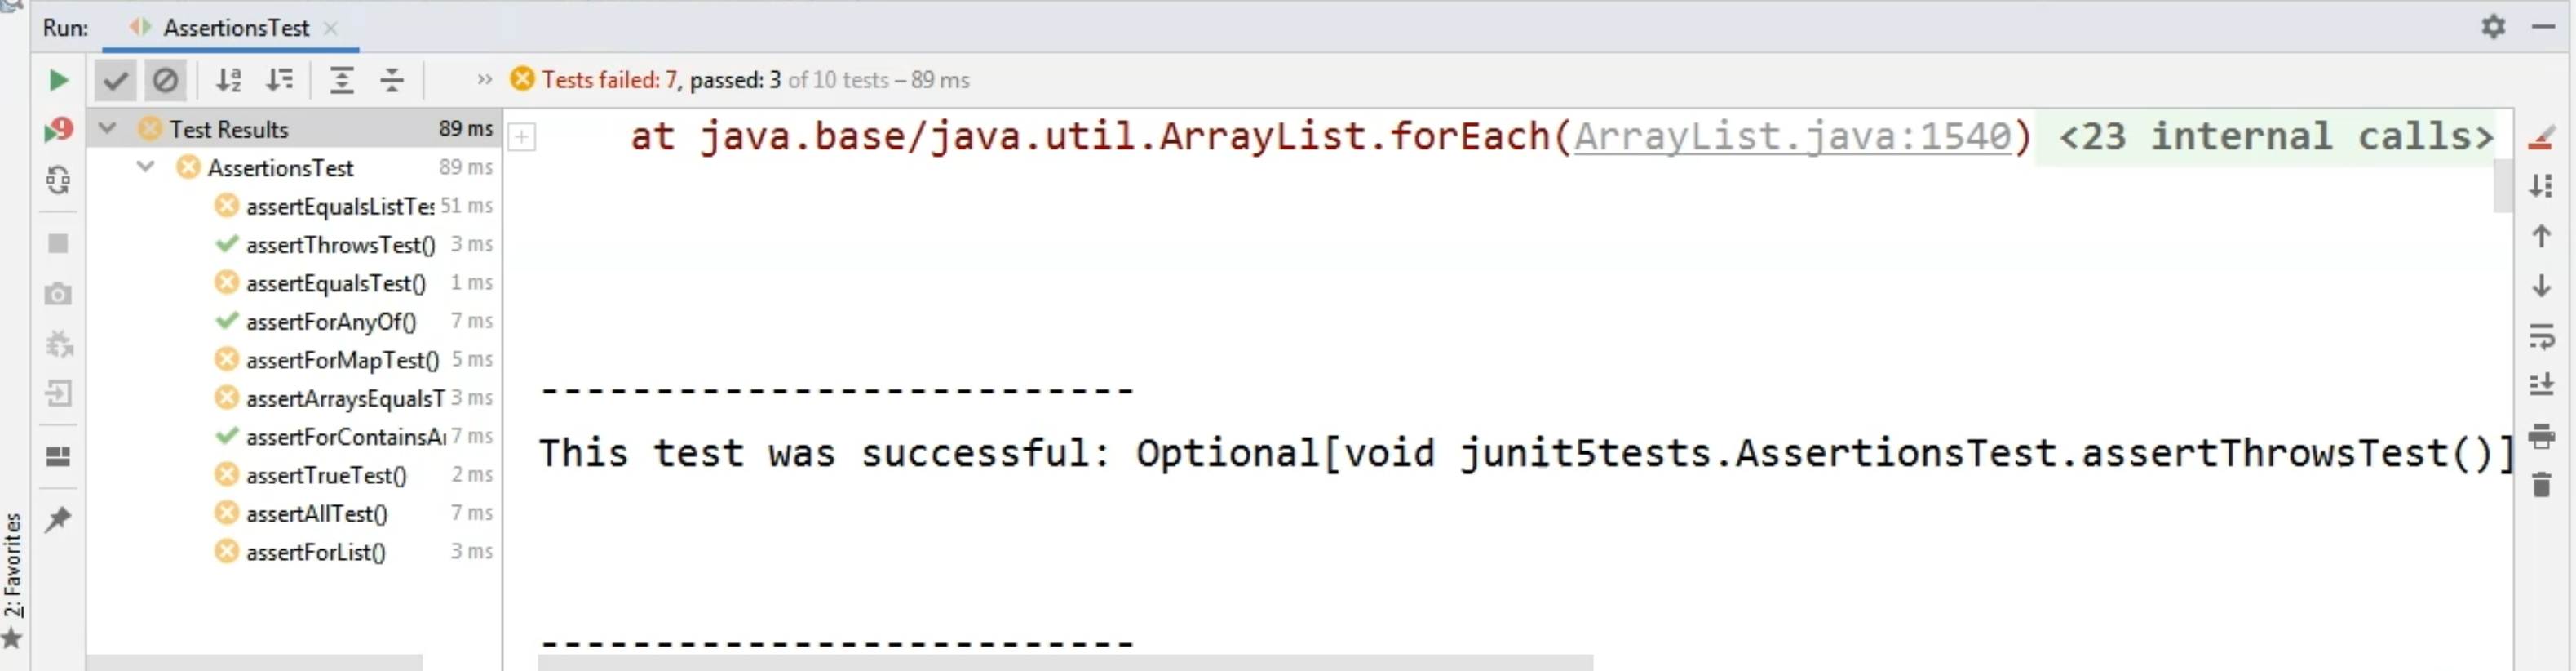
Here you can see that we have the name of the method and the class and, of course, the package from where this test was coming, because in the Listener, we had the context.getTestMethod() call here in the System.out.
This is where this information is coming from.
In order to see a disabled test, we will go to the DisabledEnabledTest class because here we have quite a few enabled and disabled tests.
For this test to use the listener, again, we will have to add it by saying @ExtendWith on a class level and specifying the Listener.class.
Then, we will run the test to see the results.

So in this case, we have 3 disabled tests and as you can see from the output, the first test was successful and this is the test with the method name fifthTest, whereas the test thirdTest was disabled.
The reason is that the system property didn't match what we were expecting.
So, this is the test disabled output, which comes from the method testDisabled.
These are a few examples of how you can use the TestWatcher Interface for creating your custom behavior for when a test finished running - namely, if the tests were disabled, successful, or if they failed.
