

Transcripted Summary
Welcome to our wrap up and review section.
In this section, we're going to:
Create a new page object for Notepad
Create a new test for Notepad
Learn sending keyboard mapped keys, like "Alt+F4"
Learn to enter and get a text area inside Notepad
There are also a few other tricks along the way. Let's begin now.
In this final lesson, we're going to learn a couple more tricks.
First, we're going to try to automate Notepad.
Notepad might seem a little bit easy, but there's a couple of things you need to note.
One is a file path.
One is to send keys to a text area.
Lastly, is to learn how to use the alt commands, or additional buttons on the keyboard.
# Coding in Java
Let's open up your IntelliJ and let's open up your project view.
You can do this by clicking on the left hand area here.
Here we're going to right-click and select "New", "Java File".
We're going to type in Notepad_test.
Inside the Notepad_test, we're going to go up to the top and do some imports first.
Since we know most of the imports from our previous projects, let's go to the CalculatorPO_test file copy the imports.
If you select all of these, right-click, "Copy", click onto your Notepad_test, right-click, and "Paste". That should get all your imports.
Don't worry if you have a light gray color, we will be utilizing all these later.
Let's add the @BeforeClass.
Now we'll put in the setup method. We can do this by typing in public void setup(){}.
Now let's set up the after class @AfterClass and the method will be public void teardown(){}.
Now we can set up our test @Test and we'll just call this public void testNotepad(){}.
Now let's make sure our test file is set up correctly.
Let's add some System.out.println statements with some key values.
We'll put "setup", enter our "teardown", and we've entered our "test".
import io.appium.java_client.windows.WindowsDriver;
import org.openqa.selenium.Keys;
import org.openqa.selenium.WebElement;
import org.openqa.selenium.interactions.Actions;
import org.openqa.selenium.remote.DesiredCapabilities;
import org.testng.Assert;
import org.testng.annotations.AfterClass;
import org.testng.annotations.BeforeClass;
import org.testng.annotations.BeforeMethod;
import org.testng.annotations.Test;

import java.net.MalformedURLException;
import java.net.URL;

public class Notepad_test {
    @BeforeClass
    public void setup(){
        System.out.println("setup");
    }

    @AfterClass
    public void teardown(){
        System.out.println("teardown");
    }

    @Test
    public void testNotepad(){
        System.out.println("test");
    }
}
Let's run this to make sure everything's working correctly before we continue.
You can right-click and say "Run 'testNotepad()'".
After it's compiling, you should run your test, and everything should come back with a check mark.

You should see a Total tests run of 1, and Passes of 1.
Up above this, you should see "setup", "test", "teardown" in the messages. These are the messages that we just printed.
Let's continue - we'll minimize this console.
Now let's create a Notepad page object.
We'll right-click on the java folder, "New", "Java Class".
We'll call this Notepad_PO.
First, let's add the imports to this Notepad_PO.
We'll utilize the same imports from Calc_PO.
Let's copy these two imports - right-click, Copy, go to Notepad_PO, right-click, Paste.
Now that we've pasted, let's create our base object.
Now that we have the imports, let's create our basic constructor.
Create a new line and type in public.
The class constructor name has to be the same as the class and the file name.
In this instance, it would be Notepad_PO().
import io.appium.java_client.windows.WindowsDriver;
import org.openqa.selenium.WebElement;

public class Notepad_PO {

    public Notepad_PO(WindowsDriver wd){

    }
}
Let's look at our Calc_PO for some inspiration on what we did previously.
You'll notice that we have a class level variable WindowsDriver - this allows us to use the WindowsDriver throughout the different methods.
Next, we have the public Calc_PO, and remember here we passed in the WindowsDriver and we called it wd.
Next, we assigned a wd object to the driver object - this will allow us to utilize the driver throughout the page object.
Let's continue to do that now.
First, we will declare the WindowsDriver - we'll assign it to null.
Next, we are going to have the WindowsDriver value passed in - we'll call this wd.
Now we will assign wd to the driver object.
import io.appium.java_client.windows.WindowsDriver;
import org.openqa.selenium.WebElement;

public class Notepad_PO {
    WindowsDriver driver = null;
    public Notepad_PO(WindowsDriver wd){
        driver = wd;
    }
}
Now we're ready to begin.
Now we can continue to add the rest of the page objects.
Let's open up Notepad, and open up the Accessibility Insights.
If you have a shortcut in your taskbar, you can click on this Notepad, or you can click on the "Start" button and type in "notepad".
If you don't have your Accessibility Insights already open, remember you can go to your "Start"
button and type in "Accessibility Insights".
Once Accessibility Insights is open, go ahead and enable the highlighter, and continue the UI automation tree.
There's lots of things to identify but the key is, let's try to identify as many objects at the same time as possible.
Most of these elements will have a similar pattern to how we identify them and how we utilize them.
Previously, we've never looked at the "Minimize", "Maximize", and the "Close" buttons - let's see how we can utilize these.
If you hover over the "Minimize", you should see "button 'Minimize'". Quickly scroll over to pause.
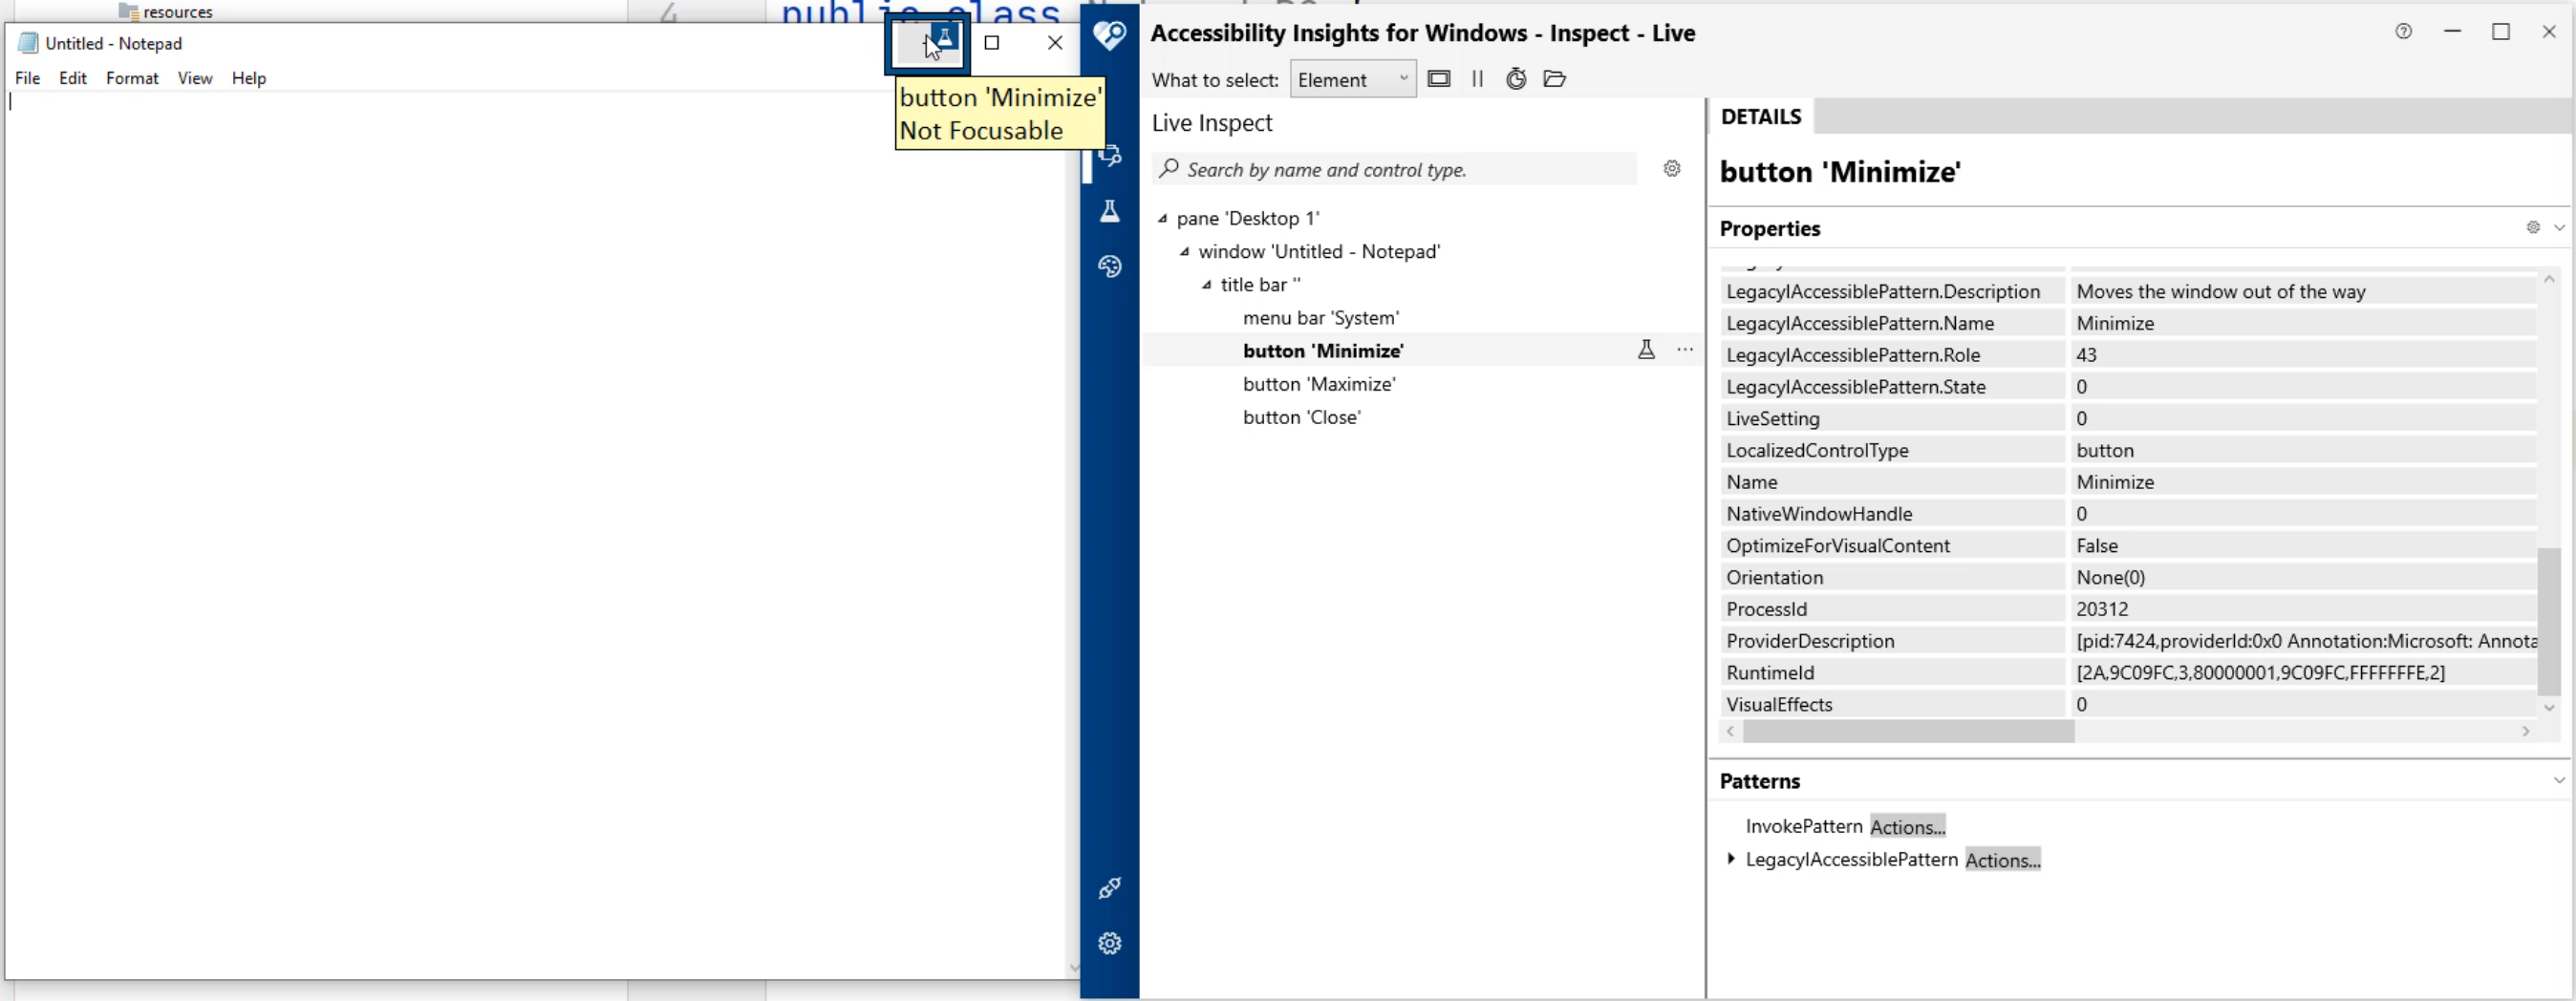
Now that we have paused the UI automation tree, we can see "button 'Minimize'", "Maximize", and "Close".
Let's quickly scroll through this and figure out what we can utilize.
One thing we've noticed - there's no AutomationId - this means we can't utilize the accessibility ID.
There's also no class name so we can't utilize the class name.
But we do have a name - we'll utilize the name instead of using Xpath.
Using the name to identify the element will be a lot easier and minimize our code.
Let's go ahead and add the "Minimize", "Maximize", and "Close".
We'll also go ahead and turn off the highlighter and minimize Accessibility Insights.
Previously, for these page object elements, we did public WebElement, and then we gave it a name - we are going to call it minimize.
Here we're going to start with return driver.findElementByName("Minimize");
Now let's copy this method and change the name, change the button locator for "Maximize" and "Close".
import io.appium.java_client.windows.WindowsDriver;
import org.openqa.selenium.WebElement;

public class Notepad_PO {
    WindowsDriver driver = null;
    public Notepad_PO(WindowsDriver wd){
        driver = wd;
    }

    public WebElement minimize(){
        return driver.findElementByName("Minimize");
    }

    public WebElement maximize(){
        return driver.findElementByName("Maximize");
    }

    public WebElement close(){
        return driver.findElementByName("Close");
    }
}
Let's go back to Accessibility Insights and see if these are correct.
We should see "Minimize", "Maximize", and "Close".
Let's open up Notepad again and let's open up Accessibility Insights, enable the highlighter. and resume the UI automation tree.
Next, we are going to look at the file menu area.
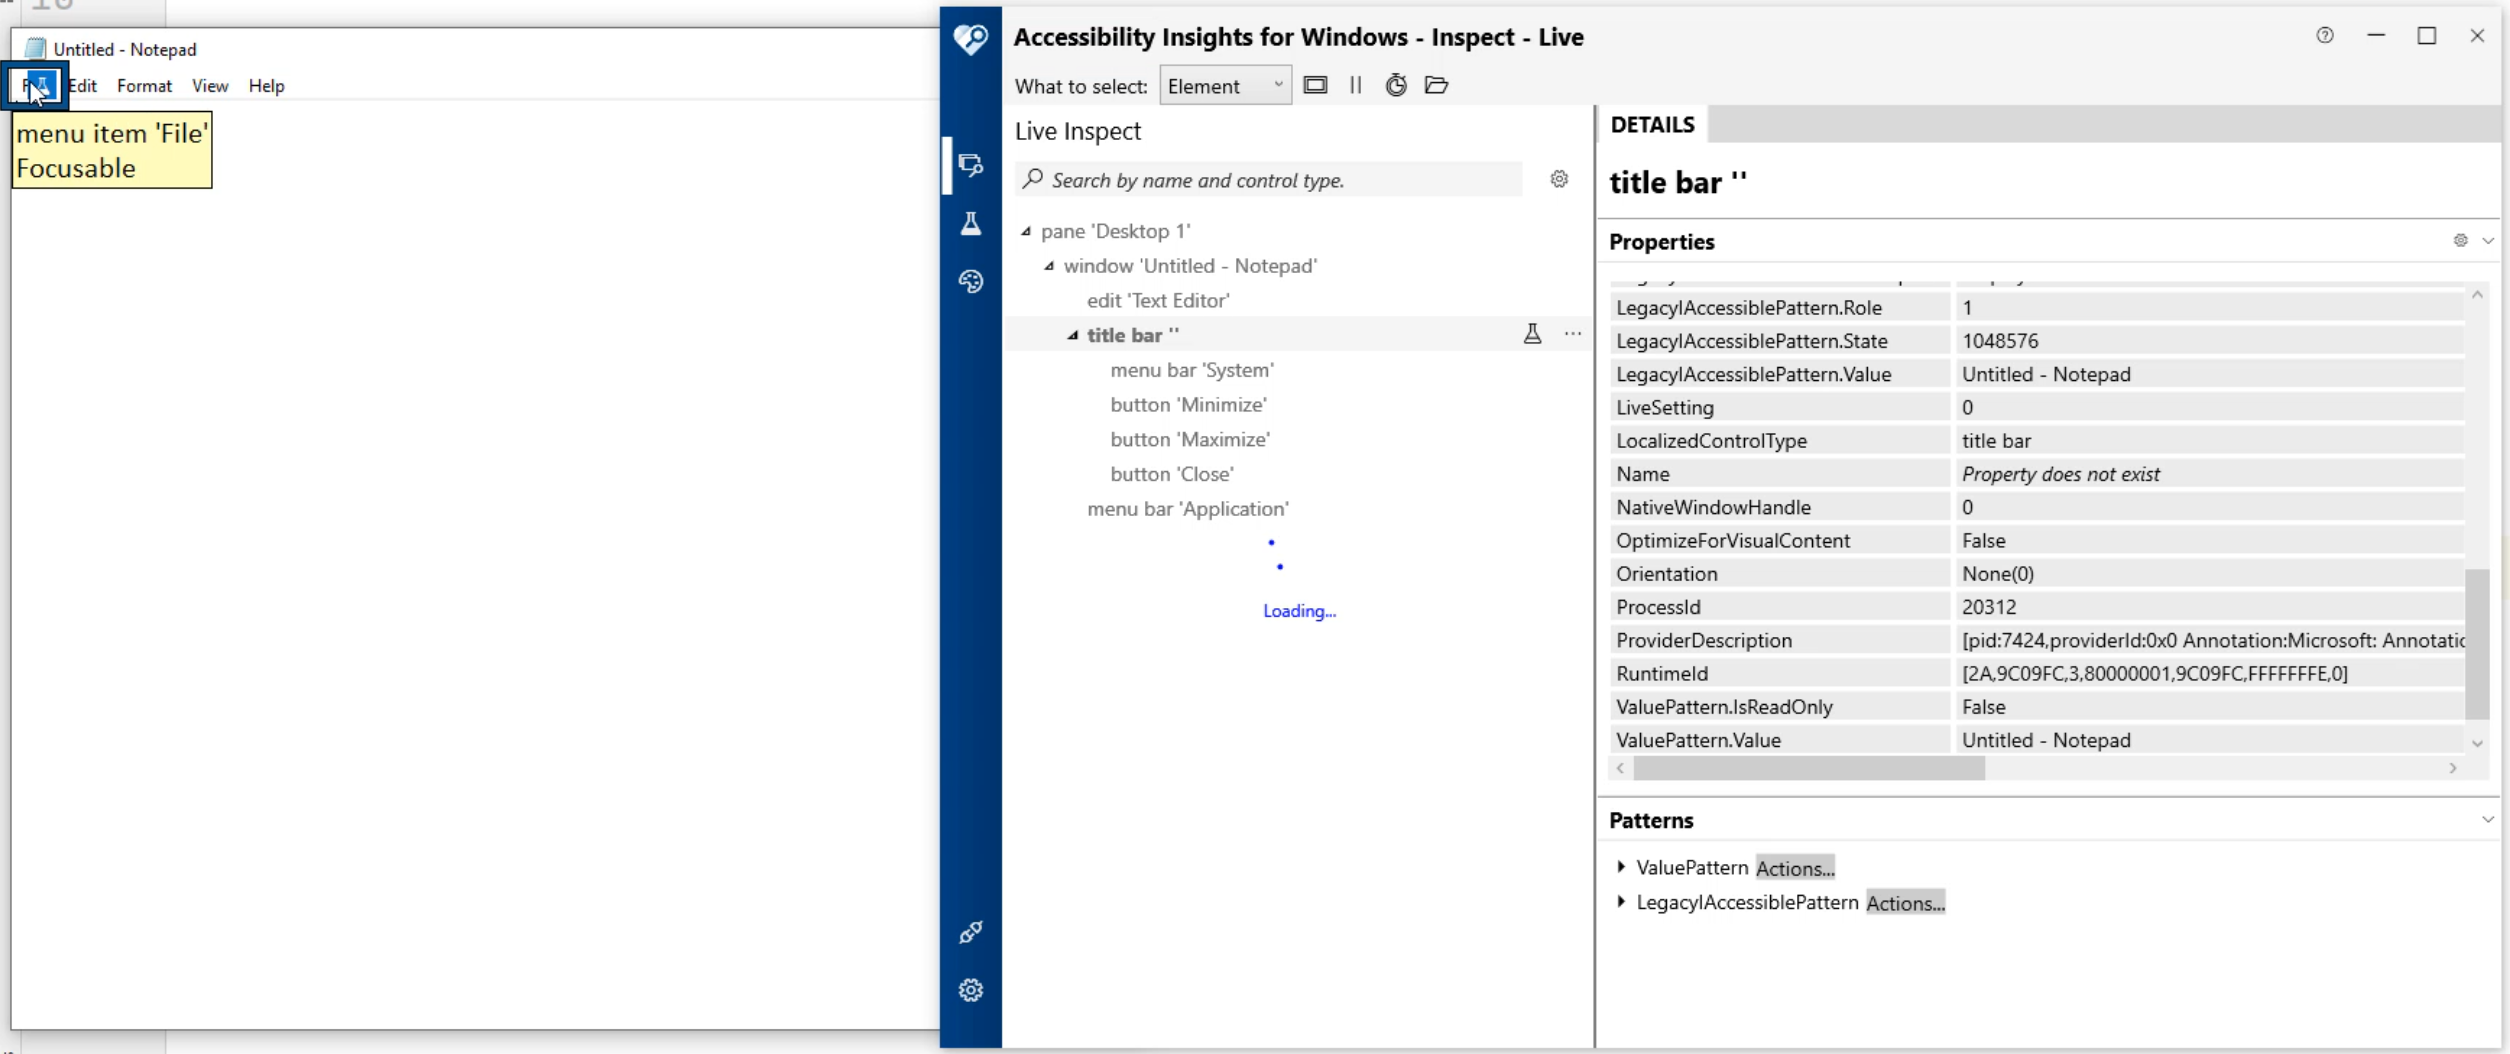
You hit pause and now you have 'File', 'Edit', 'Format', 'View', 'Help'.
If you scroll up in your details view, you should see a bunch of other values.
Notice there's no "AutomationId", and there's no "ClassName", but we are left with a "Name".
Let's continue to use "Name".
We will now minimize Accessibility Insights for Windows, and minimize Notepad.
This time we'll change the method name to menuFile and then we are trying to find this "File". I'll let you add the rest of these.
Now let's figure out how we can utilize the text area.
Open up Notepad, and open up Accessibility Insights.
Let's enable the record, enable the highlighter.
Once you hover over the text area, you should be able to pause this again.
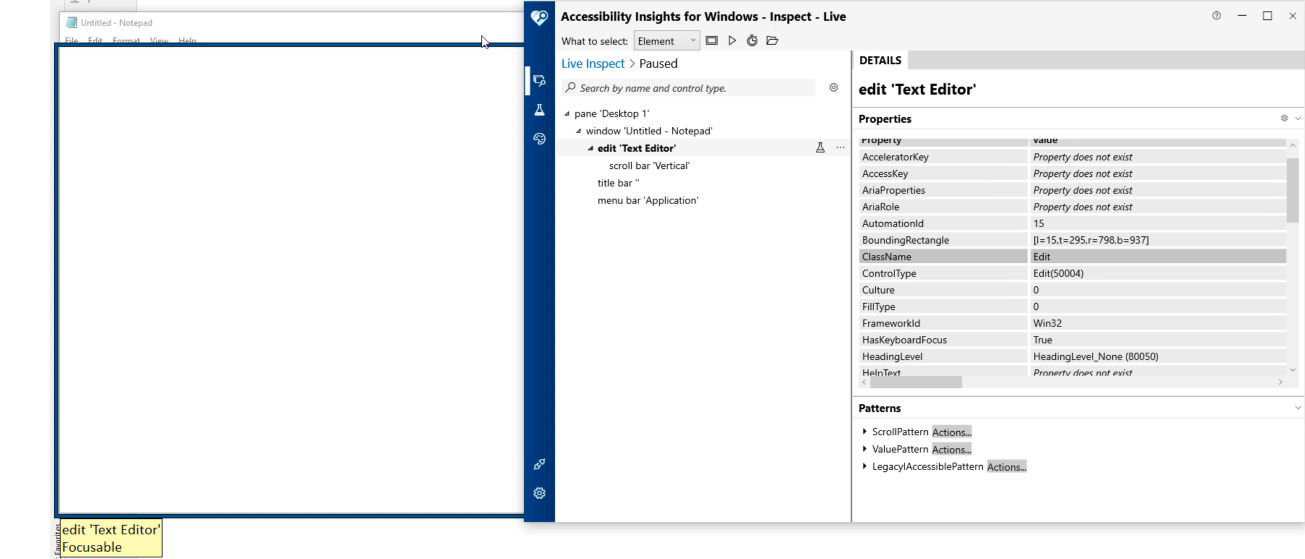
Let's look at the details of the text area to see what we can utilize.
Here you have the option of using "AutomationId" "15" - that's not very descriptive.
It's difficult for us to look at a value "15" and know what we were trying to identify by.
In the future, when somebody is trying to maintain your script, if this value changes from 15 to 16, it is difficult to understand which element you should be looking for.
So instead, we're going to look for something that's more descriptive.
We have the "ClassName" called "Edit" - that's one possibility.
And we also have the "Name", "Text Editor".
You can choose to use a "Text Editor" or the class name - I will leave that up to you.
In my example, I'm going to use "ClassName".
We'll minimize these two, don't forget to turn off your highlighter.
We'll copy this method again and this time we are going to type in textArea and we're going to change this method to findElementByClassName and the area is going to be called "Edit".
import io.appium.java_client.windows.WindowsDriver;
import org.openqa.selenium.WebElement;

public class Notepad_PO {
    WindowsDriver driver = null;
    public Notepad_PO(WindowsDriver wd){
        driver = wd;
    }

    public WebElement minimize(){
        return driver.findElementByName("Minimize");
    }

    public WebElement maximize(){
        return driver.findElementByName("Maximize");
    }

    public WebElement close(){
        return driver.findElementByName("Close");
    }
    public WebElement menuFile(){
        return driver.findElementByName("File");
    }

    public WebElement textArea(){
        return driver.findElementByClassName("Edit");
    }
}
This should be sufficient enough to run our test, but let's give you a couple more things.
We have never covered how to automate the Windows dialogue.
We can see this as an example in Notepad.
Go ahead and open up your Notepad application.
Enter some text, select "File" and select "Exit" - here's your Windows dialog.
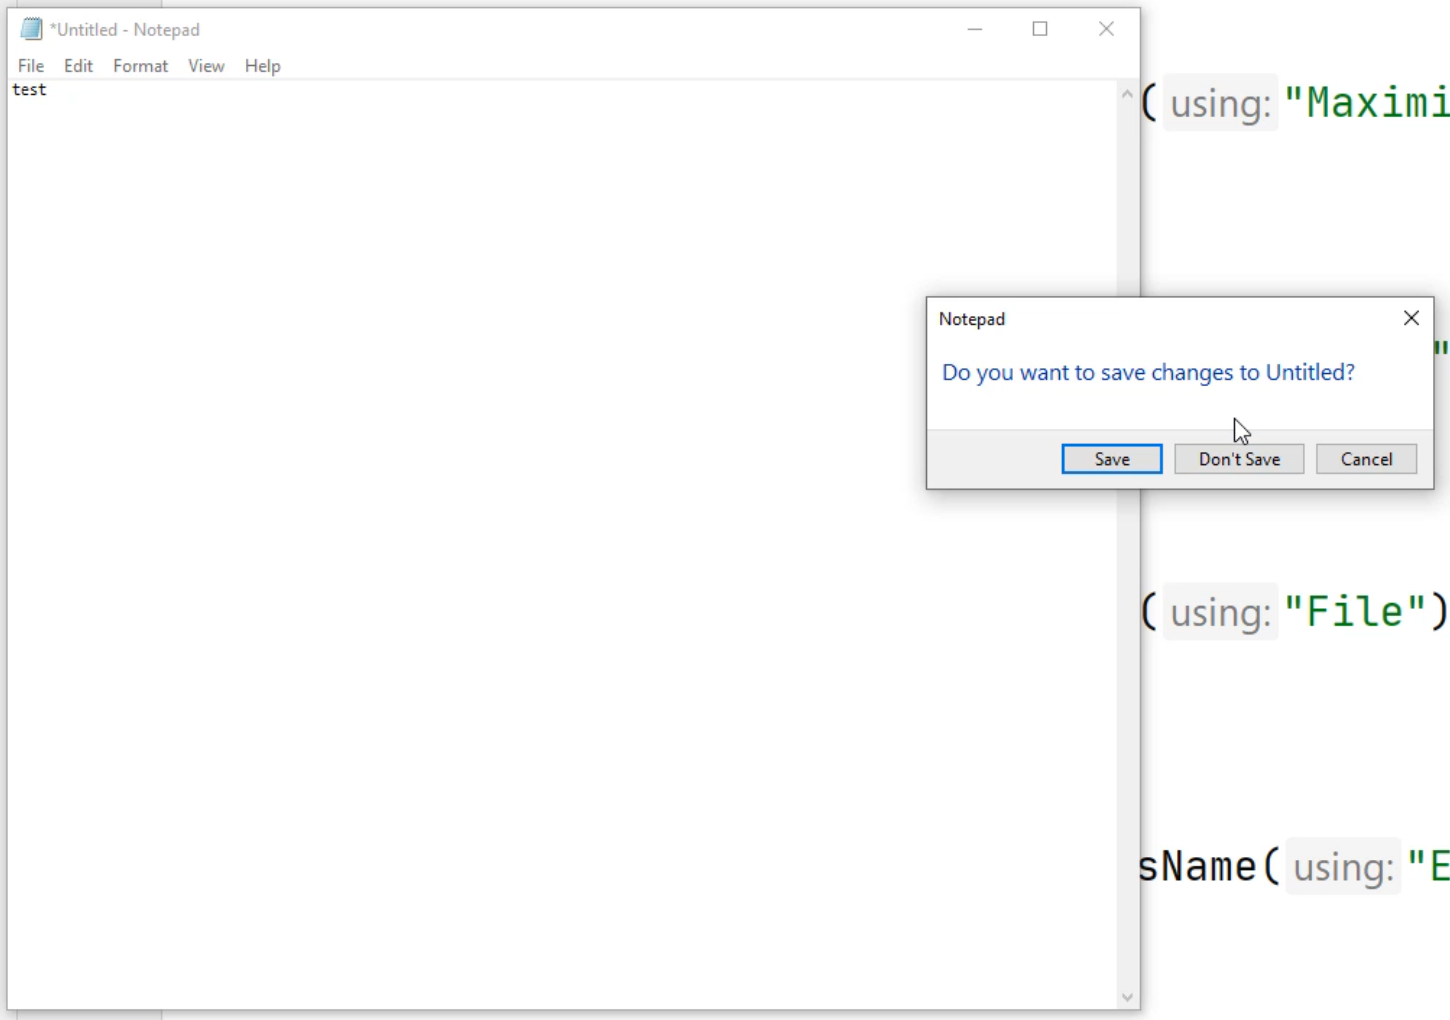
We have never automated anything in here.
Let's open up our Accessibility Insights and see how we can automate these three buttons. Enable the highlighter, and resume the automation tree.
Here you can see that it's just a "button 'Save'", "button 'Don't Save'", and "button 'Cancel'".
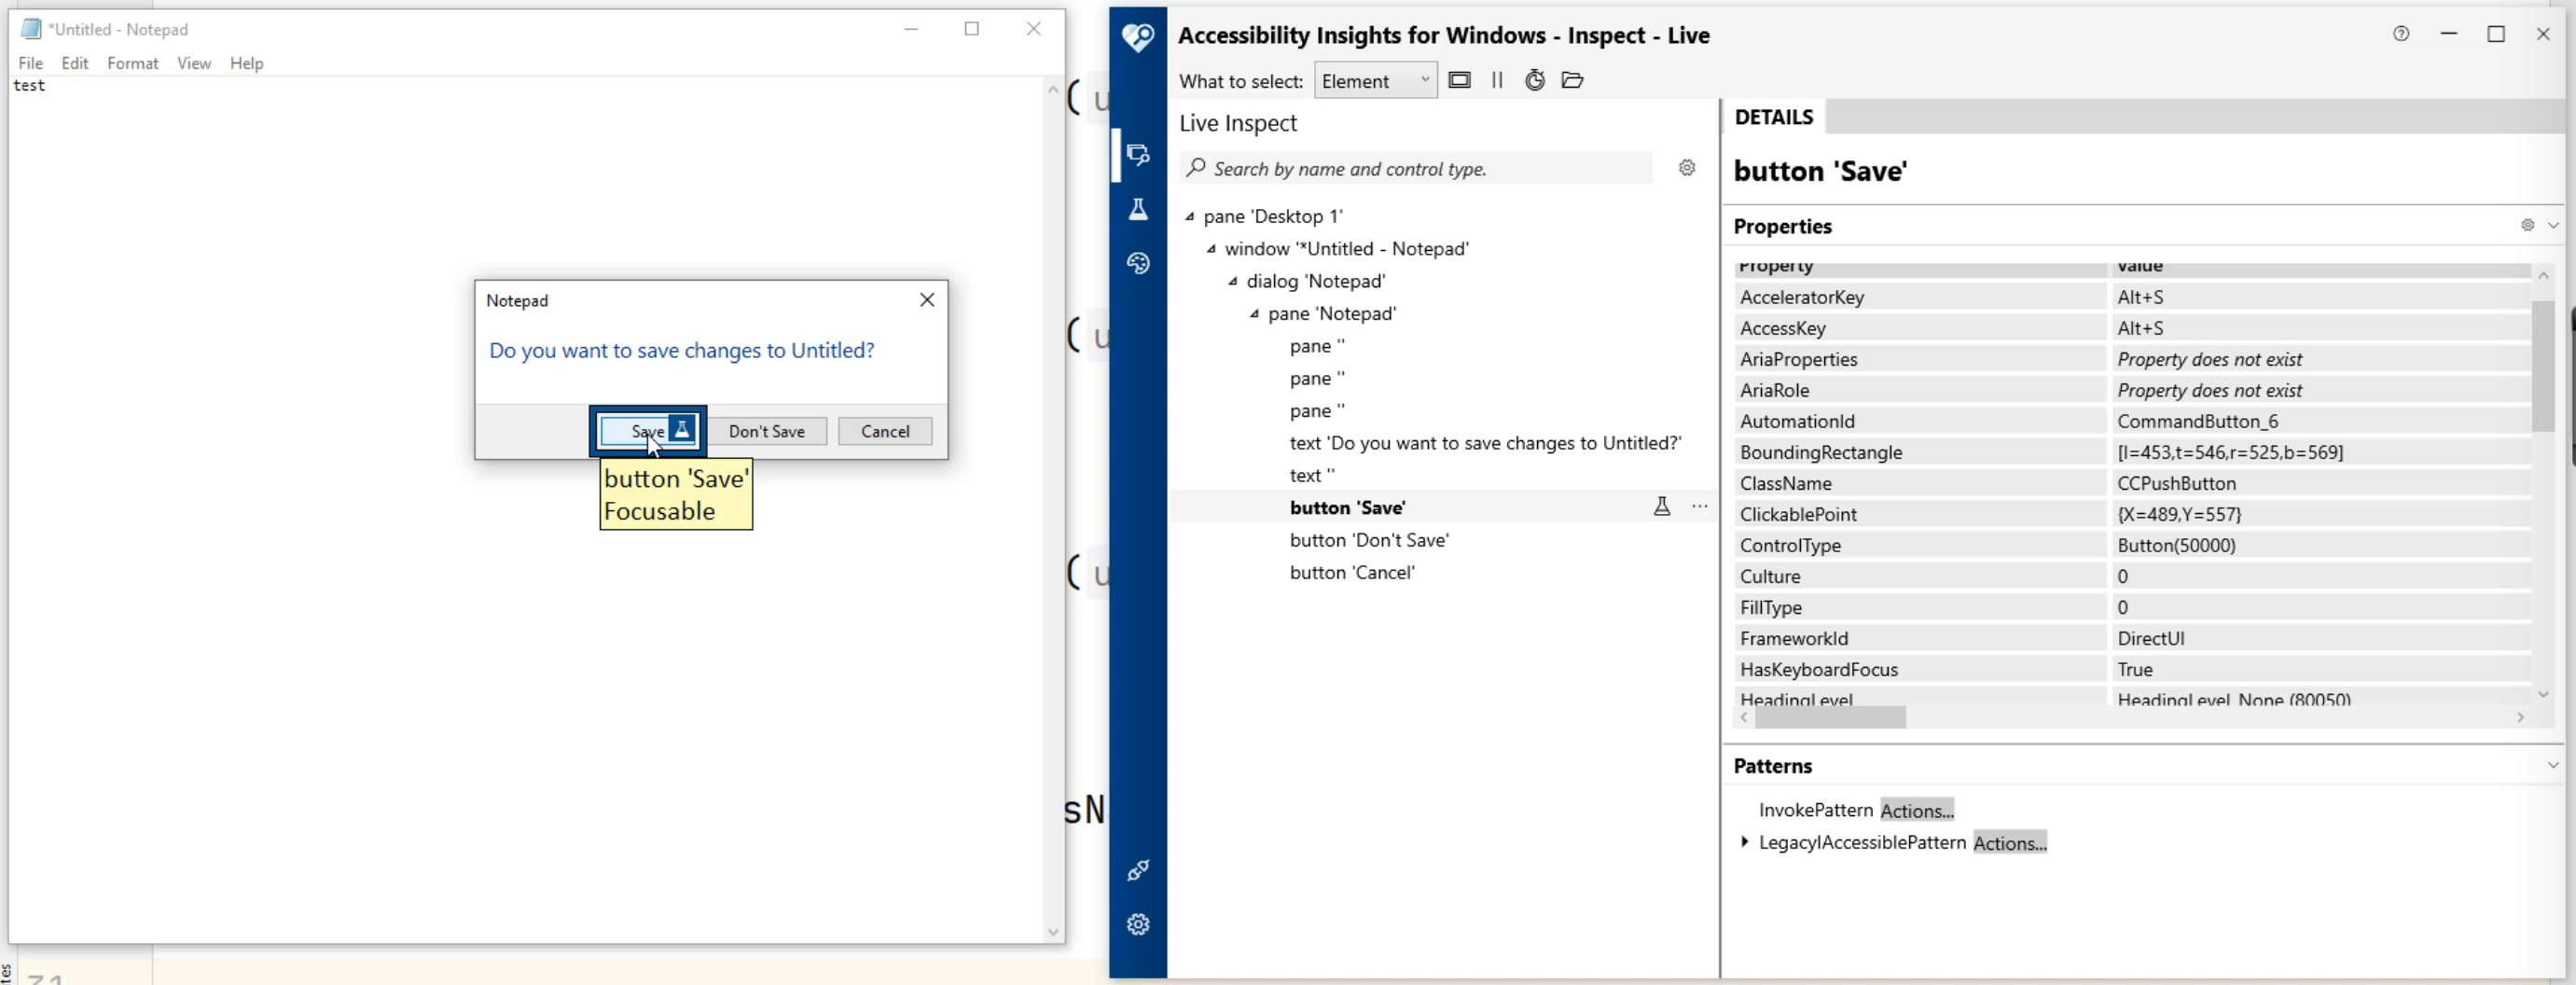
Let's pause this again, disable the highlight, and let's look at these three.
We have "button 'Save'", with "AutomationId" "CommandButton_6" - that's not very easy to use. Again, it's a vague locator.
Let's continue to scroll down.
We do have a "ClassName". However, let's look at the "Don't Save" button - the "ClassName" is the same - it says "CCPushButton".
For "Cancel", it's the same "CCPushButton", so we can't utilize the "ClassName" in this example.
Let's continue to scroll down the details.
We do have a value "Name" and it's "Cancel". Is this unique?
Here it says "Name", "Don't Save" for the "Don't Save" button, and the "Save" button says "Name", "Save". This is a great option to use.
We'll just use the "Name" now.
Let's minimize your Accessibility Insights and let's go back to your IDE.
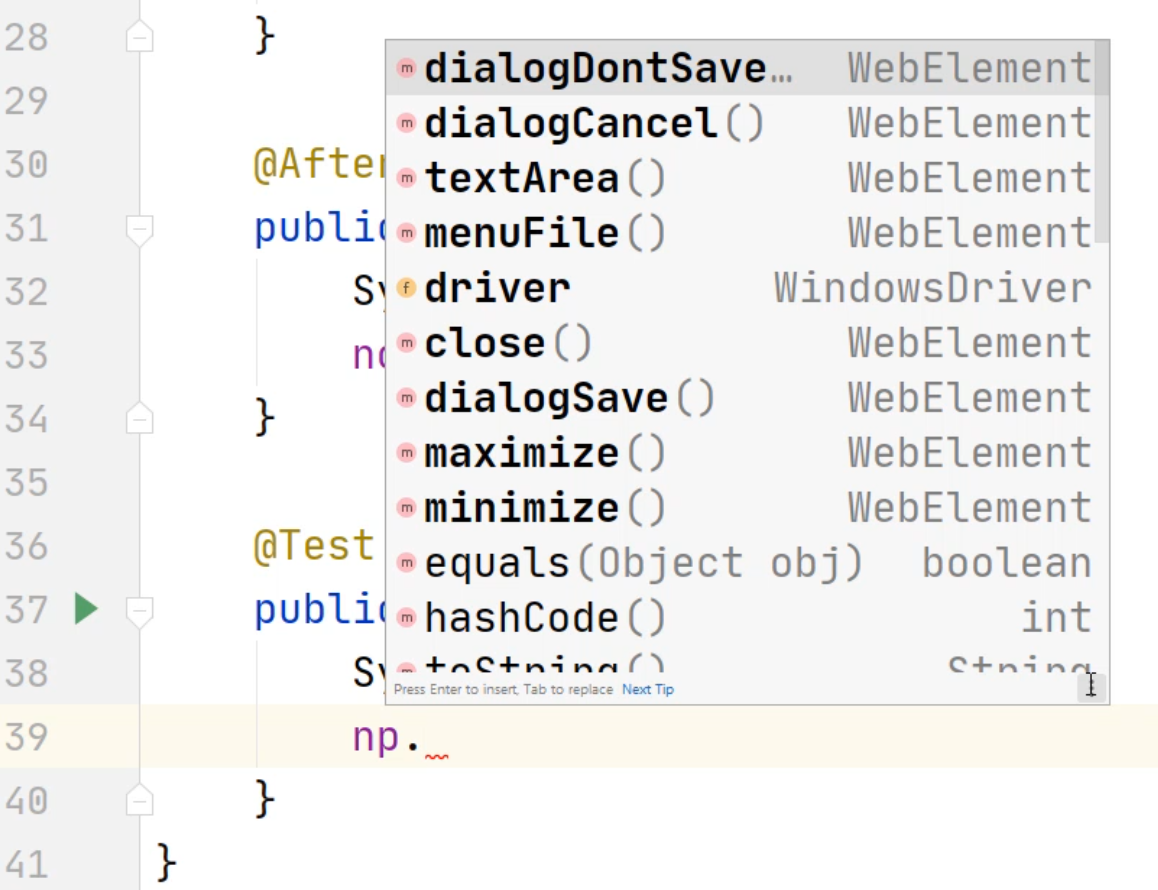
Since we are using "Name", we'll just copy and paste this method we previously created.
Now we'll change this name to dialogueSave.
We'll find an element by name using the value "Save".
Here we'll create two more methods - one's called dialogDontSave and one will be called Cancel.
The value for dialogDontSave is "Don't Save" and for dialogCancel, it's "Cancel".
import io.appium.java_client.windows.WindowsDriver;
import org.openqa.selenium.WebElement;

public class Notepad_PO {
    WindowsDriver driver = null;
    public Notepad_PO(WindowsDriver wd){
        driver = wd;
    }

    public WebElement minimize(){
        return driver.findElementByName("Minimize");
    }

    public WebElement maximize(){
        return driver.findElementByName("Maximize");
    }

    public WebElement close(){
        return driver.findElementByName("Close");
    }
    public WebElement menuFile(){
        return driver.findElementByName("File");
    }

    public WebElement textArea(){
        return driver.findElementByClassName("Edit");
    }

    public WebElement dialogSave(){
        return driver.findElementByName("Save");
    }

    public WebElement dialogDontSave(){
        return driver.findElementByName("Don't Save");
    }

    public WebElement dialogCancel(){
        return driver.findElementByName("Cancel");
    }
}
Now at this point, we should be able to go back to our Notepad_test and create our test.
Let's go ahead and open up that file now.
Now we need to add the information for the @BeforeClass, the @AfterClass, and the set up steps.
Let's do a review of our CalculatorPO_test.
Here we have a class variable WindowsDriver of calcsession.
This time we're going to change this value to notepad. Let's go ahead and copy this line of code.
Now let's set up the @BeforeClass.
In the @BeforeClass, we had the DesiredCapabilities capabilities.
Remember that in the setCapability we have to pass in the value of the application. We'll find that in a minute here.
We also have a try/catch, the calcsession which is a WindowsDriver object, a new WindowsDriver object and the Calc_PO.
This time we're going to change this to Notepad_PO, so let's go ahead and copy and paste these three lines of code.
We have to change some references now.
This isn't going to be called calcsession anymore - this is going to be called notepad.
Here we have another reference to Notepad - let's change this.
Here we have a c value.
Let's go back to the calc PO test and see what we're missing.
That's right - at the very top, we declared a private class called Calc_PO assigned it to value c - it was set to null.
Let's go ahead and copy this line of code and paste this at the top of our class.
We're not going to use a Calc_PO, but this time we are going to use Notepad_PO and now we can use variable c.
However, we also have to change this reference to calc PO.
It looks better now except I don't like this value c - let's change it to np.
Now we have our setup method completed.
import io.appium.java_client.windows.WindowsDriver;
import org.openqa.selenium.Keys;
import org.openqa.selenium.WebElement;
import org.openqa.selenium.interactions.Actions;
import org.openqa.selenium.remote.DesiredCapabilities;
import org.testng.Assert;
import org.testng.annotations.AfterClass;
import org.testng.annotations.BeforeClass;
import org.testng.annotations.BeforeMethod;
import org.testng.annotations.Test;

import java.net.MalformedURLException;
import java.net.URL;

public class Notepad_test {
    private WindowsDriver notepad = null;
    private Notepad_PO np = null;
    @BeforeClass
    public void setup(){
        System.out.println("setup");
        DesiredCapabilities capabilities = new DesiredCapabilities();
        capabilities.setCapability("app","c:\\windows\\system32\\notepad.exe");
        try {
            notepad = new WindowsDriver(new URL("http://127.0.0.1:4723"), capabilities);
            np = new Notepad_PO(notepad);
        } catch (MalformedURLException e) {
            e.printStackTrace();
        }
    }

    @AfterClass
    public void teardown(){
        System.out.println("teardown");
    }

    @Test
    public void testNotepad(){
        System.out.println("test");
    }
}
Let's finish up the teardown method.
Create a new line - we will enter notepad.quit() - this will quit out of the driver session.
import io.appium.java_client.windows.WindowsDriver;
import org.openqa.selenium.Keys;
import org.openqa.selenium.WebElement;
import org.openqa.selenium.interactions.Actions;
import org.openqa.selenium.remote.DesiredCapabilities;
import org.testng.Assert;
import org.testng.annotations.AfterClass;
import org.testng.annotations.BeforeClass;
import org.testng.annotations.BeforeMethod;
import org.testng.annotations.Test;

import java.net.MalformedURLException;
import java.net.URL;

public class Notepad_test {
    private WindowsDriver notepad = null;
    private Notepad_PO np = null;
    @BeforeClass
    public void setup(){
        System.out.println("setup");
        DesiredCapabilities capabilities = new DesiredCapabilities();
        capabilities.setCapability("app","c:\\windows\\system32\\notepad.exe");
        try {
            notepad = new WindowsDriver(new URL("http://127.0.0.1:4723"), capabilities);
            np = new Notepad_PO(notepad);
        } catch (MalformedURLException e) {
            e.printStackTrace();
        }
    }

    @AfterClass
    public void teardown(){
        System.out.println("teardown");
        notepad.quit();
    }

    @Test
    public void testNotepad(){
        System.out.println("test");
    }
}
Now let's fill up our test.
First, with our test, we're going to create a new line, and we're going to type in np. - here we all the methods that we previously created.
Let's do the first one - let's do a textArea() and in the text area, we're going to do a ., and now we can see the other actions that we can perform.
The very top one is sendKeys().
If you don't see sendKeys, you can start typing in sendKeys() and you can put in your sequence.
Notice the popup tooltip says "CharSequence" - now let's enter our sequence.
We're going to type in, "Windriver is awesome".
At this point if you want to, we can do an assertion.
Type in assert.assertEquals(np.textArea().getText(), "Windriver is awesome") - this should get the value of the text and the value should be "WinDriver is awesome".
Now let's do some more send keys.
You might ask, "Well, where should I do the sendkeys because I don't want the send keys in the text area?"
If you open up Notepad, you'll notice a dialogue was still open previously - let's click on "Cancel" here.
Let's look at the hot keys that we have within our application.
If you click on "File", you'll notice that we have "New Window", "Open".
Your hot keys are going to be the "Ctrl+O", "Ctrl+N", or the "Ctrl+S".
You can either trigger these hot keys directly inside your code, or you can click on the file menu and select one of these options.
Clicking on the file menu selecting one of these options is a little more tedious. However, it can be done.
In our example, we're going to send these system keys.
To do the exit, the universal hotkey to quit is "Alt+F4" - so that's what we will send now.
Let's go ahead and minimize Notepad. We're going to do sendkeys in the text area.
We'll type in np.textArea().sendKeys() - this time instead of putting quotations, we're going to put our key sequence - we're going to type in Keys.ALT, Keys.F4.
Now you'll notice Keys is red - that's because we haven't imported it to our class yet. You can do "Alt+Enter" to automatically import it.
The tooltip typically will tell you what the best import is going to be.
Notice here it says "org.openqa.selenium.Keys" - let's do "Alt+Enter". There, that imported correctly.
You'll notice that if we do an "Alt+F4" at this point, now remember you will see the dialogue.
Let's do np.dialogueCancel().click(); - that should click the cancel button.
Now we'll type in np.textArea() and we'll do the same send keys.
We'll do Keys.ALT, Keys.F4.
We should see the dialogue again.
Next we'll do an np.dialogueDontSave().click();.
At this point, it should leave our Notepad application closed.
import io.appium.java_client.windows.WindowsDriver;
import org.openqa.selenium.Keys;
import org.openqa.selenium.WebElement;
import org.openqa.selenium.interactions.Actions;
import org.openqa.selenium.remote.DesiredCapabilities;
import org.testng.Assert;
import org.testng.annotations.AfterClass;
import org.testng.annotations.BeforeClass;
import org.testng.annotations.BeforeMethod;
import org.testng.annotations.Test;

import java.net.MalformedURLException;
import java.net.URL;

public class Notepad_test {
    private WindowsDriver notepad = null;
    private Notepad_PO np = null;
    @BeforeClass
    public void setup(){
        System.out.println("setup");
        DesiredCapabilities capabilities = new DesiredCapabilities();
        capabilities.setCapability("app","c:\\windows\\system32\\notepad.exe");
        try {
            notepad = new WindowsDriver(new URL("http://127.0.0.1:4723"), capabilities);
            np = new Notepad_PO(notepad);
        } catch (MalformedURLException e) {
            e.printStackTrace();
        }
    }

    @AfterClass
    public void teardown(){
        System.out.println("teardown");
        notepad.quit();
    }

    @Test
    public void testNotepad(){
        System.out.println("test");
        np.textArea().sendKeys("Windriver is awesome");
        Assert.assertEquals(np.textArea().getText(), "Windriver is awesome");
        np.textArea().sendKeys(Keys.ALT, Keys.F4);
        np.dialogCancel().click();
        np.textArea().sendKeys(Keys.ALT, Keys.F4);
        np.dialogDontSave().click();
    }
}
Let's see how this works.
If you still have Notepad open like I do, go ahead and click "Close" and hit "Don't Save". You shouldn't have Notepad open anymore. Let's run this now.
Uh-oh, did you notice that I opened up Calculator instead of Notepad? That's because we forgot to change the application name.
Let's minimize our console, and let's go find our application name.
Remember here's our application name that we forgot to change? Let's get this value changed.
We'll leave that value there as an example of what it should look like.
Let's open up Accessibility Insights, and let's open up Notepad. We'll enable the highlighter and resume the automation tree to find the application name.
But what you need to do is scroll down all the way to your taskbar.
Here you will see your application running.
Hover over to the Notepad area, and you'll see which one has a Notepad application that's open.
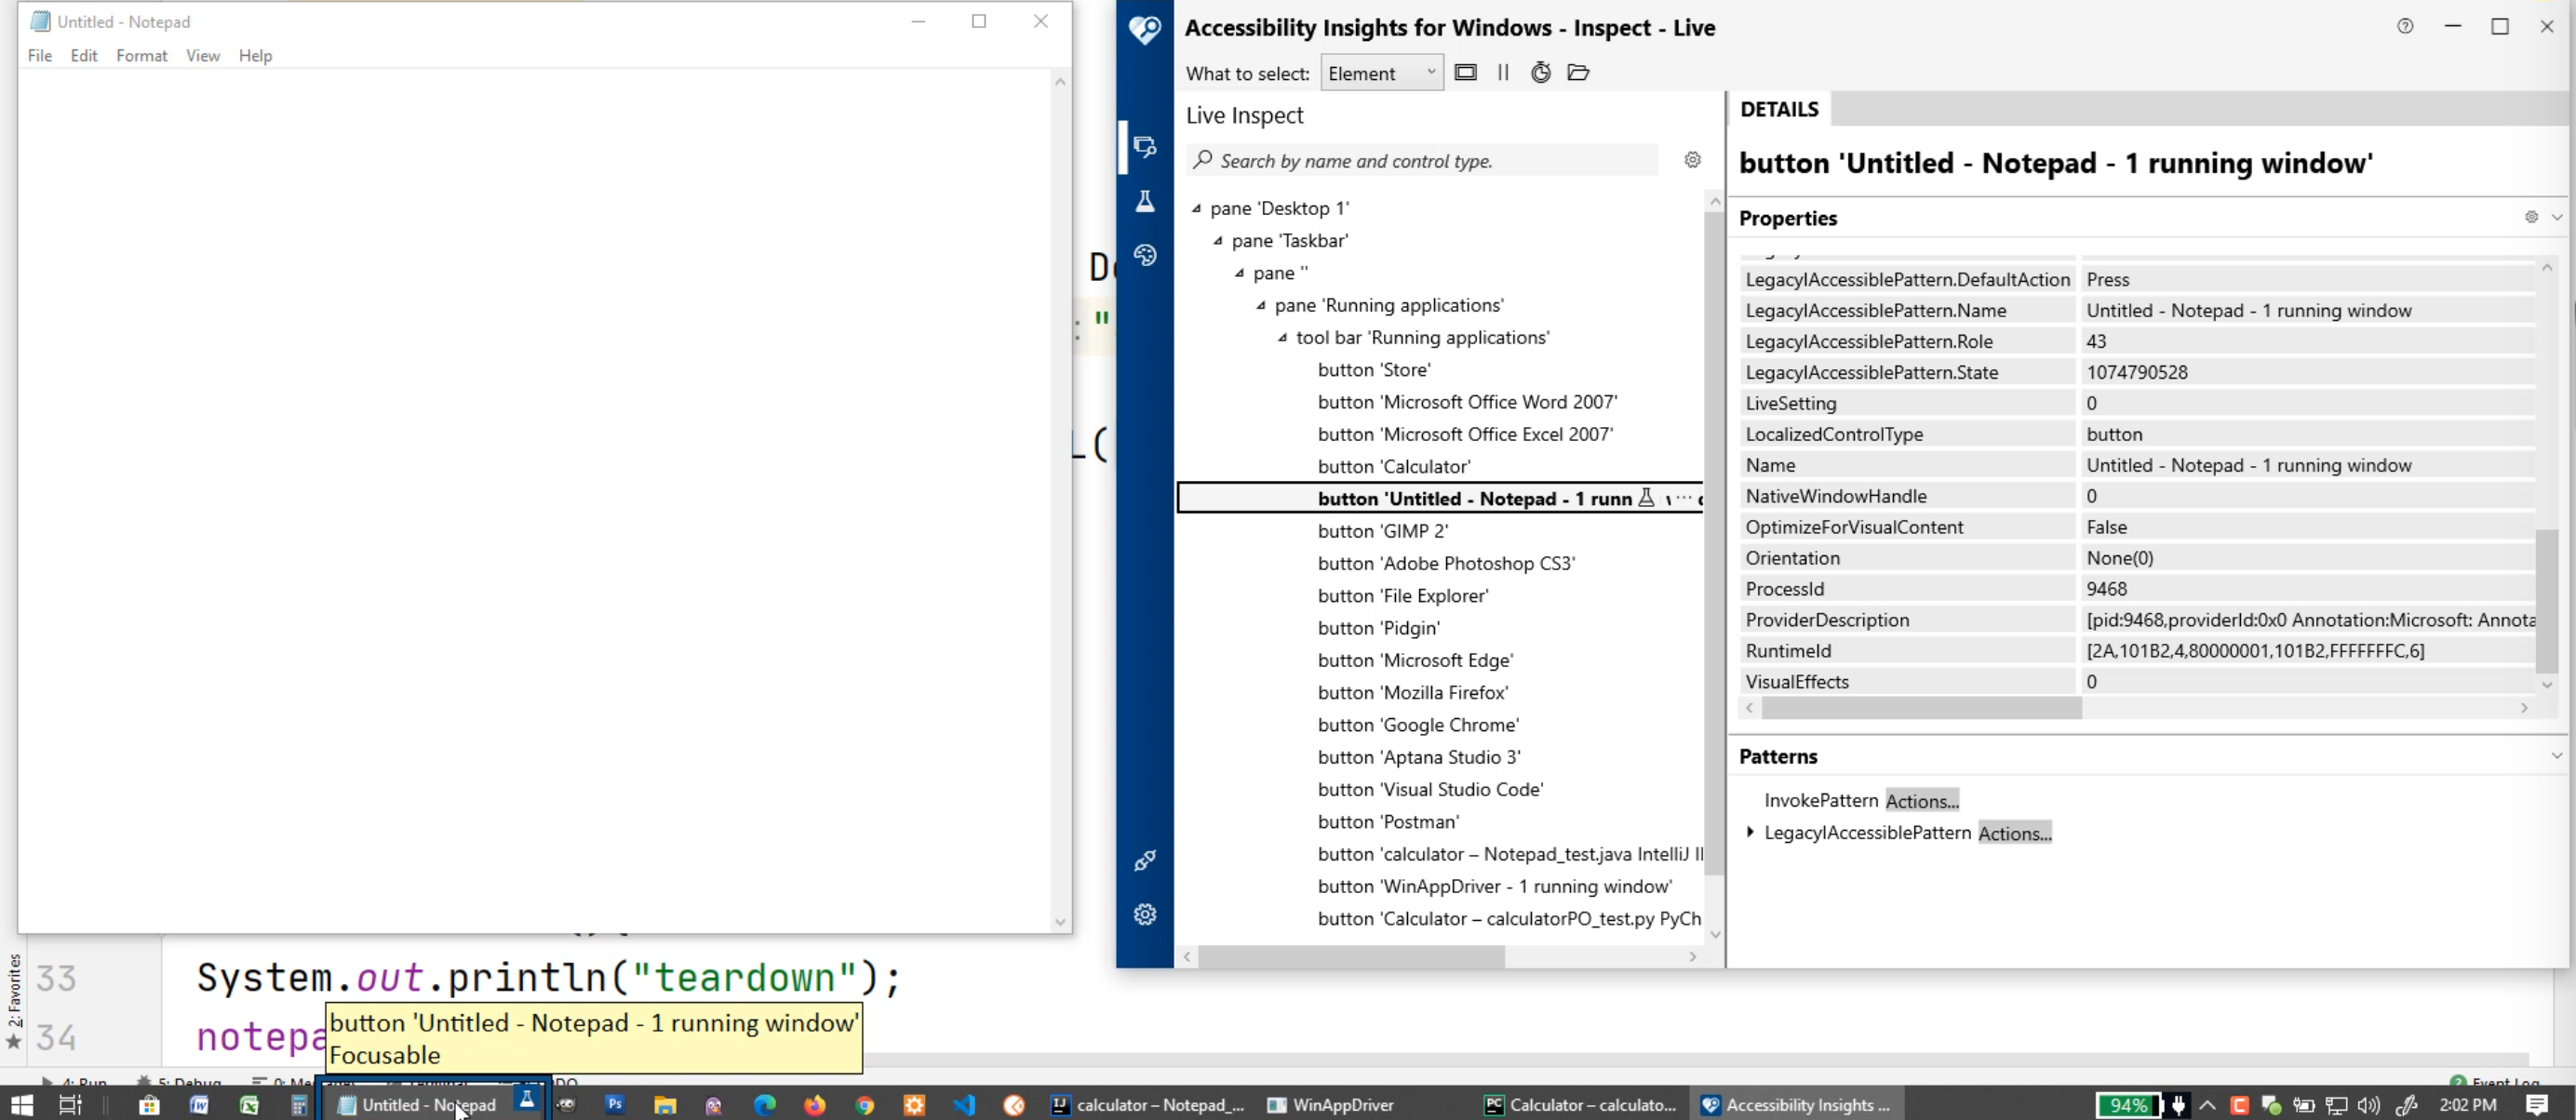
Let's quickly move your mouse to the pause button of the Accessibility Insights.
I should pause all the values that we captured previously.
Go ahead and minimize this Notepad, and let's see what we can utilize.
In the details, the "AutomationId" has this long value right here.
Let's go ahead and copy this value, go back to our editor, and paste this value in.
You'll notice I also brought in the "AutomationId" with a \t. We can go ahead and delete this and we don't need the \n at the end.
Now let's see if this application runs. We'll run the Notepad test.
Uh-oh, this time it didn't work again.
Let's see what's going on.
If you open up your WinAppDriver window, you can see the error that's happened.
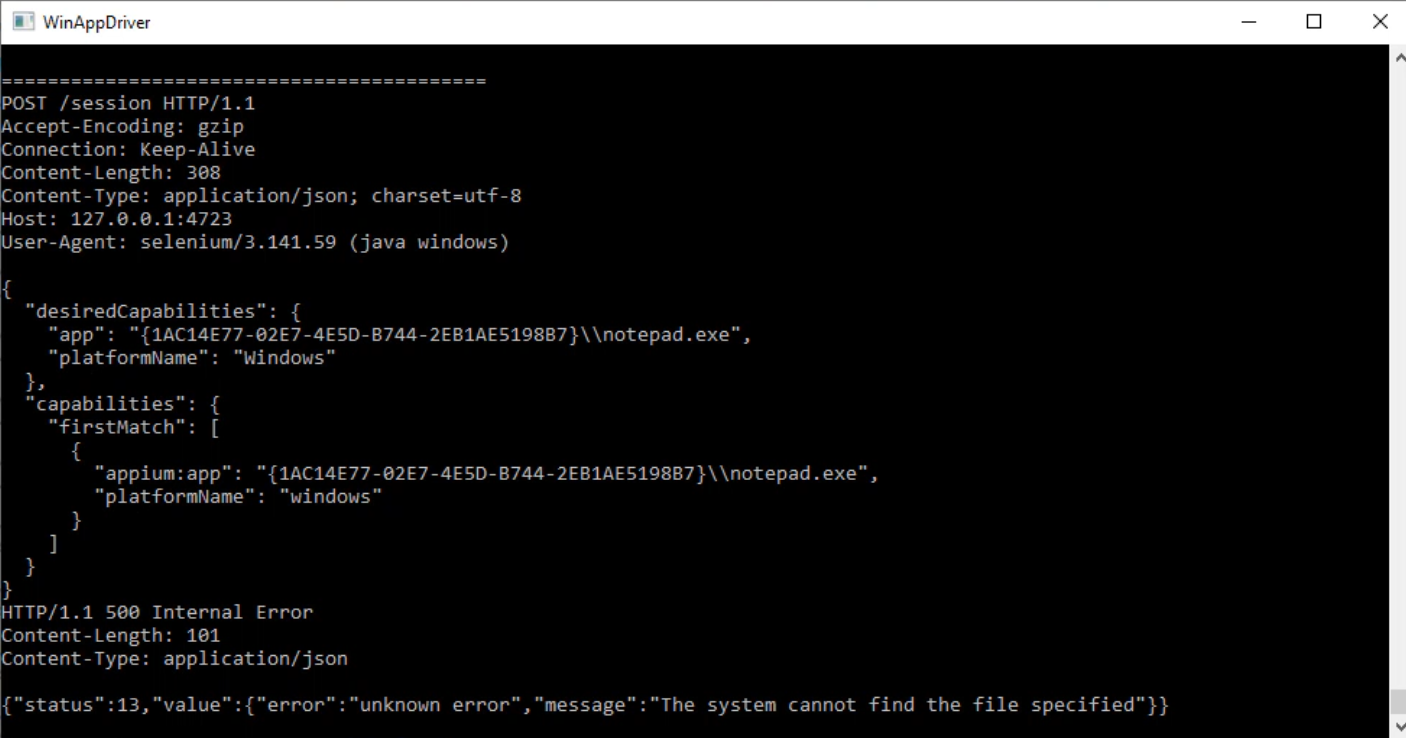
It says, "The system cannot find the file specified."
Well, here's the file that was specified, but why isn't it working?
Let's go back to Accessibility Insights.
Notice there's a single \.
We have to change this to a single slash, except now notice that the \n is a reserved value inside our IDE. Because of that, using this type of locator is going to be difficult.
So let's see what else we can do.
Because Notepad's part of Windows, it's easy to just type in Notepad somewhere and it'll open up Notepad.
In this example, you don't need to type in anything else other than notepad.exe.
Let's run this and see what happens. There. That worked.
Now, let's say Windows can't find notepad.exe, because this is a relative path.
Rather than using a relative path, we can use a static path as well.
To find a static path, this is what you do.
You can hover over any of these icons that you see in your taskbar, or in your application.
In this example, we're using Notepad, so right-click on "Notepad", and right-click on this "Notepad" above this again, and now you should see "Properties".
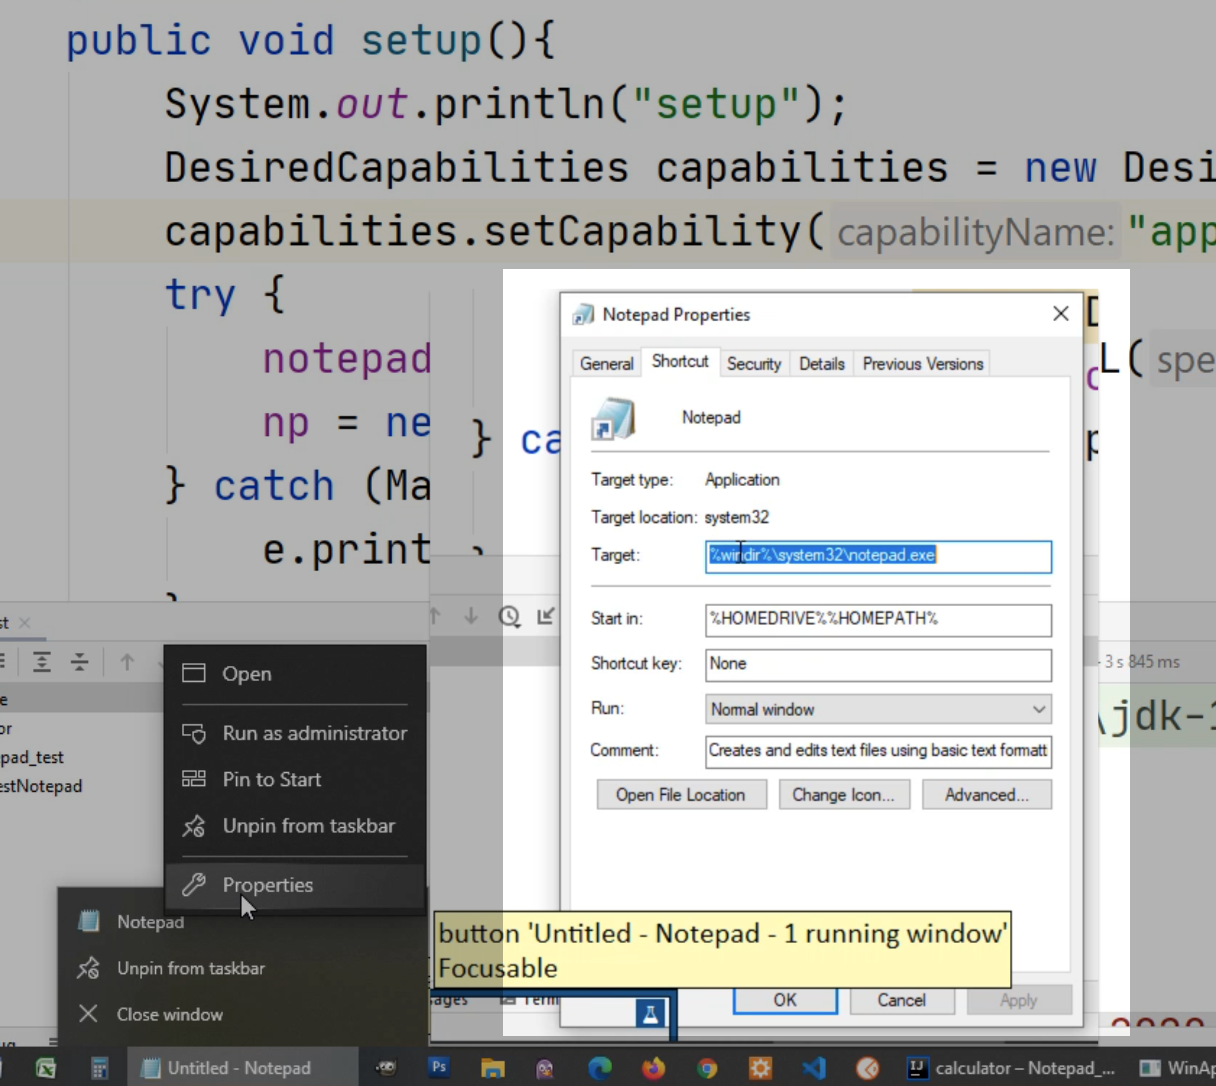
In this example, it says "%windir%\system32\notepad.exe".
You can copy this value in here, however, "windir" is not going to be referenced correctly.
But what is going to be referenced correctly inside of our windows directory is c:\\windows.
Notice I'm putting double \ in here.
If you change this to single \ in this example, even though this is what would look like if you were to navigate through your File Explorer, this is not the way that you can do it in code.
In code, you have to have the double slash \\ to escape the \. So we have to add that in here.
But at least now you'll notice the \n is no longer a new line - the \n is a reserved character within the ID.
This should work now as well. Let's run this and give a try.
You should see Notepad open. There's our dialogue and there's your close.
If you minimize this, there's our code. This wraps up our lesson.
At this point, you should have everything that you would need on a common day-to-day basis to utilize WinDriver. I hope you found this useful.
# Coding in Python
In your Pycharm editor, the first thing we're going to have to do is create a Python package.
The Python package will allow us to import the Notepad page object.
We'll right-click on "Calculator, select "New", select "Python Package", type in "notepad".
Let's right-click on this calc_PO.py, select "Copy", right-click on notepad, select "Paste" and let's change the name of this to notepad_PO.py.
The notepad_PO will have a few methods that we previously implemented.
One thing you do need to change is this class name - let's change this to notepad_PO.
In good programming practice, class name should be the same as your file name.
We're going to change these methods here first to just a few that we need.
We'll do the textArea(). dialogDontSave and dialogCancel.
Next we will change the locator names.
If you're trying to find your element by name, it will be called "Text Editor". If you're using class name, you'll use "Edit".
In my example, I'm going to use "Edit", and I'm going to change this locator type to find_element_by_class_name.
For the dialogue, the "Don't Save" button is "Don't Save" - we do find the element by name.
The "Cancel" is "Cancel".
class notepad_PO():
    def __init__(self, wd):
        self.driver = wd

    def textArea(self):
        return self.driver.find_element_by_class_name("Edit")

    def dialogDontSave(self):
        return self.driver.find_element_by_name("Don't Save")

    def dialogCancel(self):
        return self.driver.find_element_by_name("Cancel")
Now that we have our Notepad page object file created, let's create the test.
We'll right-click on "Calculator", select "New", "Python File" and we'll call this notepad_test.py.
From our calculator_PO test, here are the imports that we have - let's copy these imports over.
Now let's go back to calculator_PO and copy over the setup, tearDown, and just a sample test.
Let's copy from the class down to the first test.
Let's start at the top and change a few more things.
We're not importing from calc anymore, we're going to import from notepad.
Instead of importing the calc_PO, we are importing the notepad_PO.
Instead of calling this calculator_test, this will be the notepad_test.
Instead of calcsession, we're going to change this to notepad.
We don't need the calcresults anymore because we don't have a result window that we're looking at.
Let's continue on.
Now we have to change this application - let's just change this to c:\\windows\\system32\\notepad.
Your notepad might not be in system32 - in that case, if you want to, you can also just use notepad.
For our example, we're going to leave the full path.
Here we have a self.calcsession - remember we changed calcsession to notepad.
Let's review what this line of code will do - we're going to launch Notepad using the WebDriver, and with WebDriver it assigns that driver object to the notepad object.
import unittest
from appium import webdriver
from notepad import notepad_PO
from selenium.webdriver.common.action_chains import ActionChains

class notepad_test(unittest.TestCase):
    notepad = None;

    def setUp(self):
        print("setup")
        desired_caps = {}
        desired_caps["app"] = "c:\\windows\\system32\\notepad.exe"
        self.notepad = webdriver.Remote(
            command_executor="http://127.0.0.1:4723",
            desired_capabilities=desired_caps
        )
Let's continue down.
In the tearDown, we'll change this calcsession to notepad.
import unittest
from appium import webdriver
from notepad import notepad_PO
from selenium.webdriver.common.action_chains import ActionChains

class notepad_test(unittest.TestCase):
    notepad = None;

    def setUp(self):
        print("setup")
        desired_caps = {}
        desired_caps["app"] = "c:\\windows\\system32\\notepad.exe"
        self.notepad = webdriver.Remote(
            command_executor="http://127.0.0.1:4723",
            desired_capabilities=desired_caps
        )

    def tearDown(self):
        print("teardown")
        self.notepad.quit()
Now for our test method, we're going to change this test_add to call it test_notepad. Remember, a test method has to begin with a test value first.
We'll change the "add" for the print just for debugging - we'll call this "notepad".
Here we have a bunch of other calls into the calc_PO - let's remove these now.
We'll change the name cs to np for Notepad.
Instead of calc_PO, we're going to change it to notepad_PO, and this calc_PO will be notepad_PO as well.
Here instead of passing in the calcsession object, we're going to pass in the notepad object, so it's going to be self.notepad.
Now let's change the next line - here we're going to call np.textArea() - remember the first thing that we did was enter a string value.
After we entered the np.textarea(), we can do a send_keys().
Notice that doesn't bring up anything - this might be tricky for you.
Here's a good way to give yourself a little pointer to what you should do.
Let's create a new line before our send_keys, and let's do self.notepad.find_element_by_name("Edit") and then we can do . and here you can see the rest of the actions you can do.
Let's try to find the send_keys and here we can put, "windriver is awesome".
By using the page object model, we only need the second part right here. We'll highlight that, copy it, and replace the send_keys.
This line of code would perform the exact same action as this line.
Next, we'll do some send keys.
We'll do np.textArea().send_keys() - remember in our Java example, we sent an "Alt+F4" here.
Uh-oh, something isn't right, we should have code completion at this point. Let's scroll to the top and add the imports for Keys.
Here we're going to import from our selenium library.
From line 4, it'll give you a good example of what you should start typing.
Let's type from selenium.webdriver.common.keys import Keys.
Now that that's imported, we should be able to go back down to our send_keys and type in Keys.ALT,Keys.F4 - this should now send the "Alt+F4" key.
Now let's delete the rest of these lines of code. Let's finish the rest of our test.
We'll do np.dialogCancel().click() - this should click the cancel button and close the dialogue.
Now let's do another np.textArea().send_keys(Keys,ALT, Keys.F4) - this should try to close the application again.
This time we're going to do np.dialogDontSave().click().
import unittest
from appium import webdriver
from notepad import notepad_PO
from selenium.webdriver.common.action_chains import ActionChains
from selenium.webdriver.common.keys import Keys

class notepad_test(unittest.TestCase):
    notepad = None;

    def setUp(self):
        print("setup")
        desired_caps = {}
        desired_caps["app"] = "c:\\windows\\system32\\notepad.exe"
        self.notepad = webdriver.Remote(
            command_executor="http://127.0.0.1:4723",
            desired_capabilities=desired_caps
        )

    def tearDown(self):
        print("teardown")
        self.notepad.quit()

    def test_Notepad(self):
        print("notepad")
        np = notepad_PO.notepad_PO(self.notepad)
        self.notepad.find_element_by_name("Edit").send_keys("windriver is awesome")
        np.textArea().send_keys("windriver is awesome")
        np.textArea().send_keys(Keys.ALT, Keys.F4)
        np.dialogCancel().click()
        np.textArea().send_keys(Keys.ALT, Keys.F4)
        np.dialogDontSave().click()
Now let's try to run our test.
We'll left-click here, and select "Run 'Unit tests for notepad'".
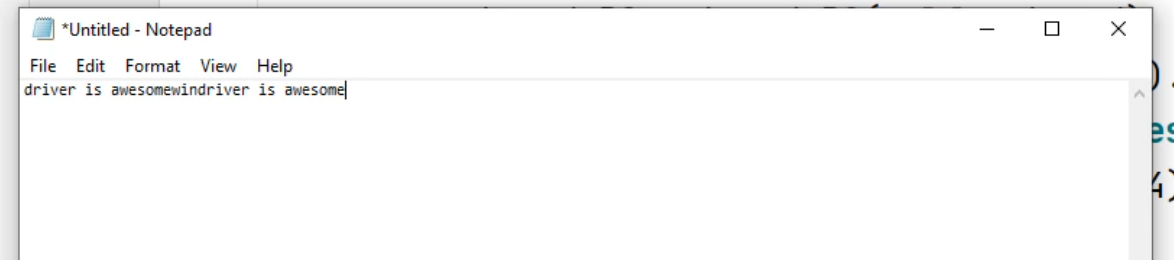
Did you see that we typed in "windriver is awesome" twice?
Now that you have a good example for how the code looks like in Python, you can go back and finish out the rest of your Notepad page object file.
This wraps up our WinAppDriver lessons. I hope you have found WinAppDriver useful. I wish you the best in automating Windows applications in the future.
