

Transcripted Summary
In this lesson, we're going to talk about the Page Object, and then we're also going to go back and refactor our code.
# What is a Page Object?
A page object is design pattern for enhancing test maintenance and reducing code duplication. A Page object is an object oriented class that serves as an interface to a page of our AUT (Application Under Test).
The benefit is that if the UI changes for the page, the tests themselves do not change. Only the code within the page object needs to change.
Subsequently, all changes to support the new UI are located in one place.
# The Page Object Design Pattern
The advantages:
Clean separation between test code and page specific code, such as locators and layout.
Single repository for the services or operations offered by the page rather than having these services scattered throughout the test.
Now let's go and refactor our code.
# Coding in Java
You might ask at this point, "Why would we use a page object pattern?"
Well, the page object pattern reduces some of the complexities and the nuances of mistakes that we can make.
Let's look at this first test in Calculator.java - this is a test that we created previously for the addition method.
In here, you'll notice that we are finding an element by one, two, plus, nine, equals.
What would happen if we typed in something like this? calcsession.findElementByName("one").click();
In this example, you'll notice that line 41 has a lower case "one".
When your code tries to execute this line to find the "one" element, it will return "element is not found".
You'll notice here how easy it is to make a typing mistake.
With the page object model, what we will do is make it so that we can't make this typing mistake.
Everything will be static in how we are going to call our code.
Let's delete this example for now, and let's create our page object.
To begin our refactor to utilize the page object pattern, what we're going to do is open up our project view by clicking on the left hand side here.
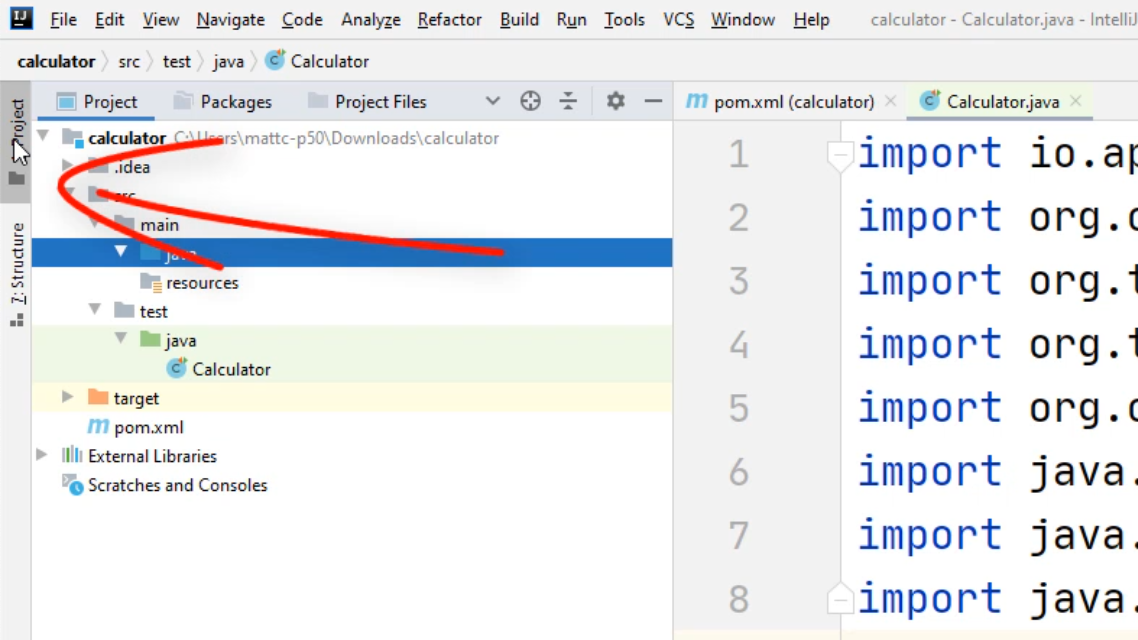
Inside this java folder, we're going to right-click and select "New" and select "Java Class".
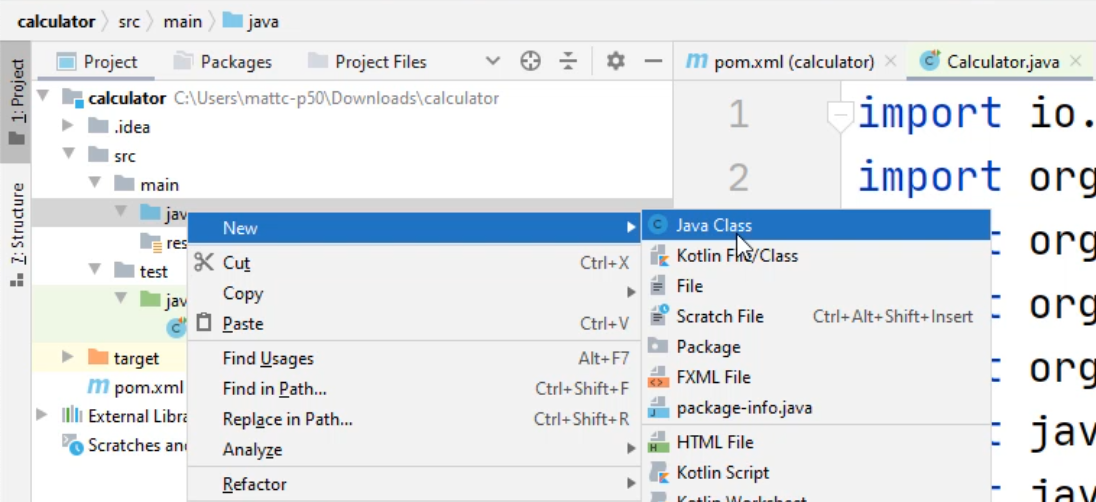
For this class, we're going to name it Calc_PO - this way we can denote our calc class as a page object.
Now that we have our Calc_PO, we have to create a basic constructor.
A basic constructor in Java looks like this.
public class Calc_PO {
    public Calc_PO{

    }
}
The constructor is a basic blueprint of our application - these denote the basic stuff that we will absolutely have to have to make our class work.
For our page object, we have to have the Windows driver passed into it. That way we don't create multiple windows of the calculator app.
We do this by typing in the following: WindowsDriver wd. And you can give it any variable name that you want to.
Now that we have wd passed into it, we have to figure out how we're going to utilize it.
To utilize wd, which is a WindowsDriver, we're going to create a class variable.
We're going to call it private WindowsDriver driver = null.
Now we are going to assign driver to wd, which is a Windows driver that we passed in.
Now that driver can be utilized within all the other methods that we are going to create.
Let's create a method for the "One" button.
We can do this by creating a couple lines of code, we're going to type in public, and this time, instead of putting void, we're going to return a WebElement. This will denote in our code that a WebElement will be returned in our method.
Now we'll name this "One", and now we are going to do a return statement.
For the return statement, we're going to type in return driver.findElementByName(), and we know that the name for the "one" button is "One".
Now you'll notice that we have an error in our code, and you'll notice that we need to import this WebElement.
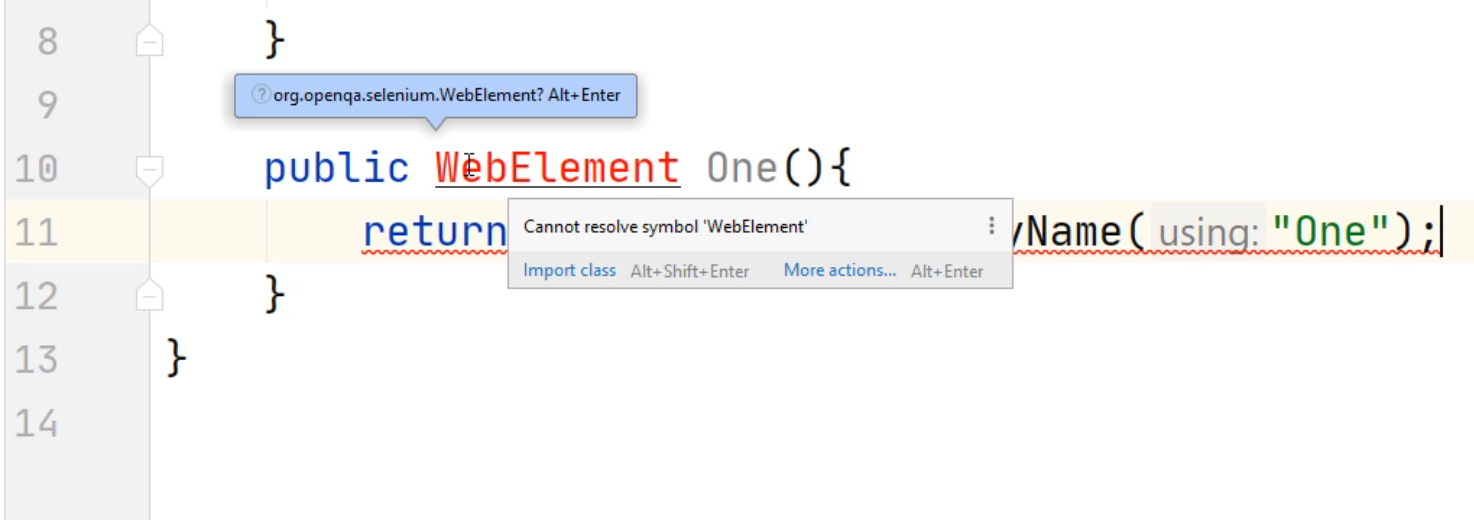
Here you can see that the hover over tooltip says, "Cannot resolve symbol 'WebElement'"
If you put your cursor on this WebElement and press "Alt+Enter" on your keyboard, you'll notice that at the top, now we are importing the WebElement from the Selenium QA library.
import io.appium.java_client.windows.WindowsDriver;
import org.openqa.selenium.WebElement;

public class Calc_PO {
    private WindowsDriver driver = null;
    public Calc_PO(WindowsDriver wd){
        driver = wd;

    }

    public WebElement One(){
        return driver.findElementByName("One");
    }
}
Let's copy and paste this code and do a button for "Two".
We'll change this method name to Two() - I want to change this value that we're going to find to "Two".
Let's minimize our code and let's create a few more.
import io.appium.java_client.windows.WindowsDriver;
import org.openqa.selenium.WebElement;

public class Calc_PO {
    private WindowsDriver driver = null;
    public Calc_PO(WindowsDriver wd){
        driver = wd;

    }

    public WebElement One(){
        return driver.findElementByName("One");
    }

    public WebElement Two(){
        return driver.findElementByName("Two");
    }

    public WebElement Three(){
        return driver.findElementByName("Three");
    }

    public WebElement Four(){
        return driver.findElementByName("Four");
    }

    public WebElement Plus(){
        return driver.findElementByName("Plus");
    }

    public WebElement Equals(){
        return driver.findElementByName("Equals");
    }
}
Now we can save this.
Let's open our Explorer view by clicking on this left hand side, under "Projects".
Now let's copy and paste our previous Calculator.java file.
We'll do this by right clicking and selecting copy, and we'll select copy again.
Now we'll click on this java folder, right-click, and select "Paste".
Now it's going to ask you for the "New name".
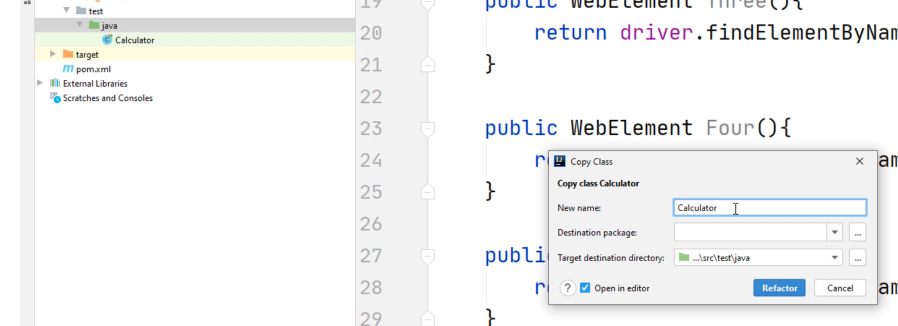
This time we're going to name it CalculatorPO_test, and select "Refactor".
When you do "Refactor", it will also change the name of the class as well - this class has to match your file name.
Luckily, all the imports are still intact.
We can continue to minimize this window.
Let's scroll down to our tests and let's get rid of the rest of the tests that we already have, as we don't need these anymore.
Here's our previous example for a test for addition. We will refactor this in a second.
Now let's go to the top and inside our @BeforeClass, we need to modify this code.
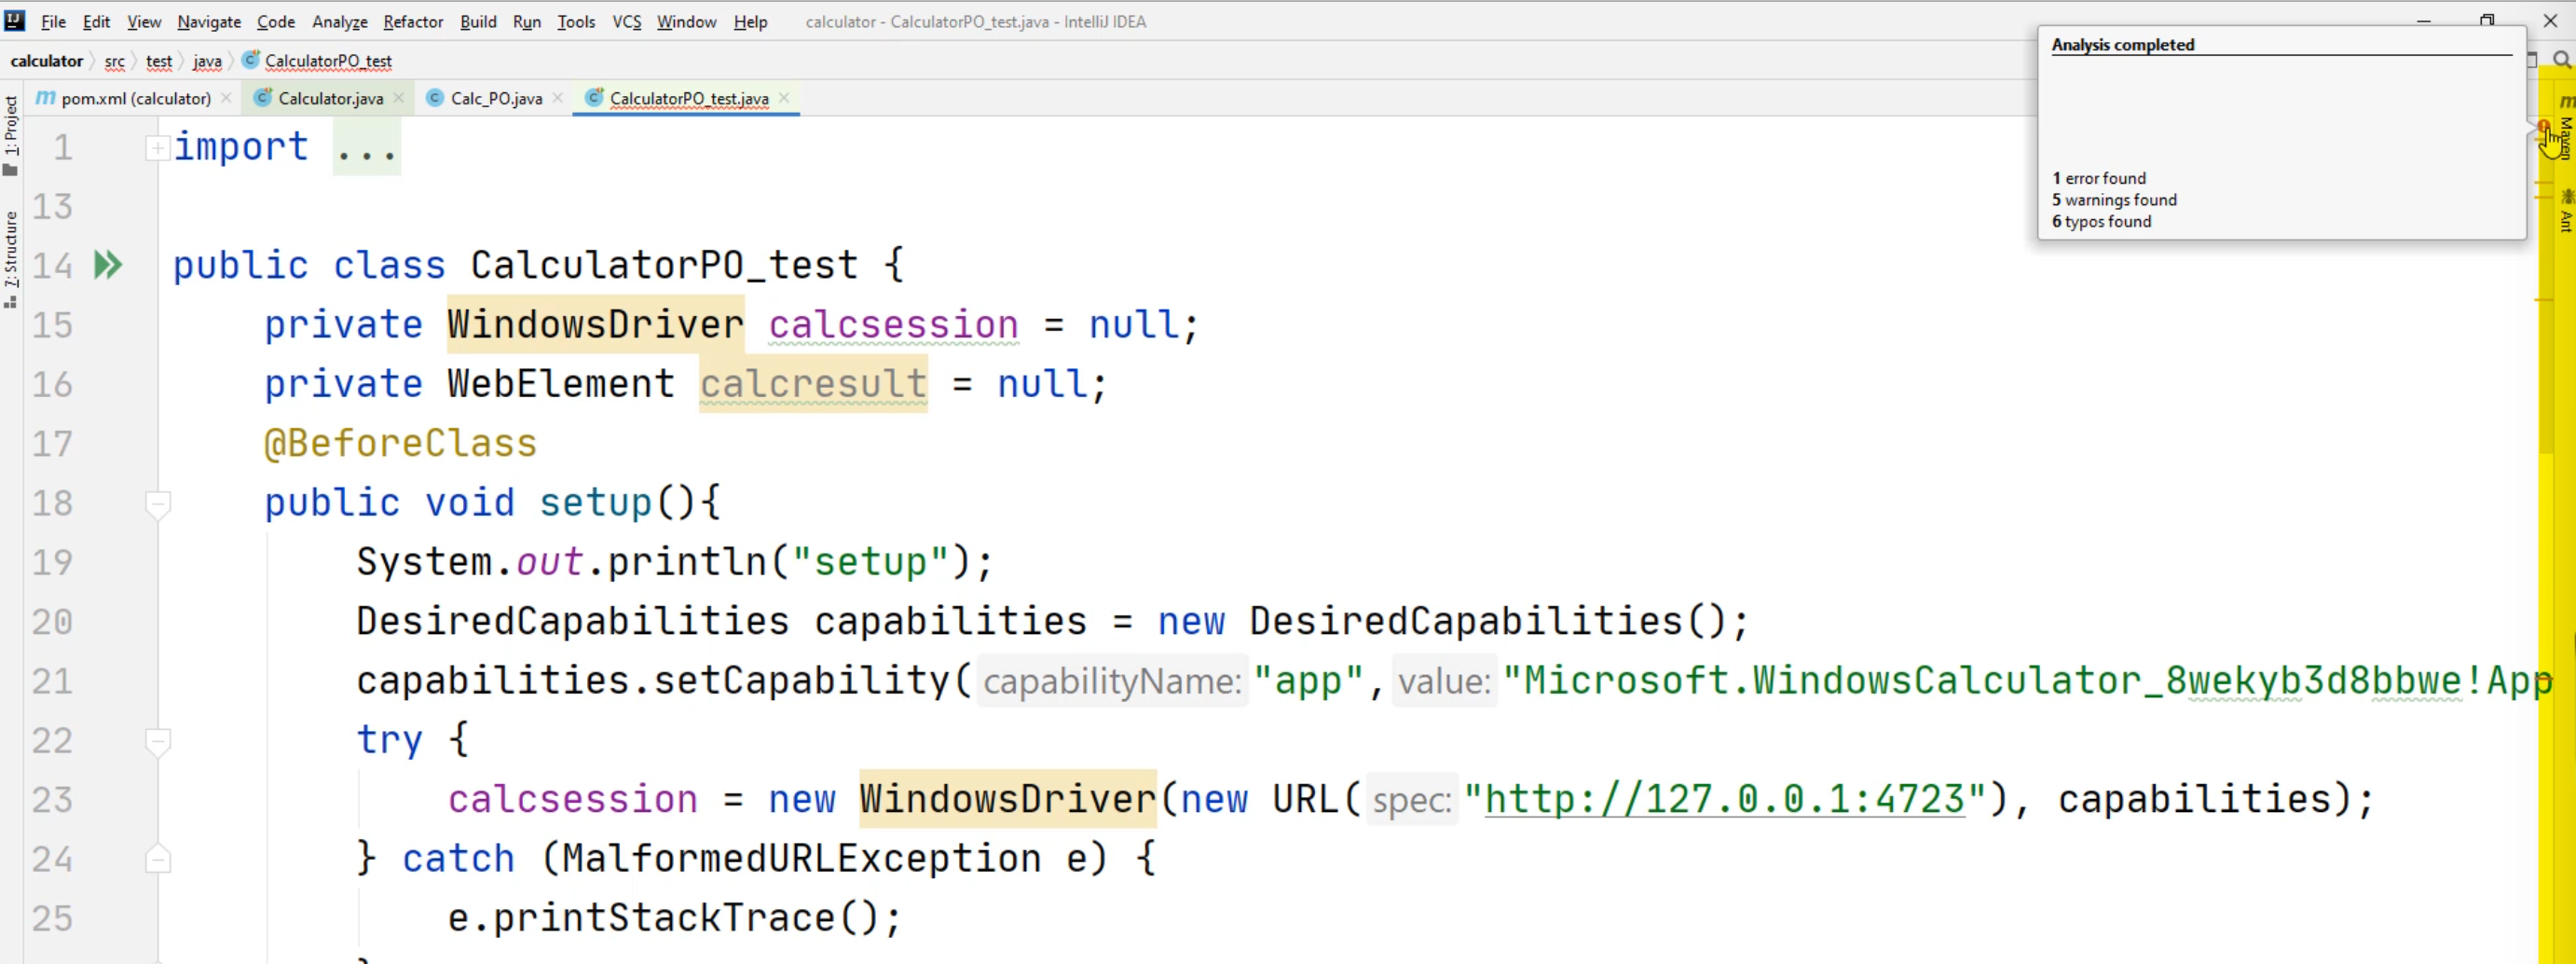
At this point, you'll notice that your class CalculatorPO_test.java is underlined with red.
Typically, this means that there's an error in your code.
You can hover on this right-hand side, and it will show you there is 1 error found.
Along this right-hand side, you can also scroll down and look for a red.
What you'll want to do is find the red in this column.
Here's our red. Let's click on this.
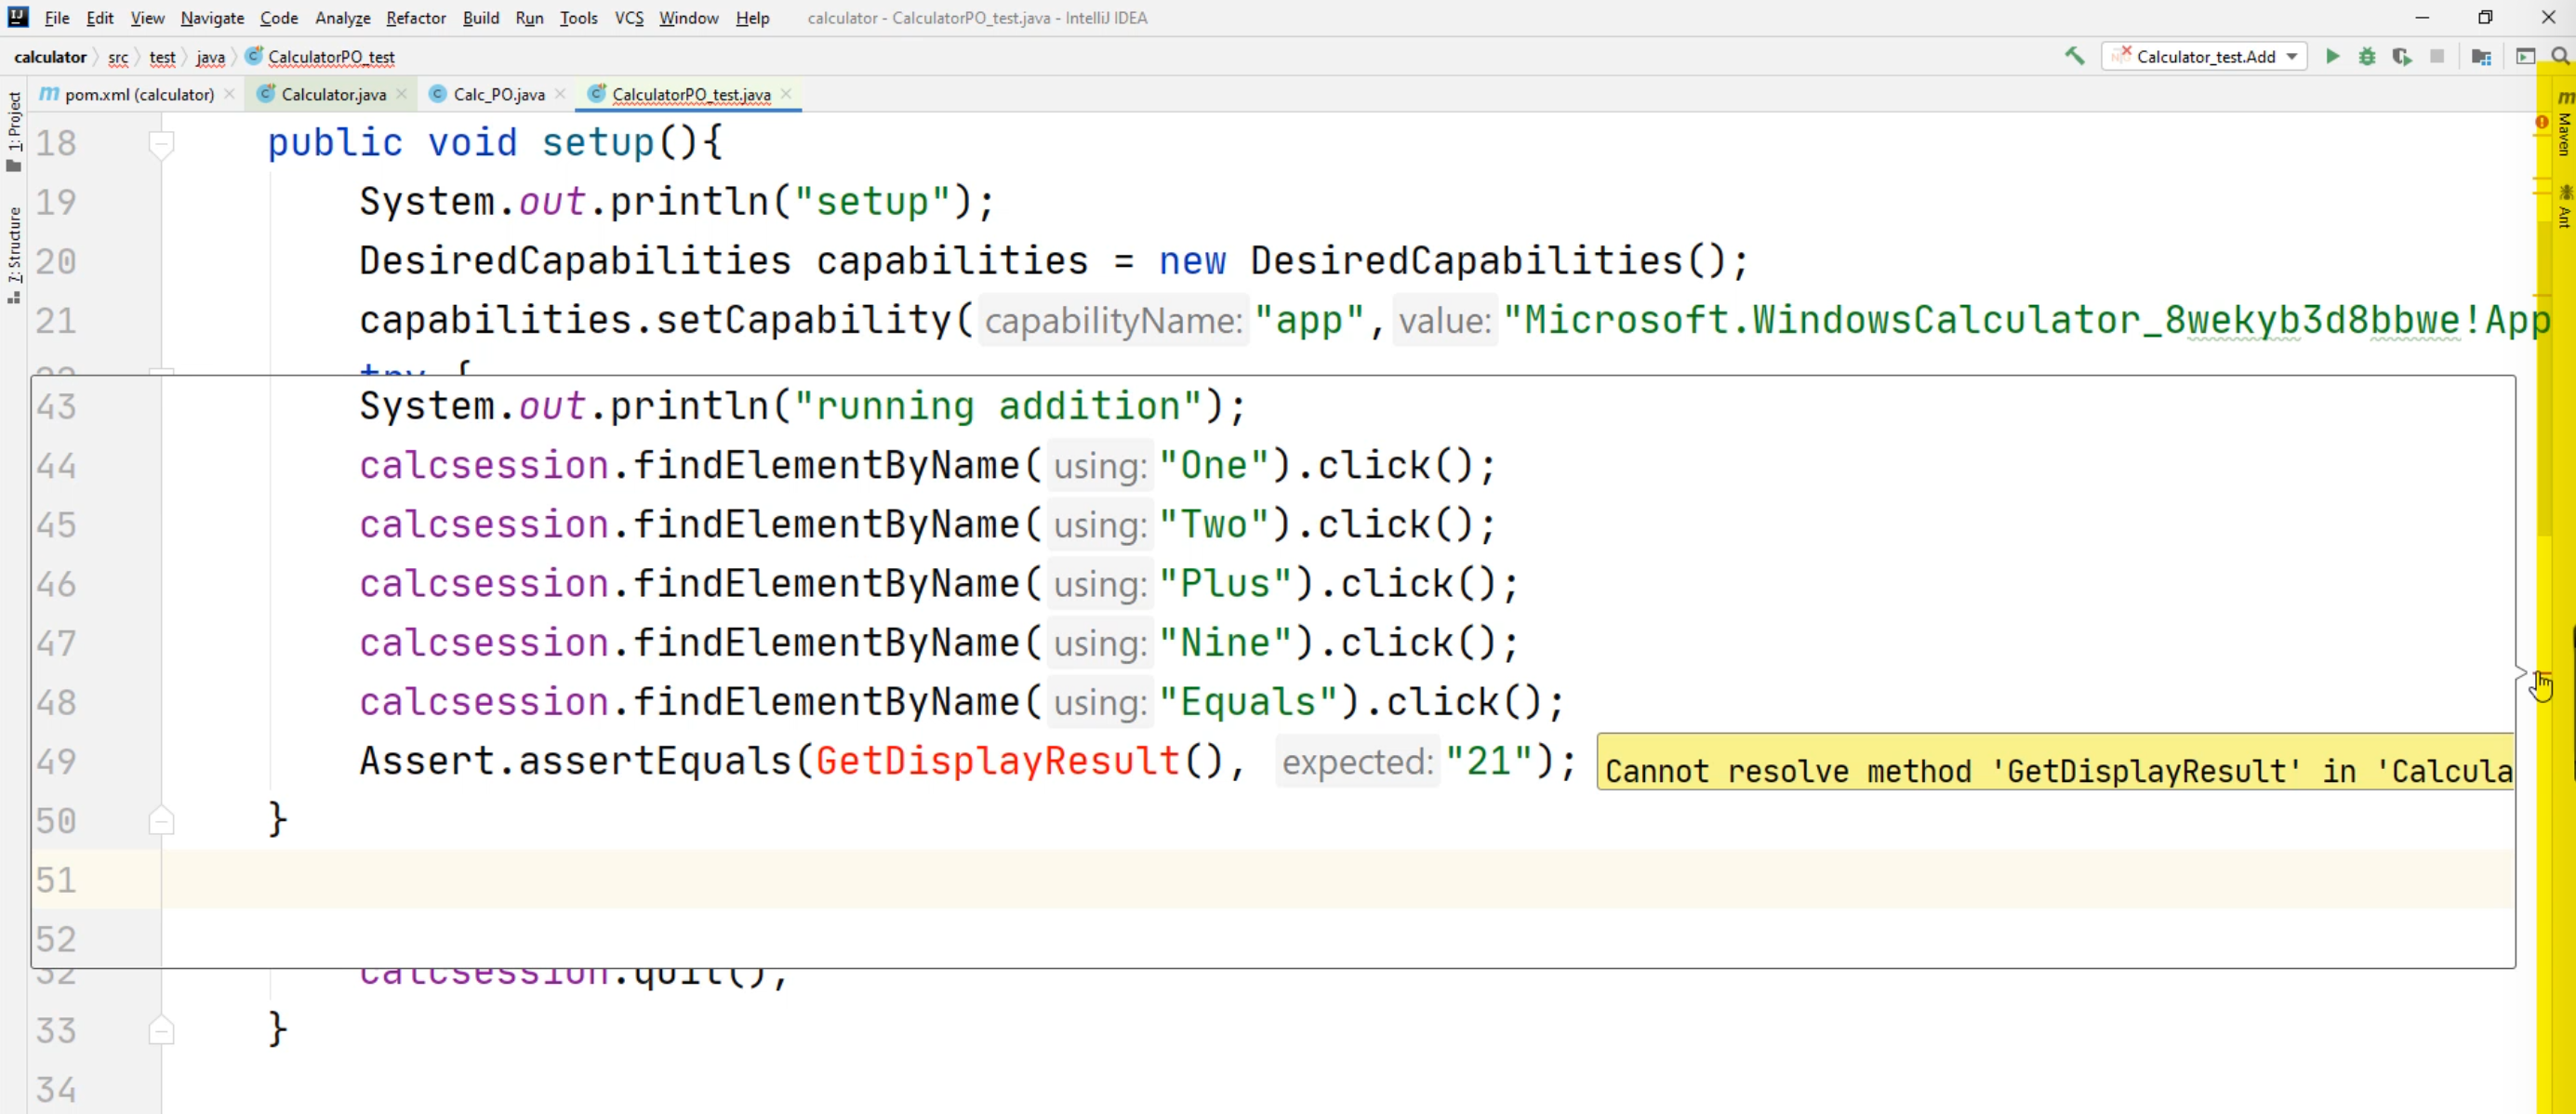
Notice that the assertEquals is calling our method, GetDisplayResult, and expecting a 21.
Since we deleted it from our CalculatorPO_test.java file, we will need to add this to our Calc_PO - let's do that now.
Let's copy this previous method again.
However, this time, instead of returning a WebElement, what we're going to have to do is return a String and change this method to GetDisplayResult.
Our return statement is going to be different as well.
Let's go back to our Calculator.java file, and let's scroll down to our GetDisplayResult method.
Let's copy and paste these two lines of code, this calcresult and calcsession.
Go to the Calculator_PO, select the code that you want to get rid of, delete, right-click and hit "Paste".
Now notice calcresult and calcsession are now returning an "unresolved symbol".
We don't need these anymore. Let's delete these.
Notice that the findElementByAccessibilityId is red - the reason is because we lost our driver. We lost that calculator session.
However, we can utilize this driver right here that is our calculator session.
Now we have our driver object and part of the driver object will contain the findElementByAccessibilityId.
Next, we can do something a little more advanced.
Rather than having multiple lines of code. We can reduce this and simplify our code.
Notice this calcresult - this calc result was previously dependent on the element that was returned by the driver.findElementByAccessibilityId.
Let's simplify this a little bit more.
We're going to copy this line of code - don't copy the semi-colon.
Let's double-click on this calcresult and let's right-click and hit "Paste".
At this point, you'll notice that your line of code is really long.
However, we can get rid of line 36 now.
Now I have a more simplified method with one line of code.
import io.appium.java_client.windows.WindowsDriver;
import org.openqa.selenium.WebElement;

public class Calc_PO {
    private WindowsDriver driver = null;
    public Calc_PO(WindowsDriver wd){
        driver = wd;

    }

    public WebElement One(){
        return driver.findElementByName("one");
    }

    public WebElement Two(){
        return driver.findElementByName("Two");
    }

    public WebElement Three(){
        return driver.findElementByName("Three");
    }

    public WebElement Four(){
        return driver.findElementByName("Four");
    }

    public WebElement Plus(){
        return driver.findElementByName("Plus");
    }

    public WebElement Equals(){
        return driver.findElementByName("Equals");
    }

    public String GetDisplayResult(){
        return driver.findElementByAccessibilityId("CalculatorResults").getText().replace("Display is", "").trim();
    }
}
Let's go back to our CalculatorPO_test.java file.
You're still going to see the GetDisplayResult as underlined red.
Now we're going to create a new object.
Here for the calcsession, notice that we are creating a new WindowsDriver object. calcsession = new WindowsDriver(new URL("http://127.0.0.1:4723"), capabilities);
However, we need to pass this calcsession into our Calculator class.
What we are going to do now is create a new Calc_PO class.
First, we're going to try to define the Calc_PO.
First, we have to declare the object type.
This object type name is going to be Calc_PO.
Let's give it a variable name - we'll call it c - c = new Calc_PO.
Now it's asking for a "WindowsDriver".
The calcsession is the "WindowsDriver" that we're going to be passing in.
Now we need to make this Calc_PO c a class level variable.
Right now it's only available in this method.
What we're going to do is go up to this line 17.
Anything that is outside of the methods will be a class level variable.
Here, we're going to type in private Calc_PO c = null.
Now we'll go back to where we declared our Calc_PO, and we can delete this from our code.
What has essentially happened is we created this variable called c - it has a Calc_PO object - before we had it assigned to null.
In this setup, we have now assigned it to this Calc_PO object, this new object that has been created.
public class CalculatorPO_test {
    private WindowsDriver calcsession = null;
    private WebElement calcresult = null;
    private Calc_PO c = null;
    @BeforeClass
    public void setup(){
        System.out.println("setup");
        DesiredCapabilities capabilities = new DesiredCapabilities();
        capabilities.setCapability("app","Microsoft.WindowsCalculator_8wekyb3d8bbwe!App");
        try {
            calcsession = new WindowsDriver(new URL("http://127.0.0.1:4723"), capabilities);
            c = new Calc_PO(calcsession);
        } catch (MalformedURLException e) {
            e.printStackTrace();
        }
    }
}
Now we can scroll down to our code for our test and we can change this line of code.
Remember, previously, we used calcsession.findElementByName("One").
If we copy and paste this code, notice that if we change this to lowercase "one", our code is still correct.
Now that we have the page object pattern with a Calc_PO object, we can now do c.One().click().
When we call the method One, we don't have to worry about being case sensitive in how we type it.
If we type in c.one().click(), now you'll notice your code is red and if you try to run your code, it will not compile.
Let's leave this around for a second and let's change the rest of our code.
We're going to change this to c.Two().click().
Don't forget your open and closing parentheses - this denotes that it's a method.
Since we haven't created the method for nine, we're just going to use One - so we'll do c.One().click().
For this "Equals", we will type in c.Equals().click().
Lastly, we're going to change this GetDisplayResult().
It's still the same method, but now we're going to change this GetDisplayResult() to c.GetDisplayResult() and there's our method that we created in our Calc_PO.
This time, we will have to evaluate a different value.
Let's delete these other lines of code that we don't need.
public class CalculatorPO_test {
    private WindowsDriver calcsession = null;
    private WebElement calcresult = null;
    private Calc_PO c = null;
    @BeforeClass
    public void setup(){
        System.out.println("setup");
        DesiredCapabilities capabilities = new DesiredCapabilities();
        capabilities.setCapability("app","Microsoft.WindowsCalculator_8wekyb3d8bbwe!App");
        try {
            calcsession = new WindowsDriver(new URL("http://127.0.0.1:4723"), capabilities);
            c = new Calc_PO(calcsession);
        } catch (MalformedURLException e) {
            e.printStackTrace();
        }
    }


    @Test
    public void addition(){
        System.out.println("running addition");
        c.One().click();
        c.Two().click();
        c.Plus().click();
        c.One().click();
        c.Equals().click();
        Assert.assertEquals(c.GetDisplayResult(), "13");
    }
Now let's figure out what this evaluation is going to be on the assertEquals.
If we type in one, two, plus, one, it should equal "13".
Now let's try to run our test.
We'll click on this test and select "Run 'addition()'".
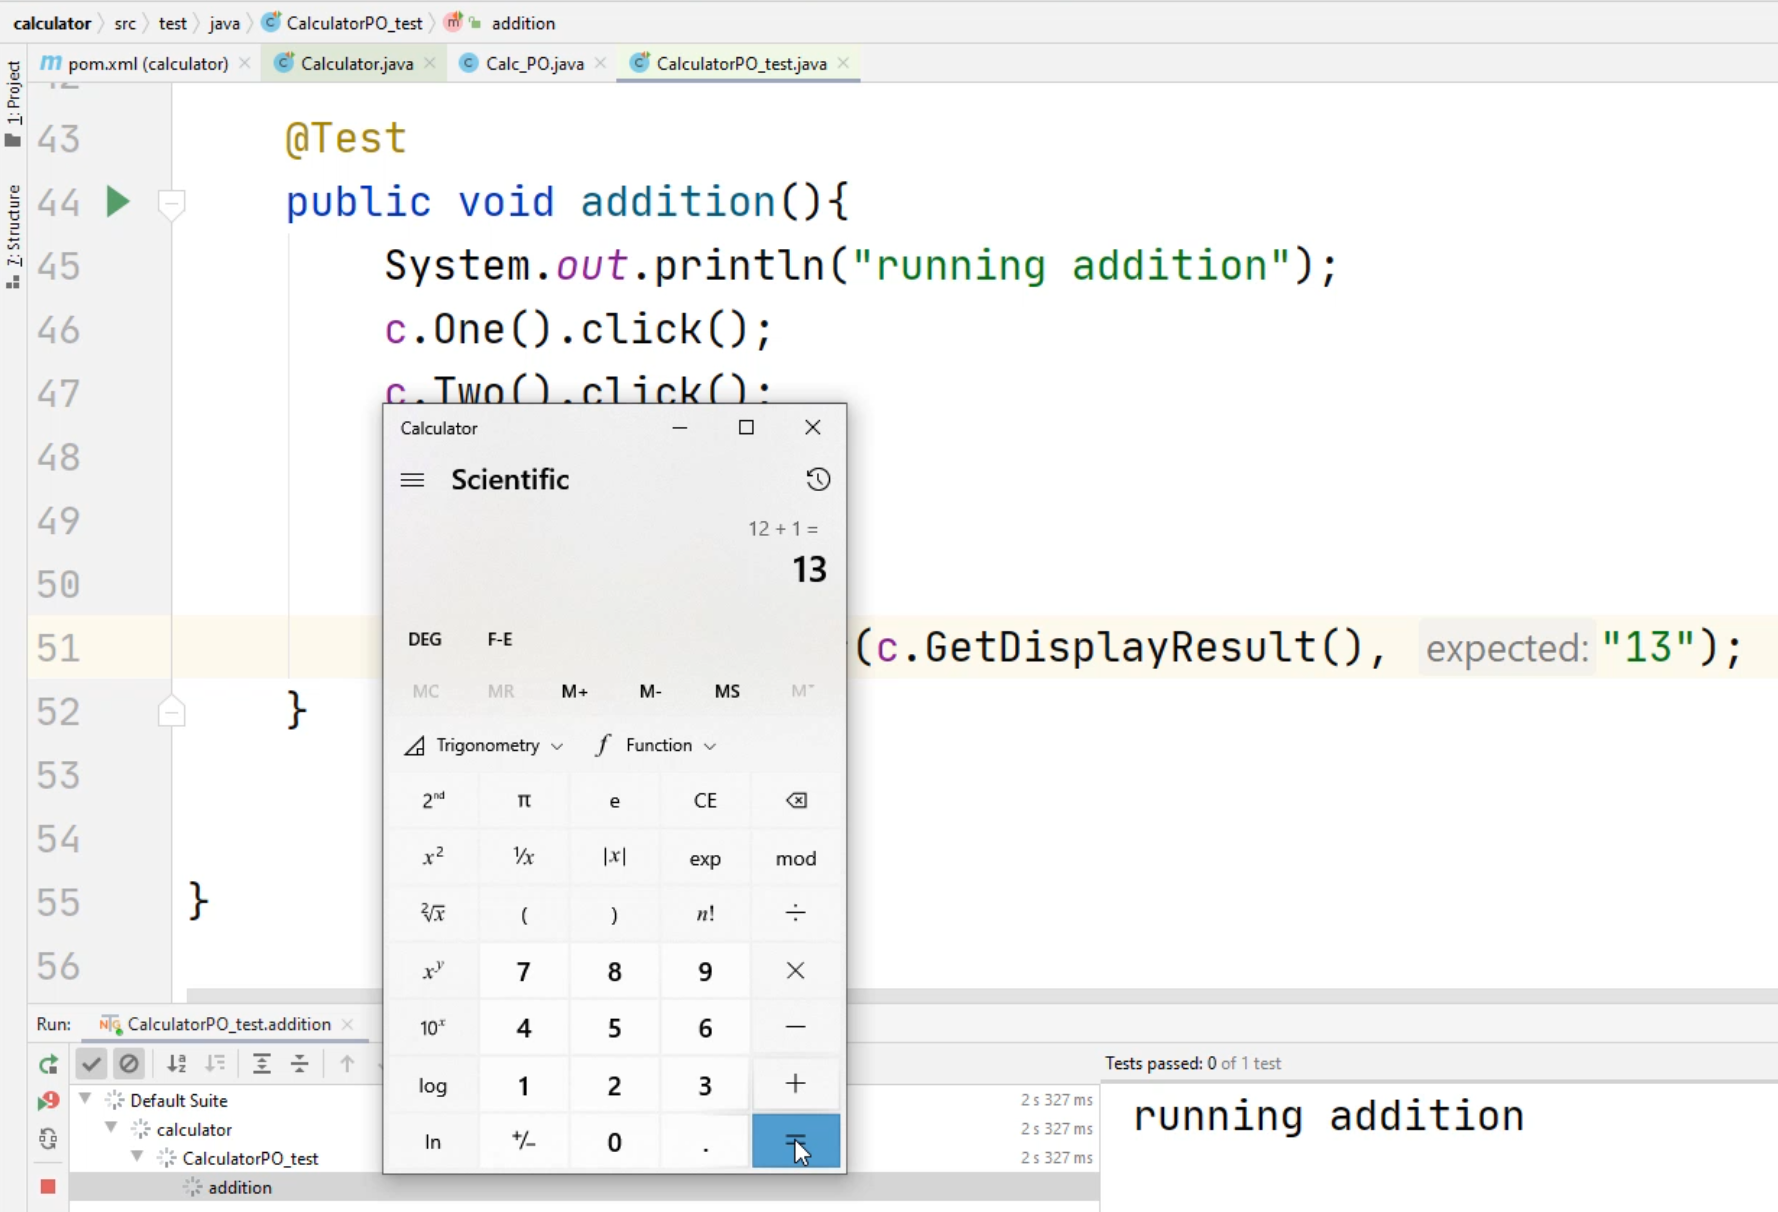
Notice that it asserted correctly - this time it asserted that it's 13.
Let's look at another example that we discussed earlier.
In this example, if I type in c.one().click() with lower case "one" and now if we try to run our method, we'll get this compilation error.
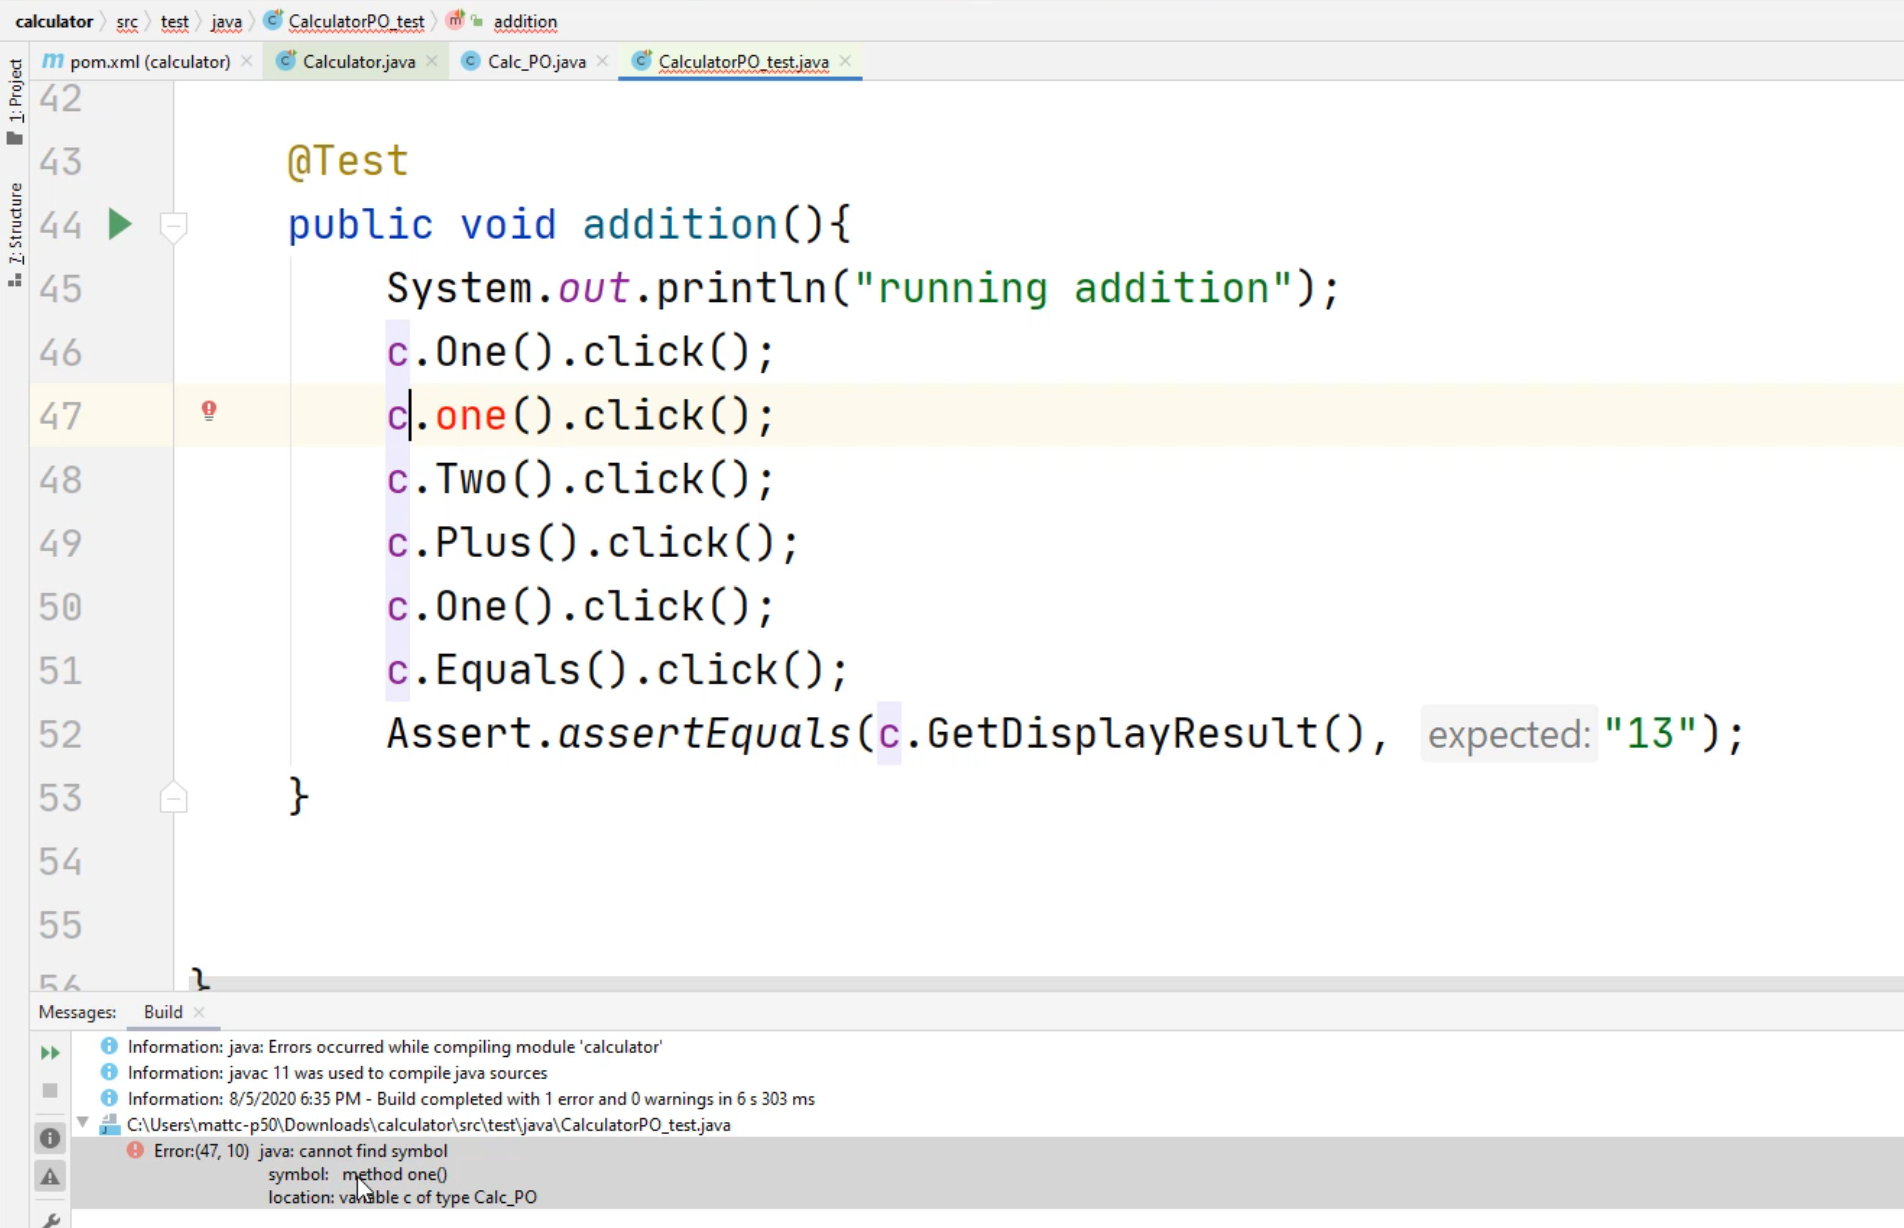
You'll notice it says "method one(), java cannot find symbol" - it means that this method is not available.
If we delete this method, our code will compile.
Another benefit of using this page object model is that if one of the locators changes, you only have to change the locator in one place.
Let's take a look at this.
Let's go to the Calc_PO and take a look.
If this locator for the button "One" changes to "one", I only have to change it in one location.
I don't have to change multiple lines of code to make my test run again - this makes it easier to maintain.
# Coding in Python
Now, let's see how we can apply the page object pattern to our Python project.
First, let's open up our project view.
You can do this if you close it out by clicking on this project in the left-hand corner.
Now right-click on the Calculator folder, select "New", and select "Python Package".
We'll call this calc for the package.
Now right-click on this new calc Python package and select "New", select "Python File".
Let's call this calc_PO - this will be our page object.
Now that we have our calc page object file created, let's create a class.
We'll call it class calc_PO():.
Now we'll create another definition.
In Python, to create a constructor, we use the def __init__.
The self will be automatically created.
After the word self, put a comma and put a value called wd.
Remember that wd is similar to our WebDriver that we pass in with our Java class.
Now we can call this self.driver = wd.
class calc_PO():
    def __init__(self, wd):
        self.driver = wd
Now let's create our first method.
Now let's create a method that allows us to click the "one" button.
We do this by typing def One, and for this one, we're going to do a return similar to what we did in Java - return self.driver..
Notice now that code complete is not really giving you anything.
This is one of the challenges you will have when you're writing Python code.
However, the easiest way to get around this is by doing the following.
We'll go back to our calculator_test.py file.
We'll find one of these lines with self.calcsession.find_element_by_name("One") - what we're going to do is copy this, go back to the calc_PO file that was created and now replace the self.driver with this line of code.
Here, we're going to change the calcsession to driver.
What we are doing in this example now is instantiating the calc_PO, we're going to pass it the WebDriver - the self.driver object can be utilized within the rest of our code.
Let's create a couple more examples of this.
class calc_PO():
    def __init__(self, wd):
        self.driver = wd

    def One(self):
        return self.driver.find_element_by_name("One")

    def Two(self):
        return self.driver.find_element_by_name("Two")

    def Equals(self):
        return self.driver.find_element_by_name("Equals")
Let's go this far - I don't want to do all the work for you guys, you guys can figure out the rest yourself.
Let's create a test to see if this works.
Here's our calculator_test.py.
Let's right-click on the calculator_test.py file and select "Copy".
Now click on the calculator folder at the very top of the project, right-click, and hit "Paste".
We'll change this to calculatorPO_test.
There, now the file is created, we can minimize our project view.
Now let's scroll down to the test_add method.
Let's change the pattern of how this code is utilized.
First, we're going to scroll to the top and create a new line and we're going to say from calc import calc_PO - calc is the package that we just created, this will import our calc page object.
Let's create a new variable called cs.
This will be similar to the calcsession, except we're going to call this a little bit differently.
We're going to select = and now we're going to type in calc_PO.calc_PO() - you'll notice this is repeated, but this is to instantiate the base class.
Now we can pass in the WebDriver - in this example here, we'll just type in self.calcsession.
from calc import calc_PO

    def test_add(self):
        print("add")
        cs = calc_PO.calc_PO(self.calcsession)
Now we can start doing the page object pattern.
We can do this by typing cs.One().click().
We can also now do cs.Two().click().
Notice that you don't have the code complete. This is one of the parts that's a little bit trickier about Python.
However, the behavior will be exactly the same.
Let's do one more line of code to replace.
We'll replace this "Equals" line.
We'll do cs.Equals().click() and now we can delete the "Equals" line of code.
We'll delete the "One" and "Two" and now we should have the exact replacement code.
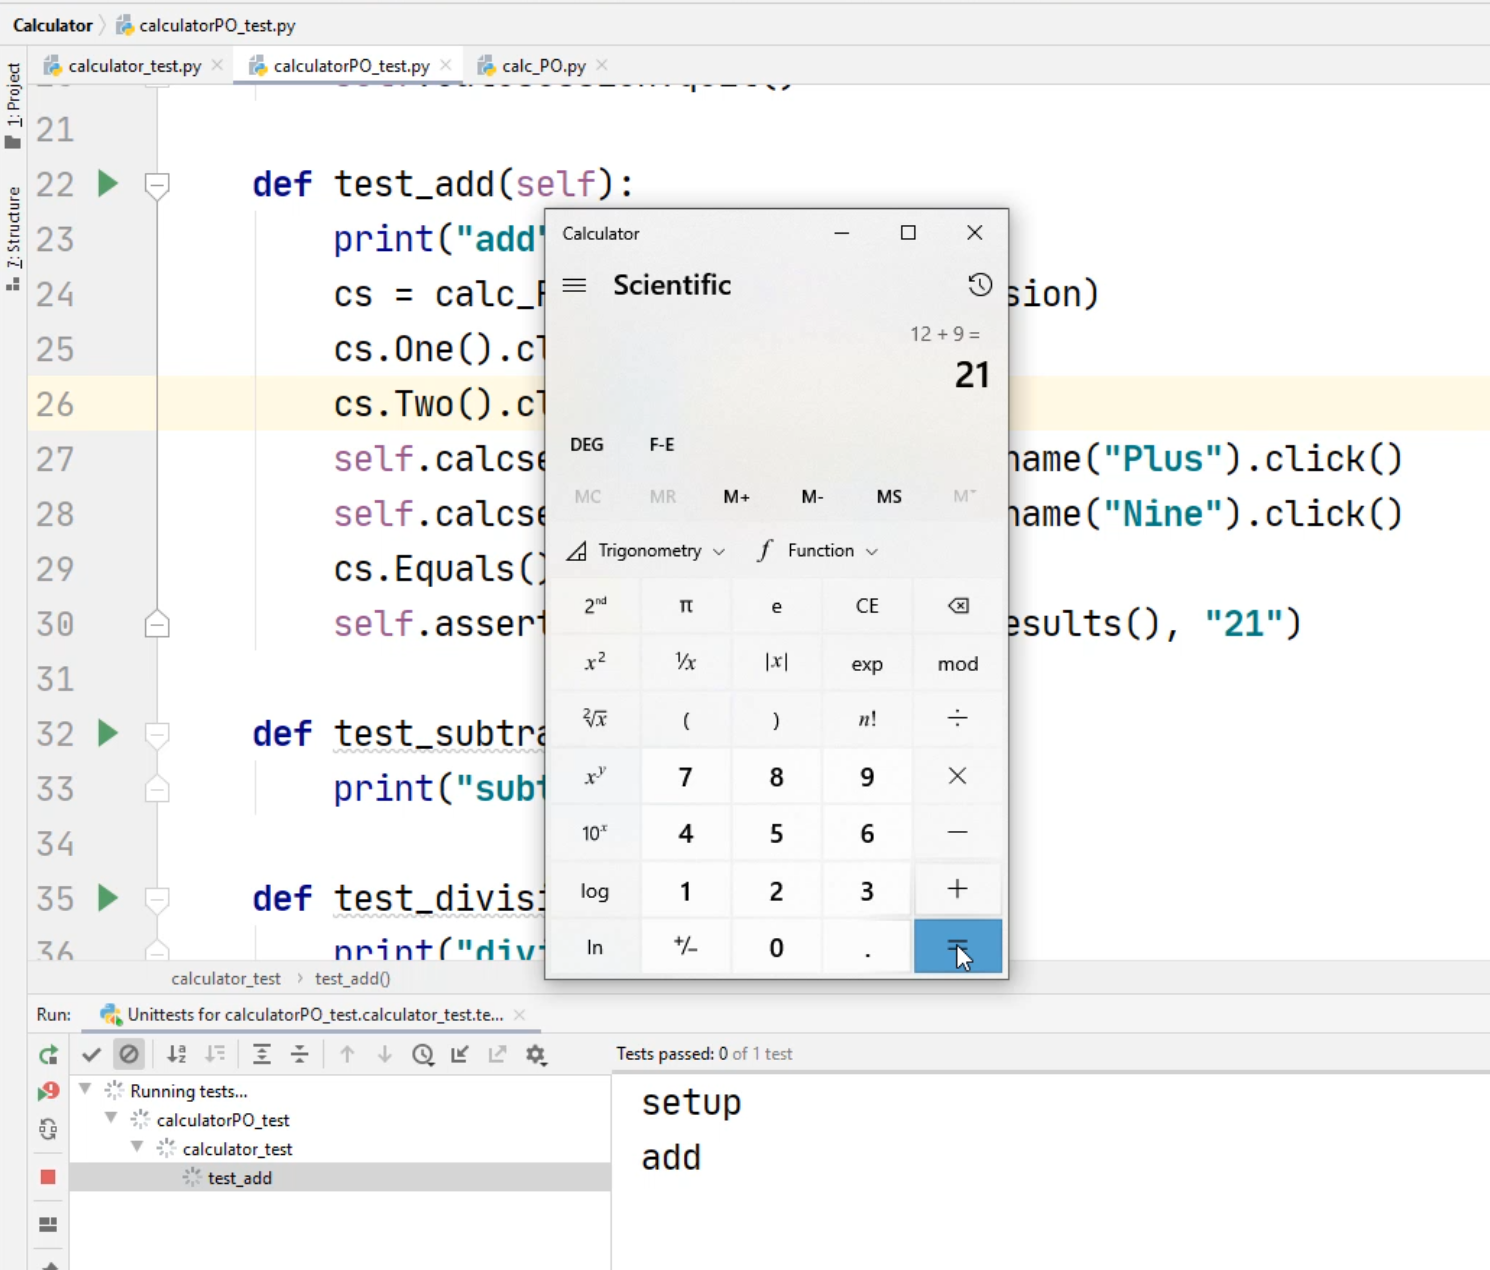
from calc import calc_PO

    def test_add(self):
        print("add")
        cs = calc_PO.calc_PO(self.calcsession)
        cs.One().click()
        cs.Two().click()
        self.calcsession.find_element_by_name("Plus").click()
        self.calcsession.find_element_by_name("Nine").click()
        cs.Equals().click()
        self.assertEqual(self.getDisplayResults(), "21")
Now you can see how the page object can replace some of the code that you have.
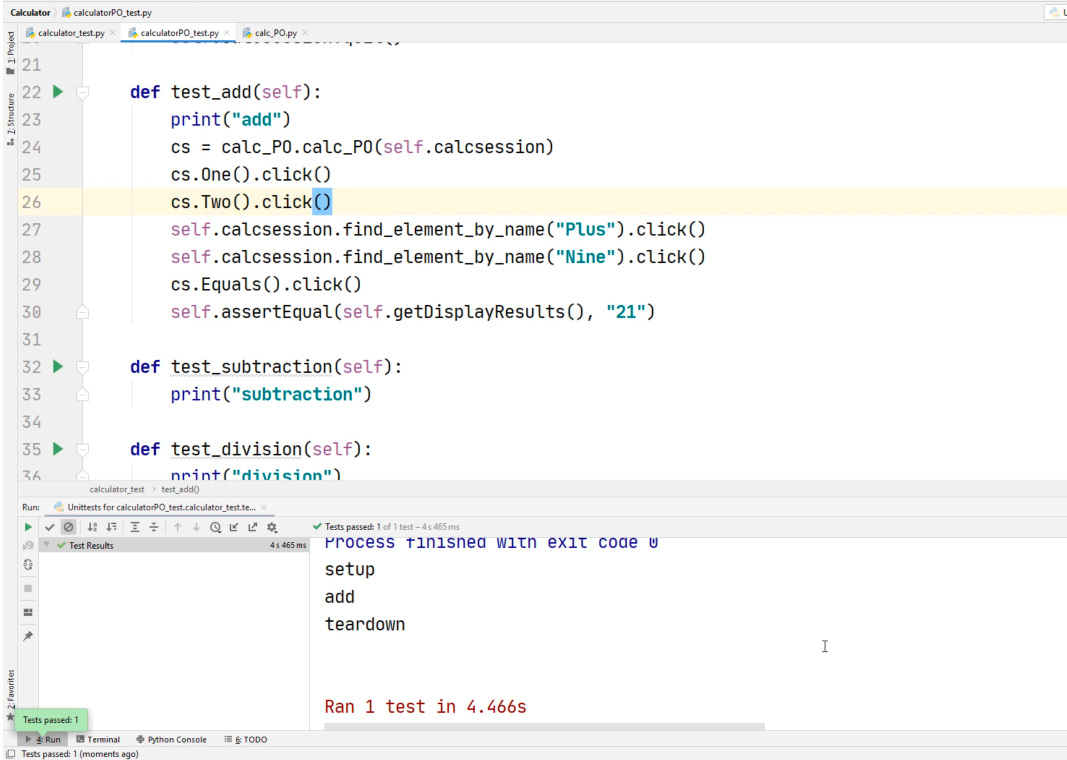
Let's try to run this test_add again, and let's see what happens.
We should get the same result, and the assertion should still pass.
Let's click on this "Run Test" and select "Run".
There you go - the test results passed, and now you know how to follow the page object pattern in Python.
Go ahead and fill out the rest of the calc_PO for yourself.
