

Transcripted Summary
# Coding in Java
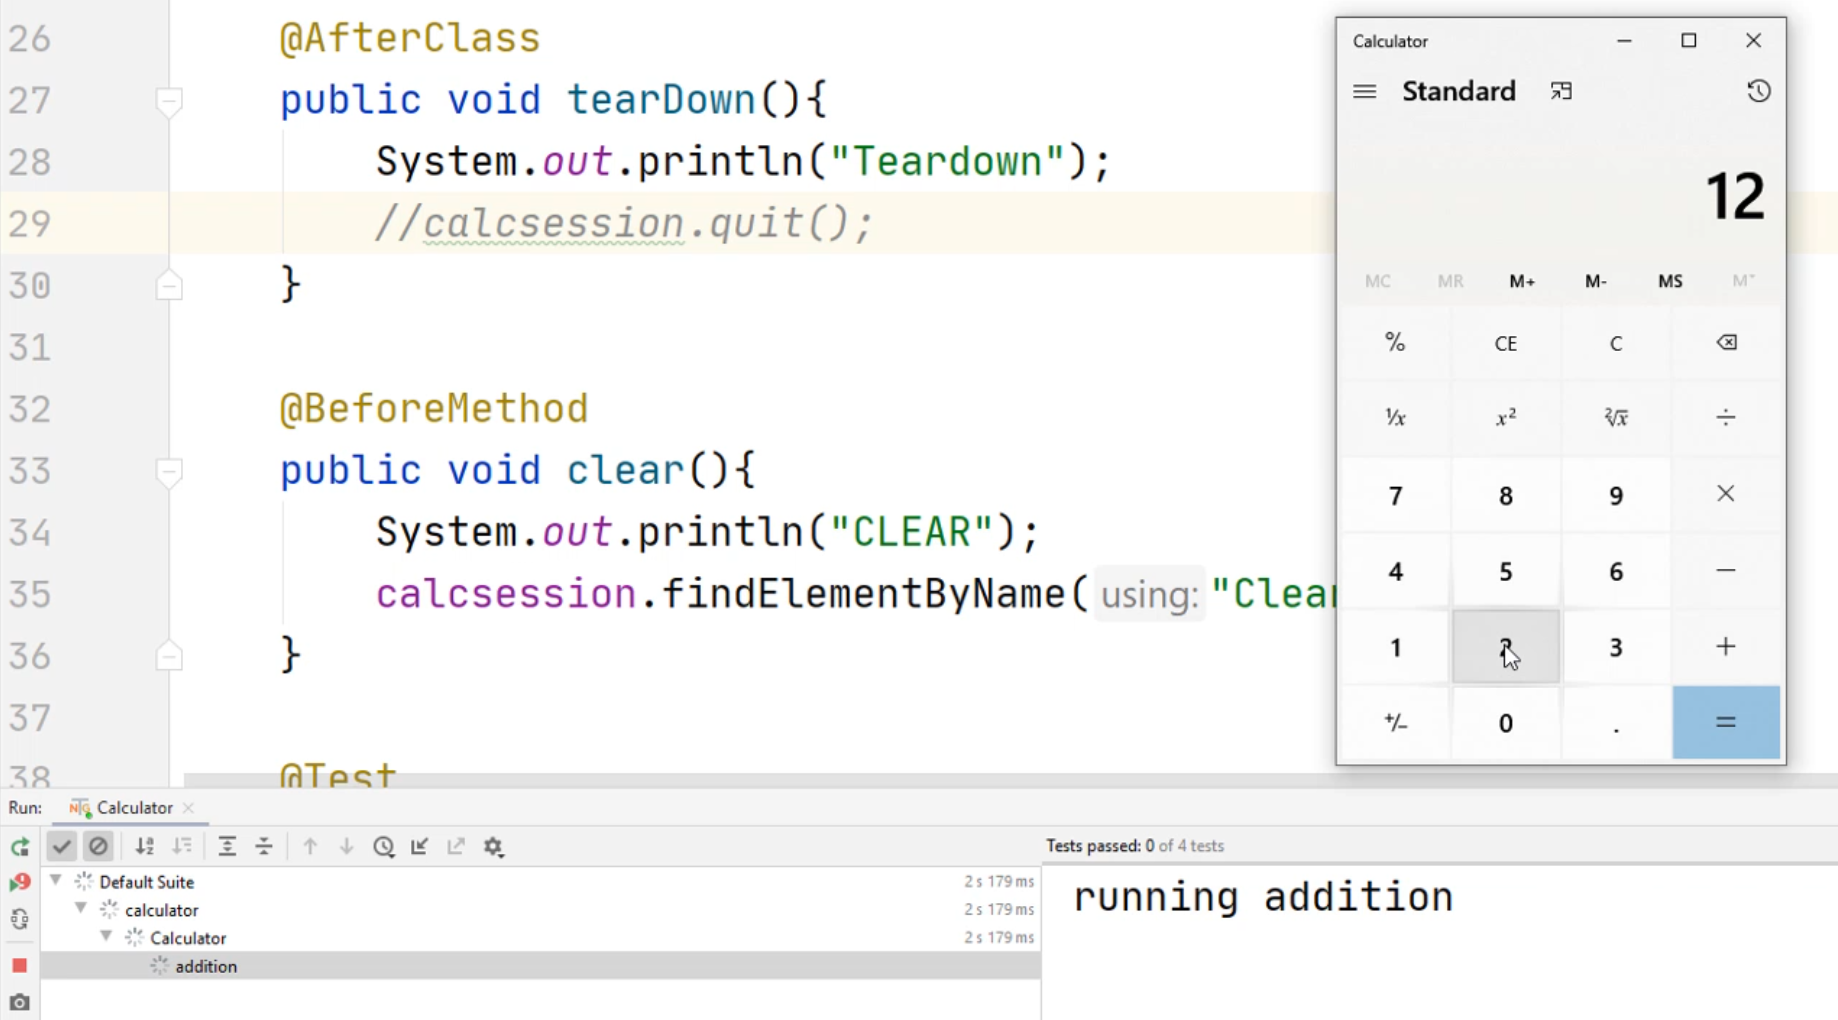
As you noticed previously when we ran our automation, the Calculator app is left open.
Let's fix that now.
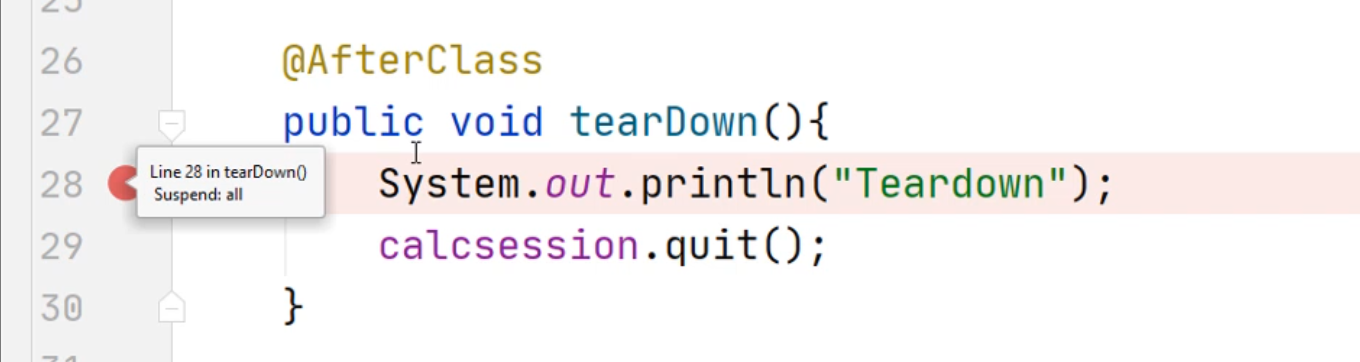
Let's go to the AfterClass in Calculator.java, and we're just going to create a new line right here.
We're going to type in calcsession.quit() - this will close out our application.
import io.appium.java_client.windows.WindowsDriver;
import org.openqa.selenium.WebElement;
import org.testng.annotations.*;
import org.openqa.selenium.remote.DesiredCapabilities;
import java.net.MalformedURLException;
import java.net.URL;

public class Calculator {
    private WindowsDriver calcsession = null;
    private WebElement calcresult = null;
    @BeforeClass
    public void setup(){
        System.out.println("setup");
        DesiredCapabilities capabilities = new DesiredCapabilities();
        capabilities.setCapability("app","Microsoft.WindowsCalculator_8wekyb3d8bbwe!App");
        try {
            calcsession = new WindowsDriver(new URL("http://127.0.0.1:4723"), capabilities);
        } catch (MalformedURLException e) {
            e.printStackTrace();
        }
    }

    @AfterClass
    public void tearDown(){
        System.out.println("Teardown");
        calcsession.quit();
    }

    @BeforeMethod
    public void clear(){
        System.out.println("CLEAR");
    }

    @Test
    public void addition(){
        System.out.println("running addition");
    }
    @Test
    public void multiplication(){
        System.out.println("running multiplication");
    }
    @Test
    public void subtraction(){
        System.out.println("running subtraction");
    }
    @Test
    public void division(){
        System.out.println("running division");
    }
}
Let's scroll up to the top of our class and let's run this again.
We should see a flash of our Calculator open, and we should see it close. Did you catch that?
In the event you didn't catch that, let's show you how you guys can pause your application from running.
Here, we are going to use a debugger. The debugger just means that we're going to pause our application from running.
This is a commonly-used type of development process.
To add a debugger to our code, we're going to go to the left hand section of our IDE and just left-click and put a red dot.
This indicates that it's a pause point.
This suspends all the code from running.
Now we're going to run our application again, but this time, instead of selecting "Run 'Calculator'", we're going to select "Debug 'Calculator'".
Notice our Calculator is running at this point and has paused our break point and here's our calcsession.quit().
Notice the calculator hasn't quit yet.
Now we're going to step through our code a little bit to show you each line of execution.
In your IDE, you'll have this option called "Step Over".
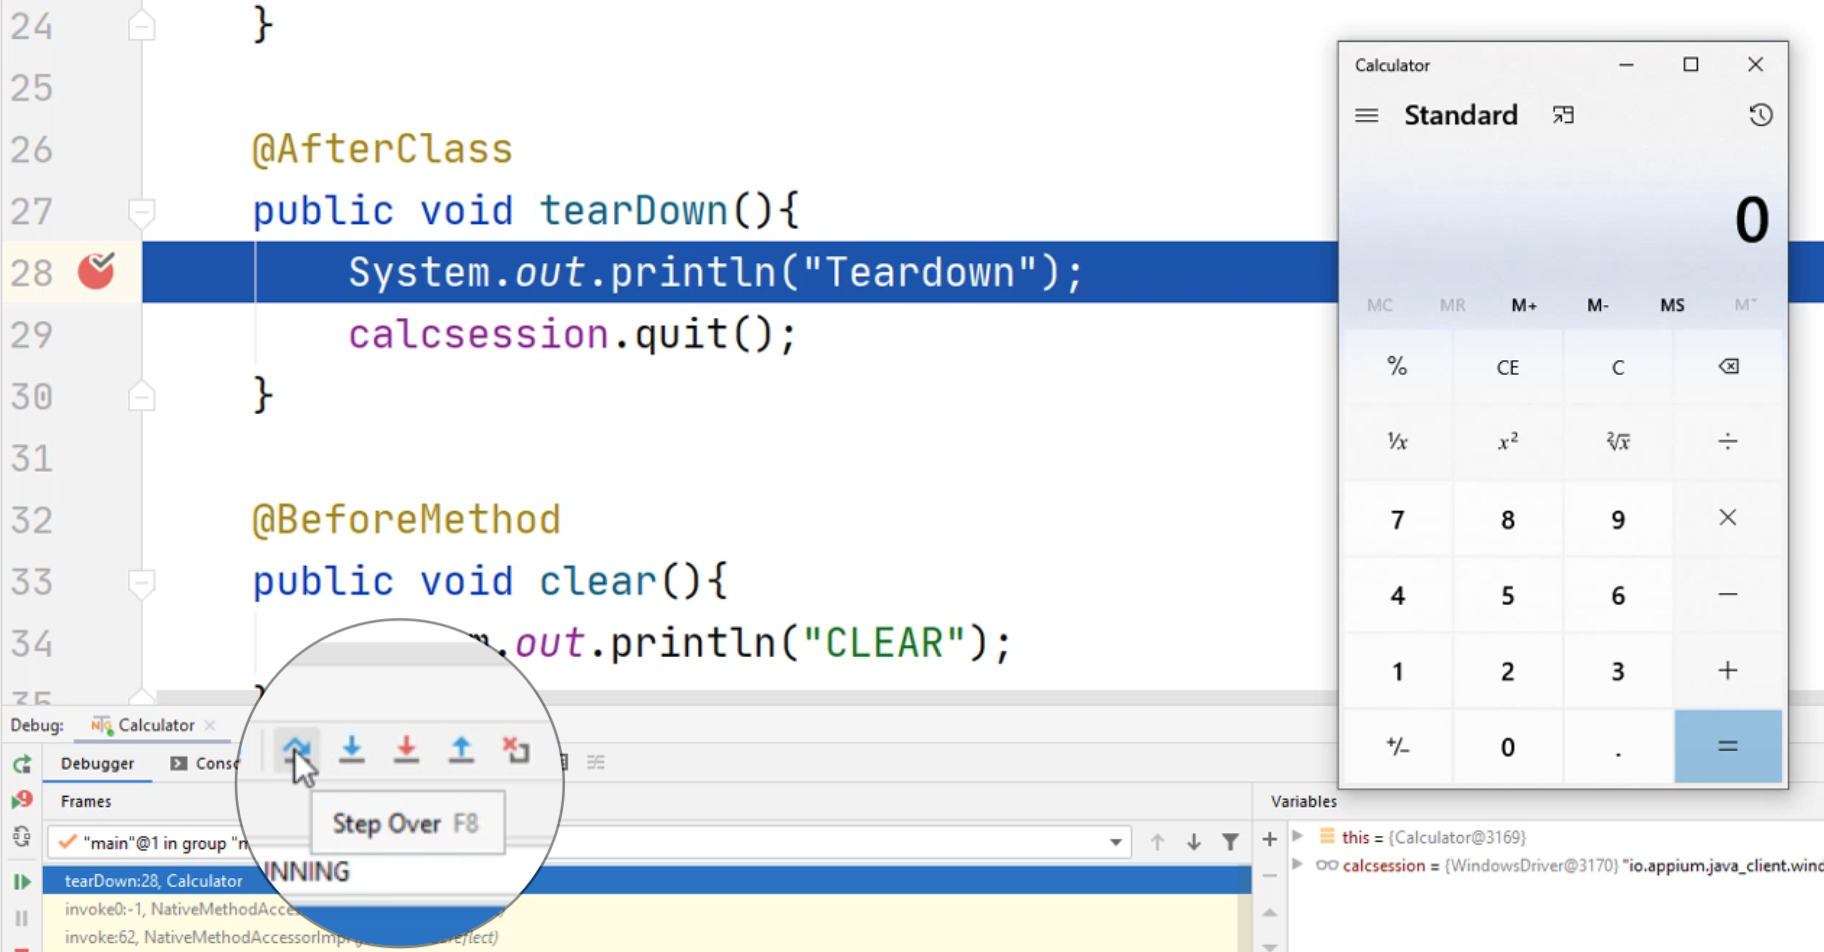
You can use the "F8" key as well.
This is the button that we're going to click on - we're going to click on this "Step Over".
At this point, your calculator is still running - you can't see that on the window.
If you open up your taskbar, you'll see your Calculator is still running.
Here's a calculator that we had previously that was still running.
After this line executes, the calcsession.quit(), you should see the Calculator close at this point.
We're going to click on the "Step Over" button.
You'll notice that the calculator closed. If you open up your taskbar, you will now notice there's only one calculator running.
Let's continue to add additional code to our project.
Let's remove this debug at this point and get it back to where we were before.
Let's look at this BeforeMethod.
In this BeforeMethod, what we want to do is clear out the entries.
This is where we want to clear out whatever we previously had entered in our calculator.
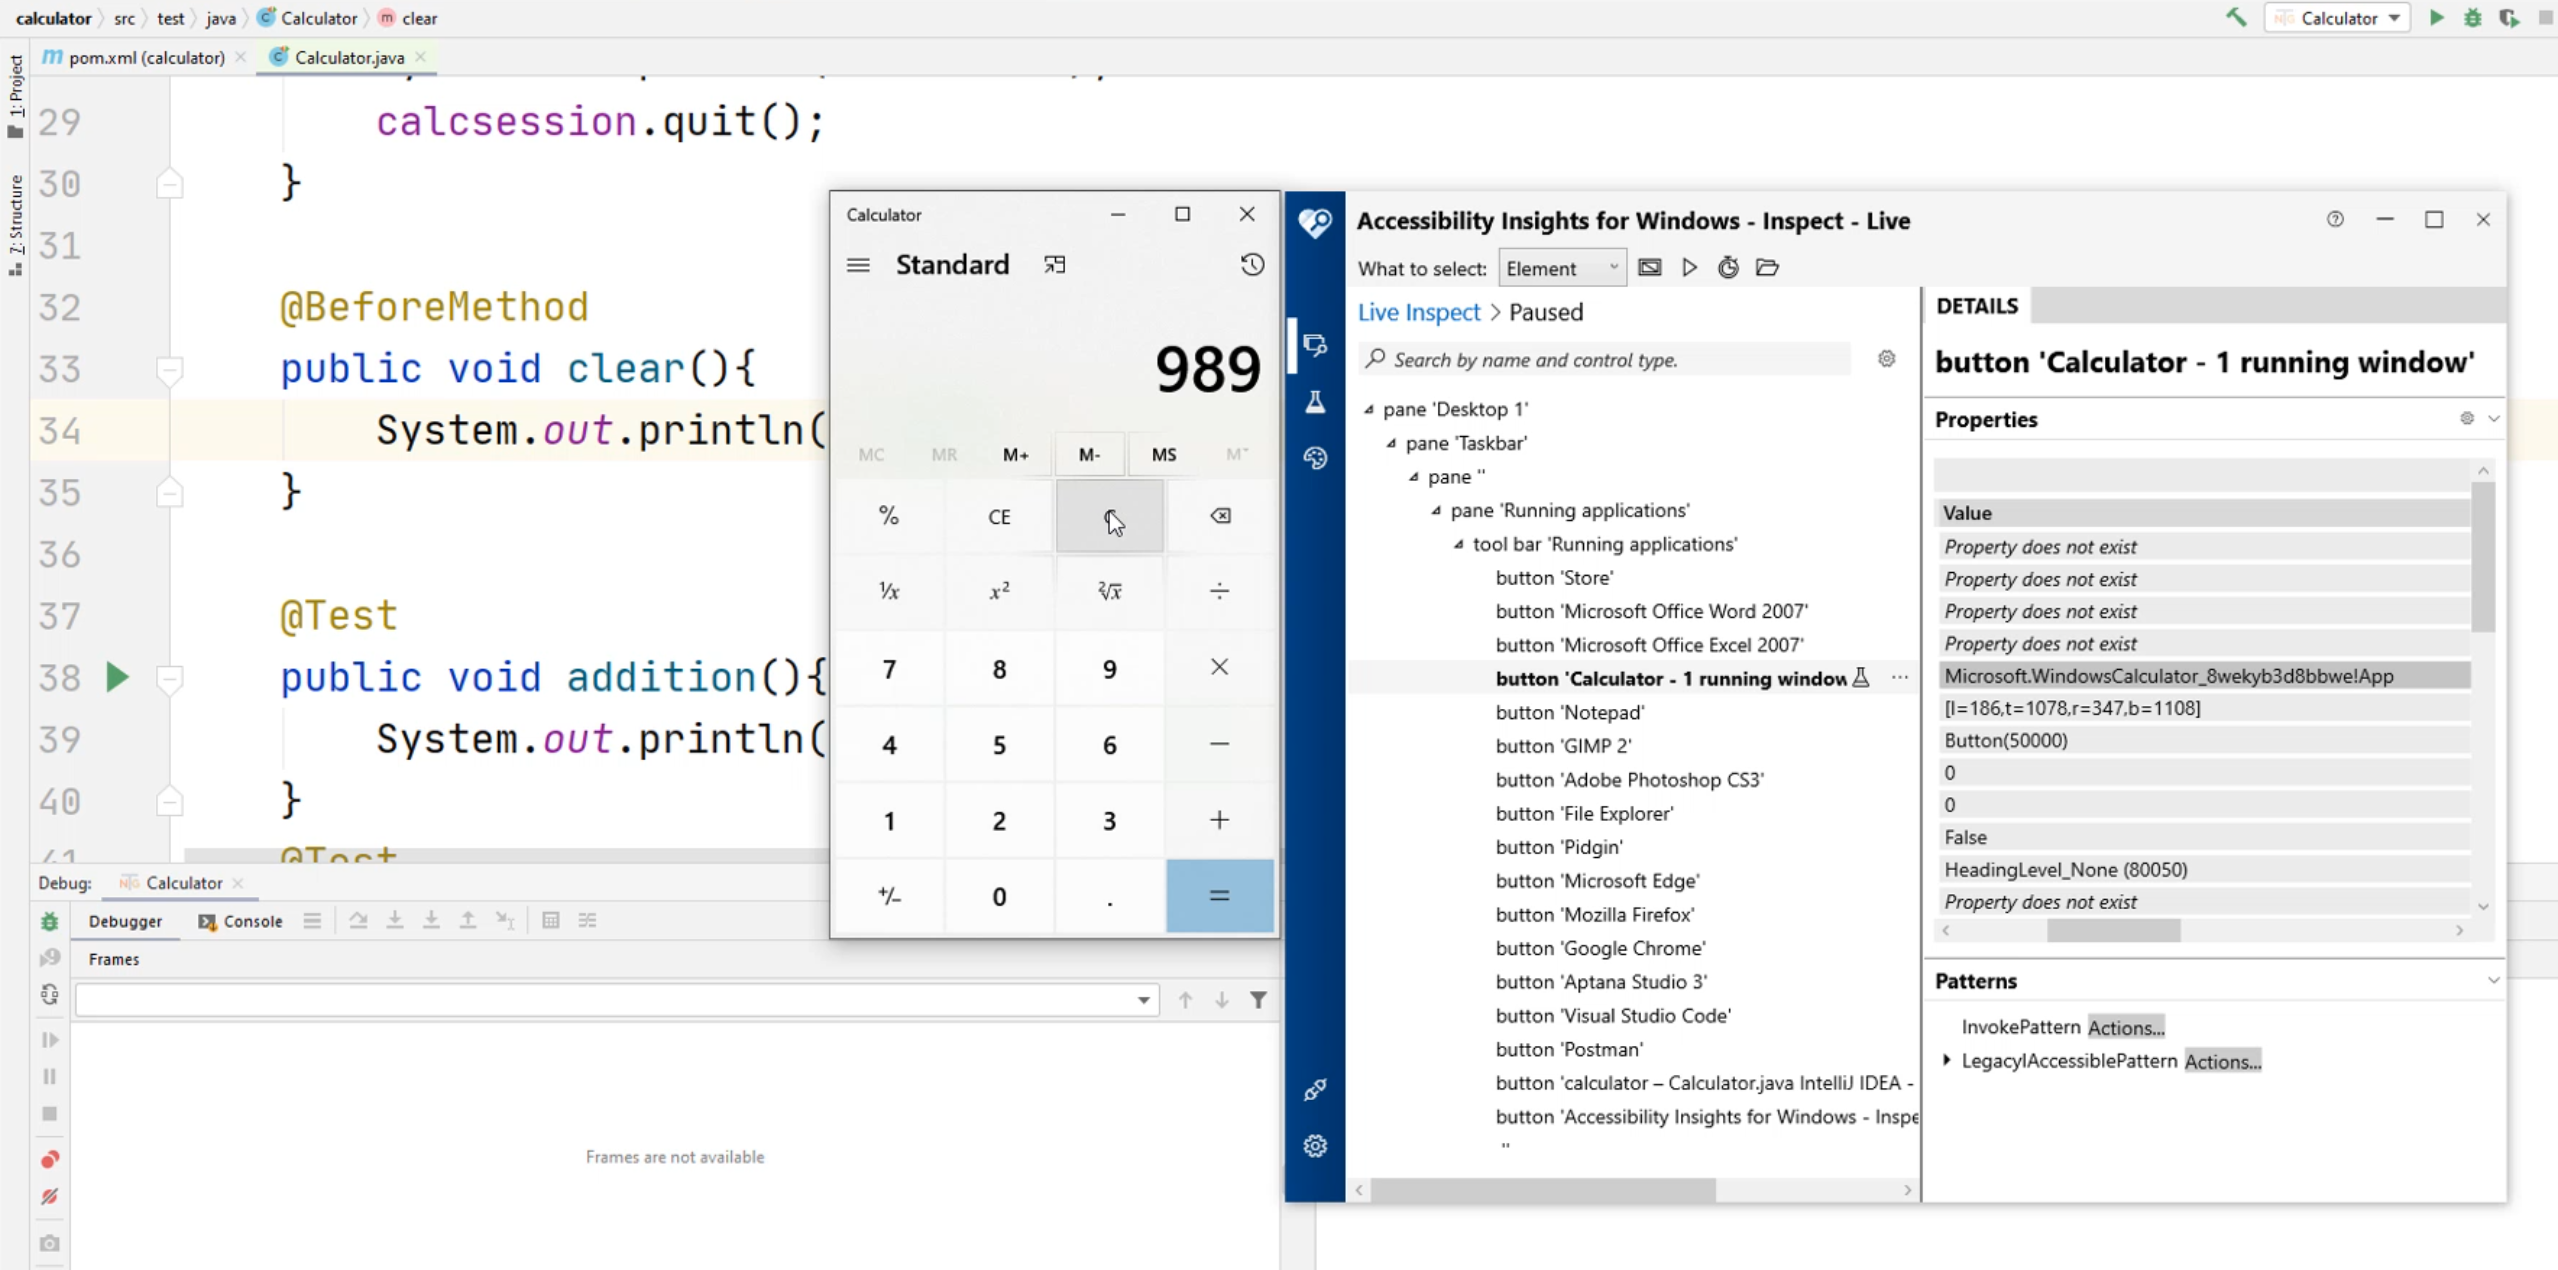
Let's open up our Calculator, and let's open up our Accessibility Insights.
The button that we're trying to isolate is this "Clear" button.
So let's say we click on "9" - "8" - "9".
Every time we run the automation, we want to click on this "Clear" - that's the button that we're going to focus on.
Let's turn on our highlighter.
Let's click on "Pause" and start recording the automation UI tree.
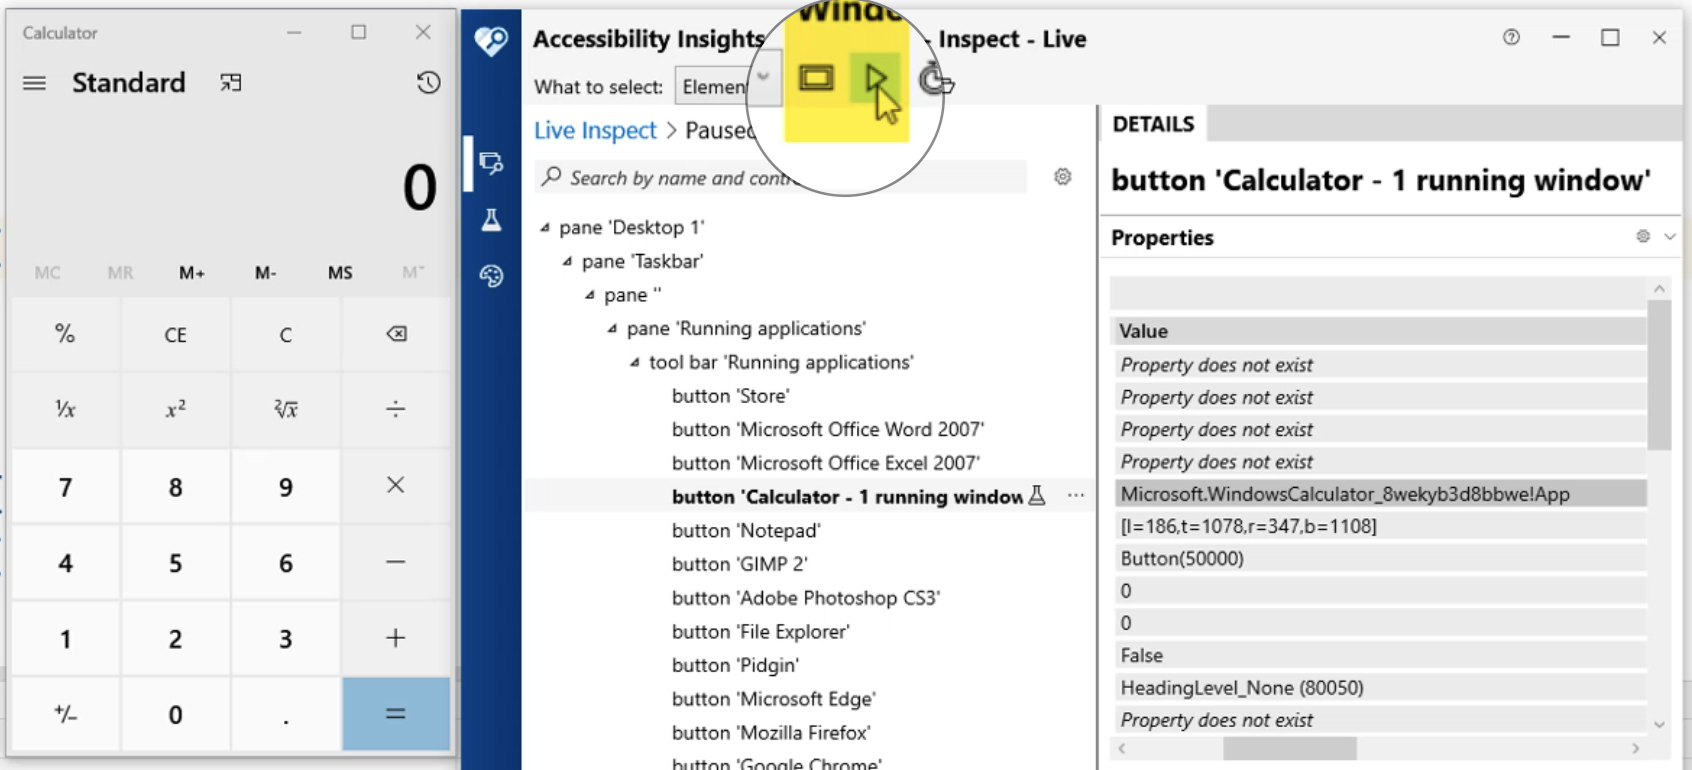
We're going to hover over the "Clear" button and in the details, we can scroll over and see that the "AutomationId" is called "clearButton".
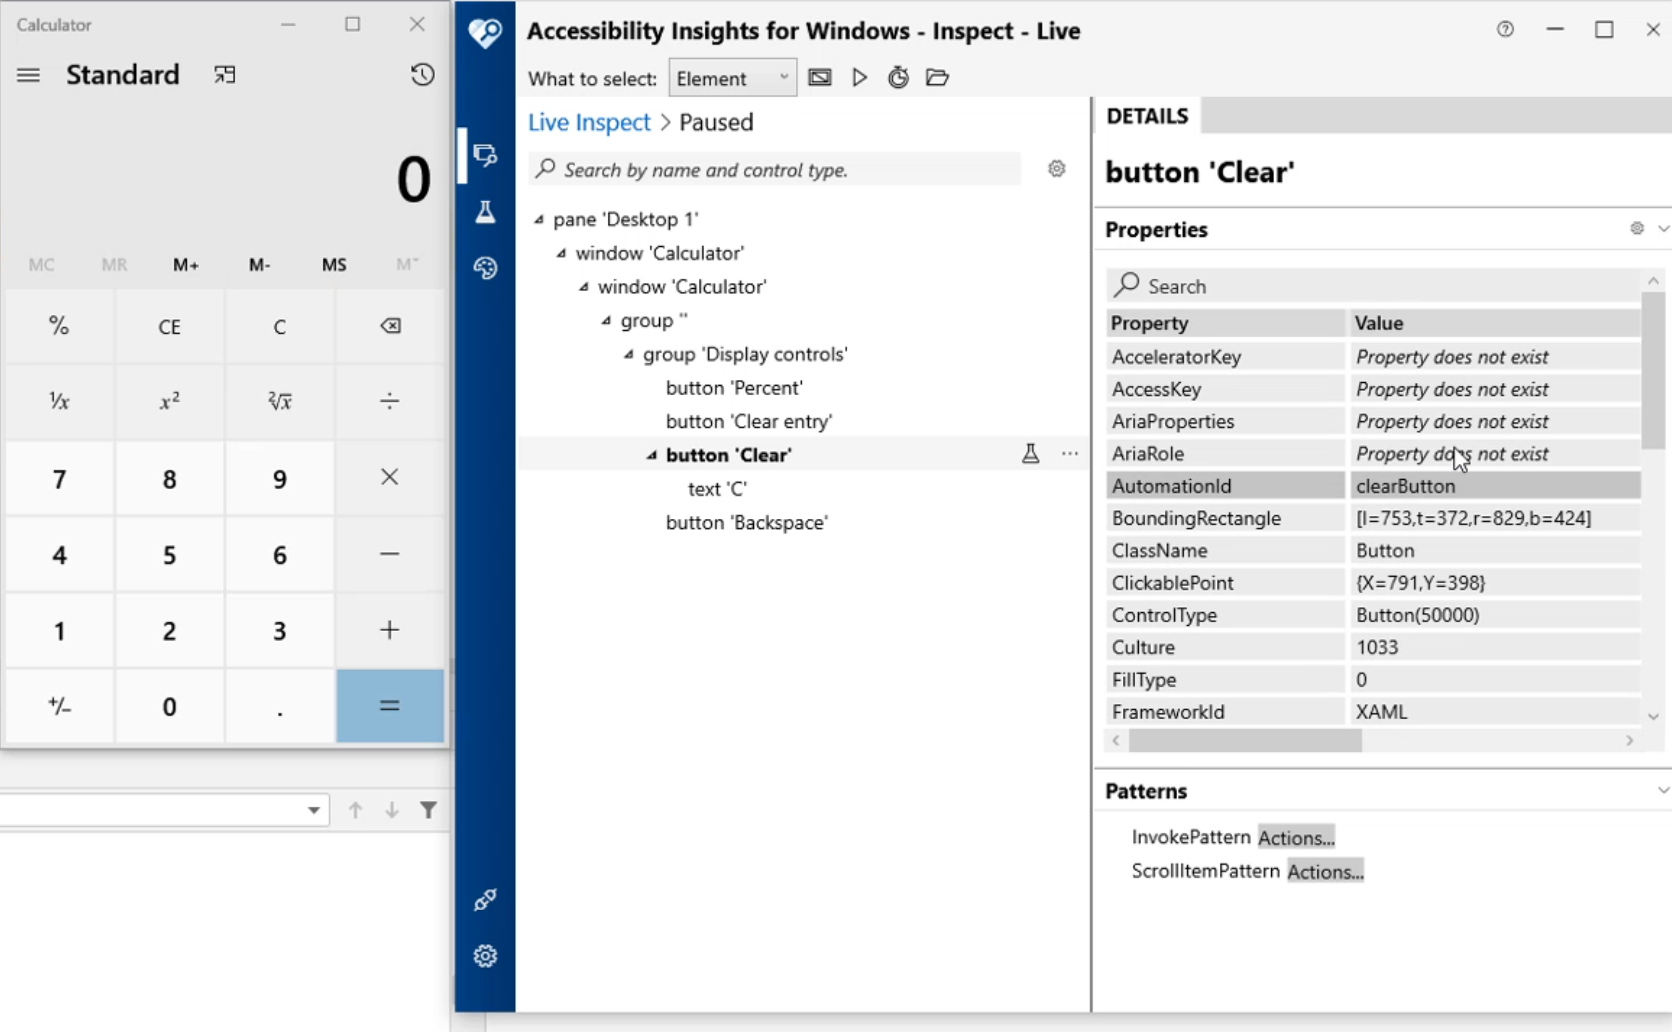
We can utilize this value for our automation.
Let's scroll down and look at the "Name" - the name says "Clear".
The name "Clear" is a little easier to use, so this is what we will be using for automation.
Let's minimize these two windows.
Let's create a new line here and type in calcsession.
First, we're going to have to find the element.
We're going to find the element by name.
We'll type in "findElementBy", and you should see the "ByName" option right here - let's double click on this.

You'll create the open and close parentheses (), and we're going to have to wrap this in double quotes "".
Remember the value is "Clear" with a capital "C".
After we find this element, we're going to add a . and now we can see the options that we have.
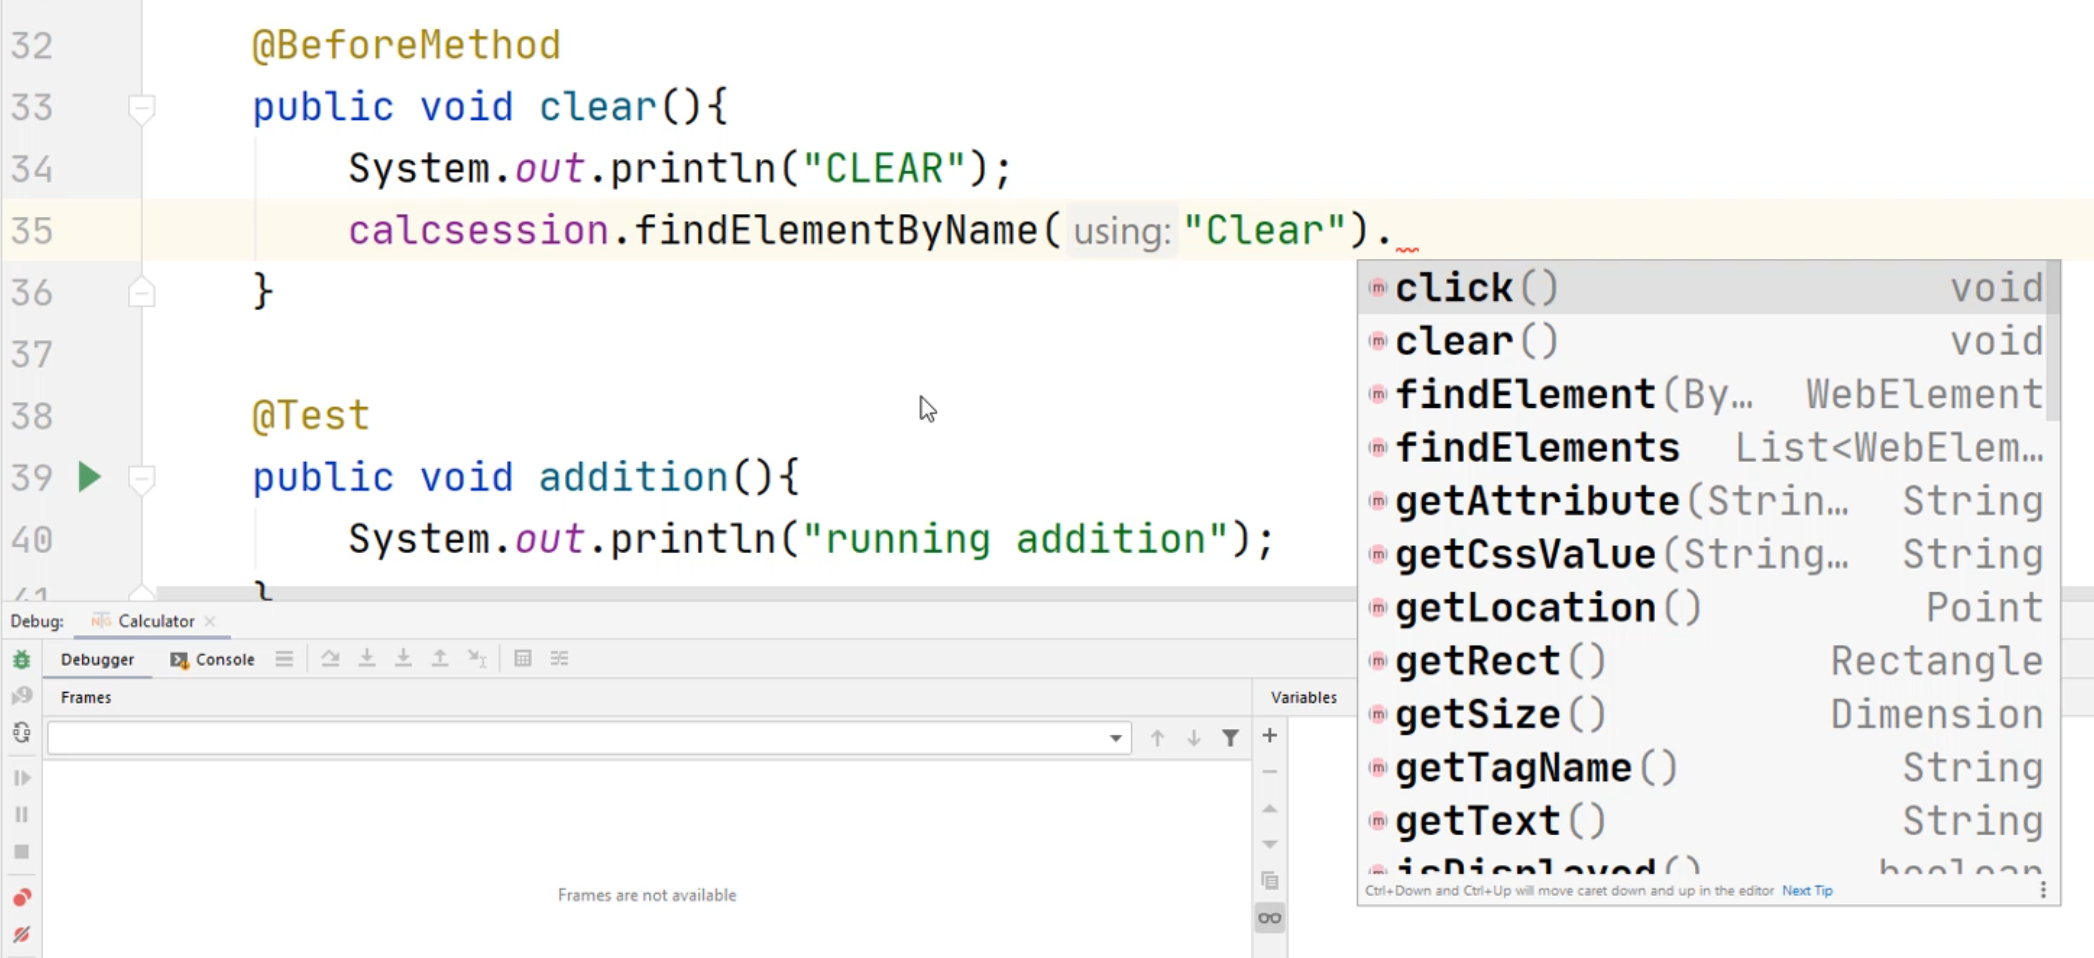
We can do a .click, .clear, .getRect, .getLocation, .getSize, .getText.
Each of these denotes a different method within our WebDriver - our WebDriver can utilize any of these functions.
The .getText will get the text of the value of the element.
The .getSize returns the dimensions of the element, but for what we need, we're going to use a .click.
import io.appium.java_client.windows.WindowsDriver;
import org.openqa.selenium.WebElement;
import org.testng.annotations.*;
import org.openqa.selenium.remote.DesiredCapabilities;
import java.net.MalformedURLException;
import java.net.URL;

public class Calculator {
    private WindowsDriver calcsession = null;
    private WebElement calcresult = null;
    @BeforeClass
    public void setup(){
        System.out.println("setup");
        DesiredCapabilities capabilities = new DesiredCapabilities();
        capabilities.setCapability("app","Microsoft.WindowsCalculator_8wekyb3d8bbwe!App");
        try {
            calcsession = new WindowsDriver(new URL("http://127.0.0.1:4723"), capabilities);
        } catch (MalformedURLException e) {
            e.printStackTrace();
        }
    }

    @AfterClass
    public void tearDown(){
        System.out.println("Teardown");
        calcsession.quit();
    }

    @BeforeMethod
    public void clear(){
        System.out.println("CLEAR");
        calcsession.findElementByName("Clear").click();
    }

    @Test
    public void addition(){
        System.out.println("running addition");
    }
    @Test
    public void multiplication(){
        System.out.println("running multiplication");
    }
    @Test
    public void subtraction(){
        System.out.println("running subtraction");
    }
    @Test
    public void division(){
        System.out.println("running division");
    }
}
This will click on the "Clear" button, and now let's run our automation again.
We're going to run the Calculator.
Did you catch that? Let's run this again. Watch closely.
You'll notice that the "Clear" button is pushed each time that the method is run.
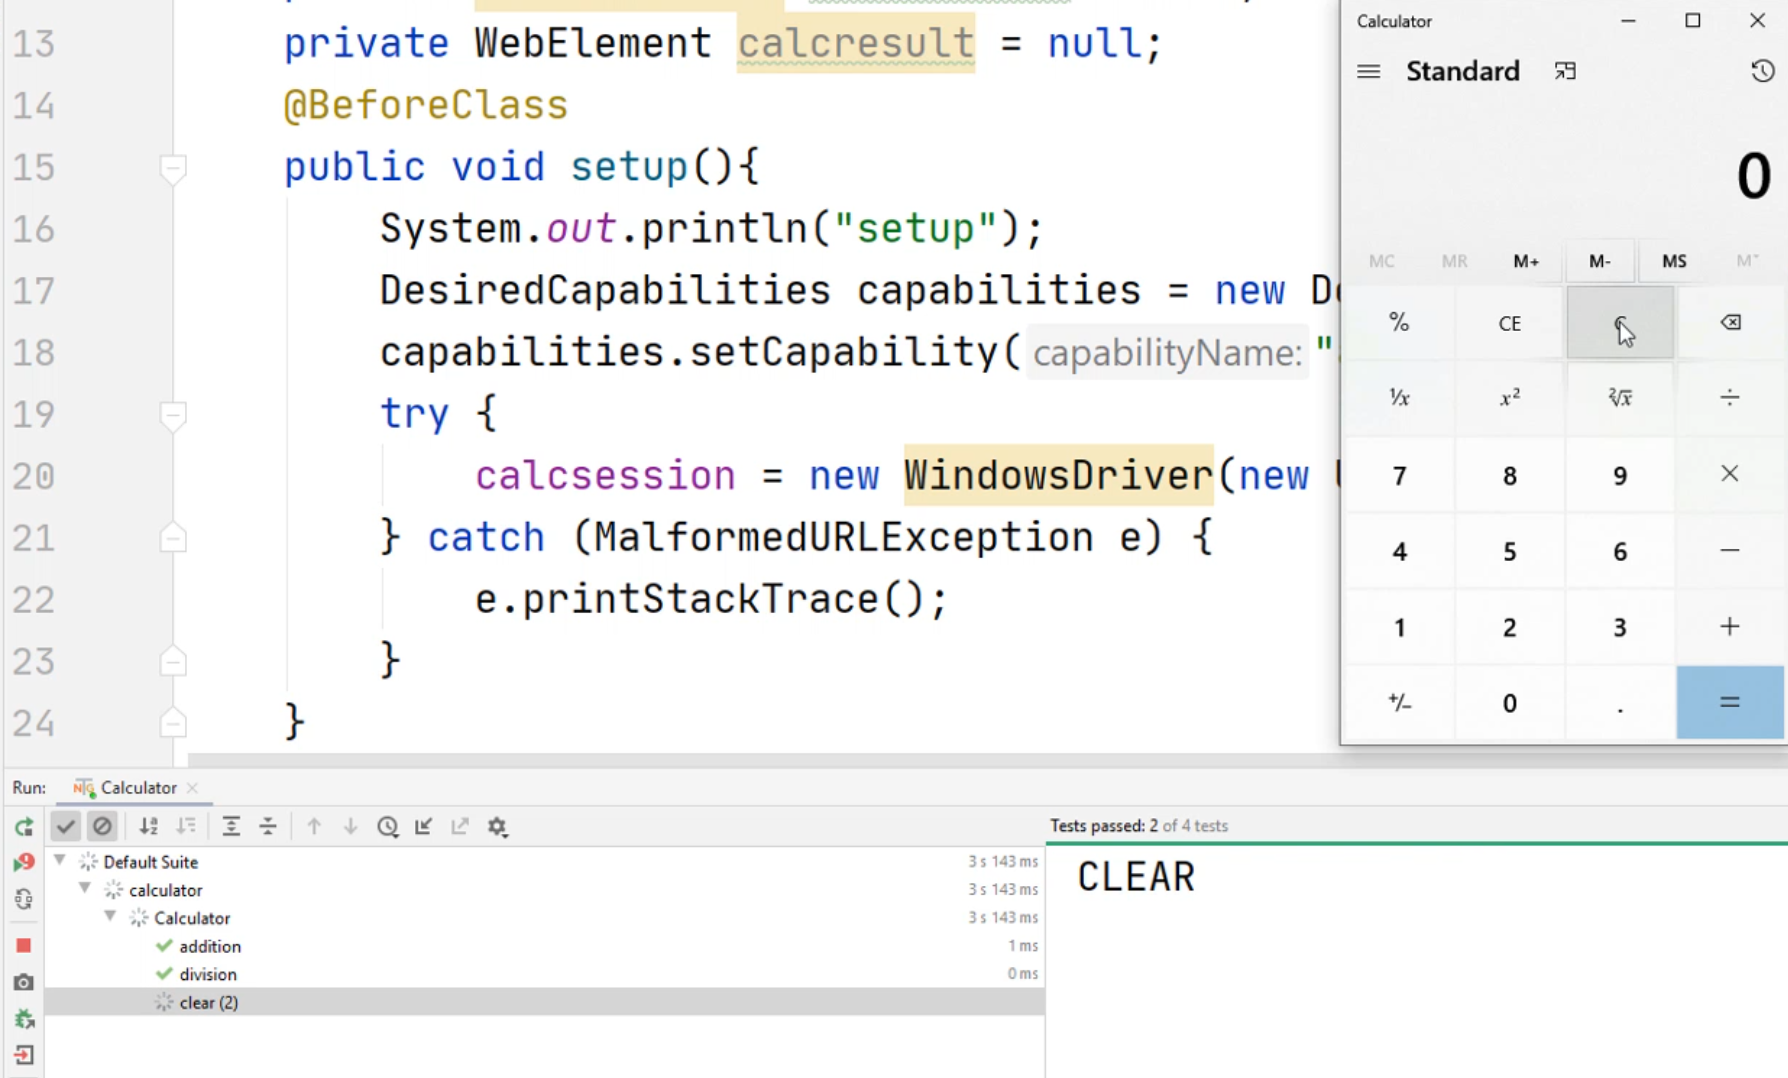
Since we have four different methods, you'll notice that it was clicked four times.
Let's try this one more time. Here's one, two, three, and four and close.
Now let's add some additional functionality into our automation.
Let's focus on the buttons first.
We have to figure out how we can identify each element inside the buttons of the Calculator.
Let's open up the Calculator app and let's open up the Accessibility Insights.
Let's turn on the highlighter and let's resume the recording of the automation UI tree.
Let's hover over the button "9". Nine has a value named "Nine".
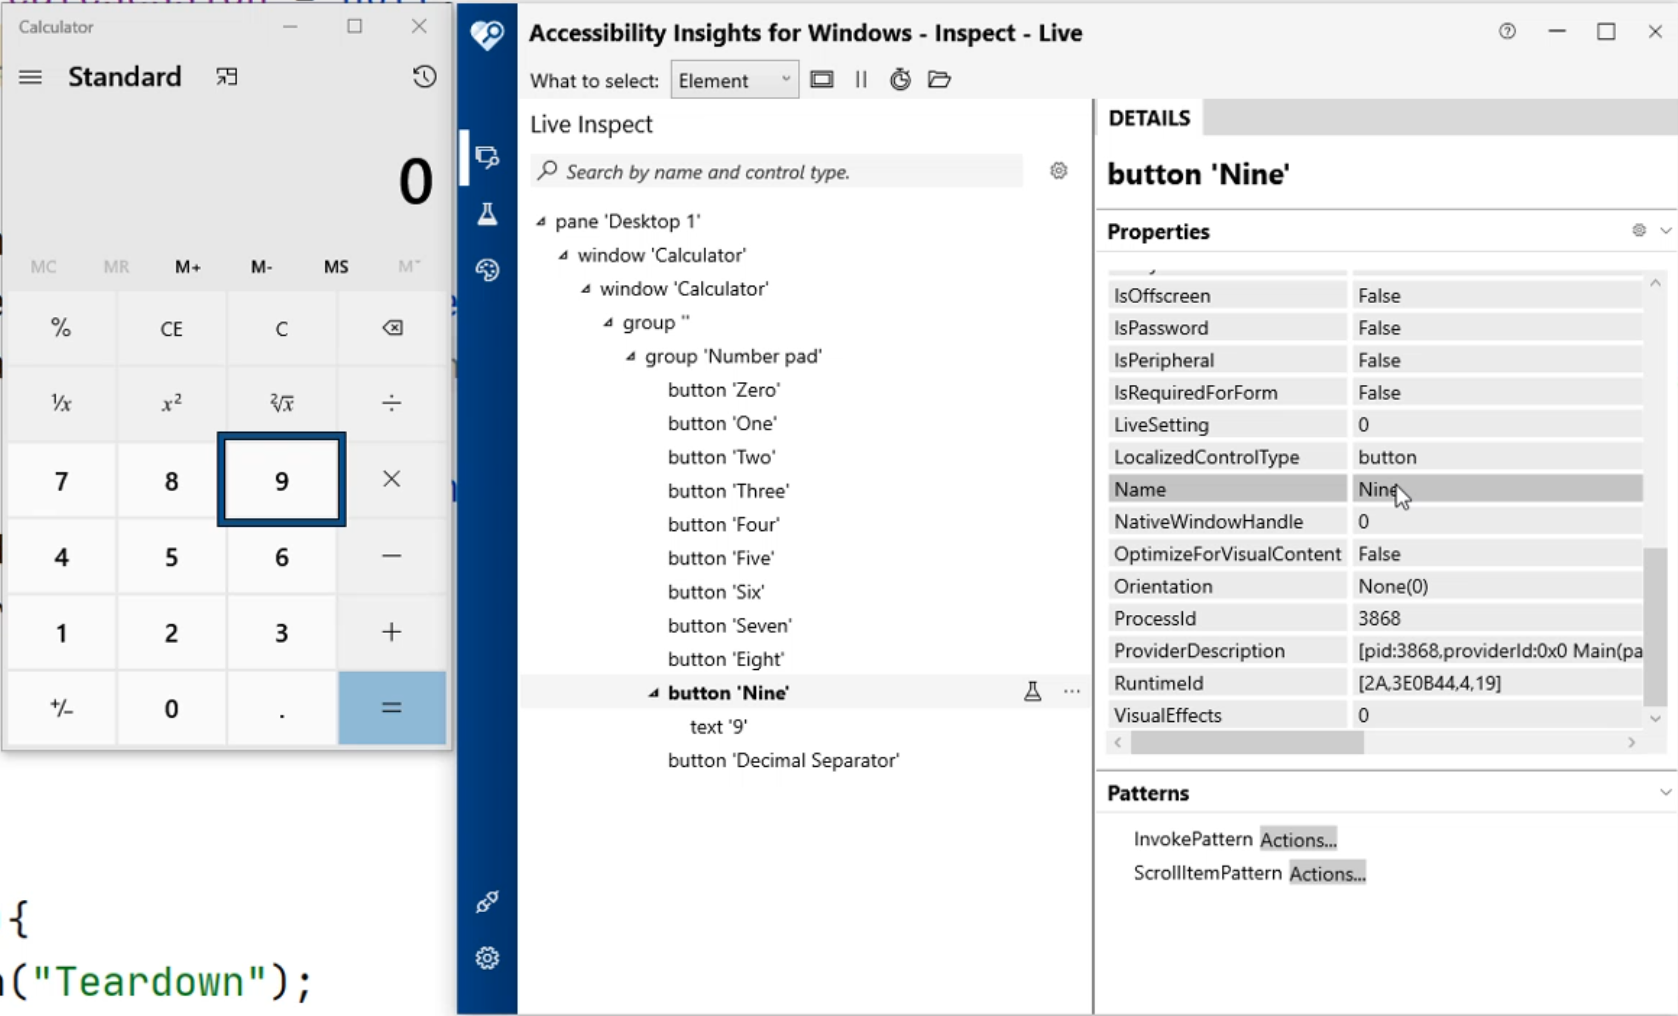
If you hover over "8", it's the value of "Eight".
Hover over "7", it's "Seven".
"6" shows "Six".
This gives us a common way to identify each of our values from "0" through "9".
Let's do this in our automation code now.
Let's go ahead and pause the recording of the automation tree and disable the highlighter and minimize these two windows.
Now let's scroll down to our addition method.
We're going to type in calcsession.findElementByName("One"). Just like the "Clear", we're going to type in .click() and let's type in another button.
Let's type in the code for another value.
Let's type in calcsession.findElementByName("Two"). Remember to use a capital "Two". Do a .click().
Let's see what happens at this point in our automation.
Before we do that, I want to stop the Calculator from closing.
So what I'm going to do to comment out this line is just to put in //. That will comment this line of code from running.
import io.appium.java_client.windows.WindowsDriver;
import org.openqa.selenium.WebElement;
import org.testng.annotations.*;
import org.openqa.selenium.remote.DesiredCapabilities;
import java.net.MalformedURLException;
import java.net.URL;

public class Calculator {
    private WindowsDriver calcsession = null;
    private WebElement calcresult = null;
    @BeforeClass
    public void setup(){
        System.out.println("setup");
        DesiredCapabilities capabilities = new DesiredCapabilities();
        capabilities.setCapability("app","Microsoft.WindowsCalculator_8wekyb3d8bbwe!App");
        try {
            calcsession = new WindowsDriver(new URL("http://127.0.0.1:4723"), capabilities);
        } catch (MalformedURLException e) {
            e.printStackTrace();
        }
    }

    @AfterClass
    public void tearDown(){
        System.out.println("Teardown");
        //calcsession.quit();
    }

    @BeforeMethod
    public void clear(){
        System.out.println("CLEAR");
        calcsession.findElementByName("Clear").click();
    }

    @Test
    public void addition(){
        System.out.println("running addition");
        calcsession.findElementByName("One").click();
        calcsession.findElementByName("Two").click();
    }
    @Test
    public void multiplication(){
        System.out.println("running multiplication");
    }
    @Test
    public void subtraction(){
        System.out.println("running subtraction");
    }
    @Test
    public void division(){
        System.out.println("running division");
    }
}
So now what's going to happen is we should see the Calculator open, type in the keys, type in the keys "1" and "2", and our automation will stop, but we should still see our calculator open with "12" as a value.
Let's scroll up and let's run this. Did you see that?
Let's go back to our IDE now. We're going to minimize this console area.
Let's open up our Calculator and let's open up Accessibility Insights, enable the highlighter, and let's start recording.
Let's hover over the "division" and notice the names say "Divide by", "Multiply by", "Minus", "Plus". We can utilize these different values for automation.
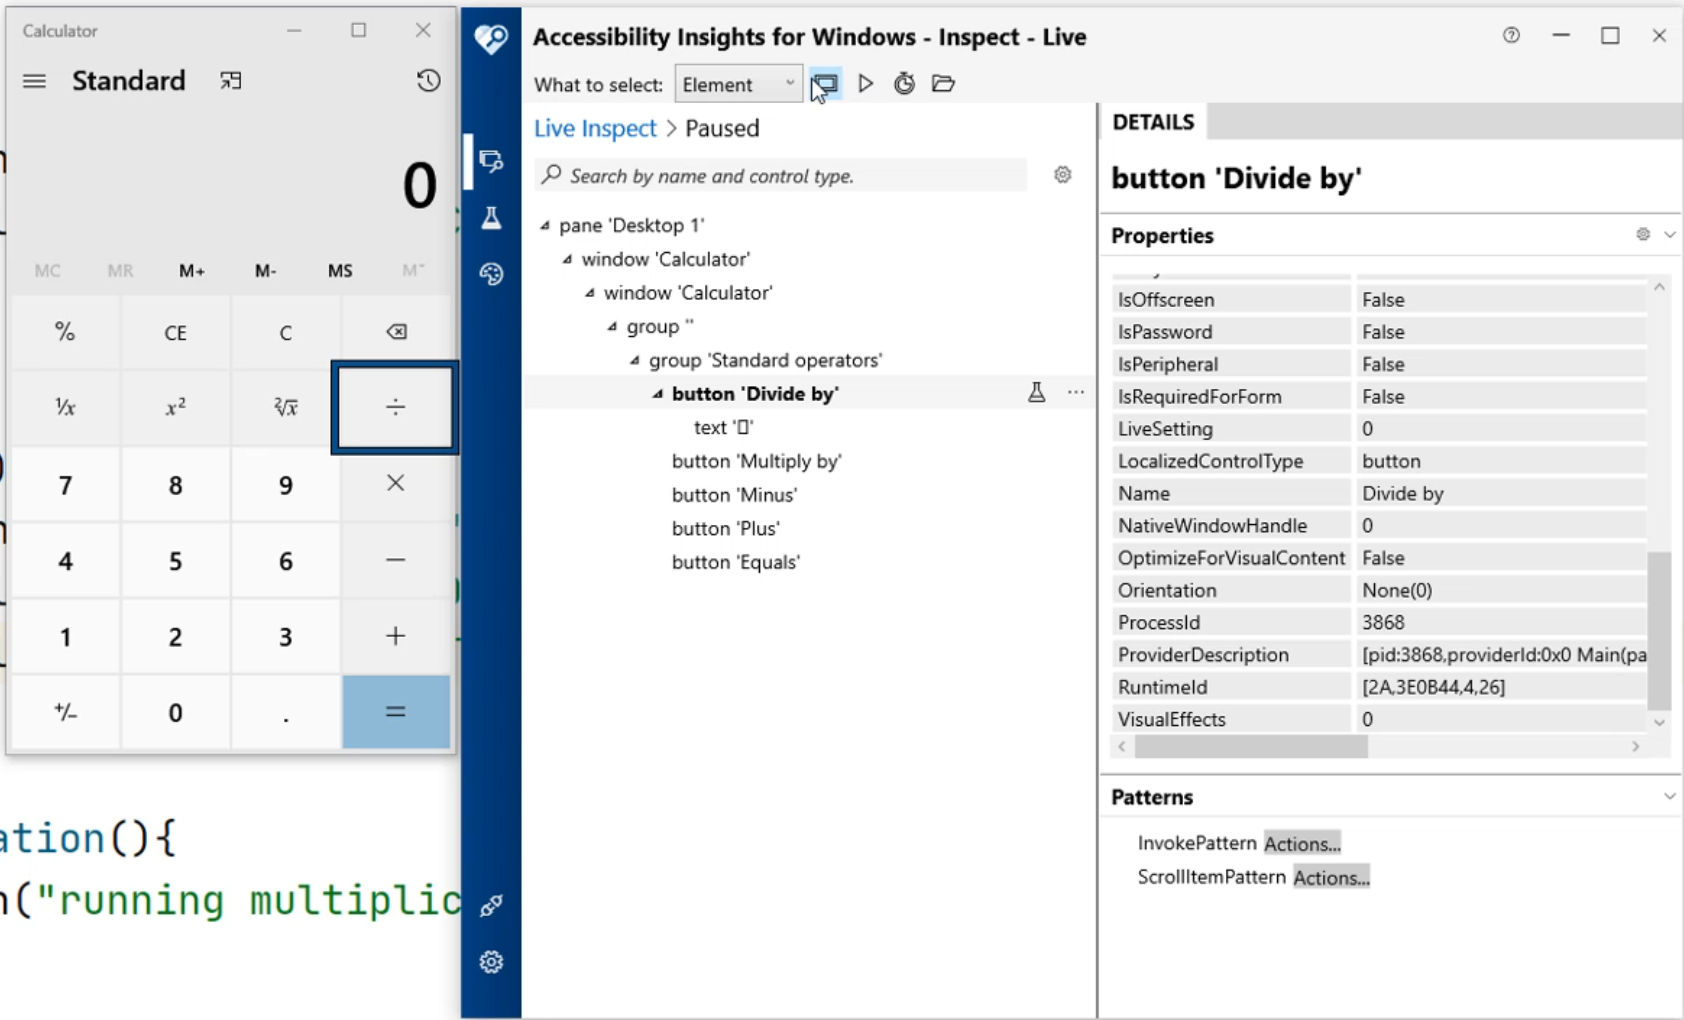
Let's pause our UI automation tree, and disable the highlighter and minimize these two windows.
Here, we're going to type in calcsession.findElementByName(), and we'll type in Plus for the key and .click().
Now we're going to type in calcsession and let's put in another value - you can use whatever value you want to - I'm going to use Nine, and then .click().
I'm going to do calcsession.findElementByName() and I want to do Equals.
At this point, we should see our automation run and should type in "1", "2", "+", "9", "=".
import io.appium.java_client.windows.WindowsDriver;
import org.openqa.selenium.WebElement;
import org.testng.annotations.*;
import org.openqa.selenium.remote.DesiredCapabilities;
import java.net.MalformedURLException;
import java.net.URL;

public class Calculator {
    private WindowsDriver calcsession = null;
    private WebElement calcresult = null;
    @BeforeClass
    public void setup(){
        System.out.println("setup");
        DesiredCapabilities capabilities = new DesiredCapabilities();
        capabilities.setCapability("app","Microsoft.WindowsCalculator_8wekyb3d8bbwe!App");
        try {
            calcsession = new WindowsDriver(new URL("http://127.0.0.1:4723"), capabilities);
        } catch (MalformedURLException e) {
            e.printStackTrace();
        }
    }

    @AfterClass
    public void tearDown(){
        System.out.println("Teardown");
        //calcsession.quit();
    }

    @BeforeMethod
    public void clear(){
        System.out.println("CLEAR");
        calcsession.findElementByName("Clear").click();
    }

    @Test
    public void addition(){
        System.out.println("running addition");
        calcsession.findElementByName("One").click();
        calcsession.findElementByName("Two").click();
        calcsession.findElementByName("Plus").click();
        calcsession.findElementByName("Nine").click();
        calcsession.findElementByName("Equals").click();
    }

//    @Test
//    public void multiplication(){
//        System.out.println("running multiplication");
//    }
//    @Test
//    public void subtraction(){
//        System.out.println("running subtraction");
//    }
//    @Test
//    public void division(){
//        System.out.println("running division");
//    }
}
Let's see how that works.
Before we do that, let's comment out the rest of the section for the rest of our test. We don't need this section right now.
So I'm going to highlight all this code and I'm going to hold down the "Ctrl" key and push the "/" button - that will highlight the whole entire section.
When you want to unhighlight this section, you hold down the "Ctrl" key and push the same "/" button - that will uncomment all this code.
When you comment out the code, the code will not run.
Let's comment out this code now, scroll up and let's run our automation.
This is working great.
But now at this point, let's add an assertion to make sure that our values are correct.
If the values are not correct, we should fail our test.
Let's open up our Accessibility Insights, let's enable the highlighter and start the record.
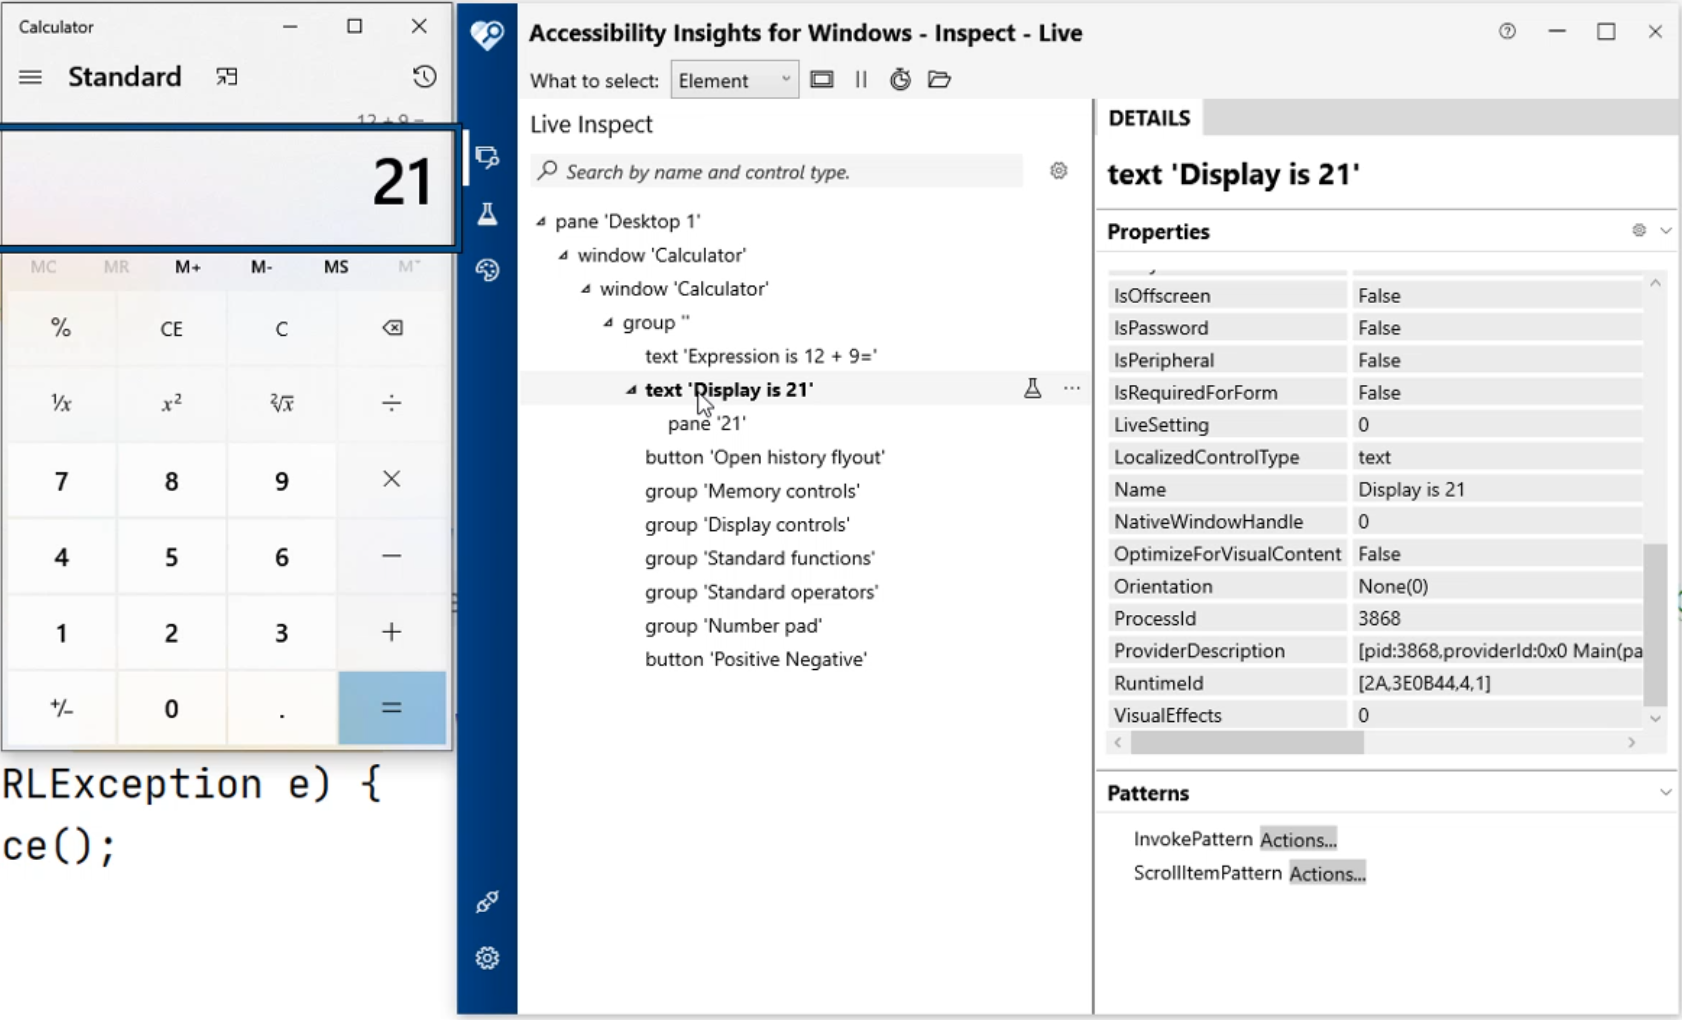
What we want to look for is this display area.
Notice this display for this text is "21" - you can see that this value is displayed right here - it says, "Display is 21."
To verify that this is working correctly, we're going to have to write some automation around it.
Notice in this example, the "Name" of this element is "Display is 21".
If we change this to something else - let's click on "0", "C".
Let's highlight the display again. Now, this time it says, "Display is 0".
We can't use "Name" to locate our element because this isn't static anymore.
So now, we're going to have to use something else.
Luckily, we have the "AutomationId" - "CalculatorResults".
So now we can type in "12", "+", "9", "=".
Click on this display area, and you'll notice the "CalculatorResults" is something static.
This value never changes so we can use "CalculatorResults" as our locator.
Let's disable the highlight and pause our automation tree and let's minimize these two windows.
Now let's create a new method. Let's scroll down to the bottom of our project and create a new line and type in public.
This time we're going to change the value to String.
Remember, previously, we used void.
The reason why we put String here is that we're going to return a value, and the value has to be a string type.
We're going to type in GetDisplayResult() and we're going to type in return and we're just going to put in an empty value "".
Now let's create a new line and we're going to type in calcresult, and now we're going to find the element - we're going to do "calcsession.findElement".
Remember this time we can't use the "ByName" value anymore.
We have to use the AccessibilityID here, so you should see the "ByAccessibilityID".
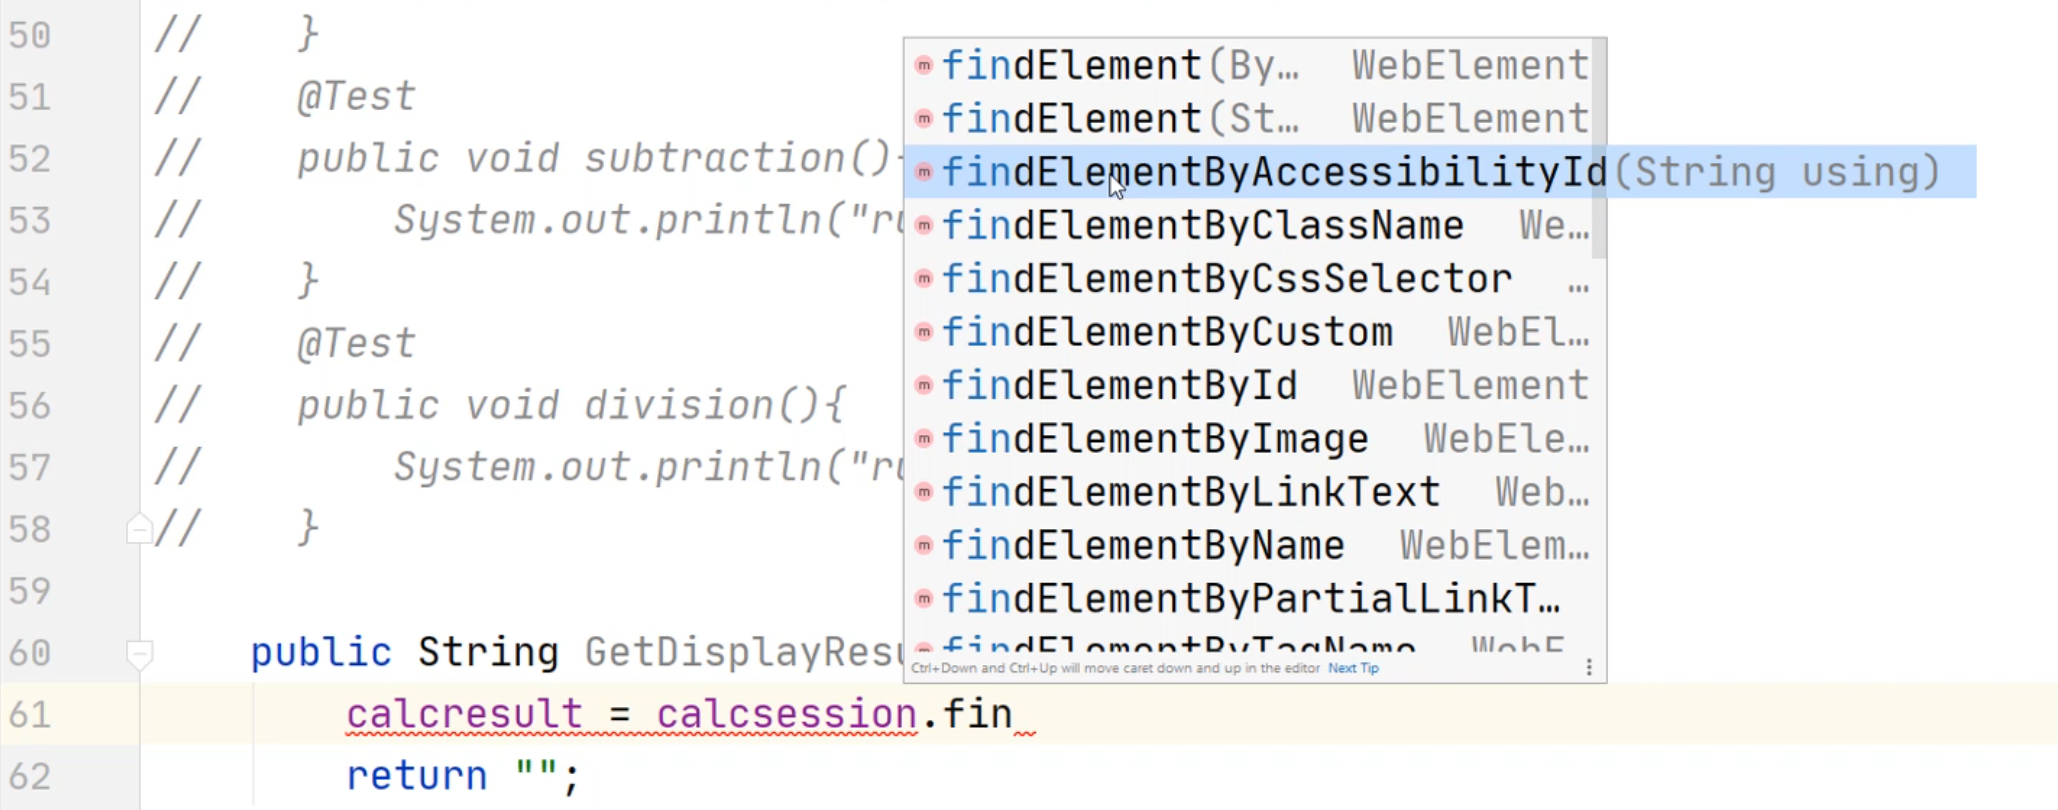
We're going to put in the value and we're going to end it with a semicolon.
The value that we're going to put in here - if you don't remember, we can go back to AccessibilityID - is called "CalculatorResults".
This will find the element now.
Create a new line - we're going to type in calcresult.getText().
import io.appium.java_client.windows.WindowsDriver;
import org.openqa.selenium.WebElement;
import org.testng.annotations.*;
import org.openqa.selenium.remote.DesiredCapabilities;
import java.net.MalformedURLException;
import java.net.URL;

public class Calculator {
    private WindowsDriver calcsession = null;
    private WebElement calcresult = null;
    @BeforeClass
    public void setup(){
        System.out.println("setup");
        DesiredCapabilities capabilities = new DesiredCapabilities();
        capabilities.setCapability("app","Microsoft.WindowsCalculator_8wekyb3d8bbwe!App");
        try {
            calcsession = new WindowsDriver(new URL("http://127.0.0.1:4723"), capabilities);
        } catch (MalformedURLException e) {
            e.printStackTrace();
        }
    }

    @AfterClass
    public void tearDown(){
        System.out.println("Teardown");
        //calcsession.quit();
    }

    @BeforeMethod
    public void clear(){
        System.out.println("CLEAR");
        calcsession.findElementByName("Clear").click();
    }

    @Test
    public void addition(){
        System.out.println("running addition");
        calcsession.findElementByName("One").click();
        calcsession.findElementByName("Two").click();
        calcsession.findElementByName("Plus").click();
        calcsession.findElementByName("Nine").click();
        calcsession.findElementByName("Equals").click();
    }

//    @Test
//    public void multiplication(){
//        System.out.println("running multiplication");
//    }
//    @Test
//    public void subtraction(){
//        System.out.println("running subtraction");
//    }
//    @Test
//    public void division(){
//        System.out.println("running division");
//    }

    public String GetDisplayResult(){
        calcresult = calcsession.findElementByAccessibilityId("CalculatorResults");
        calcresult.getText();
        return "";
    }
}
Now, at this point, we have the text.
Let's go back to Accessibility Insights.
You'll notice here that says the text right here - the text is "Display is 21."
Well, we don't want the value of this - we just want the value of "21".
So now we have to add an additional code to remove this "Display is."
Let's minimize our Accessibility Insights and now we're going to add additional commands in here.
These are going to be the Java String commands. With the Java String commands, you can manipulate the string that you're getting.
Currently, the getText will return "Display is 21." What we want it to return is "21".
To do this, we're going to do a .replace() and type in the text that we want to replace, which is "Display is", and we're going to replace it with empty quotes "" - this will replace it with an empty value.
The last thing that we want to do is do a .trim().
The .trim will remove all the open spaces - so in this scenario, if we have " 21 ", the .trim() will remove these empty spaces.
Let's delete our comment now.
Now let's delete this return statement because we don't need that, but what we are going to add is return on our previous line. This should now return the value that we want.
import io.appium.java_client.windows.WindowsDriver;
import org.openqa.selenium.WebElement;
import org.testng.annotations.*;
import org.openqa.selenium.remote.DesiredCapabilities;
import java.net.MalformedURLException;
import java.net.URL;

public class Calculator {
    private WindowsDriver calcsession = null;
    private WebElement calcresult = null;
    @BeforeClass
    public void setup(){
        System.out.println("setup");
        DesiredCapabilities capabilities = new DesiredCapabilities();
        capabilities.setCapability("app","Microsoft.WindowsCalculator_8wekyb3d8bbwe!App");
        try {
            calcsession = new WindowsDriver(new URL("http://127.0.0.1:4723"), capabilities);
        } catch (MalformedURLException e) {
            e.printStackTrace();
        }
    }

    @AfterClass
    public void tearDown(){
        System.out.println("Teardown");
        //calcsession.quit();
    }

    @BeforeMethod
    public void clear(){
        System.out.println("CLEAR");
        calcsession.findElementByName("Clear").click();
    }

    @Test
    public void addition(){
        System.out.println("running addition");
        calcsession.findElementByName("One").click();
        calcsession.findElementByName("Two").click();
        calcsession.findElementByName("Plus").click();
        calcsession.findElementByName("Nine").click();
        calcsession.findElementByName("Equals").click();
    }

//    @Test
//    public void multiplication(){
//        System.out.println("running multiplication");
//    }
//    @Test
//    public void subtraction(){
//        System.out.println("running subtraction");
//    }
//    @Test
//    public void division(){
//        System.out.println("running division");
//    }

    public String GetDisplayResult(){
        calcresult = calcsession.findElementByAccessibilityId("CalculatorResults");
        return calcresult.getText().replace("Display is", "").trim();
    }
}
Now that we have our GetDisplayResult method created, let's scroll to our addition method and let's add the assertion.
Here at the very last line after the "Equals", we're going to create a new line.
We're going to type in Assert. - we're going to assert that it equals each other.
If you press "Alt+Enter" now, it will import the correct library.
First, we're going to enter GetDisplayResult() - this is the result that we're going to get and we're going to assert that it equals 21 - this is the expected result.
So now we have the actual results versus the expected.
Rather than scrolling all the way to the top to run our test, we can utilize a "Run Test" just for this method. Let's click on this "Run Test" and click on "Run 'addition()'".
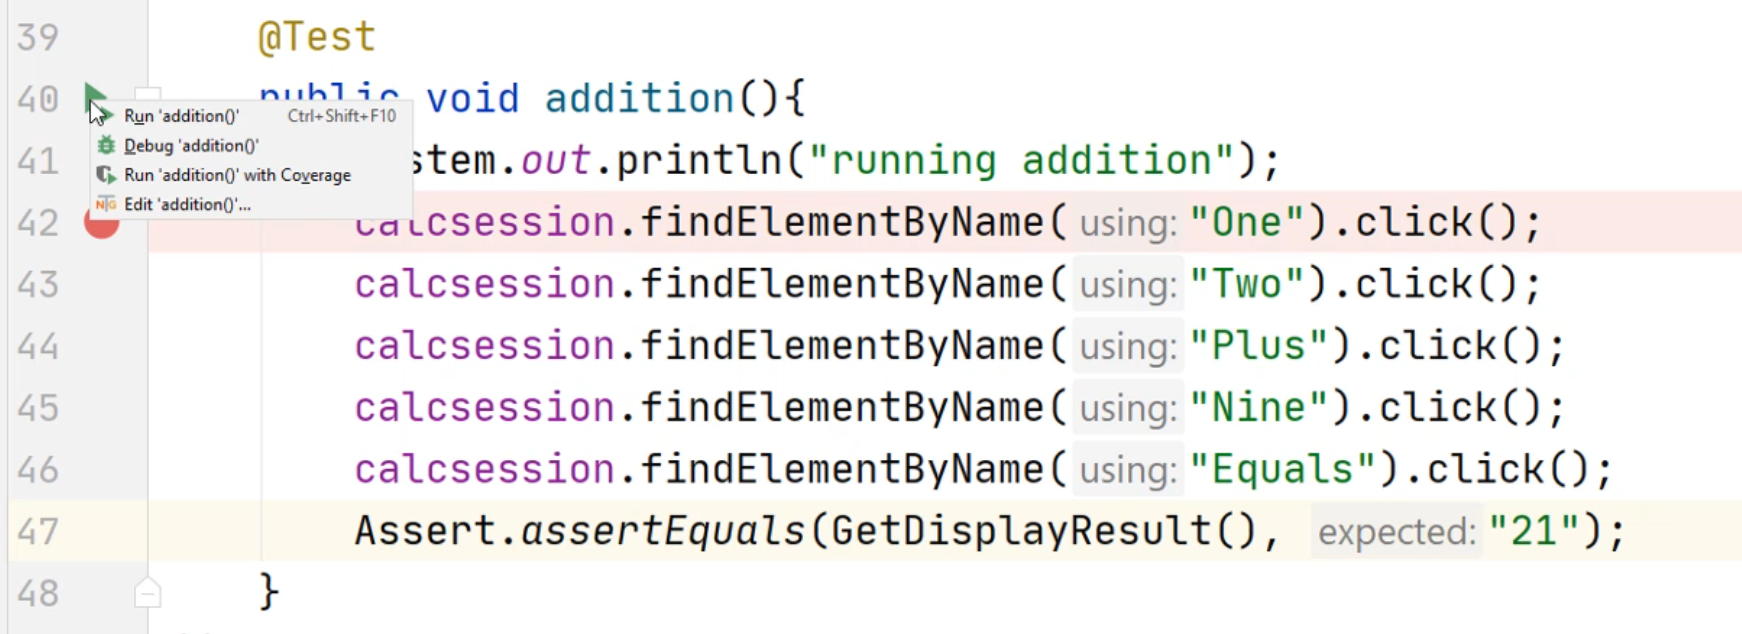
You'll now notice that it says "Tests Passed".
If you click on the "addition" right here, it says "running addition".

There's nothing else in our console.
If you click on this "Default Suite" and scroll down to the bottom, here you'll see the "Default Suite".

There were Total test runs of 1, and 1 passed. 0 failures, 0 skips.
Let's change this to a fail scenario. We're going to change this "21" to a "22".
Let's run our test method again. Notice this time, we have a failed message now.
Our test has failed. Let's scroll down to the bottom and see what happened.

Here, you will see the Expected value of 22, but the Actual value is 21.
If you continue scrolling, you'll see that our Tests run was 1, and our failures was 1. Our passes is now 0.
Let's change it back to "21" - a working scenario.
Let's continue on and add additional steps to our multiplication, subtraction, and division.
import io.appium.java_client.windows.WindowsDriver;
import org.openqa.selenium.WebElement;
import org.testng.Assert;
import org.testng.annotations.*;
import org.openqa.selenium.remote.DesiredCapabilities;
import java.net.MalformedURLException;
import java.net.URL;

public class Calculator {
    private WindowsDriver calcsession = null;
    private WebElement calcresult = null;
    @BeforeClass
    public void setup(){
        System.out.println("setup");
        DesiredCapabilities capabilities = new DesiredCapabilities();
        capabilities.setCapability("app","Microsoft.WindowsCalculator_8wekyb3d8bbwe!App");
        try {
            calcsession = new WindowsDriver(new URL("http://127.0.0.1:4723"), capabilities);
        } catch (MalformedURLException e) {
            e.printStackTrace();
        }
    }

    @AfterClass
    public void tearDown(){
        System.out.println("Teardown");
        calcsession.quit();
    }

    @BeforeMethod
    public void clear(){
        System.out.println("CLEAR");
        calcsession.findElementByName("Clear").click();
    }

    @Test
    public void addition(){
        System.out.println("running addition");
        calcsession.findElementByName("One").click();
        calcsession.findElementByName("Two").click();
        calcsession.findElementByName("Plus").click();
        calcsession.findElementByName("Nine").click();
        calcsession.findElementByName("Equals").click();
        Assert.assertEquals(GetDisplayResult(), "21");
    }
    @Test
    public void multiplication(){
        System.out.println("running multiplication");
        calcsession.findElementByName("Three").click();
        calcsession.findElementByName("Three").click();
        calcsession.findElementByName("Multiply by").click();
        calcsession.findElementByName("Three").click();
        calcsession.findElementByName("Equals").click();
        Assert.assertEquals(GetDisplayResult(), "99");
    }
    @Test
    public void subtraction(){
        System.out.println("running subtraction");
        calcsession.findElementByName("Nine").click();
        calcsession.findElementByName("Three").click();
        calcsession.findElementByName("Minus").click();
        calcsession.findElementByName("Three").click();
        calcsession.findElementByName("Equals").click();
        Assert.assertEquals(GetDisplayResult(), "90");
    }
    @Test
    public void division(){
        System.out.println("running division");
        calcsession.findElementByName("Three").click();
        calcsession.findElementByName("Three").click();
        calcsession.findElementByName("Divide by").click();
        calcsession.findElementByName("Three").click();
        calcsession.findElementByName("Equals").click();
        Assert.assertEquals(GetDisplayResult(), "11");
    }

    public String GetDisplayResult(){
        calcresult = calcsession.findElementByAccessibilityId("CalculatorResults");
        return calcresult.getText().replace("Display is", "").trim();
    }
}
# Coding in Python
Next, let's create another method.
Let's go down to the end of our file and tab over and type in def.
We're going to type in getDisplayResults.
In the next line of code, we're going to type in text = self.calcsession. - and now we're going to find the element by AccessibilityId.
Remember, the AccessibilityId is the AutomationId that we found inside Accessibility Insights.
Now we'll type in find. Let's stop here a moment.
Notice in Python, each of the method names are a little bit different.
You'll see the underline _ in between each of these values.
Remember in Java, all these element names were combined together.
However, we can find the same AccessibilityID by either going through the list or continue typing out the value that we were looking for.
Let's continue to type _element_by_accessibility_id.
We'll type in "CalculatorResults" like we did in Java.
At the end of this line, we'll put in .text.
Let's create another line of code.
Now we're going to do something called string manipulation.
We can take the text =, and we're going to take the same text that we had previously and put a .strip.
Remember, we're going to strip out the "Display is", so we'll type in "Display is ".
We're going to strip out the left empty spaces by doing a .rstrip() and we can use double quotes "" or single quotes '' in Python - this is interchangeable.
This time, let's use the example of a single quote - we'll put a space in between ' '.
Now we'll do another - we'll type in .lstrip(), single quotes with a space in between ' '.
Now we can type in return text.
import unittest
from appium import webdriver

class calculator_test(unittest.TestCase):
    calcsession = None;
    calresult = None;

    def setUp(self):
        print("setup")
        desired_caps = {}
        desired_caps["app"] = "Microsoft.WindowsCalculator_8wekyb3d8bbwe!App"
        self.calcsession = webdriver.Remote(
            command_executor="http://127.0.0.1:4723",
            desired_capabilities=desired_caps
        )

    def tearDown(self):
        print("teardown")
        self.calcsession.quit()

    def test_add(self):
        print("add")

    def test_subtraction(self):
        print("subtraction")

    def test_division(self):
        print("division")

    def test_multiplication(self):
        print("multiplication")

    def getDisplayResults(self):
        text = self.calcsession.find_element_by_accessibility_id("CalculatorResults").text
        text = text.strip("Display is ").rstrip(' ').lstrip(' ')
        return text
Let's examine what we just did.
Here, we are going to find the text that is displayed in the calculator.
We're going to assign that text to the variable text.
We're going to strip out the "Display is".
Next, we're going to strip off any right empty space remaining and the left empty space remaining around the text and assign them to the word text.
Lastly, we're going to return the text.
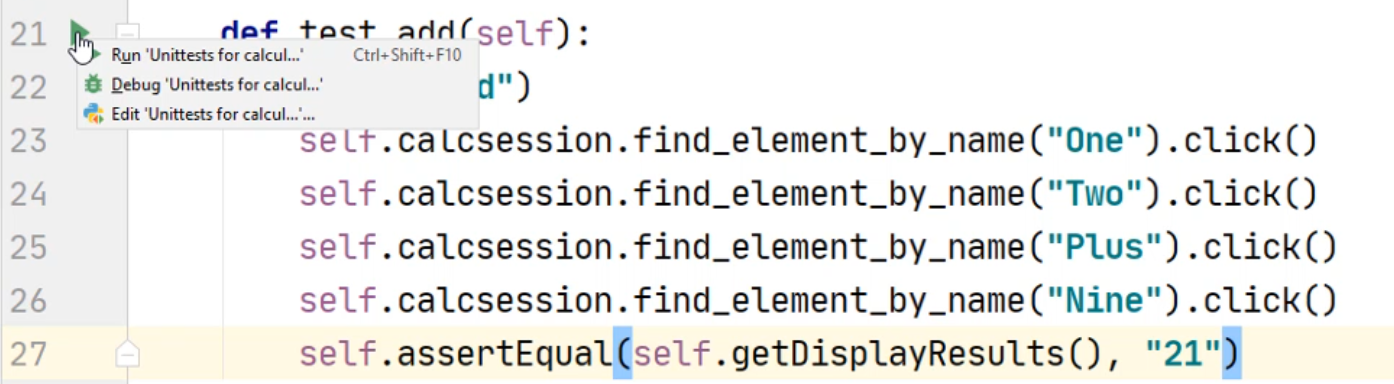
Now let's go back to the addition method.
Here, we're going to create a new line of code and type in self.calcsession.find.
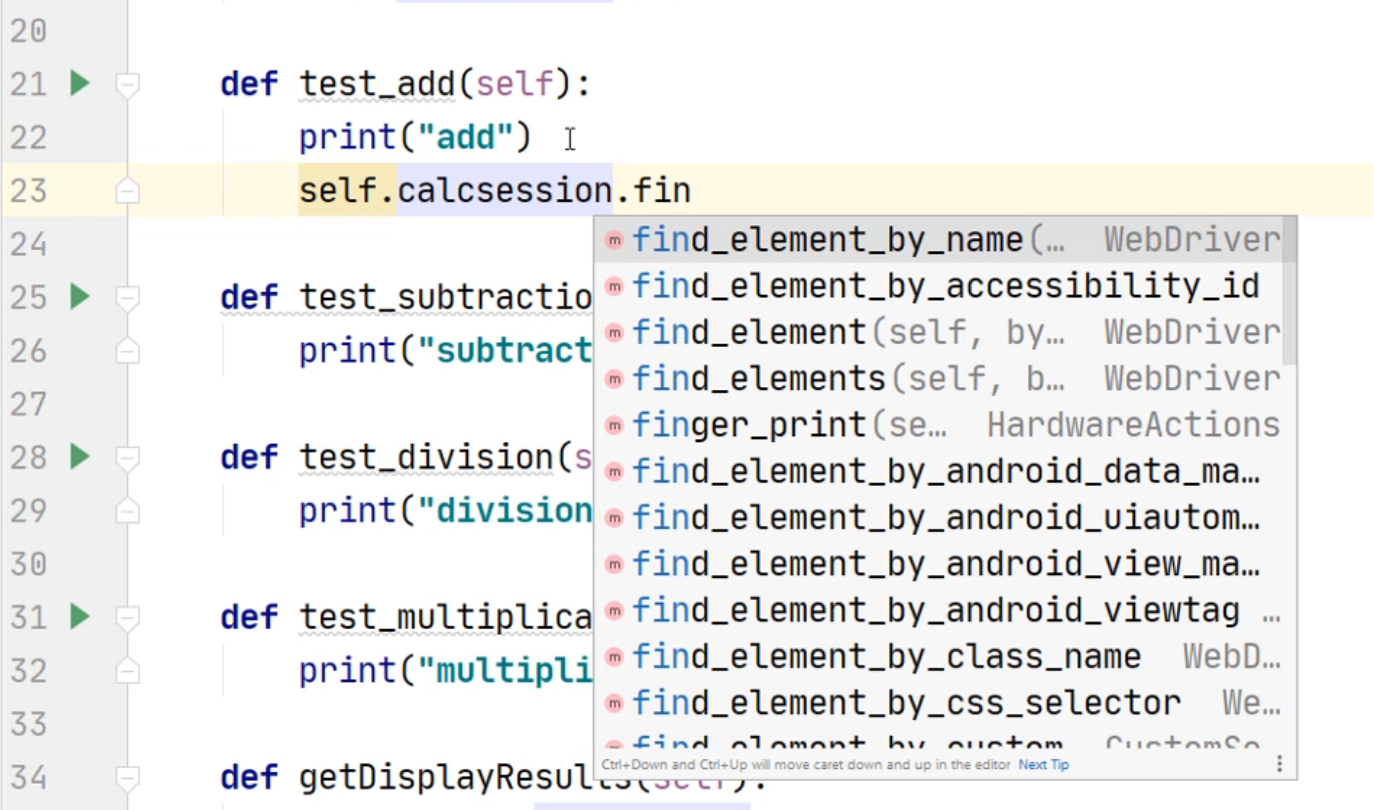
This time, you should be able to see your code complete and see the find_element_by_name - let's double-click on it this time.
For the name, we're going to type in "One", then .click().
On the next line of code, we will type in self.calcsession.find_element_by_name("Two").click().
Now we're going to type in self.calcsession.find_element_by_name("Plus").click().
Next, we'll do a Nine - self.calcsession.find_element_by_name("Nine").click().
Let's hit "Enter" and create our assertion.
Unit tests, like TestNG, will have its own assertion class.
To utilize the assertion, we're going to type in self.assertEqual().
Now we will call the getDisplayResult() method. In this example, it should equal "21".
import unittest
from appium import webdriver

class calculator_test(unittest.TestCase):
    calcsession = None;
    calresult = None;

    def setUp(self):
        print("setup")
        desired_caps = {}
        desired_caps["app"] = "Microsoft.WindowsCalculator_8wekyb3d8bbwe!App"
        self.calcsession = webdriver.Remote(
            command_executor="http://127.0.0.1:4723",
            desired_capabilities=desired_caps
        )

    def tearDown(self):
        print("teardown")
        self.calcsession.quit()

    def test_add(self):
        print("add")
        self.calcsession.find_element_by_name("One").click()
        self.calcsession.find_element_by_name("Two").click()
        self.calcsession.find_element_by_name("Plus").click()
        self.calcsession.find_element_by_name("Nine").click()
        self.calcsession.find_element_by_name("Equals").click()
        self.assertEqual(self.getDisplayResults(), "21")

    def test_subtraction(self):
        print("subtraction")

    def test_division(self):
        print("division")

    def test_multiplication(self):
        print("multiplication")

    def getDisplayResults(self):
        text = self.calcsession.find_element_by_accessibility_id("CalculatorResults").text
        text = text.strip("Display is ").rstrip(' ').lstrip(' ')
        return text
Now let's try to run our method.
We're going to run this test_add.
Do the same thing by clicking the play button and select "Run".
You'll notice our Calculator open.
First, we click the "1" button, then the "2", then the "+", then the "9", then the "=".
Lastly, we assert it by the results.
You can scroll down the console and you'll see the process we ran.
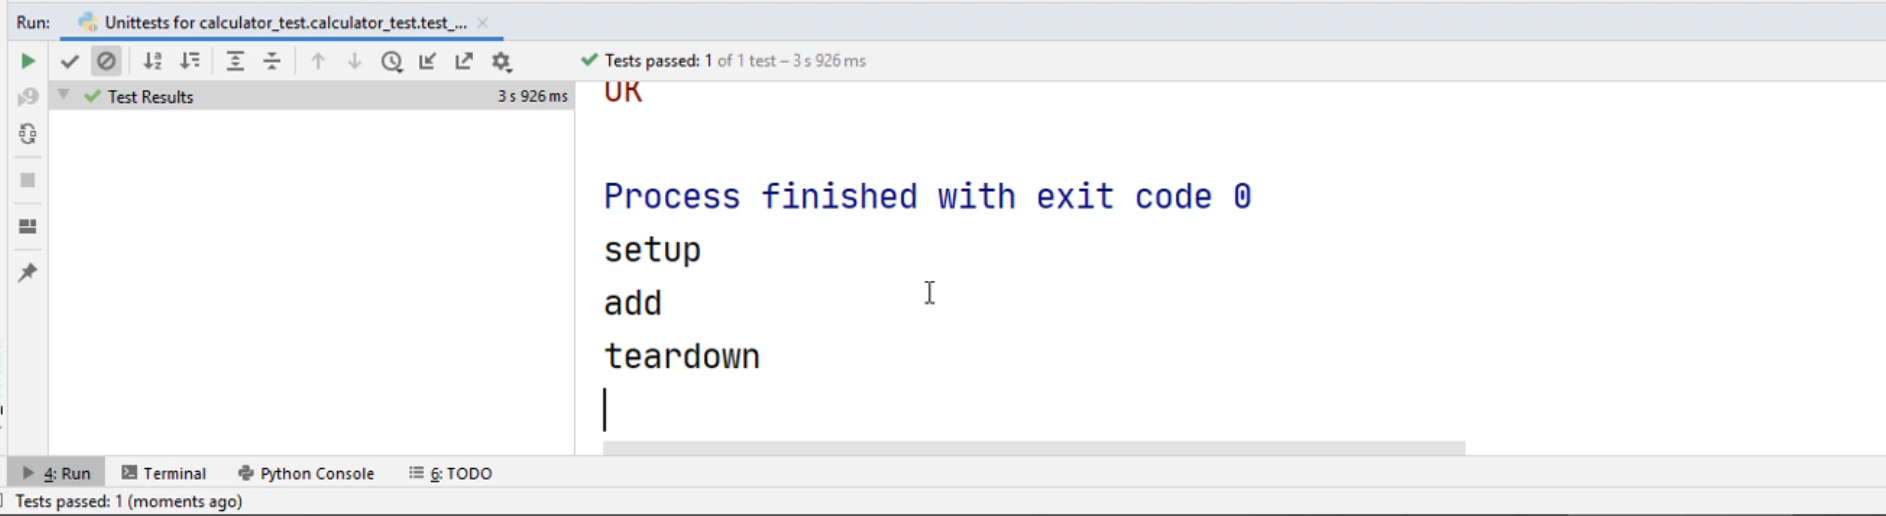
Finally, to indicate that the test passed, Python just says "OK".
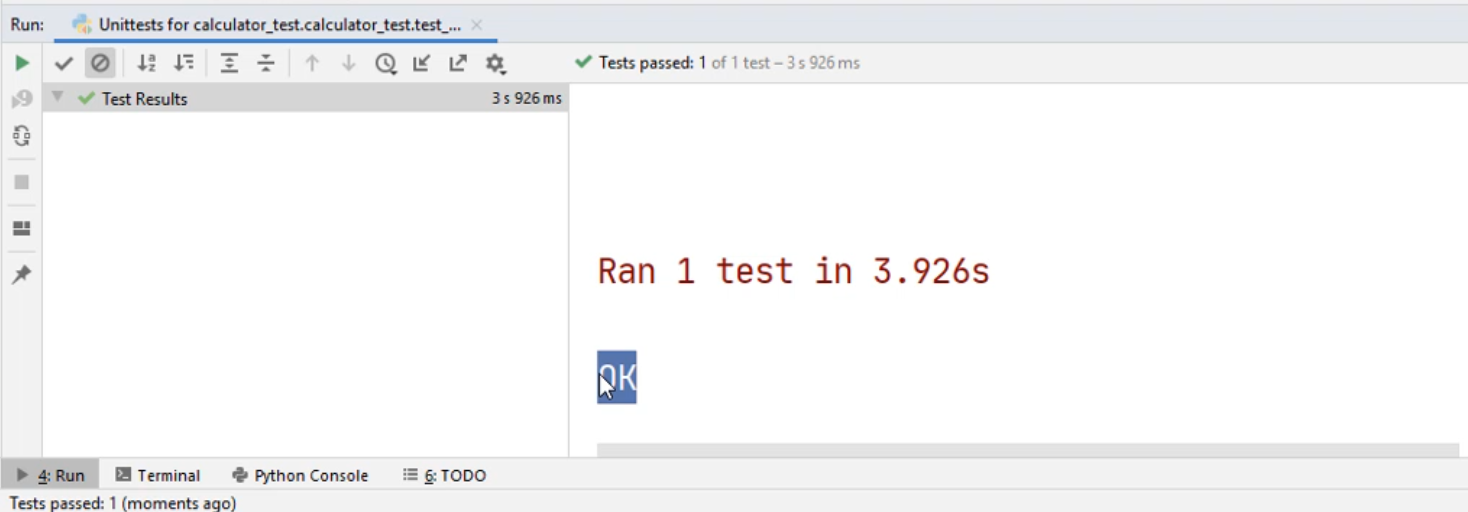
You can also see that the tests passed "1 of 1".
Now let's minimize this window. You can continue to add the rest of the code for these test methods, for subtraction, division, multiplication.
