

Transcripted Summary
In this lesson, we are going to set up new projects.
We're going to:
Set up a Java Maven project
Add this Selenium Java library
Add a TestNG library
Add the Appium library
Create our first automation project with a Calculator
Set up a Python project
Add the Selenium WebDriver library
Write our calculator automation in Python
We have lots to cover. So let's begin.
We are now ready to create our first project.
# Set up a Java Maven project
Let's start by opening up IntelliJ.
Click on the Start, search for IntelliJ and click on it, or press Enter to start it.
At this point, you should see three options.
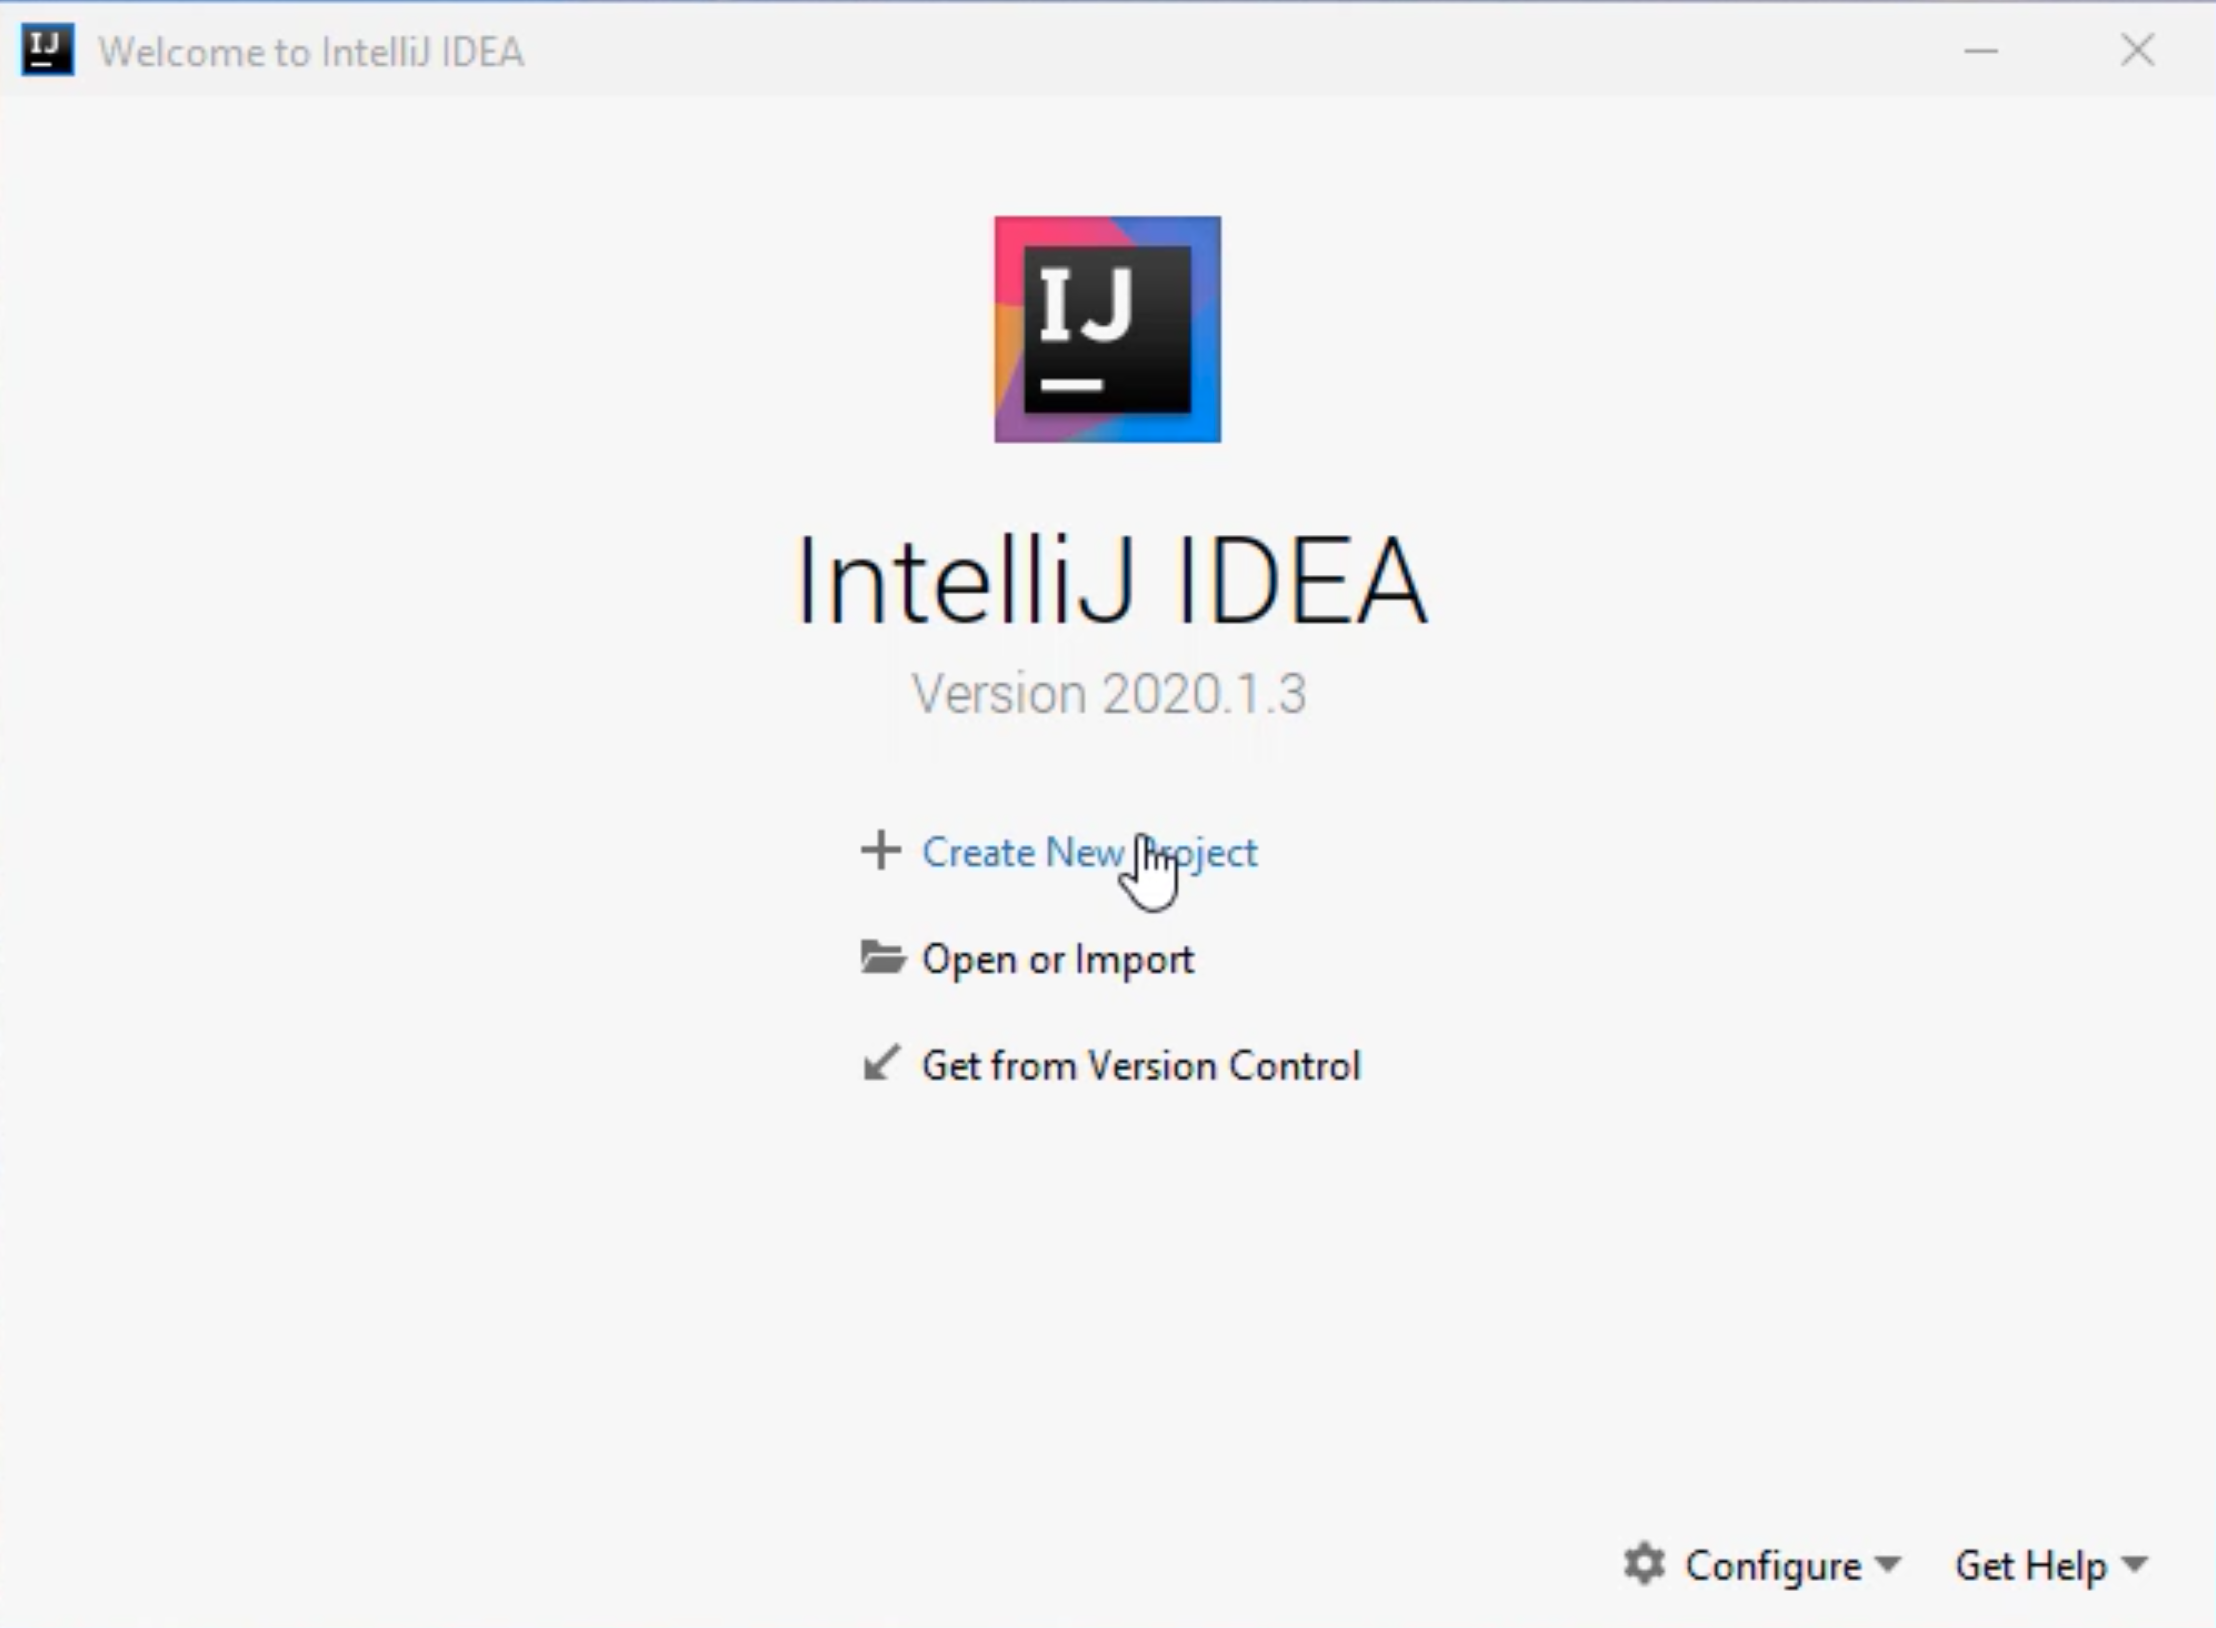
Either "Create New Project", "Open or Import" or "Get from Version Control".
We're going to click on the "Create New Project".
Make sure the Maven project type is selected and click "Next".
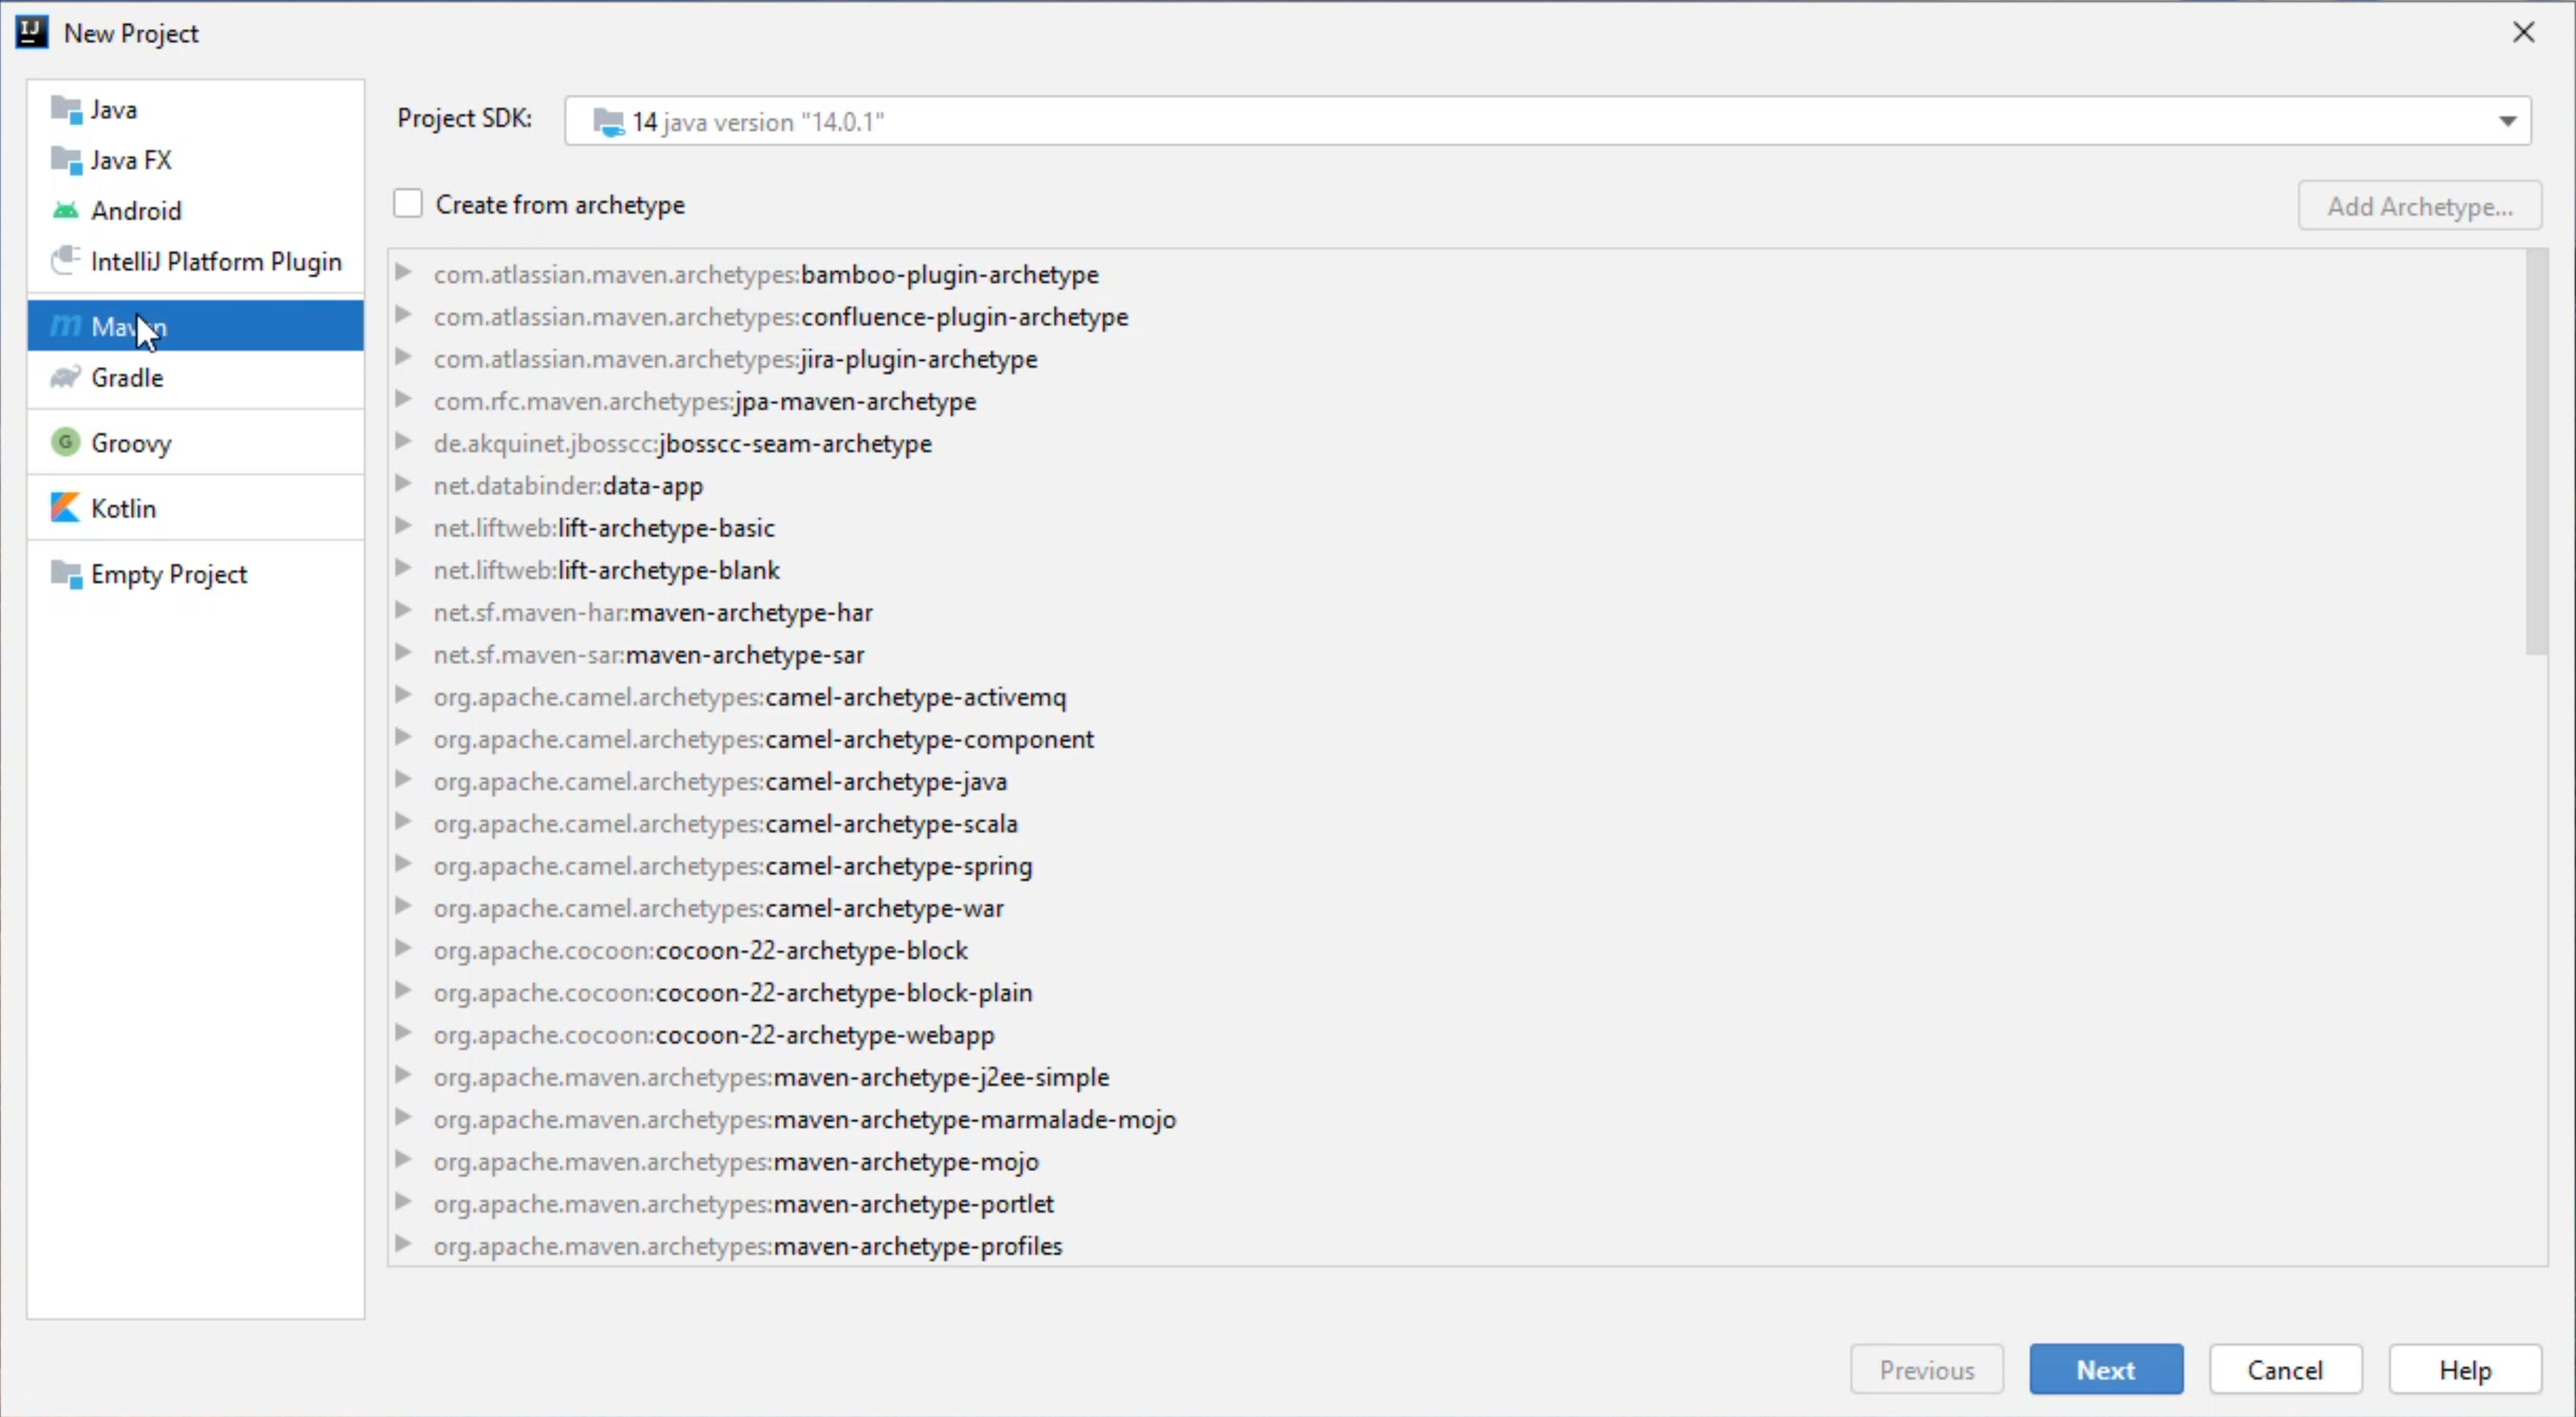
We are going to name this "calculator" - we're going to automate the calculator app.
Select "Finish".
And now you have your first project created. Let's maximize this window.
Now we have to add some dependencies to our pom.xml.
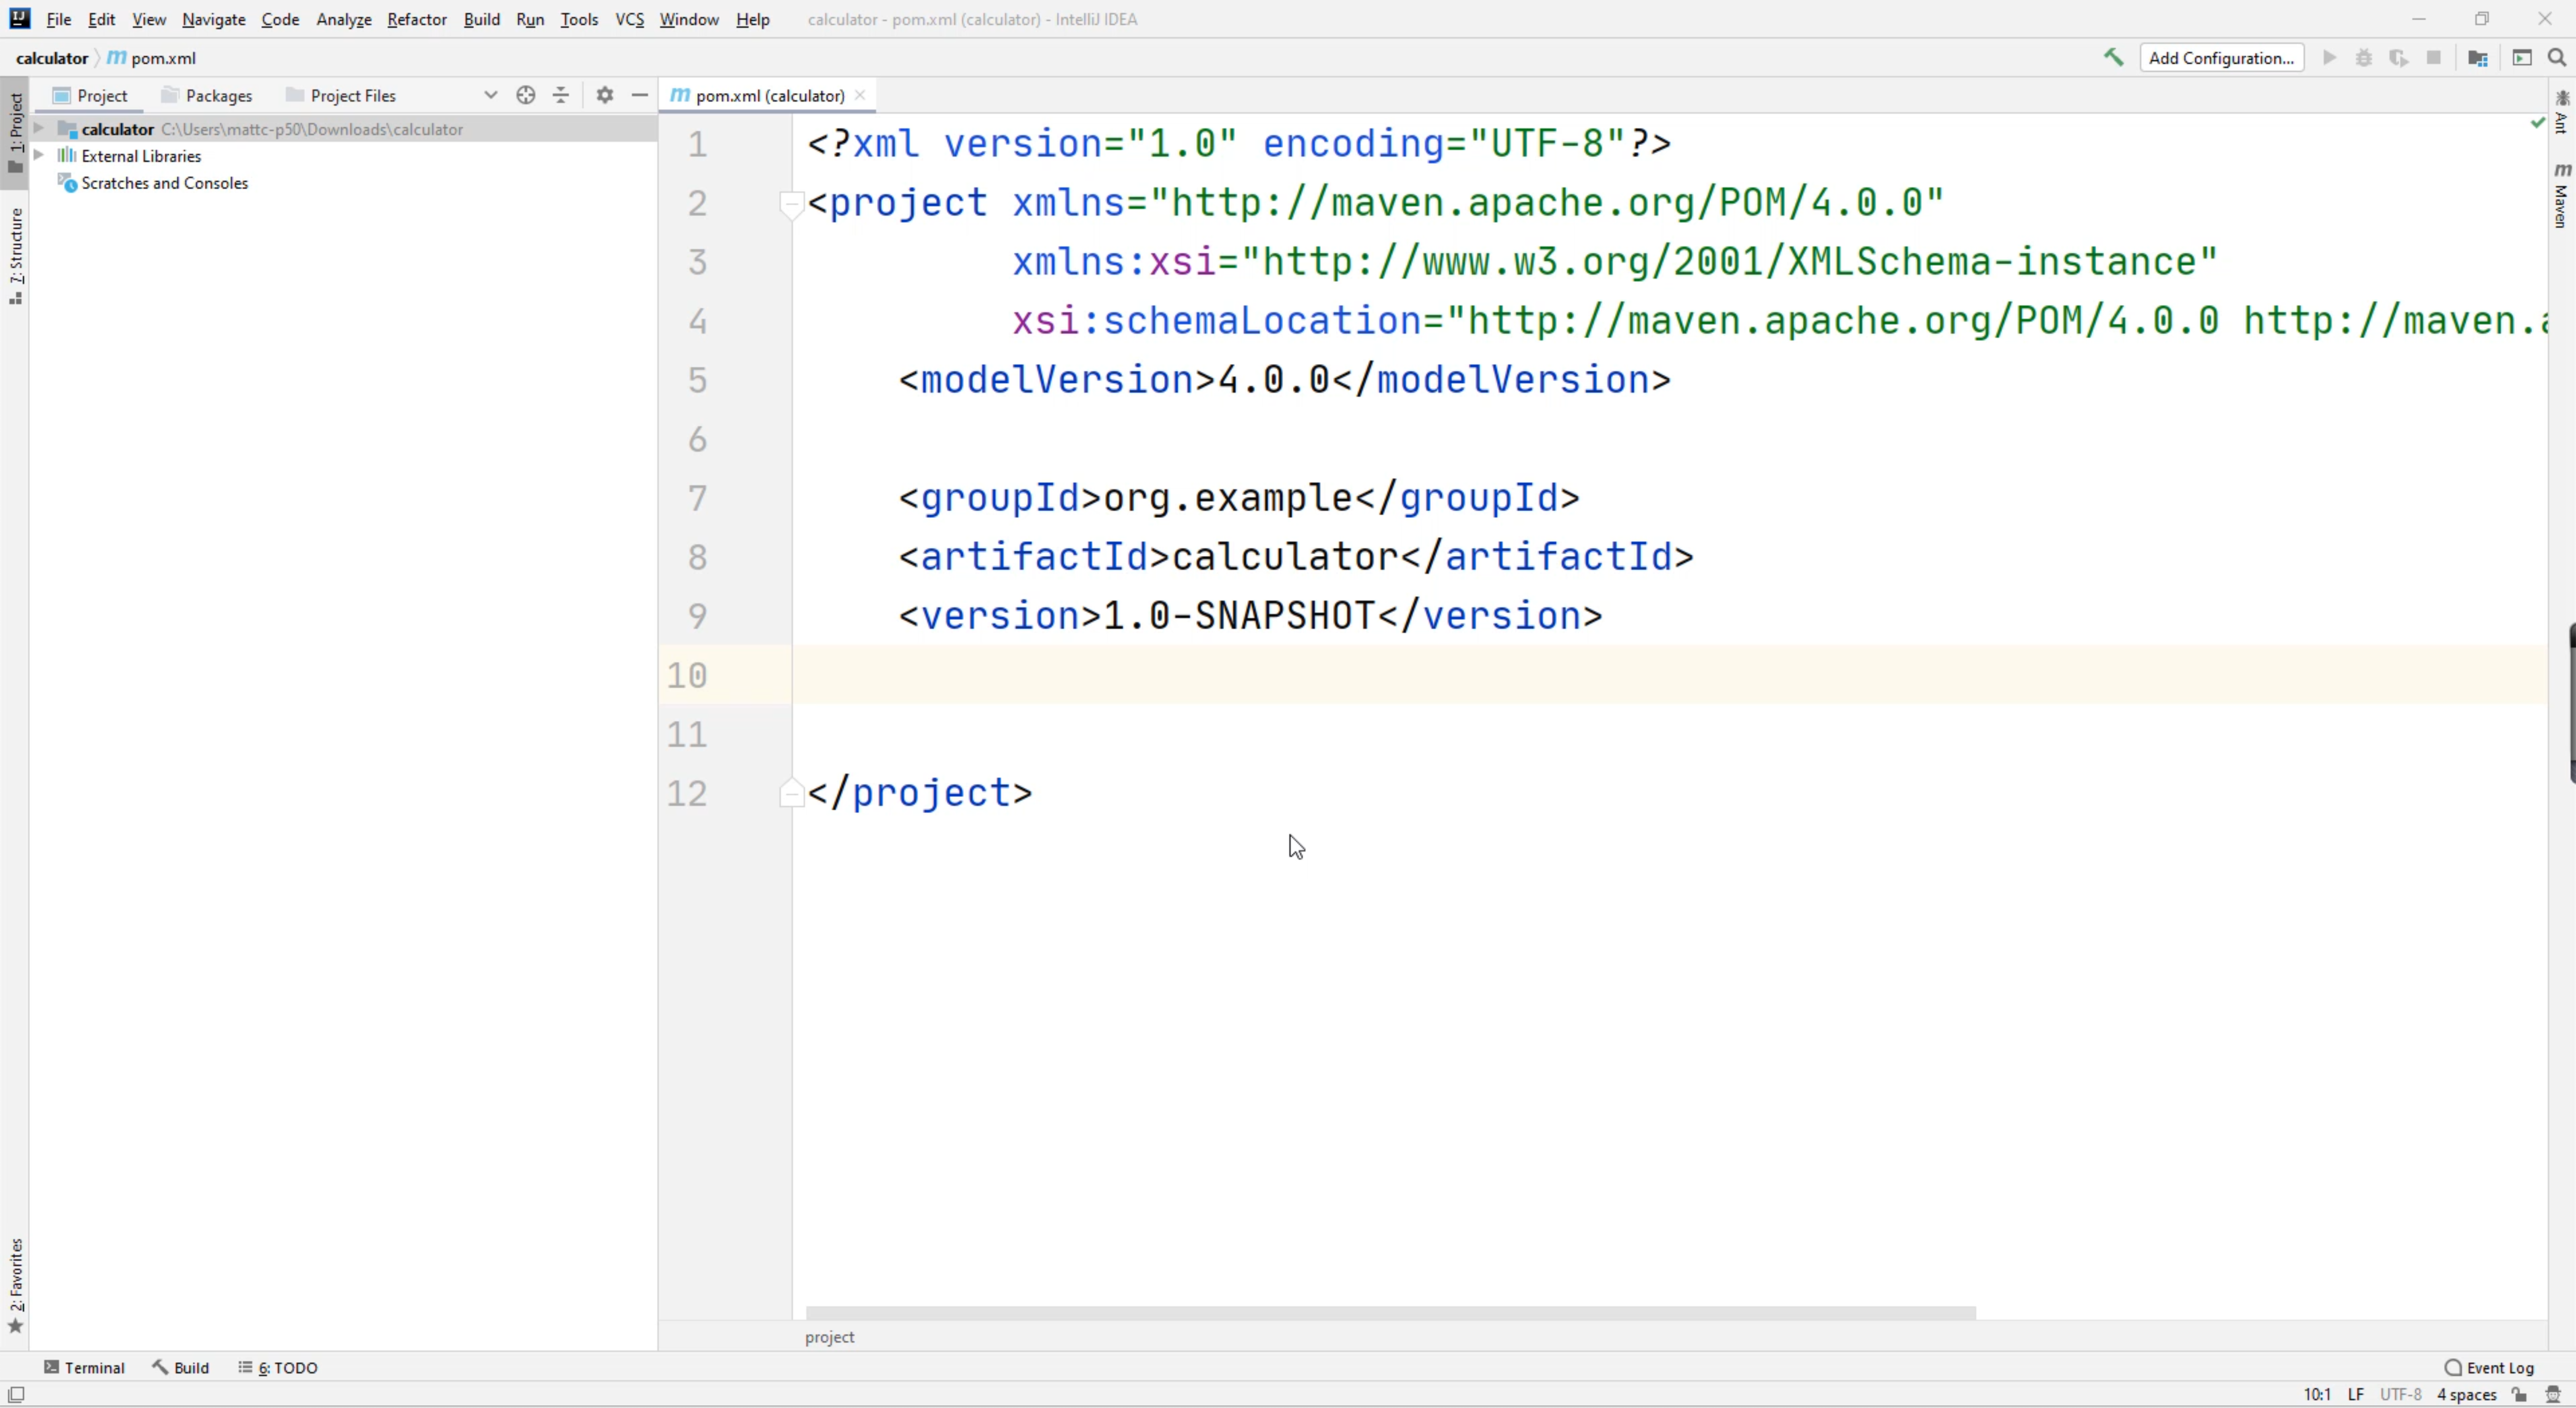
Our pom.xml is a blueprint of all the libraries we are going to depend on.
These are all the dependencies that we will need to build our automation project.
First, we're going to create an open tag and a closing tag for dependencies.
We're going to type in dependencies and it should bring up the first option.
We're going to skip a few lines and now we are going to add the Selenium Java dependency.
<?xml version="1.0" encoding="UTF-8"?>
<project xmlns="http://maven.apache.org/POM/4.0.0"
         xmlns:xsi="http://www.w3.org/2001/XMLSchema-instance"
         xsi:schemaLocation="http://maven.apache.org/POM/4.0.0 http://maven.apache.org/xsd/maven-4.0.0.xsd">
    <modelVersion>4.0.0</modelVersion>

    <groupId>org.example</groupId>
    <artifactId>calculator</artifactId>
    <version>1.0-SNAPSHOT</version>
<dependencies>

</dependencies>

</project>
We're going to open up a web browser. For our Maven project, we need to go to Maven repository to find all the libraries that we depend on.
We're going to go to Google and then type in search for "mvn repository".
We should have a link that says Maven Repository.
# Add the Selenium Java library
Once we're at the Maven Repository site, let's search for "selenium java", and we should see the first option for Selenium Java right here.

Here, you should see the Selenium Java project and you should see the latest versions that are available.
We are not going to choose the alpha versions, but we are going to choose this 3.141.59 version.
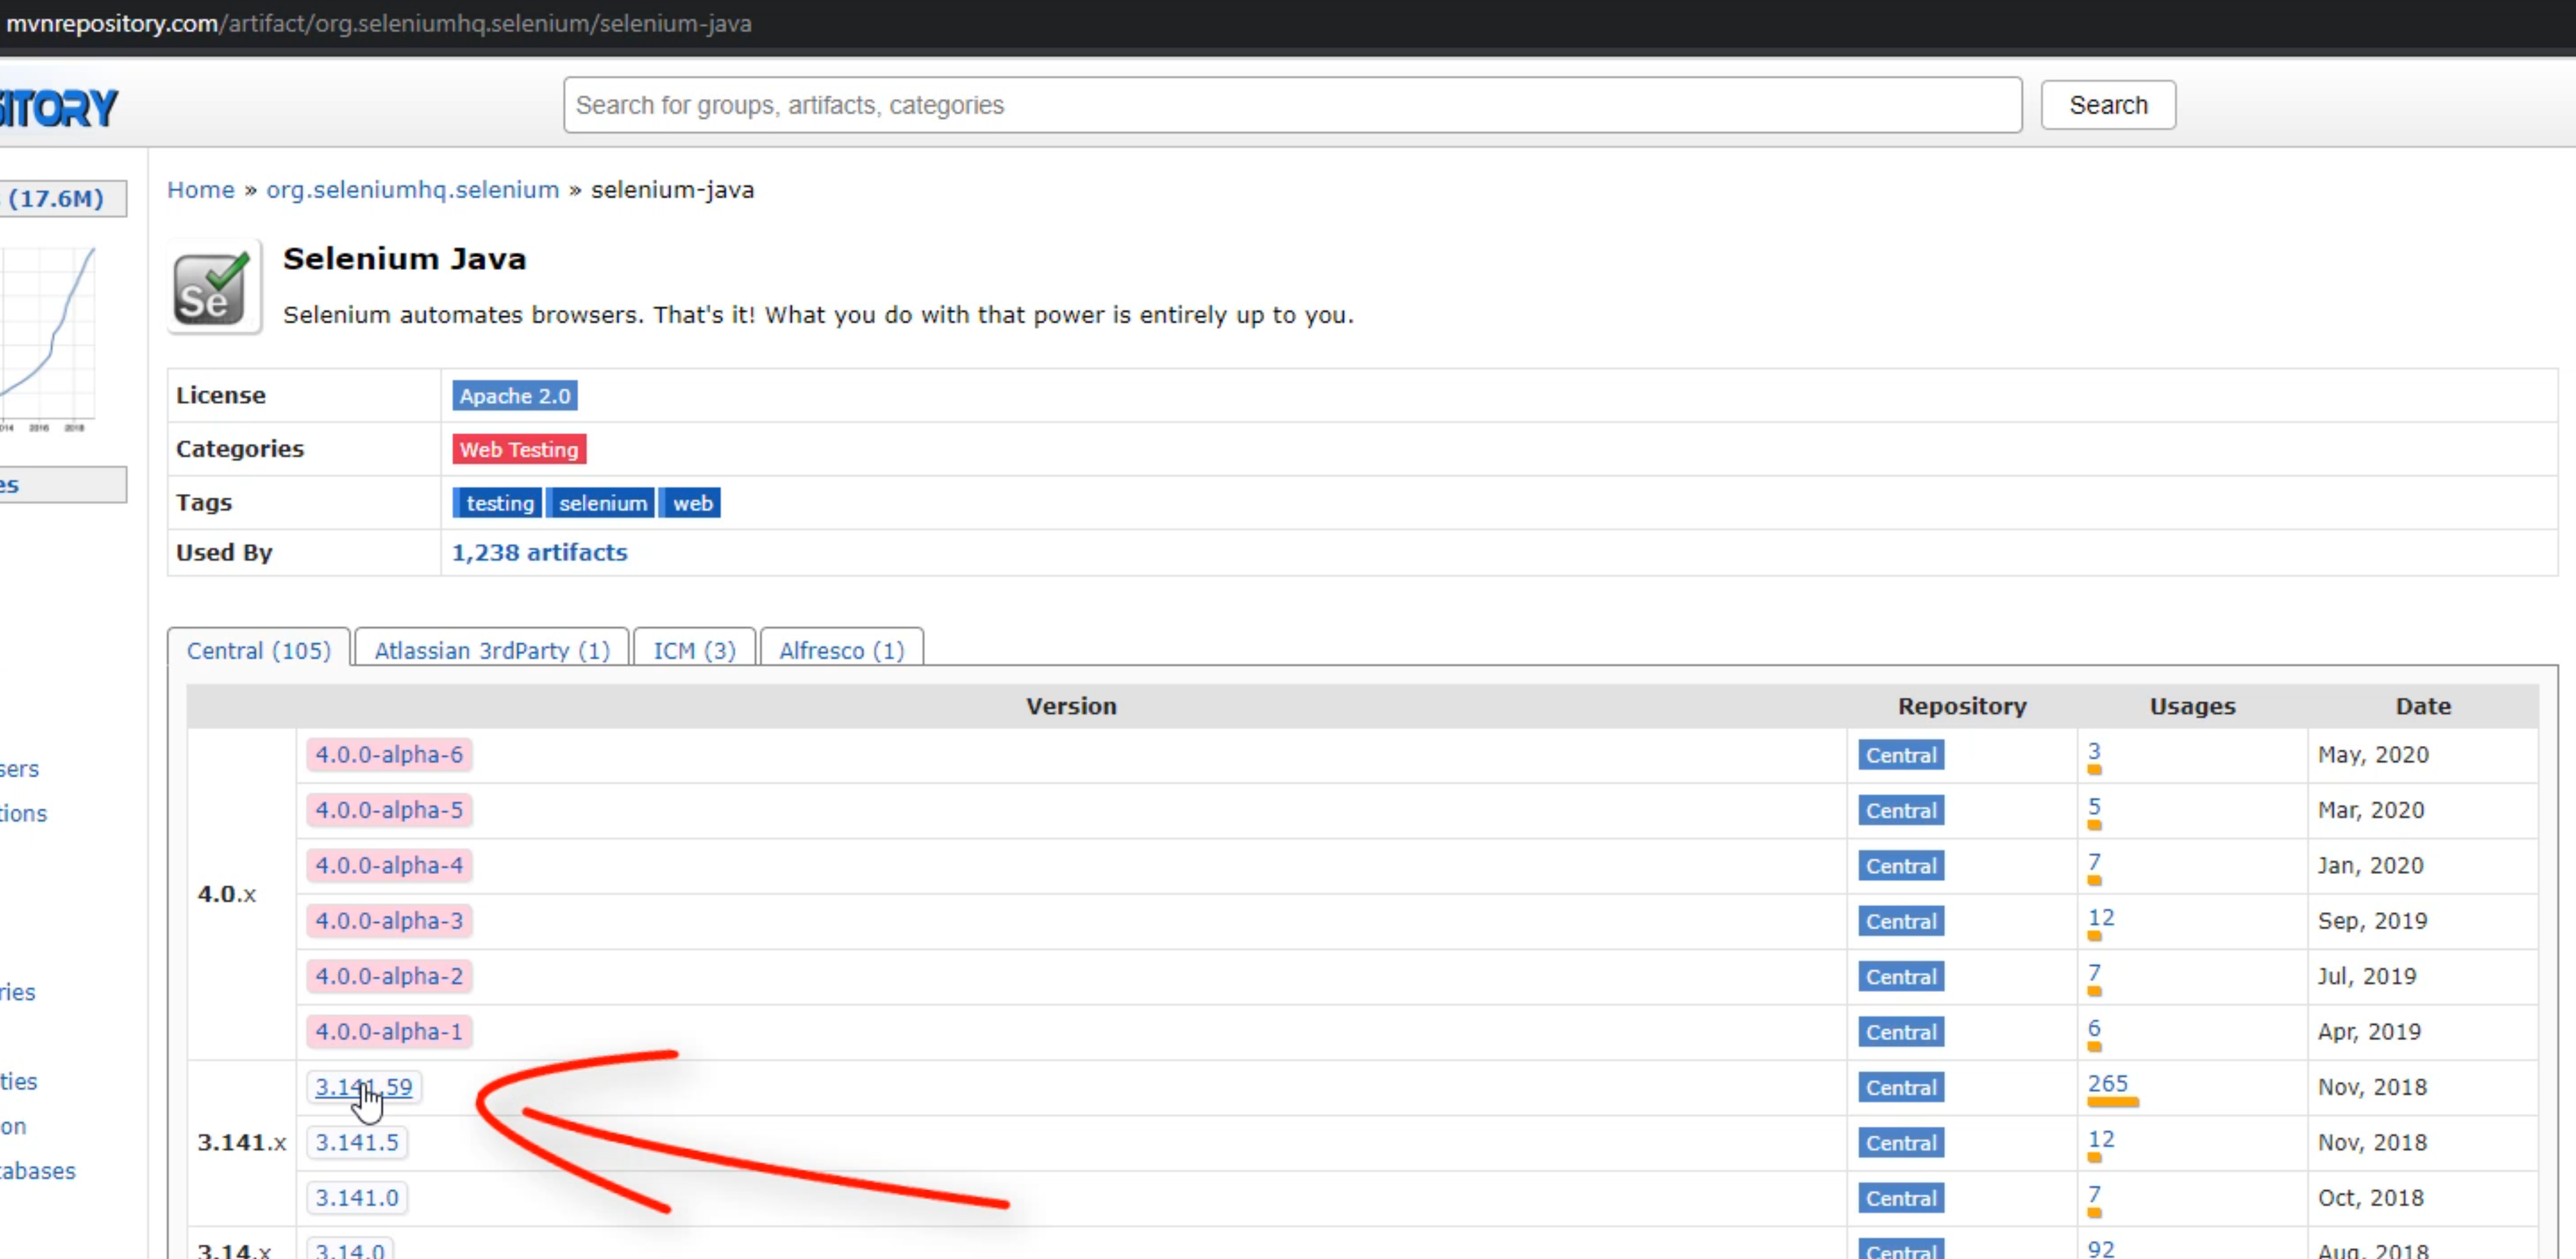
Let's click on this link right here.
This is the latest version as of writing, but what we'll do is copy and paste this.
<!-- https://mvnrepository.com/artifact/org.seleniumhq.selenium/selenium-java -->
<dependency>
    <groupId>org.seleniumhq.selenium</groupId>
    <artifactId>selenium-java</artifactId>
    <version>3.141.59</version>
</dependency>
We should be able to left-click inside this box and all the information should be copied to your clipboard.
Let's open up your IDE again, on this line and click "Paste".
This should bring in the Selenium Java dependency.
You'll also notice a little tiny box up here in the right-hand corner - this one right here.
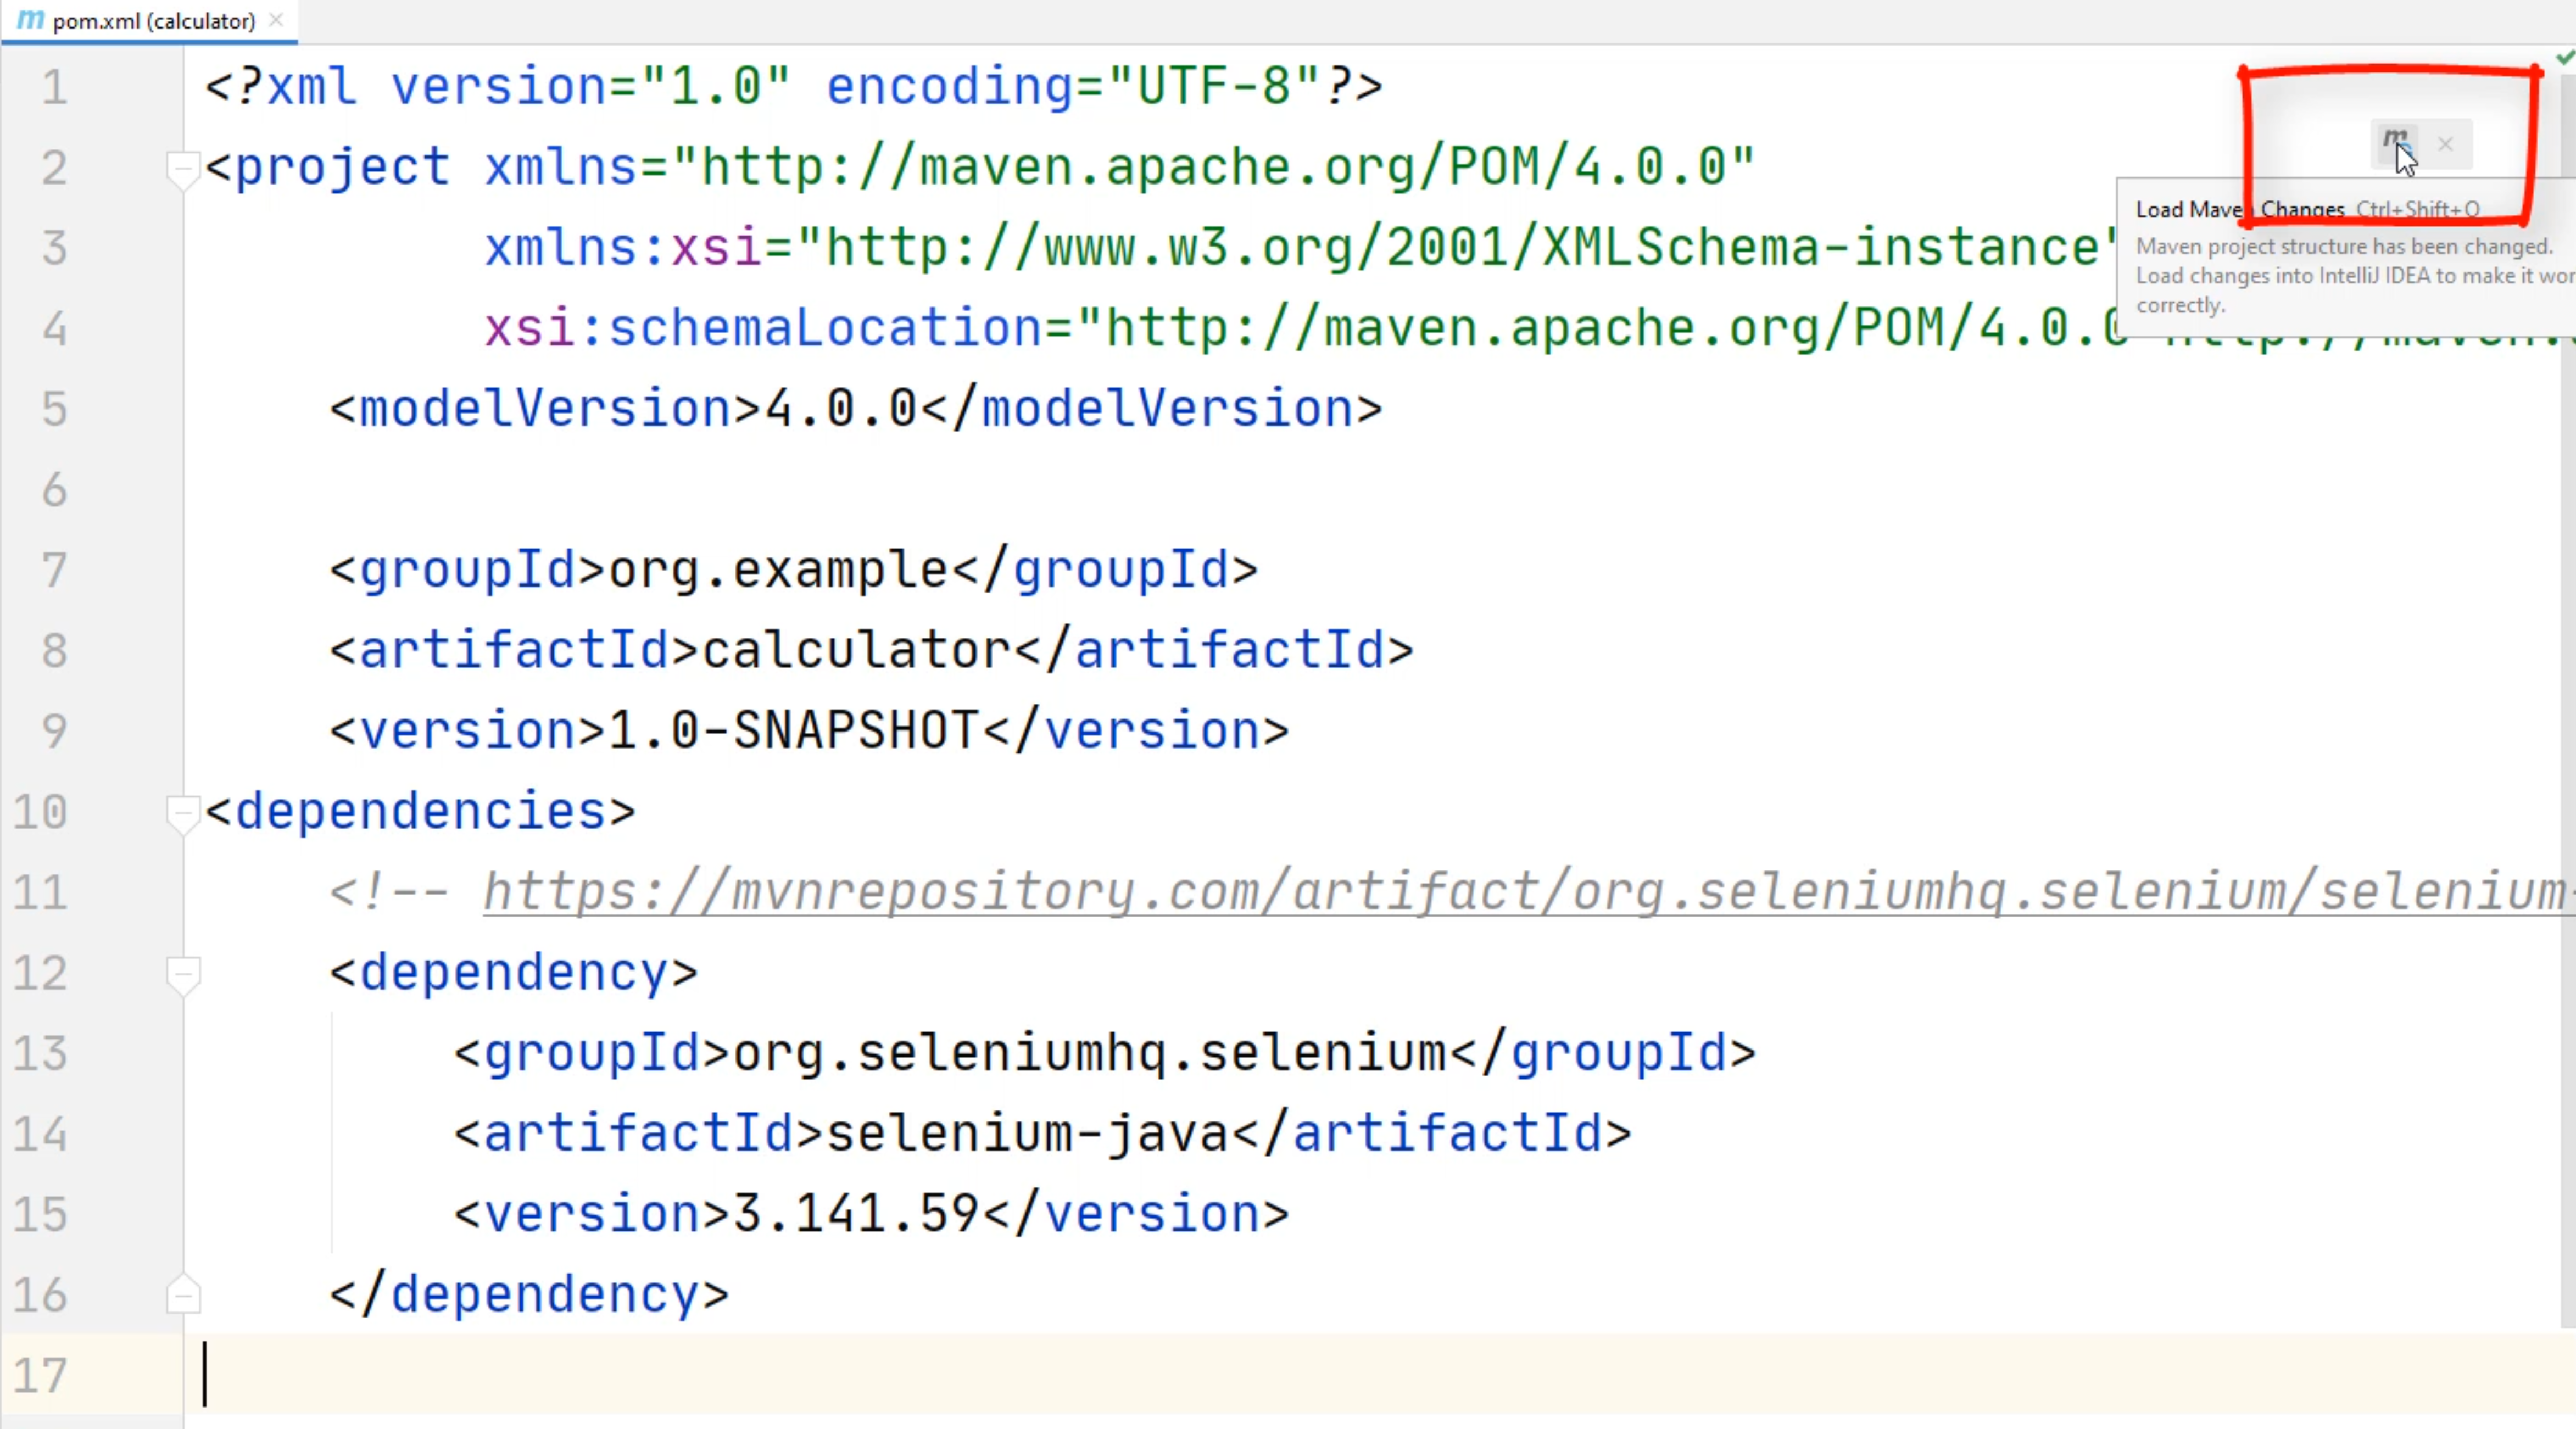
This option will allow you to load in the library.
Let's click on this and load the Maven changes.
After a few seconds, you should be able to click on the external libraries.
You should be able to see the Selenium Java project being loaded in right here.
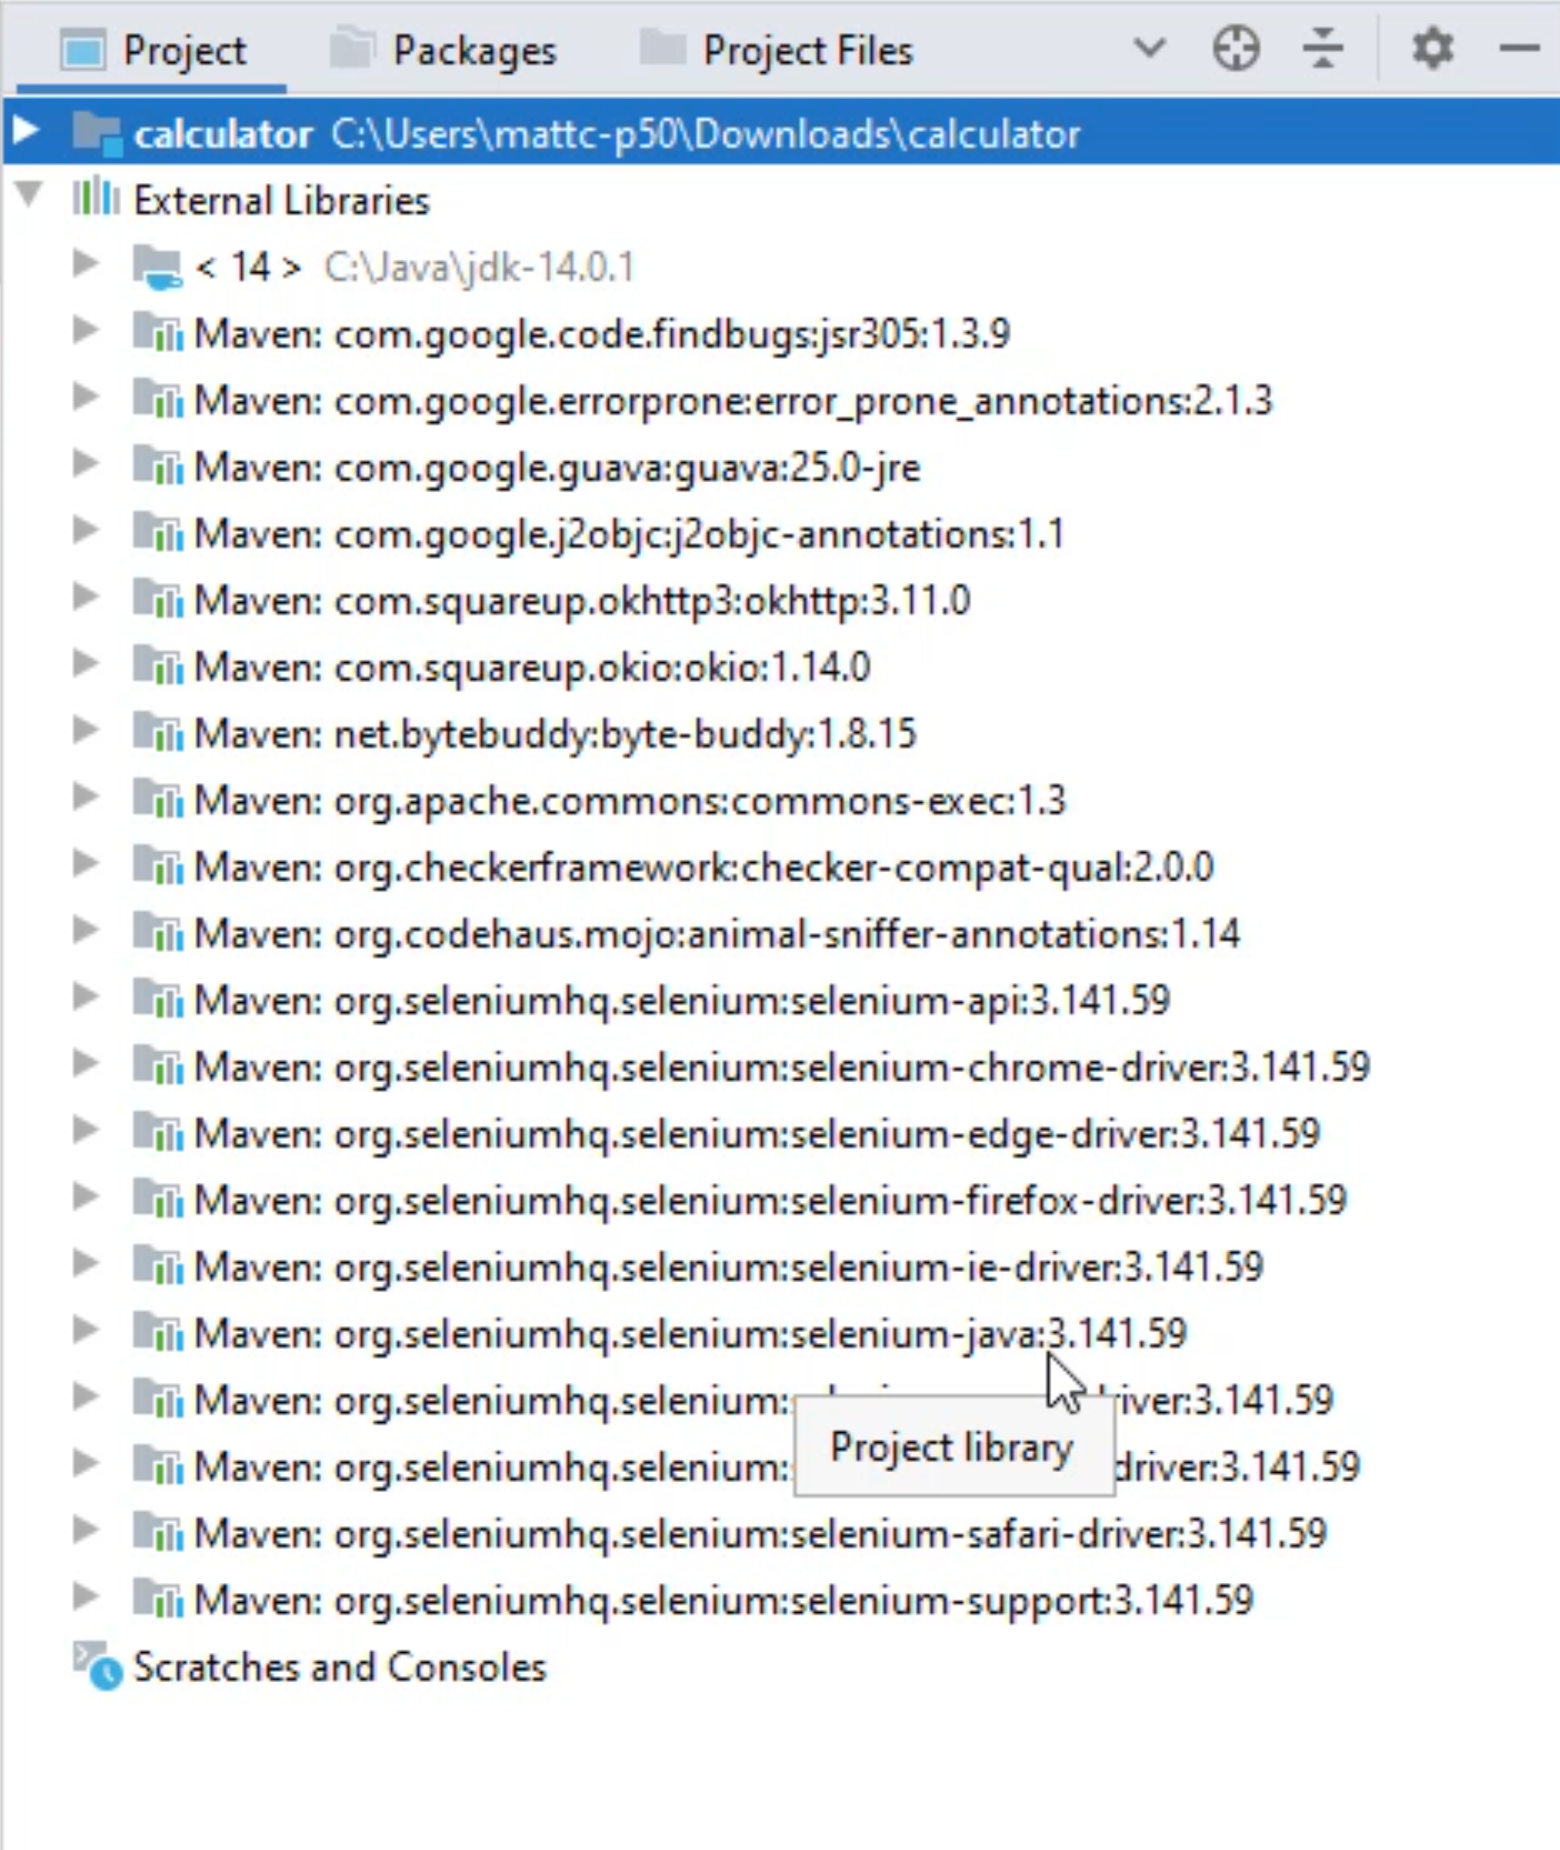
And you'll notice it says 3.141.59 version.
# Add a TestNG library
Next, we need a test runner.
The test runner will help us run our tests.
We are going to utilize TestNG.
Let's go back to the same page - the Maven repository and let's search for "testng".
And it should be the first option.
Let's click on the "TestNG" and let's see what versions are available.
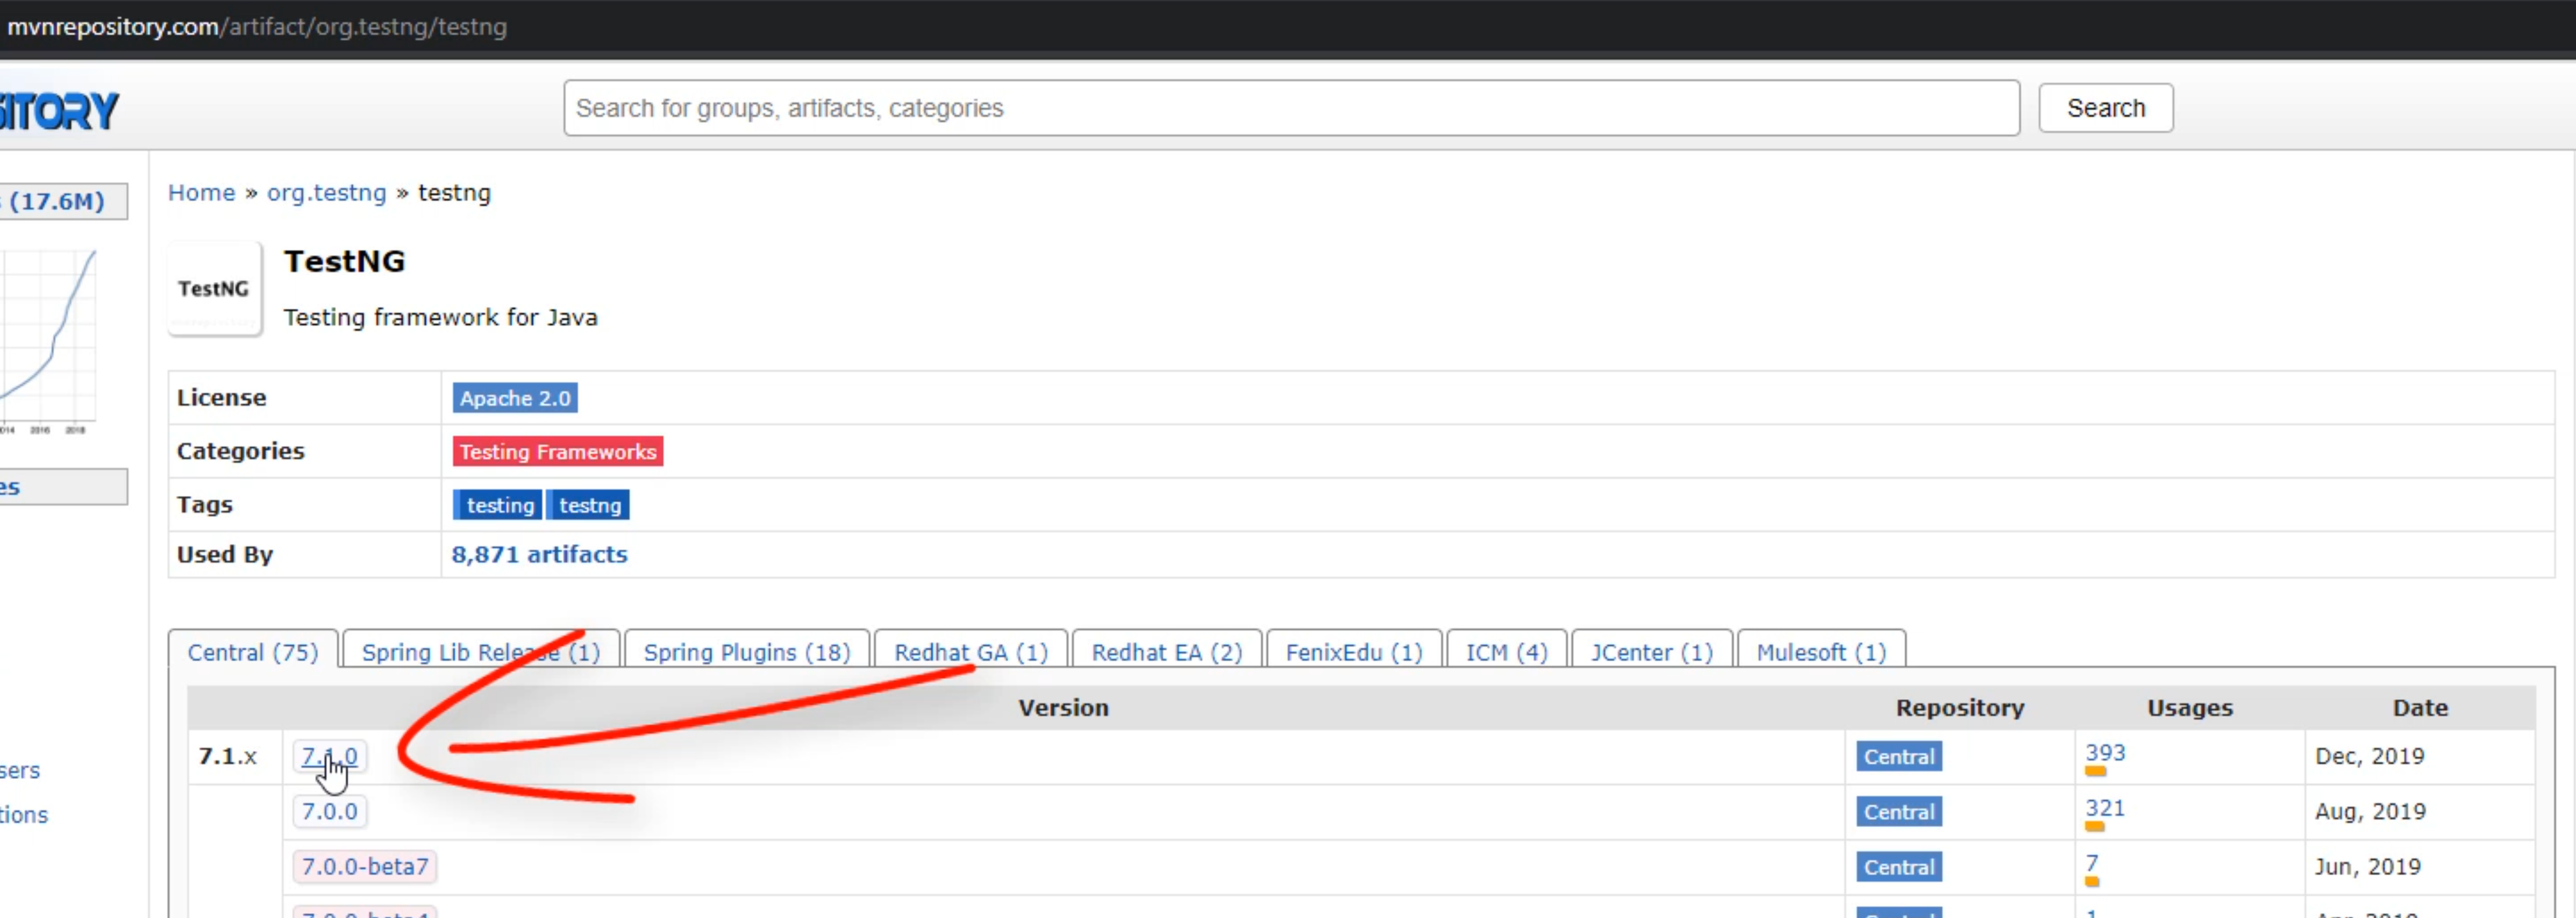
It looks like 7.1 is the latest one that is available.
We'll click on the link and this time again, we're going to click on the box to copy to clipboard.
<!-- https://mvnrepository.com/artifact/org.testng/testng -->
<dependency>
    <groupId>org.testng</groupId>
    <artifactId>testng</artifactId>
    <version>7.1.0</version>
    <scope>test</scope>
</dependency>
We'll go back to our IDE. We're going to right-click on the next line and click paste.
Again, we'll see the button to load Maven changes and we'll click on it to load in the new changes.
This should download the TestNG 7.1.
As you can see in your left pane here, if you have left it open, you will see TestNG 7.1 library.
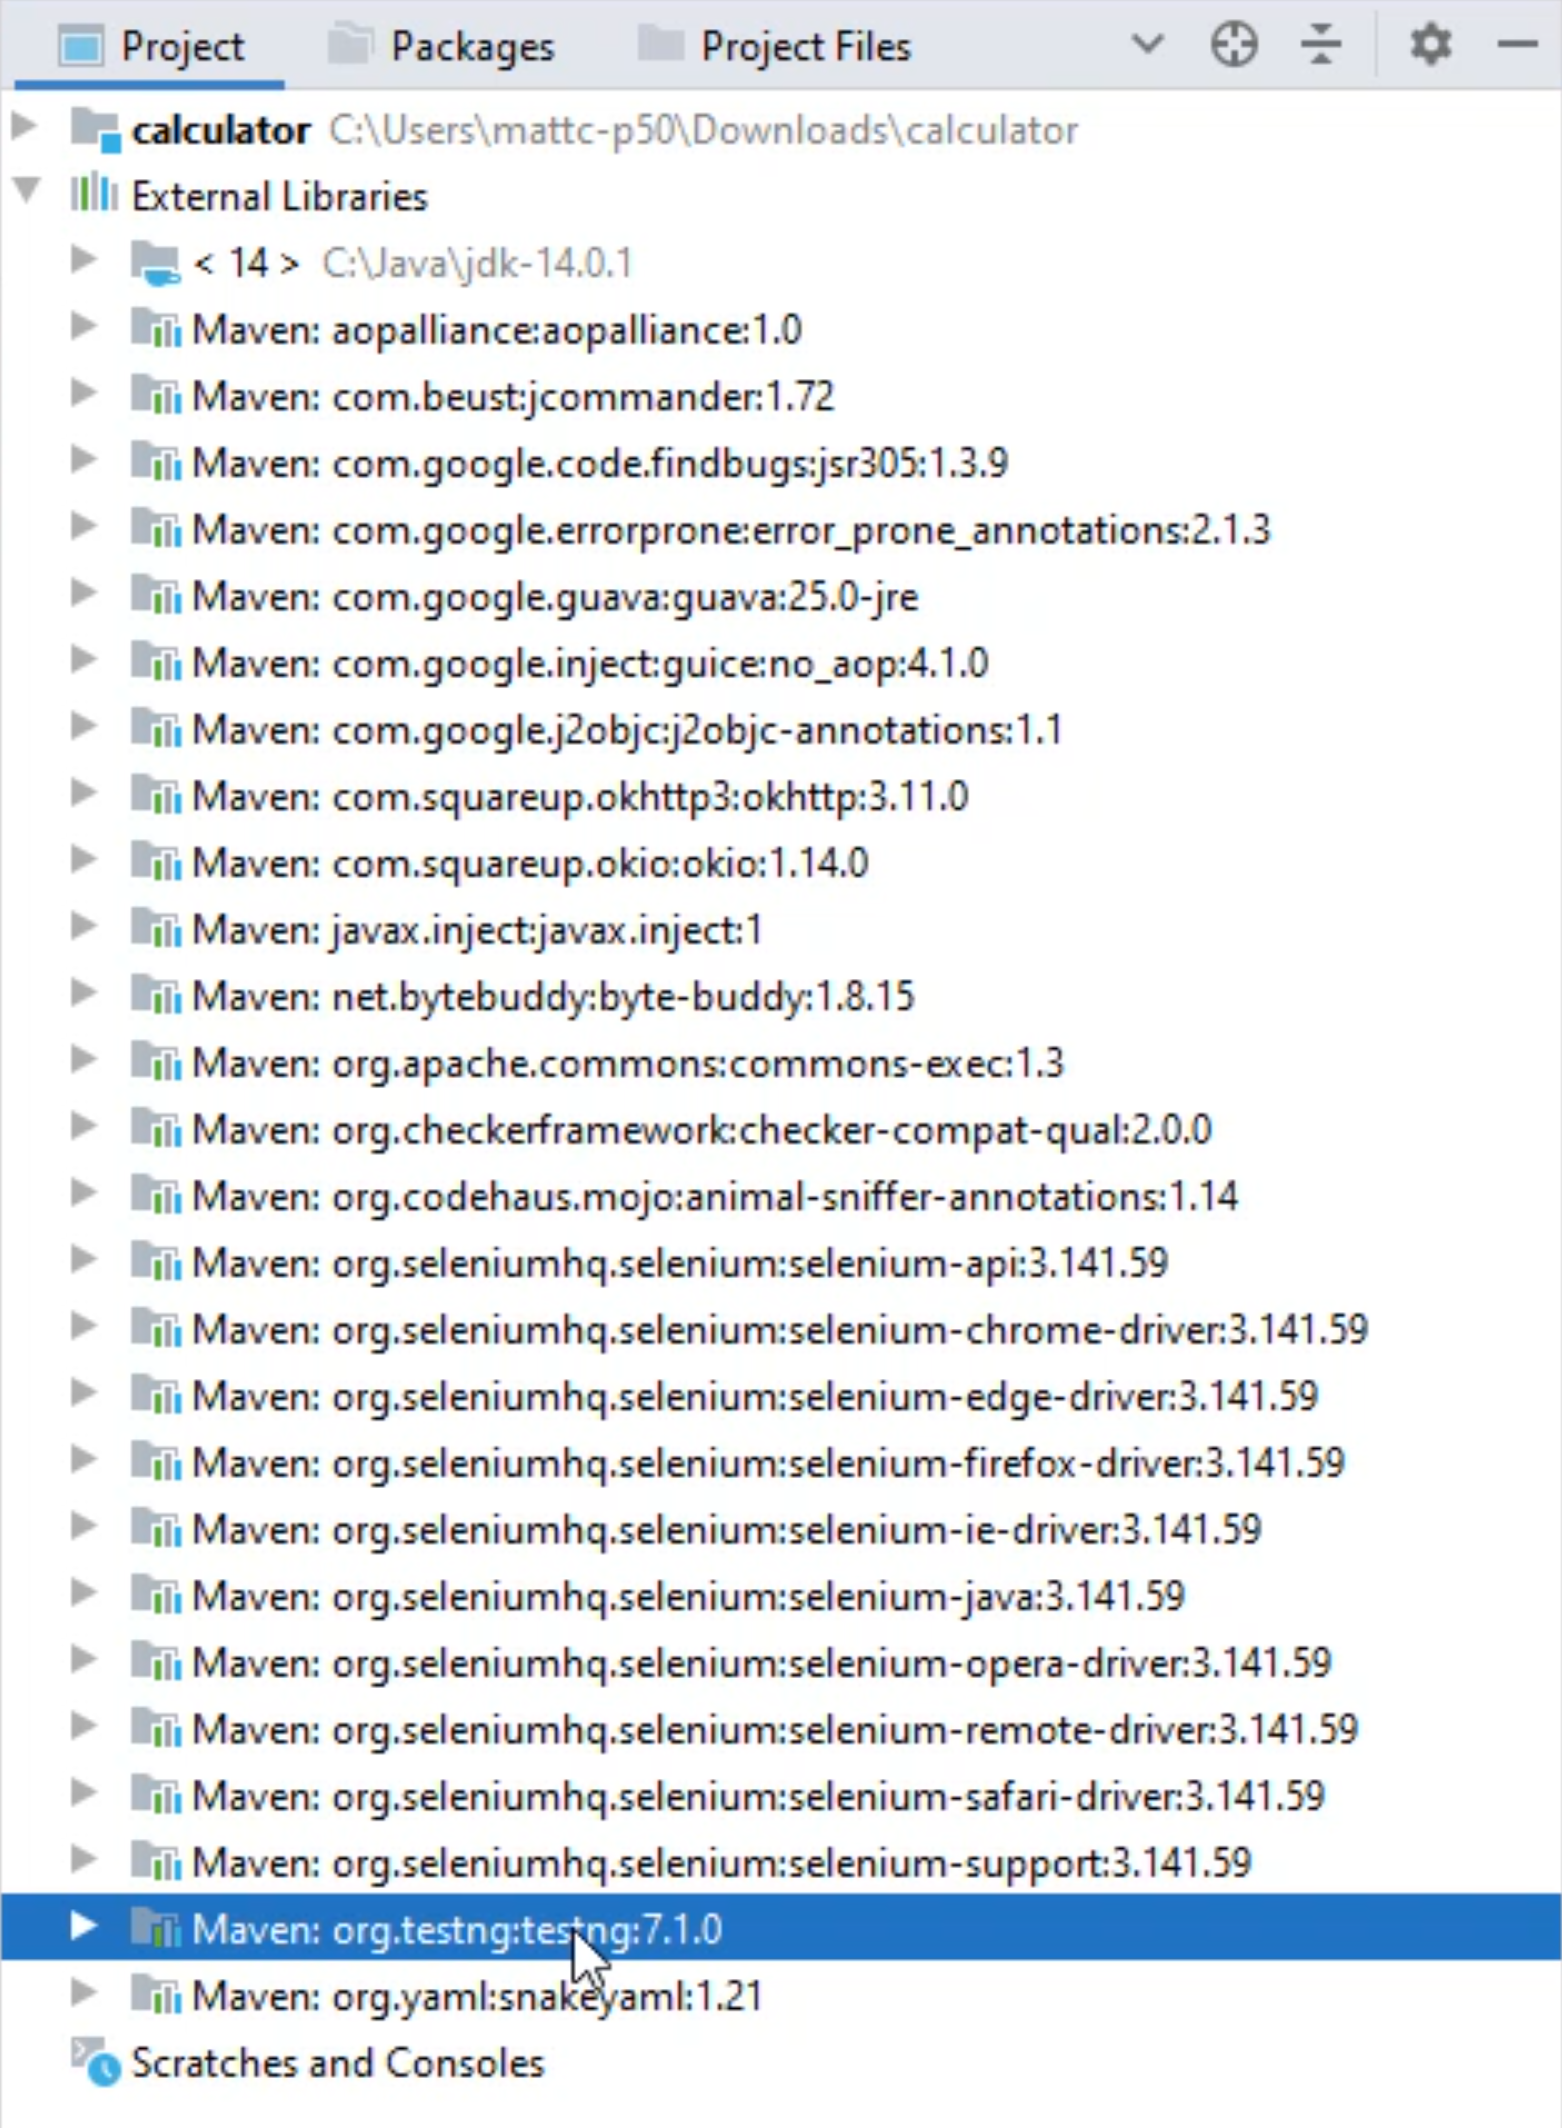
There are your external libraries that's being pulled in.
# Add the Appium library
The last library we will need is an Appium library.
Appium will be utilized to drive the automation.
It acts as a hub to interface with our WinAppDriver.
Now let's go back to our Maven repository and let's type in "appium".
It should be the first one right here that says Java Client and the latest version is 7.3.0.
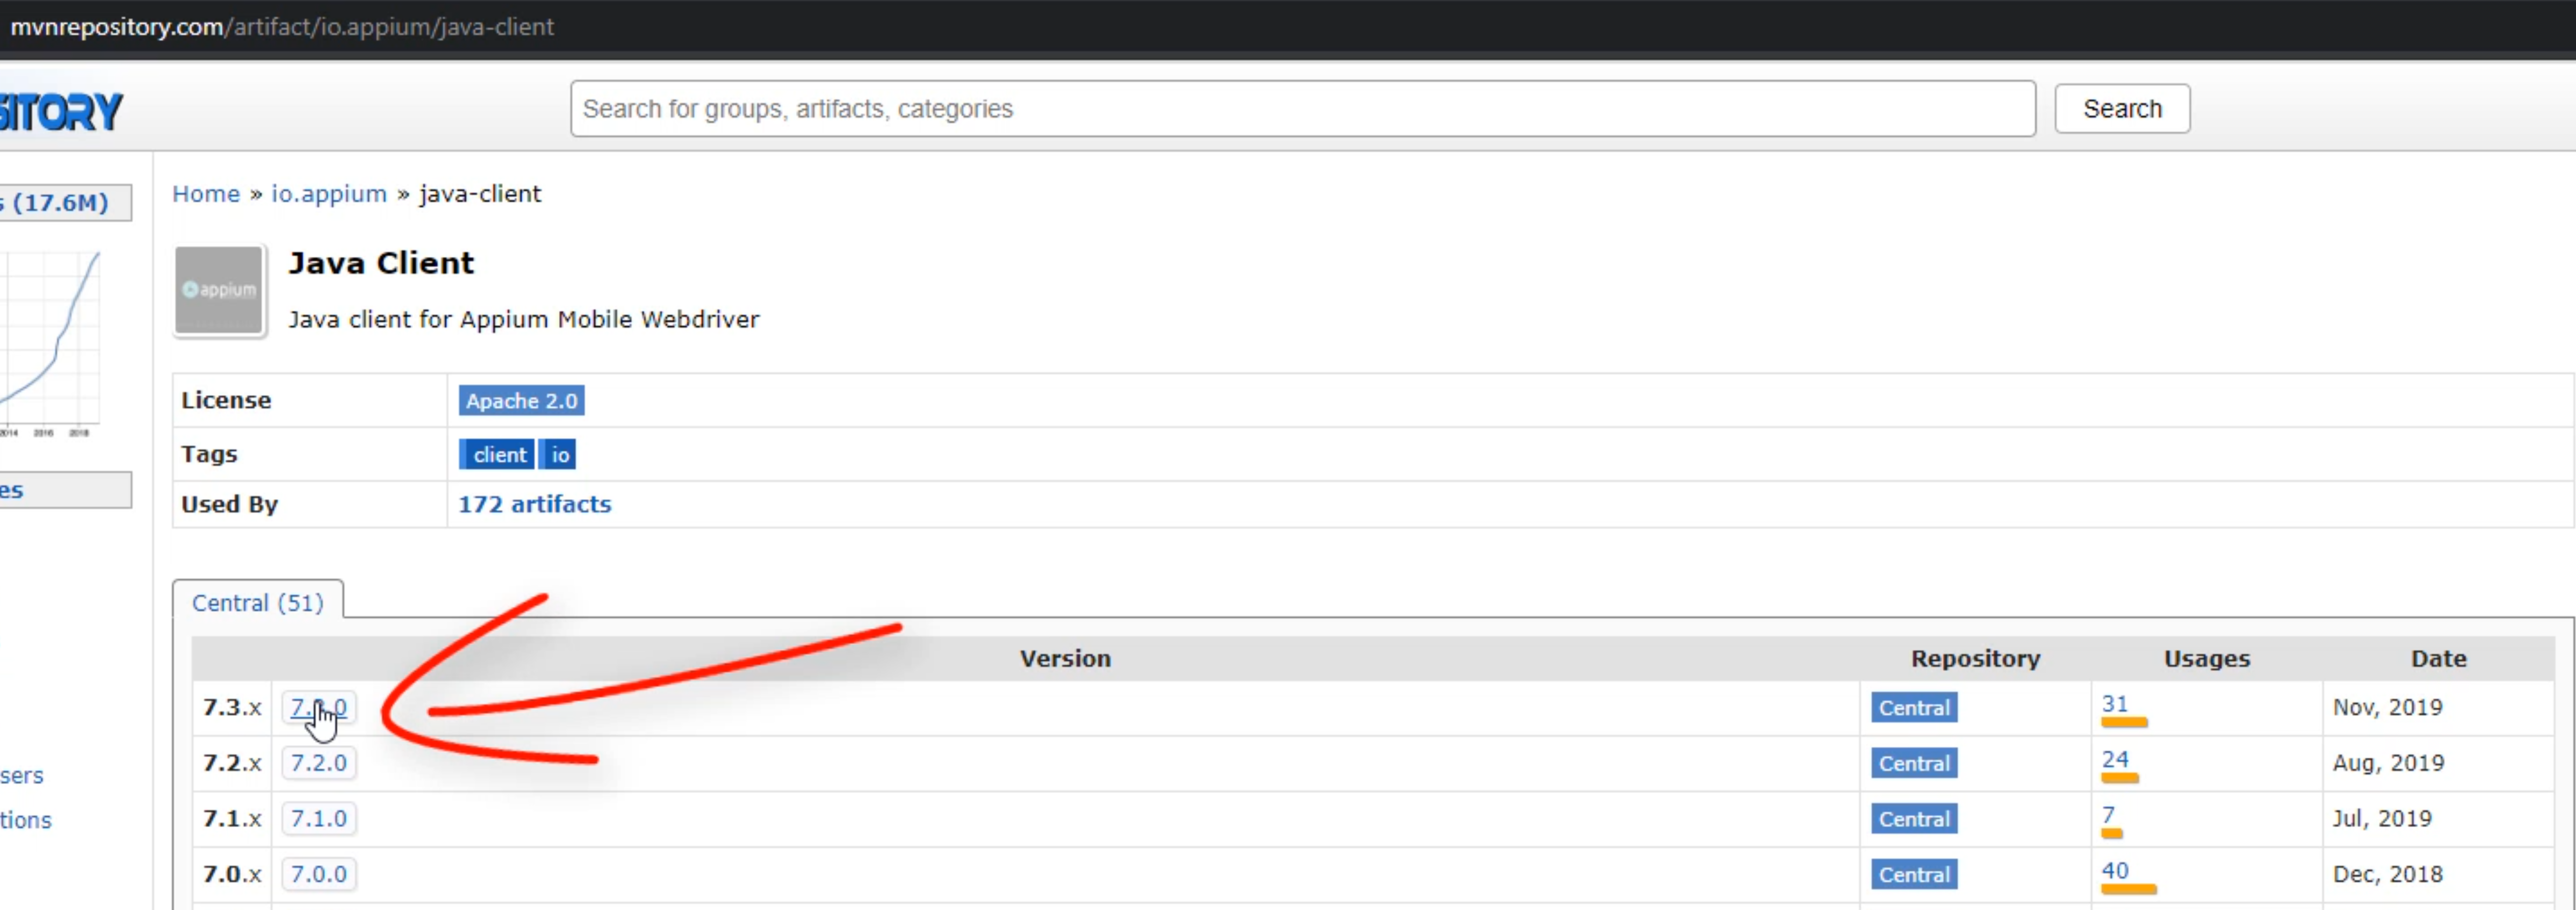
Let's click on this version and again, let's click on this text box from Maven - that should copy our dependency information into our clipboard.
<!-- https://mvnrepository.com/artifact/io.appium/java-client -->
<dependency>
    <groupId>io.appium</groupId>
    <artifactId>java-client</artifactId>
    <version>7.3.0</version>
</dependency>
Let's click on our IDE and let's right-click and paste the change in there.
This is our latest dependency.
And again, we will click on this icon to load Maven changes in the upper right-hand corner.
Here you will see the rest of the dependencies being pulled in for the Appium client.
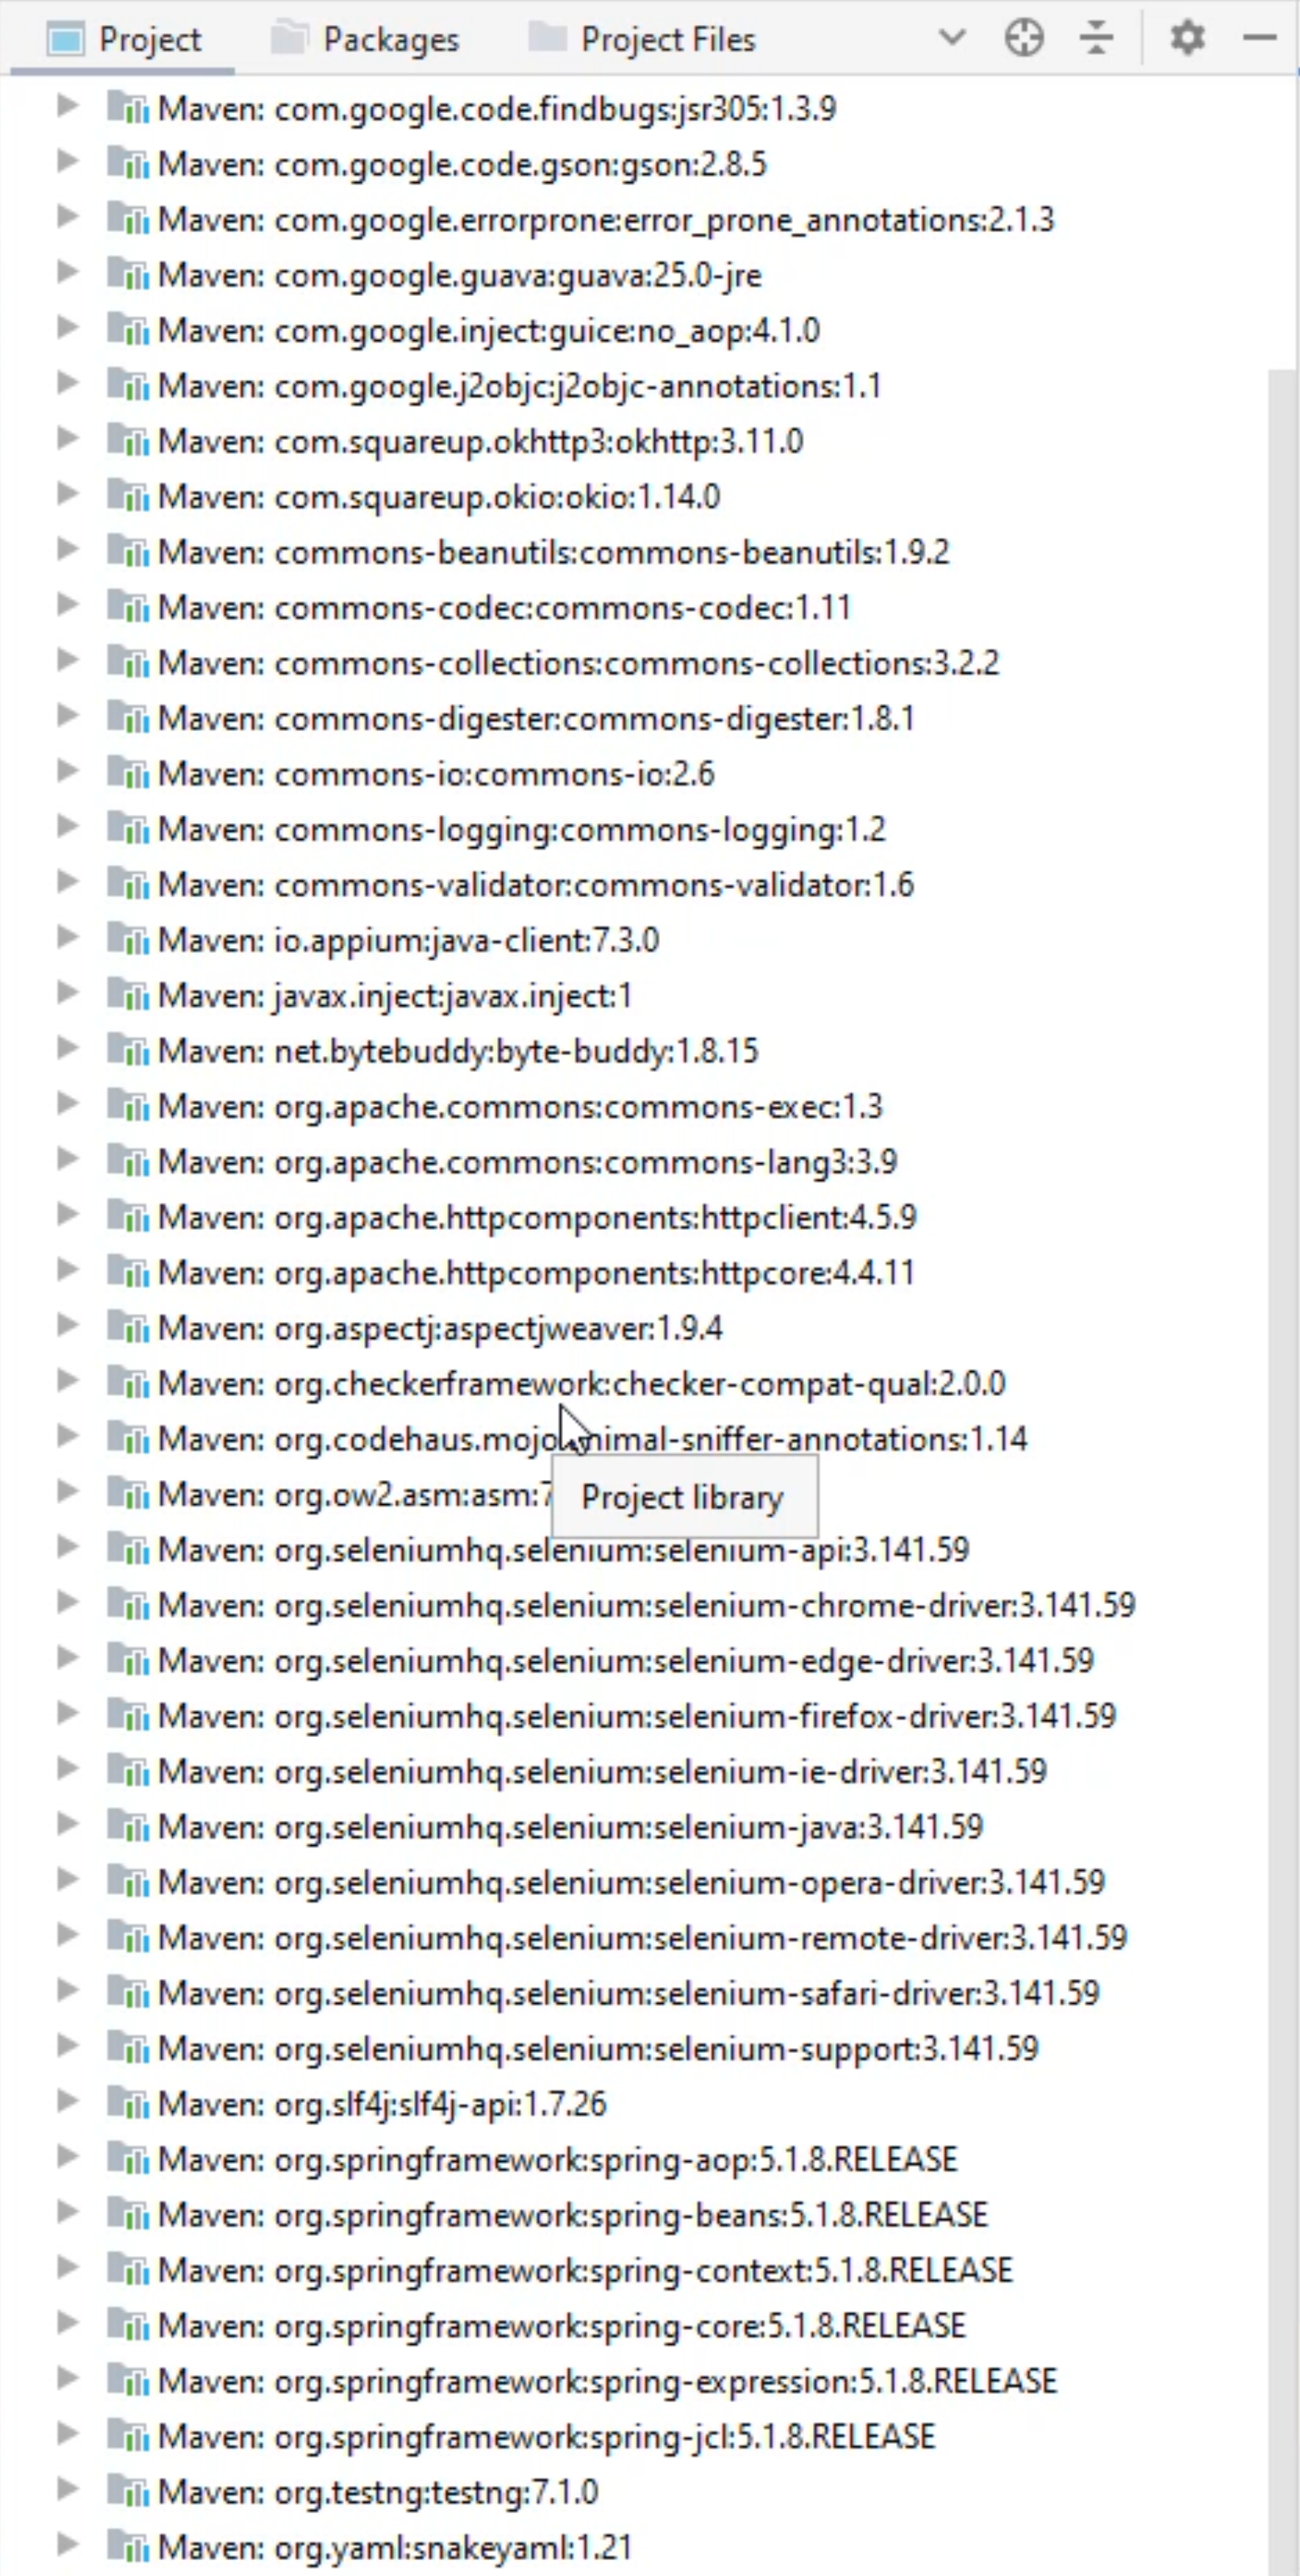
Now pom.xml looks like this:
<?xml version="1.0" encoding="UTF-8"?>
<project xmlns="http://maven.apache.org/POM/4.0.0"
         xmlns:xsi="http://www.w3.org/2001/XMLSchema-instance"
         xsi:schemaLocation="http://maven.apache.org/POM/4.0.0 http://maven.apache.org/xsd/maven-4.0.0.xsd">
    <modelVersion>4.0.0</modelVersion>

    <groupId>org.example</groupId>
    <artifactId>calculator</artifactId>
    <version>1.0-SNAPSHOT</version>
<dependencies>
    <!-- https://mvnrepository.com/artifact/org.seleniumhq.selenium/selenium-java -->
    <dependency>
        <groupId>org.seleniumhq.selenium</groupId>
        <artifactId>selenium-java</artifactId>
        <version>3.141.59</version>
    </dependency>
    <!-- https://mvnrepository.com/artifact/org.testng/testng -->
    <dependency>
        <groupId>org.testng</groupId>
        <artifactId>testng</artifactId>
        <version>7.1.0</version>
        <scope>test</scope>
    </dependency>
    <!-- https://mvnrepository.com/artifact/io.appium/java-client -->
    <dependency>
        <groupId>io.appium</groupId>
        <artifactId>java-client</artifactId>
        <version>7.3.0</version>
    </dependency>


</dependencies>

</project>
Now let's minimize the external libraries.
# Create our first automation project with a Calculator
Let's create our first source file to add our code to.
Let's click on this arrow for the calculator and you should see two folders in here.
One says .idea, and one says src for source.
Let's open up the source.
You should now see two more folders - one's main, one's test.
Let's open up test and you should see a java folder.
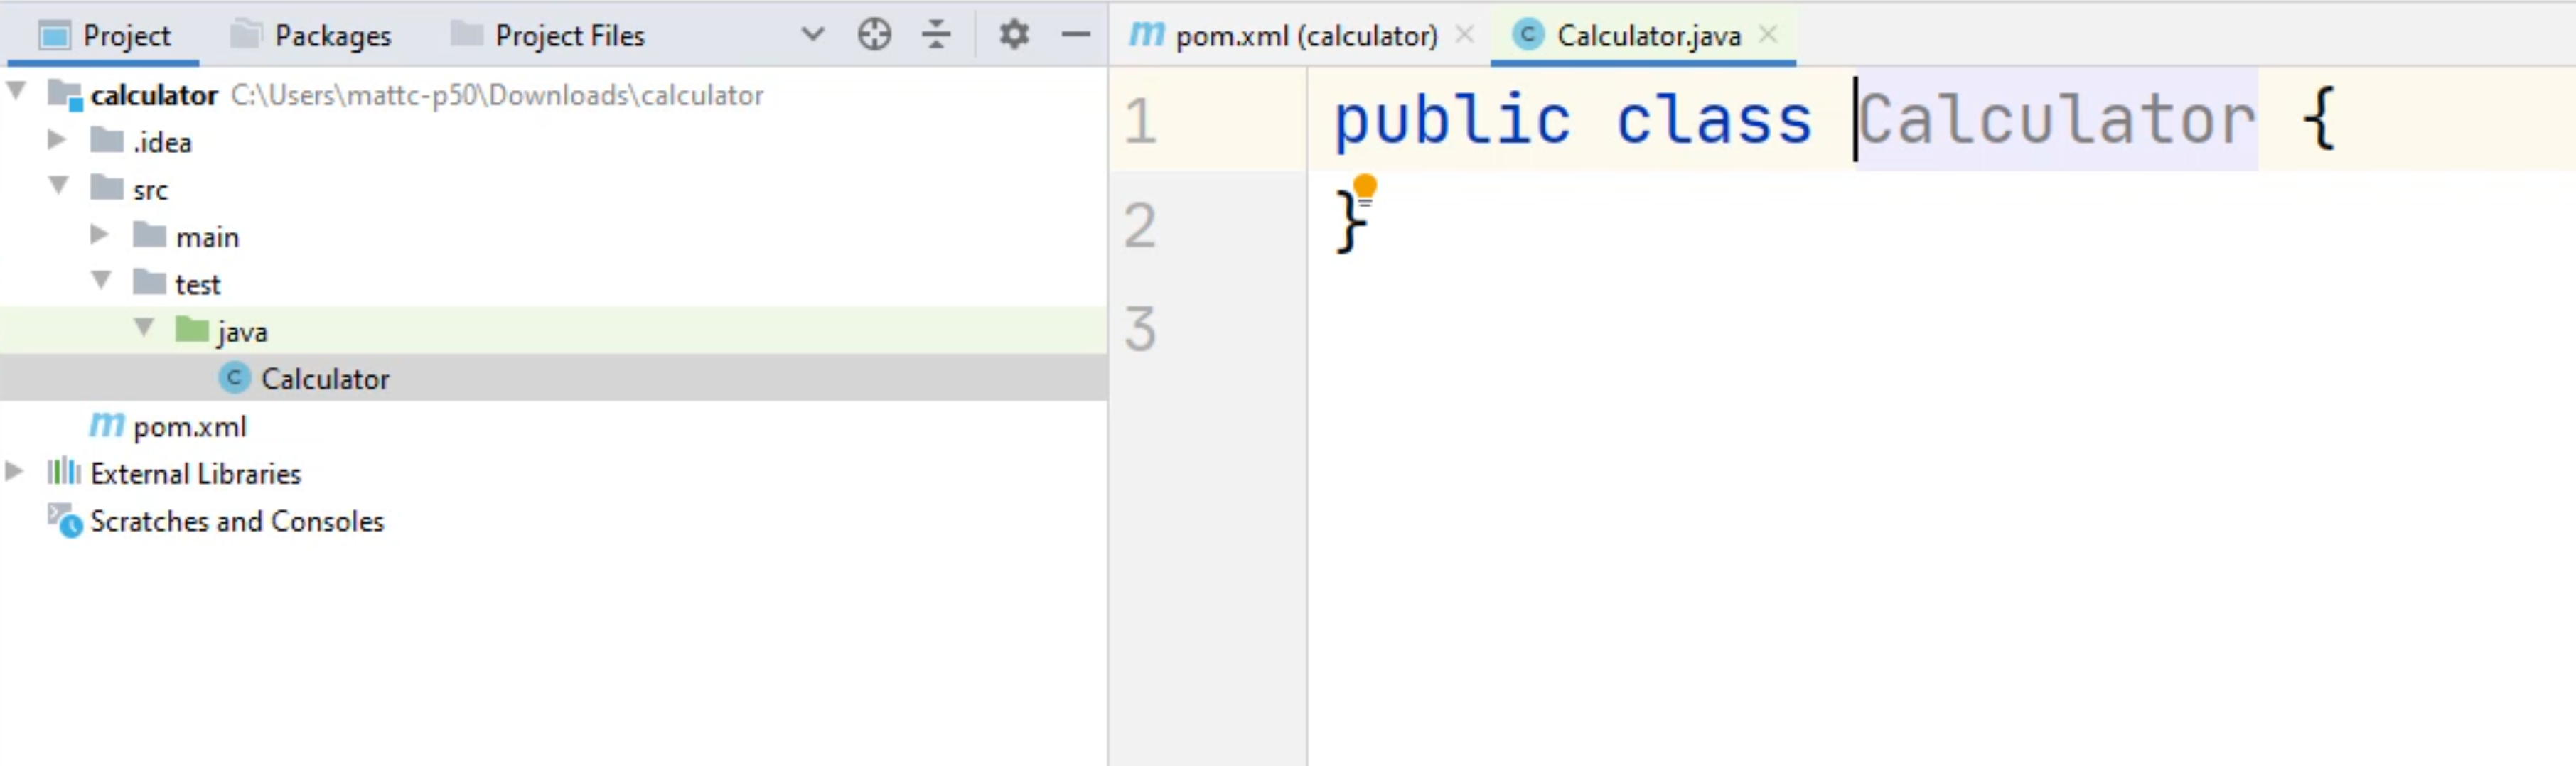
Let's right-click on this java folder and select "New" and we'll select "Java Class".
Let's call this class Calculator and hit "Enter" when you're done.
This will now create your Calculator class.
Now let's add some test methods.
To begin, we're going to type in public void addition, followed by open and closed () and then open and closed [].
The void means we do not have a return type.
Let's create some more for multiplication, subtraction and division.
Let's type in public void multiplication, and now public void subtraction, public void division.
Remember, don't forget your open and closed {} - this defines the start and the end of a method.
At this point, you shouldn't see any underlined text that is red.
public class Calculator {
    public void addition(){}
    public void multiplication(){}
    public void subtraction(){}
    public void division(){}
}
If that is the case, that means you have something wrong with your code.
Let's learn about TestNG.
To get full TestNG documentation, you can go to https://testng.org/doc/documentation-main.html.
TestNG is a testing framework designed to simplify a broad range of testing needs from unit testing to integration testing.
It is built on top of JUnit.
TestNG is a three step process.
You write the business logic of your test and insert TestNG annotations into your code.
Add the information about your test, whether it's a class name or groups you wish to run into a TestNG.xml file or in a build.xml file.
TestNG has many different test annotations.
However, we are only going to look at four of them for our automation.
@BeforeClass- this annotated method runs before the execution of test methods in a current class.@AfterClass- this annotated method will run after all the test methods in the current class have been run.@BeforeMethod- this annotated method will be invoked before the execution of each test method where the test method is nothing but a test case.@Test- marks a method as part of the test.
The easiest way to make sure our methods are working is to add a little message.
We can do this by using the System.out.println method.
Let's click in between the open and closed {} for the addition method and create a new line and type in System.out.println.
Here we're just going to type in "addition", you'll see a little underline at the end, make sure you close it with a semicolon.
Then let's do this for the rest of the methods.
public class Calculator {
    public void addition(){
        System.out.println("addition");
    }
    public void multiplication(){
        System.out.println("multiplication");
    }
    public void subtraction(){
        System.out.println("subtraction");
    }
    public void division(){
        System.out.println("division");
    }
}
At this point, let's add our TestNG annotations - this will allow us to run each of our tests.
First, we're going to import the TestNG library.
We're going to go to the top of our file, hit enter a couple of times, go to line 1 and type in import org.testng.annotations.
You'll notice as I type, it gives you a lot of different options you can select from.
Rather than typing the whole entire annotations here.
You can also click the down arrow, and hit "Enter".
Rather than importing each of these classes individually, we're just going to import the whole entire library - you can do this by selecting the * method, and let's end this with a semicolon.
Let's go to your first method.
That should be the public void addition method - hit "Enter" here and let's create a new line.
Before this line on test line 4, we're going to add @T for test, and enter Test.
This makes the public void addition a test.
At this point, you can add additional steps into your test.
Let's add the @Test annotation to the rest of our methods.
import org.testng.annotations.*;

public class Calculator {
    @Test
    public void addition(){
        System.out.println("addition");
    }
    @Test
    public void multiplication(){
        System.out.println("multiplication");
    }
    @Test
    public void subtraction(){
        System.out.println("subtraction");
    }
    @Test
    public void division(){
        System.out.println("division");
    }
}
Now that we have added the methods to our class, let's see if we can run it.
You'll see the arrows on the left-hand side of your IDE - these will indicate which methods you can run.
We're going to try to run the whole entire class.
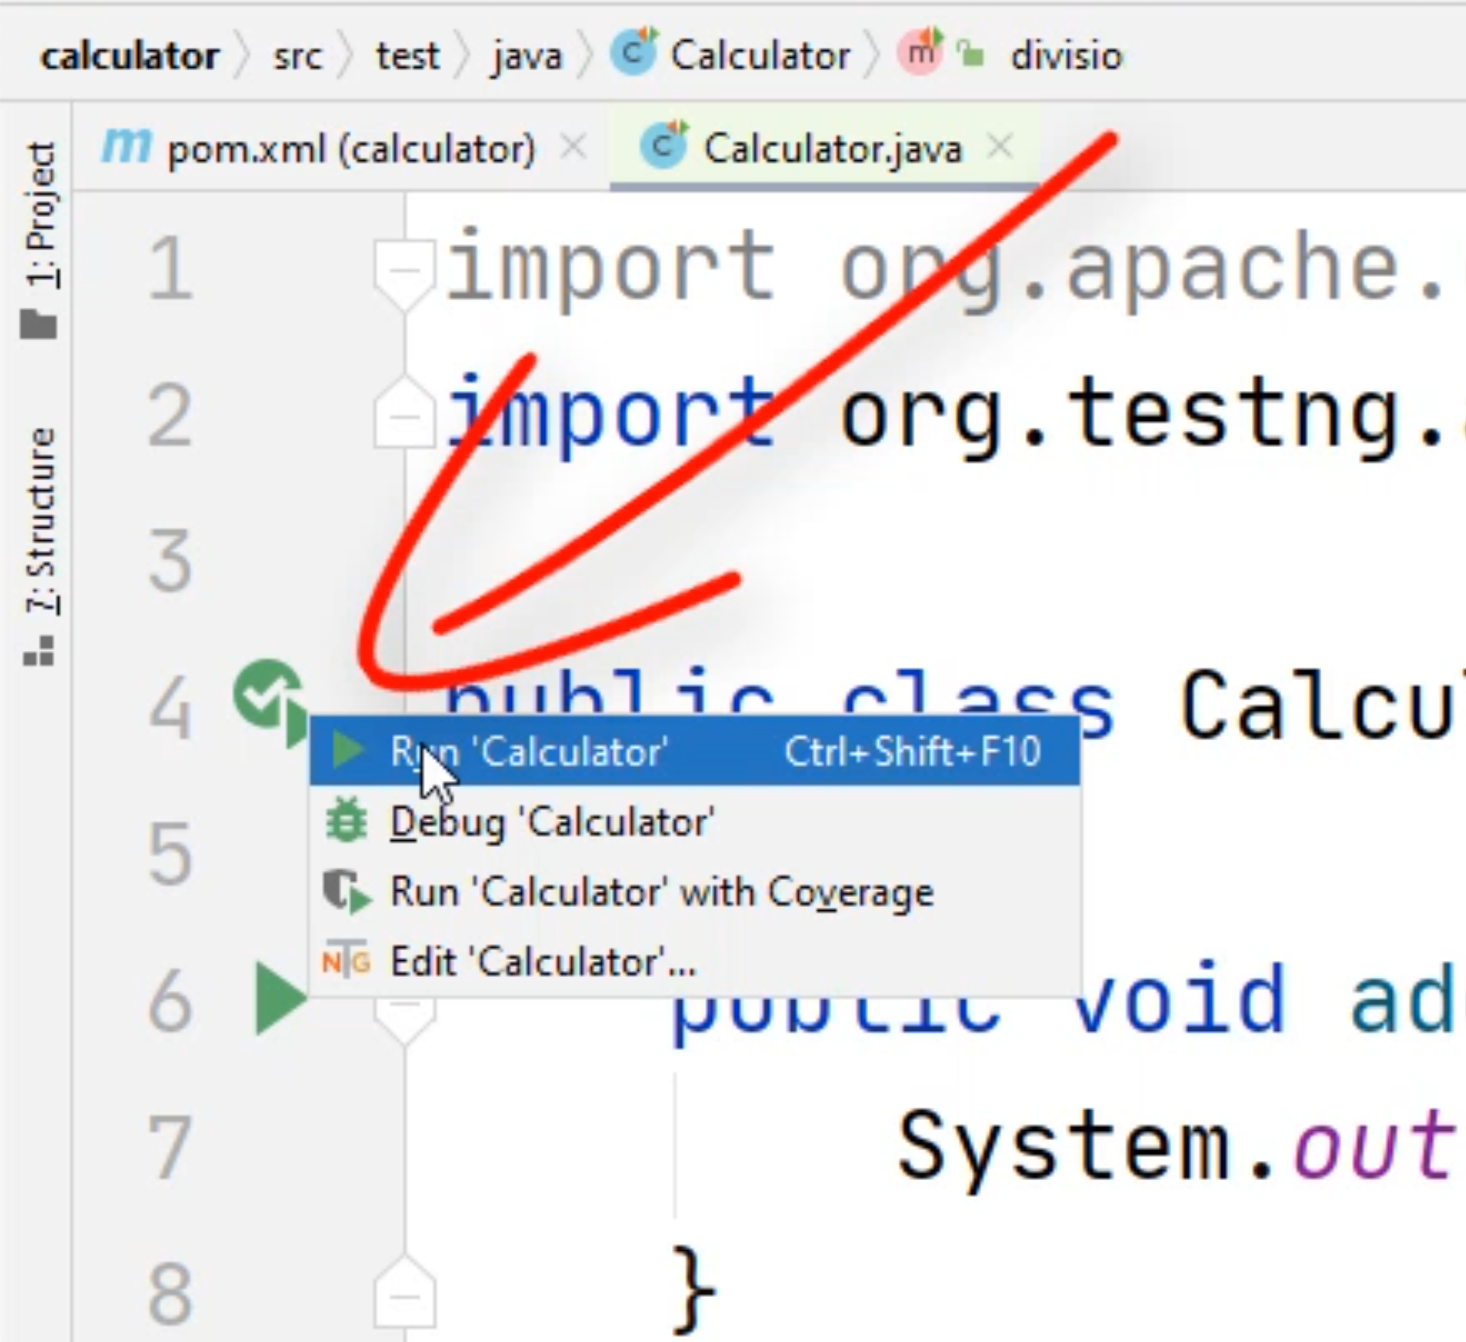
If you click on this little arrow right here on the left-hand side, you should see four options.
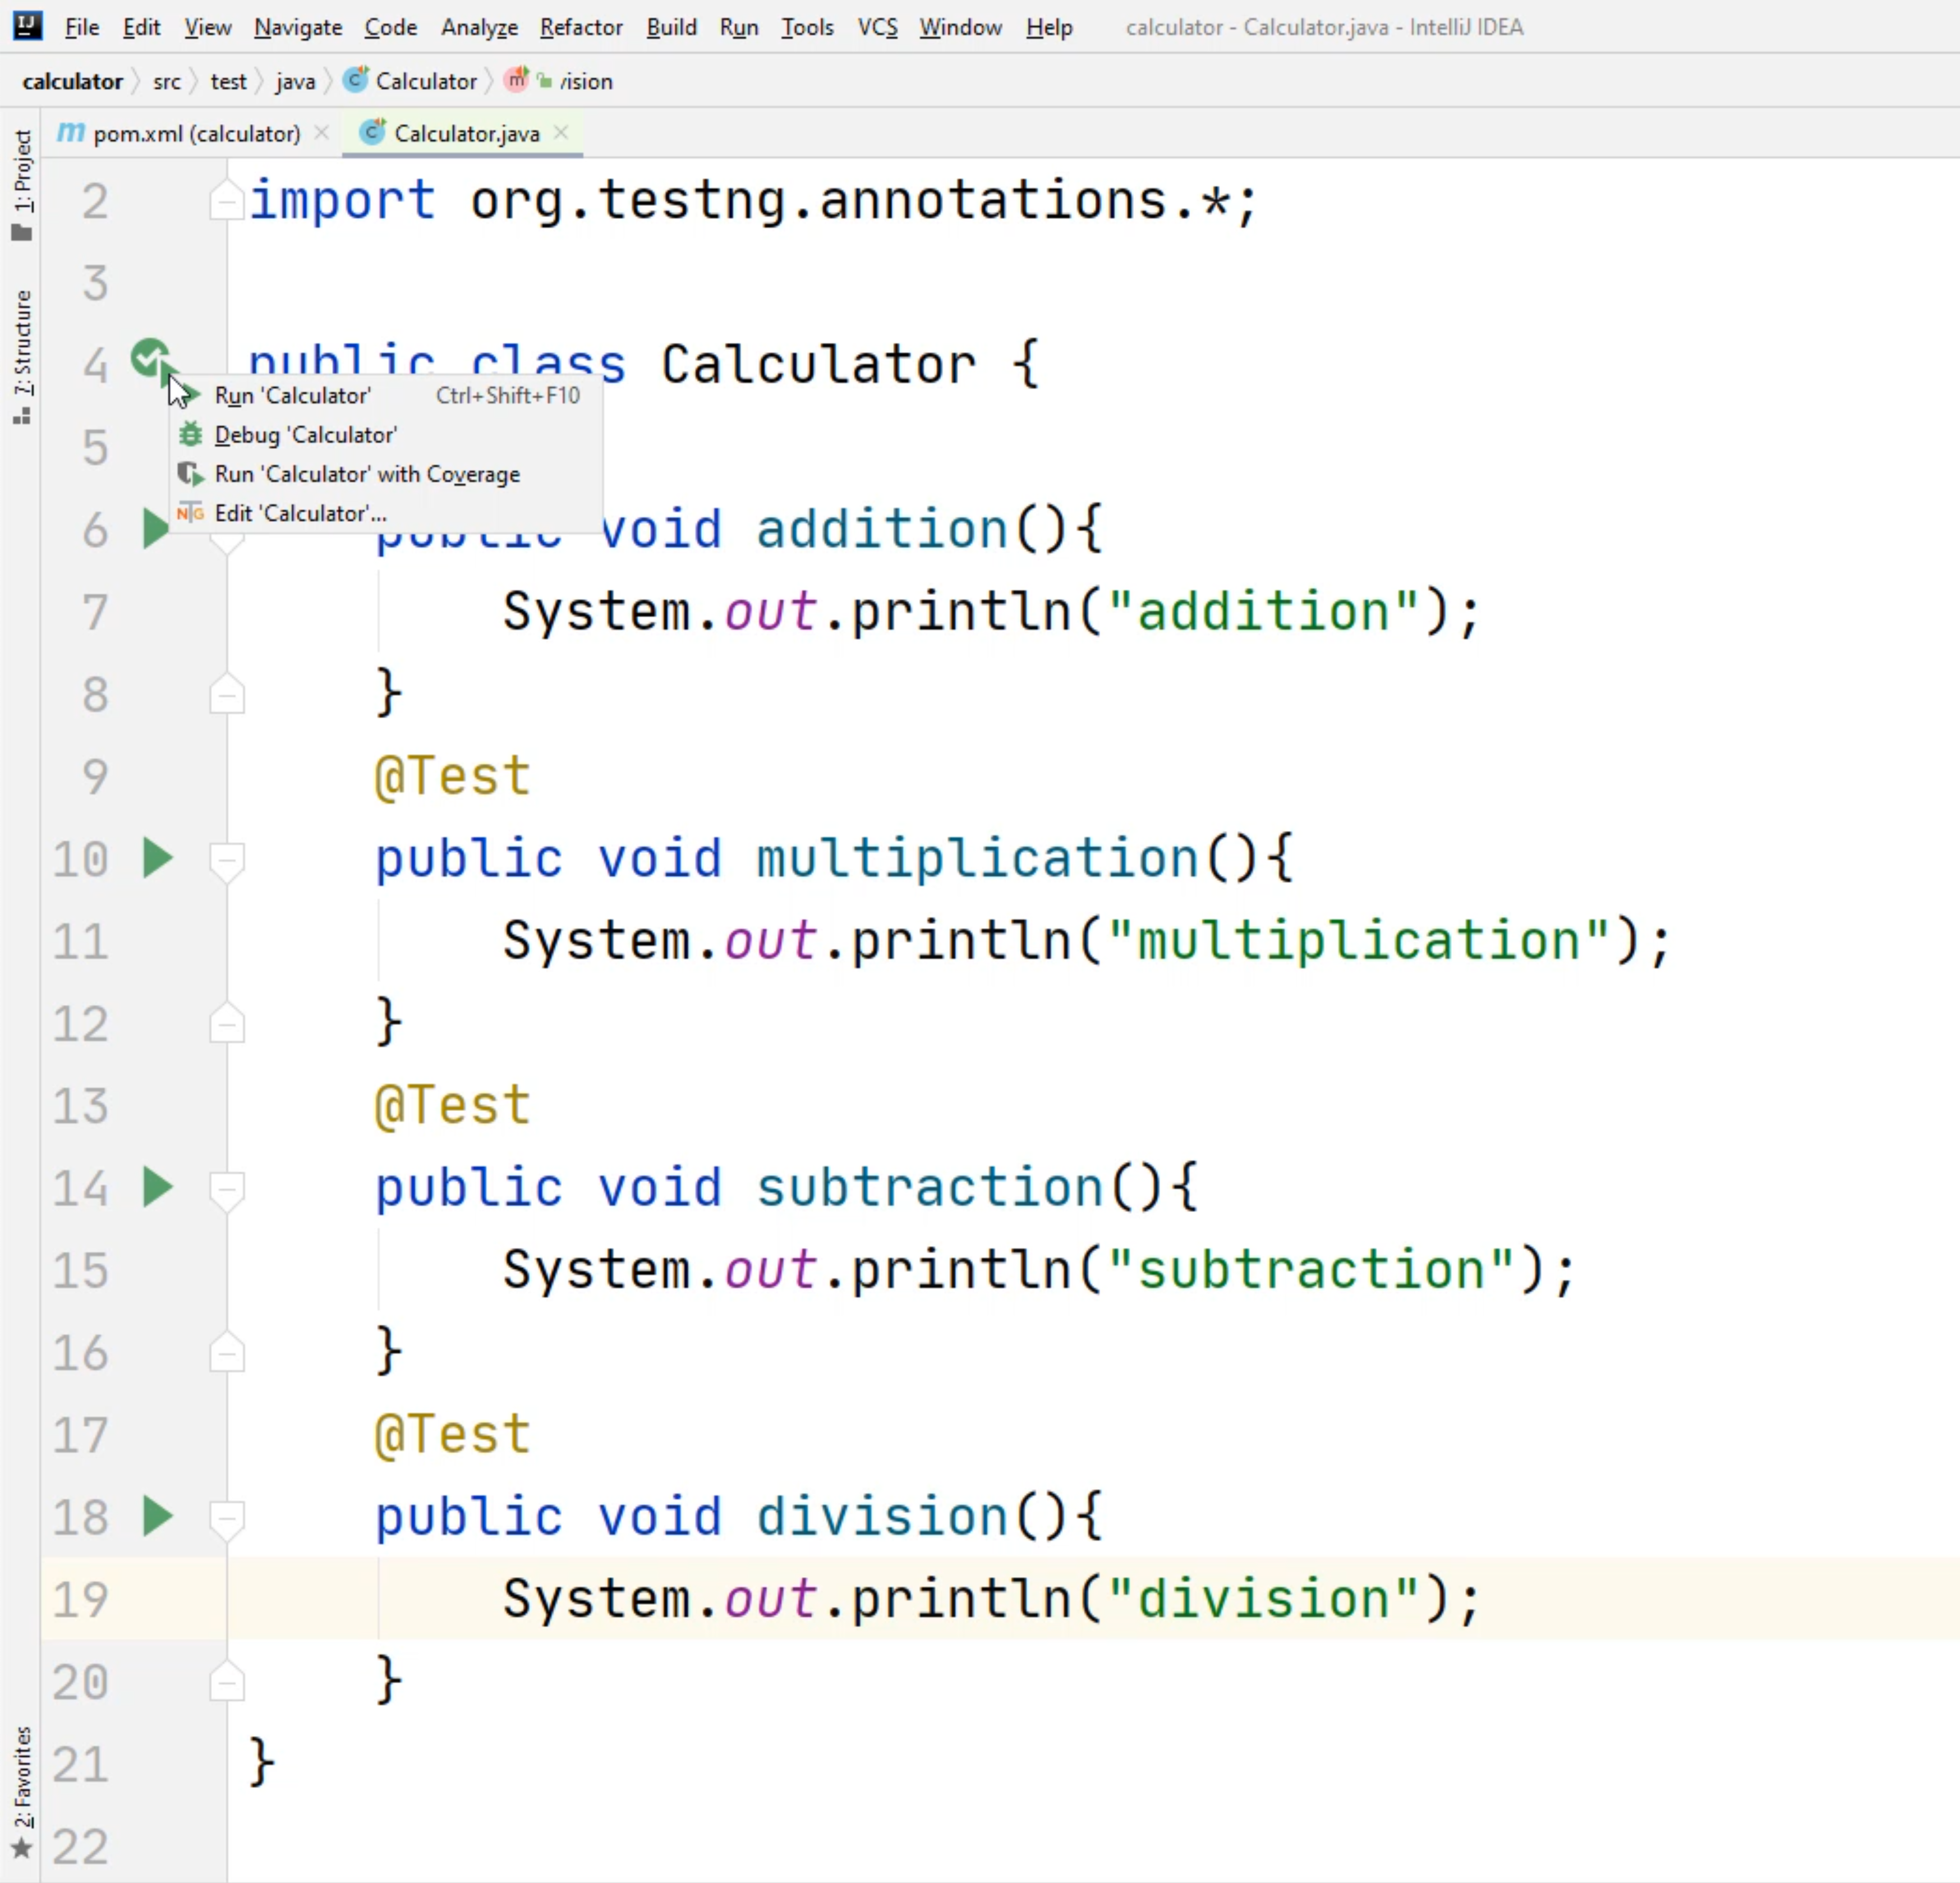
You'll see "Run 'Calculator'", "Debug 'Calculator'", 'Run 'Calculator' with Coverage" or "Edit 'Calculator'".
We are going to try to use the "Run 'Calculator'".
You'll notice at this point your IDE you should be building and compiling your class.
Now you will see an error.
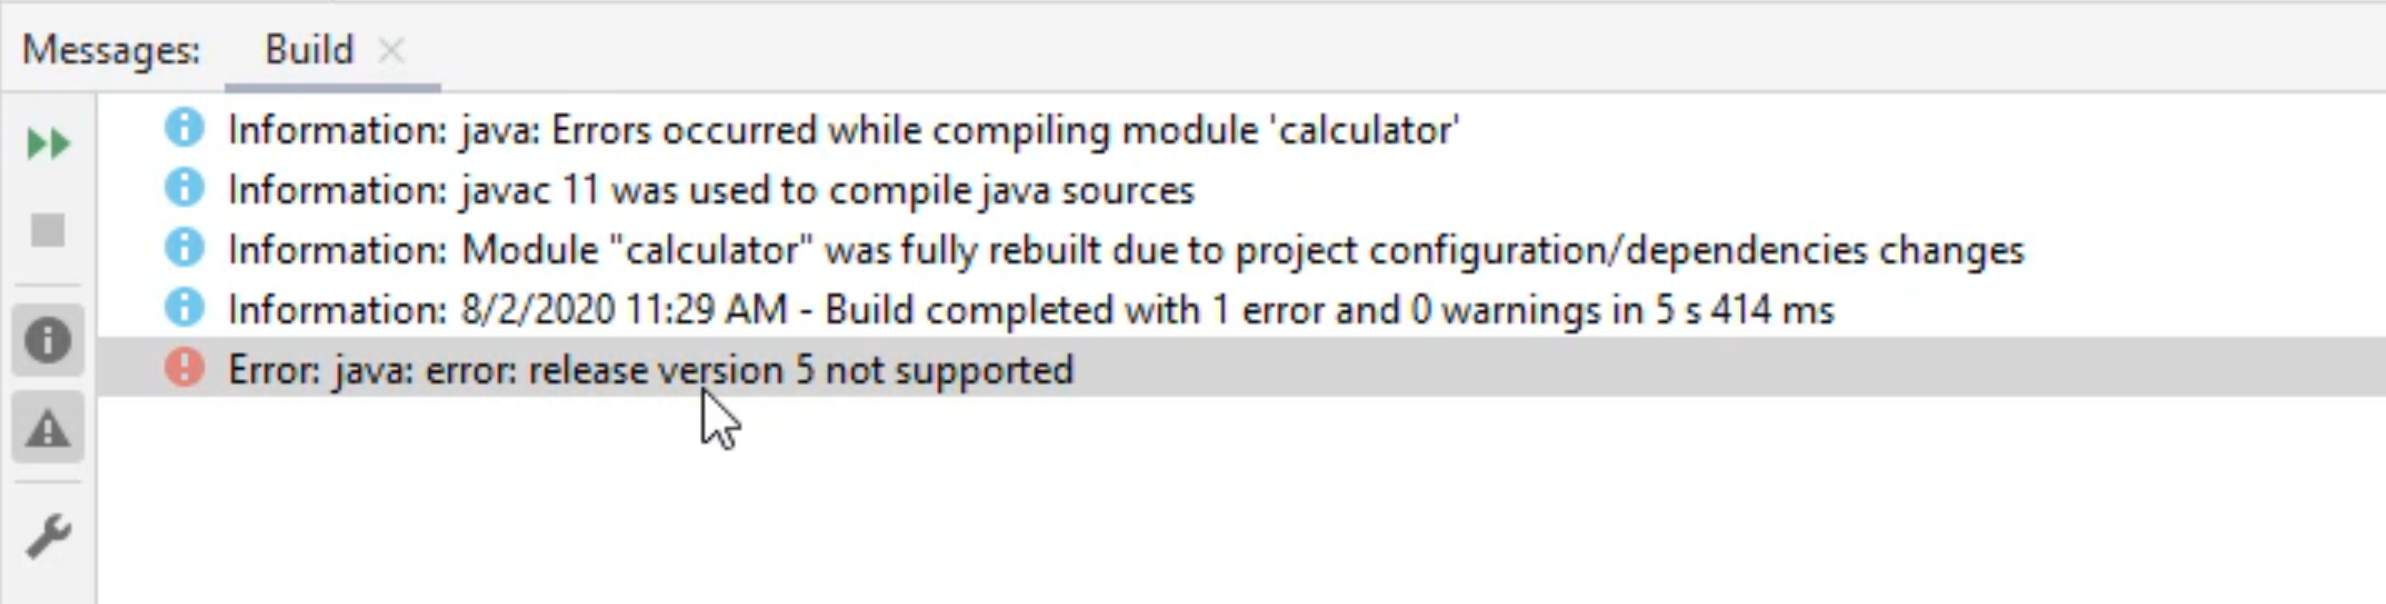
Most likely it'll say "java: error: release version number 5 is not supported".
At this point, what you need to do is up the compiled version for your IDE.
You can do this by selecting "File", "Settings" and look for the "Build, Execution, Deployment" section and select the "Java Compiler" under "Compiler". Let's select this option.
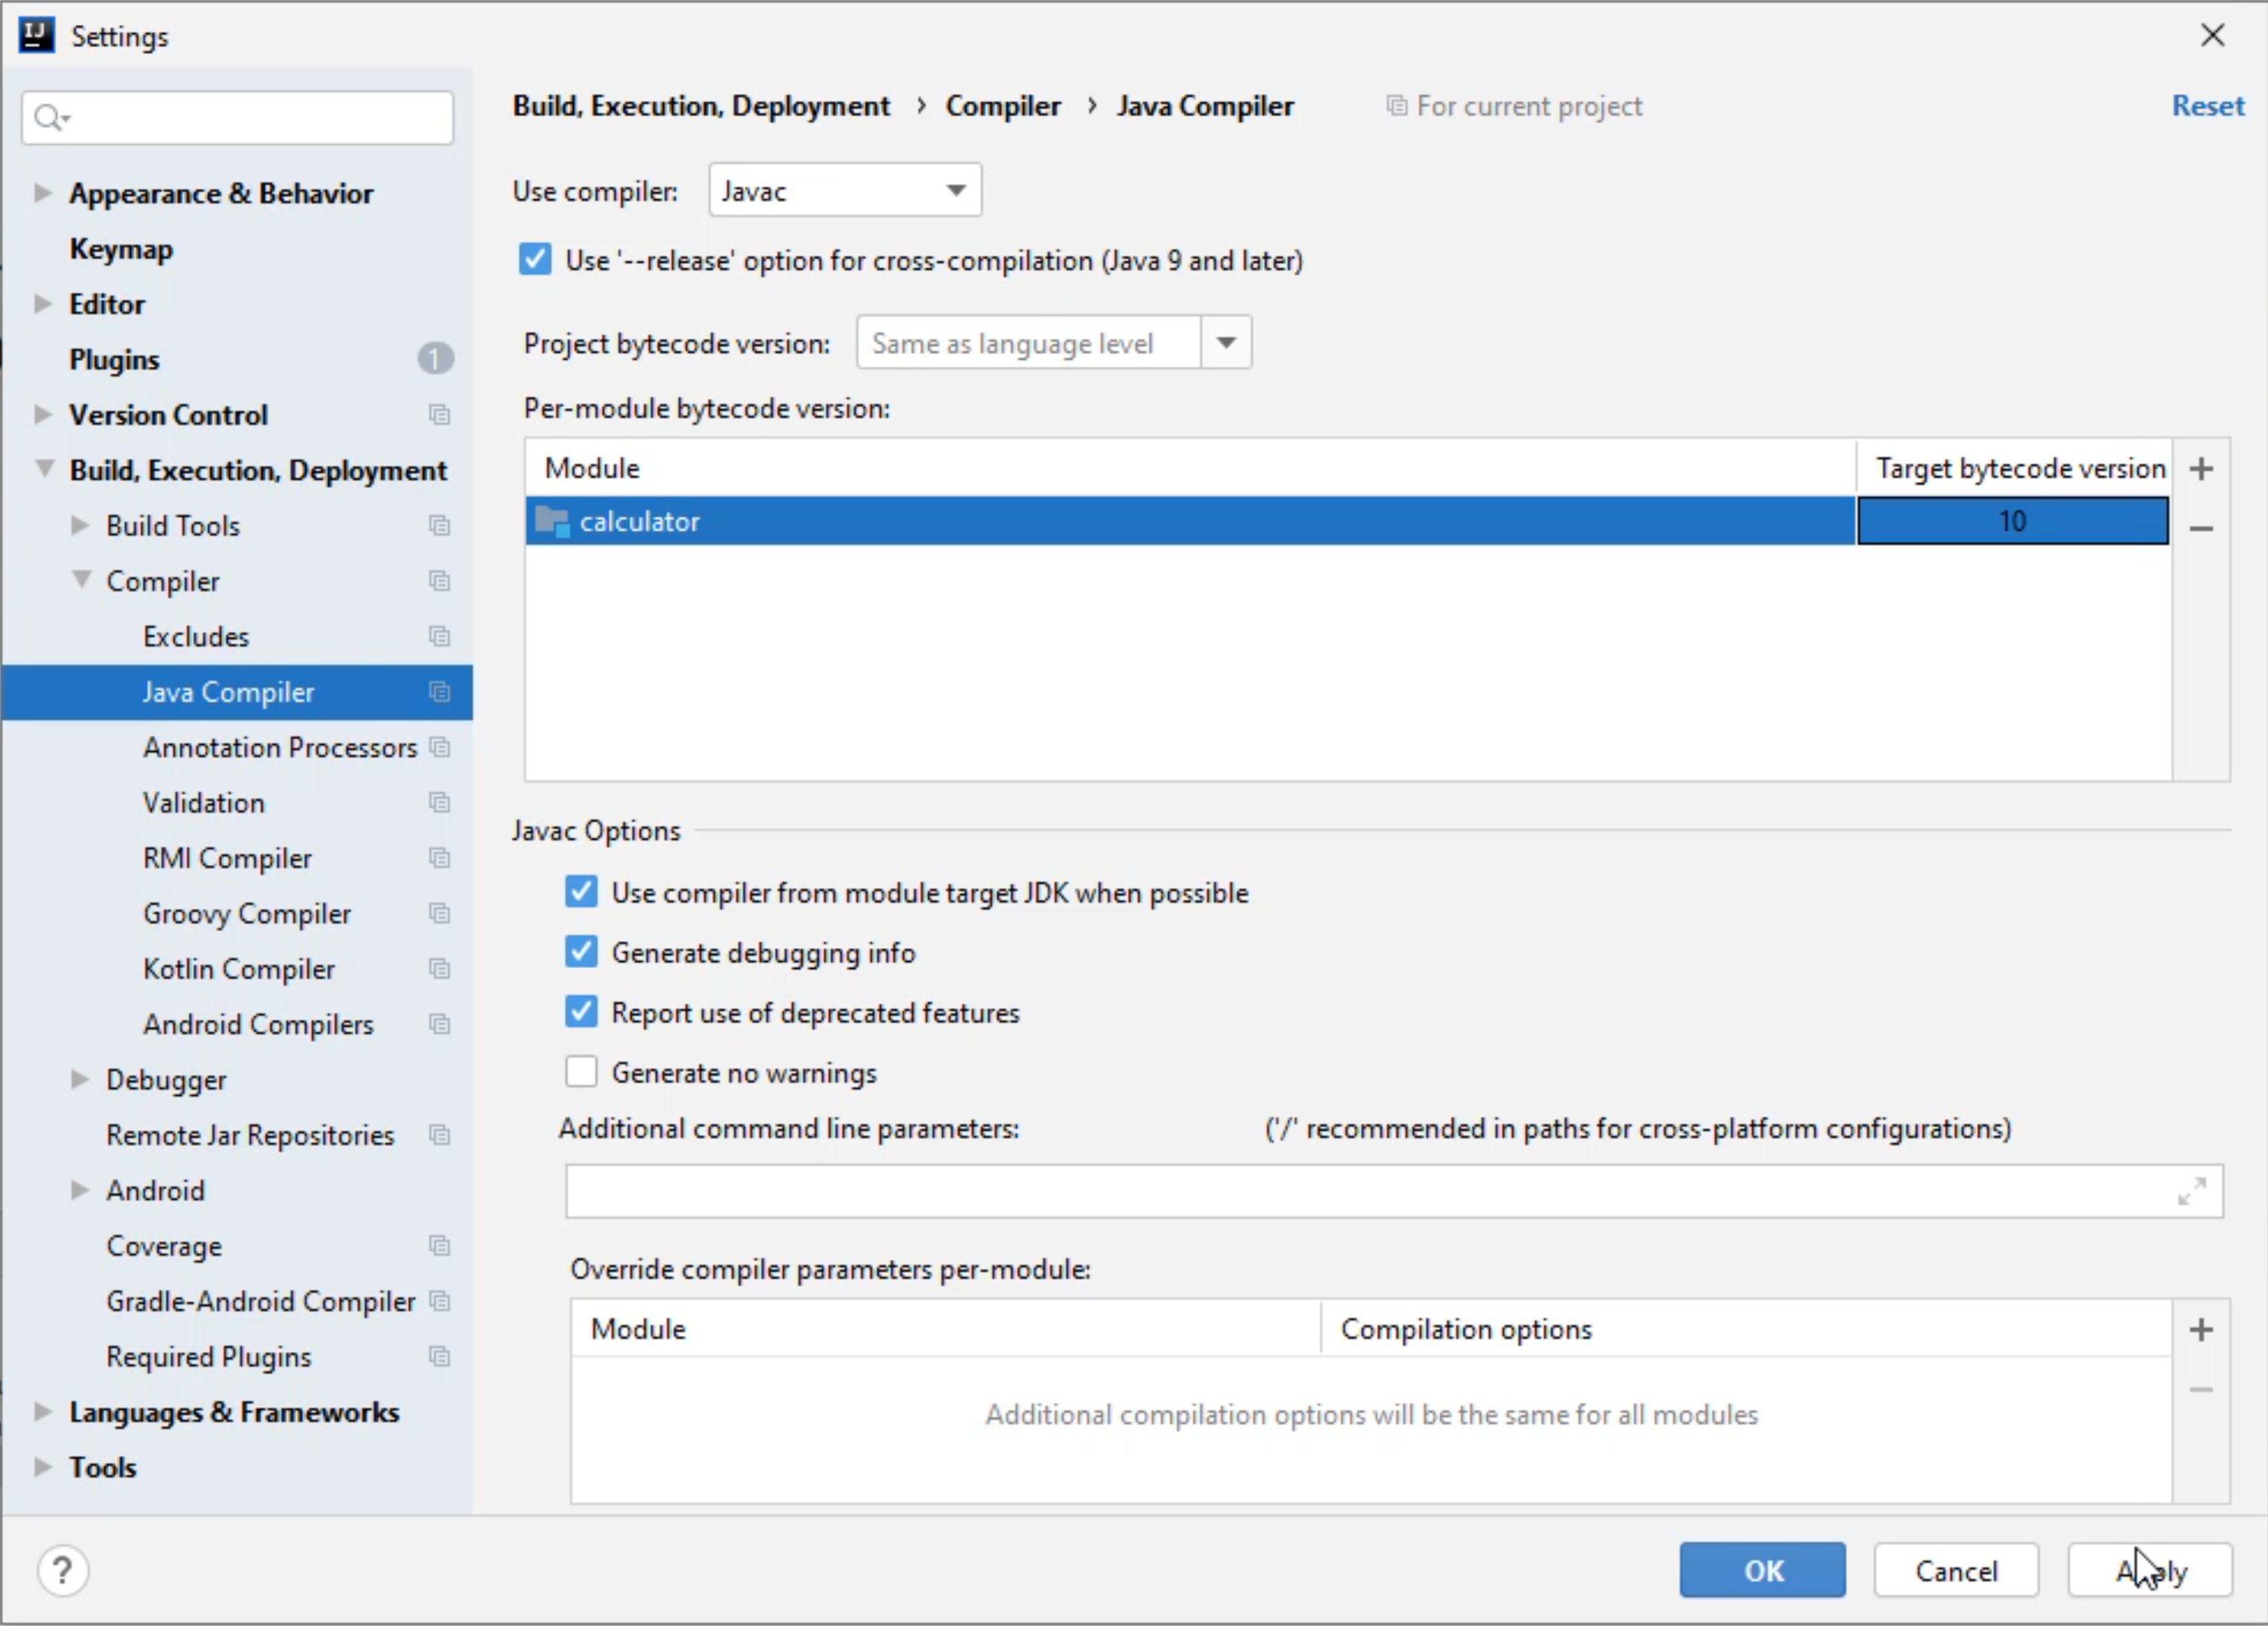
Now you'll see a "Target bytecode version" - let's change this to something other than 5, let's go up to version 10.
If you select any other versions above this, you might or might not see the same type of error.
If you do, just select a lower version.
Once you're done, click "Apply" or the "OK" button, and let's try recompiling again.
Left-click on this and select "Run 'Calculator'".
You will now see the compiler recompile everything, and this time there is no error.
You'll also notice that 4 tests have passed.
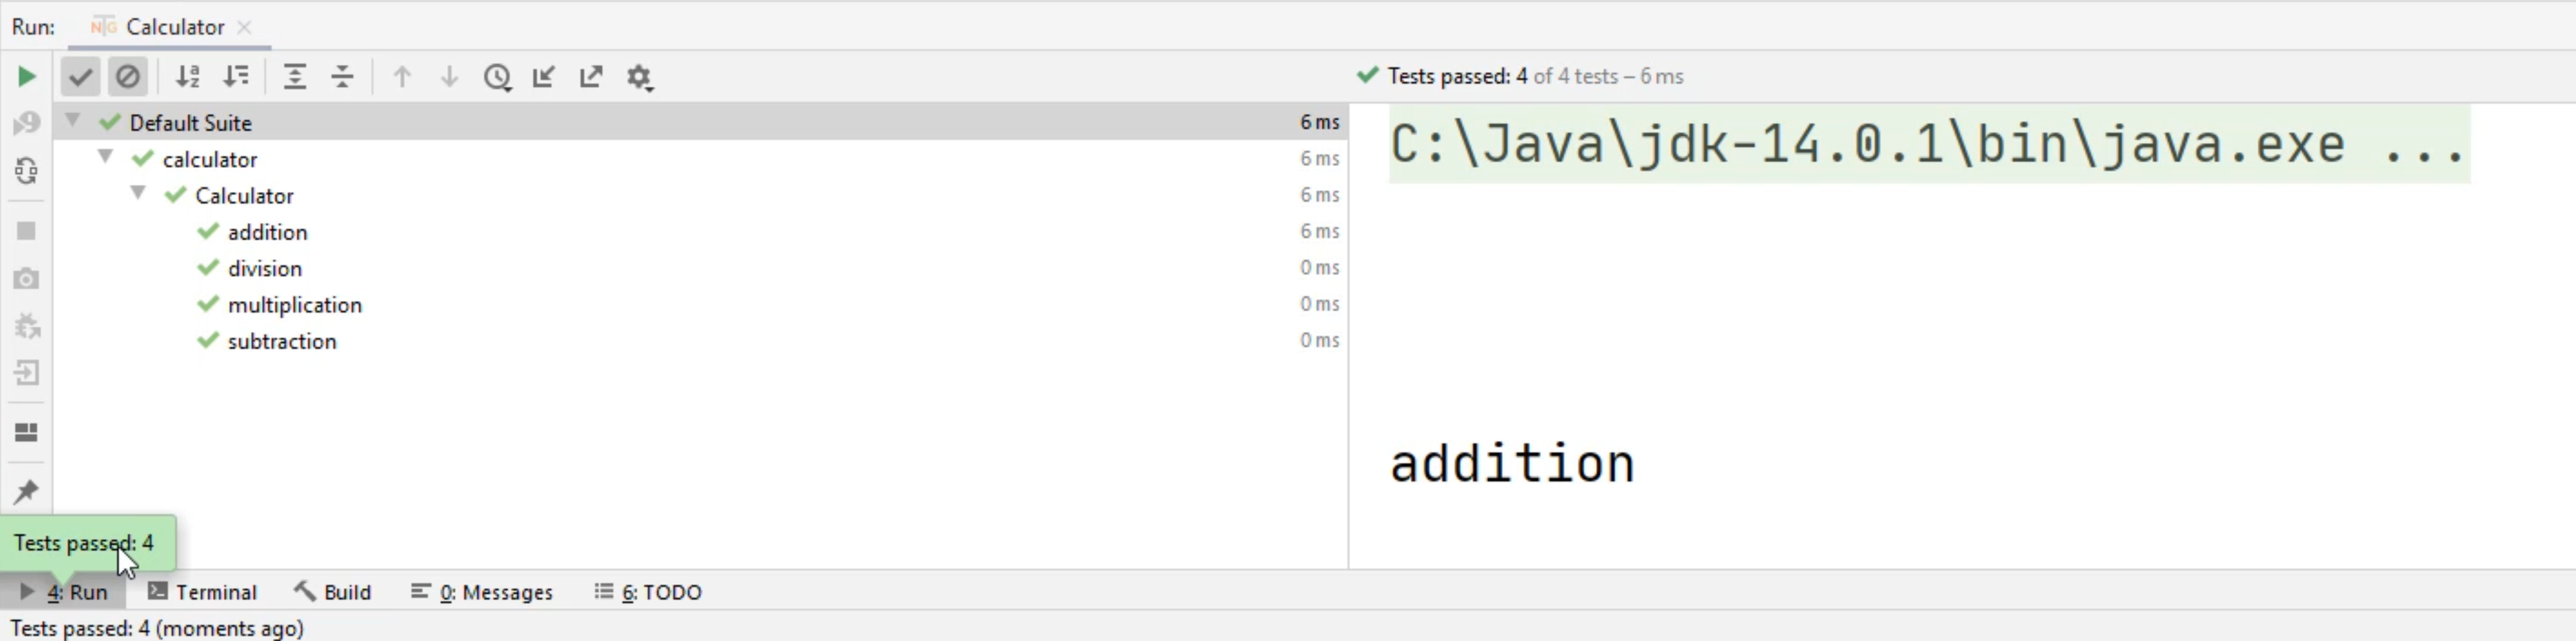
You'll notice that addition, division, multiplication, subtraction have all passed.
In this right-hand section, you'll see addition, division, multiplication, and subtraction.
These messages are coming out of our System.out.println right here.
If we want to change these messages, we can say "running addition", "running multiplication", "running subtraction" and "running division".
import org.testng.annotations.*;

public class Calculator {
    @Test
    public void addition(){
        System.out.println("running addition");
    }
    @Test
    public void multiplication(){
        System.out.println("running multiplication");
    }
    @Test
    public void subtraction(){
        System.out.println("running subtraction");
    }
    @Test
    public void division(){
        System.out.println("running division");
    }
}
If we run this whole entire class again, you'll see a note that says "Build" and it will recompile.
After it's complete, you'll see "running addition", "running division", "running multiplication" and "running subtraction".
At this point, we know that our methods are working, so you do have a good working structure now.
# Coding in Python
Now that we have our project working in Java, let's try this in Python.
Let's open up our PyCharm editor that we installed earlier.
Let's do this by clicking on the Start button and type in "py". And you should automatically see the PyCharm Community Edition application - let's open up this application.
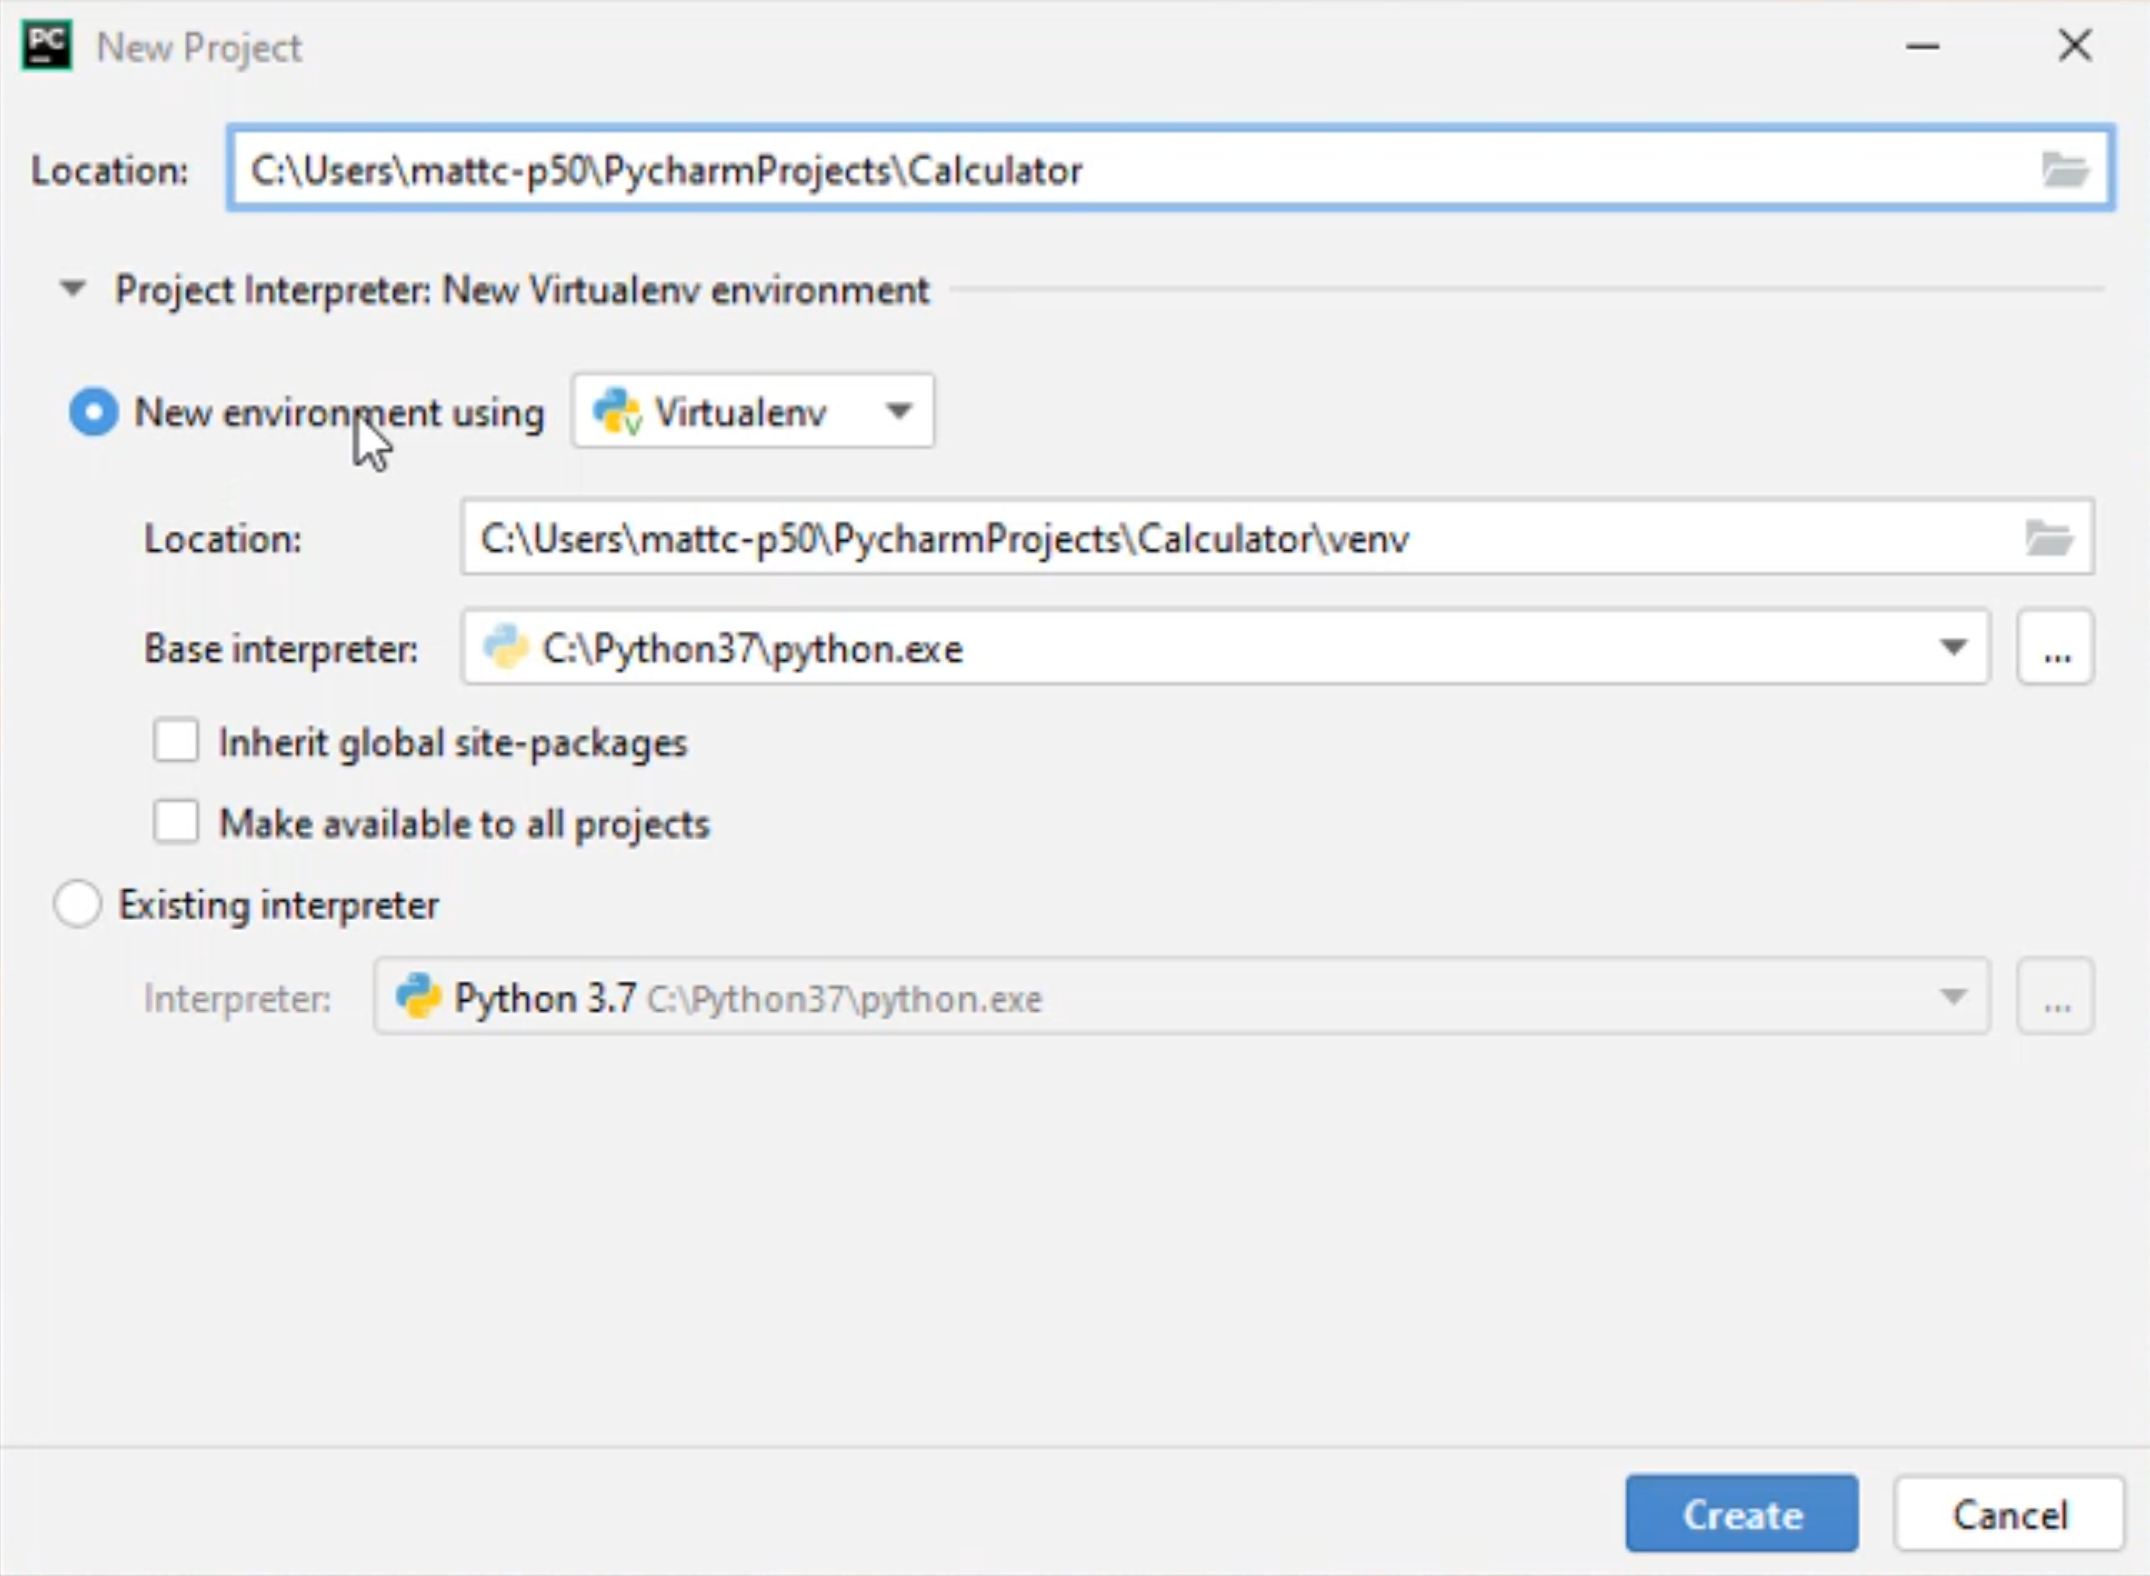
Let's create a new project and for this project, we'll call it Calculator.
And for the new environment, just leave it with using Virtualenv.
Before we begin further, we have to add a couple of Python libraries to our project.
We can do this by using pip.
Pip
Pip is a standard package manager for Python - it allows you to install and manage packages that are not part of the standard Python library.
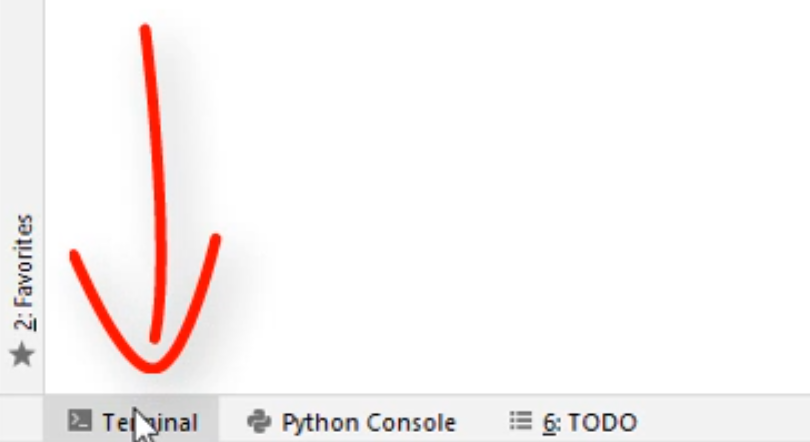
Before we begin, we have to open up a terminal.
You can do this by clicking on the Terminal in the lower left-hand corner.
Now we can install Selenium and the Appium client.
To install Selenium, we will type
pip install selenium
And hit "Enter".
Once that is done, let's install the Appium client.
We do this by typing in
pip install appium-python-client
Once these are installed, we can minimize the terminal - you can do this by clicking on the "Hide".
Now let's create our Calculator test.
We're going to click on this drop arrow. We're going to right-click on our folder up here in the left-hand side of our explorer, select "New", and "Python File".
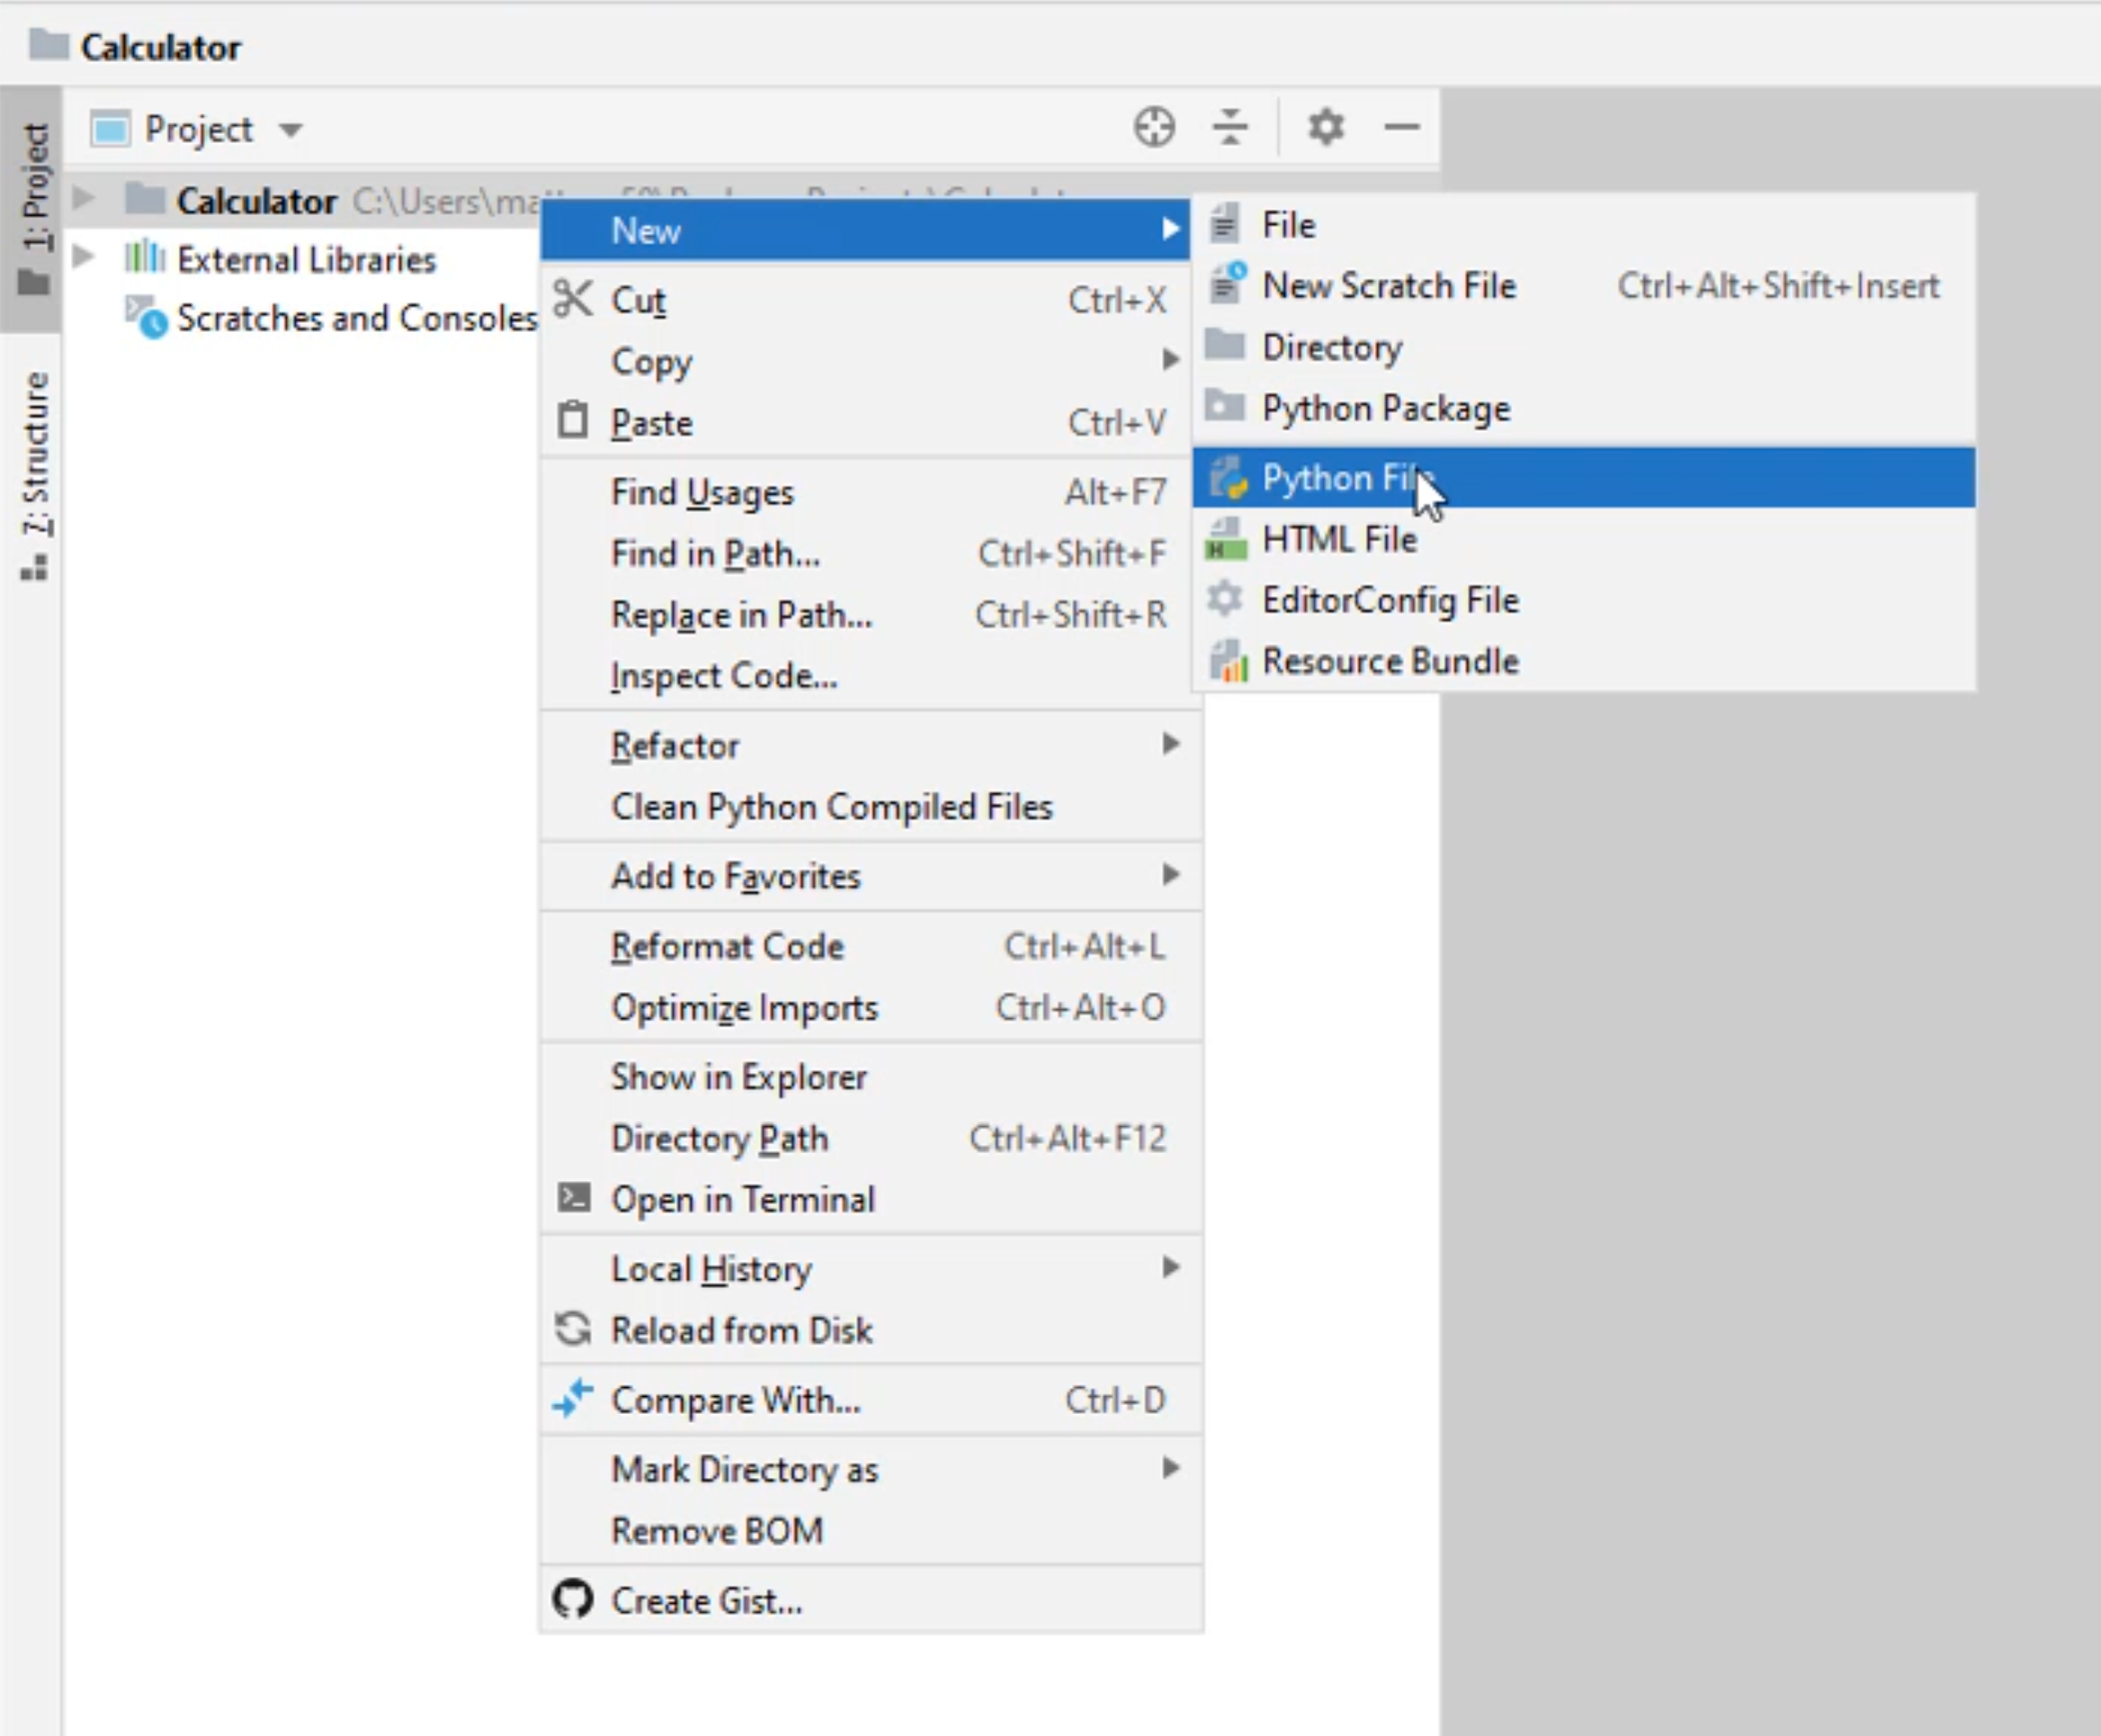
We're going to call it calculator_test.
We're going to minimize this left-hand side now.
The first thing we were going to do in our file is import the unittest library.
We can do this by typing import unittest.
Now let's create a class.
Let's type the word class and use the same file name for our class name, calculator_test, open and close () - inside the (), we are going to type in unittest.TestCase.
At the end of this line, we're going to put a semicolon.
In Python, there are no open and close braces.
A code that belongs to this class will be denoted by a tab.
Let's do that now.
When we create a new line, you'll notice it's automatically tabbed over.
Now, let's create a setUp method.
In Python, the method is denoted by def.
I'm going to type in setUp().
You also notice that self has already prepopulated in here.
The self just means that it's an instance of a class.
Let's create a new line and now let's type in print("setup").
Now we can create the teardown.
Let's create two additional lines of space and type in def tearDown, and let's put in another print() and we'll type in "teardown".
Let's go ahead and create the rest of the methods we are going to try out.
This is going to be something similar that we did in Java.
I'm going to type in def add and type in print("add"), and do the same for subtraction, division, multiplication.
import unittest

class calculator_test(unittest.TestCase):
    def setUp(self):
        print("setup")

    def tearDown(self):
        print("teardown")

    def add(self):
        print("add")

    def subtraction(self):
        print("subtraction")

    def division(self):
        print("division")

    def multiplication(self):
        print("multiplication")
At this point, you'll notice in the left-hand column, we can't run each of these individual tests. What's going on?
Well, remember in Java, we denoted a test by using the @Test, unittest does not have this annotation.
Instead with unittest, we type in test_.
Once you put a test_ in here, unittest will automatically pick up this method as a test method.
import unittest

class calculator_test(unittest.TestCase):
    def setUp(self):
        print("setup")

    def tearDown(self):
        print("teardown")

    def test_add(self):
        print("add")

    def test_subtraction(self):
        print("subtraction")

    def test_division(self):
        print("division")

    def test_multiplication(self):
        print("multiplication")
Notice now that I have a test_add and you can see the play button.
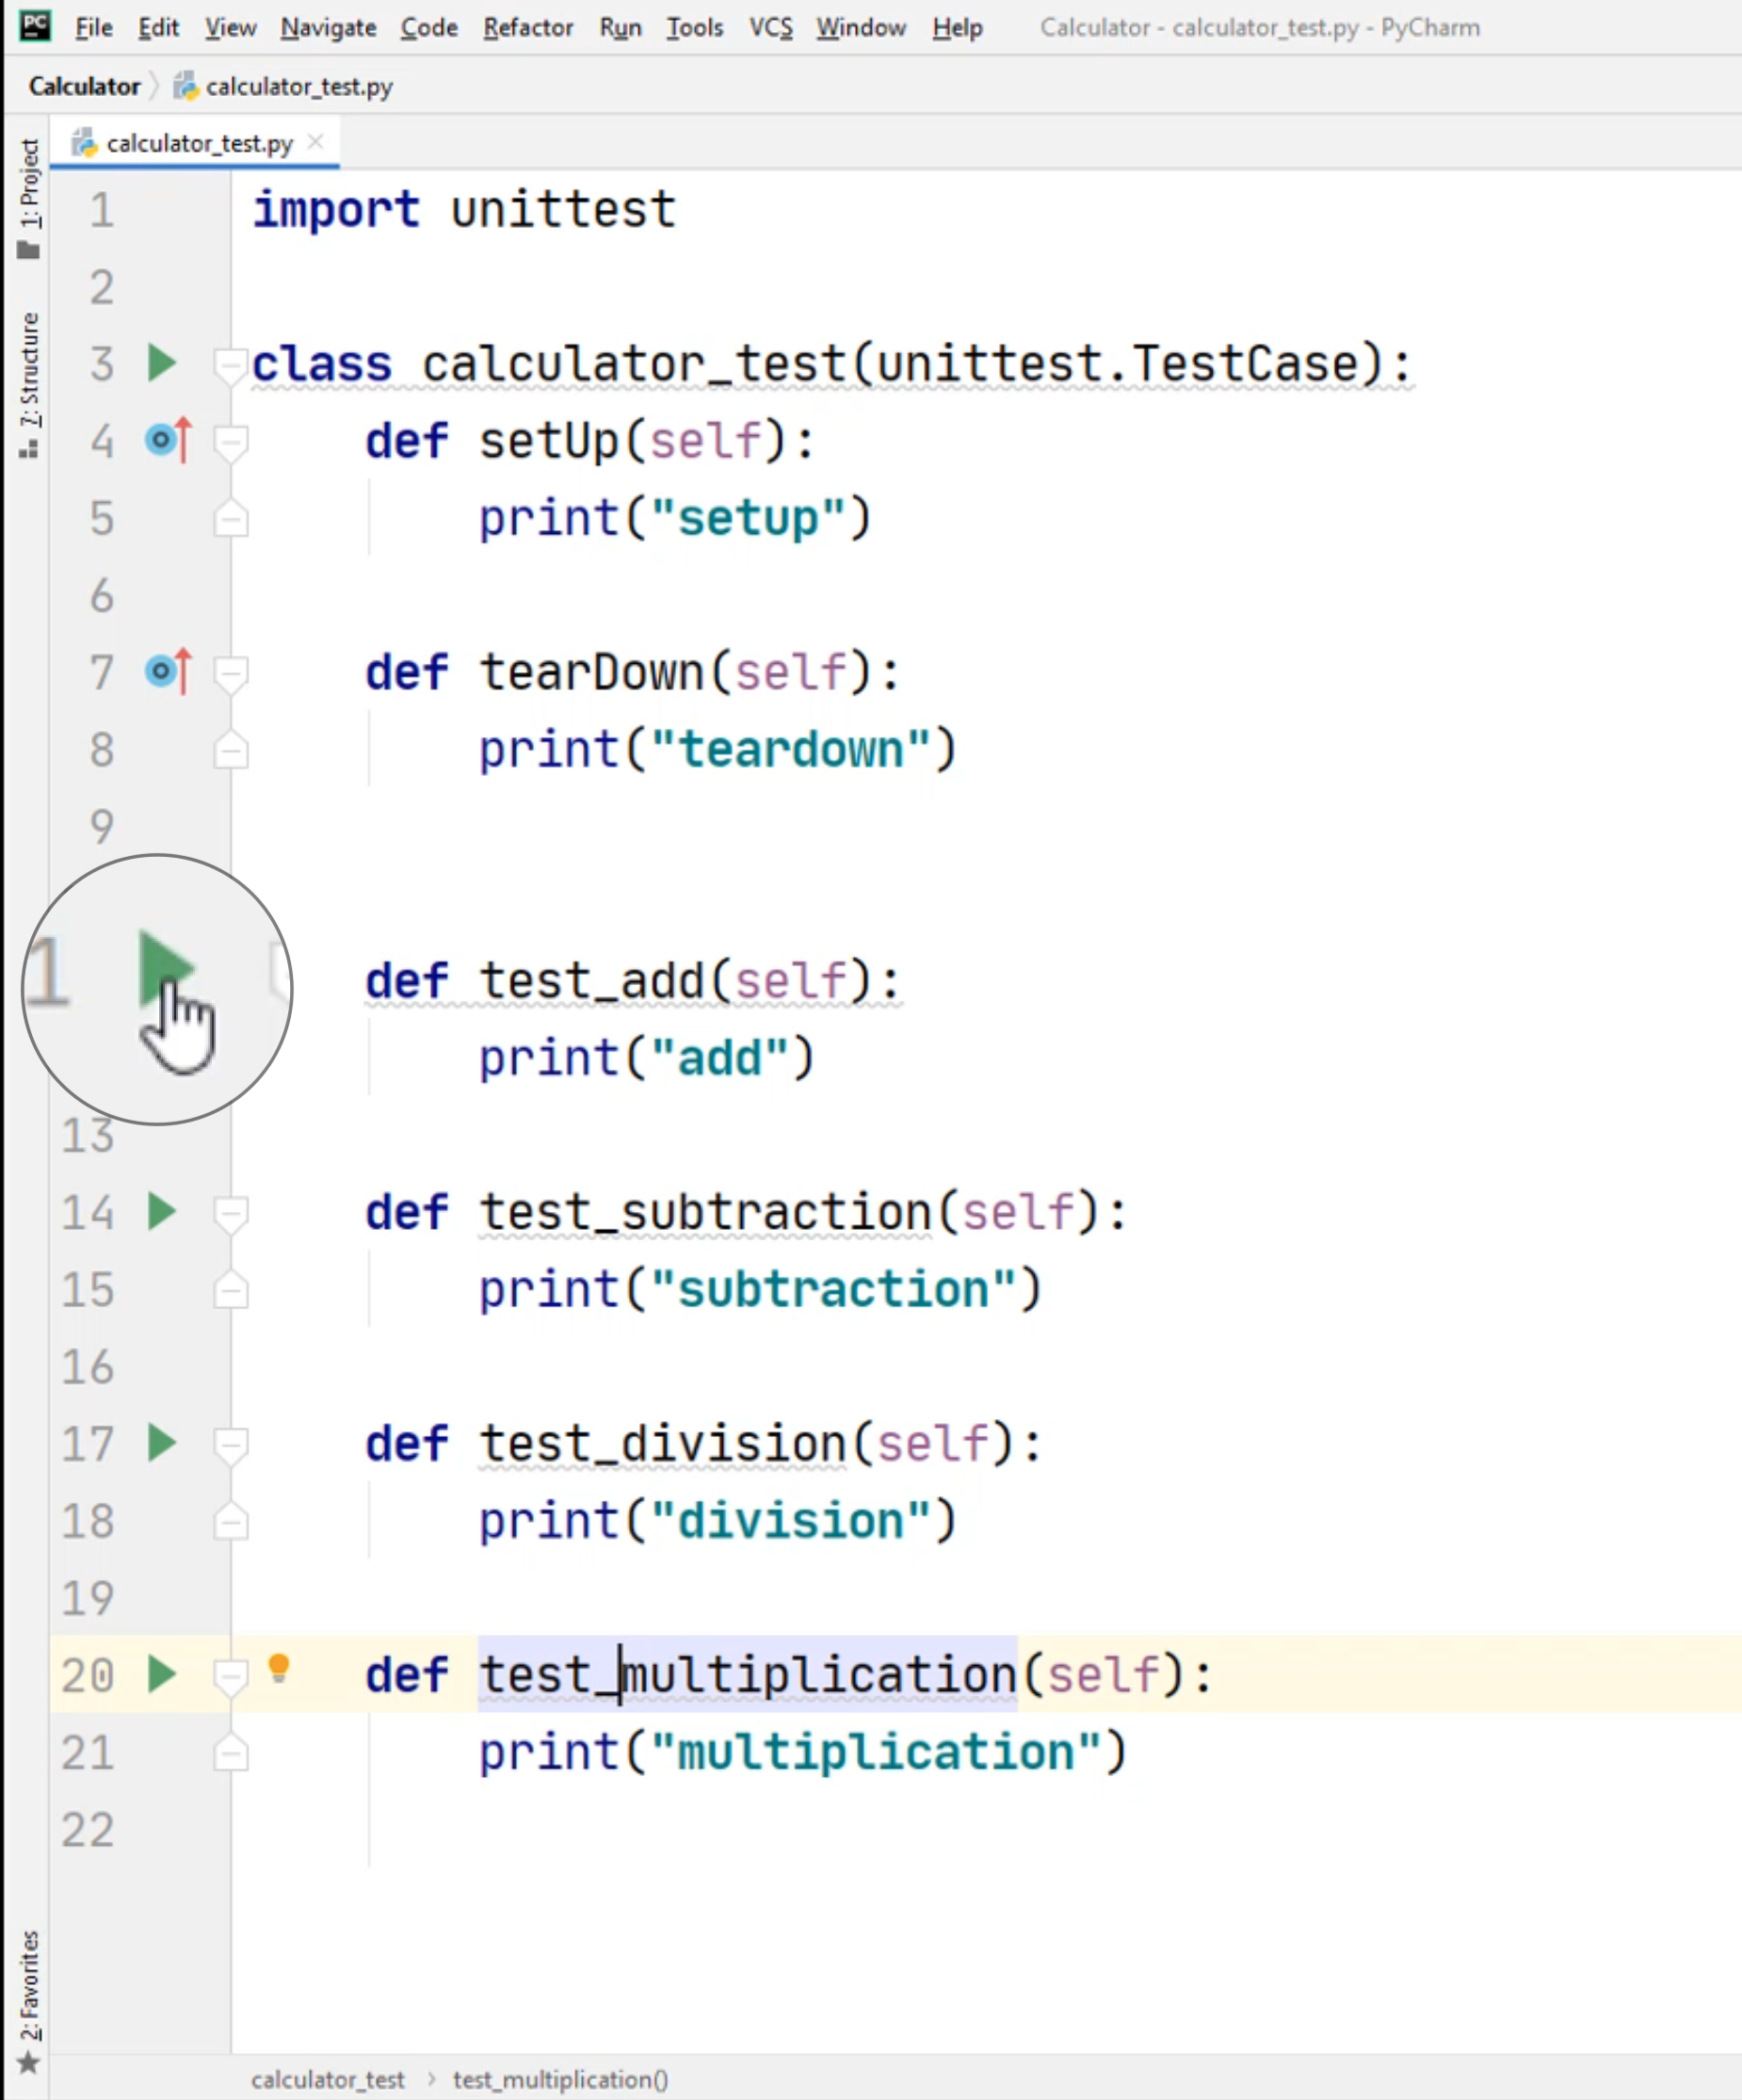
Now we can click on "Run Test".
In the console in the IDE, you can scroll down and you can see the setup method that was run, the add and the teardown.
This is something similar that we have done within Java.
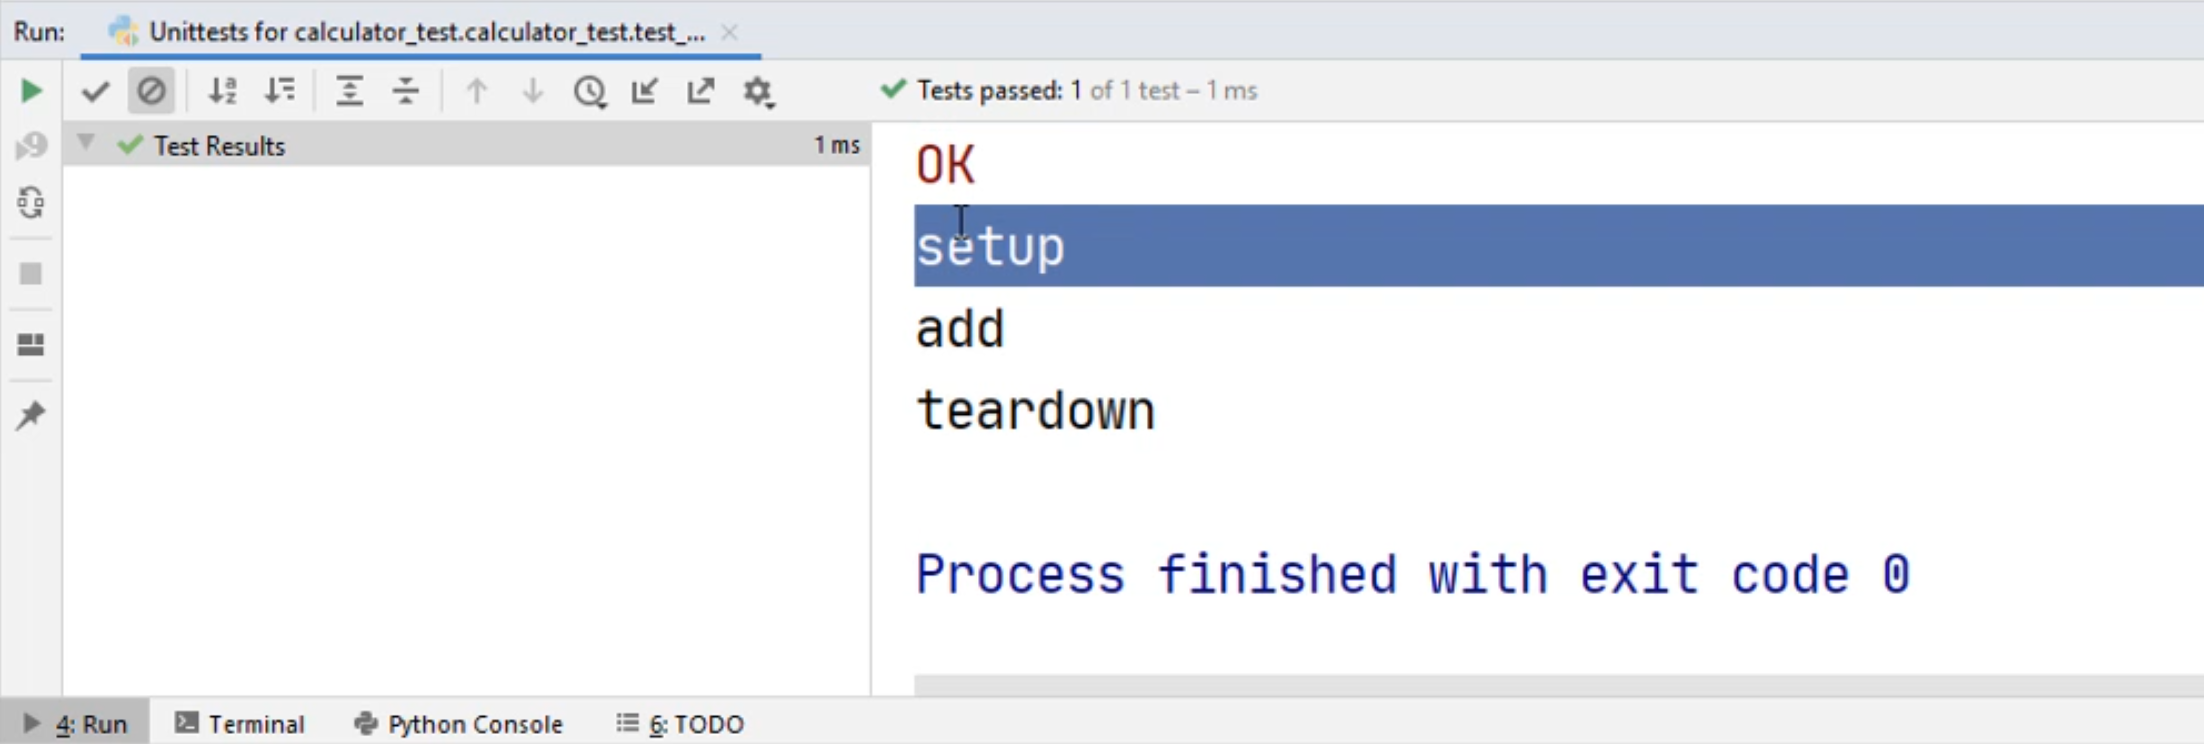
Let's look at another example - now let's click on the play button for the class.
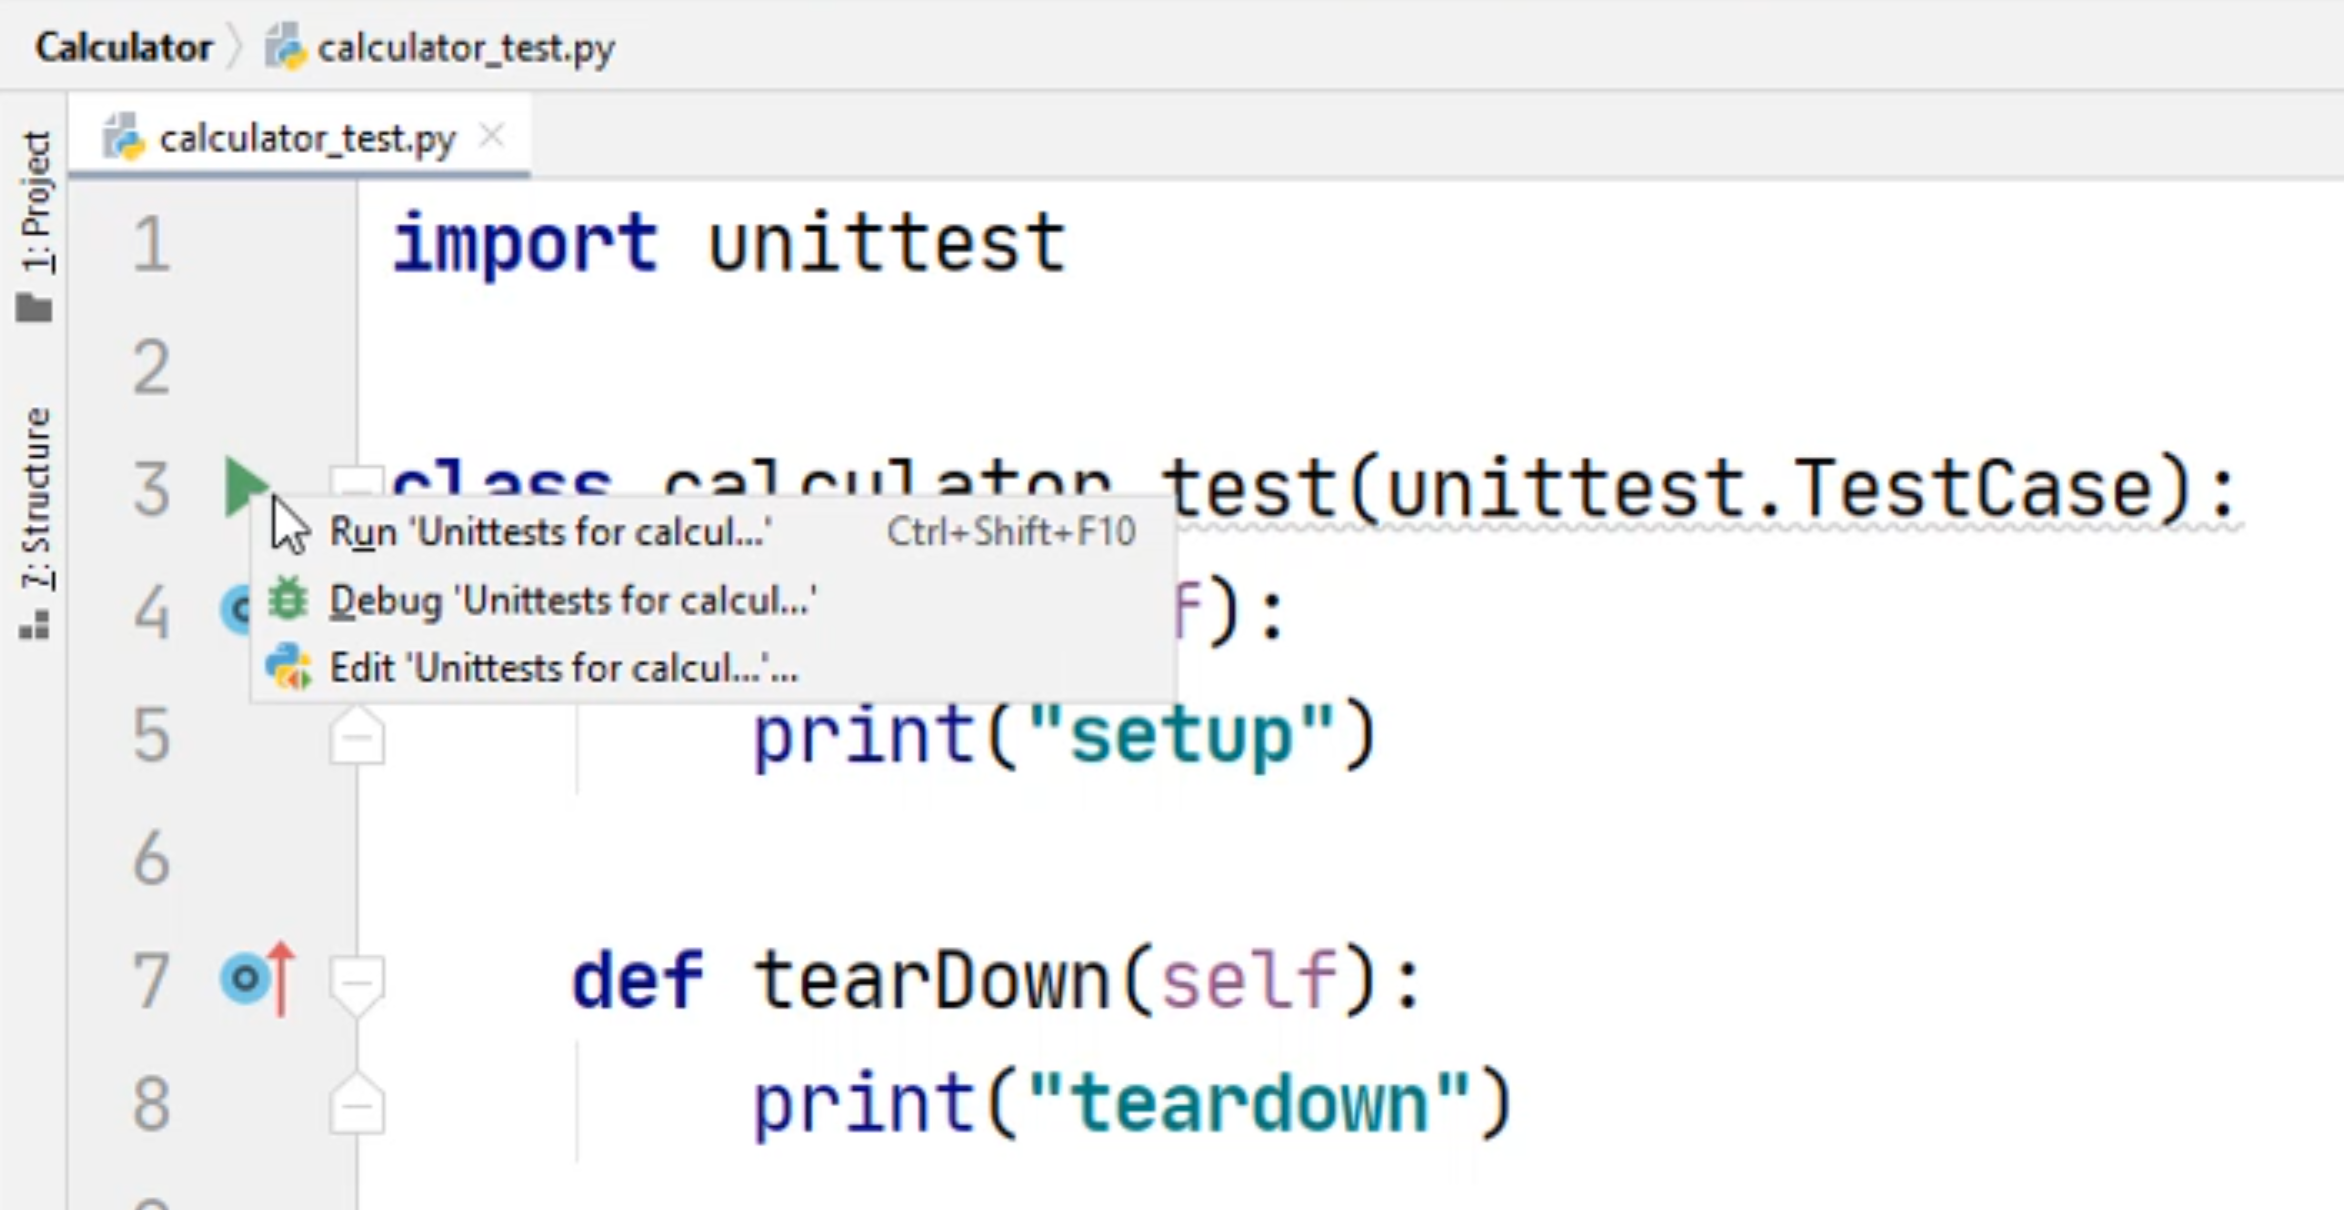
I'm going to say "Run 'Unittest for calculator".
You'll notice this one here's a little bit different with unittest.
Unittest does a setup and a teardown after each test.
So now you see "setup", "add", "teardown", "setup", "division", "teardown".
And if you continue to scroll down, you'll see "setup", "multiplication", "teardown", "setup", "subtraction" and "teardown".
This is okay.
Let's minimize our console and let's continue to add more code.
