

Transcripted Summary
In this lesson, we are going to learn about XPath.
XPath stands for XML Path Language.
XPath uses "path-like" syntax to identify and navigate nodes in an XML document.
XPath contains over 200 built-in functions.
XPath uses path expressions to select nodes in an XML document.
These path expressions look very much like the path on traditional computer file system - an example of this is
c:/windows/system32/.
# XPath Functions
You can find a cheat sheet at https://devhints.io/xpath.
The first / selects a node from our root node.
A // selects nodes in the document from the current node that matches selection no matter where they are.
@ selects attribute.
We have lots of good information to cover so let's begin.
Now that we know how to grab multiple elements, what happens if there is a value that we can't grab? Can we use something else like a XPath?
The answer is yes. Let's look at the XPath now.
# Coding in Java
First, we're going to open up our code in Calculator.java and we're going to copy this ChooseCalculator method.
We're going to paste that in here, and this time we're going to create a method called ChooseCalculatorXpath.
What we're going to do this time is we're going to change the way that we find these elements.
So, here we're going to try to change the element and type in .findElements and you should see an option in your list that says .findElementsByXPath - let's select this option.
While using the XPath, this ListViewElement will not work because it's expecting an XPath.
This right here is not an XPath so we'll delete this value for now.
Then let's create another test method - we'll copy this SelectAnotherCalculator, and this time we're going to change it to SelectAnotherCalculatorXpath.
Let's open up our Accessibility Insights.
If you notice right here, there's not a really good way to identify what an XPath is.
Accessibility Insights does not have a good way to see the XPath for each of these attributes.
So what we're going to do is we're going to minimize this and we're going to open up our WinApp recorder tool that we downloaded earlier.
Let's open up our file explorer, by clicking on the start button and type in "explorer" - click into our Downloads folder and find our WinAppDriverUIRecorder folder.
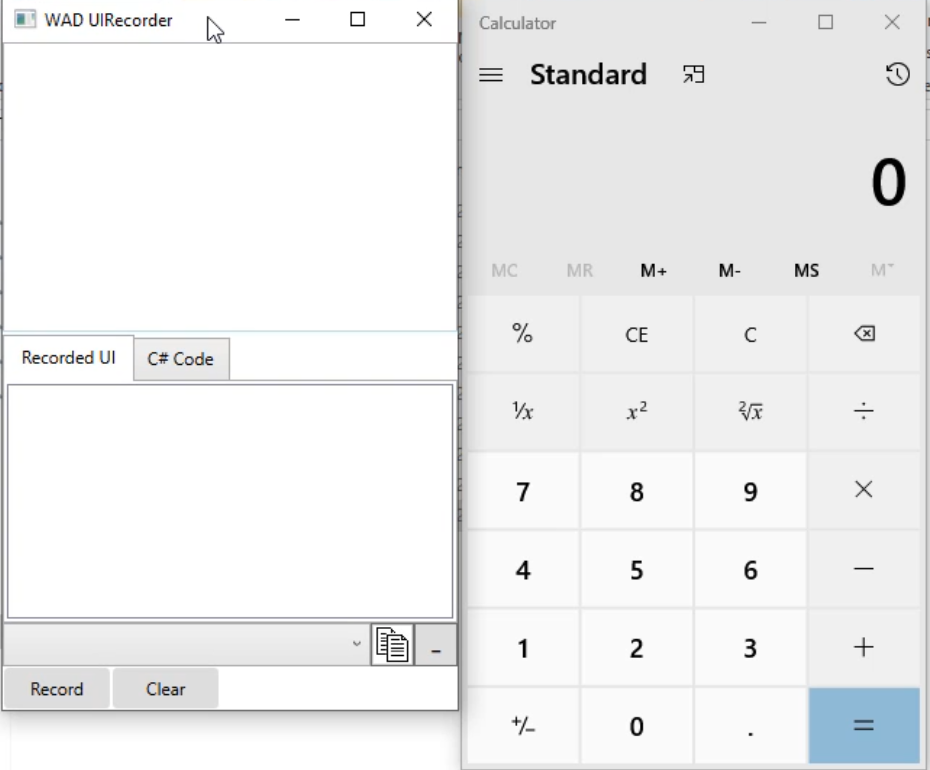
Let's double-click on this WinAppDriverUIRecorder.exe, and now let's open up Calculator.
Let's click on this record button.
Now if you hover over the Calculator, you should see the XPath up here in the top pane.
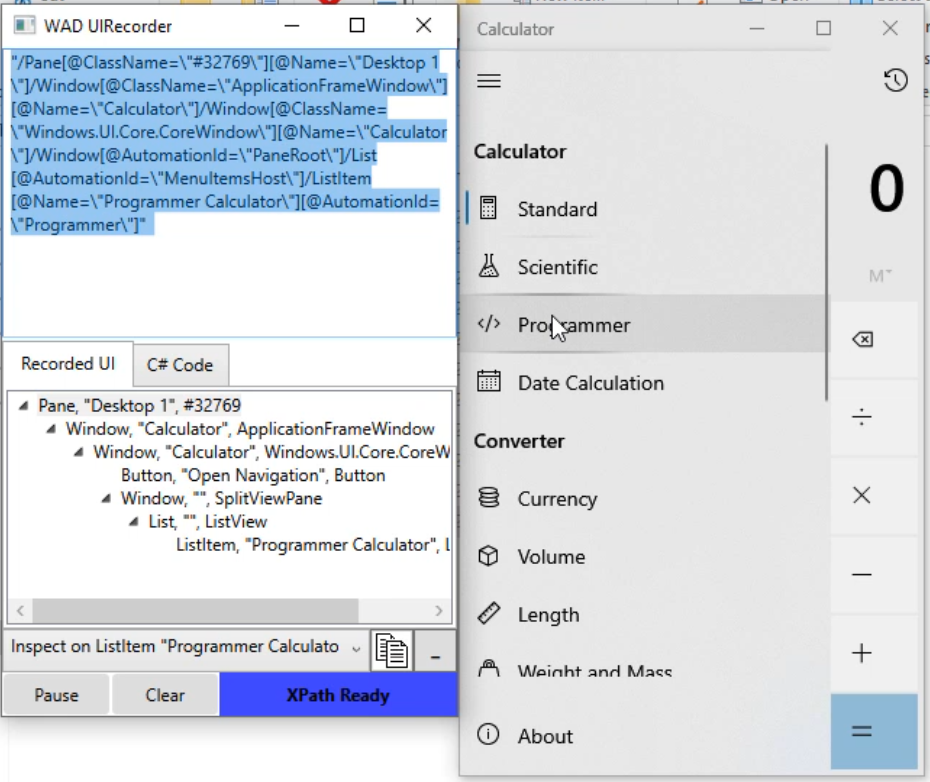
In this top pane here, let's click on this toggle pane again.
Now let's move our cursor down to the Standard.
As I highlight over the scientific, you'll notice a few of the values change.
Let's go down to the Programmer and notice that most of the XPath is staying static - the only value that's changing is after the list item.
Let's click pause and now what we're going to do is copy the Xpath.
We're going to right-click, after we highlighted it, we're going to copy the full XPath.
Click the pause on the UI Recorder and minimize the calculator and let's go back to our IDE.
Now that we have our XPath, let's paste it into our IDE and see what it looks like.
You'll notice the XPath is really long.
The nice thing with the XPath is that it will find pretty much everything that you see here.
So, let's find something that's unique, but yet still something we can utilize.
Everything underneath this list item is our elements that we're trying to locate.
So what we're going to do is delete the rest of this - make sure you don't delete the last quote.
And everything previous to this was pretty much the same. And what we're going to do is delete everything before this as well.
This will give us a relative XPath that we put in the slash right here //ListItem - so what that's going to do is look within the application, the calculator, and find anything that has ListItem that follows this pattern.
Let's add a debug to line 107 and let's run this. Click on Run and Debug.
Let's minimize this calculator. And I noticed that list of elements right here; it shows 18.
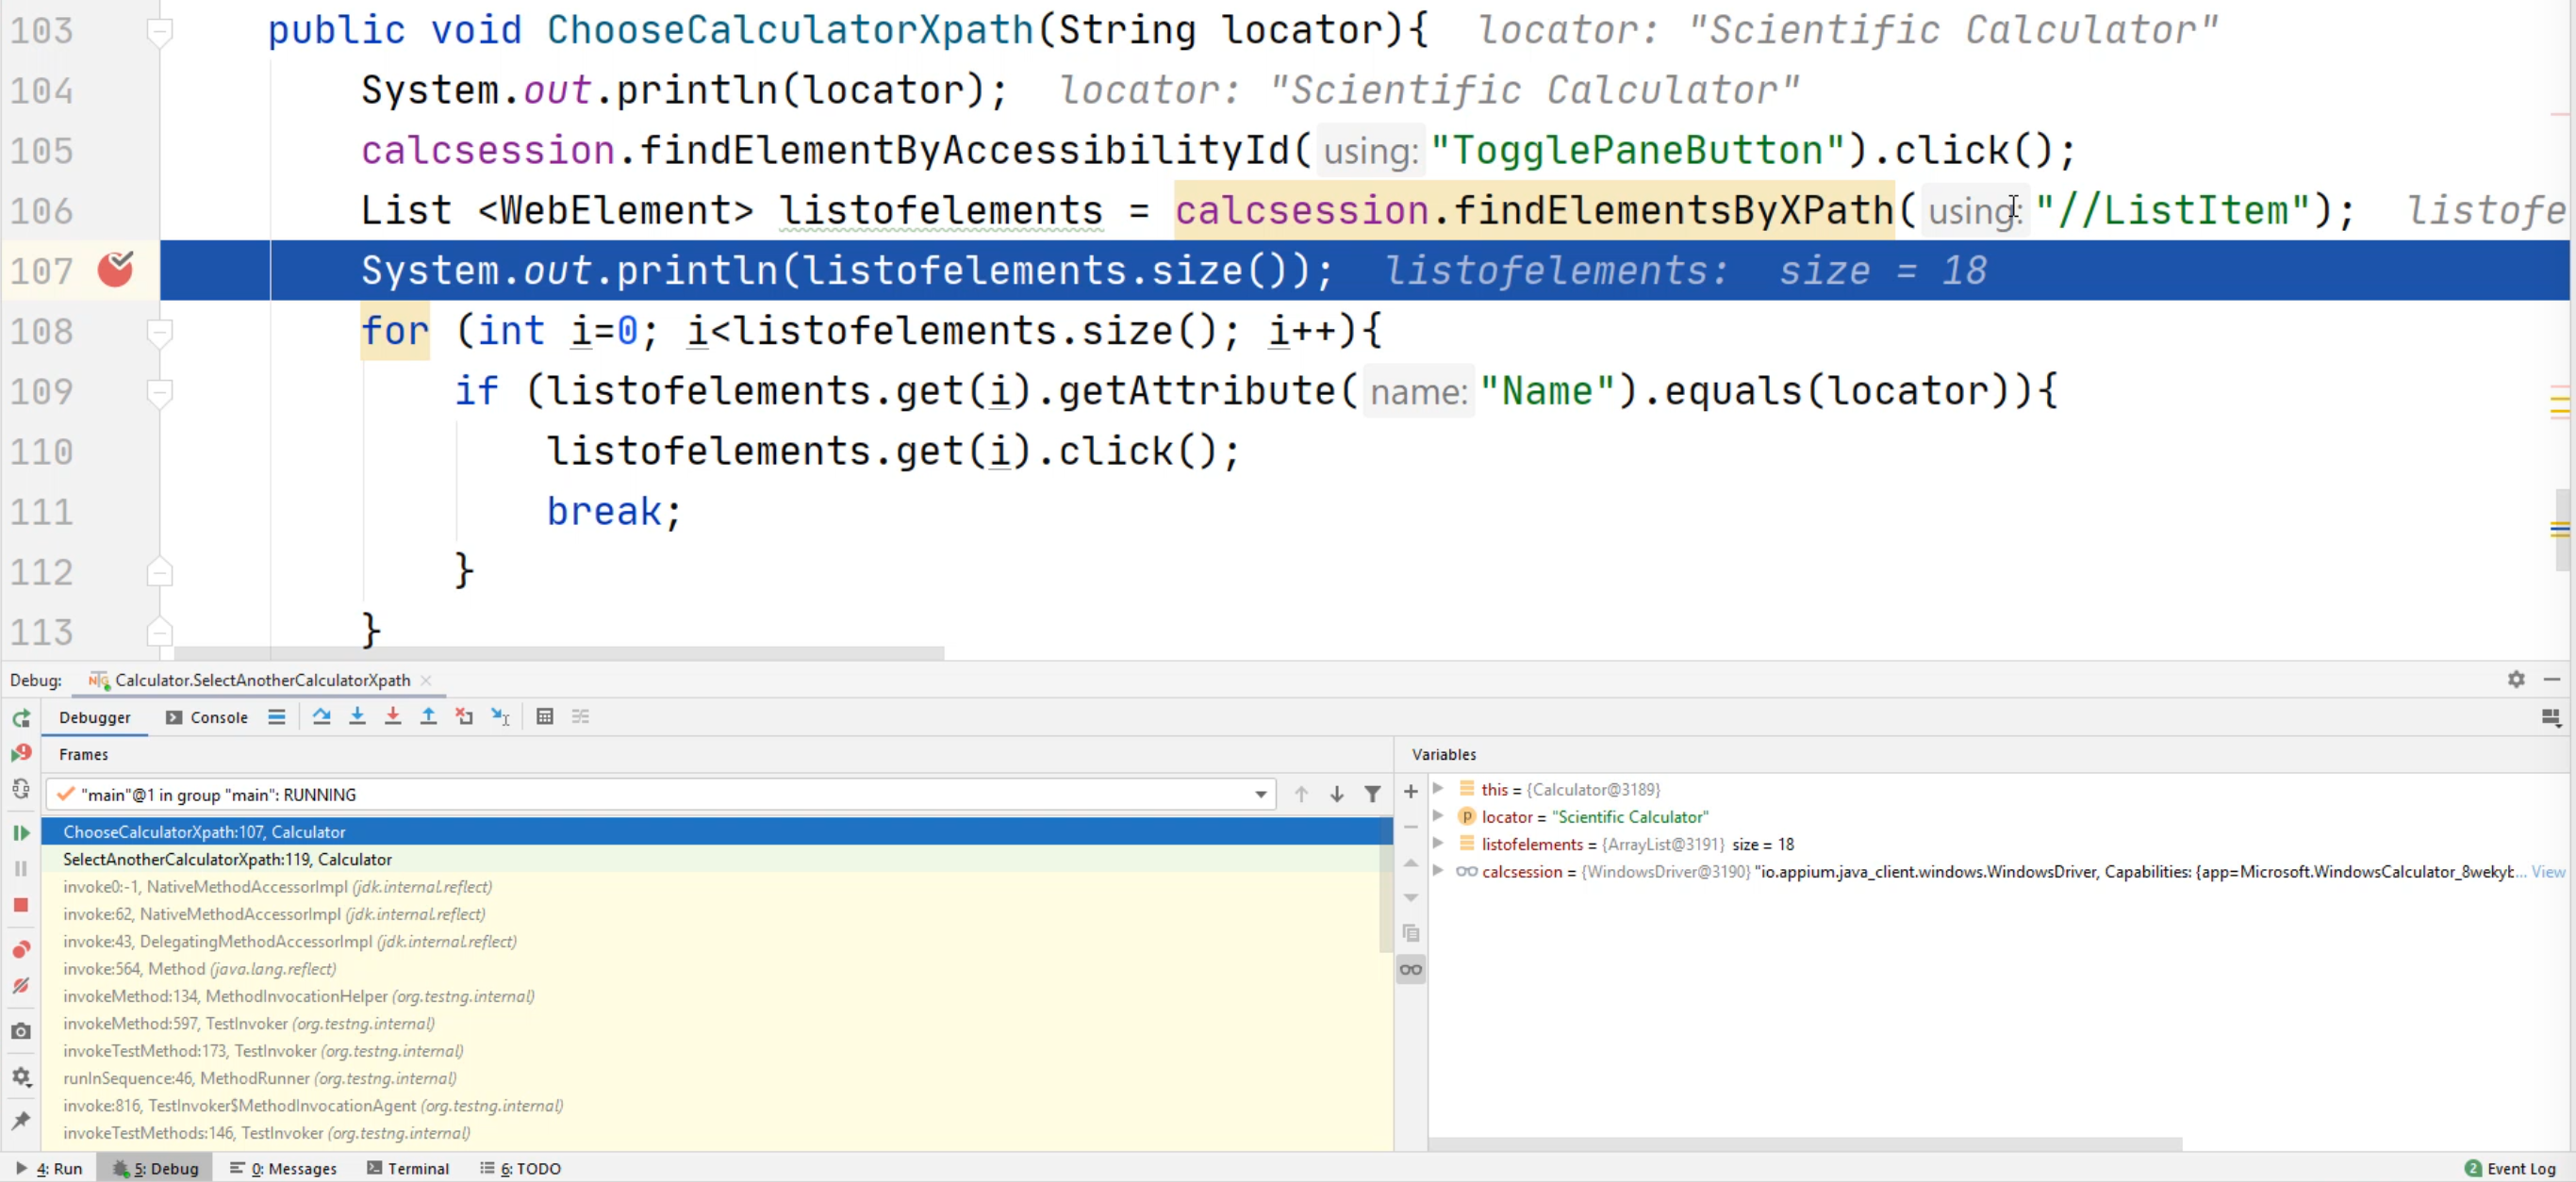
This matches what we had before; and now instead of using some type of a locator - instead of using something that has a class name - if the class name doesn't exist, now you can use the XPath of just a ListItem.
    public void ChooseCalculatorXpath(String locator){
        System.out.println(locator);
        calcsession.findElementByAccessibilityId("TogglePaneButton").click();
        List <WebElement> listofelements = calcsession.findElementsByXPath("//ListItem");
        System.out.println(listofelements.size());
        for (int i=0; i<listofelements.size(); i++){
            if (listofelements.get(i).getAttribute("Name").equals(locator)){
                listofelements.get(i).click();
                break;
            }
        }
    }

    @Test
    public void SelectAnotherCalculatorXpath(){
        System.out.println("Selecting Anther Calculator");
        ChooseCalculatorXpath("Scientific Calculator");
    }
And now you have two different ways to grab all the elements that you want to within all the applications.
In our last example, you'll notice that we have a lot of code for trying to find an element.
Let's simplify this by using some more Xpath tricks.
First, we're going to create another copy of these two methods.
Let's copy the ChooseCalculatorXpath method, along with the SelectAnotherCalculatorXpath test.
Once it's selected, right-click, select Copy, create a new line, and let's Paste it.
Now let's try to change this name.
First we're going to change the ChooseCalculatorXpath method to ChooseCalculatorXpathSimple.
Now that we have this method created, let's simplify this even more - we're going to delete this entire for loop along with the System.out.
Now that we don't need to find a list of elements, we're going to delete this part of this line of code so now we should have calcsession.findElementsByXPath.
However, we're going to change this - we're going to delete the "s" in findElements.
Now it should just show calcsession.findElementByXPath, along with an XPath.
Lastly, we're going to change this and put a .click().
At this point, your method should work.
However, because we changed our findElements to findElement, we are only going to find the first element that matches.
In this example, it's going to find the first element that says //ListItem.
We're going to delete this //ListItem now, and we're going to come up with a better XPath.
Here in the test, we're going to rename this test to SelectAnotherCalculatorXpathSimple.
Now, instead of using the ChooseCalculatorXpath, we're going to add the Simple to this method call.
    public void ChooseCalculatorXpath(String locator){
        System.out.println(locator);
        calcsession.findElementByAccessibilityId("TogglePaneButton").click();
        List <WebElement> listofelements = calcsession.findElementsByXPath("//ListItem");
        System.out.println(listofelements.size());
        for (int i=0; i<listofelements.size(); i++){
            if (listofelements.get(i).getAttribute("Name").equals(locator)){
                listofelements.get(i).click();
                break;
            }
        }
    }

    @Test
    public void SelectAnotherCalculatorXpath(){
        System.out.println("Selecting Anther Calculator");
        ChooseCalculatorXpath("Scientific Calculator");
    }

    public void ChooseCalculatorXpathSimple(String locator){
        System.out.println(locator);
        calcsession.findElementByAccessibilityId("TogglePaneButton").click();
        calcsession.findElementByXPath("").click();
    }

    @Test
    public void SelectAnotherCalculatorXpathSimple(){
        System.out.println("Selecting Anther Calculator");
        ChooseCalculatorXpathSimple("Scientific Calculator");
    }
Now let's open up the WinApp UI Recorder tool.
We'll do this by clicking on the "Start" button, type in "explorer", and go to our Downloads folder.
Let's double-click on this WinAppDriverUIRecorder folder, and double-click on the executable.
Let's open up Calculator.
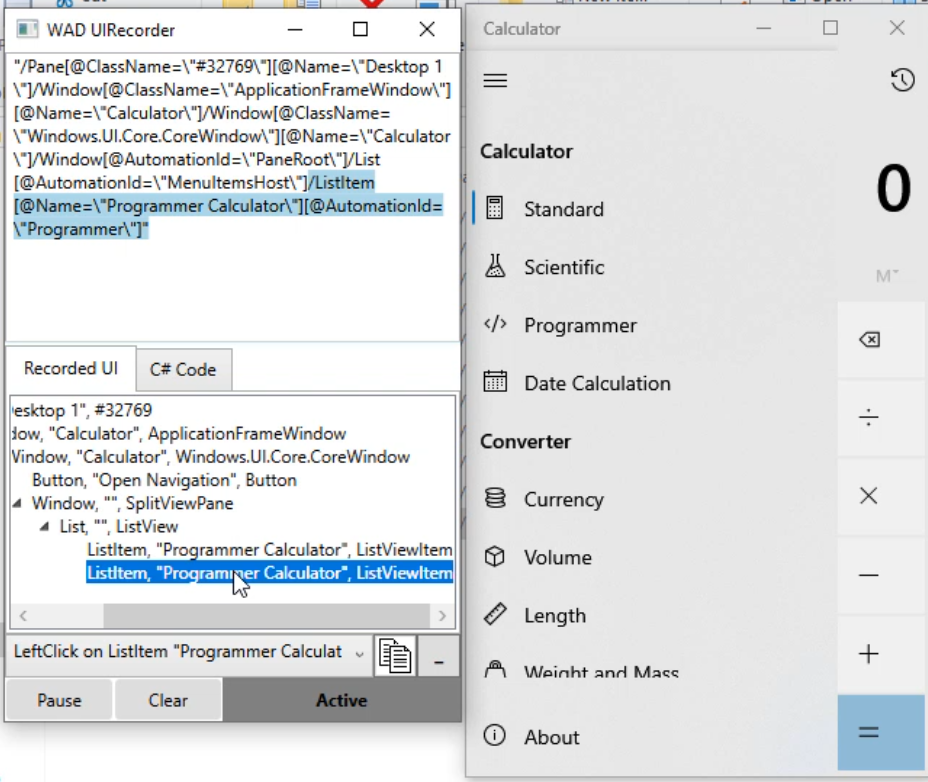
Let's click on this "Record" button for the UI recorder and now let's hover over this hamburger - I'll click on it to open it up.
First of all, hover over this "Scientific" calculator.
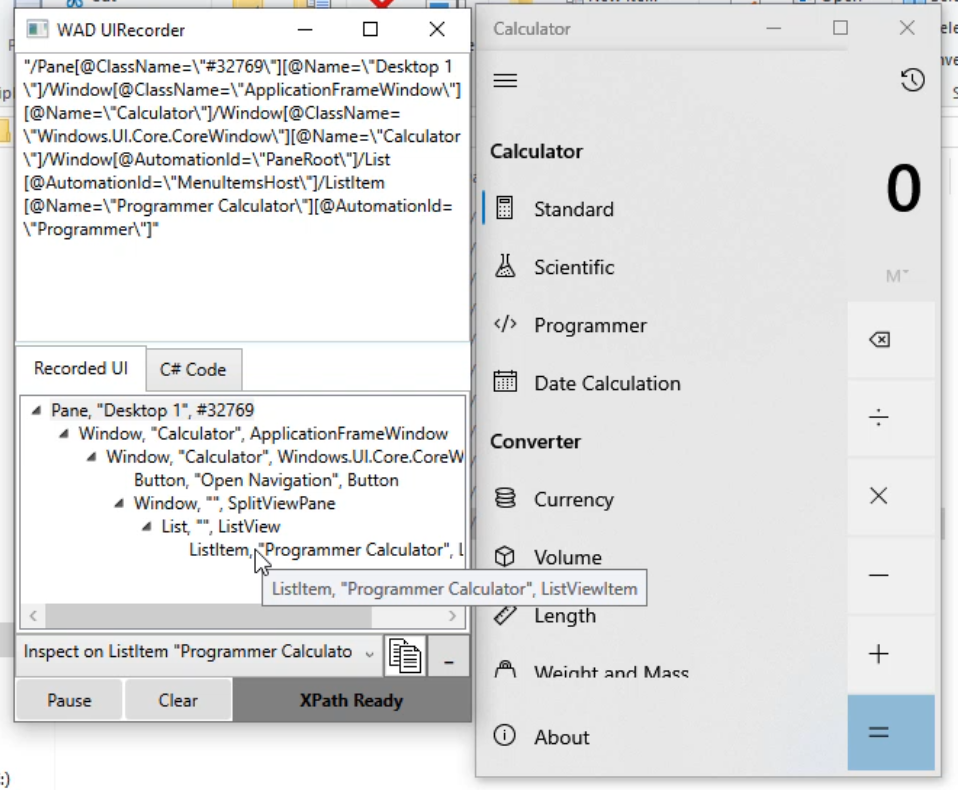
Notice this "Recorded UI" section is updated with the "ListItem" with the "Programmer Calculator".
Let's right-click on this and hit click "Edit Attributes".
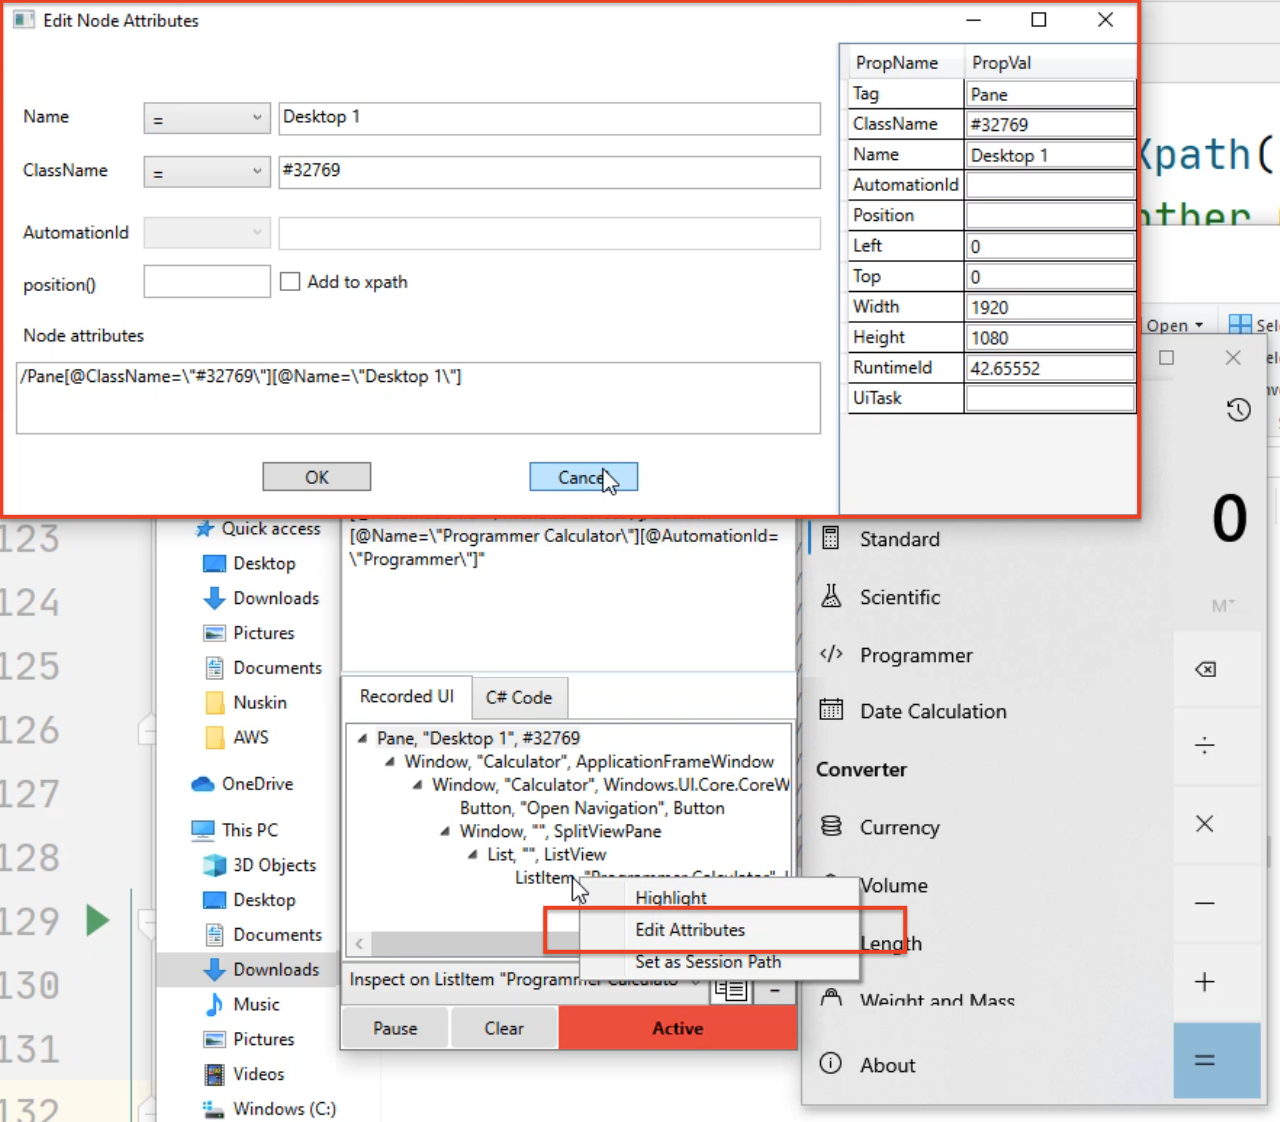
This will open up the Node Attributes for the main window. Click on "Cancel".
Now you'll notice there's two options for this ListItem.
This is a quirk within the application, but we can get around this.
Let's select the second option now for this ListItem, and let's right-click and select "Edit Attributes".
Now you'll notice that you have the "ListItem[@Name" equals a value, and this value is "Programmer Calculator".
We're going to change this now to use a different function of the XPath called "contains".
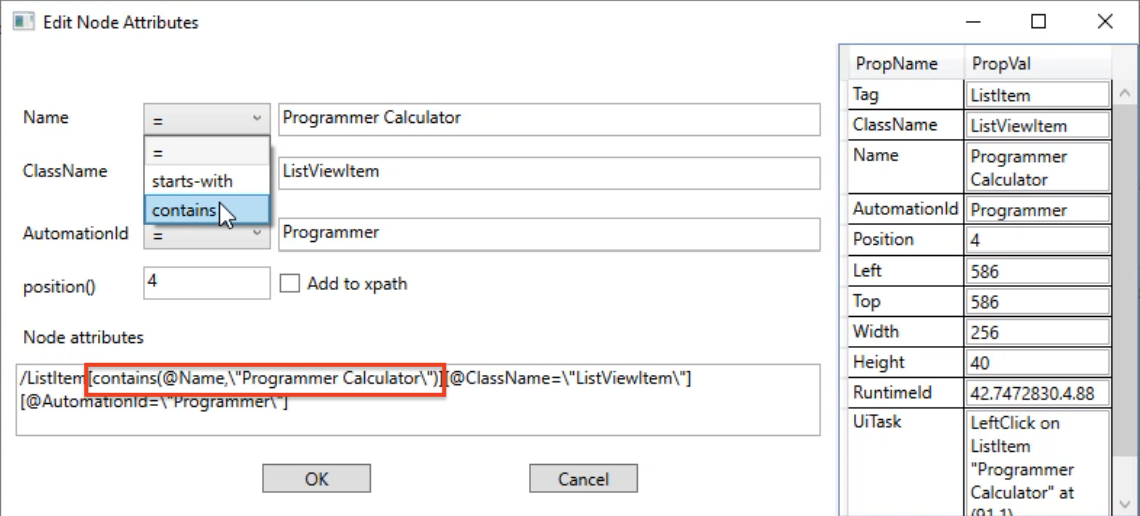
Now you have an updated XPath that you can utilize rather than using the full XPath like we did in our previous example and simplifying it.
We're going to use this "contains" function within the XPath.
Well, the first thing to do is copy /ListItem[contains(@Name,\"Programmer Calculator\")].
We can click "Cancel" to close out our UI recorder and our Calculator.
Let's go back to our IDE.
Under this ChooseCalculatorXpathSimple we have a blank value for our XPath.
Let's create a new line and paste this code in here.
Here's our XPath that we want.
If we wanted to, what we could do is just paste this XPath in here. This will work now.
However, "Programmer Calculator" is static in this value.
What we want to do is change it to use a locator.
So let's paste our previous example and we'll comment out this line of code.
This way we know exactly what we're going to be looking for in the value.
Now let's delete this "Programmer Calculator" value and type in locator.
Before we do that, we're going to put both a space and + before and after locator - /ListItem[contains(@Name,\\\" + locator + \\\")].
Because this has to be an evaluated variable, we have to change a little bit more of our Xpath.
Here we are going to delete these two double backslashes - /ListItem[contains(@Name,\" + locator + \\\")].
Now remember what we need to include is this " right here - we have to include this quote, but we also have to end it with another quote - /ListItem[contains(@Name,\"" + locator + \\\")].
To do that we have to leave this backslash in here - this will escape the double quote character.
Now we have this locator, do the same thing here - we'll delete that, add a double quote - - /ListItem[contains(@Name,\"" + locator + "\")].
Now that we have an example that matches our XPath code let's try to run and see what happens.
Notice our calculator opened, but something threw an error message.
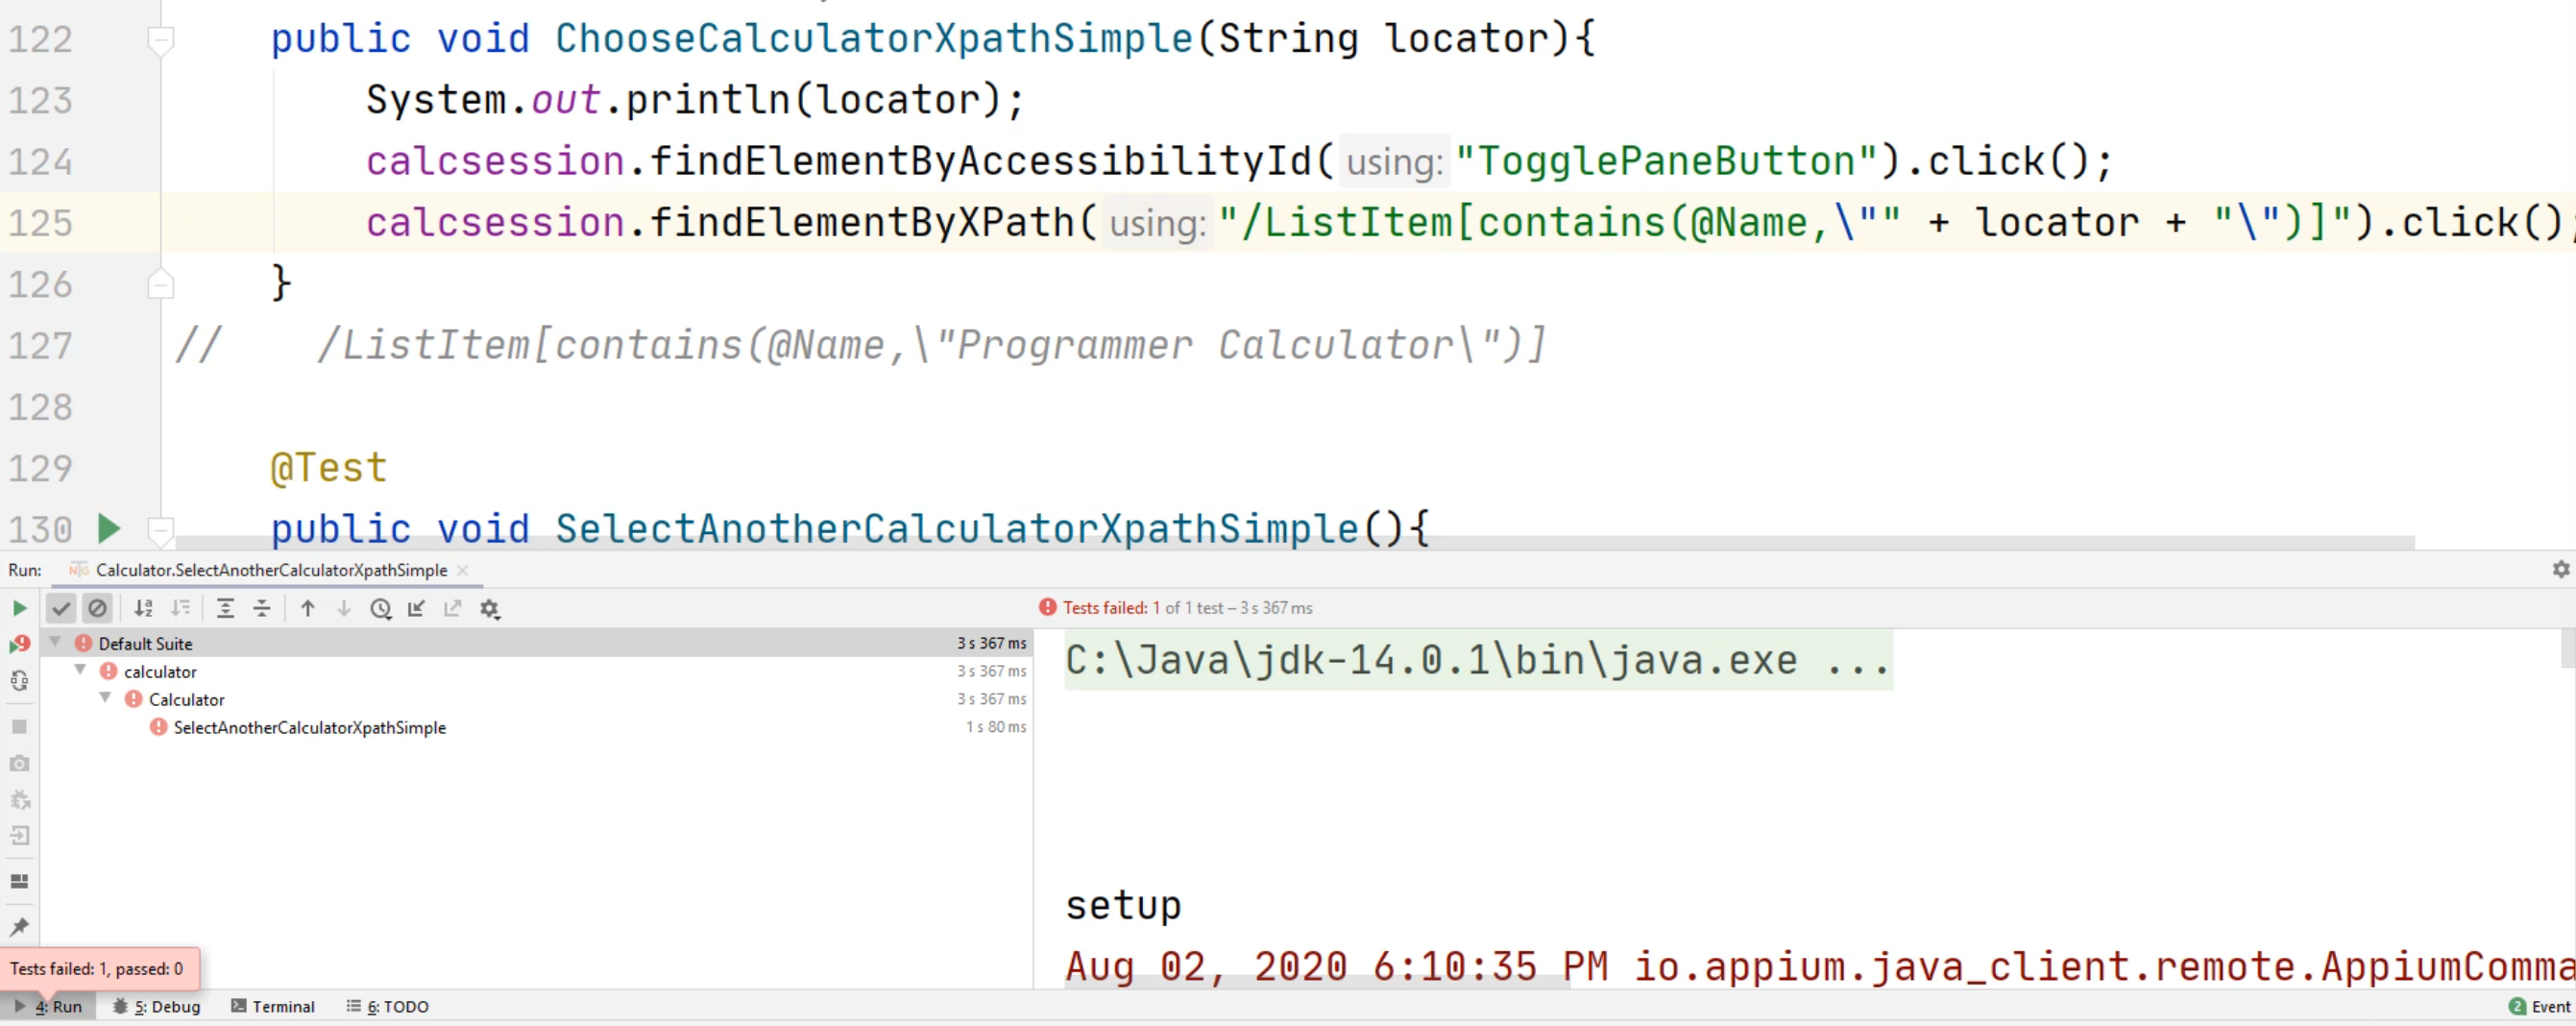
If you scroll down this right hand side of the console the error message you should see is NoSuchElementException: An element could not be located on the page.

Let's continue to scroll down a little bit more and you should see the XPath.
It says using=xpath and has a value=/ListItem[contains and the name of the calculator we're trying to use - name of the calculator and everything looks accurate.
However, one thing that we forgot to do, we forgot to add the double slash.
Remember - a single slash tells the XPath to look for the root.
If we add a double slash, it means anywhere from the root, inside the XML, go down to the DOM tree and find this ListItem - //ListItem[contains(@Name,\"" + locator + \\\")].
    public void ChooseCalculatorXpath(String locator){
        System.out.println(locator);
        calcsession.findElementByAccessibilityId("TogglePaneButton").click();
        List <WebElement> listofelements = calcsession.findElementsByXPath("//ListItem");
        System.out.println(listofelements.size());
        for (int i=0; i<listofelements.size(); i++){
            if (listofelements.get(i).getAttribute("Name").equals(locator)){
                listofelements.get(i).click();
                break;
            }
        }
    }

    @Test
    public void SelectAnotherCalculatorXpath(){
        System.out.println("Selecting Anther Calculator");
        ChooseCalculatorXpath("Scientific Calculator");
    }

    public void ChooseCalculatorXpathSimple(String locator){
        System.out.println(locator);
        calcsession.findElementByAccessibilityId("TogglePaneButton").click();
        calcsession.findElementByXPath("//ListItem[contains(@Name,\"" + locator + "\")]").click();
    }

    @Test
    public void SelectAnotherCalculatorXpathSimple(){
        System.out.println("Selecting Anther Calculator");
        ChooseCalculatorXpathSimple("Scientific Calculator");
    }
We're going to put a breakpoint before we try to execute this line.
After this line, we're going to do a System.out - we're just going to put a message to ourselves.
This way we can stop right here - I'm going to stop on line 125 and hit "Step Over" and we should be able to stop on line 126.
Now let's try to run Debug - we'll click on this play button and select Debug.
Now our code is paused. Let's click on the "Step Over".
We're going to click on "Step Over" and notice that it stopped on our System.out and notice that the calculator has been changed to a Scientific calculator.
Let's finish off this program.
Notice the simplicity that we added to our code.
Previously, we had all these different lines of code that execute for us to find an element and now we have only four lines of code.
And if you delete this system out, we only have three lines of code versus the previous multiple lines of code that we had.
This makes it much more simplistic in our code and will make our automation easier to maintain in the future.
# Coding in Python
Now let's see how ChooseCalculator method works if we use an Xpath.
We'll select this ChooseCalculator method we just created.
We'll right-click, select Copy, tab over at the end of the file, right-click and hit Paste.
Now we will have to rename this method - we'll name it, ChooseCalculatorXpath.
Next, we can change this calcsession - instead of find_elements_by_class_name, we're going to delete the rest of this code, and now we can type in .find_elements_ by_xpath().
And now we can choose the XPath we have - let's put //ListItem.
Now let's create another test method.
We'll copy and paste this method, create a couple more new lines, we'll right-click and Paste.
Instead of calling the ChooseCalculator method we're going to change this to XPath, then we're going to have to change this test name to test_choosecalculatorxpath.
    def ChooseCalculatorXpath(self, locator):
        self.calcsession.find_element_by_accessibility_id("TogglePaneButton").click()
        listElement = self.calcsession.find_elements_by_xpath("//ListItem")
        for l in listElement:
            if l.get_attribute("AutomationId") == locator:
                l.click()
                break

    def test_choosecaculatorxpath(self):
        self.ChooseCalculatorXpath("Scientific")
Let's see if it works.
Click on the Run and select Run.
Amazingly enough, it still works.
This is how you would utilize the find_elements_by_xpath in Python.
