

Transcripted Summary
Now that we have our automation working, let's look at some reasons why we want to recreate our code into something more reusable.
There are certain times and situations where you don't want to recreate certain lines of code over and over again, simply because of a simple small value.
Let's take a look at an example of this.
Let's open up the Calculator app and let's open up the Accessibility Insights.
Before we enable the highlighter and start looking at the UI automation tree, let's look at the other options inside the Calculator.
Calculator app might look pretty simple, but if you click on this little hamburger up in the left hand corner of the application, you'll notice there's a lot more options.
You can have the Standard calculator, Scientific calculator, Programmer calculator, Date Calculation, Currency, Volume.
If you keep on scrolling down, there's a lot of different options you can choose from.
So rather than creating one test that goes to each one of these, what we want to do now is create a standard method that will allow us to click on any of these calculator options.
That way all we're going to do is pass in a certain value, and once we have that value, it will know exactly which one of these calculators we want to select.
Let's do this by clicking on the highlighter and enabling the UI tree.
First we're going to click on this hamburger to open it up.
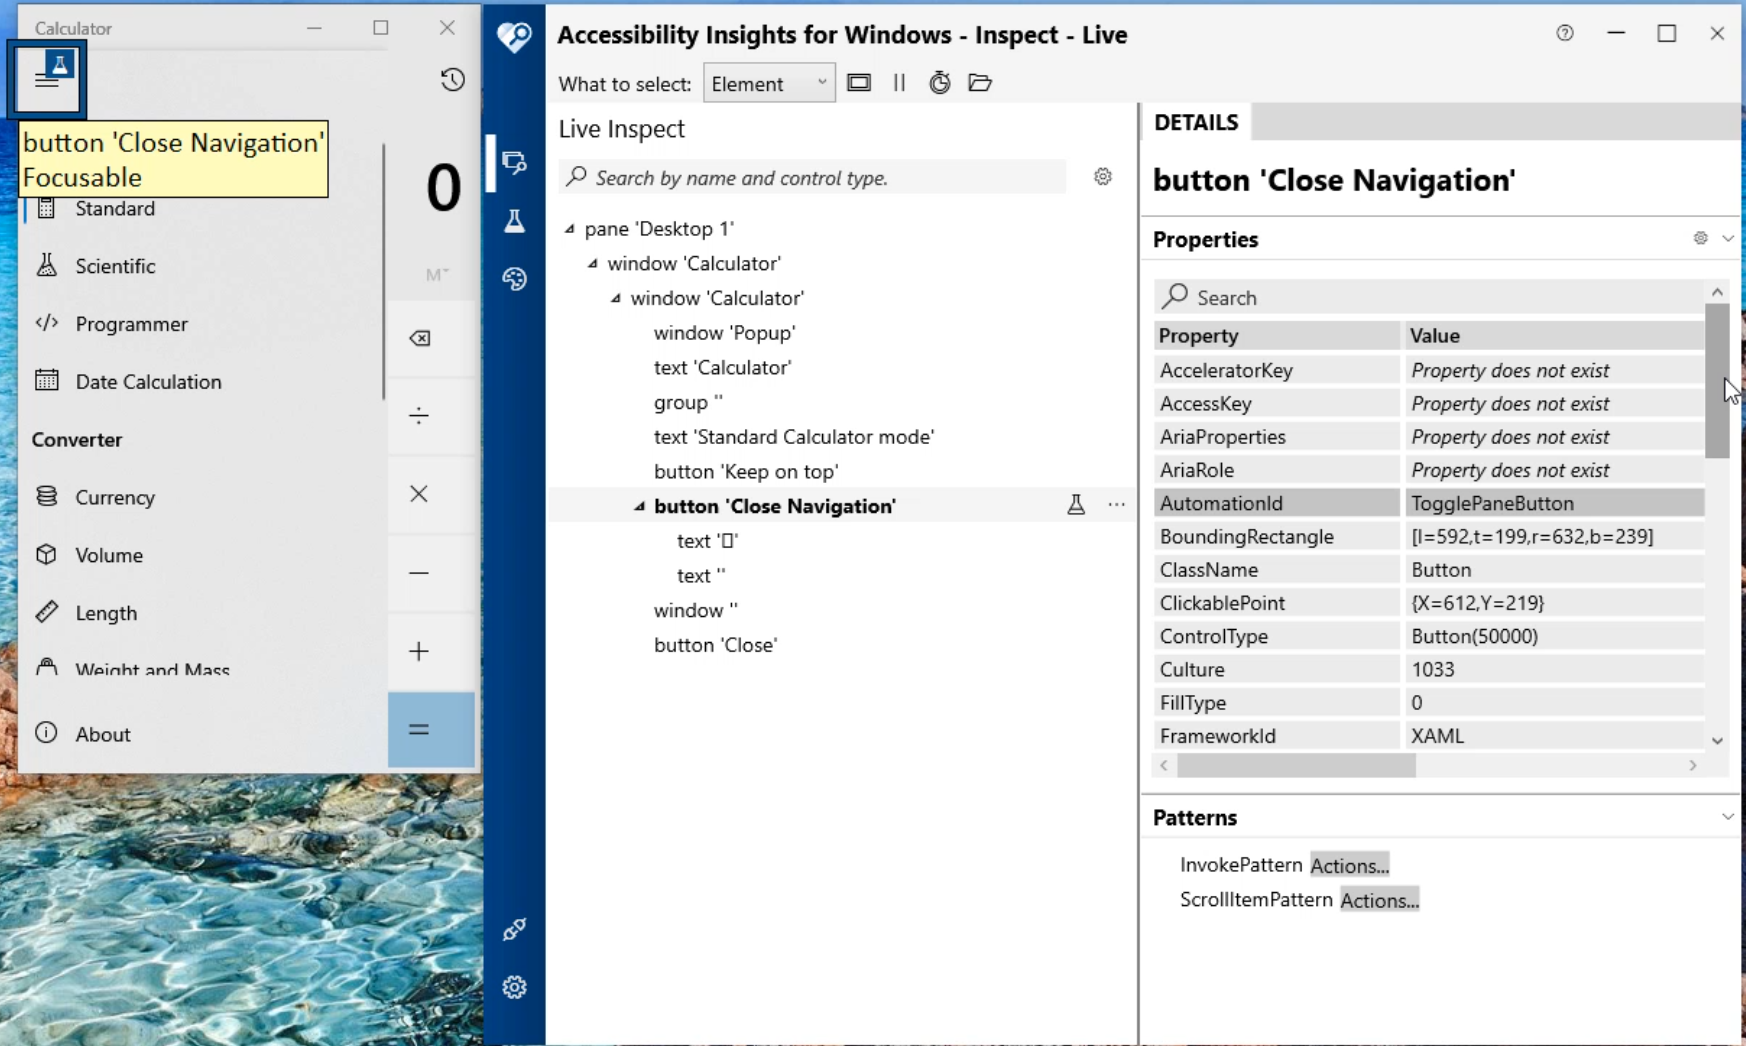
This is called TogglePanelButton - this is the AutomationId we're going to use for this option.
You can also use the name "Close Navigation", but notice that if you close this navigation, now it says "Open Navigation".
So again, in this scenario, we can't use the "Name", but we can utilize the "AutomationId".
Now that we have opened our navigation pane, let's look at these items in here.
It's all in the list item right here.
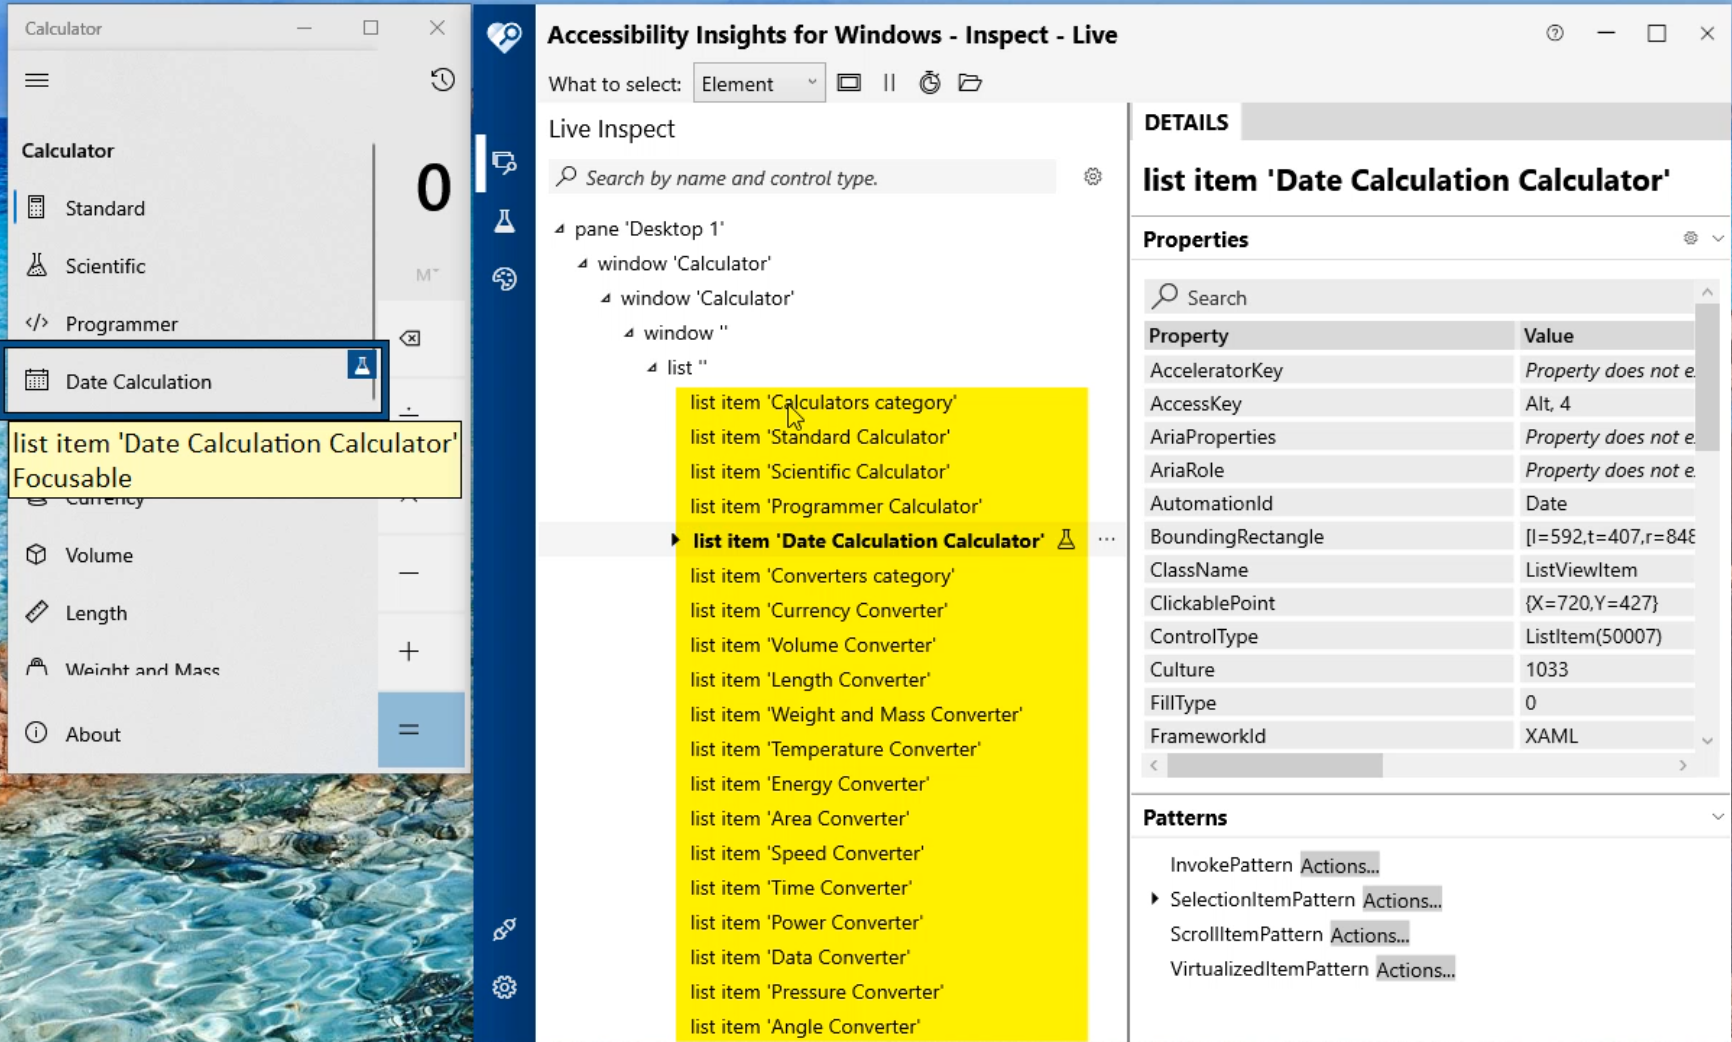
You have a 'Calculators category', 'Standard Calculator', 'Scientific Calculator', 'Programmer Calculator'.
There's lots of different string values that you can choose from.
Another option is if you're selecting this 'Standard Calculator', you can also scroll down here and there's a "Name" for it.
The "Name" is a little long, but we can also utilize the "AutomationId".
The next thing we're having to figure out is how to grab all these elements all at the same time.
And with this, we're going to have to use another tool.
Let's minimize everything here. Let's disable the highlighter, pause our recording, and let's minimize this window.
# Coding in Java
Let's open our IntelliJ IDE and let's add additional code.
Scroll down to the bottom of Calculator.java and let's create a new method.
For this method, we're going to call this public void ChooseCalculator.
In this method here, we're going to add a value that we're going to pass in and call it a String locator.
The first line of code that we're going to add is calcsession.findElementByAccessibilityID("").click().
We're leaving this empty so we can grab the value.
Let's open up our Accessibility Insights and let's open up our Calculator.
If you don't have your highlighter enabled and it's not recording the automation tree, make sure you click on these two buttons to enable it.
Now let's hover over this 'Open Navigation' button.
This navigation button is called "TogglePaneButton".
Let's pause our highlight and pause our UI tree and minimize our calculator window.
We should still be able to see this TogglePane ID. We'll scroll up a little bit in our IDE and you'll notice Accessibility Insights is still open.
So now we can type in TogglePaneButton.
That's the first button we're going to click on.
Let's create a new line of code.
At this point the pane should open.
Inside this pane, we're going to see a lot of these other calculators we can choose from.
Let's enable the highlight, look in at the UI tree.
You'll notice here we have a bunch of list items.
Let's minimize this, pause our UI tree and hide our highlighter.
So now you'll notice here we have a bunch of list items here.
The list item here that's in common is "ListViewItem".
You can click on this first option here, it's a "ListViewItem". Click on the second option here - "ListViewItem". Click on this third option - "ListViewItem".
So this gives us a common way to grab all these elements.
Now let's minimize the Calculator.
We're going to create a new type of object called a List.
So we'll type List <WebElement> and then listofelements = calcsession..
This time you'll notice in this list here, we have findElements and we have a bunch of other options now.
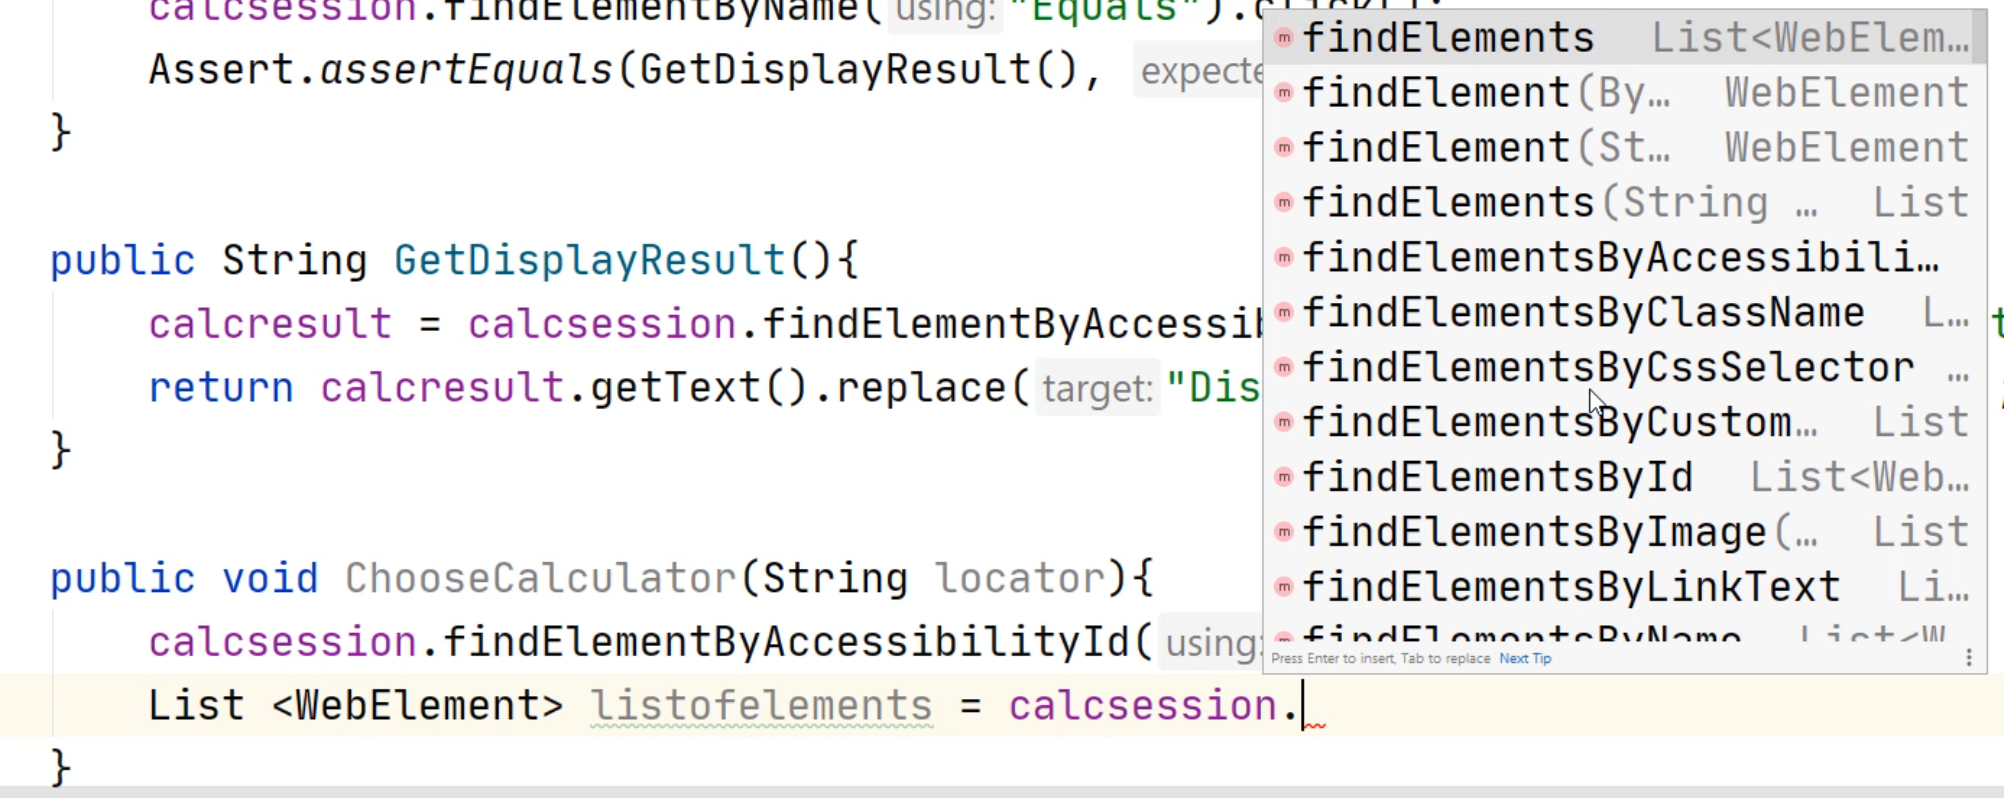
Remember, before we were using the findElement to find our single element.
findElements
The findElements will find a whole entire list of elements that follows a certain pattern type.
In this example, we're going to use the class name - findElementsByClassName.
To look at this ClassName, let's open up our Accessibility Insights and it shows that the "ClassName" is "ListViewItem".
What this line of code will do is it's going to return a whole entire list of elements.
First, we're going to use findElementsByClassName, and we're going to find every element that matches this value.
Since we have multiple, it's going to return a whole entire list of it.
Before we do that, we have to declare a List.
The variable name for this is going to be called listofelements - this is a data variable that we will reference when we go through our list.
Lastly, for our list, we have to declare what type of data is going to be inside the list - here we're going to say it's a WebElement.
    public void ChooseCalculator(String locator){
        calcsession.findElementByAccessibilityId("TogglePaneButton").click();
        List <WebElement> listofelements = calcsession.findElementsByClassName("ListViewItem");
    }
The next line of code, we're going to see what options we have with the list.
With this List data type, we're going to type in listofelements. and now you can see the methods within this class.
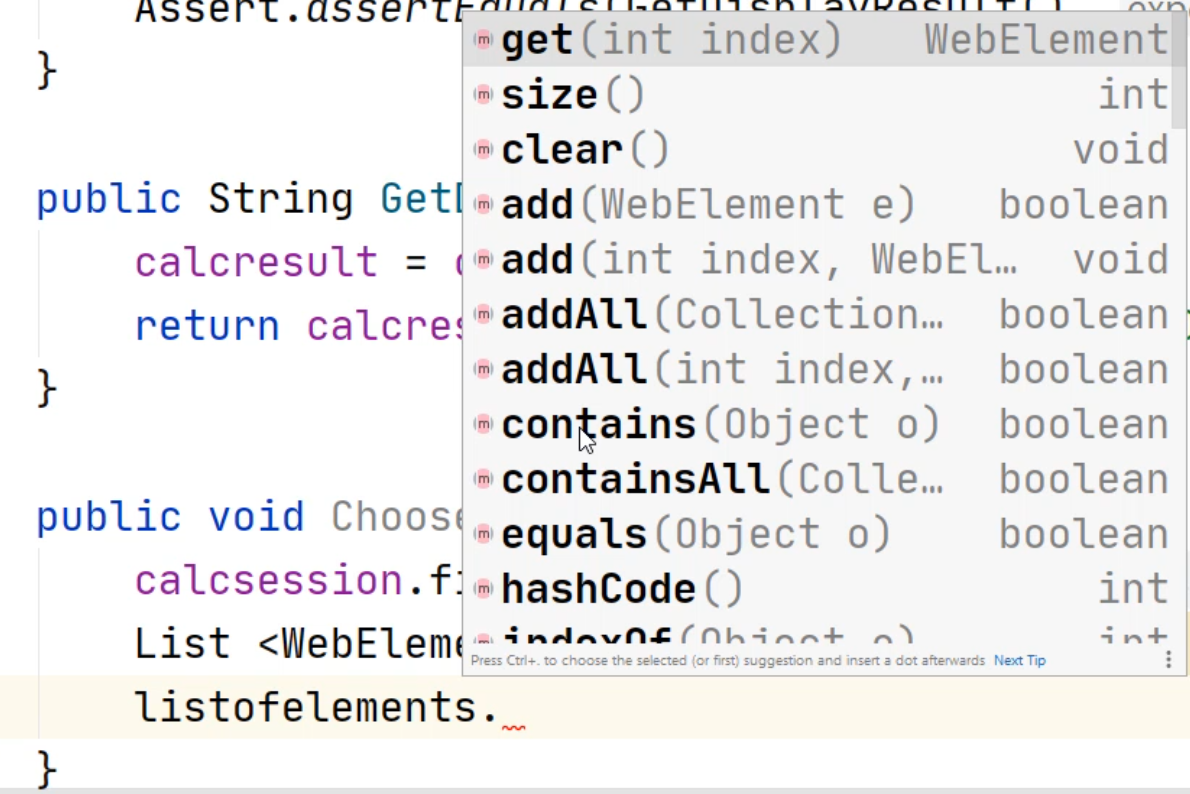
You have a get, size, clear, add, and this looks like it's adding an element.
addAll, containsAll... if you continue to scroll down, you should see the rest of the classes.
First of all, we're going to use the size - we're going to do a listofelements.size.
Now what we're going to do is just going to do a System.out.println, and we're going to print out the size of this list.
Now we should see if we have a list of elements, but before we do that, we have to create a new test.
    public void ChooseCalculator(String locator){
        calcsession.findElementByAccessibilityId("TogglePaneButton").click();
        List <WebElement> listofelements = calcsession.findElementsByClassName("ListViewItem");
        System.out.println(listofelements.size());
    }
Let's create a new test called public void SelectAnotherCalculator.
Here we'll add the annotation @Test.
We're going to do another System.out.println, and we're going to put the comment of "Selecting Another Calculator".
We're going to add another line of code to call into our method here. We're going to call ChooseCalculator - that should be in our method that's above here.
Now we're going to add a value in here - we don't know what the exact values are going to be, so we're just going to put in mycalculator.
This will just prove that we have a value in here.
Now let's go back to our ChooseCalculator method and here we're going to put a System.out.println and we're going to print out this locator.
public void ChooseCalculator(String locator){
System.out.println(locator);
calcsession.findElementByAccessibilityId("TogglePaneButton").click();
List <WebElement> listofelements = calcsession.findElementsByClassName("ListViewItem");
System.out.println(listofelements.size());
}
@Test
public void SelectAnotherCalculator(){
System.out.println("Selecting Anther Calculator");
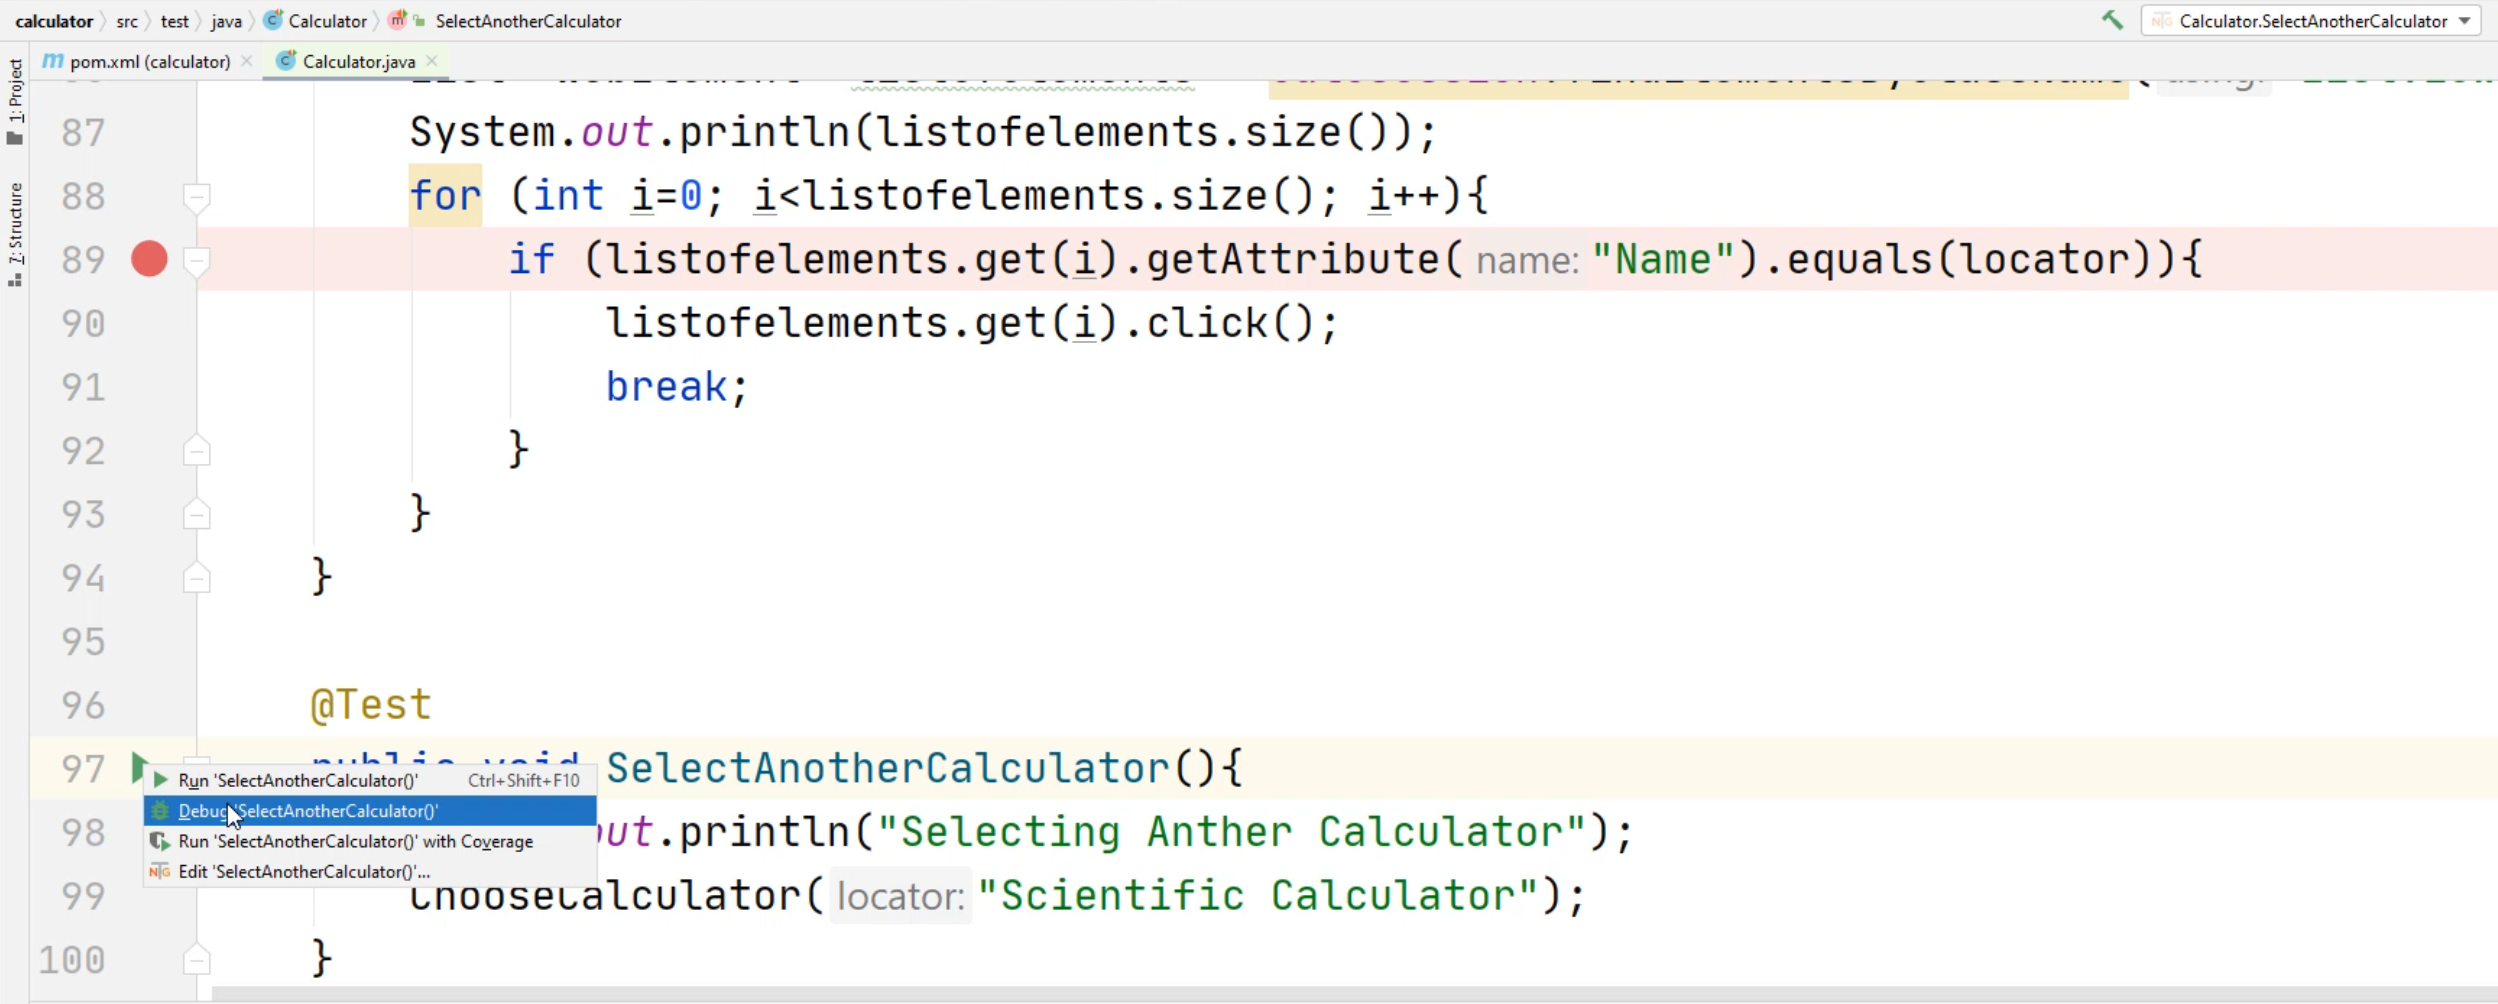
ChooseCalculator("mycalculator");
}
When we run our code, what we should see is that we're going to see in our console, we're going to see this message "Selecting Anther Calculator" and then we're going to go into this method here ChooseCalculator and we're going to print out the locator that was passed in - in this example, it's going to be "mycalculator".
At the end, we're going to print out a number that indicates how many items we found in the list.
Let's try that now. Let's click on this and let's run this SelectAnotherCalculator.
Now let's see what happened in our steps.
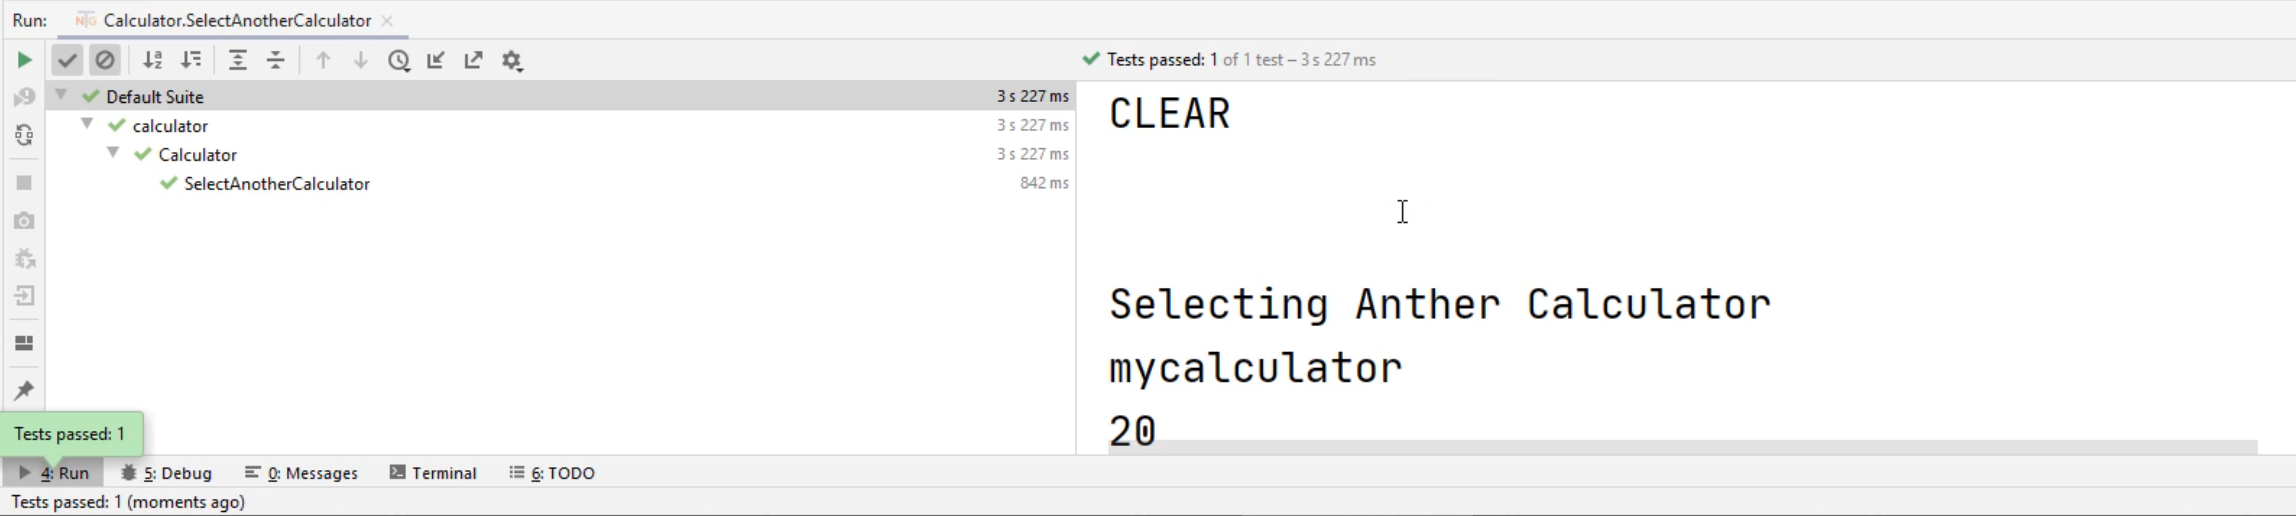
We will see that we first clicked on the "clear" button and now we went to the method that says, "Selecting Anther Calculator".
Here's the value that we passed in "mycalculator".
The value that came back for the size is "20".
The next line of code that we're going to introduce is a for loop.
A for loop will allow us to go through our whole entire list of elements and look at each attribute inside the element.
The for loop for Java we're going to do is for().
We're going to declare a new variable of i using an integer value.
We're going to set this to int i=0;.
Now, since we know there's a list of 20 elements, we're going to do i < listofelements.size;.
And every time we go through the list, we're going to increment or iterate through that list so we're going to do i++, and then open and close braces {} to indicate the code block.
    public void ChooseCalculator(String locator){
        System.out.println(locator);
        calcsession.findElementByAccessibilityId("TogglePaneButton").click();
        List <WebElement> listofelements = calcsession.findElementsByClassName("ListViewItem");
        System.out.println(listofelements.size());
        for (int i=0; i<listofelements.size(); i++){
        }
    }

    @Test
    public void SelectAnotherCalculator(){
        System.out.println("Selecting Anther Calculator");
        ChooseCalculator("mycalculator");
    }
Now we're going to do an if statement.
We're going to type in if() and pass listofelements and instead of .size this time, we're going to do a .get() and notice here we have an index.
It's going to index through each of the web elements and since now we have a counter throughout our loop, we're going to use the i value.
And now we're going to do a . again.
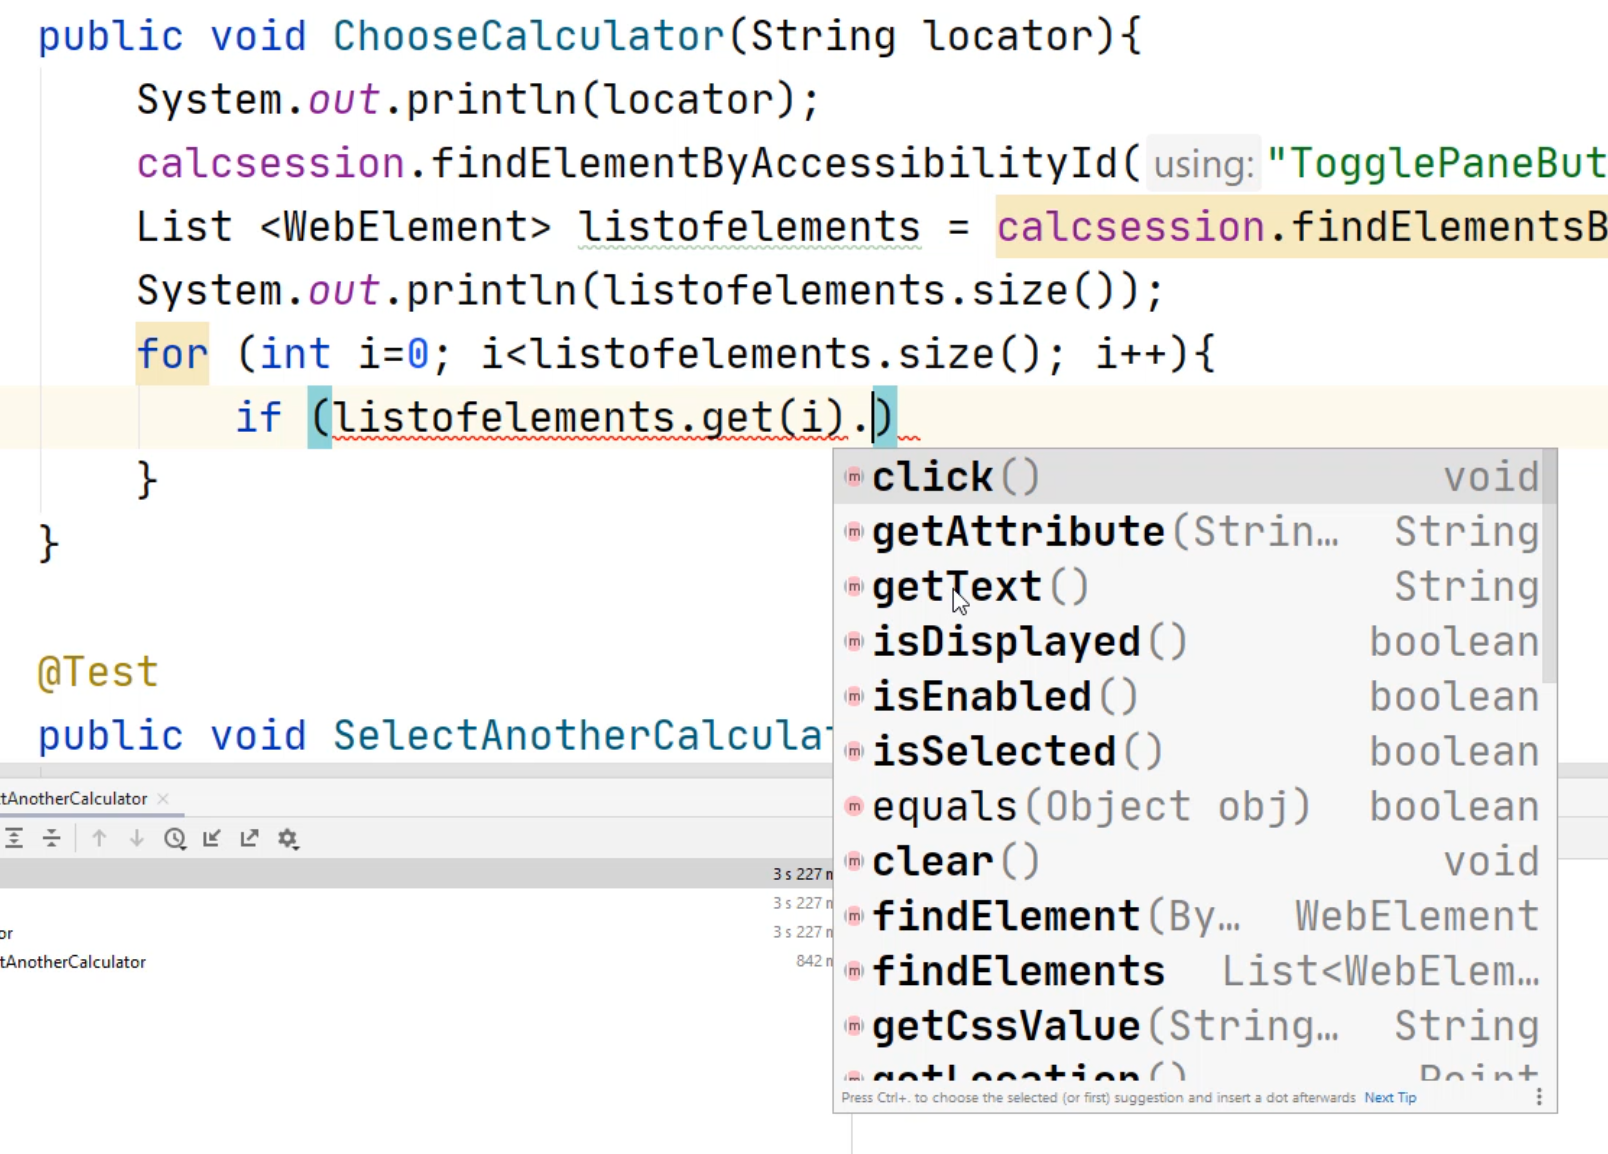
This time you'll notice there is a click, getAttribute, getText, isDisplayed.
Well, one of the things that we can't use is the getText, because there is no text inside this.
Let's take a look at why.
Let's open up our Accessibility Insights, open up our Calculator, resume the UI automation tree, and let's take a look at what's going on.
If we click on this button here, that should open our automation tree and here's our automation tree.
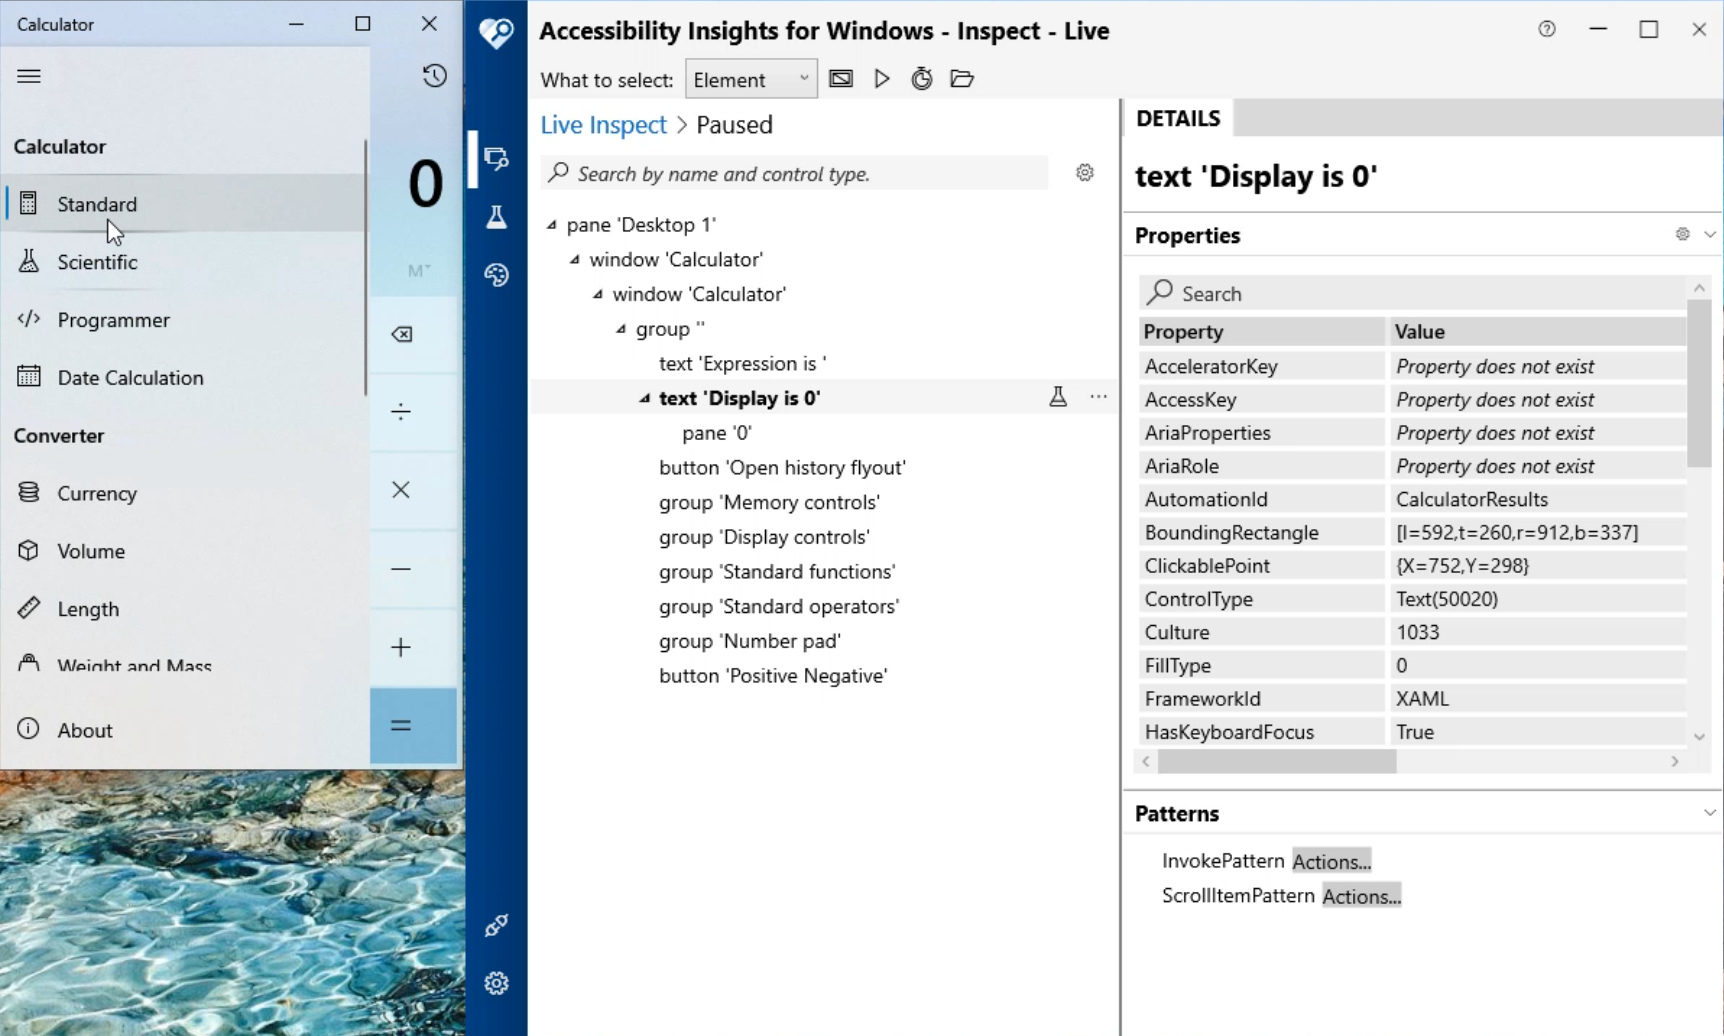
Here's all of our list items for each of the calculators. Notice in here there is no Text.

There's a HelpText in here, there's a Name, but that's about it.
Now, if we click on the display, notice there's an item right here that says text.
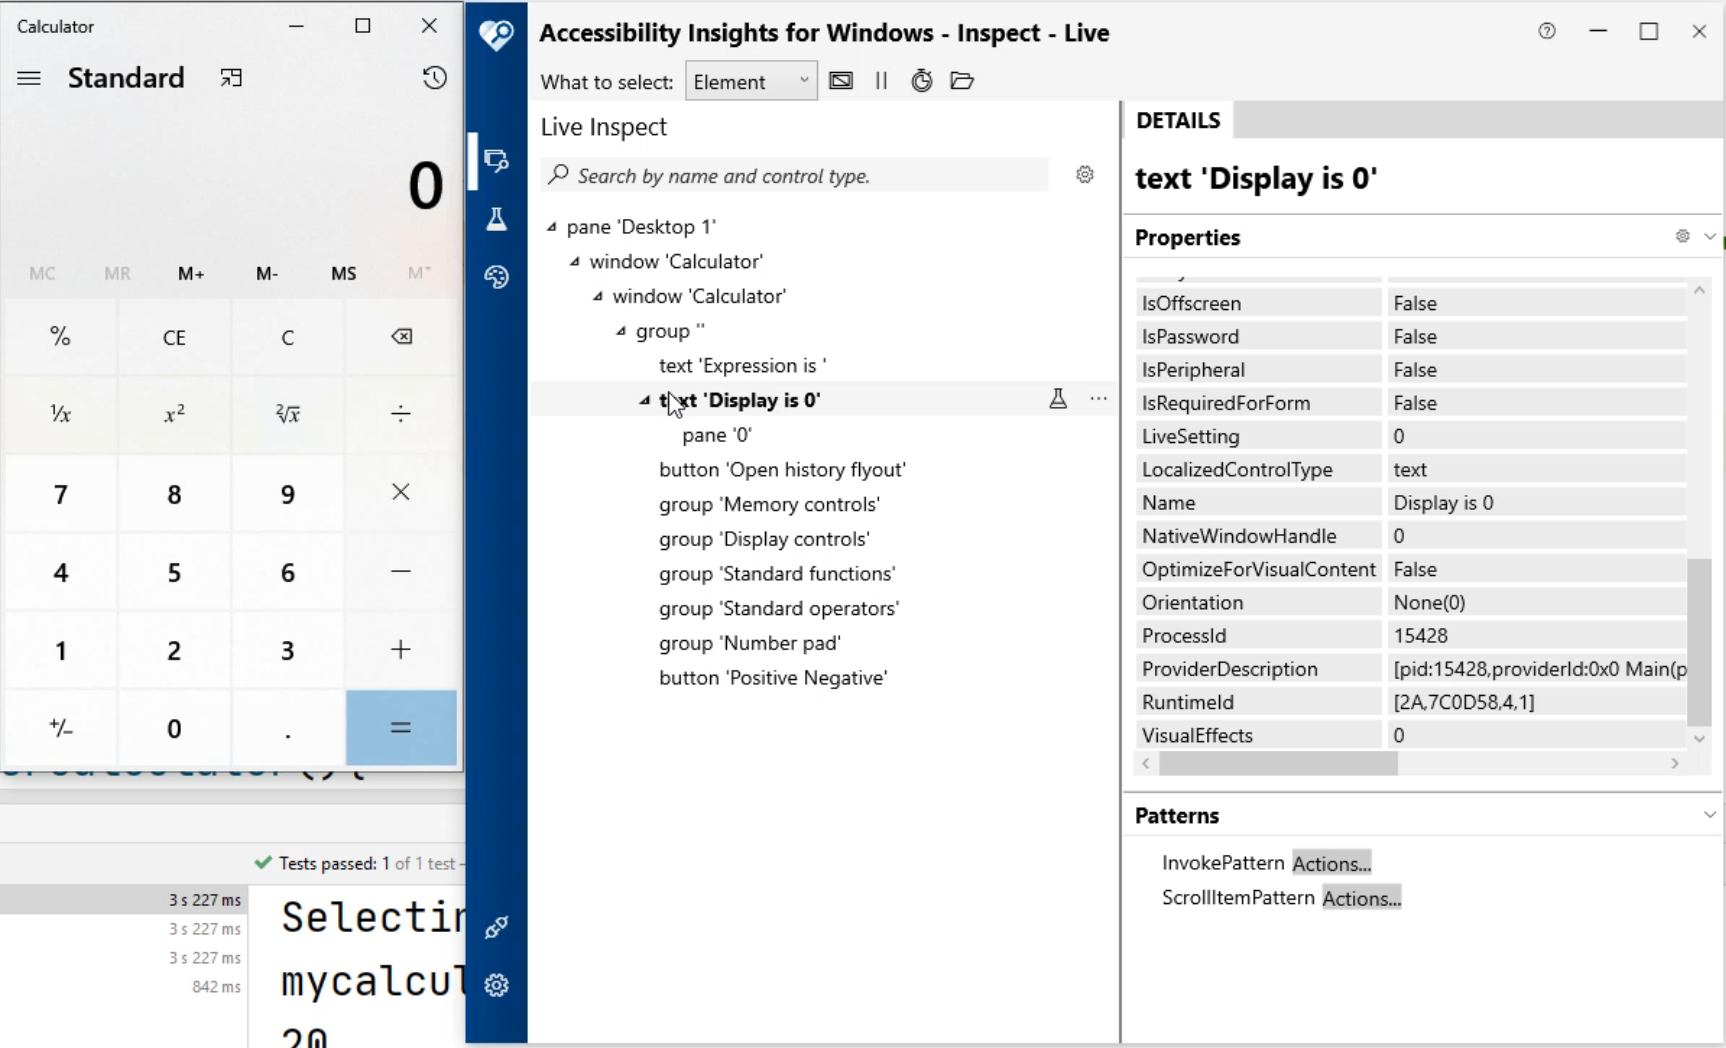
This indicates that there's text and the text is "Display is 0".
But if we click on this list here, there is no text.
Next we're going to add a if statement inside of our for loop.
What this if statement is going to do is going to match up the locator that we passed in.
Our goal is to say, if the locator matches the element that we're looking for, we're going to do a click on it.
So we're going to type the if.
Since we have a way to iterate through our list, we're going to type in listofelements.get, and we have an integer value that it was expecting.
This integer value is the element that we're looking at - we have an iterator i, so we're going to type in the i and now we're going to do a .get.
We have a couple of options.
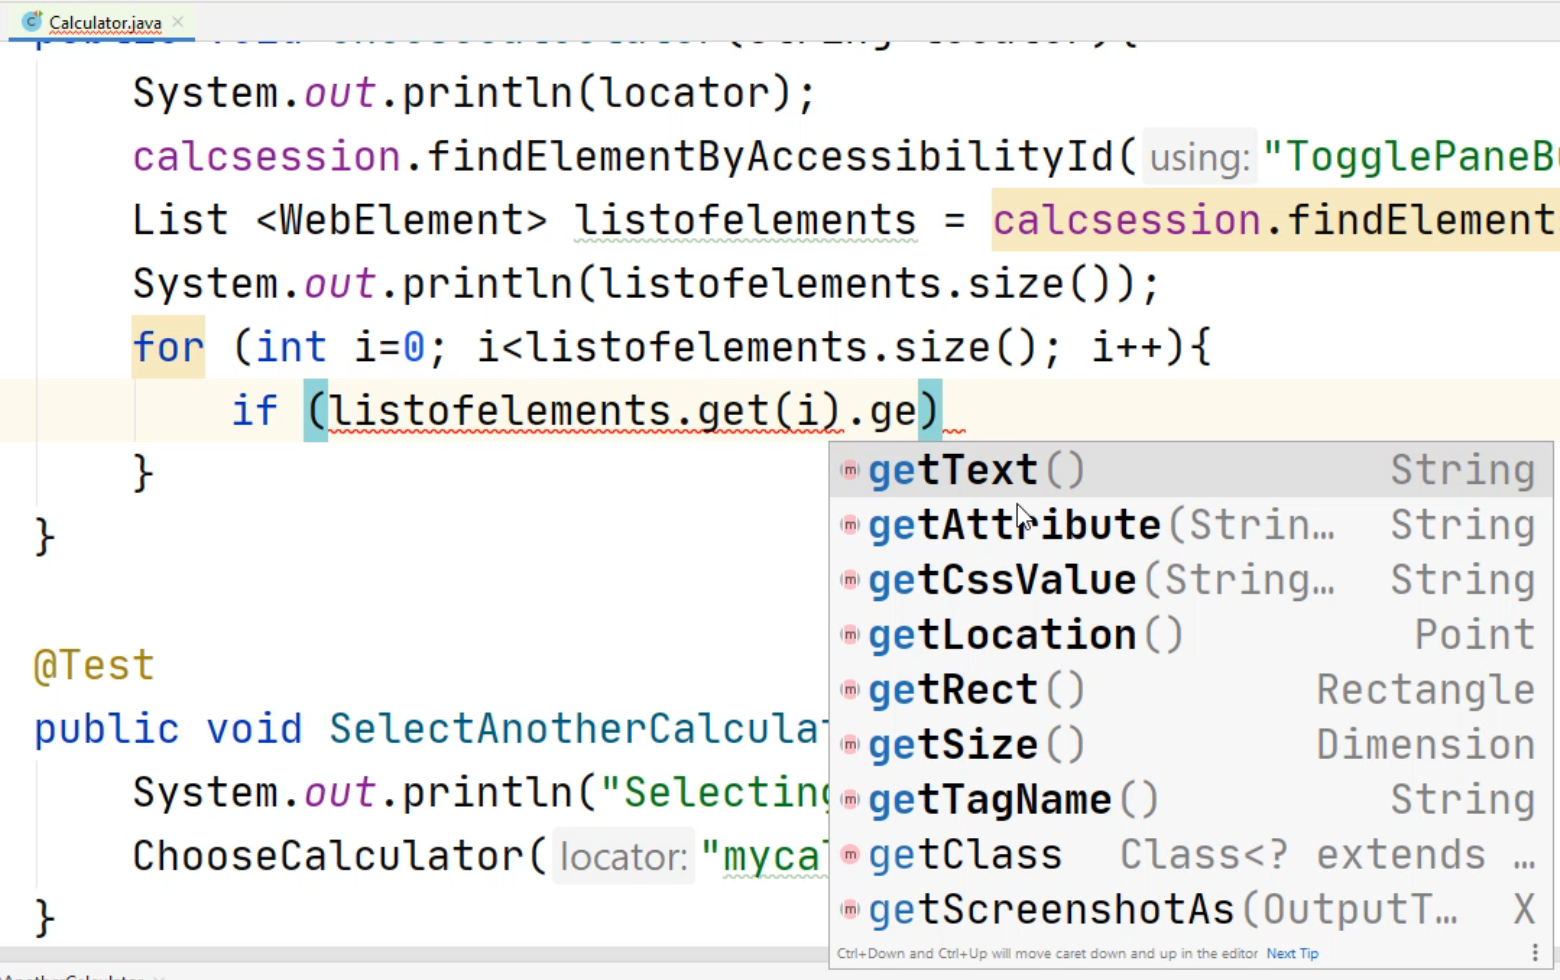
We have a getText, getAttribute, getCSSValue, getLocation.
But what we're going to do is we're going to use the getAttribute.
The reason why we can't use getText is there is no text within the element.
We can use getAttribute.
Let's look at the attribute values here.
We're going to finish out the rest of the line of our code, and it says .equals(locator).
    public void ChooseCalculator(String locator){
        System.out.println(locator);
        calcsession.findElementByAccessibilityId("TogglePaneButton").click();
        List <WebElement> listofelements = calcsession.findElementsByClassName("ListViewItem");
        System.out.println(listofelements.size());
        for (int i=0; i<listofelements.size(); i++){
            if (listofelements.get(i).getAttribute("Name").equals(locator)){
            }

        }
    }

    @Test
    public void SelectAnotherCalculator(){
        System.out.println("Selecting Anther Calculator");
        ChooseCalculator("mycalculator");
    }
So now, we have this loop right here that goes through.
Here's our locator that we're trying to match in.
This locator will be the calculator name that we're going to utilize.
It's going to go find a whole entire list of all the elements of the names that we have.
It's going to go through this loop and for the first item in the list, it's going to getAttribute of something and see if it equals the value that we passed in.
Now let's open our Accessibility Insights again.
Let's open up our Calculator and make sure your automation tree is enabled.
Let's take a look at this and see why we don't have a text item.
If you look at this element right here, here's our 'Standard Calculator' option.
Here's our 'Scientific Calculator' option.
If you scroll down through this list, these are the details.
Notice there is no text value. Since there is no text value, we can't utilize text to grab any of these values.
But what is nice is, with getAttribute, every one of these properties right here is an attribute.
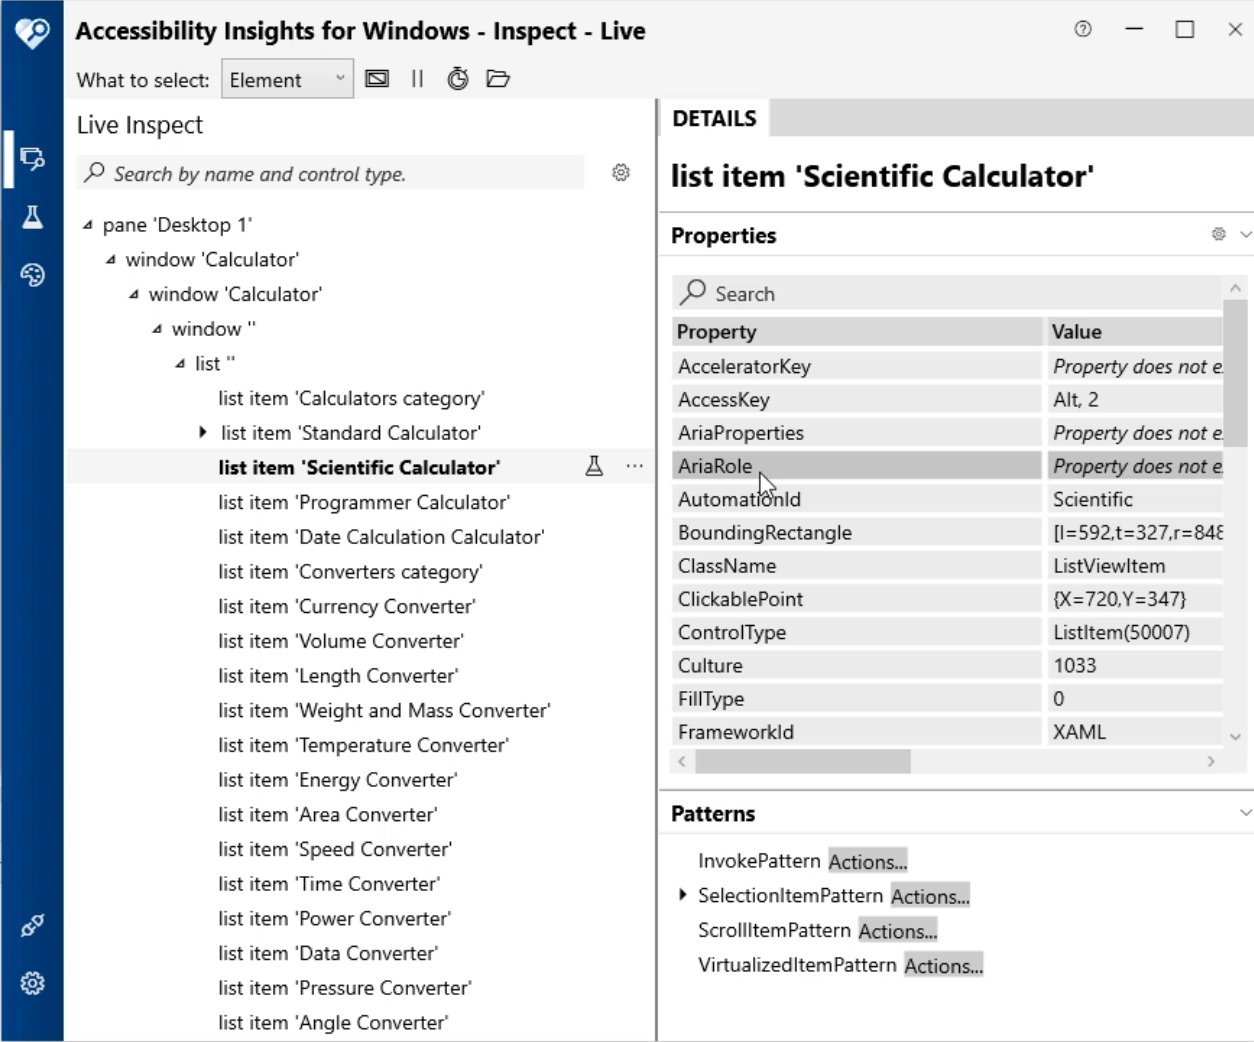
So if you want the "AutomationId", you would type in AutomationId.
If you want the "AriaRole", we would type in AriaRole.
If you want to get "Name", you can type in the Name.
In this example, the name is "Scientific Calculator".
Let's add this to our code now. Let's minimize these two, and in our code, we will add the attribute value of name. Make sure you check the exact spelling and in this case, it's a capital N.
Now we'll add a step to click the element by typing, listofelements dot get i, followed by a dot click. Then we will add a "break" so we can get out of the loop so our code won't have to check the entire list of elements after it's found one that matches.
    public void ChooseCalculator(String locator){
        System.out.println(locator);
        calcsession.findElementByAccessibilityId("TogglePaneButton").click();
        List <WebElement> listofelements = calcsession.findElementsByClassName("ListViewItem");
        System.out.println(listofelements.size());
        for (int i=0; i<listofelements.size(); i++){
            if (listofelements.get(i).getAttribute("Name").equals(locator)){
                listofelements.get(i).click();
                break;
            }
        }
    }

    @Test
    public void SelectAnotherCalculator(){
        System.out.println("Selecting Anther Calculator");
        ChooseCalculator("mycalculator");
    }
Let's go back to our test method and let's change this locator value.
Let's open up Accessibility Insights and here, the name that we're going to look for is "Scientific Calculator" so we'll change this to "Scientific Calculator" to match.
Let's minimize our Accessibility Insights.
So here's the value that we're going to pass in and now let's run the test.
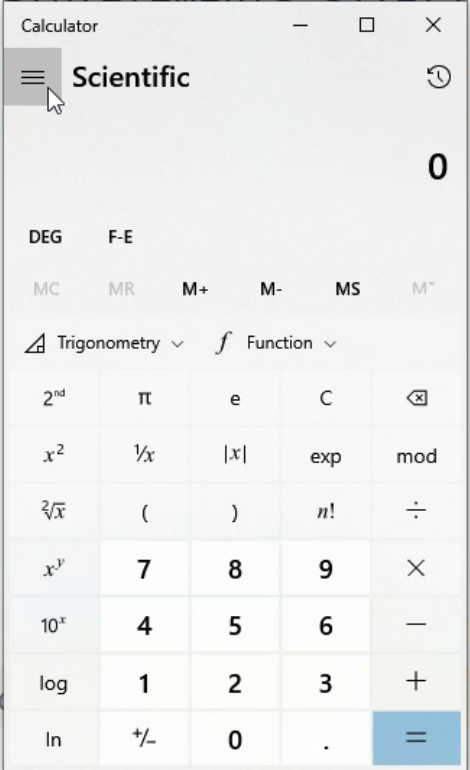
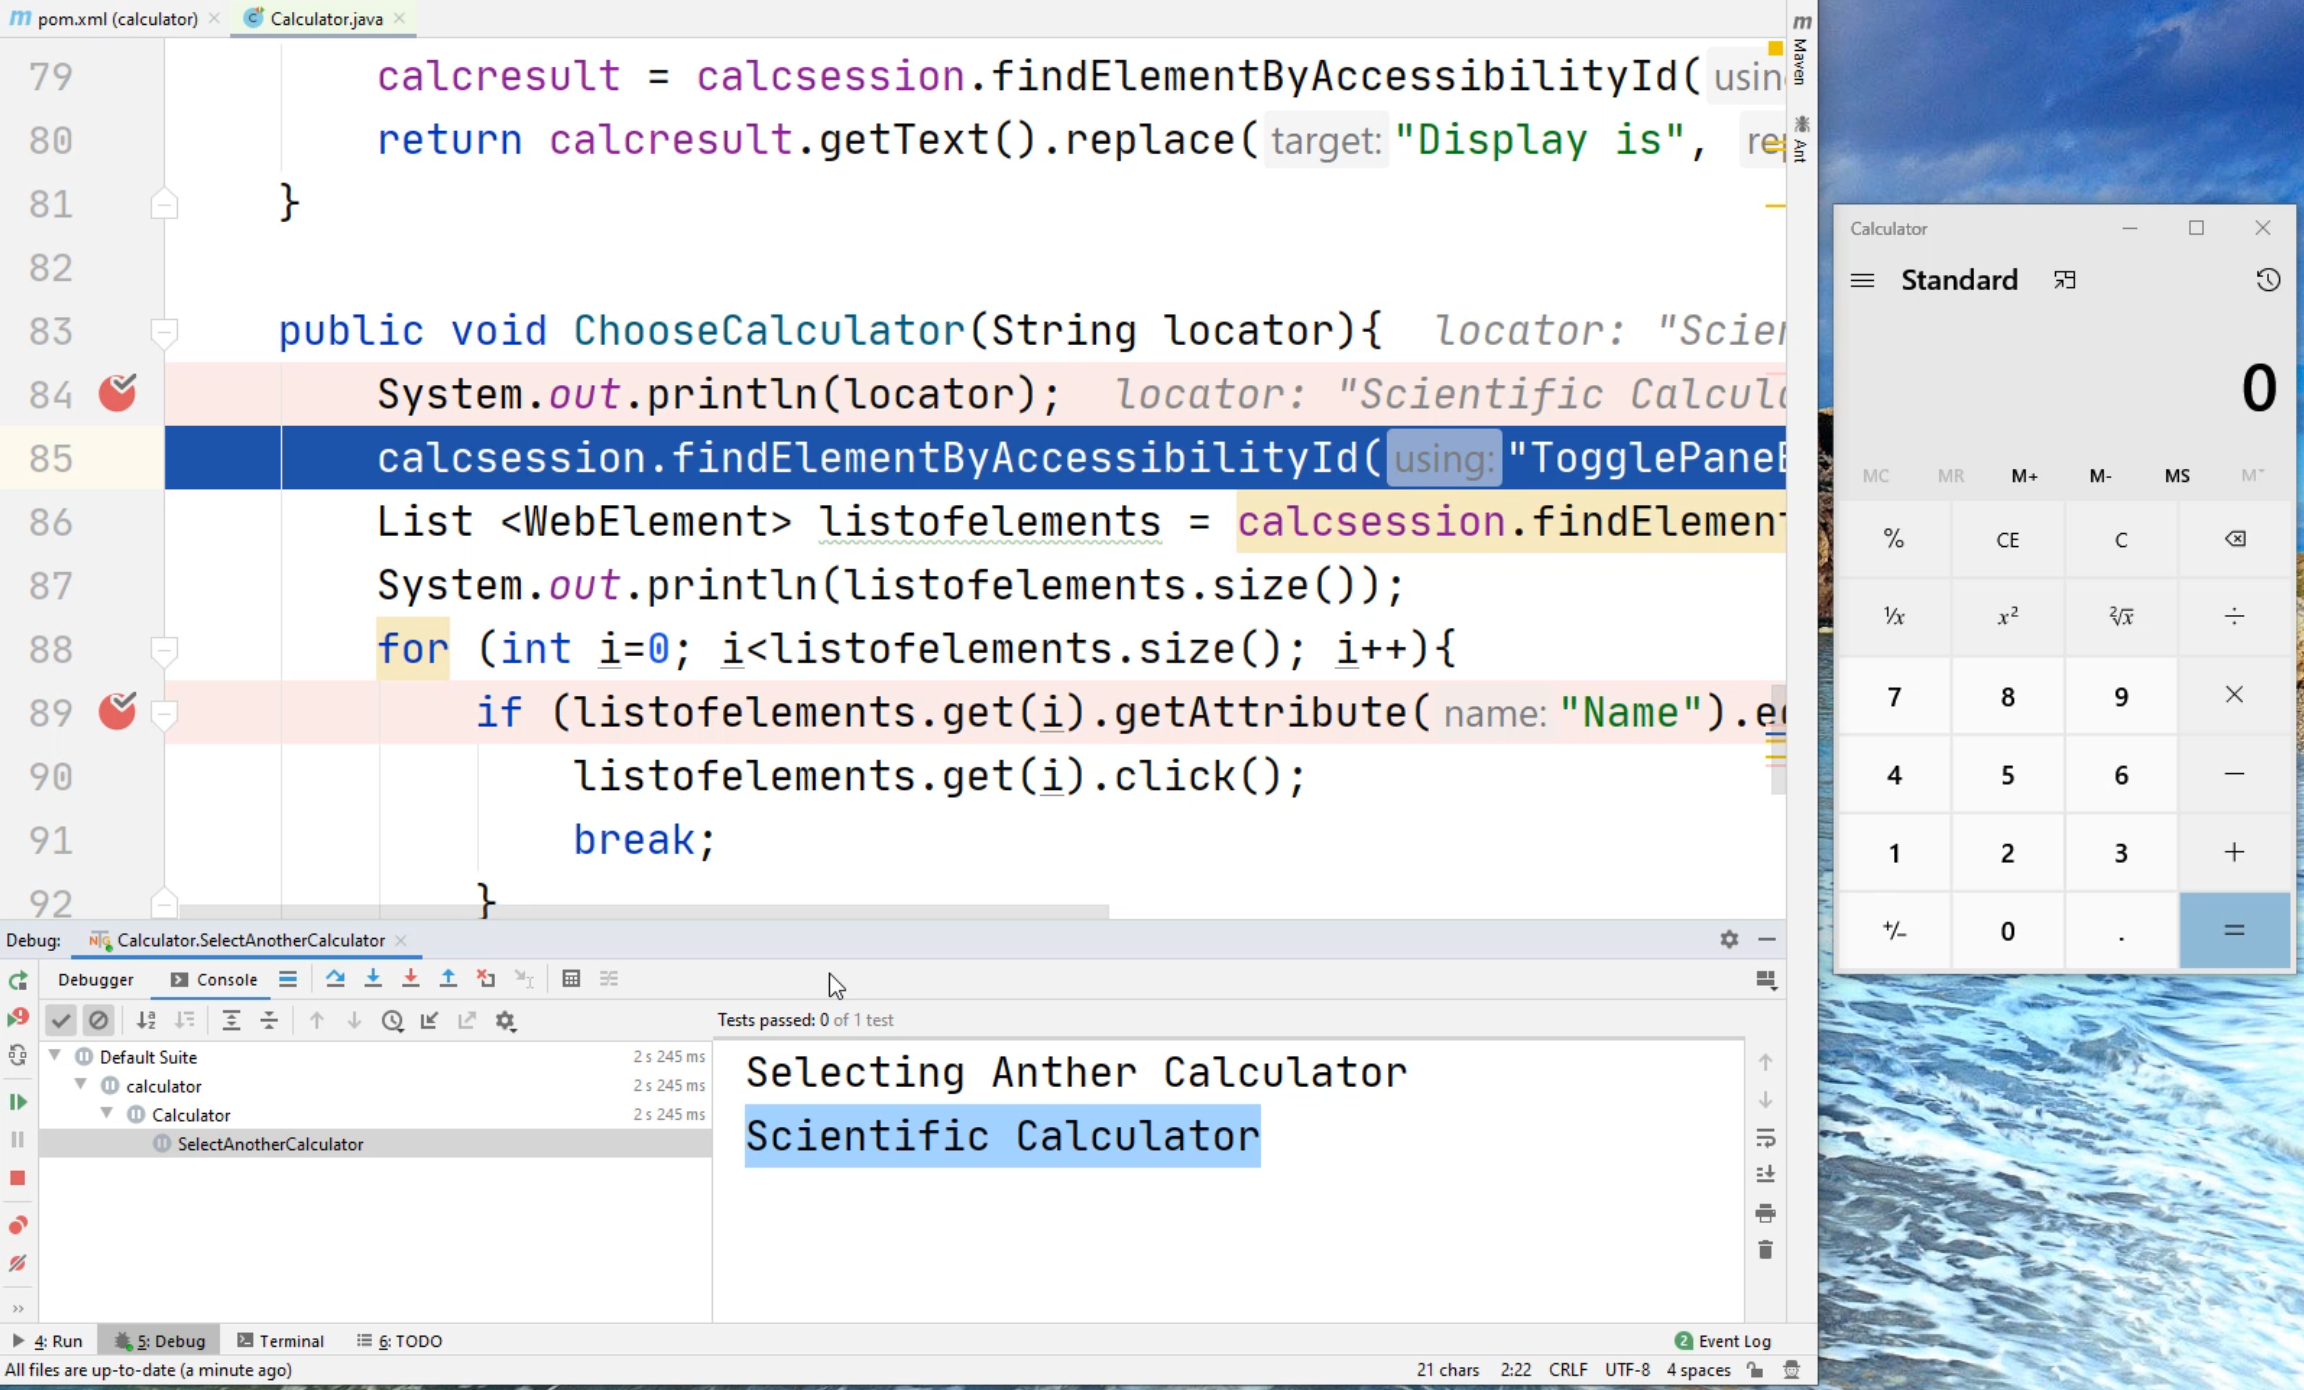
At the end of this test, what you should see is that the calculator will open.
Instead of seeing the Standard Calculator like this, we're going to see the Scientific Calculator like this.
Let's close this calculator and see the actions happen.
Now let's run our test. Did you see that happen? It ran pretty quick.
To verify that everything worked, what we're going to do is add a breakpoint inside of our code.
Let's go to line 89, to our if statement.
What's going to happen is the code is going to pause right here, and if it passes - meaning that if the attribute value is equal to the locator that we're looking for - it will go to line 90.
Otherwise it'll go back to the for loop and just stop right here again.
Let's debug our code.
Click on the "Play" button and select "Debug 'SelectAnotherCalculator'".
Your calculator should now be open. Let's minimize our IDE.
If your calculator is hidden underneath your IDE, you might want to move it to the right. This way you can see exactly which line of code is executing and what is running.
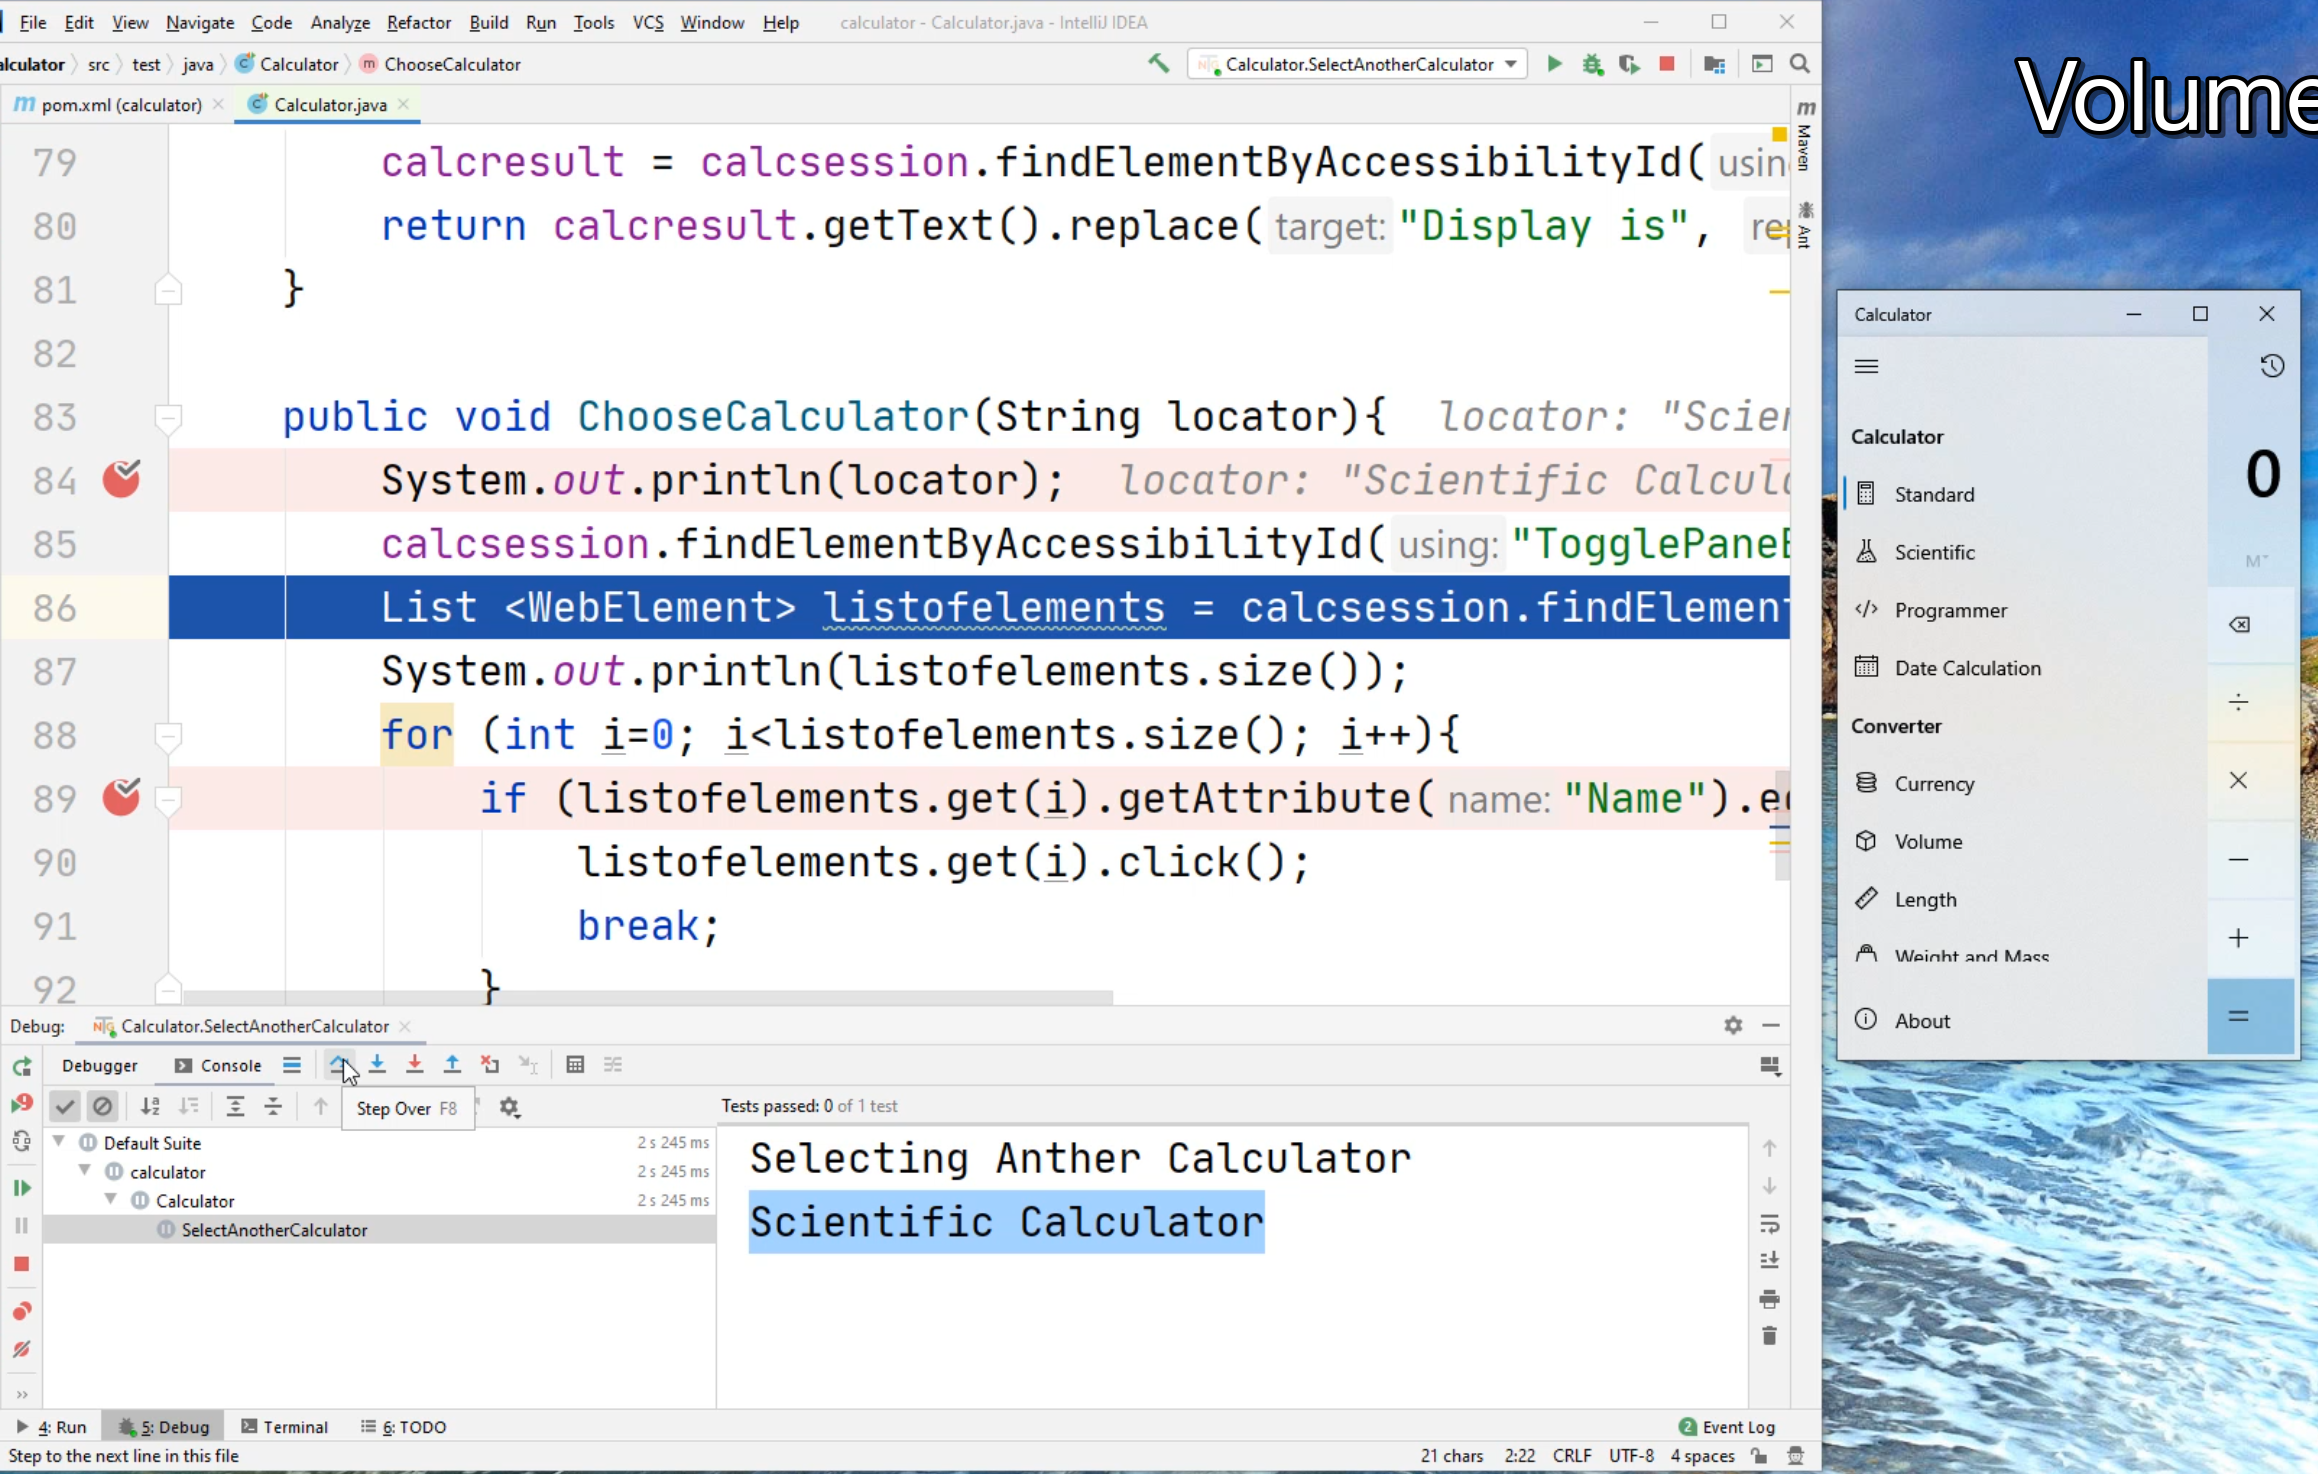
Now let's click on this "Step Over" button.
Inside the console here, you'll see the text that was just printed.
The text that we printed out was "Scientific Calculator" - this is our locator.
Let's click on the "Step Over" again and you'll notice I have opened up the toggle pane - the pane will have all the different calculators in there with it.
Now we'll move back over here to "Step Over" and now we have a list of elements.
We're going to "Step Over" again and this time, I've found 18 elements.
Let's "Step Over" this again, into the for loop, and now we know it's going to run through 18 times.
The first one that it's going to look for is a list of elements, and it's going to match that name.
If it equals, it should go into line 90.
Since it didn't go into line 90 - it went back to line 88, it means that the first element didn't match.
Let's do a "Step Over" again, and we should be back at line 89.
This time we're going to click "Next" again - notice this time it actually went into line 90 and now the calculator that is actually selected is a Scientific Calculator.
We can click on this "Resume Program" and it'll close out our Calculator and we're done with our test.
Now we have created a method that will go through each of our calculators and select a different type.
import java.util.List;

    public void ChooseCalculator(String locator){
        System.out.println(locator);
        calcsession.findElementByAccessibilityId("TogglePaneButton").click();
        List <WebElement> listofelements = calcsession.findElementsByClassName("ListViewItem");
        System.out.println(listofelements.size());
        for (int i=0; i<listofelements.size(); i++){
            if (listofelements.get(i).getAttribute("Name").equals(locator)){
                listofelements.get(i).click();
                break;
            }
        }
    }

    @Test
    public void SelectAnotherCalculator(){
        System.out.println("Selecting Anther Calculator");
        ChooseCalculator("Scientific Calculator");
    }
# Coding in Python
Now let's create the ChooseCalculator method in Python.
Let's go over to our Python editor.
At the bottom of our file calculator_test.py, we'll create a new definition def ChooseCalculator().
Inside of the open and close parentheses, after the word self, we're going to put , locator.
Next, we're going to create a new line of code.
Now we're going to type in self.calcsession.find_element_by_accessibility_id("TogglePaneButton").click().
Next in Python, you don't have to declare the object type, but we're going to call it listElement = self.calcsession.find_element.
Remember this time we're trying to find a plural.
So we're going to type in elements with an "s".
And now we can do _by_class_name and the class name will be ListViewItem.
Next we'll create our for loop to iterate through all the items in the list.
It will be for l in listElement: - you can give it any type of reference. - you can name it a or b, for now I'm going to use l.
Create a new line of code - we're going to type in if l..
Remember, we used a getAttribute method to get the "AutomationId" value - we'll do the same now.
We'll type in get_attribute("AutomationId").
Instead of .equals - we don't have a .equals in Python, but what we do have is a double equals ==.
So we'll check if get_attribute("AutomationId") == locator:
Now we're going to do an action - we can say if the element matches, we'll do l.click() and we'll also do a break because we don't need to continue the rest of the for loop.
You'll notice that this method's a little bit simpler than the Java one.
Now let's create a test and type in def test_choosecalculator.
Create a new line and type in self.ChooseCalculator and we'll put in the value "Scientific".
    def ChooseCalculator(self, locator):
        self.calcsession.find_element_by_accessibility_id("TogglePaneButton").click()
        listElement = self.calcsession.find_elements_by_class_name("ListViewItem")
        for l in listElement:
            if l.get_attribute("AutomationId") == locator:
                l.click()
                break

    def test_choosecaculator(self):
        self.ChooseCalculator("Scientific")
At this point, we should be able to select the Scientific Calculator.
Now let's open our Calculator app to make sure it's on a Standard calculator.
If it's not, you can double click on this hamburger and select Standard.
This way you can see the automation is working.
Now let's run this test_choosecalculator.
I hope you saw it. It worked. This is how you would write your method in Python.
