

Transcripted Summary
# Coding in Java
Now let's add some additional code to our class (Calculator.java).
Inside of our class we need to have a before and an after.
What we do want to do is create a setup and a teardown set of steps.
We're going in type in public void tearDown().
Inside this tearDown method, we will put in everything that we need to do to stop our test.
Let's create a public setup as well - public void setup().
This is where we will put all of our steps to start our automation.
Let's add the BeforeClass and AfterClass class annotations to these two methods that we just barely created.
For the setup we'll do @BeforeClass and for the tear down, we'll do @AfterClass.
Before we do anything else, let's do another system printout - System.out.println("setup").
For the AfterClass, for the tearDown, we're going to type in System.out.println("teardown").
import org.testng.annotations.*;

public class Calculator {
    @BeforeClass
    public void setup(){
        System.out.println("setup");
    }
    @AfterClass
    public void tearDown(){
        System.out.println("Teardown");
    }
    @Test
    public void addition(){
        System.out.println("running addition");
    }
    @Test
    public void multiplication(){
        System.out.println("running multiplication");
    }
    @Test
    public void subtraction(){
        System.out.println("running subtraction");
    }
    @Test
    public void division(){
        System.out.println("running division");
    }
}
Let's click on the "Run Test" to see if it works.
We're going to run the Calculator again.
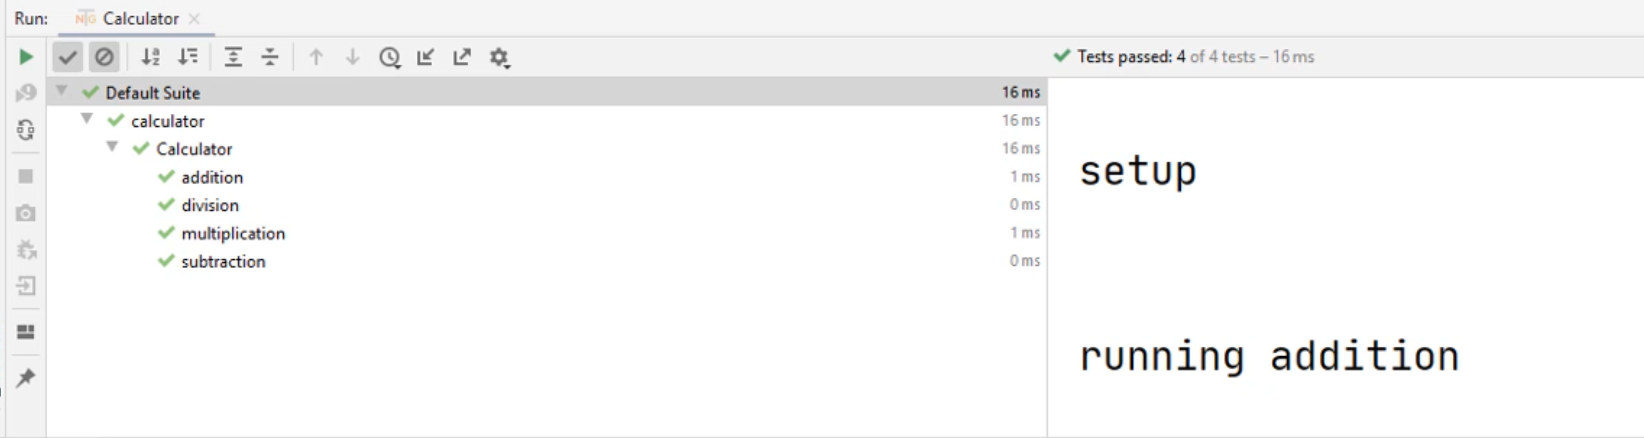
Here you will notice you have a "setup", "running addition", "running division", "running multiplication", "running subtraction", and a "Teardown".
This indicates the order that we're going to be running this as.
Notice that there is no order in our method for where the before or after is set up.
We can also put the before and after to the end of our file and we run our class again.
You'll notice the order of operations is still "setup", "running addition", "running division", "running multiplication", "running subtraction", and a "Teardown".
Annotations
Regardless of where you put the before and after, the @BeforeClass will always run one time before the class starts. The @AfterClass will always run one time after the class.
Another annotation that we should add to our class is the BeforeMethod.
This will give us a rendezvous point - this will set up a scenario where we will always know what the known values are going to be.
So here let's create another couple more lines and type in "@Before", and you should see the @BeforeMethod right here - let's select on this BeforeMethod annotation.
Let's type in public void clear().
With this method, what we were going to try to do is clear the entries.
So here we'll type in System.out.println("CLEAR").
import org.testng.annotations.*;

public class Calculator {
    @Test
    public void addition(){
        System.out.println("running addition");
    }
    @Test
    public void multiplication(){
        System.out.println("running multiplication");
    }
    @Test
    public void subtraction(){
        System.out.println("running subtraction");
    }
    @Test
    public void division(){
        System.out.println("running division");
    }
    @BeforeClass
    public void setup(){
        System.out.println("setup");
    }
    @AfterClass
    public void tearDown(){
        System.out.println("Teardown");
    }
    @BeforeMethod
    public void clear(){
        System.out.println("CLEAR");
    }
}
Now let's run our class again.
Let's look at the order of operations.
You'll notice that it goes to the setup, does a clear, runs addition, clear, runs division, clear, runs multiplication, clear, runs subtraction and then teardown.
Notice in this scenario that we ran clear multiple times - we didn't have to specify in our method, but this executes every time before one of these methods get executed.
This develops a rendezvous point that we know where the starting point is going to be.
Let's move our BeforeClass, AfterClass and our BeforeMethod to the top. This will make it easier to see our setup steps.
Now let's begin creating some code.
Let's add two variables to our class.
We're going to create one variable for the calculator session and another element variable for our calculator results.
You do this by typing in private WindowsDriver, and if you notice right here in the code complete, it gives you the option, so we can double click on that one.
We'll type in calcsession = null.
null just means that we just declared the variable, but we don't have anything assigned to it.
Now let's type in private, and this time we're going to use a WebElement - you'll notice right here, the first option is a WebElement. Otherwise, you can just type in the full value.
You want to type in calcresult = null.
At this point, you'll notice that you have a highlight that the 'WebElement' cannot be resolved.
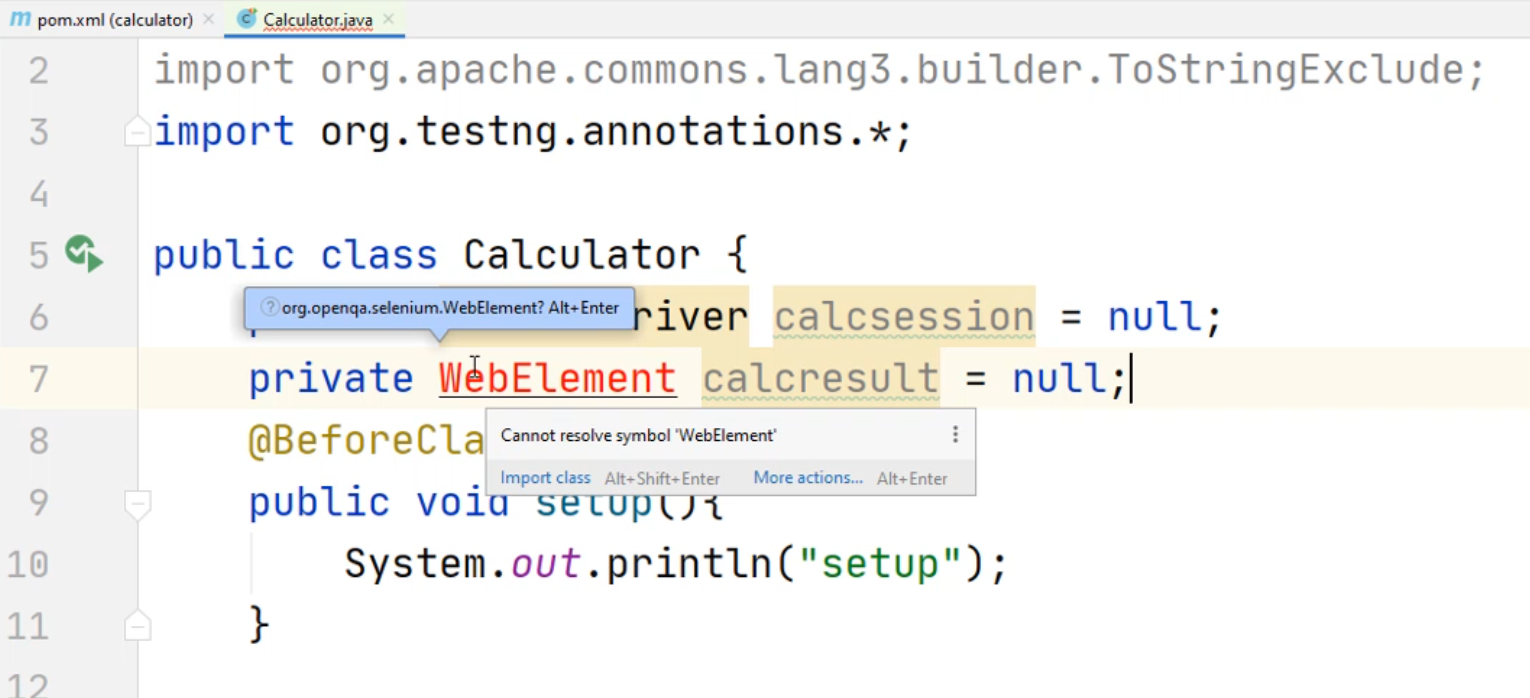
Two options at this point you can do is if you click on this element and you'll see the tool tip, it says, press "Alt+Enter".
If you press "Alt+Enter", you'll notice that the import imports the WebElement.
The reason why it was red before is that we didn't have the library imported.
Let's work on our BeforeClass now.
Before we do that, we have to import a few more things.
We're going to go up to the top of our class, create a new line and type in import org.openqa.selenium.remote.DesiredCapabilities;
We're also going to type in import java.net.URL;.
Once these classes are imported, we can continue.
Let's go to the setup() method, and create a new line.
We're going to type in DesiredCapabilities, and rather than typing the whole entire thing, I'm just going to click on this code complete.
We're going to type in capabilities as a variable name, = new DesiredCapabilities;
The DesiredCapabilities gives us indication of what we want to do - which app do we want to run? How do we want to set up our session?
The next line that we're going to type in is capabilities.setCapability.
You'll notice you have multiple to choose from.
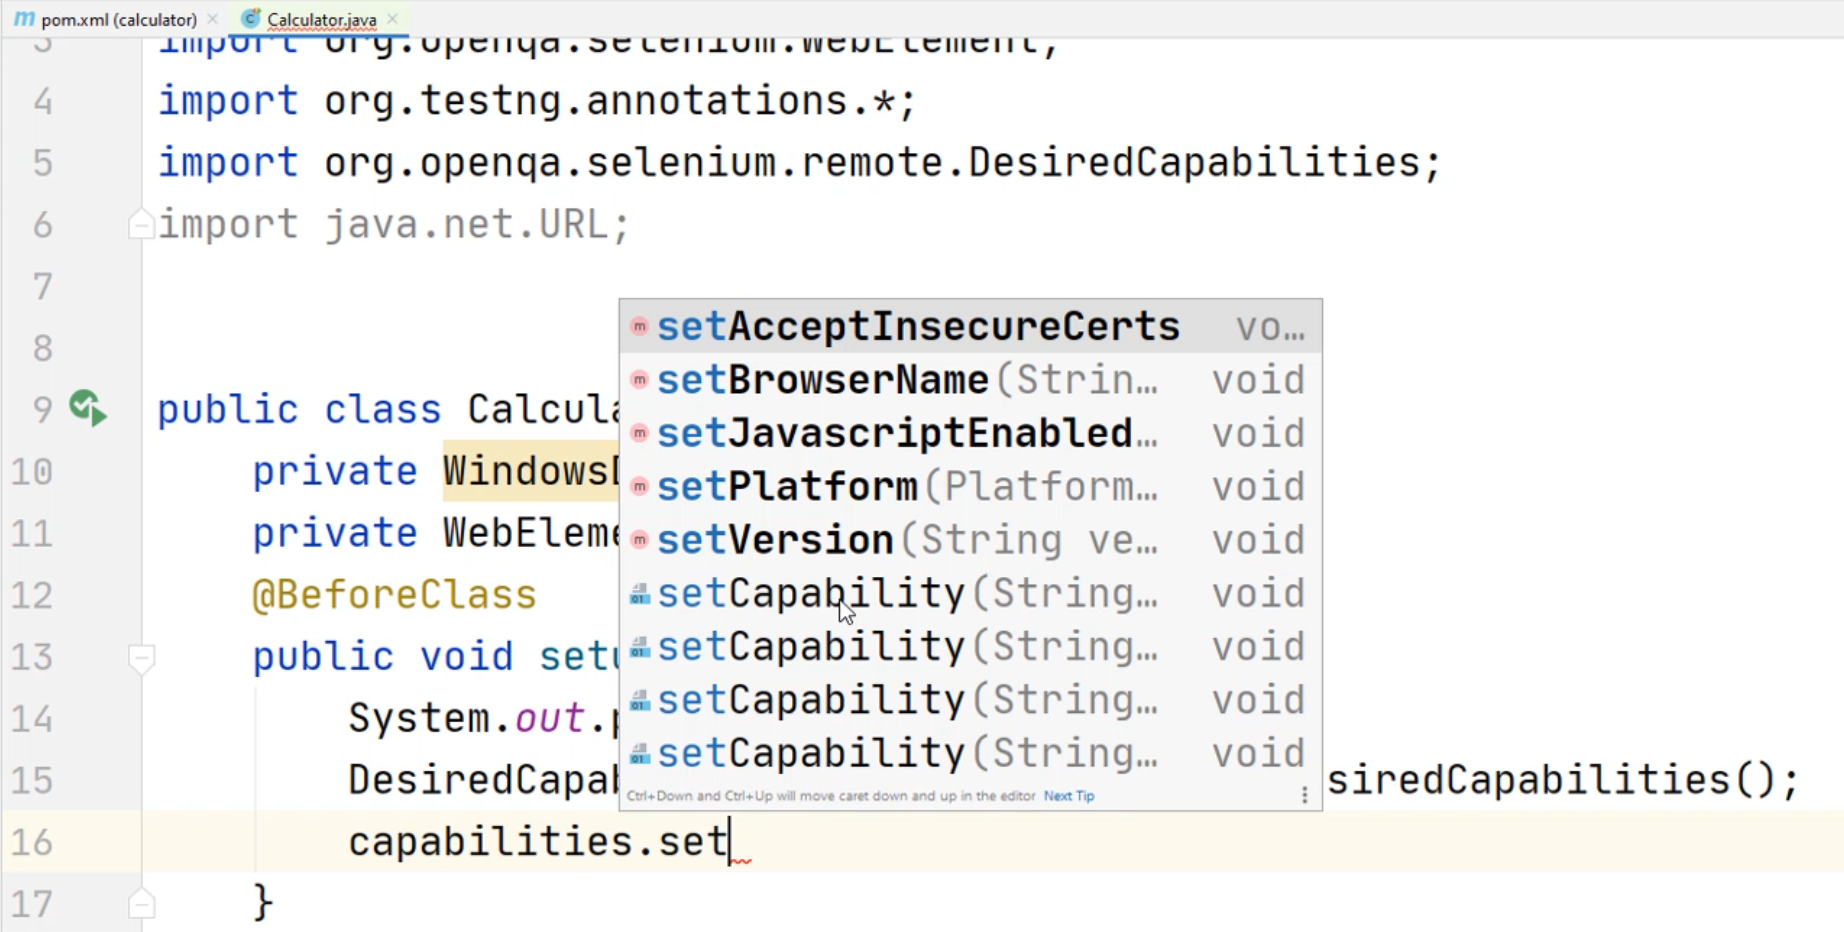
You can choose any one of these and the compiler will pick the best option for you based on the values you pass in.
Now let's pass in the application - we'll type in the app, and this is a key value pair.
So you'll notice now we can pass in a Boolean value, a string value, a platform name or object value.
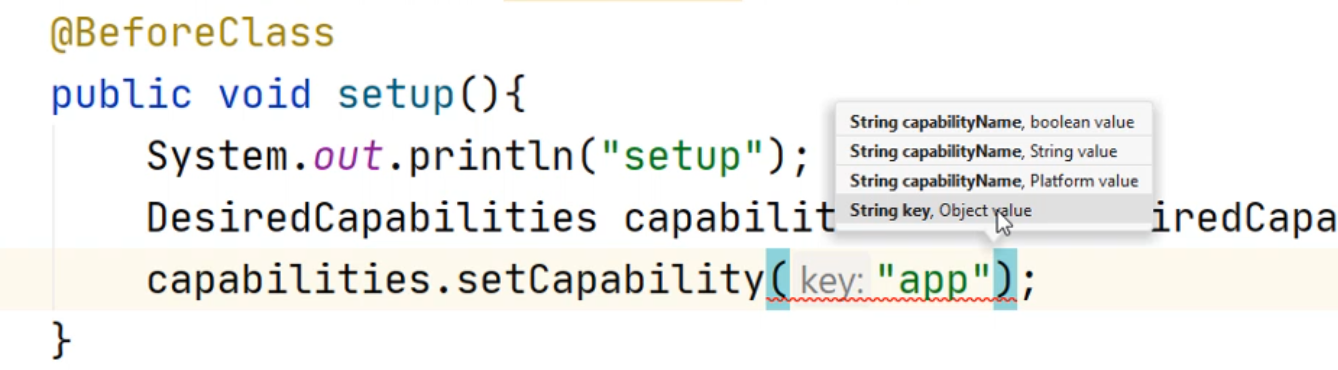
In this scenario, we're going to pass in a string name.
At this point, we're going to type a comma and the double quotes "".
Now, at this point you might be asking what you should put in for the string value.
To figure out what our application value is, inside of our application name, what we're going to use is Accessibility Insights.
You should have Accessibility Insights open - if not, go ahead and start running now.
Previously, if you have paused the recording of the automation tree, click on the resume UI automation tree, and let's highlight everything again.
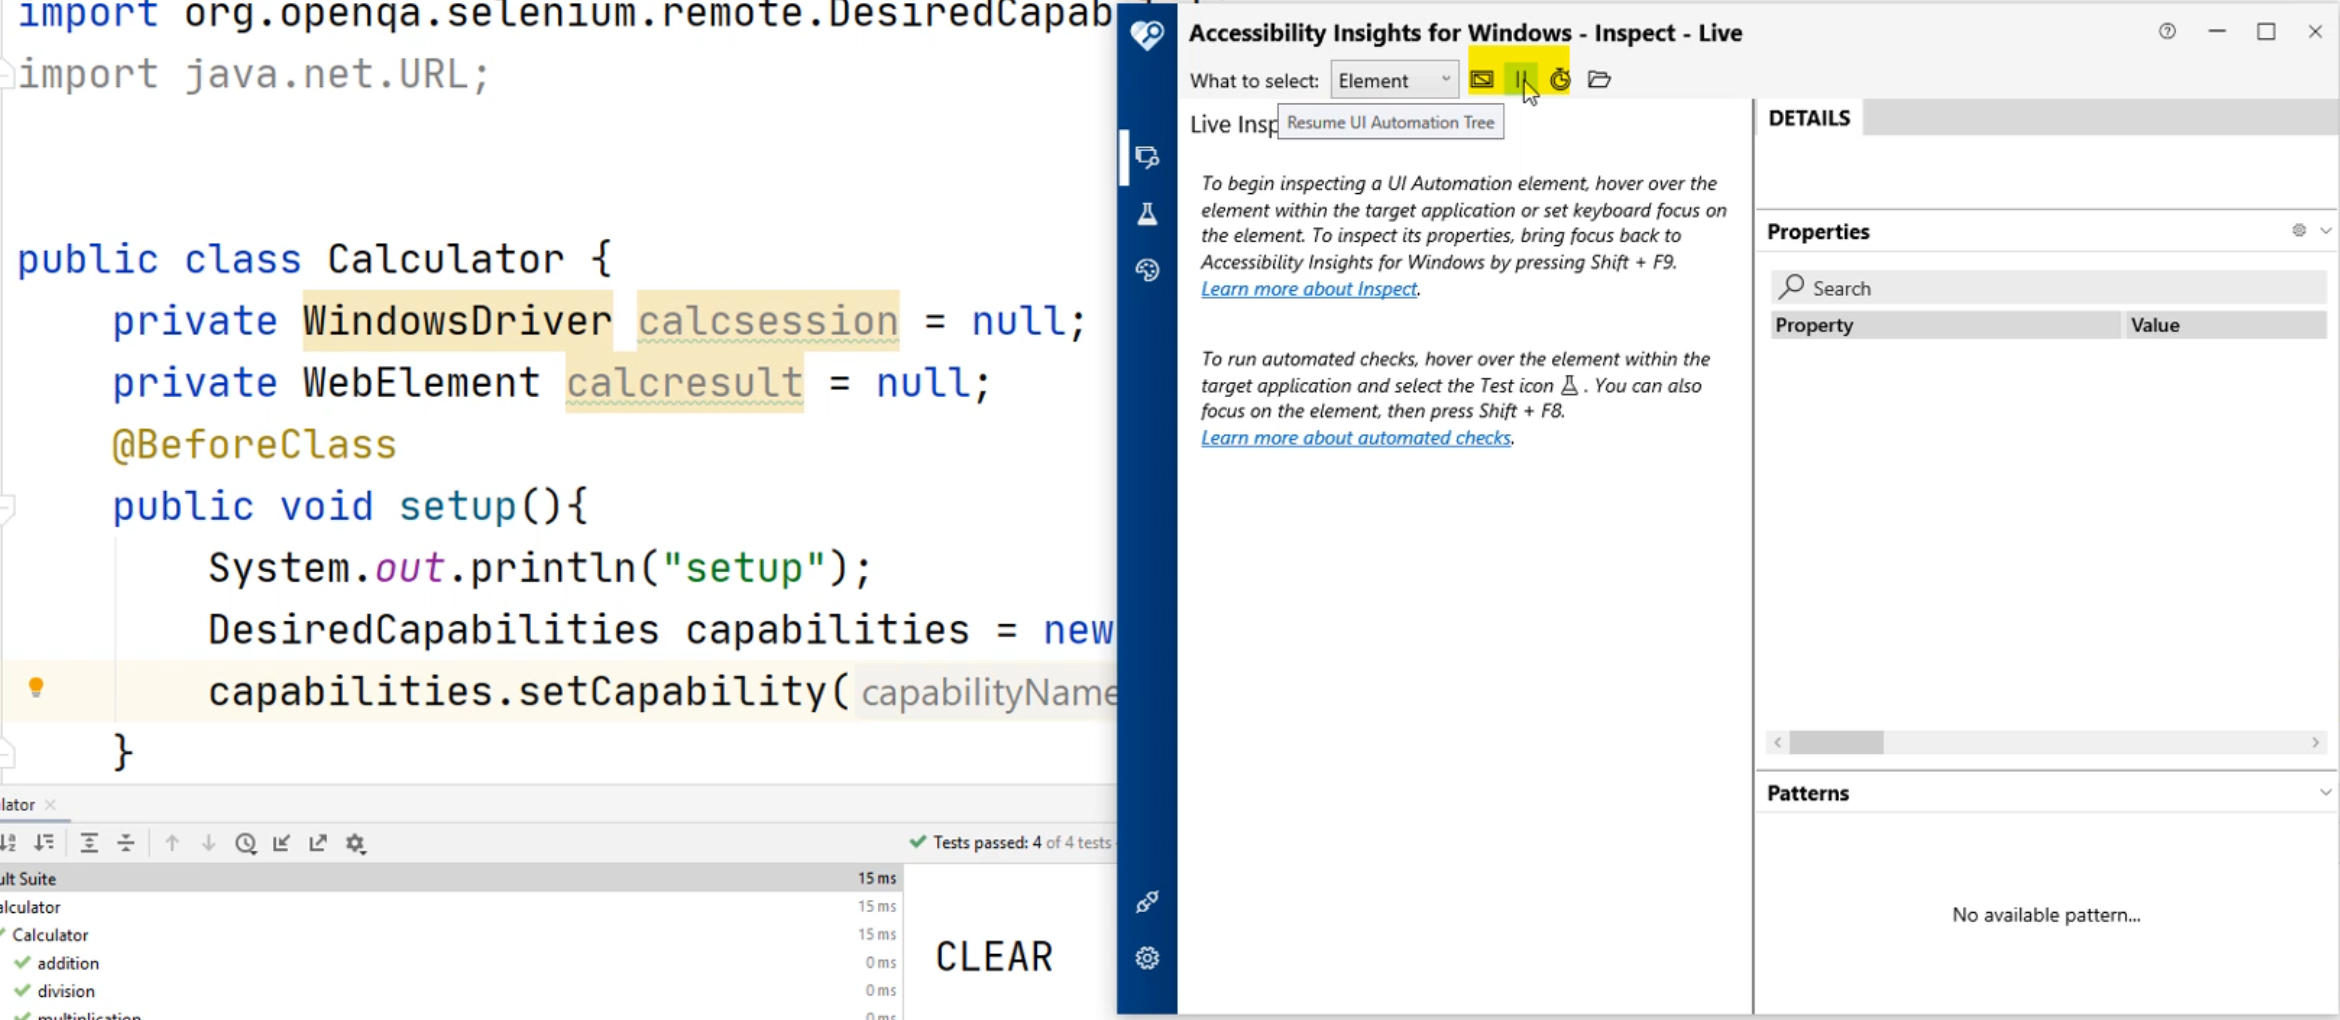
Right now, I have my highlighter set to off - we're going to enable it again.
Now we're going to go hover over the task bar.
If you hover to the bottom of your windows, you should see a bunch of the toolbars running.
You should see an option that says "tool bar 'Running applications'".

You'll notice here there's a bunch of applications that are available inside tool bar.
You also see this app "Calculator - 1 running window".
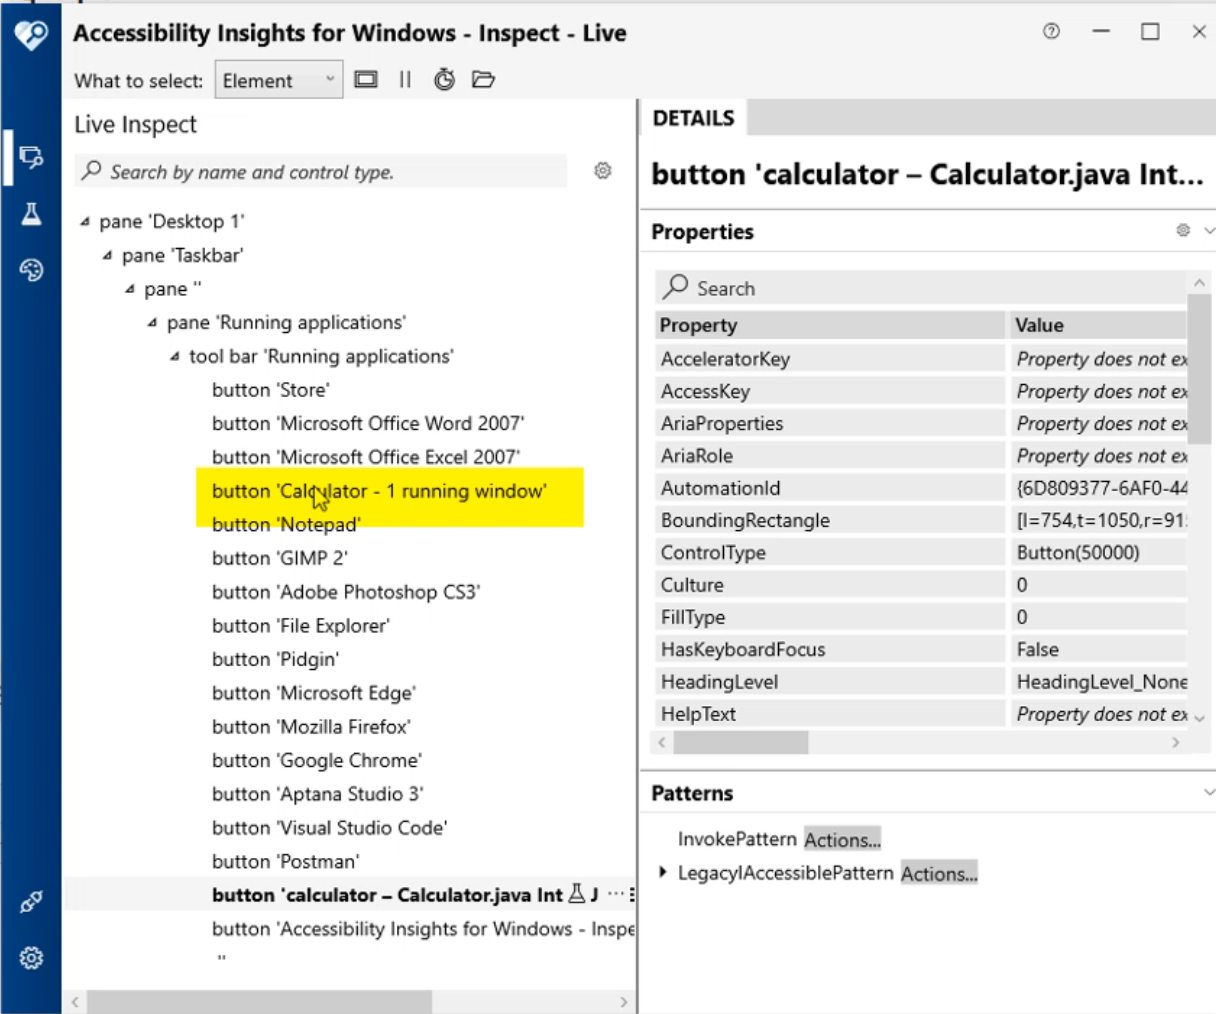
Let's click on this and let's go up to pause it, and let's disable the highlighter again.
Here we can see our application with Calculator.
Here in the details we're going to find the AutomationID and here in the AutomationID, we can see the value of the calculator application name.
This is the name that we are going to use input into our IDE.
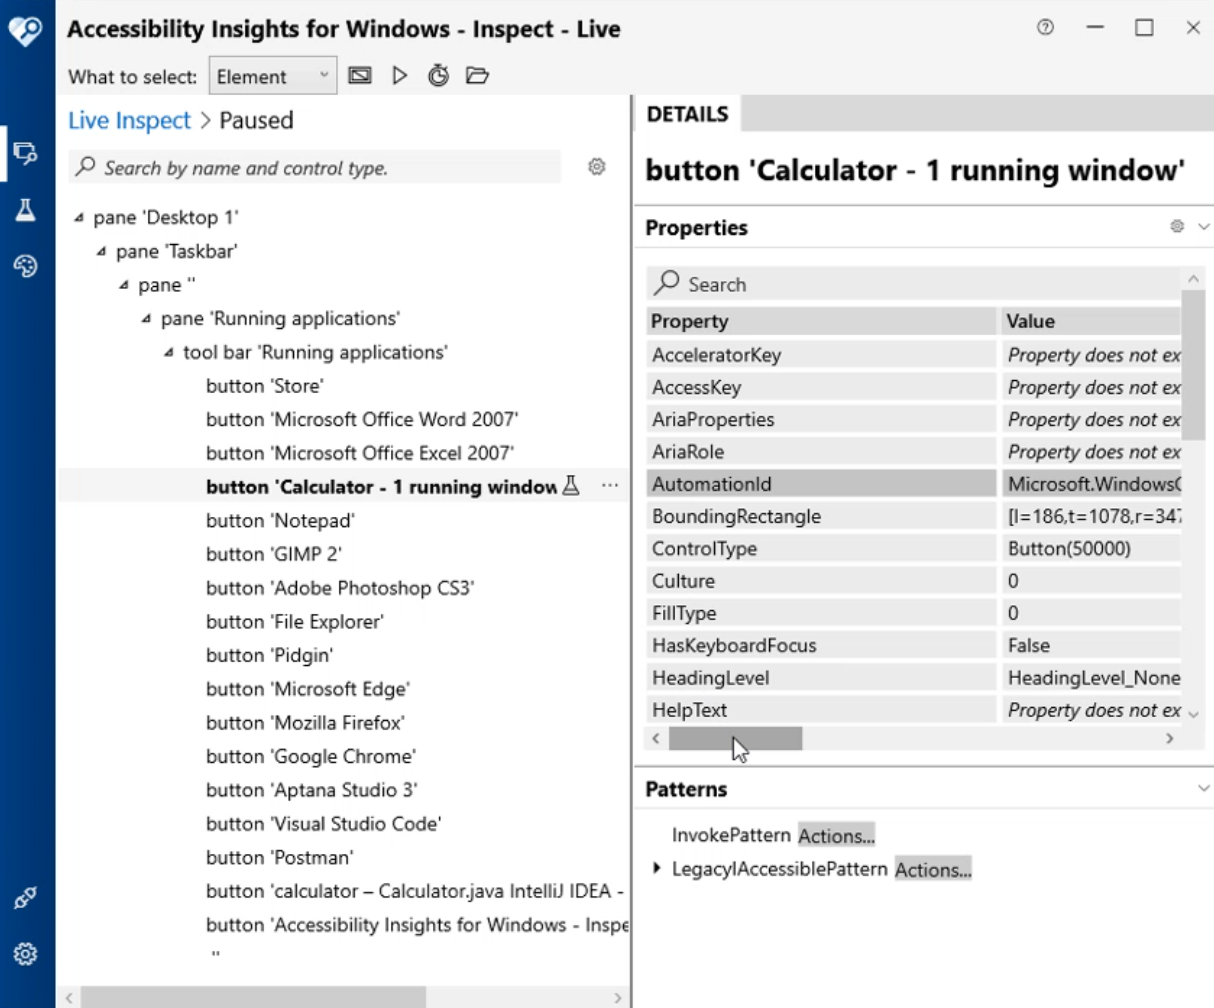
At this point, we're going to right-click and click on "Copy selected properties".
We'll go back to our IDE and paste this value in here:
AutomationId\tMicrosoft.WindowsCalculator_8wekyb3d8bbwe!App\n
You'll also notice here that there are a bunch of other values that are added in here.
The one that we wanted to get was the Microsoft.WindowsCalculator with this value 8wekyb3d8bbwe! and App.
We can delete AutomationId\t - the extra characters that were copied.
This is our name, and this is our value that we got, and we don't need this \n for a new line break.
Now, at this point, we can open up our application and delete the BeforeMethod.
Now we're going to add the code to open up this application.
At this point, the DesiredCapabilities with the setCapability only defines the name of the application.
It technically hasn't opened up the application yet.
So here, we're going to type in calcsession and here we have the two variables that we declared earlier.
We'll set calcsession = new WindowsDriver(new URL("")).
Here we are going to tell our WindowsDriver where our application driver is running at.
We're going to be running on our local machine, so it's going to be http://127.0.0.1.
We're going to have to add a port in and the port by default is going to be 4723.
The second part of this new declaration for this WindowsDriver that we're going to add is the capabilities.
At this point, what is going to happen is that we're going to create a new session.
We're going to assign the calculator session to a new WindowsDriver.
The WindowsDriver is going to use the local instance of the WinAppDriver, and it's going to set the capabilities, which is the application and the application name that we're going to start.
Let's end this by entering a semi-colon.
import org.testng.annotations.*;
import org.openqa.selenium.remote.DesiredCapabilities;
import java.net.URL;

public class Calculator {
    private WindowsDriver calcsession = null;
    private WebElement calcresult = null;
    @BeforeClass
    public void setup(){
        System.out.println("setup");
        DesiredCapabilities capabilities = new DesiredCapabilities();
        capabilities.setCapability("app","Microsoft.WindowsCalculator_8wekyb3d8bbwe!App");
        calcsession = new WindowsDriver(new URL("http://127.0.0.1:4723"), capabilities);
    }

    @AfterClass
    public void tearDown(){
        System.out.println("Teardown");
    }

    @Test
    public void addition(){
        System.out.println("running addition");
    }
    @Test
    public void multiplication(){
        System.out.println("running multiplication");
    }
    @Test
    public void subtraction(){
        System.out.println("running subtraction");
    }
    @Test
    public void division(){
        System.out.println("running division");
    }

}
At this point, you'll notice the URL is underlined.
If you put your cursor here, it'll give you some more details about what's happening. If you move your cursor away and move your cursor back, now it shows you the unhandled exception.
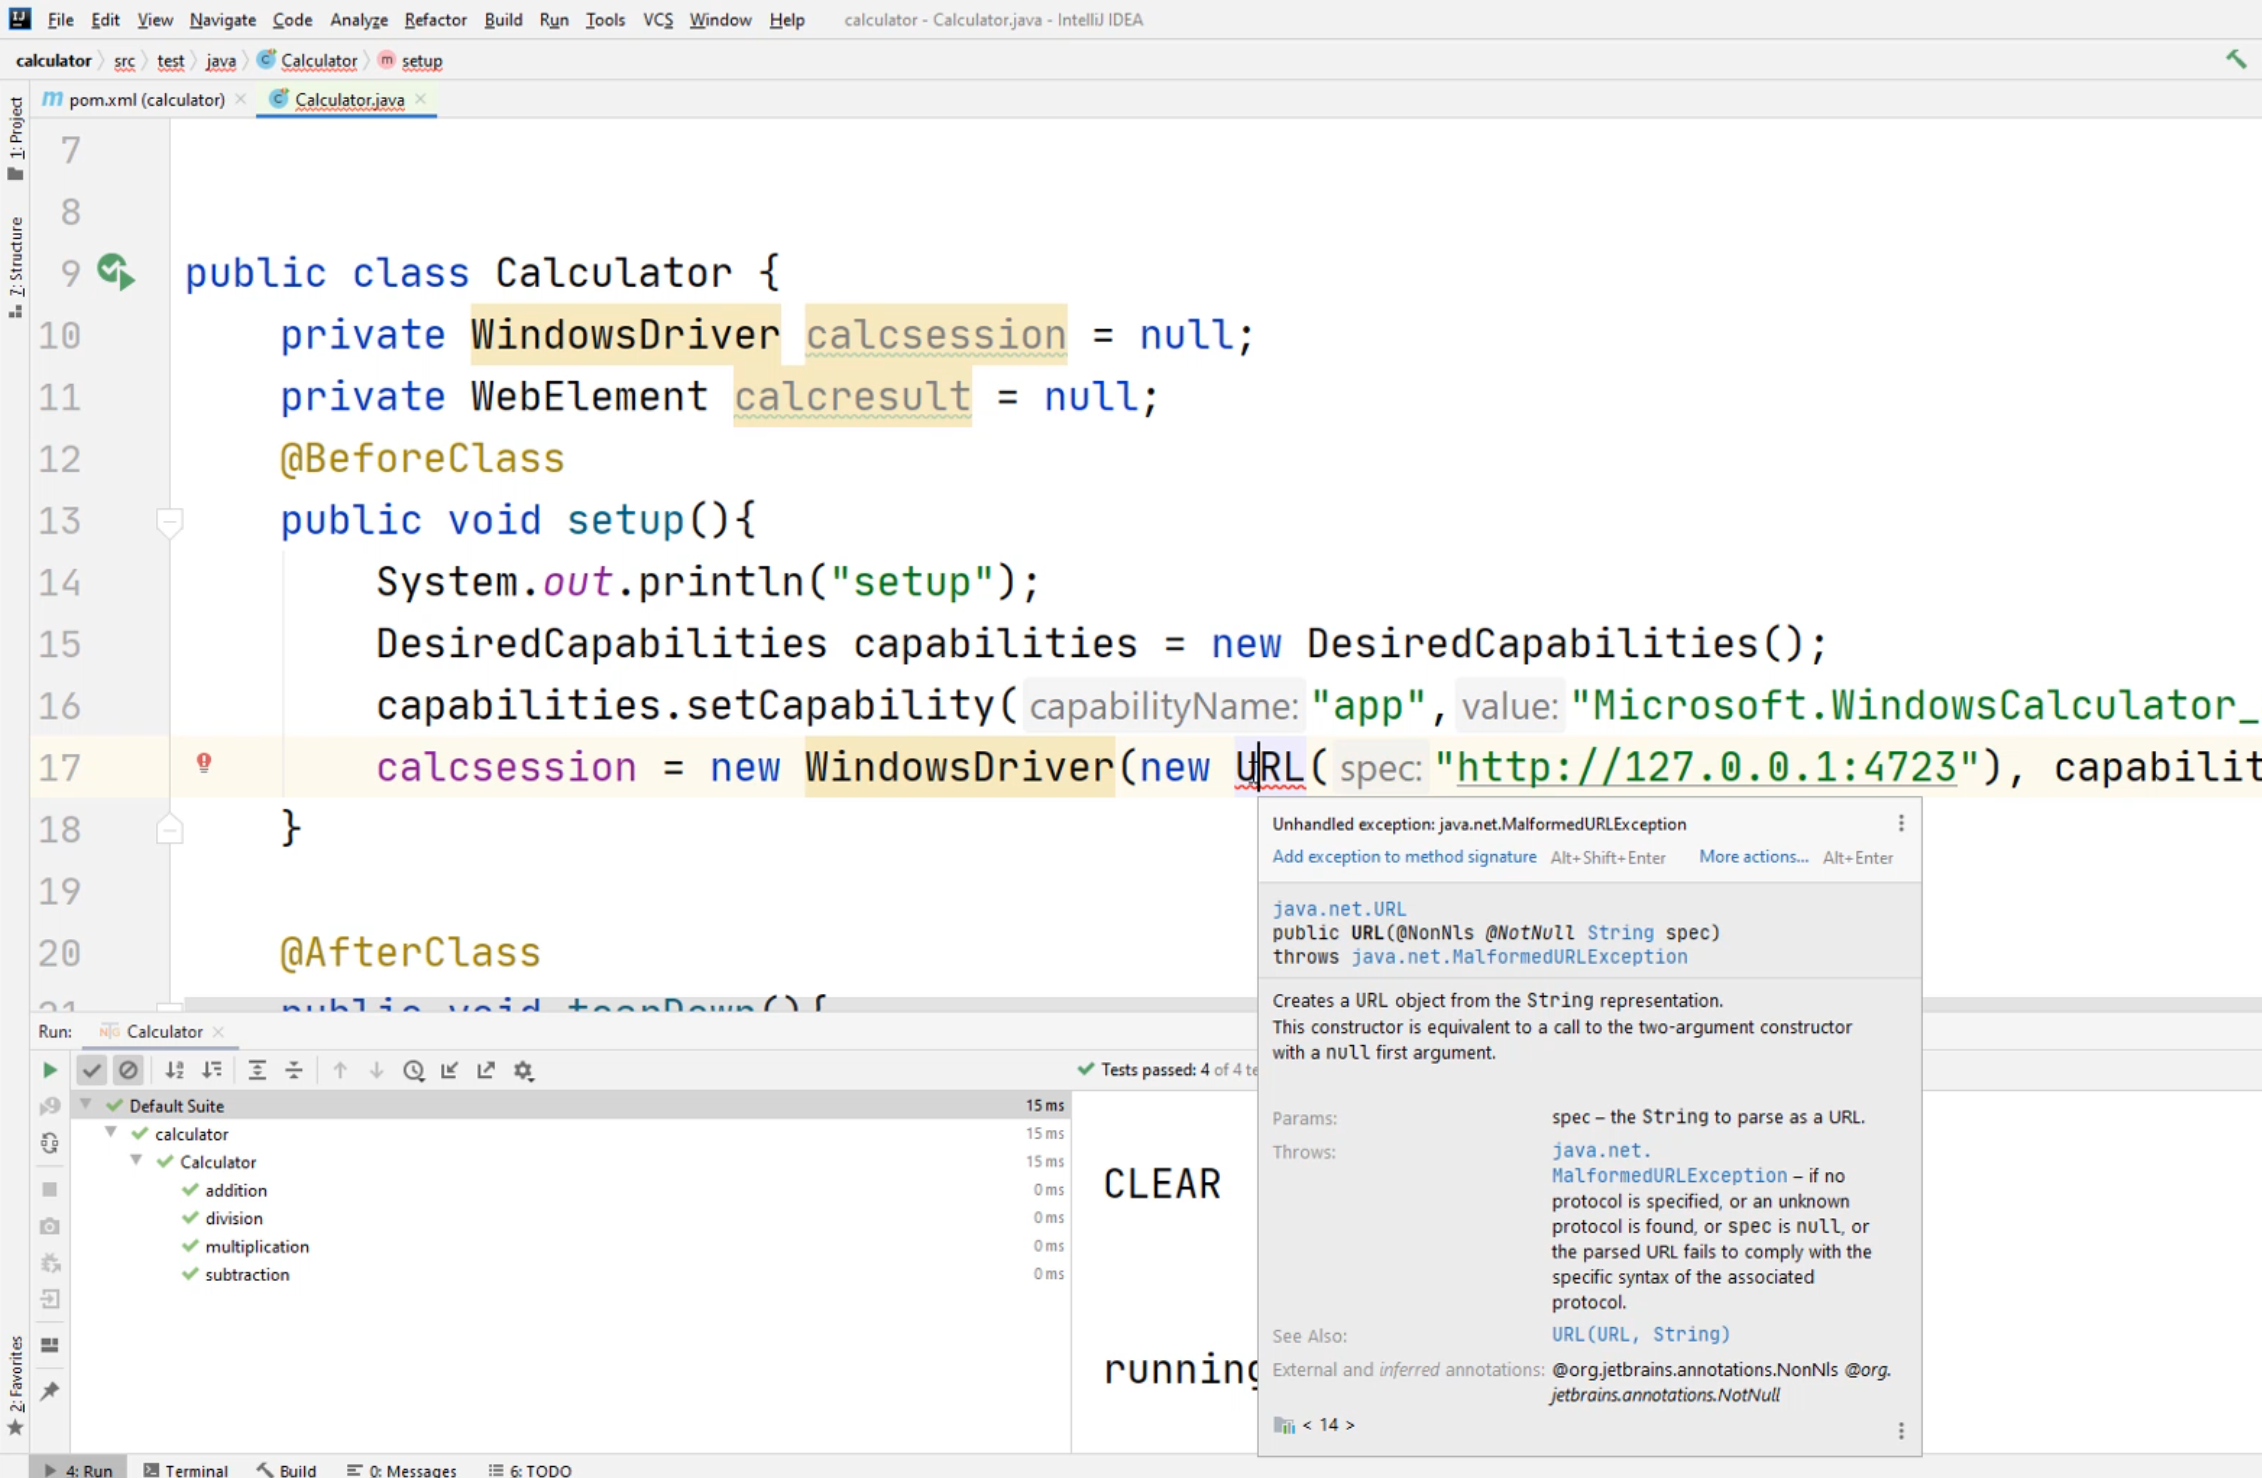
It shows a malformed URL exception.
At this point, it's kind of hard to know what's going on, but you'll notice a red light bulb to the left of this.
If you click on this drop arrow, it will give you the options you can choose from.
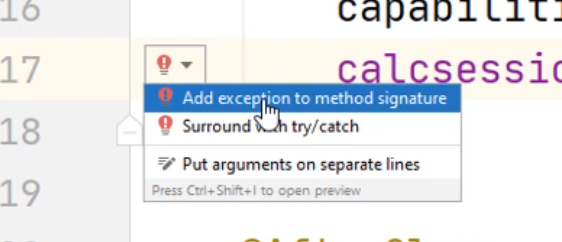
Right here you can choose, "Add exception to method signature", or "Surround with try/catch".
We're going to choose "Surround it with try/catch" and now it puts a try/catch into our code.
What this means is that in the event that this application does not run, or the WindowsDriver is not available, what is it going to do?
What it's going to do is print out a stack trace for us.
import org.testng.annotations.*;
import org.openqa.selenium.remote.DesiredCapabilities;
import java.net.URL;

public class Calculator {
    private WindowsDriver calcsession = null;
    private WebElement calcresult = null;
    @BeforeClass
    public void setup(){
        System.out.println("setup");
        DesiredCapabilities capabilities = new DesiredCapabilities();
        capabilities.setCapability("app","Microsoft.WindowsCalculator_8wekyb3d8bbwe!App");
        try {
            calcsession = new WindowsDriver(new URL("http://127.0.0.1:4723"), capabilities);
        } catch (MalformedURLException e) {
            e.printStackTrace();
        }
    }

    @AfterClass
    public void tearDown(){
        System.out.println("Teardown");
    }

    @BeforeMethod
    public void clear(){
        System.out.println("CLEAR");
    }

    @Test
    public void addition(){
        System.out.println("running addition");
    }
    @Test
    public void multiplication(){
        System.out.println("running multiplication");
    }
    @Test
    public void subtraction(){
        System.out.println("running subtraction");
    }
    @Test
    public void division(){
        System.out.println("running division");
    }

}
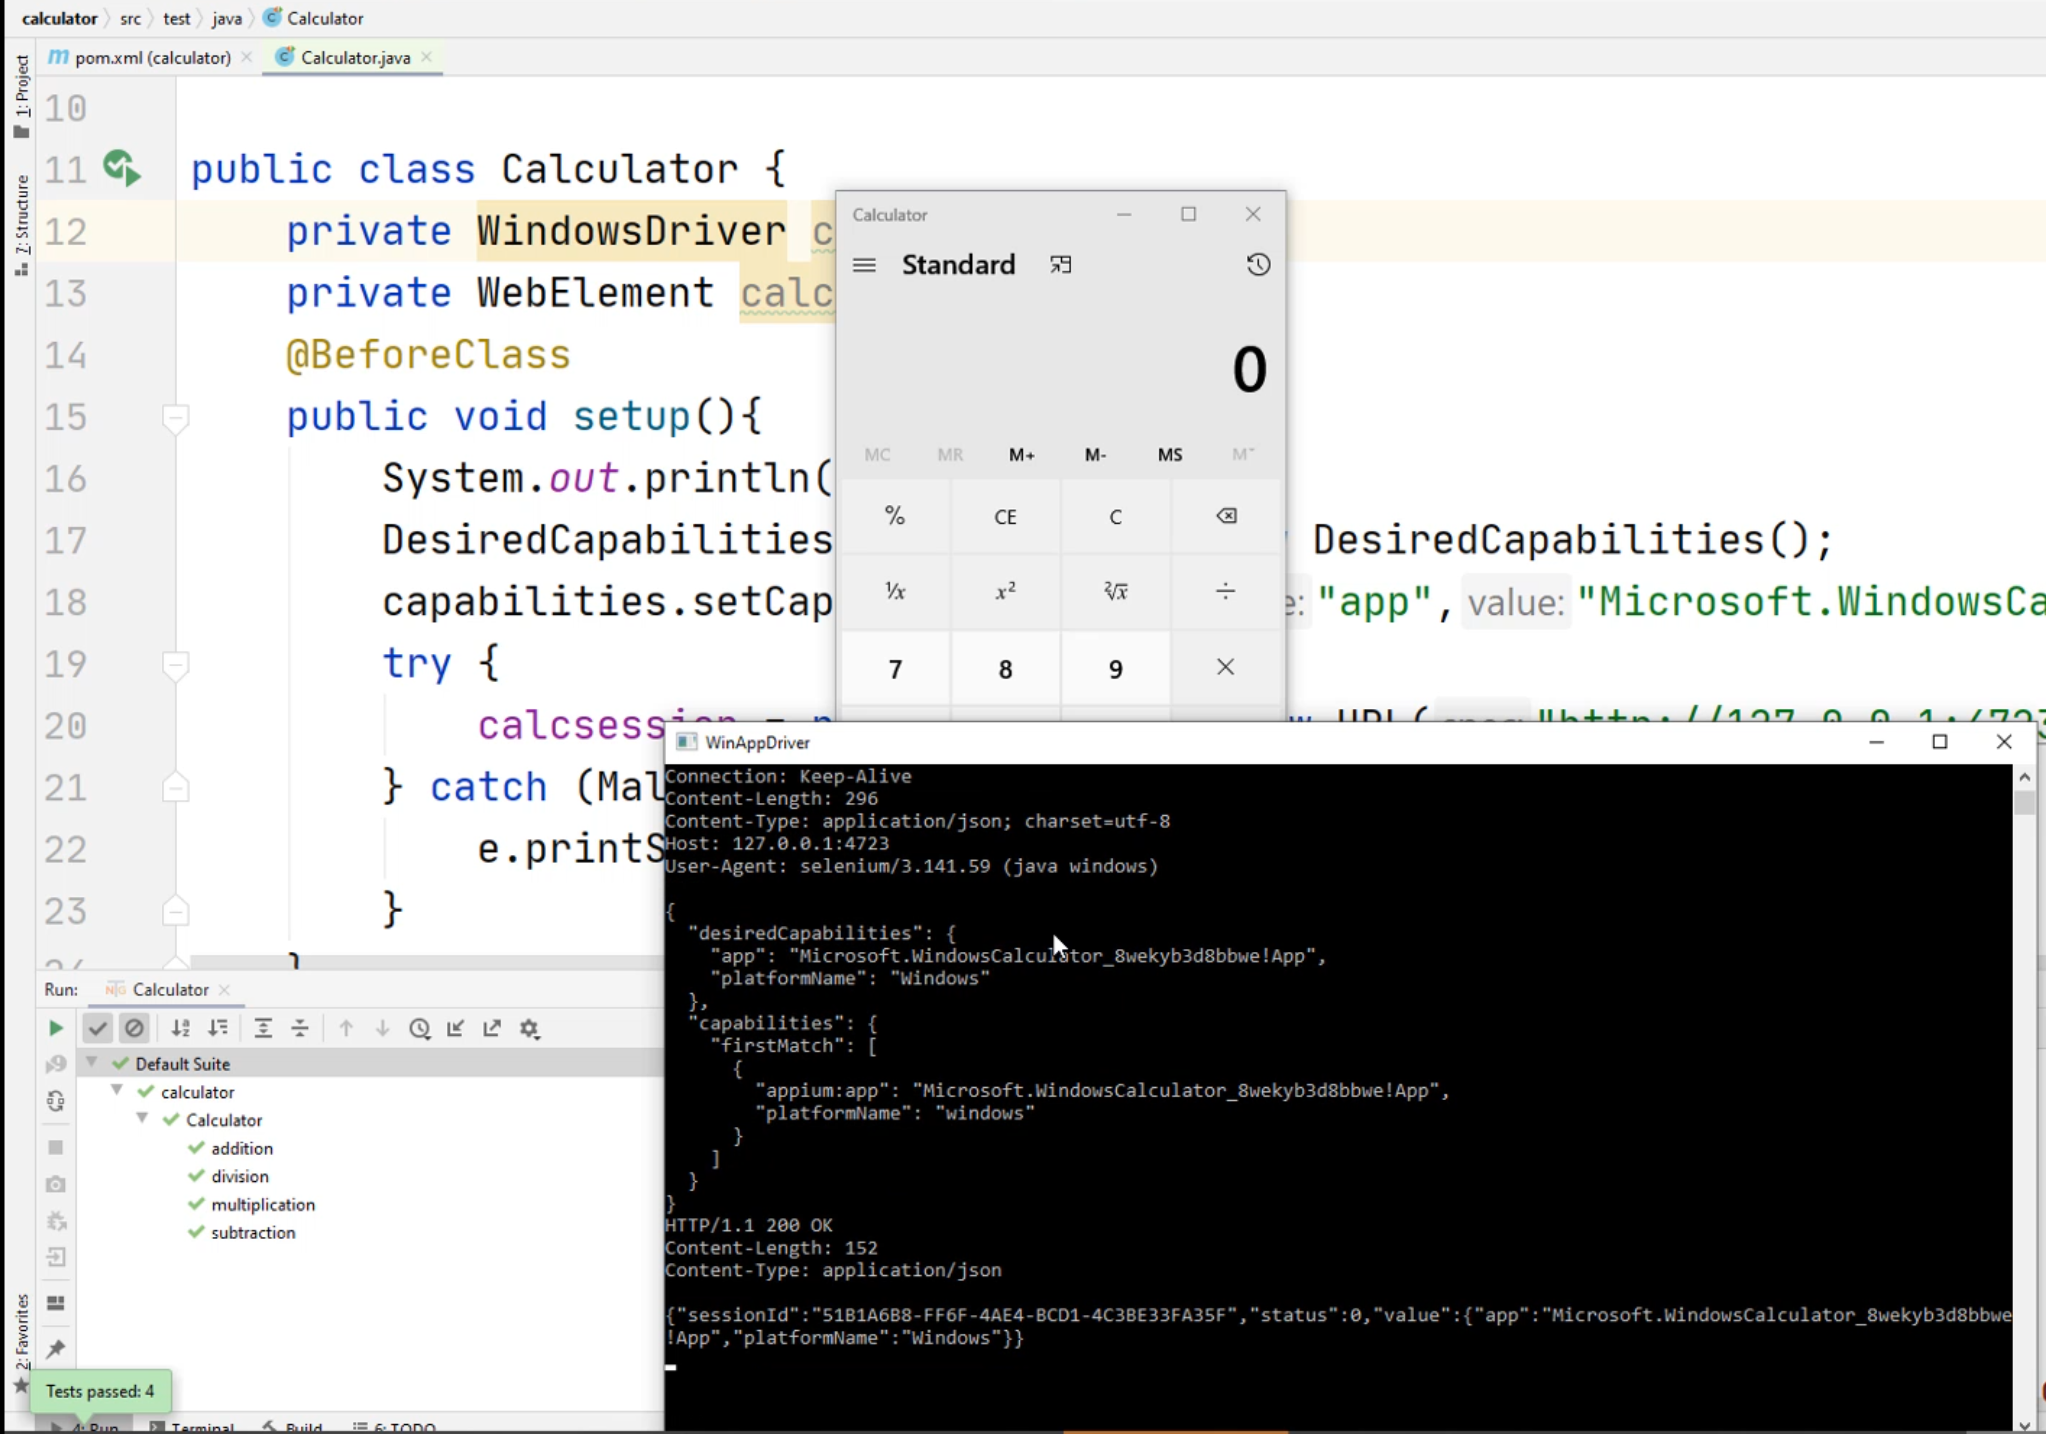
At this point, let's try to run our application and see what happens.
We should be able to click on this "Run Test" and say, "Run 'Calculator'", and you'll see the setup.
You'll notice Calculator has opened back up.
Also, you'll notice I have two instances of Calculator open now.
Let's close out this Calculator and try that again.
This time we're going to close out both our Calculators that we previously opened.
Let's run this again.
Now you'll notice our Calculator's running again.
Let's go back to the WinAppDriver down in our Explorer bar, and here you'll see the code as being run.
# What is JSON wire protocol?
JSON stands for JavaScript Object Notation.
JSON is one of the most widely used and accepted methods for communication.
JSON is used a lot in web services.
The WinAppDriver uses JSON as a medium to communicate between our client libraries - whether we're using Java, C-sharp, Python or any other languages - this is how it communicates.
The request is in the form of HTTP request, which accepts input in the form of JSON.
The operations are performed and the responses of the execution are shared back to the client in the form of JSON.
Here's an example of what the window looks like.
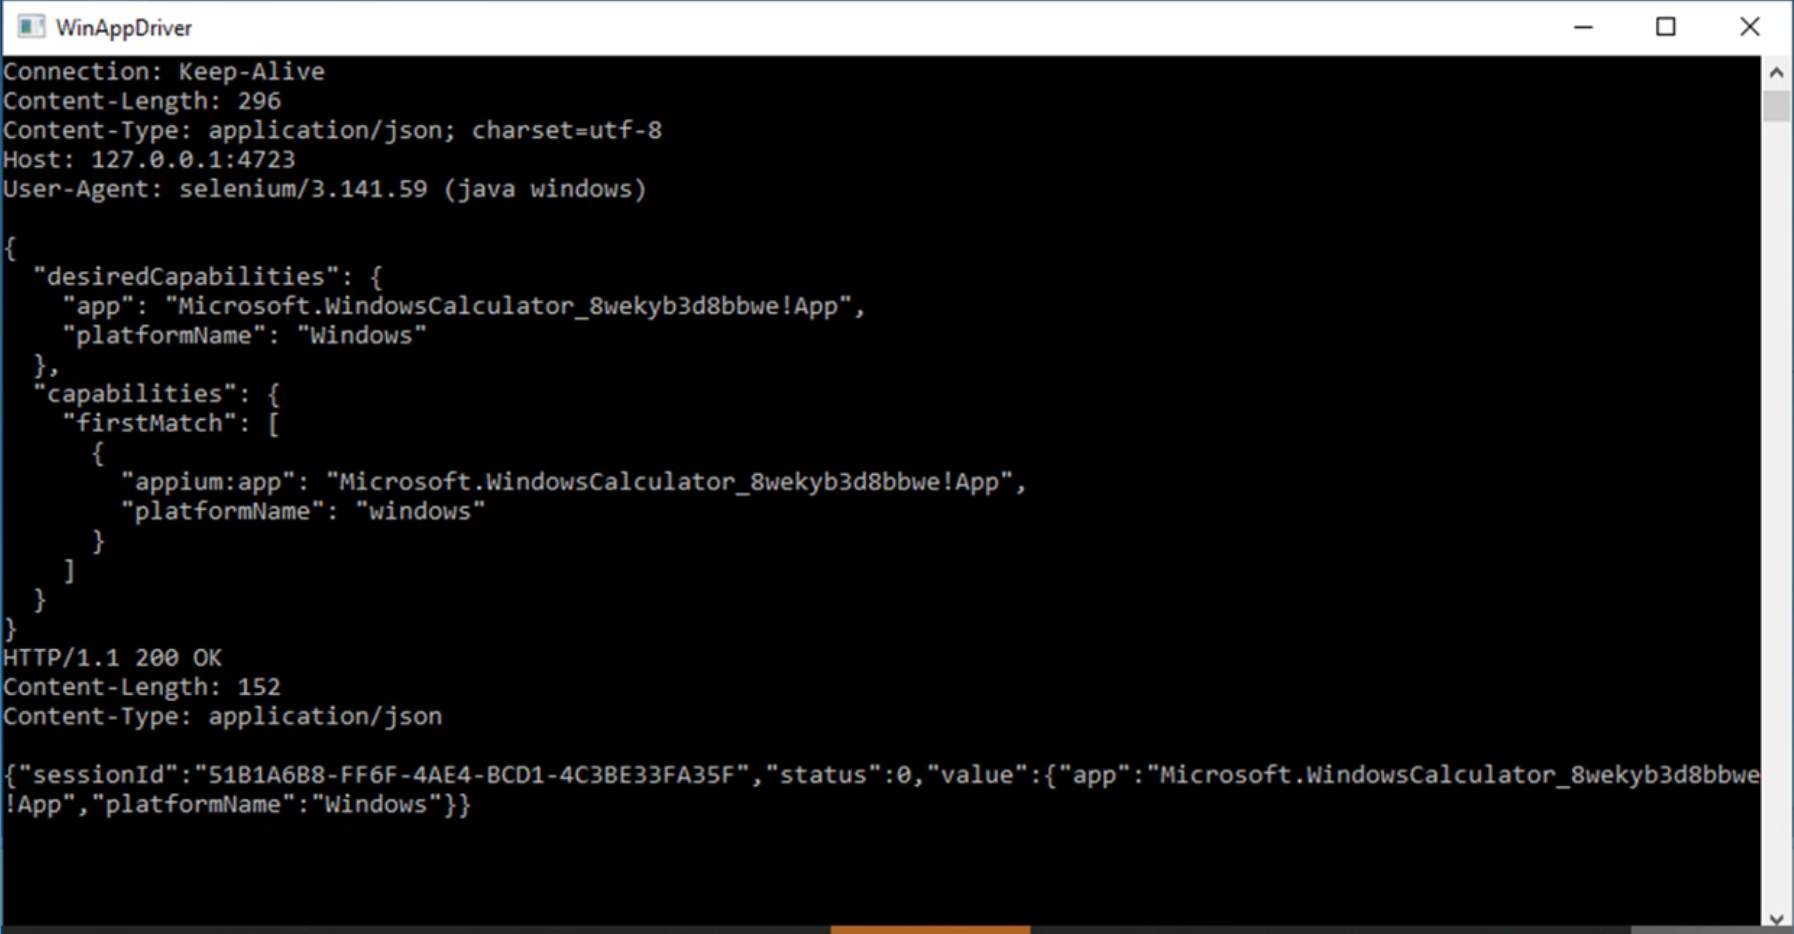
In this example, we'll open up the Calculator app and it reports back the response from it.
Notice that the response is a 200 status.
# Coding in Python
Now that we have added our methods, let's continue to add some more code.
import unittest

class calculator_test(unittest.TestCase):
    def setUp(self):
        print("setup")

    def tearDown(self):
        print("teardown")

    def test_add(self):
        print("add")

    def test_subtraction(self):
        print("subtraction")

    def test_division(self):
        print("division")

    def test_multiplication(self):
        print("multiplication")
First, we're going to add the imports.
We're going to type in from appium import, and this time we're going to import webdriver.
Notice this is a little bit different from the Java version - in the Java version we imported WindowsDriver.
Everything about appium is similar to WebDriver.
Now let's go down to the setup method.
Let's add the code to start our webdriver.
First, we're going to create a new line of code and type in desired_caps = {}.
Create another line in the code and type in desired_caps["app"] = "".
Now we have to get our application name - we can do this by copying it over from our Java project.
Now remember here in our Java project, we have capabilities.setCapability, and we have the value app. Next to it, we have the app name.
Let's select and copy this app name.
Select the value, right-click, select Copy, minimize our IDE for our intelliJ IDE, and inside our Pycharm IDE, we can right-click and paste.
Now we have declared the application that we want to start.
Next, we're going to create a class variable - we're going to create a calcresult and a calcsession variable.
This will be a class variable - the class variable will be accessible by the rest of our test methods.
Let's click on the space right before this def setUp.
Now let's create a new line of code and one more line of code.
Let's create two class variables.
One's called calcsession and instead of null, we use None.
None vs null in Python
Python does not have the reserved word null. It doesn't understand what it is. None is the same as null in Python.
Now let's type in calcresult = None.
Next, let's go back to our setUp method and let's type in self.calcsession.
Notice here that we had to use the word, self.
self
If we do not use the word self and we just type in calcsession = test, this calcsession right here is a method variable - this does not get assigned to a class variable.** **
To assign the class variable, we have to type in self.calcsession = webdriver.Remote().
Let's hit "Enter" at this point inside the (), you should create a new line.
Now we're going to type in command_executor, and for the command_executor, we're going to type in single quotes '' or double quotes "", then "http://127.0.0.1:4723".
Now type comma, and a new line of code and type in desired_capabilities=desired_caps.
At this point, we should have a calculator session defined.
Once the calculator session is defined, it should start up our Calculator app.
Now let's go to the tearDown and create a new space.
Now let's type in self.calcsession.quit(). This will close our calculator.
import unittest
from appium import webdriver

class calculator_test(unittest.TestCase):
    calcsession = None;
    calresult = None;

    def setUp(self):
        print("setup")
        desired_caps = {}
        desired_caps["app"] = "Microsoft.WindowsCalculator_8wekyb3d8bbwe!App"
        self.calcsession = webdriver.Remote(
            command_executor="http://127.0.0.1:4723",
            desired_capabilities=desired_caps
        )

    def tearDown(self):
        print("teardown")
        self.calcsession.quit()

    def test_add(self):
        print("add")

    def test_subtraction(self):
        print("subtraction")

    def test_division(self):
        print("division")

    def test_multiplication(self):
        print("multiplication")
