

Transcripted Summary
Within this video, we'll be looking at element state. We'll be looking at isSelected, isEnabled, and isDisplayed.
These states are functions that return “true” or “false”:
isSelectedis true when our element is active, and it is false when our element is notisEnabledis true when an element can be interacted with, but once our element is disabled,isEnabledis falseisDisplayedis true whenever our element is displayed on the screen, and it's false once that element is not
Let's look at a use case for these three functions.
So, based on the previous video of how we will be doing scrolling, I have gone ahead and put in 3 sets of scrolls that should get us to the Tabs button.
Let me go ahead and show you guys the test that we're writing.
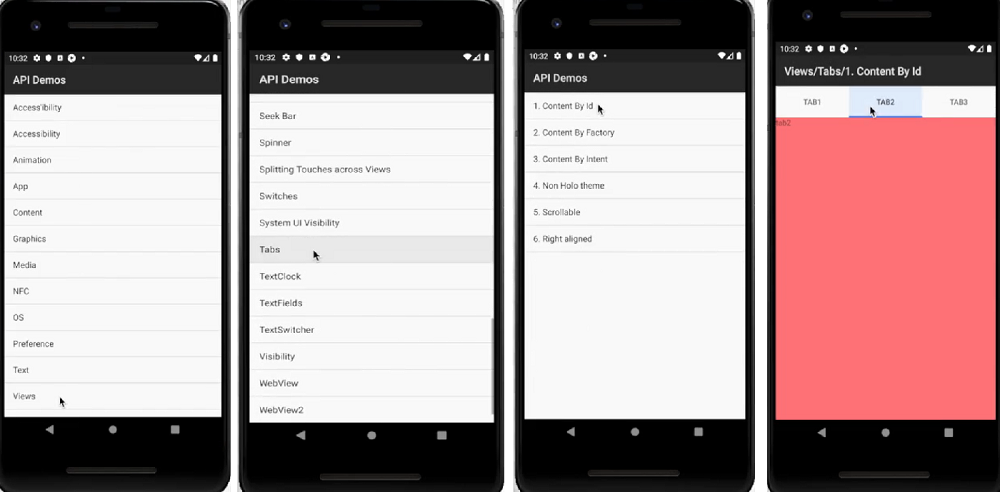
From the default page of the app, we'll be clicking on Views
Then we'll be scrolling 3 times to Tabs (which we will click)
Then we are clicking on Content By ID
Then we'll be looking at these 3 Tabs for what is selected, what is enabled, and what is displayed
Okay so we already have the View button from previous lessons.
get viewBtn() {return $('//android.widget.TextView[@content-desc="Views"]')};
The other elements that we'll need to get:
We'll need to get the Tabs button
We'll need to get Content By ID button
We need to get the selector for these three tabs
We'll also need to get the selector for each text within these tabs
Let's go ahead and get those.
You can move on the actual emulator that you're using the inspector with. And when you head back to the inspector, you can refresh and it will refresh to the screen that the emulator is currently on.
For the Tabs element, the xpath is fine.
get tabsBtn() {return $('//android.widget.TextView[@content-desc="Tabs"]')};
So that's the Tabs button.
Then the Content By ID, xpath is also fine.
get contentByIdBtn() {return $('//android.widget.TextView[@content-desc="1. Content By Id"]')};
Next, we'll need to get these tabs.
And because we want to use 1 selector for all of these tabs, what we need to do is find something general enough that is shared between these 3 tabs or these 3 elements, but also only unique to these 3 elements.
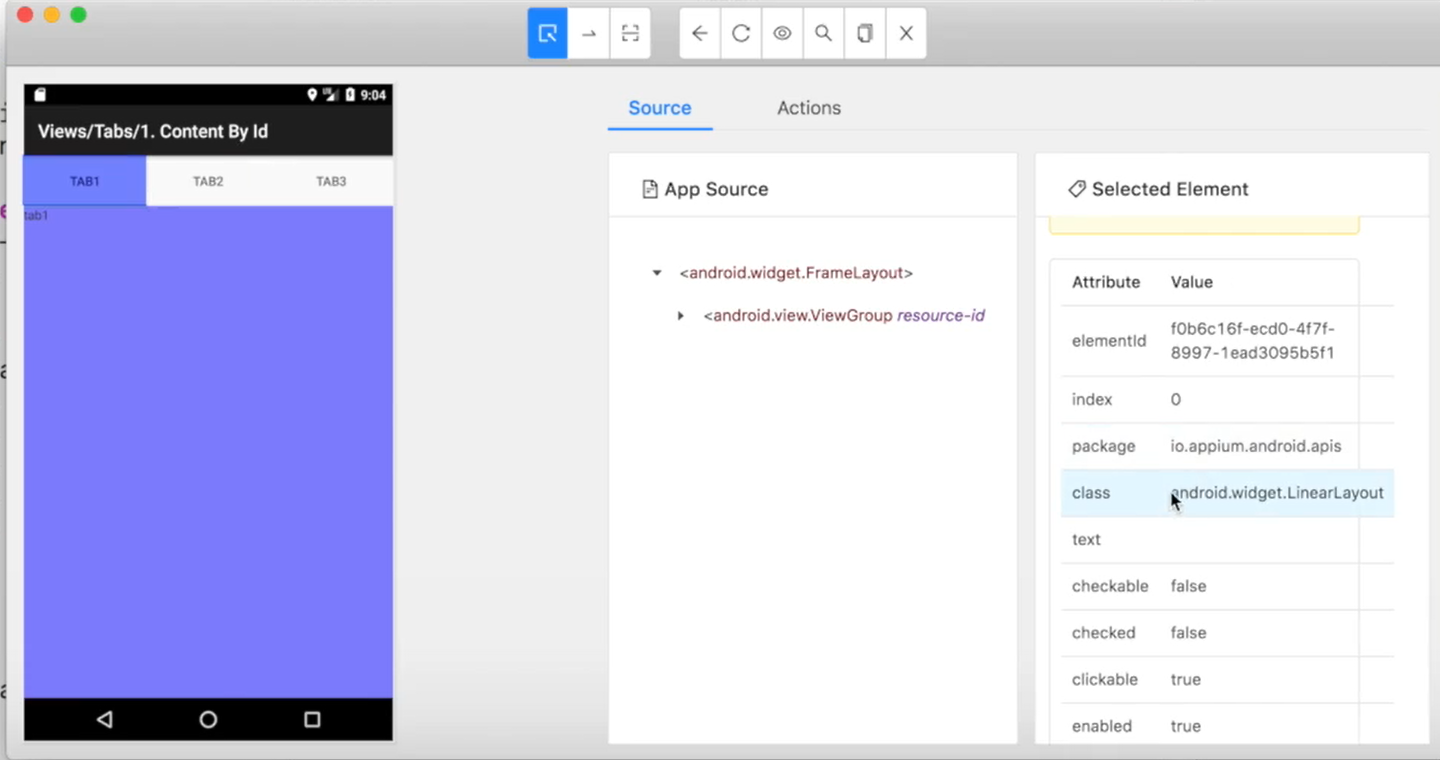
One such thing is the class. As you can see, the class remains the same for each.
So, we can use the class.
Because we want all of the elements that are returned from this selector, we'll go ahead and specify double dollar signs.
get tabs() {return $$('android.widget.LinearLayout')};
That should do it.
Next, what we'll need is this element right here.
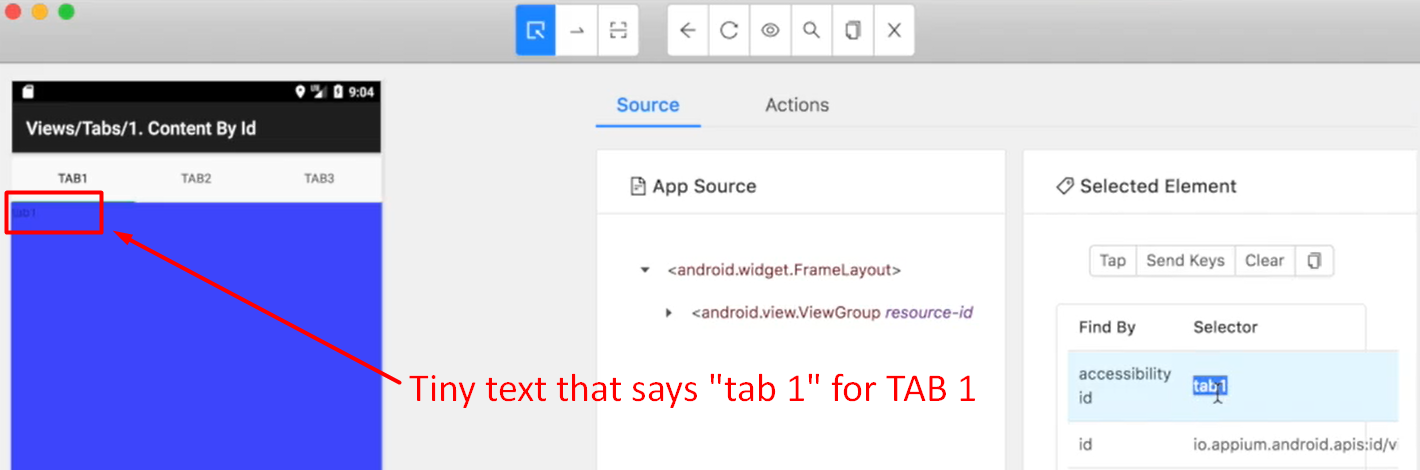
And we can go ahead and use the accessibility id for these.
So, let's call that “tab1Details” with accessibility id of ~tab1.
We need other two details so let's go ahead and copy and paste this. Let's rename them tab2Details and tab3Details.
get tab1Details() {return $('~tab1')};
get tab2Details() {return $('~tab2')};
get tab3Details() {return $('~tab3')};
So now we have all of the elements that we need.
All right, so we have already clicked on the View button. And we have done the scroll.
The next thing that we need to do, we need to
clickon the Tabs button. Let's go ahead and just saydialog.tabsBtn.click().Then after that we'll then need to click on the Content By ID button; so, let's say
dialog.contentByIdBtn.click().
Now let's start looking at these different functions.
We'll be looking at the Tabs element that identified the 3 tabs at the top.
So that element is dialog.tabs and the functions that we'll be looking at is isEnabled.
In order to access the tab elements, we'll need to specify which one we want to access, like an array.
Let's go ahead and choose the first one, and the isEnabled function, remember it returns true or false. So, we'll need to go ahead and utilize the value from this function.
Let's go ahead and create a variable for isEnabled, isDisplayed, and isSelected. Let's just copy and paste that.
Let's go ahead and store this in the appropriate variables.

Okay great.
We'll also need to go ahead and display these, so let's go ahead and do a console.log.
Let's duplicate that for isSelected and isDisplayed.
Because we know that we have 3 of these tab elements, we need to go ahead and create some type of loop.
Let's go ahead and create a for loop, let's say for(i=0; i<3; i++) and let's do all of this within this loop so that we can have this being displayed for all tabs.
So, we will go ahead and replace the static 0 with an i for the increment of the loop.
Let's also give this a better name, so let's say “Verify isSelected, isEnabled & isDisplayed”.
const dialog = require('../../pageObjects/dialog.page');
const expect = require('chai').expect;
describe('Dialog', ()=>{
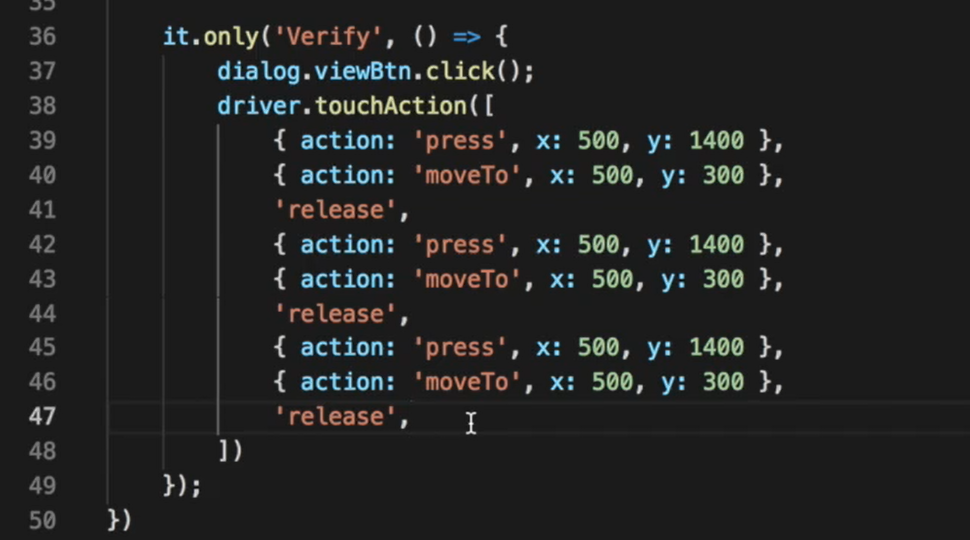
it('Verify isSelected, isEnabled & isDisplayed', () => {
dialog.viewBtn.click();
driver.touchAction([
{ action: 'press', x: 500, y: 1400 },
{ action: 'moveTo', x: 500, y: 300 },
'release',
{ action: 'press', x: 500, y: 1400 },
{ action: 'moveTo', x: 500, y: 300 },
'release',
{ action: 'press', x: 500, y: 1400 },
{ action: 'moveTo', x: 500, y: 300 },
'release'
])
dialog.tabsBtn.click();
dialog.contentByIdBtn.click();
let isEnabled, isSelected, isDisplayed;
for(i=0; i<3; i++){
isEnabled = dialog.tabs[i].isEnabled();
isSelected = dialog.tabs[i].isSelected();
isDisplayed = dialog.tabs[i].isDisplayed();
console.log('isEnabled:', isEnabled);
console.log('isSelected:', isSelected);
console.log('isDisplayed:', isDisplayed);
}
});
})
Now let's go ahead and give this a try.
So, as you can see, it displays “isEnabled”, “isSelected”, and “isDisplayed” three times.
Let's just go ahead and add some more details so we can easier make out what this is saying.
Let's say “Tab”, and let's make this a String literal.
console.log(`Tab ${i}`)
console.log('isEnabled:', isEnabled);
console.log('isSelected:', isSelected);
console.log('isDisplayed:', isDisplayed);
Okay so let's look at this a bit more in depth.
So, let's open up on this phone, and let's manually get to the tabs.
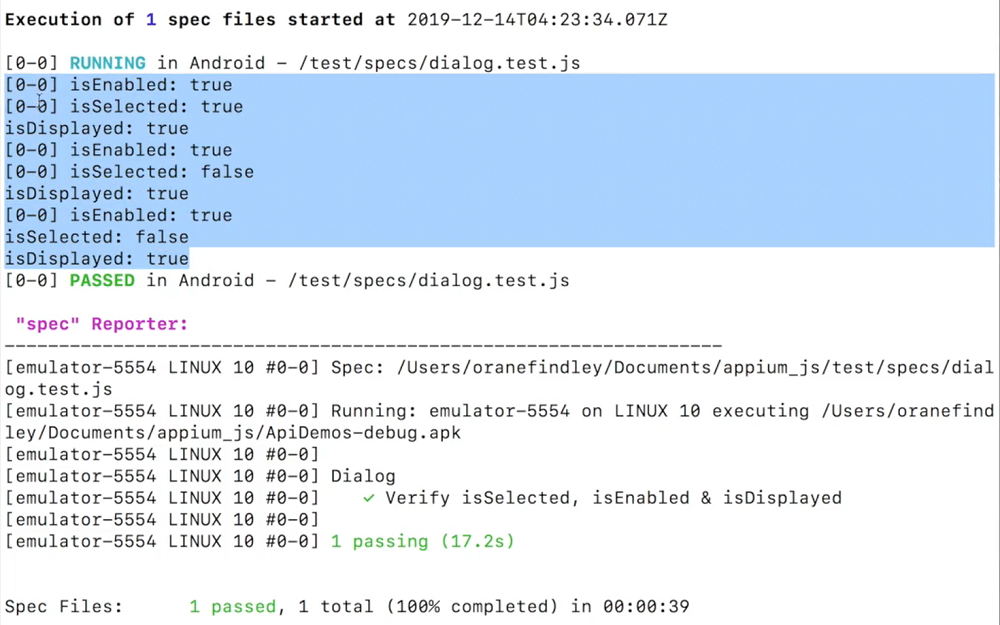
Okay so if we take a look, this is saying that for tab 0,
isEnabledis true, and that is true. As a matter of fact, all tabs are enabled. The user can click on all tabs. So, if we take a look on what is printed out here, you will see thatisEnabledis true for all tabs.Next
isSelected— the only tab that is selected is Tab 1, soisSelectedis true for the first one. Then for the other 2isSelectedis false.Also, for
isDisplayed, we're looking at these tab elements, so all of them are displayed.
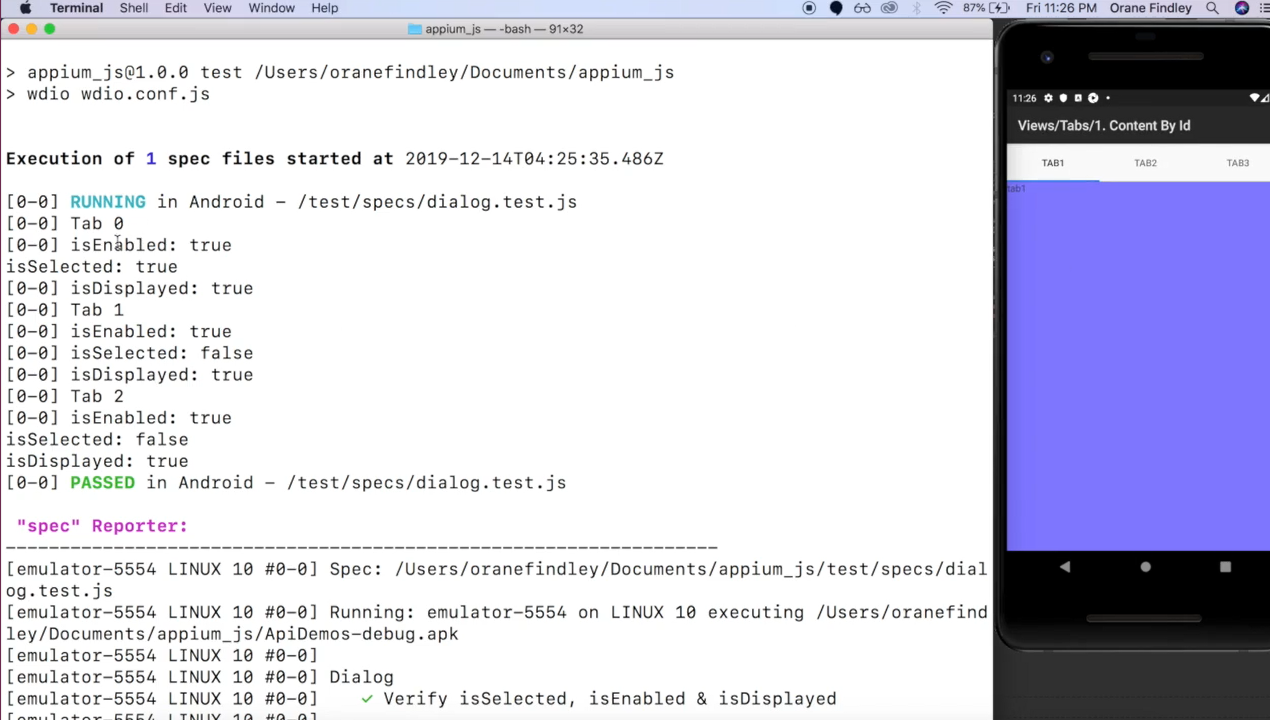
Let's add one more step to this. Let's just add a “+1” there so that makes more sense.
console.log(`Tab ${i+1}`)
Then let's go one step further and look at the tab details.
Let's say console.log for the “Tab Details 1” and let's repeat this for the other Tab Details, 2 and 3.
However, we don't want to print this on every run. Let's just print this whenever we are on the selected one.
So, let's say if isEnabled is true and isSelected is also true, let's go ahead and print these.
if(isEnabled && isSelected){
    console.log("Tab Details 1:", dialog.tab1Details.isDisplayed());
    console.log("Tab Details 2:", dialog.tab2Details.isDisplayed());
    console.log("Tab Details 3:", dialog.tab3Details.isDisplayed());
}
All right, so let's rerun this and do another analysis.
Okay great, let's take another look at this.
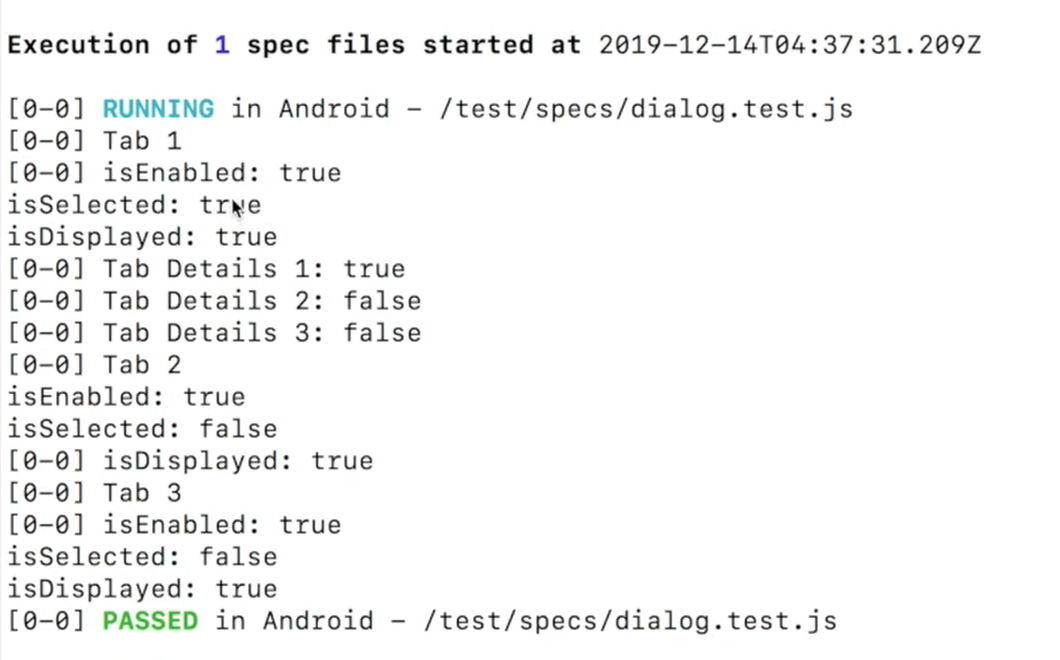
So, for Tab 1 that is selected, we now have the Tab Details being printed.
Remember that we're printing out the result from isDisplayed so currently this is correct for Tab Details 1 — isDisplayed is true. For the other 2 it is false.
Now you should be able to distinguish between isEnabled, isSelected, and isDisplayed. You should also have enough knowledge to use this throughout your tests.
